catalogue
1. Principle of cluster scheme
2. Single machine multi instance deployment
3.RabbitMQ image cluster configuration
The clustering scheme of message queue will be adopted in practical production applications. If RabbitMQ is selected, it is necessary to understand the principle of its clustering scheme
Generally speaking, if it is only to learn RabbitMQ or verify the correctness of business engineering, it is OK to use its single instance deployment in the local environment or test environment. However, considering the reliability, concurrency, throughput and message stacking capacity of MQ middleware, RabbitMQ clustering scheme is generally considered in the production environment.
1. Principle of cluster scheme
RabbitMQ, a message queuing middleware product, is written based on Erlang. Erlang language is naturally distributed (realized by synchronizing magic cookie s of each node of Erlang cluster). Therefore, clustering MQ supports. This makes it unnecessary for RabbitMQ to implement the HA scheme and save the metadata of the cluster through ZooKeeper like ActiveMQ and Kafka. Clustering is a way to ensure reliability. At the same time, it can increase message throughput through horizontal expansion.
2. Single machine multi instance deployment
Due to some factors, sometimes you have to build a rabbitmq cluster on one machine,. The real generation environment still needs to be configured into a multi machine cluster. For how to configure a multi machine cluster, you can refer to other materials. Here we mainly discuss how to configure multiple rabbitmq instances in a single machine.
Main reference official documents: Clustering Guide — RabbitMQ https://www.rabbitmq.com/clustering.html First, make sure that RabbitMQ is running without problems. It's ok to see this page

Then, stop the rabbitmq service
systemctl stop rabbitmq-server
Start the first node:
[root@localhost ~]# RABBITMQ_NODE_PORT=5673 RABBITMQ_SERVER_START_ARGS="-rabbitmq_management listener [{port,15673}]" RABBITMQ_NODENAME=rabbit1 rabbitmq-server start

              RabbitMQ 3.6.5. Copyright (C) 2007-2016 Pivotal Software, Inc.
  ##  ##      Licensed under the MPL.  See http://www.rabbitmq.com/
  ##  ##
  ##########  Logs: /var/log/rabbitmq/rabbit2.log
  ######  ##        /var/log/rabbitmq/rabbit2-sasl.log
  ##########
              Starting broker...
 completed with 3 plugins.
Start the second node:
[root@localhost ~]# RABBITMQ_NODE_PORT=5674 RABBITMQ_SERVER_START_ARGS="-rabbitmq_management listener [{port,15674}]" RABBITMQ_NODENAME=rabbit2 rabbitmq-server start

              RabbitMQ 3.6.5. Copyright (C) 2007-2016 Pivotal Software, Inc.
  ##  ##      Licensed under the MPL.  See http://www.rabbitmq.com/
  ##  ##
  ##########  Logs: /var/log/rabbitmq/rabbit2.log
  ######  ##        /var/log/rabbitmq/rabbit2-sasl.log
  ##########
              Starting broker...
 completed with 6 plugins.
The end command is as follows:
rabbitmqctl -n rabbit1 stop
rabbitmqctl -n rabbit2 stop
rabbit1 operation as the master node:
[root@locahost ~]# rabbitmqctl -n rabbit1 stop_app
Stopping node rabbit1@super ...
[root@locahost ~]# rabbitmqctl -n rabbit1 reset
Resetting node rabbit1@locahost ...
[root@locahost ~]# rabbitmqctl -n rabbit1 start_app
Starting node rabbit1@locahost ...
rabbit2 operates as a slave node:
[root@locahost ~]# rabbitmqctl -n rabbit2 stop_app
Stopping node rabbit2@locahost ...
[root@locahost ~]# rabbitmqctl -n rabbit2 reset
Resetting node rabbit2@locahost ...
[root@locahost ~]# rabbitmqctl -n rabbit2 join_cluster rabbit1@'localhost' ###The host name in '' is changed to its own
Clustering node rabbit2@locahost with rabbit1@super ...
[root@locahost ~]# rabbitmqctl -n rabbit2 start_app
Starting node rabbit2@locahost ...
3.RabbitMQ image cluster configuration
The default cluster mode of RabbitMQ has been completed above, but the high availability of the queue is not guaranteed. Although the switches and bindings can be copied to any node in the cluster, the contents of the queue will not be copied. Although this mode solves the node pressure of a project group, the queue can not be applied directly due to the downtime of the queue node and can only wait for restart. Therefore, in order to apply normally in case of downtime or failure of the queue node, it is necessary to copy the queue content to each node in the cluster and create a mirror queue.
The image queue is based on the normal cluster mode, and then some policies are added, so you still have to configure the normal cluster before setting the image queue. Let's continue with the above cluster.
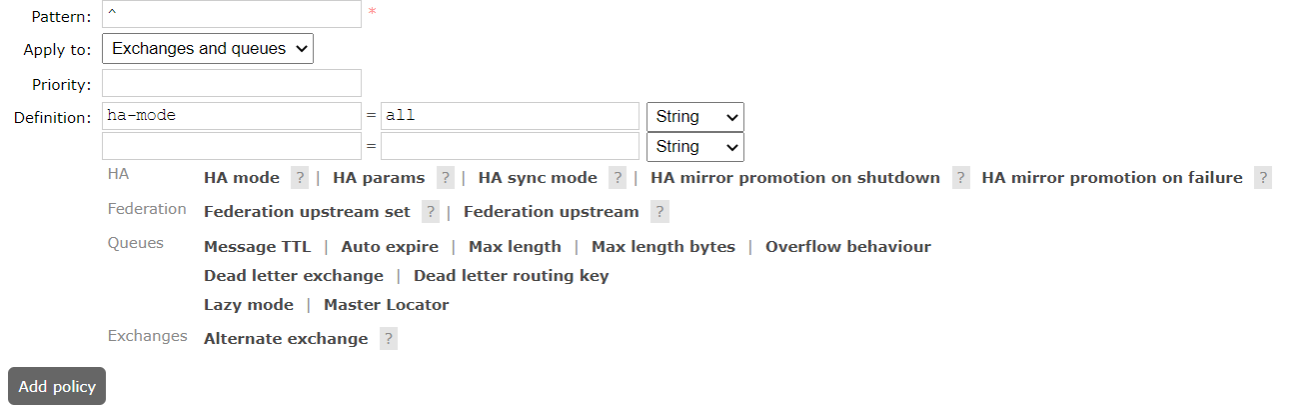
**The image queue can be set through admin - > policies on the management side of the open web page**
-
Name: policy name
-
Pattern: the matching rule. If it matches all queues, it is ^
-
Definition: use all in Ha mode mode mode, that is, synchronize all matching queues. Question mark link help document
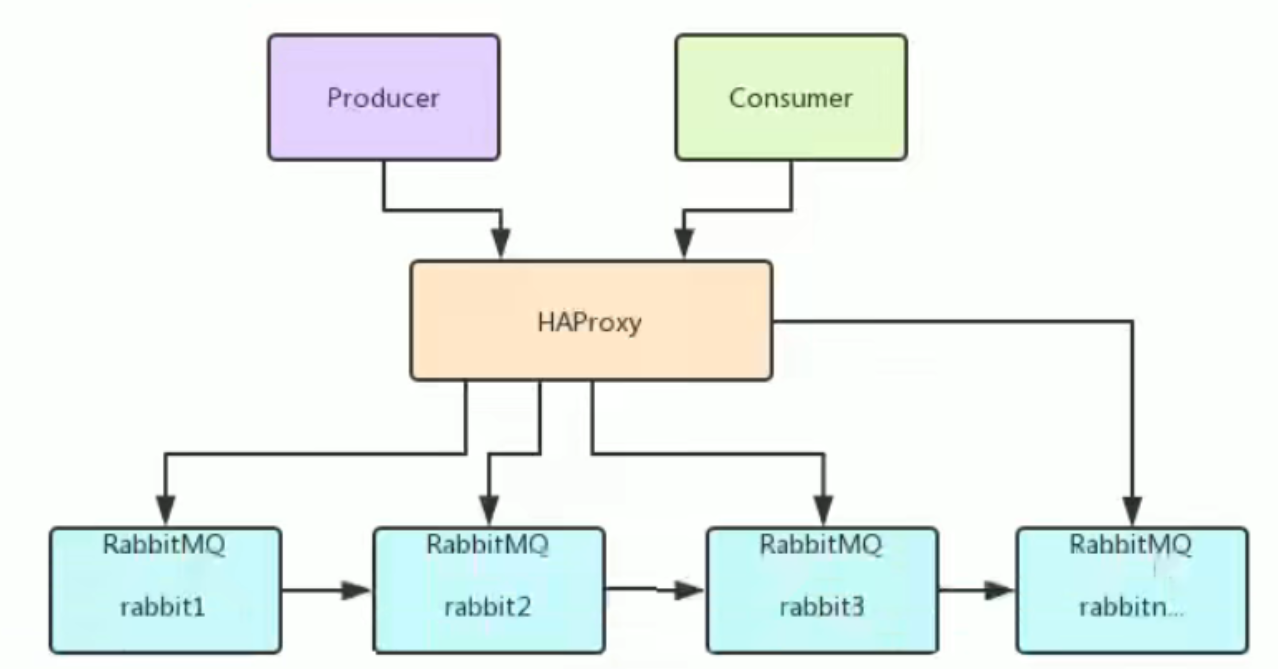
4. Load balancing - HAProxy
HAProxy provides high availability, load balancing and proxy based on TCP and HTTP applications. It supports virtual hosts. It is a free, fast and reliable solution used by many well-known Internet companies, including Twitter, Reddit, StackOverflow and GitHub. HAProxy implements an event driven, single process model that supports a very large number of concurrent connections.
4.1 installing HAProxy
//Upload haproxy source package
//decompression
tar -zxvf haproxy-1.6.5.tar.gz -C /usr/local
//Enter the directory, compile and install
cd /usr/local/haproxy-1.6.5

//Compile into Linux 3.10 kernel and use / / rpm -q kernel to view the commands of the kernel
make TARGET=linux31 PREFIX=/usr/local/haproxy


make install PREFIX=/usr/local/haproxy
mkdir /etc/haproxy

//Create haproxy profile

vi /etc/haproxy/haproxy.cfg
4.2 configuring HAProxy
Configuration file path: / etc / haproxy / haproxy cfg
#logging options
global
log 127.0.0.1 local0 info
maxconn 5120
chroot /usr/local/haproxy
uid 99
gid 99
daemon
quiet
nbproc 20
pidfile /var/run/haproxy.pid
defaults
log global
mode tcp
option tcplog
option dontlognull
retries 3
option redispatch
maxconn 2000
contimeout 5s
clitimeout 60s
srvtimeout 15s
#front-end IP for consumers and producters
listen rabbitmq_cluster
bind 0.0.0.0:5672
mode tcp
#balance url_param userid
#balance url_param session_id check_post 64
#balance hdr(User-Agent)
#balance hdr(host)
#balance hdr(Host) use_domain_only
#balance rdp-cookie
#balance leastconn
#balance source //ip
balance roundrobin
server node1 xxx.xxx.xxx.xxx:5673 check inter 5000 rise 2 fall 2
server node2 xxx.xxx.xxx.xxx:5674 check inter 5000 rise 2 fall 2
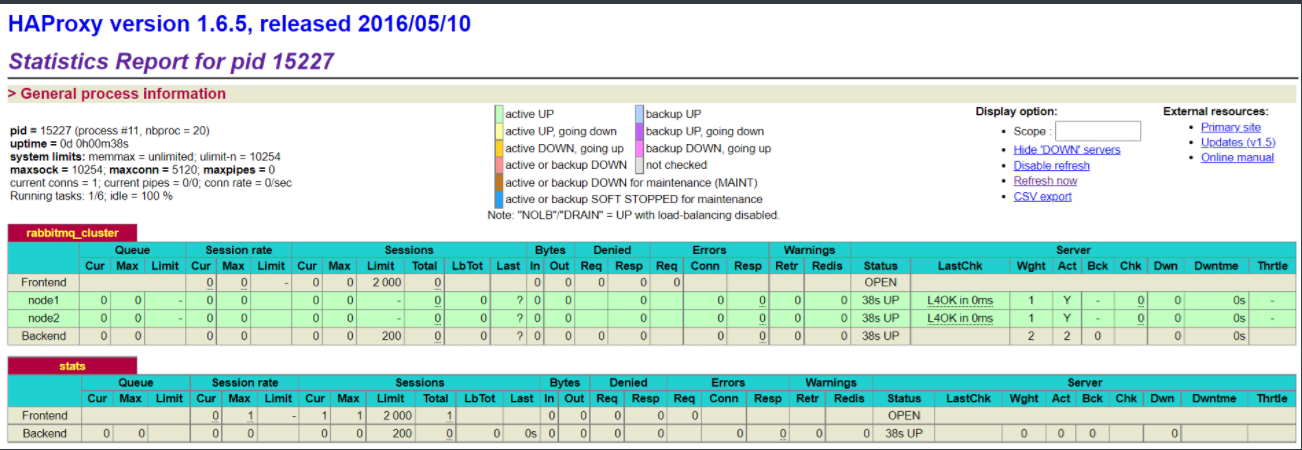
listen stats
bind xxx.xxx.xxx.xxx:8100
mode http
option httplog
stats enable
stats uri /rabbitmq-stats
stats refresh 5sNote that XXX is replaced by ip, and then start the HAproxy load
/usr/local/haproxy/sbin/haproxy -f /etc/haproxy/haproxy.cfg
//Viewing haproxy process status
ps -ef | grep haproxy

Visit the following address pairs mq Node monitoring
http://xxx.xxx.xxx.xxx:8100/rabbitmq-stats
If you access the mq cluster address in the code, you can access the haproxy address: 5672