1. What is message queue
Message queue is mainly used to manage asynchronous messages (after registration, SMS sending is not necessary, and queue can be used). Realize the two-way decoupling between systems, and also play the role of message buffer and message distribution. When the producer generates a large amount of data, but the consumer cannot consume quickly (the excessive amount of second kill data means that the system crashes, and the queue can discard redundant requests), or the consumer is abnormal (the request is lost after the service hangs up, and the queue can save the request).
In vernacular, the main function is asynchronous, peak clipping and decoupling.
1. Introduction to rabbitmq
1. Operation process
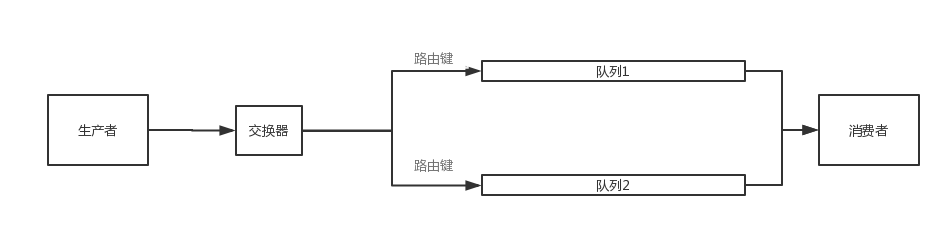
rabbitmq is a kind of message queue. You can see the workflow from the figure above. The producer sends the request to the switch. The switch sends the request to the queue according to a certain binding relationship (average sending), and then the queue sends the request to the consumer. The switch is only responsible for forwarding, not saving, and then binds to the queue through the binding relationship. The switch binds the queue according to the routing key. When multiple consumers consume a queue, the queue will be sent to multiple consumers evenly.
among
- The producer is the service / class that sends the message.
- The consumer is the service / class that receives the message.
- The switch sends the received message to the queue according to the switch type.
- Messages that are not consumed are stored in the queue.
2. Switch type
rabbitmq offers four switches.
- fanout: sent to all queues bound to the switch.
- Direct: the default exchange method is to find the queue according to the provided key. If the key is a, data can only be sent to the queue of A.
- Topic: fuzzy matching, as long as it conforms to the format. There can be two special characters "" and "#" for fuzzy matching, where "" is used to match one word and "#" is used to match multiple words (which can be zero). For example, *. C. # can match A.C.B. cannot match A.B.C. (which is associated with banding key)
- head: match according to the headers attribute in the message content.
3. Tools used
ConnectionFactory, connection and Channel are the most basic objects in the API provided by RabbitMQ. Connection is the socket link of RabbitMQ, which encapsulates some logic related to the socket protocol. ConnectionFactory is the manufacturing factory of connection.
Channel is the most important interface for us to deal with RabbitMQ. Most of our business operations are completed in channel, including defining Queue, defining Exchange, binding Queue to Exchange, publishing messages, etc.
4.spring boot integration rabbitmq
Code idea: define the queue and exchange in the configuration file, and then the queue corresponds to the switch with the routing key name (the routing key and queue name match, that is, the routing key is used to find the column name). Then the producer can determine the queue to be sent through the switch and queue name, and the consumer chooses to monitor the queue to obtain the message.
Before integration, you need to install rabbitmq, and then start and build the framework.
1.Direct switch
1. Create a new queue and binding relationship
@Configuration
public class RabbitMQConfig {

	// -------------------------topic queue
	// Create queue
	@Bean
	public Queue topicQueue() {
		return new Queue("topic.mess");
	}
}
2. Producers
Configure a queue directly, and then call API to send the message.
public class ProducerController {
	@Autowired
	private RabbitTemplate rabbitTemplate;

	@GetMapping("/sendMessage")
	public Object sendMessage() {
		new Thread(() -> {
			//for (int i = 0; i < 100; i++) {

				Date date = new Date();
				String value = new SimpleDateFormat("yyyy-MM-dd hh:mm:ss").format(date);
				System.out.println("send message {}" + value);
				City city= new City();
				city.setCityName("aaaa");
				city.setDescription("bbb");
				city.setProvinceId((long)111);
				rabbitTemplate.convertAndSend("topic.mess", city); //Use default queue

			//}
		}).start();
		return "ok";
	}
}
3. Consumers
Consumers can use it directly (you can pass the basic object type). The @ RabbitListener annotation is required.
@Component
@RabbitListener(queues = "topic.mess") //topic switch
public class Consumer2 {

	@RabbitHandler
	public void consumeMessage(City city) {
		System.out.println("consume message {} 2222222:" + city);
	}
}
2.topic switch
1. Create a new queue and binding relationship
Name two queues and a topic switch, and then bind the relationship between them through the routing key. If the routing key and the queue name are the same, they can be matched, but the topic can be fuzzy matched # and can replace a paragraph of characters.
@Configuration
public class RabbitMQConfig {

	// -------------------------topic queue
	// Create queue
	@Bean
	public Queue topicQueue() {
		return new Queue("topic.mess");
	}

	@Bean
	public Queue topicQueue2() {
		return new Queue("topic.mess2");
	}

	// Create a topic type switch
	@Bean
	public TopicExchange topicExchange() {
		return new TopicExchange("topic");
	}


	// Use the routingKey to bind the Queue to the Exchange Topic. The Exchange binds to the Queue through the routingKey
	@Bean
	public Binding bindingA(Queue topicQueue, TopicExchange topicExchange) {
		return BindingBuilder.bind(topicQueue).to(topicExchange).with("topic.mess");
	}

	@Bean
	public Binding bindingB(Queue topicQueue2, TopicExchange topicExchange) {
		return BindingBuilder.bind(topicQueue2).to(topicExchange).with("topic.#");
	}
}
2. Producers
Call the API directly to send messages. The consumer sends to the queue. Because there are fuzzy matching rules, topic.mess can match topic.mess and topic.mess2 queues, while topic.mess2 can only match topic. #.
@RestController
public class ProducerController {
	@Autowired
	private RabbitTemplate rabbitTemplate;

	@GetMapping("/sendMessage")
	public Object sendMessage() {
		new Thread(() -> {
			//for (int i = 0; i < 100; i++) {

				Date date = new Date();
				String value = new SimpleDateFormat("yyyy-MM-dd hh:mm:ss").format(date);
				System.out.println("send message {}" + value);
				City city= new City();
				city.setCityName("aaaa");
				city.setDescription("bbb");
				city.setProvinceId((long)111);
				rabbitTemplate.convertAndSend("topic", "topic.mess", city);
				rabbitTemplate.convertAndSend("topic", "topic.mess2", city);
			//}
		}).start();
		return "ok";
	}
}
3. Consumers
Consumers receive directly.
@Component
@RabbitListener(queues = "topic.mess") //topic switch
public class Consumer2 {

	@RabbitHandler
	public void consumeMessage(City city) {
		System.out.println("consume message {} 2222222:" + city);
	}
}
3.Fanout Exchange broadcast
1. Create a new queue and binding relationship
Name the queue and switch in the configuration file, and then bind.
// --------FanoutExchange binding
	// -------------------------Fanout queue
	@Bean
	FanoutExchange fanoutExchange() {
		return new FanoutExchange("fanoutExchange");
	}
	@Bean
	public Queue fanoutQueue() {
		return new Queue("fanoutqueue");
	}
	@Bean
	public Queue fanoutQueue2() {
		return new Queue("fanoutqueue2");
	}
	@Bean
	public Binding bindingC(Queue fanoutQueue, FanoutExchange fanoutExchange) {
		return BindingBuilder.bind(fanoutQueue).to(fanoutExchange);
	}
	@Bean
	public Binding bindingD(Queue fanoutQueue2, FanoutExchange fanoutExchange) {
		return BindingBuilder.bind(fanoutQueue2).to(fanoutExchange);
	}
2. Producers
Call the API to send a message.
@RestController
public class ProducerController {
	@Autowired
	private RabbitTemplate rabbitTemplate;

	@GetMapping("/sendMessage")
	public Object sendMessage() {
		new Thread(() -> {
			//for (int i = 0; i < 100; i++) {

				Date date = new Date();
				String value = new SimpleDateFormat("yyyy-MM-dd hh:mm:ss").format(date);
				System.out.println("send message {}" + value);
				City obj = new City();
				obj.setCityName("aaaa");
				obj.setDescription("bbb");
				obj.setProvinceId((long)111);
				rabbitTemplate.convertAndSend("fanoutExchange","", value); //Use default queue

			//}
		}).start();
		return "ok";
	}
}
3. Consumers
Then, all bound queues can be received.
@Component
@RabbitListener(queues = "fanoutqueue2")
public class Consumer {

	@RabbitHandler
	public void consumeMessage(String message) {
		System.out.println("consume message {} 1111111:" + message);
	}
}
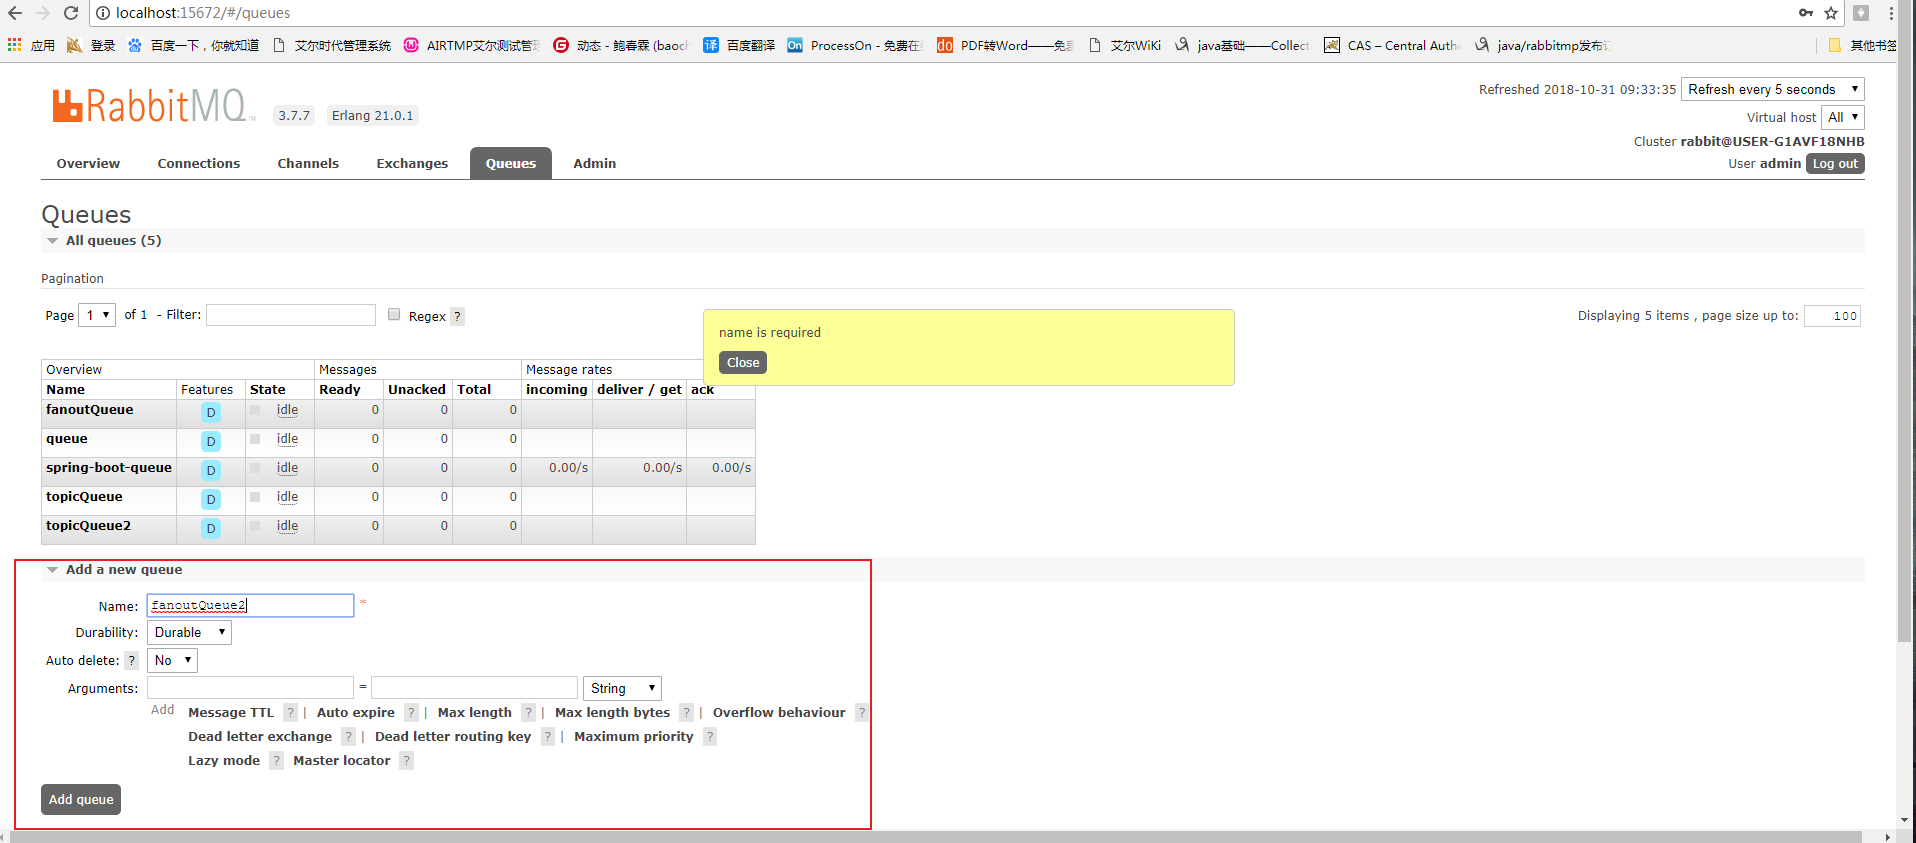
5. Create a new queue on the page
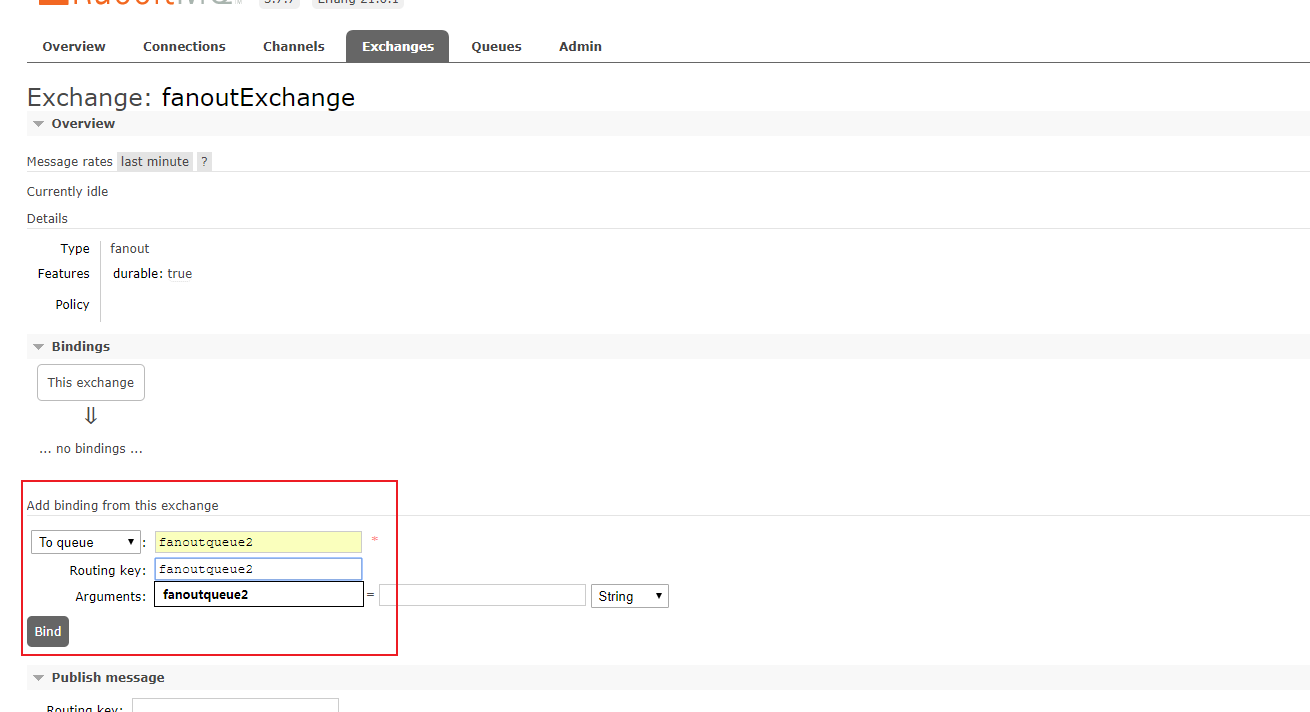
You can also http://localhost:15672/#/exchanges Directly configure the binding relationship between queue and switch in. (slightly troublesome, not recommended)
1. Create a new queue
2. New switch
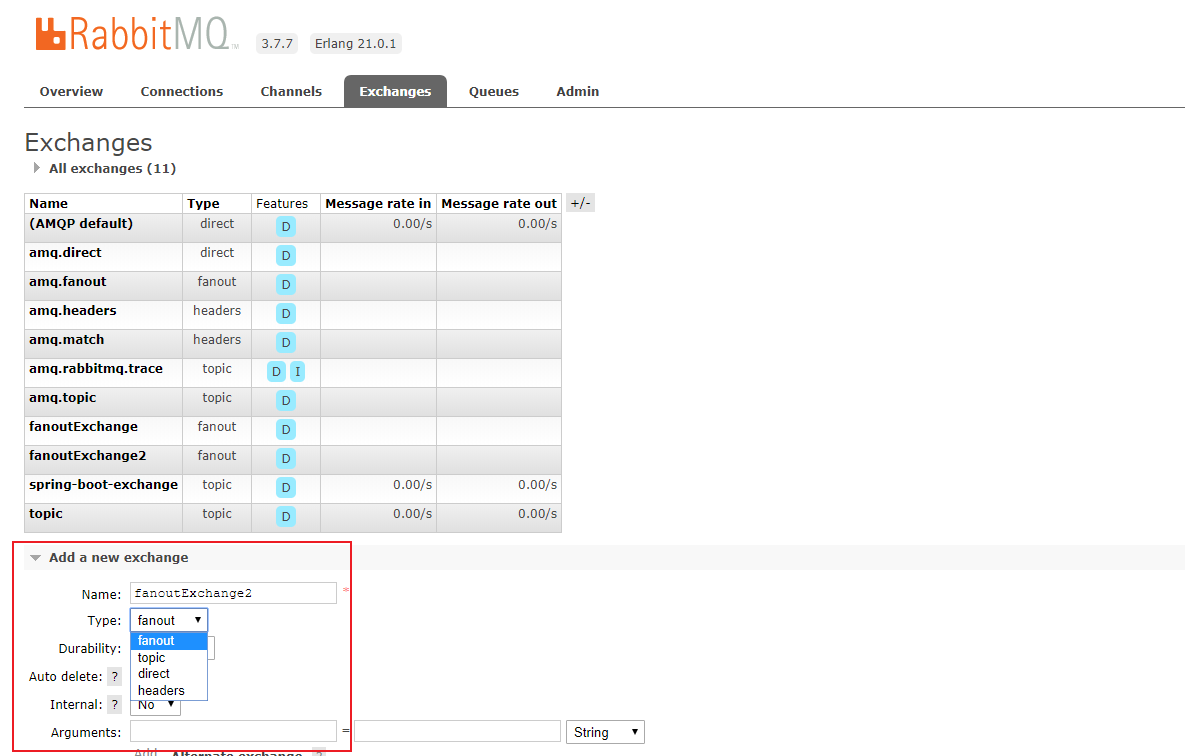
3. Add binding relationship
Bind the relationship between the switch and the queue, and then you can use it directly. You don't need to use the internal java name.