1-1 overview of message queuing
1. Queue
From v 
2. Message queue
Message refers to the data transmitted between applications. Messages can be very simple, such as text strings and JSON, or complex, such as embedded objects.
Message queue is a distributed message container that uses queue as the underlying storage data structure and can be used to solve the communication between different processes and applications, also known as message middleware.
In essence, message queue is a middleware with queue structure, that is, messages can be returned directly after being put into the middleware without immediate processing by the system. In addition, a program will read these data and process them sequentially.
At present, ActiveMQ, RabbitMQ, Kafka, RocketMQ and other message queues are widely used.
3. Application scenarios
There are five common scenarios for message queuing:
- Message communication
- Asynchronous processing
- Service decoupling
- Flow peak clipping
A. Message communication
The main function of message queue is to send and receive messages. It has an efficient communication mechanism, so it is very suitable for message communication.
Point to point chat system can be developed based on message queue, and broadcasting system can also be developed to broadcast messages to a large number of recipients.
B. Asynchronous processing
Generally, written programs are executed in sequence (synchronous execution). For example, a user registration function is executed in the following order:
- Write user registration data
- Send registration email
- Send SMS notification of successful registration
- Update statistics

According to the above execution sequence, success can be returned only after all execution is completed, but in fact, after the successful execution of step 1, other steps can be executed asynchronously. The following logic can be sent to the message queue and then executed asynchronously by other programs, as shown below:
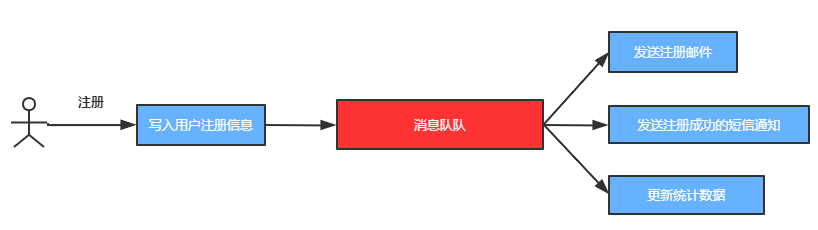
Using message queue for asynchronous processing can return results faster, speed up the response speed of the server and improve the performance of the server.
C. Service decoupling
In the system, communication between applications is very common. Generally, applications call directly. For example, application A calls the interface of application B. at this time, the relationship between applications is strongly coupled.
If application B is unavailable, application A will also be affected.
The message queue is introduced between application A and application B for service decoupling. If application B hangs up, it will not affect the use of application A.
After using message queue, the producer does not care who the consumer is, and the consumer does not care who the sender is. This is decoupling. Message queue is often used to solve the call dependency between services.
D. Flow peak clipping
For highly concurrent systems, when the access peak, sudden traffic flows like a flood to the application system, especially some highly concurrent write operations, will cause the database server to be paralyzed at any time and can not continue to provide services.
The introduction of message queue can reduce the impact of burst traffic on the application system. The message queue is like a "reservoir", which blocks the flood in the upstream and reduces the peak flow into the downstream river, so as to reduce the flood disaster.
The most common example in this regard is the seckill system. Generally, the instantaneous traffic of seckill activities is very high. If all the traffic flows to the seckill system, it will crush the seckill system. By introducing message queue, it can effectively buffer the sudden traffic and achieve the function of "cutting peak and filling valley".
1-2. RabbitMQ overview
1. General
RabbitMQ is a message queue server developed in Erlang language and implementing AMQP protocol. Compared with other message queues of the same type, RabbitMQ has the biggest feature of ensuring considerable single machine throughput and excellent delay.
RabbitMQ supports a variety of clients, such as Python, Ruby NET, Java, JMS, C, PHP, ActionScript, XMPP, STOMP, etc.
RabbitMQ originated from the incoming system and is used to store and forward messages in distributed systems.
RabbitMQ features:
- Reliability: RabbitMQ provides a variety of technologies to trade off between performance and reliability. These technologies include persistence mechanism, delivery confirmation, publisher verification and high availability mechanism
- Flexible routing: messages are routed through the switch before reaching the queue. RabbitMQ provides a variety of built-in switch types for typical routing logic
- Cluster: multiple RabbitMQ servers in the same LAN can be aggregated and used as an independent logical agent
- Federation: for servers, it requires more loose and unreliable links than clustering. RabbitMQ provides a federation model for this purpose
- High availability queue: in the same cluster, queues can be mirrored to multiple machines to ensure that they are still available after some nodes fail
- Multi protocol: supports message delivery of multiple message protocols, such as AMQP, STOMP, MQTT, etc
- Extensive clients: RabbitMQ supports almost all common languages, such as Java NET, Ruby, PHP, C#, JavaScript, etc
- Visual management tool: RabbitMQ comes with an easy-to-use visual management tool, which can help you monitor and manage messages and nodes in the cluster
- Tracking: RabbitMQ provides support for tracking abnormal behavior and can find the problem
- Plug in system: RabbitMQ comes with a variety of plug-ins to extend, and you can even write plug-ins to use
2. AMQP protocol
RabbitMQ is a message queue server that implements the AMQP protocol. Here we first introduce the following AMQP.
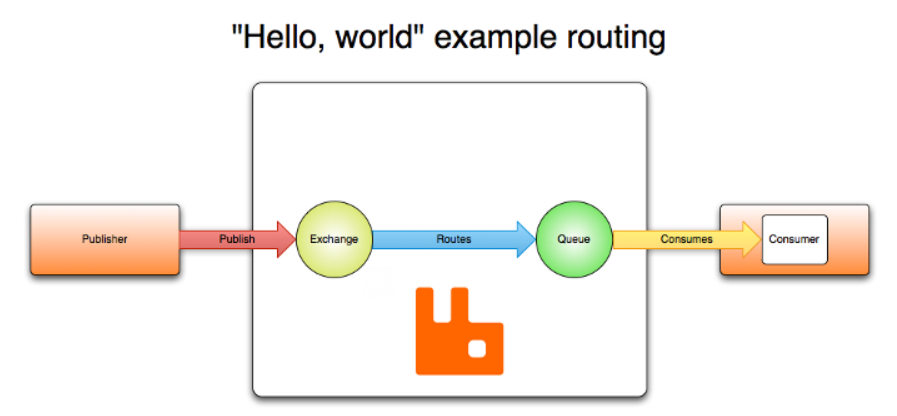
AMQP, Advanced Message Queuing Protocol, is an open standard of application layer protocol. It is designed for message oriented middleware. It supports communication between qualified client applications and messaging middleware broker s.
message brokers receive messages from publishers, also known as producers, and send the received messages to consumers who process the messages according to the established routing rules.
Because AMQP is a network protocol, publishers, consumers and message agents in this process can exist on different devices.
The working process of AMQP 0-9-1 is as follows:
Messages are sent by publisher s to exchange s, which are often compared to post offices or mailboxes. The switch then distributes the received message to the bound queue according to the routing rules. Finally, the AMQP agent will deliver the message to the consumers who have subscribed to this queue, or the consumers can obtain it by themselves according to their needs.
When publishing a message, the publisher can assign various message attributes (message meta data) to the message. Some attributes may be used by message brokers, while others are completely opaque and can only be used by applications receiving messages.
From the perspective of security, the network is unreliable, and the application receiving the message may also fail to process the message.
For this reason, the AMQP module includes the concept of message acknowledgements: when a message is delivered to the consumer from the queue, the consumer will notify the message broker. This can be automatic or executed by the developer of the application processing the message. When "message acknowledgement" is enabled, the message broker will not completely delete the message from the queue until it receives an acknowledgement from the consumer.
In some cases, such as when a message cannot be successfully routed, the message may be returned to the publisher and discarded. Alternatively, if the message broker performs a delay operation, the message will be placed in a so-called dead letter queue. At this point, the message publisher can select some parameters to handle these special cases.
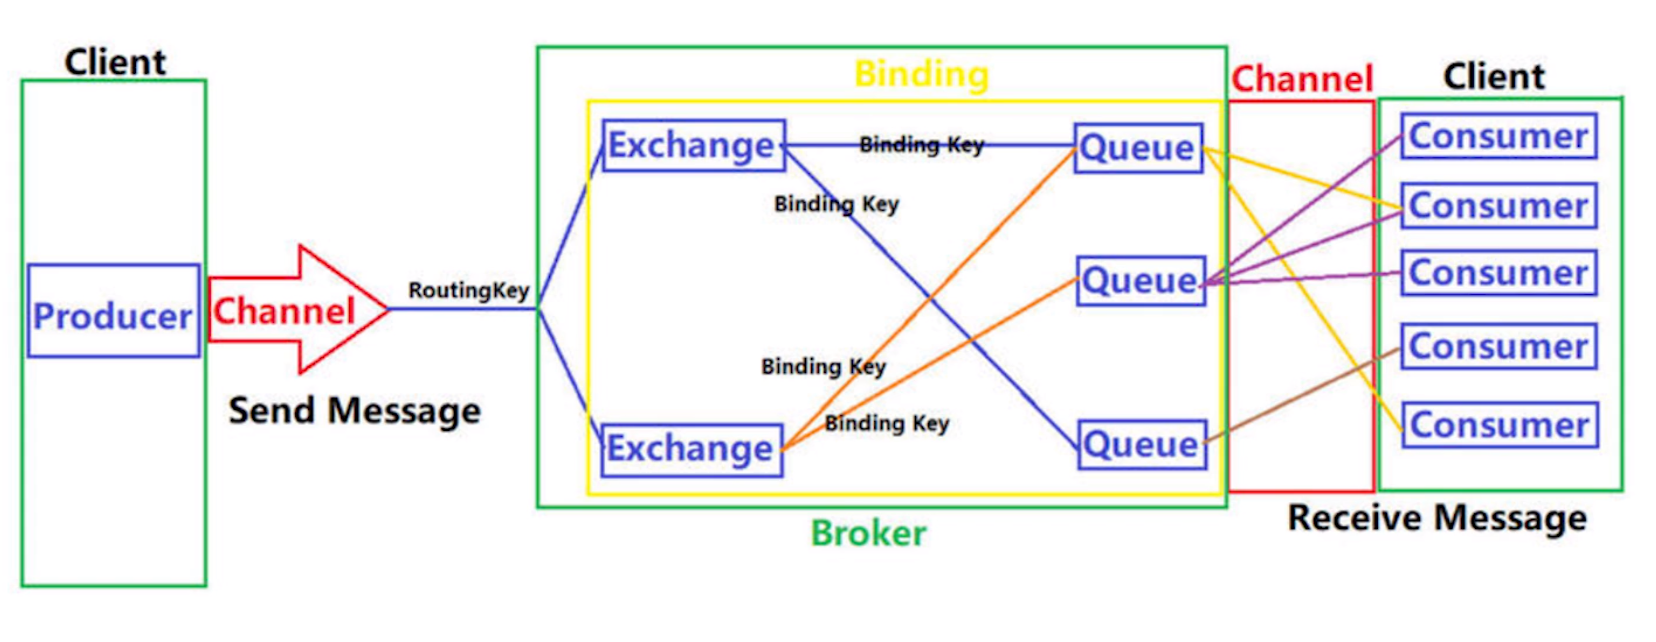
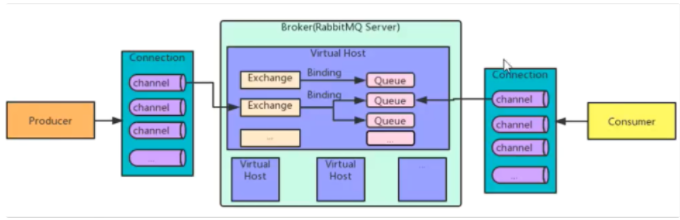
Queues, switches, and bindings are collectively referred to as AMQP entities.
The design model of AMQP protocol is as follows:
3. Related concepts
RabbitMQ has its own set of core concepts. Understanding these concepts is very important. Only by understanding these core concepts can it be possible to establish a comprehensive understanding of RabbitMQ.
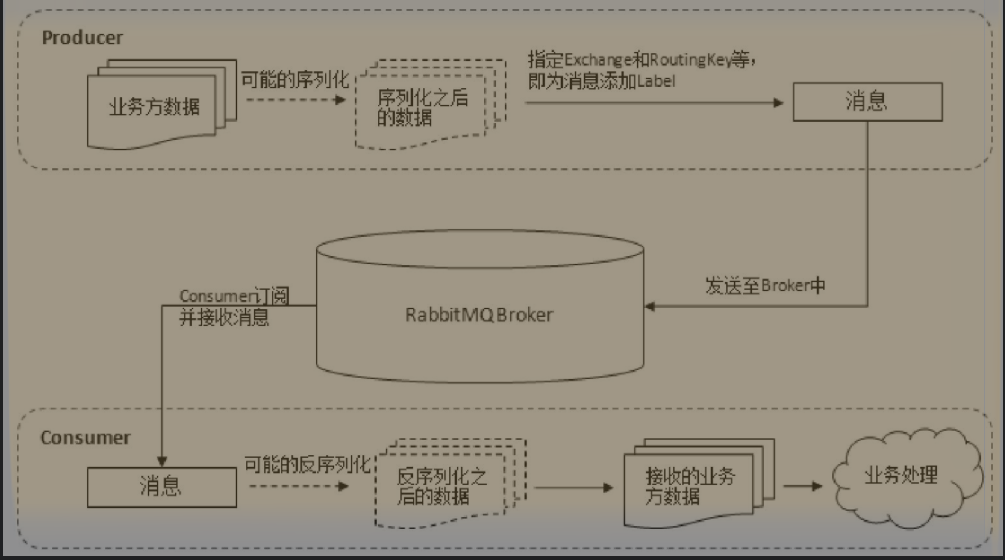
A. Producer
The producer connects to the RabbitMQ server and sends the message to the queue of the RabbitMQ server. It is the sender of the message.
Messages can generally contain two parts:
- Message body: message body can also be called payload. In practical application, message body is generally a data with business logic structure, which can be very simple, such as text string, json, embedded object, etc.
- Label
Producers do not need to know who consumers are.
In addition, the producer does not directly send the message to the queue, but sends the message to the exchange, and then the exchange forwards it to the queue.
B. Consumer
The consumer connects to the RabbitMQ server, subscribes to the queue, and is the receiver of the message.
When a consumer consumes a message, it is only the payload of the consumption message.
In the process of message routing, the label of the message will be discarded. The message stored in the queue only has the message body, and the consumer will only consume the message body, so they don't know who the producer of the message is. Of course, the consumer doesn't need to know.
C. Broker
Broker is the service node of message oriented middleware.
For RabbitMQ, a RabbitMQ Broker can be simply regarded as a RabbitMQ service node or a RabbitMQ service instance.
D. Queue
Queue is the object used to store messages in RabbitMQ. It is the structure used to store messages.
On the production side, the producer's message is finally sent to the specified queue, and the consumer also obtains the message by subscribing to a queue.
Messages in RabbitMQ can only be stored in queues. The characteristics of queues are first in first out.
Messages received by the queue must be forwarded by Exchange.
The message data in a queue may come from multiple exchanges, and the message data in an Exchange may also be pushed to multiple queues. The relationship between them is many to many.
Multiple consumers can subscribe to the same Queue. At this time, the messages in the Queue will be evenly allocated (i.e. polled) to multiple consumers for processing, instead of each messenger receiving and processing all messages.
As shown in the figure, the red indicates the queue
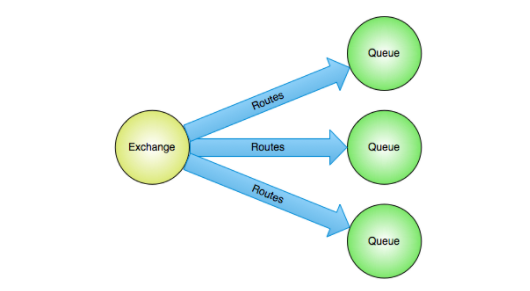
E. Exchange
Exchange, a message exchange, is used to receive messages from producers and forward messages to bound queues according to routing keys.
Each message sent by the producer will have a routing key, which is a simple string. The message is first forwarded to the queue through Exchange according to the binding rules.
The message data in a queue may come from multiple exchanges, and the message data in an Exchange may also be pushed to multiple queues. The relationship between them is many to many.
After getting a message, the switch routes it to one or more queues. Which routing algorithm it uses is determined by the switch type and rules called bindings.
As shown in the figure:
There are four types of exchange types:
- fanout: fan switch. This type does not process routing keys. It is similar to broadcasting. All messages sent to the switch will be sent to all queues bound to the switch. Sending messages is the fastest under this type.
- direct: directly connected to the switch. The mode handles the RoutingKey. A queue that exactly matches the RoutingKey and BindingKey is required to receive messages from the switch. This mode is most used.
- Topic: topic switch, which matches the routing key with a certain pattern.
- headers: header switches are rarely used.
Note: the Exchange is only responsible for forwarding messages and does not have the ability to store messages. Therefore, if there is no queue listed in the Exchange binding, or there is no queue that meets the routing rules, the messages will be lost.
F. Binding
Binding is an operation, which is used to establish rules for forwarding messages from Exchange to Queue. When Binding Exchange to Queue, a routing key BindingKey needs to be specified. Binding is generally used for the routing mode and subject mode of RabbitMQ.
As shown below:
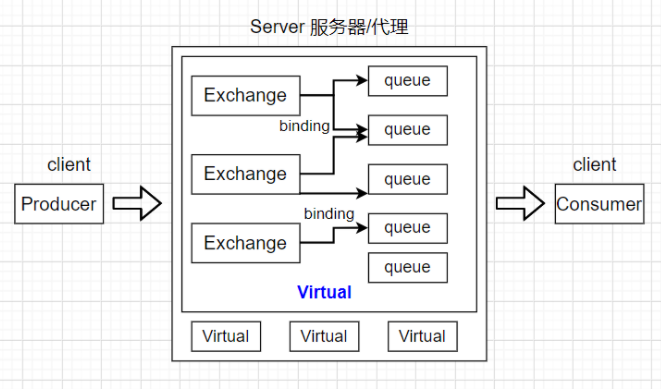
G. vhosts
vhosts, virtual host. Virtual host is also called virtual host. Under a virtual host, there are a group of different exchnages and queues. Exchnage s and queues of different virtual hosts do not affect each other.
Each Vhost is essentially a mini RabbitMQ server with its own queue, switch, binding and permission mechanism.
Application isolation and permission division. Virtual host is the smallest permission unit division in RabbitMQ.
For analogy, we can compare the Virtual host to the database in MySQL. Usually, when using mysql, we will specify different databases for different projects. Similarly, when using RabbitMQ, we can specify different virtual hosts for different applications.
In RabbitMQ, users can only control permissions at the granularity of virtual hosts. Therefore, if you need to prohibit group A from accessing the switches / queues / bindings of group B, you must create a virtual host for group A and B respectively.
Each RabbitMQ server has a default virtual host "/".
A RabbitMQ Server can have multiple vhosts, and the user and permission settings are attached to vhosts.
Only exchange and queue under the same vhosts can be bound to each other.
Suggestion: generally, when multiple projects need to use RabbitMQ, it is not necessary to deploy RabbitMQ for each project, which is a waste of resources. Only one vhost is required for each project. Vhosts are absolutely isolated. Different vhosts correspond to different projects and do not affect each other.
H. Connection
Connection is one of the internal objects of RabbitMQ. It is a physical concept. It is a TCP connection used to manage each TCP network connection to RabbitMQ.
Producers, consumers and brokers are connected through Connection.
I. Channel
Channel is the most important interface for dealing with RabbitMQ. It is a partial logical concept. Multiple channels can be created in a Connection.
Most RabbitMQ related operations are completed in the Channel interface, including defining Queue, defining Exchange, binding Queue to Exchange, publishing messages, etc.
Once the Connection is established, the client can then create an AMQP Channel, and each Channel will be assigned a unique ID. The Channel is a virtual Connection based on the Connection. Each AMQP instruction processed by RabbitMQ is completed through the Channel.
Why introduce Channel?
In a certain scenario, many threads in an application need to consume or produce messages from RabbitMQ, so it is necessary to establish many connections, that is, many TCP connections. However, for the operating system, it is very expensive to establish and destroy TCP connections. If the usage peak is encountered, the performance bottleneck will appear.
RabbitMQ adopts a method similar to NIO (non blocking I / O) and selects TCP connection multiplexing, which can not only reduce performance overhead, but also facilitate management.
Each thread controls a channel, so the channel multiplexes the TCP Connection of Connection. At the same time, RabbitMQ can ensure the privacy of each thread, just like having an independent Connection. When the traffic of each channel is not very large, multiplexing a single Connection can effectively save TCP Connection resources in the case of performance bottleneck.
However, when the traffic of the channel itself is large, the multiplexing of one Connection by multiple channels will produce a performance bottleneck, which will limit the overall traffic. At this time, you need to open multiple connections and spread these channels into these connections.
4. Operation process
Refer to the figure below:
The operation process of the message is as follows:
Message sent by producer:
- The producer connects to the Broker, establishes a Connection, and opens a Channel
- The producer declares an exchange and sets related properties, such as exchange type, persistence, etc
- The producer declares a queue and sets related properties, such as exclusivity, persistence, automatic deletion, etc
- Producers bind switches and queues through routing keys
- The producer sends a message to the Broker, which contains information such as routing keys and switches
- The corresponding switch finds the matching queue according to the received routing key
- If found, the message sent from the producer is stored in the corresponding queue
- If it is not found, select whether to discard or return to the producer according to the attributes configured by the producer
- Close channel
- Close connection
Consumer receives message:
- The consumer connects to the Broker, establishes a Connection, and opens a Channel
- The consumer requests the Broker to consume the messages in the corresponding queue, and may set the corresponding callback function and make some preparations
- Wait for the Broker to respond and deliver the message in the corresponding queue, and the consumer receives the message
- The consumer acknowledges (ack) the received message
- RabbitMQ deletes the corresponding confirmed message from the queue
- Close channel
- Close connection
The architecture design is as follows:
2-1. install
Here we only introduce the installation of Windows and CentOS7. The official website also provides the installation of Ubuntu, Mac and even docker.
The code of RabbitMQ server is written in erlang language, so you need to install erlang language first.
Note: the version of RabbitMQ depends on the version of Erlang. There are version compatibility requirements between the two. Be sure to select a compatible version. For details, please refer to: https://www.rabbitmq.com/which-erlang.html
1. Windows installation
A. Install erlang
First download erlang from the official website: Official website download address
Download the exe file and install
After installation, you need to set environment variables:
My computer - right click Properties - advanced system settings - environment variables - user variables / system variables to create a new variable:
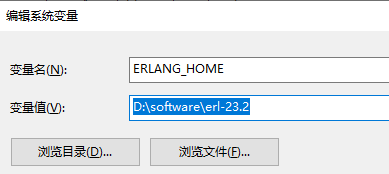
Variable name: ERLANG_HOME, the installation directory whose variable value is erlang
You also need to add to Path:% ERLANG_HOME%\bin
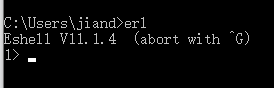
Then open the command line and enter erl. If the version information of erlang is displayed, the installation is successful:
B. Installing RabbitMQ
Download RabbitMQ from the official website: Official website download address
Double click Install
C. Install Web management [not required]
This step is not necessary. RabbitMQ also provides a Web management tool. As a plug-in of RabbitMQ, the Web management tool is equivalent to a background management page for viewing in the browser
Enter the sbin directory, open the command line and enter:
./rabbitmq-plugins.bat enable rabbitmq_management
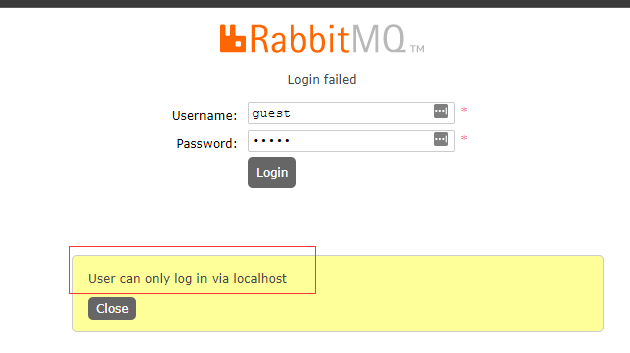
After the installation is successful, enter http://localhost:15672 You can access the administration page
The default account and password are guest
Note: generally, a new administrator user will be created without using the default guest. The guest user can only be accessed under localhost. If accessed from other machines in the intranet, an error will be reported when logging in:
See 6-1 for the usage of the Web management page
2. Centos 7 installation
A. Install erlang
About installing erlang, RabbitMQ official website There are four ways to install:
I use the first way here, according to Github Installation method on
Create a new file: / etc / yum repos. d/rabbitmq_ erlang. repo
# vim /etc/yum.repos.d/rabbitmq_erlang.repo
[rabbitmq_erlang]
name=rabbitmq_erlang
baseurl=https://packagecloud.io/rabbitmq/erlang/el/7/$basearch
repo_gpgcheck=1
gpgcheck=1
enabled=1
# PackageCloud's repository key and RabbitMQ package signing key
gpgkey=https://packagecloud.io/rabbitmq/erlang/gpgkey
       https://dl.bintray.com/rabbitmq/Keys/rabbitmq-release-signing-key.asc
sslverify=1
sslcacert=/etc/pki/tls/certs/ca-bundle.crt
metadata_expire=300

[rabbitmq_erlang-source]
name=rabbitmq_erlang-source
baseurl=https://packagecloud.io/rabbitmq/erlang/el/7/SRPMS
repo_gpgcheck=1
gpgcheck=0
enabled=1
# PackageCloud's repository key and RabbitMQ package signing key
gpgkey=https://packagecloud.io/rabbitmq/erlang/gpgkey
       https://dl.bintray.com/rabbitmq/Keys/rabbitmq-release-signing-key.asc
sslverify=1
sslcacert=/etc/pki/tls/certs/ca-bundle.crt
metadata_expire=300
After saving, install using yum
yum install erlang
Then open the command line and enter erl. If the version information of erlang is displayed, the installation is successful:

Note: you cannot directly install erlang using yum, which will cause the version of erlang to be very low, and there will be version conflicts when installing rabbitMQ later
B. Install other dependencies
In addition to erlang, RabbitMQ also needs to be installed: socat and logrotate
yum install -y socat logrotate
C. Installing RabbitMQ
There are two ways to install:
- rpm installation
- Install using yum or up2date
The first method: rpm installation
Download RabbitMQ. For specific rpm package links, please refer to: Official website download page
wget https://github.com/rabbitmq/rabbitmq-server/releases/download/v3.8.14/rabbitmq-server-3.8.14-1.el7.noarch.rpm
Then install:
rpm -ivh rabbitmq-server-3.8.14-1.el7.noarch.rpm
The second method: install yum
Create a new file: / etc / yum repos. d/rabbitmq_ server. repo
# vim /etc/yum.repos.d/rabbitmq_server.repo
[rabbitmq_server]
name=rabbitmq_server
baseurl=https://packagecloud.io/rabbitmq/rabbitmq-server/el/7/$basearch
repo_gpgcheck=1
gpgcheck=0
enabled=1
gpgkey=https://packagecloud.io/rabbitmq/rabbitmq-server/gpgkey
sslverify=1
sslcacert=/etc/pki/tls/certs/ca-bundle.crt
metadata_expire=300

[rabbitmq_server-source]
name=rabbitmq_server-source
baseurl=https://packagecloud.io/rabbitmq/rabbitmq-server/el/7/SRPMS
repo_gpgcheck=1
gpgcheck=0
enabled=1
gpgkey=https://packagecloud.io/rabbitmq/rabbitmq-server/gpgkey
sslverify=1
sslcacert=/etc/pki/tls/certs/ca-bundle.crt
metadata_expire=300
Then install using yum:
yum install -y rabbitmq_server rabbitmq-server
Verify successful installation by rabbitmqctl:
>>> rabbitmqctl version
3.8.14
D. Start
Start RabbitMQ as a daemon:
# -detached is an optional parameter, indicating that the background is enabled
rabbitmq-server -detached
You can verify whether it starts by viewing the status:
rabbitmqctl status
If you want to close, you can use:
rabbitmqctl stop
E. Install Web management [not required]
This step is not necessary. RabbitMQ also provides a Web management tool. As a plug-in of RabbitMQ, the Web management tool is equivalent to a background management page for viewing in the browser
rabbitmq-plugins enable rabbitmq_management
After installation, you can access it through localhost:15672
The default account and password are guest
Note: generally, a new administrator user will be created without using the default guest. The guest user can only be accessed under the local host. If it is accessed from other machines in the intranet, an error will be reported when logging in:
The following is to add an administrator user (here root):
# Add user
rabbitmqctl add_user root 123456

# Give administrator privileges
rabbitmqctl set_user_tags root administrator

# Set all permissions
rabbitmqctl set_permissions -p / root ".*" ".*" ".*"

# View user list
rabbitmqctl list_users
2-2 RabbitMQ common commands
The following are the scene commands for RabbitMQ:
# View version
rabbitmqctl version

# View status
rabbitmqctl status

# stop it
rabbitmqctl stop

# Add user
rabbitmqctl add_user root 123456

# Give administrator privileges
rabbitmqctl set_user_tags root administrator

# Set all permissions
rabbitmqctl set_permissions -p / root ".*" ".*" ".*"

# View user list
rabbitmqctl list_users

# View all switches
rabbitmqctl list_exchanges

# View all queues
rabbitmqctl list_queues

# View unconfirmed messages
rabbitmqctl list_queues name messages_ready messages_unacknowledged

# View all bindings
rabbitmqctl list_bindings
3-1. Exchange Type
There are four types of exchange types:
- fanout: fan switch. This type does not process routing keys. It is similar to broadcasting. All messages sent to the switch will be sent to all queues bound to the switch. Sending messages is the fastest under this type.
- direct: directly connected to the switch. The mode handles the routing key. A queue with exactly matching routing keys is required to receive messages from the switch. This mode is most used.
- Topic: topic switch, which matches the routing key with a certain pattern.
- headers: header switches are rarely used.
1. Fanout
The fan exchange routes messages to all queues bound to it, regardless of the bound routing key, that is, the RoutingKey is not required in the fan mode.
If N queues are bound to a fan switch, when a message is sent to this fan switch, the switch will send copies of the message to all N queues respectively. The fan switch is used to process the broadcast routing of messages.
Because the fan switch sends copies of messages to all queues bound to it, the application scenarios are very similar:
- Large scale multi-user online (MMO) games can use it to handle global events such as leaderboard updates
- Sports news websites can use it to distribute score updates to mobile clients in near real time
- The distribution system uses it to broadcast various status and configuration updates
- In group chat, it is used to distribute messages to users participating in group chat
Legend of fan exchanger:
2. Direct
A direct exchange delivers a message to the corresponding queue according to the routing key carried by the message. The direct switch is used to process unicast routing of messages. Here's how it works:
- Bind a queue to a switch and give the binding a routing key
- When a message with the routing key R is sent to the direct switch, the switch will route it to the queue with the same binding value R.
Direct attached switches are often used to circularly distribute tasks to multiple workers. When doing so, we need to understand that in AMQP 0-9-1, message load balancing occurs between consumer s, not between queue s.
The direct connection switch is a fully matched unicast mode. It is also the default switch mode of RabbitMQ and the simplest mode.
Legend of direct connected exchanger:
3. Topic
topic exchanges route messages to one or more queues by matching the routing key of messages and the binding mode from queue to switch. Topic switches are often used to implement various distribution / subscription modes and their variants. Topic switches are usually used to implement multicast routing of messages.
Topic switches have a wide range of usage scenarios. Whenever a problem involves multiple consumers/applications who want to select targeted messages, topic switches can be considered.
Usage scenario:
- Distribute data about specific geographic locations, such as points of sale
- Background tasks completed by multiple workers. Each worker is responsible for handling some specific tasks
- Stock price updates (and other types of financial data updates)
- News updates involving categories or labels (for example, for specific sports or teams)
- Coordination of different kinds of services in the cloud
- Distributed architecture / system-based software packaging, in which each builder can only deal with a specific architecture or system.
The flow of the topic exchange is similar to that of the direct connection mode, but it is more optimized than the direct connection mode in that it supports the wildcard of the RoutingKey. The wildcard is not in the way of regular expression, but simply supports * and #, and the RoutingKey has strict planning, and the asterisk (.) must be used between words separate
- *Represents a word
- #Represents zero or more words
As shown in the figure:
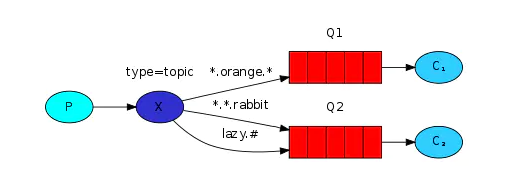
- Messages with a routing key of "com.orange.rabbit" will be routed to Q1 and Q2 at the same time
- Messages with a routing key of "lazy.orange.rabbit" will be routed to Q1 and Q2 at the same time
- Messages with a routing key of "com.hidden.rabbit" will only be routed to Q2
- Messages with a routing key of "com.orange.demo" will only be routed to Q1
- Messages with a routing key of "java.hidden.rabbit" will only be routed to Q2
- Messages with a routing key of "java.hidden.demo" will be discarded or returned to the producer because there is no matching routing key (the mandatory parameter is required)
4. Headers
Sometimes the routing operation of a message involves multiple attributes. At this time, it is easier to express the message header than the routing key, and the header header switch is born for this purpose. The header switch uses multiple message attributes to establish routing rules instead of routing keys. The routing rule is established by judging whether the value of the message header matches the specified binding.
We can bind a queue to the header switch and use multiple headers for matching for the binding between them. In this case, the message broker has to get more information from the application developer. In other words, it needs to consider whether a message needs to be partially matched or fully matched. The "more messages" mentioned above is the "x-match" parameter. When "x-match" is set to "any", any value of the message header can be matched to meet the condition. When "x-match" is set to "all", all values of the message header need to be matched successfully.
Head exchanger can be regarded as another form of direct connected exchanger. The head switch can work like a direct connection switch. The difference is that the routing rules of the head switch are based on the head attribute value rather than the routing key. The routing key must be a string, while the header attribute value does not have this constraint. They can even be integers or hash values (dictionaries).
The Headers switch provides another strategy different from the topic switch. When sending a message, set a header for the message. The header is a series of key value pairs, which can be set multiple. There are two options for configuring the binding relationship:
- Match any: if any key value pair in the header can match, it will be routed to the corresponding Queue
- Match all: all key value pairs in the header can be matched before being routed to the corresponding Queue
Note: the performance of the Headers type exchanger will be very poor, and it is not practical. Basically, you won't see its existence.
5. Summary
In terms of performance, fanout > Direct > topic > headers
In practical application, on the premise of meeting the working scenario, select the mode with the highest performance, and generally use the Direct type.
3-2. Message confirmation
When a consumer consumes a message, it may take a few seconds, or it may take a long time, such as dozens of minutes. At this time, the consumer may crash halfway, or the connection is disconnected, or the consumer is manually kill ed, so the message may be lost.
In order to ensure that messages can reach consumers reliably from the queue, RabbitMQ provides a message confirmation mechanism.
Message confirmation mechanisms can be divided into two types:
- Consumer confirmation
- Producer confirmation
As shown in the figure, the message confirmation process of RabbitMQ:
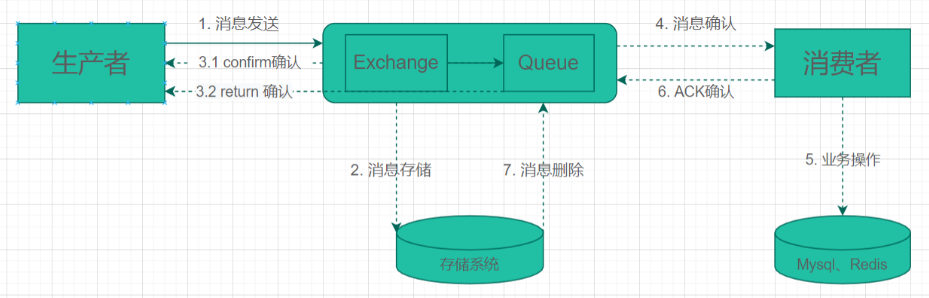
Consumer confirmation
Consumer recognition mechanism:
- After processing the message, the consumer sends back an ack to tell RabbitMQ that the message has been received and processed. At this time, RabbitMQ can delete it
- If the consumer fails to process the message, it can also send back an ack to tell RabbitMQ to reject the message and ask RabbitMQ to resend the message
- If the consumer dies without sending an ack (its channel is closed, connection is closed, or TCP connection is lost), RabbitMQ will understand that the message is not fully processed and will queue again. If another consumer is online at the same time, RabbitMQ will reassign the message to another consumer, so as to ensure that no message will be lost
When consumers subscribe to the queue, they can specify the autoAck parameter:
- When autoAck is true, RabbitMQ adopts the automatic confirmation mode. RabbitMQ automatically sets the sent messages as confirmation, and then deletes them from memory or hard disk, regardless of whether consumers actually consume these messages.
- When autoAck is false, RabbitMQ will wait for the confirmation signal replied by the consumer. After receiving the confirmation signal, it will delete the message from memory or disk.
By default, autoAck is false, that is, it does not automatically confirm. Take Python as an example:
# Define the consumption callback of the queue, pass the message to the callback function, and confirm the message manually after consumption
channel.basic_consume(queue=Queue name, on_message_callback=callback, auto_ack=False)
The message confirmation mechanism is the basis for reliable delivery of RabbitMQ messages. As long as the autoAck parameter is set to false, consumers will have enough time to process messages without worrying about the loss of messages after the consumer process hangs up in the process of processing messages.
Note: in practical applications, it is easy to forget the message confirmation, which will lead to the accumulation of more and more unconfirmed messages. Such messages cannot be released automatically. You can view unconfirmed messages through the following command:
rabbitmqctl list_queues name messages_ready messages_unacknowledged
Note: automatic confirmation will be turned off in actual projects, but consumers must send ack response anyway, otherwise more and more unconfirmed messages will accumulate.
Producer confirmation
Similarly, when the producer sends a message to the Broker, if the message cannot be reached due to network reasons, and the producer does not know whether the message has arrived at the Broker, it may cause problems, such as repeated consumption.
Therefore, RabbitMQ also provides a producer confirmation mechanism:
- The message arrives at Exchange: Exchange sends a Confirm confirmation to the producer. A confirmCallback will be returned for success or failure
- The message successfully reached Exchange, but failed to post the Queue from Exchange: a returnCallback was returned to the producer. Only failure will be returned
3-3. Persistence
Although the message loss caused by the death of consumers can be avoided through the message confirmation mechanism, there is still the possibility of message loss.
When RabbitMQ crashes and hangs, all switches and queues will be lost:
- If the switch is lost, the message will not be lost, but the message cannot be sent to the switch
- If the queue is lost, the messages in the queue will be lost
Therefore, in order to ensure that messages are not lost, the persistent storage will be declared when the switch and queue are established. After persistence, even if RabbitMQ crashes and hangs up, the switch and queue still exist after restart and will not be lost.
RabbitMQ does not enable persistence by default. Temporary switches and queues are established by default.
The persistence of the switch is realized by durable=True:
# Declare exchange, which specifies the queue in which the message is delivered. If it does not exist, it is created. durable=True for exchange persistent storage, False for non persistent storage
channel.exchange_declare(exchange=Switch name, durable=True)
If the persistence of the switch is not set, after the RabbitMQ service is restarted, the relevant switch metadata will be lost, but the message will not be lost, but the message cannot be sent to the switch.
For a long-term switch, it is recommended to set it to persistence.
Queue persistence is achieved by durable=True:
# Declare a message queue in which messages will be delivered. If it does not exist, it will be created. durable=True means message queue persistent storage, False means non persistent storage
channel.queue_declare(queue=Queue name, durable=True)
Note: if a non persistent queue or switch already exists, an error will be reported when you execute the above code, because RabbitMQ does not allow you to redeclare a queue or switch with different parameters and needs to be deleted and rebuilt. In addition, if one of the queues and switches declares persistence and the other does not declare persistence, binding is not allowed.
If the queue is not set to persistent, the relevant queue metadata and data will be lost after the RabbitMQ service is restarted, that is, the messages in the queue will also be lost.
The persistence of a queue can ensure that its own metadata will not be lost due to exceptions, but it can not guarantee that the messages stored inside will not be lost. To ensure that the message will not be lost, you need to set the message persistence.
Message persistence is achieved by setting deliveryMode to 2 in basic properties:
# Insert message into queue, delivery_mode=2: Message persistence, delivery_mode=1: Message non persistent
channel.basic_publish(exchange=Switch name, routing_key=Routing key, body = message, properties=pika.BasicProperties(delivery_mode=2))
After setting the persistence of queues and messages, messages still exist after RabbitMQ service is restarted.
Only queue persistence is set, and messages in the queue will be lost after restart.
Only set the message persistence. After restarting, the queue disappears and even the message is lost. It is meaningless to set the message persistence without setting the queue persistence.
Note: if all messages are persisted, the performance of RabbitMQ will be seriously affected, because the speed of writing to disk is much slower than that of writing to memory. For messages with low reliability, persistence processing can not be used to improve the overall throughput. You can't have both fish and bear's paw. The key lies in choice and trade-off. In practice, we need to make a trade-off between reliability and throughput according to the actual situation.
Note: setting persistence for queues, switches and messages does not guarantee that 100% of messages will not be lost
- First, if automatic message confirmation is enabled, the message will be deleted from the queue when it is delivered to the consumer. If the consumer crashes and hangs up, the message will be lost. This can be solved through the manual message confirmation mechanism
- Secondly, after the messages are correctly stored in RabbitMQ, it will take a period of time (this time is very short, but can not be ignored) to store them in the disk. RabbitMQ does not do fsync processing for each message. It may only be saved to the cache rather than the physical disk. During this period, RabbitMQ broker crash es and the messages are saved to the cache, but they have not been dropped in time, Then these messages will be lost. RabbitMQ image queue mechanism can be introduced to solve the problem. For details, please refer to chapter 4.7 persistence of RabbitMQ practical guide
Summary:
- RabbitMQ does not enable persistence by default
- The switch is not persistent. After the switch is restarted, the message will not be lost, but the message cannot be sent to the switch
- The queue is not persistent. After restart, the queue will be lost and the messages in the queue will be lost
- Setting only message persistence without queue persistence is meaningless
- After queues, switches and messages are set to persist, there is no guarantee that 100% of messages will not be lost
- Generally, the switch and queue persistence are set, and whether the message is persistent depends on the actual scenario
3-4. Fair scheduling
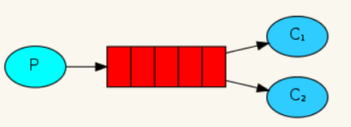
When RabbitMQ has multiple consumers, the messages received by the queue will be sent to consumers in the form of round robin distribution. Each message will be sent to only one consumer in the subscription list. This method is very suitable for extension, and it is specially designed for concurrent programs. If the load increases now, you just need to create more consumers to consume and process messages.
But most of the time, the polling distribution mechanism is not so elegant. By default, if there are n consumers, rabbitmq will distribute the m-th message to the m%n (residual method) consumers. Rabbitmq does not care whether the consumer consumes and has confirmed (Basic.Ack) the message.
Imagine that if some consumers have heavy tasks and have no time to consume so many messages, while some other consumers quickly process the allocated messages for some reasons and are idle, this will lead to the decline of the overall application throughput.
RabbitMQ can be set to allocate message tasks fairly and will not assign multiple message processing tasks to a consumer at the same time. In other words, RabbitMQ will not send new messages to consumers before processing and confirming messages, but will distribute messages to the next non busy consumer.
RabbitMQ uses channel basic_ QoS (Num) to ensure fair scheduling. This method allows to limit the maximum number of unacknowledged messages that consumers on the channel can maintain.
# Set the maximum number of unacknowledged messages allowed by the consumer to 1
channel.basic_qos(prefetch_count=1)
For example, before subscribing to the consumption queue, the consumer program calls channel basic_ QoS (3), and then a queue is defined for consumption. RabbitMQ will save a list of consumers. Each message sent will count the corresponding consumers. When the set upper limit is reached, RabbitMQ will not send any messages to this consumer until the consumer confirms a message, RabbitMQ will reduce the corresponding count by 1, and then the consumer can continue to receive messages, Until the count line is reached again. This mechanism can be similar to the sliding window of TCP/IP.
Note: if channel basic_ If num of QoS (Num) is set to 0, there is no upper limit.
4-1. Development language support
RabbitMQ supports a variety of clients, such as Python, Ruby NET, Java, JMS, C, PHP, ActionScript, XMPP, STOMP, etc.
Here, we mainly take Python and PHP as examples for demonstration.
Python
Note: Python uses version 3.7, and pika needs to be installed
pip install pika
PHP
Note: PHP: 7 X +, and install PHP amqplib, which can be installed through composer
composer.json (under the project root directory)
{
    "require": {
        "php-amqplib/php-amqplib": ">=3.0"
    }
}
Just install composer under the project directory
Or you don't need the above composer directly JSON, direct the command:
composer require php-amqplib/php-amqplib
4-2. Working mode
RabbitMQ has 7 working modes, which can be seen as follows: RabbitMQ Tutorials
- Simple mode
- Working mode
- Publish / subscribe mode
- Routing mode
- Theme mode
- RPC mode
- Producer confirmation mode
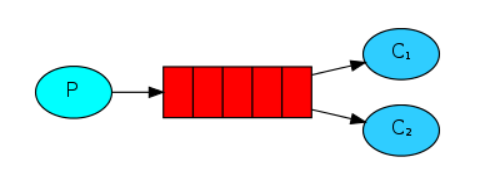
1. Simple mode
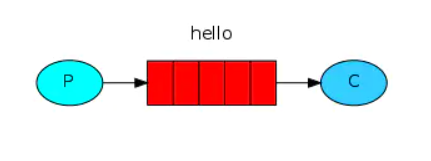
simple mode is the simplest of several working modes, as shown in the following figure:
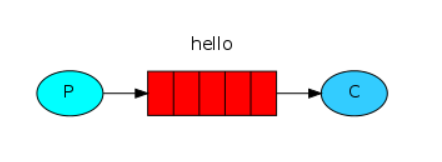
It has the following characteristics:
- There is only one producer, one consumer and one queue
- When sending and receiving messages, producers and consumers only need to specify the queue name, rather than the switch to send to. RabbitMQ will automatically use the default switch of vhosts, and the type of the default switch is direct
Application scenario: put the sent e-mail into the message queue, and then the mail service obtains the mail in the queue and sends it to the recipient
To send a message to a producer:
- Connect RabbitMQ server and establish channel
- Create a queue. If you do not create a queue, the queue does not exist when sending a message. RabbitMQ will discard the message. Note: creating a queue repeatedly does not create a queue repeatedly. It is recommended that both the production side and the consumer side need to create a queue
- Note: this message is only sent to the switch, not directly to the queue. The empty switch is the default switch. This is just a test, so the default switch is used
- Close connection
Steps for consumers to receive messages:
- Send a message with, connect to the RabbitMQ server, and establish a channel
- It is the same as sending a message and creating a queue. If you do not create a queue, the queue does not exist when sending a message, then RabbitMQ will discard the message. Note: creating a queue repeatedly does not create a queue repeatedly. It is recommended that both the production end and the consumer end need to create a queue
- Define a callback function. Each time a message is received, it will pass the message to the callback function
- Define the consumption callback of the queue, pass the message to the callback function, and confirm the message at the same time
- Recycle consumption / receive message
Python
Note: Python uses version 3.7, and pika needs to be installed
Sending end, sending message: 1-simple-send py
#!/usr/bin/env python
import pika


# Connect to RabbitMQ server
connection = pika.BlockingConnection(pika.ConnectionParameters(host='localhost'))
channel = connection.channel()

# Create queue
channel.queue_declare(queue='hello')

# Send a message, the message body is hello world, the switch is the default switch (empty switch), and the routing key is hello
channel.basic_publish(exchange='', routing_key='hello', body='Hello World!')
print(" [x] Sent 'Hello World!'")

# Close connection
connection.close()
Receiving end, receiving message: 1-simple-receive py
#!/usr/bin/env python
import pika, sys, os

def main():
    # Connect to RabbitMQ server
    connection = pika.BlockingConnection(pika.ConnectionParameters(host='localhost'))
    channel = connection.channel()

    # Create queue
    channel.queue_declare(queue='hello')

    # Define callback function
    def callback(ch, method, properties, body):
        print(f' [x] Received {body}')

    # Define the consumption callback of the queue, pass the message to the callback function, and confirm the message at the same time
    channel.basic_consume(queue='hello', on_message_callback=callback, auto_ack=True)

    print(' [*] Waiting for messages. To exit press CTRL+C')

    # Start consuming / receiving messages. Note: This is an endless loop, equivalent to ` while True '`
    channel.start_consuming()


if __name__ == '__main__':
    try:
        main()
    # ctrl + c can interrupt the loop
    except KeyboardInterrupt:
        print('Interrupted')
        try:
            sys.exit(0)
        except SystemExit:
            os._exit(0)
function:
Run the receiver first:
python 1-simple-receive.py
# => [*] Waiting for messages. To exit press CTRL+C
Rerun sender:
python 1-simple-send.py
# => [x] Sent 'Hello World!'
At this time, the receiving end will receive the message and output:
# => [x] Received 'Hello World!'
PHP
Note: PHP: 7 X +, and install PHP amqplib
Sending end, sending message: 1-simple-send php
<?php

require_once __DIR__ . '/vendor/autoload.php';
use PhpAmqpLib\Connection\AMQPStreamConnection;
use PhpAmqpLib\Message\AMQPMessage;

$exchange = '';    // Default switch
$queue = 'hello';
$routing_key = 'hello';

// Connect to RabbitMQ server
$connection = new AMQPStreamConnection('localhost', 5672, 'guest', 'guest');
$channel = $connection->channel();

// Create queue
$channel->queue_declare($queue, false, false, false, false);

// Define the message, and the message body is hello world
$msg = new AMQPMessage('Hello World!');

// Send messages to the switch. The switch is the default switch (empty switch) and the routing key is hello
$channel->basic_publish($msg, $exchange, $routing_key);

echo " [x] Sent 'Hello World!'\n";

// Close connection
$channel->close();
$connection->close();
Receiving end, receiving message: 1-simple-receive php
<?php

require_once __DIR__ . '/vendor/autoload.php';
use PhpAmqpLib\Connection\AMQPStreamConnection;

$queue = 'task-queue';

// Connect to RabbitMQ server
$connection = new AMQPStreamConnection('localhost', 5672, 'guest', 'guest');
$channel = $connection->channel();

// Create queue
$channel->queue_declare($queue, false, false, false, false);

echo " [*] Waiting for messages. To exit press CTRL+C\n";

// Define callback function
$callback = function ($msg) {
    echo ' [x] Received ', $msg->body, "\n";
};

// Define the consumption callback of the queue, pass the message to the callback function, and perform automatic message confirmation at the same time
$channel->basic_consume($queue, '', false, true, false, false, $callback);

// Recycle consumption / receive message
while ($channel->is_open()) {
    $channel->wait();
}

// Close connection
$channel->close();
$connection->close();
2. Working mode
In the simple mode, there is only one consumer. When the producer produces messages faster than the consumer consumes, messages may accumulate. At this time, one or more consumers need to be added to speed up the consumption. This mode is called work mode, as shown in the following figure:
characteristic:
- There can be multiple consumers, but a message can only be obtained by one consumer and cannot be consumed repeatedly
- Messages sent to the queue are evenly distributed by RabbitMQ to different consumers for consumption
- Manual message confirmation
- Persistence
- Fair scheduling of messages
Application scenario: it is generally applicable to the execution of resource intensive tasks. A single consumer cannot handle them, and multiple consumers are required to process them. For example, the processing of an order takes 10s. Multiple orders can be put into the message queue at the same time, and then multiple consumers can process them at the same time. This is the parallel situation, not the serial situation of a single consumer
The steps are similar to those in the simple mode, except that there can be multiple consumers
Python
Sending end, sending message: 2-work-send py
# -*- encoding: utf-8 -*-
import pika
import sys

# Connect to RabbitMQ server
connection = pika.BlockingConnection(pika.ConnectionParameters(host='localhost'))
channel = connection.channel()

# Create a queue and turn on persistence
channel.queue_declare(queue='task-queue', durable=True)

# Use the parameters of the command as the message body. If none, then hello world
message = ' '.join(sys.argv[1:]) or "Hello World!"

# Send the message and set the message to persistent
channel.basic_publish(exchange='',
                      routing_key='task-queue',
                      body=message,
                      properties=pika.BasicProperties(
                          delivery_mode=2
                      ))
print(" [x] Sent %r" % message)

# Close connection
connection.close()
Note: the queue name of the code here is inconsistent with the queue name in the simple mode. This is because the hello queue has been created after executing the code in the simple mode, which is non persistent. If the hello queue is still used here, an error will be reported during execution, because RabbitMQ does not allow redefining a queue or switch with different parameters, The rebuild needs to be deleted.
Note: the routing code here_ The key also needs to be changed to be consistent with the queue name, otherwise the message will be lost.
Receiving end, receiving message, 2-work-receive py
# -*- encoding: utf-8 -*-
import os
import pika
import time
import sys


def main():
    # Connect to RabbitMQ server
    connection = pika.BlockingConnection(pika.ConnectionParameters(host='localhost'))
    channel = connection.channel()

    # Create a queue and turn on persistence
    channel.queue_declare(queue='task-queue', durable=True)

    # Define callback function
    def callback(ch, method, properties, body):
        print(f" [x] Received {body.decode()!r}")

        # There are several in the news Just sleep for a few seconds
        time.sleep(body.count(b'.'))
        print(" [x] Done")

        # Message confirmation
        ch.basic_ack(delivery_tag=method.delivery_tag)

    # Set the maximum number of unacknowledged messages allowed by the consumer to 1
    channel.basic_qos(prefetch_count=1)

    # Define the consumption callback of the queue, pass the message to the callback function, and turn off automatic message confirmation
    channel.basic_consume(queue='task-queue', on_message_callback=callback)

    print(' [*] Waiting for messages. To exit press CTRL+C')

    # Start consuming / receiving messages. Note: This is an endless loop, equivalent to ` while True '`
    channel.start_consuming()


if __name__ == '__main__':
    try:
        main()
    # ctrl + c can interrupt the loop
    except KeyboardInterrupt:
        print('Interrupted')
        try:
            sys.exit(0)
        except SystemExit:
            os._exit(0)
Run multiple receivers, that is, multiple consumers consume the same queue at the same time. By default, RabbitMQ will send each message to the next consumer in order, and each consumer will get a similar number of messages. This way of distributing messages is called polling.
function:
Run a receiver first:
python 2-work-receive.py
# => Waiting for messages. To exit press CTRL+C
Open another console and run the same receiver
Finally, open a console to run the sender multiple times:
python 2-work-send.py First Message
# => [x] Sent 'First Message'
python 2-work-send.py Second Message
# => [x] Sent 'Second Message'
python 2-work-send.py Third Message
# => [x] Sent 'Third Message'
python 2-work-send.py Forth Message
# => [x] Sent 'Forth Message'
python 2-work-send.py Fifth Message
# => [x] Sent 'Fifth Message'
Look at the outputs of the two receivers respectively:
# first
python 2-work-receive.py
# => [*] Waiting for messages. To exit press CTRL+C
# => [x] Received 'First Message'
# => [x] Done
# => [x] Received 'Third Message'
# => [x] Done
# => [x] Received 'Fifth Message'
# => [x] Done

# the second
python 2-work-receive.py
# => [*] Waiting for messages. To exit press CTRL+C
# => [x] Received 'Second Message'
# => [x] Done
# => [x] Received 'Forth Message'
# => [x] Done
You can see that messages are evenly distributed
PHP
Sending end, sending message: 2-work-send php
<?php

require_once __DIR__ . '/vendor/autoload.php';
use PhpAmqpLib\Connection\AMQPStreamConnection;
use PhpAmqpLib\Message\AMQPMessage;

$exchange = '';    // Default switch
$queue = 'task-queue';
$routing_key = 'task-queue';

// Connect to RabbitMQ server
$connection = new AMQPStreamConnection('localhost', 5672, 'guest', 'guest');
$channel = $connection->channel();

// Create a queue and turn on persistence
$channel->queue_declare($queue, false, true, false, false);

// Use the parameters of the command as the message body. If none, then hello world
$data = implode(' ', array_slice($argv, 1));
if (empty($data)) {
    $data = 'Hello World';
}

// Define the message and set the message to persistent
$msg = new AMQPMessage($data, ['delivery_mode' => AMQPMessage::DELIVERY_MODE_PERSISTENT]);

// Send messages to the switch, which is the default switch (air switch)
$channel->basic_publish($msg, $exchange, $routing_key);

echo " [x] Sent '" . $data . "\n";

// Close connection
$channel->close();
$connection->close();
Receiving end, receiving message: 2-work-receive php
<?php

require_once __DIR__ . '/vendor/autoload.php';
use PhpAmqpLib\Connection\AMQPStreamConnection;

$queue = 'task-queue';

// Connect to RabbitMQ server
$connection = new AMQPStreamConnection('localhost', 5672, 'guest', 'guest');
$channel = $connection->channel();

// Create a queue and turn on persistence
$channel->queue_declare($queue, false, true, false, false);

echo " [*] Waiting for messages. To exit press CTRL+C\n";

// Define callback function
$callback = function ($msg) {
    echo ' [x] Received ', $msg->body, "\n";

    // There are several in the news Just sleep for a few seconds
    sleep(substr_count($msg->body, '.'));
    echo " [x] Done\n";

    // Message confirmation
    $msg->ack();
};

// Set the maximum number of unacknowledged messages allowed by the consumer to 1
$channel->basic_qos(null, 1, null);

// Define the consumption callback of the queue, pass the message to the callback function, and turn off automatic message confirmation
$channel->basic_consume($queue, '', false, false, false, false, $callback);

// Recycle consumption / receive message
while ($channel->is_open()) {
    $channel->wait();
}

// Close connection
$channel->close();
$connection->close();
3. Publish / subscribe mode
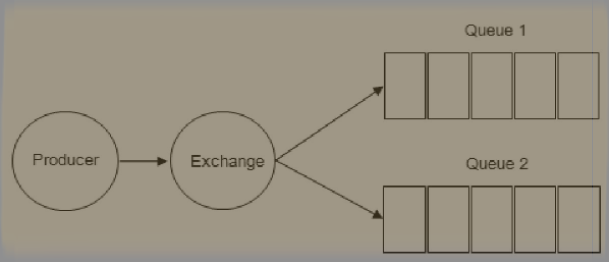
The work mode can distribute messages to multiple consumers equally, but each message can only be obtained by one consumer. If you want a message to be consumed by multiple different consumers at the same time, you can use the publish / subscribe mode, as shown in the following figure:
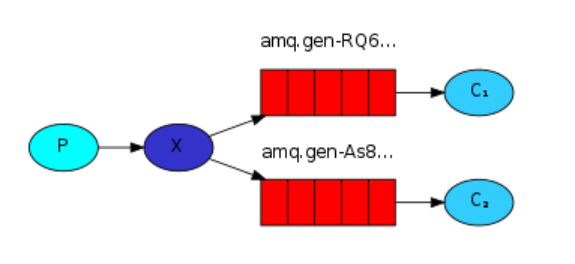
In the publish / subscribe mode, you need to specify which exchange to send to. The X above represents the exchange
characteristic:
- In publish / subscribe mode, the type of the switch is fanout
- The producer does not need to specify the queue name when sending messages. The exchange will forward the received messages to all the bound queues
- When a message is forwarded to multiple queues by the switch, a message can be obtained by multiple consumers at the same time
Application scenario: after updating the commodity inventory, you need to notify multiple caches and databases. The structure here should be:
- A fan out switch fans out two message queues: cache message queue and database message queue
- A cache message queue corresponds to multiple cache consumers
- A database message queue corresponds to multiple database consumers
Python
Sender, send message, 3-pub-sub-send py
# -*- encoding: utf-8 -*-
import pika
import sys

# Connect to RabbitMQ server
connection = pika.BlockingConnection(pika.ConnectionParameters(host='localhost'))
channel = connection.channel()

# Create an exchanger of type fan
channel.exchange_declare(exchange='logs', exchange_type='fanout')

# Use the parameters of the command as the message body. If none, then hello world
message = ' '.join(sys.argv[1:]) or "info: Hello World!"

# Send message to switch
channel.basic_publish(exchange='logs', routing_key='', body=message)
print(" [x] Sent %r" % message)

# Close connection
connection.close()
Receiving end, receiving message: 3-pub-sub-receive py
# -*- encoding: utf-8 -*-
"""
@Time    : 2021/6/12 23:42
@Author  : boli.hong
"""
import os
import pika
import sys


def main():
    # Connect to RabbitMQ server
    connection = pika.BlockingConnection(pika.ConnectionParameters(host='localhost'))
    channel = connection.channel()

    # Create an exchanger of type fan
    channel.exchange_declare(exchange='logs', exchange_type='fanout')

    # Create a temporary queue (temporary queue: once no consumer binds the queue, the queue will be deleted automatically)
    result = channel.queue_declare(queue='', exclusive=True)

    # The queue name of the temporary queue is randomly generated
    queue_name = result.method.queue

    # Binding switches and queues
    channel.queue_bind(exchange='logs', queue=queue_name)

    # Define callback function
    def callback(ch, method, properties, body):
        print(" [x] %r" % body)

    # Define the consumption callback of the queue, pass the message to the callback function, and automatically confirm the message
    channel.basic_consume(queue=queue_name, on_message_callback=callback, auto_ack=True)

    print(' [*] Waiting for messages. To exit press CTRL+C')

    # Start consuming / receiving messages. Note: This is an endless loop, equivalent to ` while True '`
    channel.start_consuming()


if __name__ == '__main__':
    try:
        main()
    # ctrl + c can interrupt the loop
    except KeyboardInterrupt:
        print('Interrupted')
        try:
            sys.exit(0)
        except SystemExit:
            os._exit(0)
be careful:
- Temporary queues are used here because multiple queues need to be simulated under publish / subscribe to bind the switch for broadcasting, so temporary queues are used.
- The temporary queue is automatically generated by the system. The queue name is random. Once the consumer connection is closed, the queue will be deleted. exclusive=True indicates that the temporary queue is created.
function:
Run multiple receivers under multiple terminals:
python 3-pub-sub-receive.py
# [*] Waiting for messages. To exit press CTRL+C
Run a sender:
python 3-pub-sub-send.py
# [x] Sent 'info: Hello World!'
All receivers will receive messages:
[x] b'info: Hello World!'
PHP
Sender, send message, 3-pub-sub-send php
<?php

require_once __DIR__ . '/vendor/autoload.php';
use PhpAmqpLib\Connection\AMQPStreamConnection;
use PhpAmqpLib\Message\AMQPMessage;

$exchange = 'boli-exchange';
$exchange_type = 'fanout';

// Connect to RabbitMQ server
$connection = new AMQPStreamConnection('localhost', 5672, 'guest', 'guest');
$channel = $connection->channel();

// Create an exchanger of type fan
$channel->exchange_declare($exchange, $exchange_type, false, false, false);

// Use the parameters of the command as the message body. If none, then hello world
$data = implode(' ', array_slice($argv, 1));
if (empty($data)) {
    $data = 'Hello World';
}

// Define message
$msg = new AMQPMessage($data);

// Send message to switch
$channel->basic_publish($msg, $exchange);

echo " [x] Sent '" . $data . "\n";

// Close connection
$channel->close();
$connection->close();
Receiving end, receiving message: 3-pub-sub-receive php
<?php

require_once __DIR__ . '/vendor/autoload.php';
use PhpAmqpLib\Connection\AMQPStreamConnection;

$exchange = 'boli-exchange';
$exchange_type = 'fanout';

// Connect to RabbitMQ server
$connection = new AMQPStreamConnection('localhost', 5672, 'guest', 'guest');
$channel = $connection->channel();

// Create an exchanger of type fan
$channel->exchange_declare($exchange, $exchange_type, false, false, false);

// Create a temporary queue whose name is random (temporary queue: once no consumer binds the queue, the queue will be deleted automatically)
list($queue_name, ,) = $channel->queue_declare('', false, false, true, false);

// Binding switches and queues
$channel->queue_bind($queue_name, $exchange);

echo " [*] Waiting for $exchange. To exit press CTRL+C\n";

// Define callback function
$callback = function ($msg) {
    echo ' [x] Received ', $msg->body, "\n";
};

// Define the consumption callback of the queue, pass the message to the callback function, and automatically confirm the message
$channel->basic_consume($queue_name, '', false, true, false, false, $callback);

// Recycle consumption / receive message
while ($channel->is_open()) {
    $channel->wait();
}

// Close connection
$channel->close();
$connection->close();
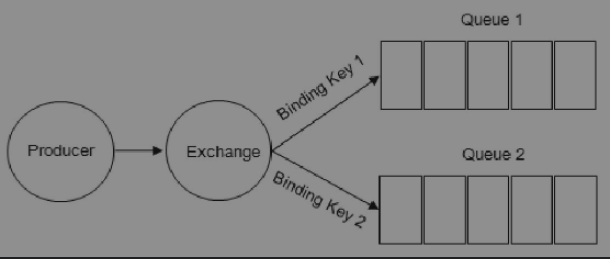
4. Routing mode
In the previous modes, the producer cannot specify the specific target queue, but in the routing mode, the target queue of messages can be specified by the producer, as shown in the following figure:
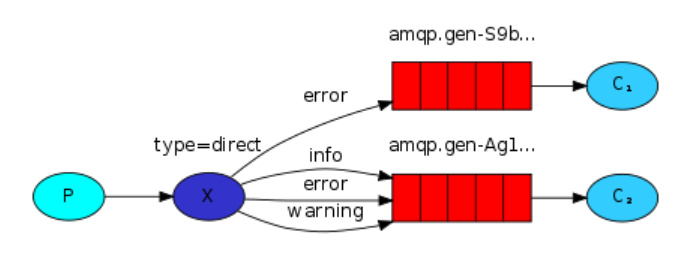
characteristic:
- In routing mode, the switch type is direct
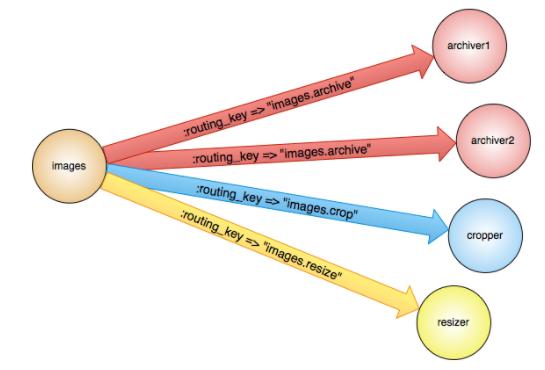
- The destination queue of messages can be specified by the producer according to the RoutingKey rule
- Consumers bind their queues through BindingKey
- A message queue can be obtained by multiple consumers
- Only queues with RoutingKey and BindingKey matching will receive messages
RoutingKey is used by the producer to specify which queue the switch will eventually route messages to, while BindingKey is used by the consumer to bind to a queue.
Application scenario: for example, an iPhone 12 is added to the commodity inventory. In the iPhone 12 promotion, the consumer specifies the routing key as iPhone 12. Only this promotion will receive messages, and other promotion activities do not care about or consume the messages of this routing key
Python
Sender, sending message, 4-routing-send py
# -*- encoding: utf-8 -*-
import pika
import sys

# Connect to RabbitMQ server
connection = pika.BlockingConnection(pika.ConnectionParameters(host='localhost'))
channel = connection.channel()

# Create a switch of type direct
channel.exchange_declare(exchange='direct_exchange', exchange_type='direct')

routing_key = sys.argv[1] if len(sys.argv) > 1 else 'info'

# Use the parameters of the command as the message body. If none, then hello world
message = ' '.join(sys.argv[2:]) or "Hello World!"

# Send message to switch
channel.basic_publish(exchange='direct_exchange', routing_key=routing_key, body=message)
print(" [x] Sent %r:%r" % (routing_key, message))

# Close connection
connection.close()
Receiving end, receiving message, 4-routing-receive py
# -*- encoding: utf-8 -*-
import pika
import sys
import os


def main():
    # Connect to RabbitMQ server
    connection = pika.BlockingConnection(pika.ConnectionParameters(host='localhost'))
    channel = connection.channel()

    # Create a switch of type direct
    channel.exchange_declare(exchange='direct_exchange', exchange_type='direct')

    # Create a temporary queue (temporary queue: once no consumer binds the queue, the queue will be deleted automatically)
    result = channel.queue_declare(queue='', exclusive=True)

    # The queue name of the temporary queue is randomly generated
    queue_name = result.method.queue

    routing_keys = sys.argv[1:]
    if not routing_keys:
        sys.stderr.write("Usage: %s [info] [warning] [error]\n" % sys.argv[0])
        sys.exit(1)

    # Binding switches and queues
    for routing_key in routing_keys:
        channel.queue_bind(exchange='direct_exchange', queue=queue_name, routing_key=routing_key)

    print(' [*] Waiting for logs. To exit press CTRL+C')

    # Define callback function
    def callback(ch, method, properties, body):
        print(" [x] %r:%r" % (method.routing_key, body))

    # Define the consumption callback of the queue, pass the message to the callback function, and automatically confirm the message
    channel.basic_consume(queue=queue_name, on_message_callback=callback, auto_ack=True)

    # Start consuming / receiving messages. Note: This is an endless loop, equivalent to ` while True '`
    channel.start_consuming()


if __name__ == '__main__':
    try:
        main()
    # ctrl + c can interrupt the loop
    except KeyboardInterrupt:
        print('Interrupted')
        try:
            sys.exit(0)
        except SystemExit:
            os._exit(0)
PHP
Sender, sending message, 4-routing-send php
<?php

require_once __DIR__ . '/vendor/autoload.php';
require_once __DIR__ . '/config.php';

use PhpAmqpLib\Connection\AMQPStreamConnection;
use PhpAmqpLib\Message\AMQPMessage;

$host = RABBITMQ_CONF['host'];
$port = RABBITMQ_CONF['port'];
$user = RABBITMQ_CONF['user'];
$password = RABBITMQ_CONF['password'];
$exchange = 'direct-exchange';
$exchange_type = 'direct';

// Connect to RabbitMQ server
$connection = new AMQPStreamConnection($host, $port, $user, $password);
$channel = $connection->channel();

// Create a switch of type direct
$channel->exchange_declare($exchange, $exchange_type, false, false, false);

$routing_key = isset($argv[1]) && !empty($argv[1]) ? $argv[1] : 'info';

// Use the parameters of the command as the message body. If none, then hello world
$data = implode(' ', array_slice($argv, 2));
if (empty($data)) {
    $data = 'Hello World';
}

// Define message
$msg = new AMQPMessage($data);

// Send message to switch
$channel->basic_publish($msg, $exchange, $routing_key);

echo " [x] Sent '" . $data . "\n";

// Close connection
$channel->close();
$connection->close();
Receiving end, receiving message, 4-routing-receive php
<?php

require_once __DIR__ . '/vendor/autoload.php';
require_once __DIR__ . '/config.php';

use PhpAmqpLib\Connection\AMQPStreamConnection;
use PhpAmqpLib\Message\AMQPMessage;

$host = RABBITMQ_CONF['host'];
$port = RABBITMQ_CONF['port'];
$user = RABBITMQ_CONF['user'];
$password = RABBITMQ_CONF['password'];
$exchange = 'direct-exchange';
$exchange_type = 'direct';

// Connect to RabbitMQ server
$connection = new AMQPStreamConnection($host, $port, $user, $password);
$channel = $connection->channel();

// Create a switch of type direct
$channel->exchange_declare($exchange, $exchange_type, false, false, false);

// Create a temporary queue whose name is random
list($queue_name, ,) = $channel->queue_declare('', false, false, true, false);

$routing_keys = array_slice($argv, 1);
if (empty($routing_keys)) {
    file_put_contents('php://stderr', "Usage: $argv[0] [info] [warning] [error]\n");
    exit(1);
}

// Binding switches and queues
foreach ($routing_key as $routing_keys) {
    $channel->queue_bind($queue_name, $exchange, $routing_key);
}

echo " [*] Waiting for $exchange. To exit press CTRL+C\n";

// Define callback function
$callback = function ($msg) {
    echo ' [x] ', $msg->delivery_info['routing_key'], ':', $msg->body, "\n";
};

// Define the consumption callback of the queue, pass the message to the callback function, and automatically confirm the message
$channel->basic_consume($queue_name, '', false, true, false, false, $callback);

// Recycle consumption / receive message
while ($channel->is_open()) {
    $channel->wait();
}

// Close connection
$channel->close();
$connection->close();
5. Thematic model
Topic pattern is to match the routing key with a pattern according to Topics on the basis of routing pattern.
Where # means matching multiple words and * means matching one word. Consumers can subscribe to a topic message through a BindingKey of a certain mode, as follows:
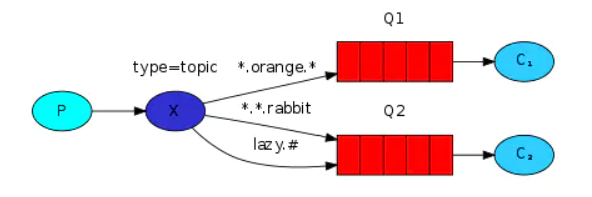
characteristic:
- The type value of the switch in topic mode is topic
- A message can be obtained by multiple consumers at the same time
Application scenario: as above, Iphone promotion activities can receive messages with the theme of Iphone, such as Iphone12, Iphone13, etc
Python
Sender, send message, 5-topic-send py
# -*- encoding: utf-8 -*-
import pika
import sys

# Connect to RabbitMQ server
connection = pika.BlockingConnection(pika.ConnectionParameters(host='localhost'))
channel = connection.channel()

# Create a switch of type subject
channel.exchange_declare(exchange='topic_exchange', exchange_type='topic')

routing_key = sys.argv[1] if len(sys.argv) > 1 else 'info'

# Use the parameters of the command as the message body. If none, then hello world
message = ' '.join(sys.argv[2:]) or "Hello World!"

# Send message to switch
channel.basic_publish(exchange='topic_exchange', routing_key=routing_key, body=message)
print(" [x] Sent %r:%r" % (routing_key, message))

# Close connection
connection.close()
Receiving end, receiving message, 5-topic-send py
# -*- encoding: utf-8 -*-
import pika
import sys
import os


def main():
    # Connect to RabbitMQ server
    connection = pika.BlockingConnection(pika.ConnectionParameters(host='localhost'))
    channel = connection.channel()

    # Create a switch of type subject
    channel.exchange_declare(exchange='topic_exchange', exchange_type='topic')

    # Create a temporary queue (temporary queue: once no consumer binds the queue, the queue will be deleted automatically)
    result = channel.queue_declare(queue='', exclusive=True)

    # The queue name of the temporary queue is randomly generated
    queue_name = result.method.queue

    routing_keys = sys.argv[1:]
    if not routing_keys:
        sys.stderr.write("Usage: %s [info] [warning] [error]\n" % sys.argv[0])
        sys.exit(1)

    # Binding switches and queues
    for routing_key in routing_keys:
        channel.queue_bind(exchange='topic_exchange', queue=queue_name, routing_key=routing_key)

    print(' [*] Waiting for logs. To exit press CTRL+C')

    # Define callback function
    def callback(ch, method, properties, body):
        print(" [x] %r:%r" % (method.routing_key, body))

    # Define the consumption callback of the queue, pass the message to the callback function, and automatically confirm the message
    channel.basic_consume(queue=queue_name, on_message_callback=callback, auto_ack=True)

    # Start consuming / receiving messages. Note: This is an endless loop, equivalent to ` while True '`
    channel.start_consuming()


if __name__ == '__main__':
    try:
        main()
    # ctrl + c can interrupt the loop
    except KeyboardInterrupt:
        print('Interrupted')
        try:
            sys.exit(0)
        except SystemExit:
            os._exit(0)
PHP
Sender, send message, 5-topic-send php
<?php

require_once __DIR__ . '/vendor/autoload.php';
require_once __DIR__ . '/config.php';

use PhpAmqpLib\Connection\AMQPStreamConnection;
use PhpAmqpLib\Message\AMQPMessage;

$host = RABBITMQ_CONF['host'];
$port = RABBITMQ_CONF['port'];
$user = RABBITMQ_CONF['user'];
$password = RABBITMQ_CONF['password'];
$exchange = 'topic-exchange';
$exchange_type = 'topic';

// Connect to RabbitMQ server
$connection = new AMQPStreamConnection($host, $port, $user, $password);
$channel = $connection->channel();

// Create a switch of type subject
$channel->exchange_declare($exchange, $exchange_type, false, false, false);

$routing_key = isset($argv[1]) && !empty($argv[1]) ? $argv[1] : 'info';

// Use the parameters of the command as the message body. If none, then hello world
$data = implode(' ', array_slice($argv, 2));
if (empty($data)) {
    $data = 'Hello World';
}

// Define message
$msg = new AMQPMessage($data);

// Send message to switch
$channel->basic_publish($msg, $exchange, $routing_key);

echo ' [x] Sent ', $routing_key, ':', $data, "\n";

// Close connection
$channel->close();
$connection->close();
Receiving end, receiving message, 5-topic-send php
<?php

require_once __DIR__ . '/vendor/autoload.php';
require_once __DIR__ . '/config.php';

use PhpAmqpLib\Connection\AMQPStreamConnection;
use PhpAmqpLib\Message\AMQPMessage;

$host = RABBITMQ_CONF['host'];
$port = RABBITMQ_CONF['port'];
$user = RABBITMQ_CONF['user'];
$password = RABBITMQ_CONF['password'];
$exchange = 'topic-exchange';
$exchange_type = 'topic';

// Connect to RabbitMQ server
$connection = new AMQPStreamConnection($host, $port, $user, $password);
$channel = $connection->channel();

// Create a switch of type subject
$channel->exchange_declare($exchange, $exchange_type, false, false, false);

// Create a temporary queue whose name is random
list($queue_name, ,) = $channel->queue_declare('', false, false, true, false);

$routing_keys = array_slice($argv, 1);
if (empty($routing_keys)) {
    file_put_contents('php://stderr', "Usage: $argv[0] [info] [warning] [error]\n");
    exit(1);
}

// Binding switches and queues
foreach ($routing_keys as $routing_key) {
    $channel->queue_bind($queue_name, $exchange, $routing_key);
}

echo " [*] Waiting for $exchange. To exit press CTRL+C\n";

// Define callback function
$callback = function ($msg) {
    echo ' [x] ', $msg->delivery_info['routing_key'], ':', $msg->body, "\n";
};

// Define the consumption callback of the queue, pass the message to the callback function, and automatically confirm the message
$channel->basic_consume($queue_name, '', false, true, false, false, $callback);

// Recycle consumption / receive message
while ($channel->is_open()) {
    $channel->wait();
}

// Close connection
$channel->close();
$connection->close();
6. RPC mode
MQ itself is based on asynchronous message processing. In the previous example, all producers (P) will not know the success or failure of consumer (C) after sending the message to RabbitMQ (even whether there is a consumer to process the message).
However, in the actual application scenario, we may need some synchronization processing. We need to wait for the server to complete my message processing before proceeding to the next step. This is equivalent to RPC (Remote Procedure Call). RPC is also supported in RabbitMQ. See the figure for the specific process.
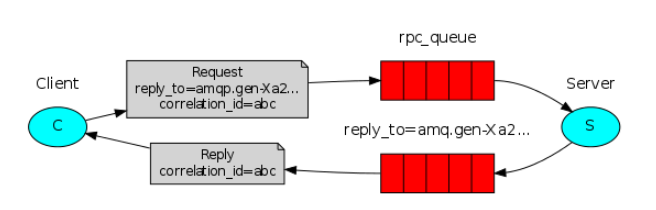
Generally speaking, it is easy to implement RPC through RabbitMQ. A client sends a request message, and the server applies it to a reply message. In order to receive the reply information, the client needs to send the address of a callback queue when sending the request.
The RPC implementation mechanism in RabbitMQ is:
- When the client starts, it creates an anonymous exclusive callback queue.
- In an RPC request, the client sends a message with two properties: one is to set the reply of the callback queue_ To attribute, and the other is the correlation that sets the unique value_ ID attribute.
- Send the request to an rpc_queue is in the queue.
- The RPC worker (also known as the server) waits for the request to be sent to this queue. When the request appears, it performs its work and sends a message with the execution result to reply_ The queue specified in the to field.
- The client waits for the data in the callback queue. When a message appears, it checks the correlation_id attribute. If the value of this property matches the request, it is returned to the application.
Message properties
AMQP protocol predefines a series of 14 attributes for messages. Most attributes are rarely used, except for the following:
- delivery_mode: marks the message as persistent (value 2) or temporary (any value other than 2). I touched this property in the second tutorial, remember?
- content_type: used to describe the encoded MIME type. For example, in practical use, application/json is often used to describe the JOSN coding type.
- reply_to (reply target): usually used to name the callback queue.
- correlation_id (Association ID): used to associate the RPC response with the request.
In the above introduction, we suggest creating a callback queue for each RPC request. This is not an efficient approach. Fortunately, there is a better way -- we can only establish an independent callback queue for each client.
This brings a new problem. When the queue receives a response, it cannot distinguish which request the response belongs to. correlation_id is to solve this problem. We set a unique value for each request. Later, when we receive a message from the callback queue, we can view this property to match the response to the request. If we take over the correlation of the message_ If the ID is unknown, destroy it directly because it does not belong to any of our requests.
Why don't we throw an error when we receive an unknown message, but ignore it?
This is to solve the possible competition on the server side. Although it is unlikely, it is possible for the RPC server to die when the reply has been sent to us but the confirmation message has not been sent to the request. If this happens, RPC will reprocess the request after restart. This is why we must handle repeated responses gracefully on the client side, while RPC needs to maintain idempotency as much as possible.
Application scenario: you need to wait for the interface to return data, such as order payment
Notes on RPC:
Although RPC is a common pattern in computing, it is often criticized. When a problem is thrown, programmers often don't realize whether it is caused by local calls or slow RPC calls. The same confusion also comes from the unpredictability of the system and the unnecessary complexity brought to the debugging work. Unlike software streamlining, abusing RPC can lead to unmaintainable Spaghetti code .
With this in mind, keep the following recommendations in mind:
Make sure you can clearly figure out which function is called locally and which function is called remotely. Document your system. Keep dependencies between components clear. Handle error cases. Understand how the client changes to deal with the downtime and long-term non response of the RPC server.
When in doubt about avoiding RPC. If you can, you should try to use asynchronous pipes instead of RPC class blocking. The results are asynchronously pushed to the next computing scenario.
Python
Server side, 6-rpc_server.py
# -*- encoding: utf-8 -*-
import pika
import sys

# Connect to RabbitMQ server
connection = pika.BlockingConnection(pika.ConnectionParameters(host='localhost'))
channel = connection.channel()

# Create queue
channel.queue_declare(queue='rpc_queue')


def fib(n):
    """
    Fibonacci sequence
    Note: since this method is recursive, it is used to test some time-consuming tasks
    """
    if n == 0:
        return 0
    elif n == 1:
        return 1
    else:
        return fib(n - 1) + fib(n - 2)


def on_request(ch, method, props, body):
    """
    Callback method to perform the actual operation and respond
    """
    n = int(body)

    print(" [.] fib(%s)" % (n,))
    response = fib(n)

    # When sending messages, the switch is the default switch (air switch)
    ch.basic_publish(exchange='',
                     routing_key=props.reply_to,
                     properties=pika.BasicProperties(correlation_id=props.correlation_id),
                     body=str(response))

    # Message confirmation
    ch.basic_ack(delivery_tag=method.delivery_tag)


# Set the maximum number of unacknowledged messages allowed by the consumer to 1
channel.basic_qos(prefetch_count=1)

# Define the consumption callback of the queue, pass the message to the callback function, and turn off automatic message confirmation
channel.basic_consume(queue='rpc_queue', on_message_callback=on_request)

print(" [x] Awaiting RPC requests")

# Start consuming / receiving messages. Note: This is an endless loop, equivalent to ` while True '`
channel.start_consuming()
The code on the server side is very simple:
- Establish the connection and declare the queue as usual
- Declare the fibonacci function, which assumes only valid positive integers as input
- Is basic_ Consumer declares a callback function, which is the core of the RPC server side. It performs actual operations and responds.
- If you want to open more threads on the server, you need to prefetch in order to evenly distribute the load to multiple servers_ Count is set.
Client, 6-rpc-client py
# -*- encoding: utf-8 -*-
import pika
import uuid


class FibonacciRpcClient(object):
    def __init__(self):
        # Connect to RabbitMQ server
        self.connection = pika.BlockingConnection(
            pika.ConnectionParameters(host='localhost'))

        self.channel = self.connection.channel()

        # Create a temporary queue (temporary queue: once no consumer binds the queue, the queue will be deleted automatically)
        result = self.channel.queue_declare(queue='', exclusive=True)

        # The queue name of the temporary queue is randomly generated
        self.callback_queue = result.method.queue

        # Define the consumption callback of the queue, pass the message to the callback function, and automatically confirm the message
        self.channel.basic_consume(
            queue=self.callback_queue,
            on_message_callback=self.on_response,
            auto_ack=True)

    def on_response(self, ch, method, props, body):
        if self.corr_id == props.correlation_id:
            self.response = body

    def call(self, n):
        self.response = None
        self.corr_id = str(uuid.uuid4())

        # Send message with reply_to and correlation_id attribute
        self.channel.basic_publish(
            exchange='',
            routing_key='rpc_queue',
            properties=pika.BasicProperties(
                reply_to=self.callback_queue,
                correlation_id=self.corr_id,
            ),
            body=str(n)
        )
        while self.response is None:
            self.connection.process_data_events()
        return int(self.response)


fibonacci_rpc = FibonacciRpcClient()

print(" [x] Requesting fib(30)")
response = fibonacci_rpc.call(30)
print(" [.] Got %r" % response)
The client code is complex:
- Establish a connection, channel, and declare an exclusive callback_queue for callback.
- We subscribe to this callback_queue so that we can receive RPC responses.
- The "on_response" callback function performs a very simple operation on each response and checks the correlation of the message of each response_ Whether the ID attribute is consistent with what we expect. If so, assign the response result to self Response, and then jump out of the consuming loop.
- Next, we define our main method call method. It performs real RPC requests.
- In this call method, we first generate a unique correlation_id value and save it, 'on_ The 'response' callback function will use it to get a response that meets the requirements.
- Similarly, in the call method, we will also have reply_to and correlation_ The message of ID attribute is published
- Finally, wait for the correct response to arrive and return the response to the user.
function:
Start the server side:
python 6-rpc-server.py
 [x] Awaiting RPC requests
Run the client, and the client will initiate a fibonacci request
python 6-rpc-client.py
 [x] Requesting fib(30)
 [.] Got 832040
At the same time, the server will respond:
[.] fib(30)
Note: the design presented here is not the only way to implement RPC services, but it has some important advantages:
- If the RPC server is running too slowly, you can easily expand it by running another server. Try running a second RPC in the console_ server. php .
- On the client side, RPC requests send or receive only one message. It doesn't need to be like queue_ Asynchronous calls such as declare, so a single request from an RPC client requires only one network round trip.
Our code is very simple and does not try to solve some complex problems, such as:
- How does the client react when no server is running.
- Whether the client needs to implement something like RPC timeout.
- If the server fails and throws an exception, should it be forwarded to the client?
- Prevent the mixing of invalid information (such as check boundary) before processing
PHP
Server side, 6-rpc-server php
<?php

require_once __DIR__ . '/vendor/autoload.php';
require_once __DIR__ . '/config.php';

use PhpAmqpLib\Connection\AMQPStreamConnection;
use PhpAmqpLib\Message\AMQPMessage;

$host = RABBITMQ_CONF['host'];
$port = RABBITMQ_CONF['port'];
$user = RABBITMQ_CONF['user'];
$password = RABBITMQ_CONF['password'];
$exchange = '';
$queue = 'rpc_queue';

// Connect to RabbitMQ server
$connection = new AMQPStreamConnection($host, $port, $user, $password);
$channel = $connection->channel();

// Create queue
$channel->queue_declare($queue, false, false, false, false);

/**
 * Fibonacci sequence
 * Note: since this method is recursive, it is used to test some time-consuming tasks
 */
function fib($n)
{
    if ($n == 0) {
        return 0;
    }
    if ($n == 1) {
        return 1;
    }
    return fib($n - 1) + fib($n - 2);
}

echo " [x] Awaiting RPC requests\n";
$callback = function ($req) {
    $n = intval($req->body);
    echo ' [.] fib(', $n, ")\n";

    $msg = new AMQPMessage(
        (string)fib($n),
        array('correlation_id' => $req->get('correlation_id'))
    );

    // Send messages to the switch, which is the default switch (air switch)
    $req->delivery_info['channel']->basic_publish(
        $msg,
        $exchange,
        $req->get('reply_to')
    );

    // Message confirmation
    $req->ack();
};

// Set the maximum number of unacknowledged messages allowed by the consumer to 1
$channel->basic_qos(null, 1, null);

// Define the consumption callback of the queue, pass the message to the callback function, and turn off automatic message confirmation
$channel->basic_consume($queue, '', false, false, false, false, $callback);

// Recycle consumption / receive message
while ($channel->is_open()) {
    $channel->wait();
}

// Close connection
$channel->close();
$connection->close();
Client, 6-rpc-client php
<?php

require_once __DIR__ . '/vendor/autoload.php';
require_once __DIR__ . '/config.php';

use PhpAmqpLib\Connection\AMQPStreamConnection;
use PhpAmqpLib\Message\AMQPMessage;


class FibonacciRpcClient
{
    private $connection;
    private $channel;
    private $callback_queue;
    private $response;
    private $corr_id;

    public function __construct($config)
    {
        // Connect to RabbitMQ server
        $this->connection = new AMQPStreamConnection($config['host'], $config['port'], $config['user'], $config['password']);
        $this->channel = $this->connection->channel();

        $this->exchange = $config['exchange'];
        $this->queue = $config['queue'];

        // Create a temporary queue whose name is random
        list($this->callback_queue, ,) = $this->channel->queue_declare('', false, false, true, false);

        // Define the consumption callback of the queue, pass the message to the callback function, and automatically confirm the message
        $this->channel->basic_consume($this->callback_queue, '', false, true, false, false, array($this, 'onResponse'));
    }

    public function onResponse($rep)
    {
        if ($rep->get('correlation_id') == $this->corr_id) {
            $this->response = $rep->body;
        }
    }

    public function call($n)
    {
        $this->response = null;
        $this->corr_id = uniqid();

        // Define message with reply_to and correlation_id attribute
        $msg = new AMQPMessage(
            (string) $n,
            array(
                'correlation_id' => $this->corr_id,
                'reply_to' => $this->callback_queue
            )
        );

        // send message
        $this->channel->basic_publish($msg, $this->exchange, $this->queue);

        // Recycle consumption / receive message
        while (!$this->response) {
            $this->channel->wait();
        }
        return intval($this->response);
    }
}

$config = RABBITMQ_CONF;
$config['exchange'] = '';
$config['queue'] = 'rpc_queue';
$fibonacci_rpc = new FibonacciRpcClient($config);
$response = $fibonacci_rpc->call(30);
echo ' [.] Got ', $response, "\n";
7. Producer confirmation mode
The producer performs reliable release confirmation. Producer confirmation is a RabbitMQ extension that can realize reliable release. When producer acknowledgment is enabled on the channel, RabbitMQ will asynchronously acknowledge messages sent by the producer, which means that they have been processed on the server side.
The publisher confirms that they are RabbitMQ extensions of the AMQP 0.9.1 protocol, so they are not enabled by default. Using confirm_ The select method enables publisher confirmation at the channel level:
$channel = $connection->channel();
$channel->confirm_select();
Note: it is not necessary to enable all messages. This mode can only be enabled for specific messages that need to ensure high reliability. This pattern will degrade performance because the acknowledgement of a message will block the publication of subsequent messages.
Application scenario: high reliability requirements for messages, such as wallet deduction
PHP
Enable publisher confirmation
$channel = $connection->channel();
$channel->confirm_select();
There are three ways to confirm messages:
- Publish a single message and synchronously wait for its confirmation
- Publish multiple messages and synchronously wait for their confirmation
- Asynchronous acknowledgement message
Publish a single message and wait for its confirmation (synchronization mechanism)
while (thereAreMessagesToPublish()) {
    $data = "Hello World!";
    $msg = new AMQPMessage($data);
    $channel->basic_publish($msg, 'exchange');
    // uses a 5 second timeout
    $channel->wait_for_pending_acks(5.000);
}
Use $channel:: wait_ for_ pending_ The ACKs (int|float) method waits for its confirmation. Once the message is confirmed, the method returns. If the message is not acknowledged within the timeout or it is nacked (meaning that the agent cannot handle it for some reason), the method throws an exception. Exception handling usually includes logging error messages and / or retrying sending messages.
Publish multiple messages and wait for their confirmation (synchronization mechanism)
$batch_size = 100;
$outstanding_message_count = 0;
while (thereAreMessagesToPublish()) {
    $data = ...;
    $msg = new AMQPMessage($data);
    $channel->basic_publish($msg, 'exchange');
    $outstanding_message_count++;
    if ($outstanding_message_count === $batch_size) {
        $channel->wait_for_pending_acks(5.000);
        $outstanding_message_count = 0;
    }
}
if ($outstanding_message_count > 0) {
    $channel->wait_for_pending_acks(5.000);
}
Compared with waiting for the confirmation of a single message, waiting for the confirmation of a batch of messages greatly improves the throughput.
The disadvantages are:
- In the case of failure, I don't know which message failed
- This scheme is synchronous and will block the release of messages
Asynchronous acknowledgement message (asynchronous mechanism)
$channel = $connection->channel();
$channel->confirm_select();

$channel->set_ack_handler(
    function (AMQPMessage $message){
        // code when message is confirmed
    }
);

$channel->set_nack_handler(
    function (AMQPMessage $message){
        // code when message is nack-ed
    }
);
There are two callbacks:
- A confirmation message
- The other is for nacked messages (messages that can be considered missing by the broker)
Each callback has an AMQPMessage $message parameter with a return message, so you can know which message this callback belongs to without processing the serial number (delivery tag).
The performance of this method is the best
5-1 comparison of common message queues
In addition to RabbitMQ, there are other common Message Queuing Middleware, such as Kafka, RocketMQ, ActiveMQ, etc. the following table lists the differences of these message queues:
| Message queue | RabbitMQ | ActiveMQ | RocketMQ | Kafka |
|---|---|---|---|---|
| Company / community | Mozilla Public License | Apache | Ali | Apache |
| Maturity | mature | mature | Relatively mature | mature |
| Authorization method | Open Source | Open Source | Open Source | Open Source |
| development language | Erlang | Java | Java | Scala & Java |
| Client support language | It officially supports Erlang,java,Ruby, etc. the community produces multiple language API s and supports almost all commonly used languages | JAVA, C + +, pyhton,php,perl,net, etc | java,c++ | java is officially supported. The open source community has multiple language versions, such as PHP, python, go, C / C + +, ruby and node JS and other languages |
| Protocol support | Multi protocol supports AMQP,XMPP,SMTP,STOMP | OpenWire,STOMP,REST,XMPP/AMOP | Custom set | Custom protocol |
| Message batch operation | I won't support it | support | support | support |
| Message push-pull mode | Multi protocol and pull/push support | Multi protocol pull/push are supported | Multi protocol and pull/push are supported | pull |
| HA | master/slave mode | Master slave based on zookeeper+LevelDB | Support multi master mode, multi master multi slave mode and asynchronous replication mode | The replica mechanism is supported. After the leader goes down, the backup will automatically replace and the leader will be re selected |
| Data reliability | It can ensure that the data is not lost, and there is a slave backup | master/slave | Support asynchronous real-time disk brushing, synchronous disk brushing, synchronous replication and step-by-step replication | The data is reliable, with replica mechanism and fault tolerance |
| Single machine throughput | Second (10000) | Worst (10000) | Maximum (100000) | Second (level 100000) |
| Message delay | microsecond | \ | Faster than Kafka | millisecond |
| Persistence capability | Memory, files and support data accumulation, but data accumulation in turn affects the production rate | Memory, files, database files | Disk file | Disk files can accumulate unlimited messages as long as the disk capacity is enough |
| Is it orderly | You can only use one client if you want to order | Can support ordering | Orderly | Multiple client s ensure order |
| affair | support | support | support | I won't support it |
| colony | support | support | support | support |
| load balancing | support | support | support | support |
| Management interface | preferably | commonly | Command line interface | Only the command line version is officially available |
| Deployment mode | independent | independent | independent | independent |
6-1. Web page operation
After entering the web management interface, you can clearly see that there are six menu directories: Overview, Connections, Channels, Exchanges, Queues and Admin.
1. Page introduction
- Overview: overview page, which mainly introduces some basic summary information of RabbitMQ
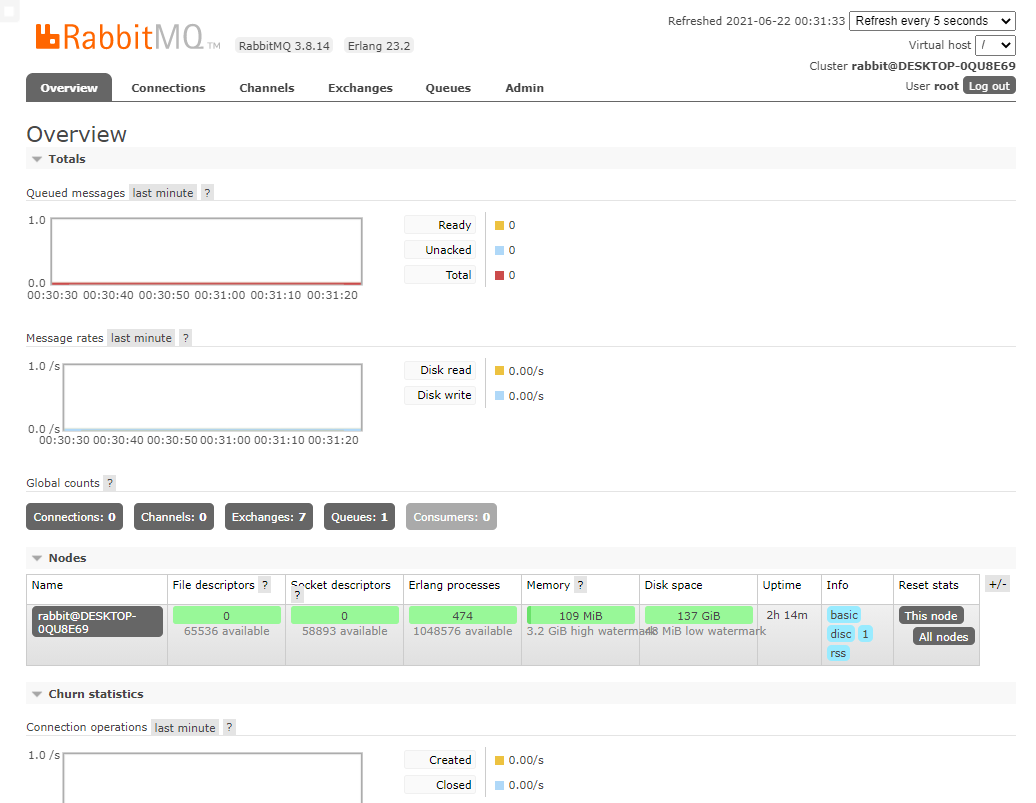
- Connections: connection pool management, which mainly introduces client connections and other information
- Channel: channel management, which mainly introduces channel connection and other information
Click a specific channel to see the corresponding consumption queue and other information
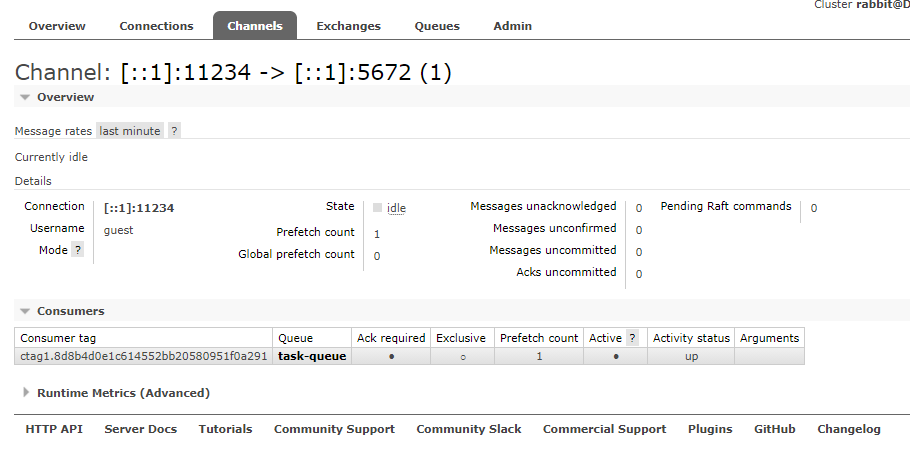
- Exchanges: switch management, which mainly introduces information such as switches
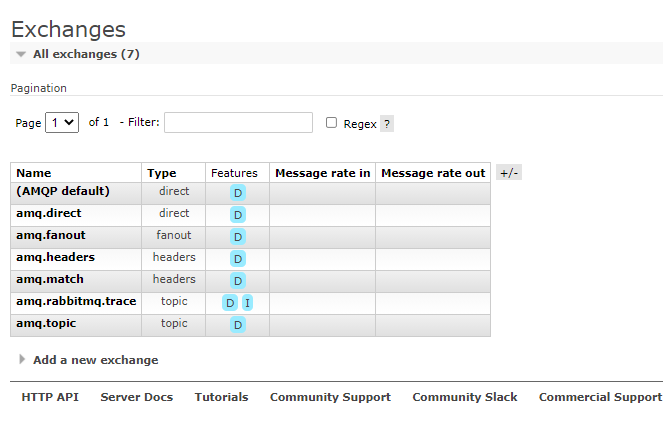
- Queues: queue management, which mainly introduces queue and other information
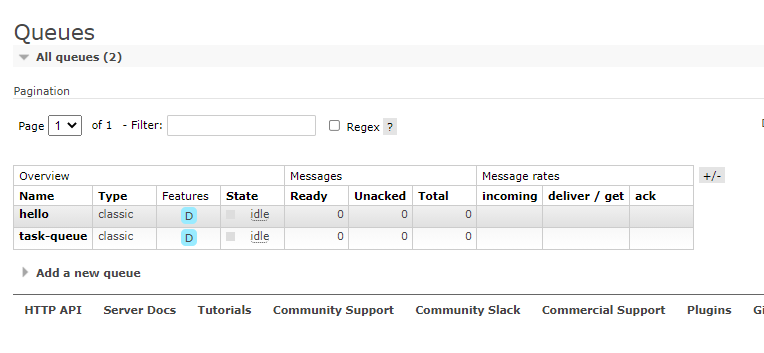
- Admin: system management, mainly including user management, virtual host, permissions and other information
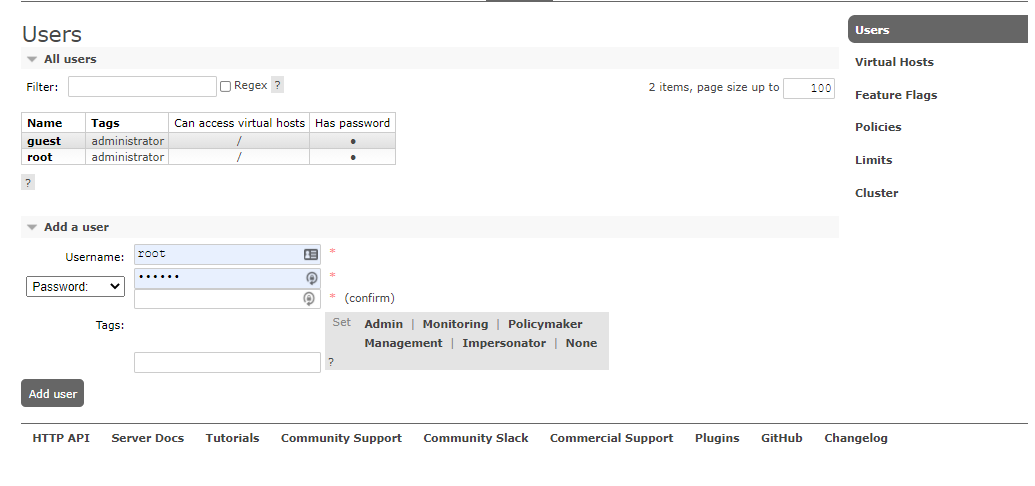
2. Exchanger management
Click to enter the Exchange page. There is an Add a new exchange tab at the bottom:
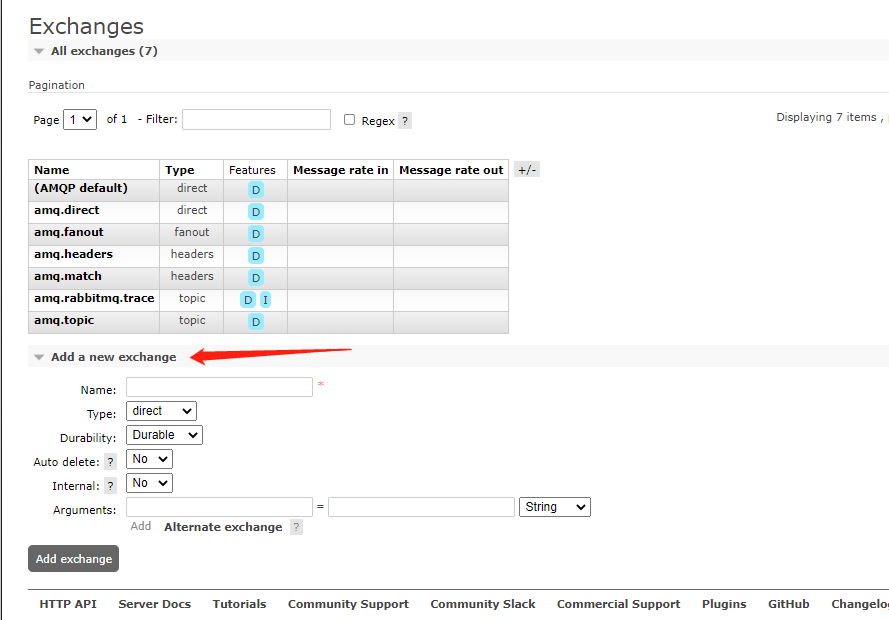
- Name: exchanger name
- Type: exchanger type
- Durable: persistent, durable: persistent, transient: not persistent
- Auto delete: whether to delete automatically. If so, when the last binding (queue or other Exchange) is unbound, the Exchange will be deleted automatically
- Internal: whether it is an internal private Exchange. If yes, it means that messages cannot be sent to this Exchange
- Argument: parameter. AMQP protocol implementation is used for extension
3. Queue management
Click to enter the Queues menu. There is also an Add a new queue tag at the bottom:
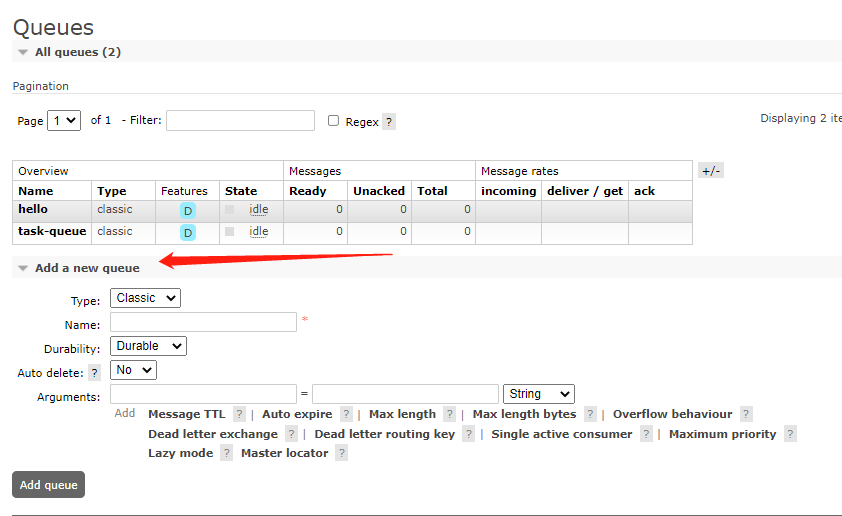
- Name: queue name
- Durability: whether to persist, Durable: persistent, Transient: not persistent
- Auto delete: whether to delete automatically. If yes, the queue will be deleted automatically when the queue content is empty
- Arguments: parameter. AMQP protocol implementation is used for extension
4. Binding
The binding relationship can be established from the Queues page or the Exchange page
If you enter from the Exchange page, the associated object is the queue. Click the corresponding Exchange to enter the details page:
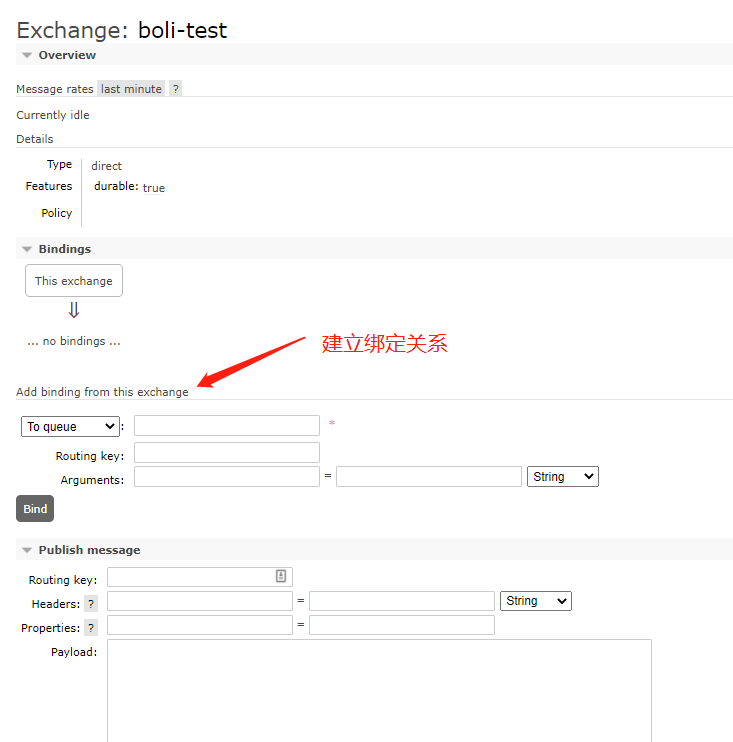
If you enter from the Queues page, the associated object is the exchange. Click the corresponding Queue to enter the details page:
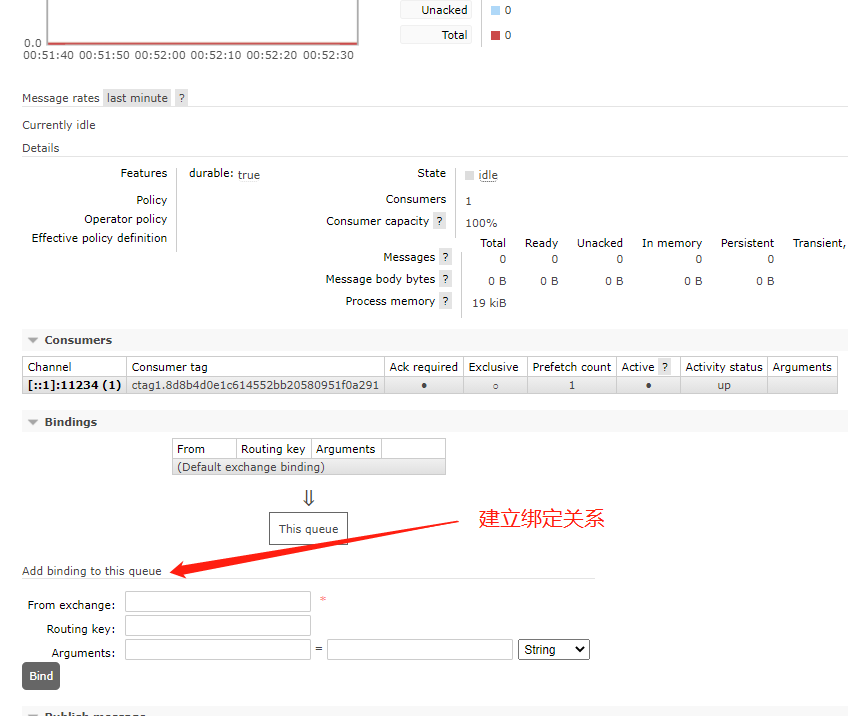
After setting up, you can see the corresponding binding relationship:
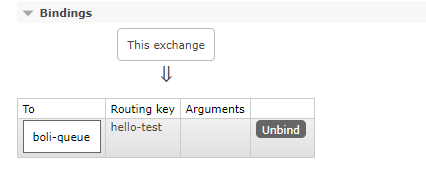
5. Send message
Send messages, either from the Queues page or from the Exchange page
On the Queue details page or Exchange details page, click the Publish message tab, fill in the corresponding routing key, and send data:
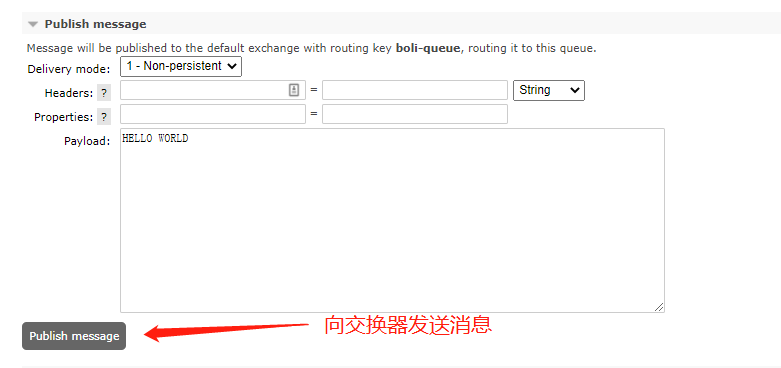
Then click the Get messages tab to get the messages in the queue: