01 expiration time TTL
The expiration time TTL indicates that the expected time can be set for the message, and within this time, it can be received and obtained by the consumer; After that, the message will be deleted automatically. RabbitMQ can set TTL for messages and queues. At present, there are two methods to set.
The first method is to set the queue attribute, and all messages in the queue have the same expiration time.
The second method is to set the message separately, and the TTL of each message can be different.
If the above two methods are used at the same time, the expiration time of the message shall be subject to the value with the smaller TTL between them. Once the lifetime of the message in the queue exceeds the set TTL value, it is called dead message. It is delivered to the dead letter queue, and the consumer will no longer receive the message.
Queue ttl
Configure ttl queue
@Configuration
public class TTLRabbitMQConfiguration {
//Switch
@Bean
public DirectExchange ttlDirectExchange(){
return new DirectExchange("ttl_direct_exchange", true, false);
}
//queue
@Bean
public Queue directTtlQueue(){
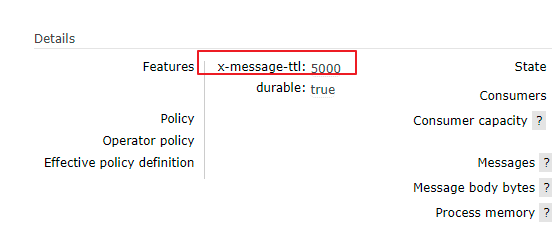
//Set expiration time
Map<String, Object> args = new HashMap<>();
args.put("x-message-ttl", 5000); //Note that this must be an int type
return new Queue("ttl.direct.queue", true, false, false, args);
}
//binding
@Bean
public Binding directTTLSmsBinding(){
return BindingBuilder.bind(directTtlQueue()).to(ttlDirectExchange()).with("ttl");
}
}
Producer method
public void makeOrderTtl(int userId, int productId, int num) {
        //1. Query whether the inventory is sufficient according to the commodity id
        //2. Save order
        String orderId = UUID.randomUUID().toString();
        System.out.println("Order production succeeded" + orderId);
        //3. Complete message distribution through MQ
        String exchangeName = "ttl_direct_exchange";
        String routingKey = "ttl";
        /*Distribution method
         * param1 Switch
         * param2 Routing key/Queue name
         * param3 Message content
         * */
        rabbitTemplate.convertAndSend(exchangeName, routingKey, orderId);
Run the tests of the producer module and send messages to the ttl queue
From the Web side, you can see that the message expires and disappears after 5 seconds

Message ttl
Add normal queue
@Bean
    public Queue directTtlMessageQueue(){

        return new Queue("ttl.message.direct.queue", true);
    }
    @Bean
    public Binding directTTLMessageBinding(){
        return BindingBuilder.bind(directTtlMessageQueue()).to(ttlDirectExchange()).with("ttlMessage");
    }
Production method
public void makeOrderTtlMessage(int userId, int productId, int num) {
        //1. Query whether the inventory is sufficient according to the commodity id
        //2. Save order
        String orderId = UUID.randomUUID().toString();
        System.out.println("Order production succeeded" + orderId);
        //3. Complete message distribution through MQ
        String exchangeName = "ttl_direct_exchange";
        String routingKey = "ttlMessage";

        //Set expiration time for messages
        MessagePostProcessor messagePostProcessor = new MessagePostProcessor() {
            @Override
            public Message postProcessMessage(Message message) throws AmqpException {
                message.getMessageProperties().setExpiration("5000");//Here is the String type
                message.getMessageProperties().setContentEncoding("UTF-8");
                return message;
            }
        };

        /*Distribution method
         * param1 Switch
         * param2 Routing key/Queue name
         * param3 Message content
         * */
        rabbitTemplate.convertAndSend(exchangeName, routingKey, orderId, messagePostProcessor);
    }
Note: the expired messages will not be moved to the dead letter queue after expiration, but the expired messages in the queue with ttl can be transferred to the dead letter queue
02 dead letter queue
DLX, fully known as dead letter exchange, can be called dead letter switch or dead letter mailbox. When a message becomes dead message in a queue, it can be re sent to another switch, which is DLX. The queue bound to DLX is called dead message queue.
The message may become a dead letter due to the following reasons:
- Message rejected
- Message expiration
- The queue has reached its maximum length
DLX is also a normal switch. It is no different from a general switch. It can be specified on any queue. In fact, it is to set the properties of a queue. When there is a dead letter in this queue, Rabbitmq will automatically republish the message to the set DLX, and then it will be routed to another queue, that is, the dead letter queue.
To use dead letter queue, you only need to set the queue parameter x-dead-letter-exchange to specify the switch when defining the queue.
Dead letter queue and switch configuration
@Configuration
public class DeadRabbitMQConfiguration {

    //Switch
    @Bean
    public DirectExchange deadDirectExchange(){
        return new DirectExchange("dead_direct_exchange", true, false);
    }

    //queue
    @Bean
    public Queue deadQueue(){
        return new Queue("dead.direct.queue", true);
    }

    //binding
    @Bean
    public Binding deadBinding(){
        return BindingBuilder.bind(deadQueue()).to(deadDirectExchange()).with("dead");
    }

}
Only ordinary switches and ordinary queues. To specify them as dead letter queues and dead letter switches, you need to specify them in ttl queue configuration
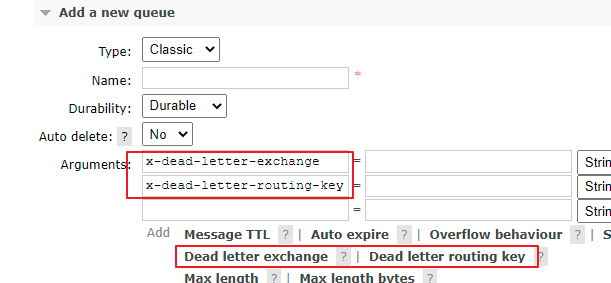
Configure these two parameters
//queue
    @Bean
    public Queue directTtlQueue(){
        //Set expiration time
        Map<String, Object> args = new HashMap<>();
        args.put("x-message-ttl", 5000); //Note that this must be an int type
        args.put("x-dead-letter-exchange", "dead_direct_exchange");
        args.put("x-dead-letter-routing-key", "dead");
        return new Queue("ttl.direct.queue", true, false, false, args);
    }

Once the queue parameter is created, an error will not be reported. Therefore, once the queue parameter is modified, it will not be overwritten
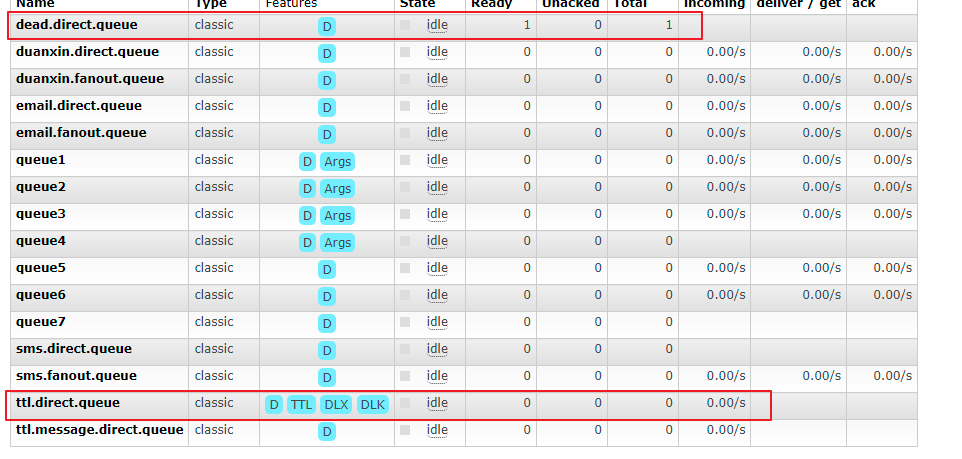
After the expiration time, TTL direct. The messages in the queue will be put into the dead letter queue
Set TTL direct. The maximum message length of the queue. If it exceeds the length, the message will be rejected and put into the private message queue
//queue
    @Bean
    public Queue directTtlQueue(){
        //Set expiration time
        Map<String, Object> args = new HashMap<>();
        //args.put("x-message-ttl", 5000); // Note that this must be an int type
        args.put("x-max-length", 5);
        args.put("x-dead-letter-exchange", "dead_direct_exchange");
        args.put("x-dead-letter-routing-key", "dead");
        return new Queue("ttl.direct.queue", true, false, false, args);
    }
Loop eleven messages
 @Test
    public void testTtlDirect(){
        for (int i = 0; i < 11; i++)
            orderService.makeOrderTtl(1, 1, 12);
    }
result:
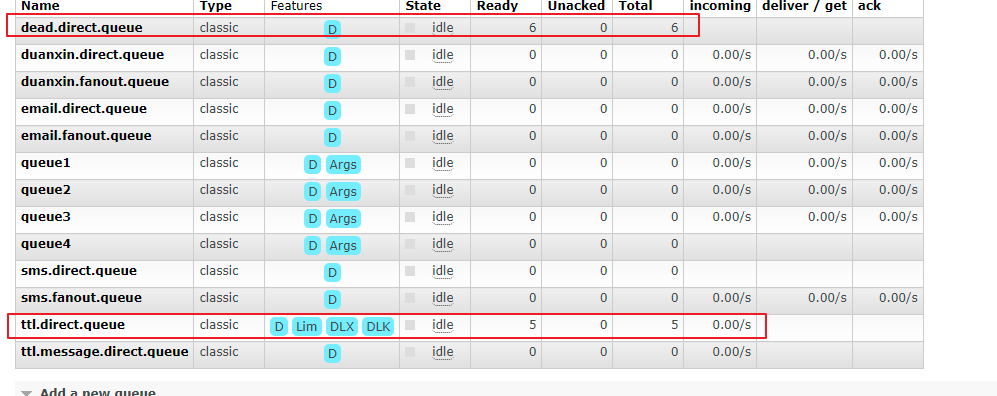
Six rejected messages were forwarded to the dead letter queue
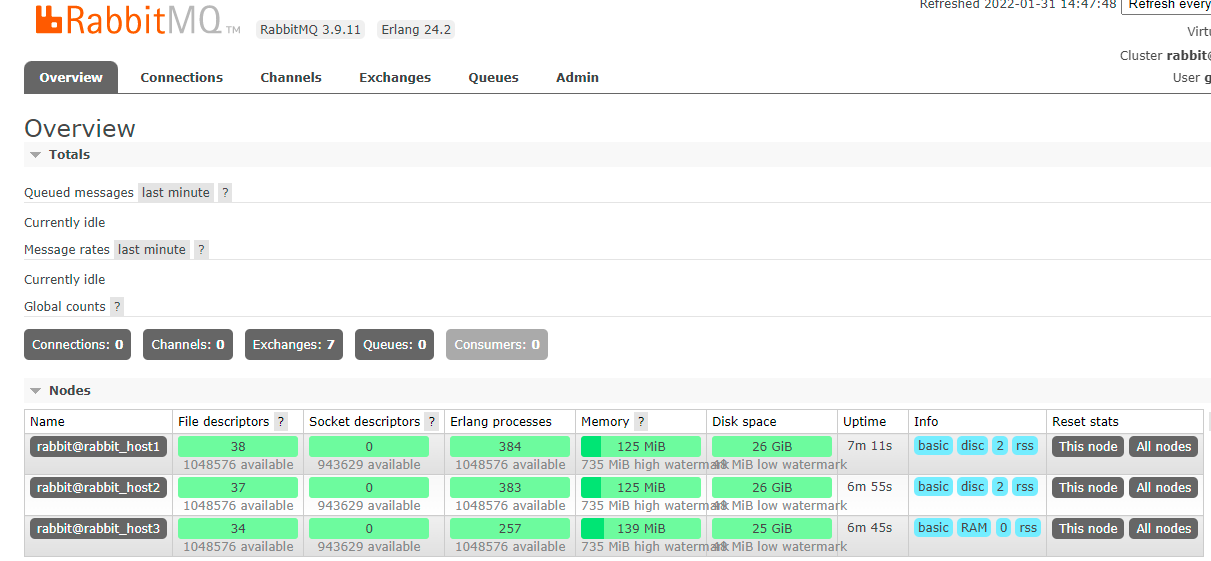
03 RabbitMQ memory disk monitoring
Memory warning for RabbitMQ
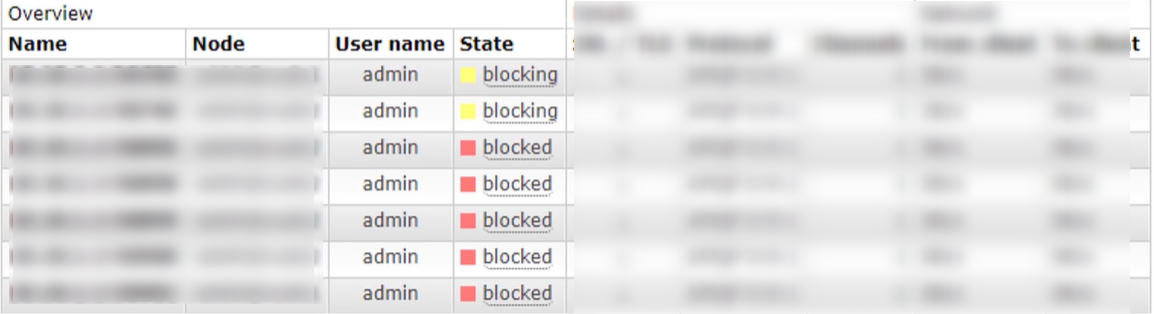
When the memory usage exceeds the configured threshold or the remaining disk space exceeds the configured threshold, RabbitMQ will temporarily block the connection of the client and stop receiving messages from the client, so as to avoid the collapse of the server, and the mentality detection mechanism between the client and the server will also fail.
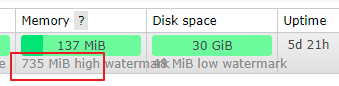
In overviews, 137MB of memory is displayed. If it reaches 735M, a warning will be given.
Persistence: the process of synchronizing data in memory to disk.
After the explosion, the message queue can no longer receive messages.
Memory control of RabbitMQ
Refer to the help documentation: https://www.rabbitmq.com/configure.html
When a warning occurs, it can be modified and adjusted through configuration
Command mode:
rabbitmqctl set_vm_memory_high_watermark <fraction>
rabbitmqctl set_vm_memory_high_watermark absolute 50MB
fraction/value is the memory threshold. The default is 0.4/2GB, which means that when the memory of RabbitMQ exceeds 40%, a warning will be generated and the connection of all producers will be blocked. The threshold value modified by this command will be invalid after the broker is restarted. The threshold value set by modifying the configuration file will not disappear with the restart, but it will take effect only after the broker is restarted as the configuration file is modified.
How to configure files:
Configuration file: / etc / rabbitmq / rabbitmq conf
#default
#vm_memory_high_watermark.relative = 0.4
# Use the relative value to set fraction. The recommended value is between 04 and 0.7, and it is not recommended to exceed 0.7
vm_memory_high_watermark.relative = 0.6
# The absolute value of absolute is used, but it is KB, MB and GB. The corresponding commands are as follows
vm_memory_high_watermark.absolute = 2GB
RabbitMQ memory page feed
Before a Broker node and memory blocking producer, it will try to page the messages in the queue to disk to free up memory space. Both persistent and non persistent messages will be written to disk. The persistent message itself has a copy in the disk, so the persistent messages will be cleared from memory during the transfer process.
By default, when the memory reaches the threshold of 50%, page feed will be processed.
In other words, when the memory threshold is 0.4 by default, when the memory exceeds 0.40.5 = 0.2, page feed will be performed.
By default, when the memory reaches the threshold of 50%, page feed will be processed.
In other words, when the memory threshold is 0.4 by default, when the memory exceeds 0.40.5 = 0.2, page feed will be performed.
You can set VM by_ memory_ high_ watermark_ paging_ Ratio to adjust.
vm_memory_high_watermark.relative = 0.4
vm_memory_high_watermark_paging_ratio = 0.7(Set a value less than 1)
Disk alert for RabbitMQ
When the remaining disk space is lower than the determined threshold, RabbitMQ will also block the producer, which can avoid the server crash caused by running out of disk space due to the continuous page change of non persistent messages.
By default: when the disk alert is 50MB, the alert will be performed. Indicates that the current disk space of 50MB will block the producer and stop the process of page feed of memory messages to the disk.
This threshold can be reduced, but it can not completely eliminate the possibility of crash caused by disk exhaustion. For example, in the gap between two disk space checks, the first check is 60MB, and the second check may be 1MB, and a warning will appear.
Modify by command:
rabbitmqctl set_disk_free_limit  <disk_limit>
rabbitmqctl set_disk_free_limit memory_limit  <fraction>
disk_limit: Fixed unit KB MB GB
fraction : Is the relative threshold. The recommended range is:1.0~2.0 between. (relative to memory)
Modify through configuration file:
disk_free_limit.relative = 3.0
disk_free_limit.absolute = 50mb
RabbitMQ cluster construction
RabbitMQ, a message queuing middleware product, is written based on Erlang. Erlang language is naturally distributed (realized by synchronizing magic cookie s of each node of Erlang cluster). Therefore, RabbitMQ naturally supports clustering. This makes it unnecessary for RabbitMQ to implement the HA scheme and save the metadata of the cluster through ZooKeeper like ActiveMQ and Kafka. Clustering is a way to ensure reliability. At the same time, it can increase message throughput through horizontal expansion.
In the actual use process, multi machine and multi instance deployment method is adopted. In order to facilitate students to practice building, sometimes you have to build a rabbitmq cluster on one machine. This chapter mainly focuses on single machine and multi instance.
Main reference official documents: https://www.rabbitmq.com/clustering.html
CentOS builds rabbitmq cluster
Installing RabbitMQ
New path:
[root@iZ8vbhcwtixrzhsn023sghZ ~]# mkdir /usr/rabbitmq -p
[root@iZ8vbhcwtixrzhsn023sghZ ~]# cd /usr/rabbitmq/
Erlang installation
wget https://packages.erlang-solutions.com/erlang-solutions-2.0-1.noarch.rpm
rpm -Uvh erlang-solutions-2.0-1.noarch.rpm
yum install -y erlang
Install Scot
yum install -y socat
Installing rabbitmq
 wget https://github.com/rabbitmq/rabbitmq-server/releases/download/v3.8.13/rabbitmq-server-3.8.13-1.el8.noarch.rpm
 rpm -Uvh rabbitmq-server-3.8.13-1.el8.noarch.rpm
Start rabbitmq
# Start service
> systemctl start rabbitmq-server
# View service status
> systemctl status rabbitmq-server
# Out of Service
> systemctl stop rabbitmq-server
# Startup service
> systemctl enable rabbitmq-server
Check whether rabbitmq is working normally
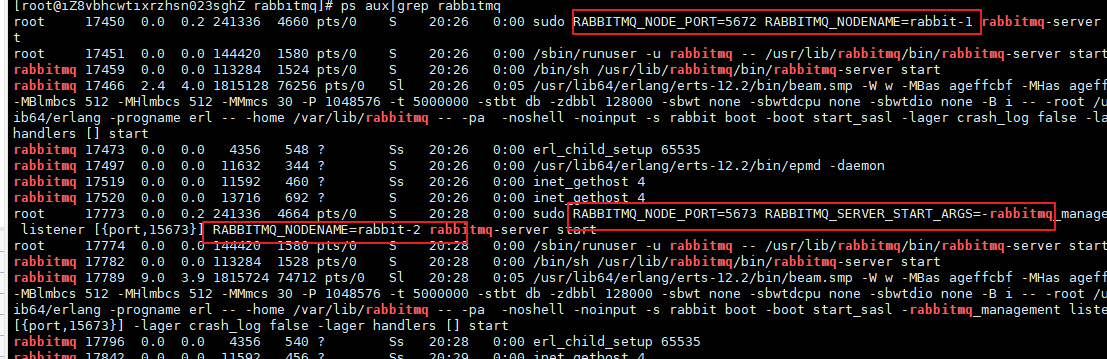
ps aux|grep rabbitmq

Stop rabbitmq
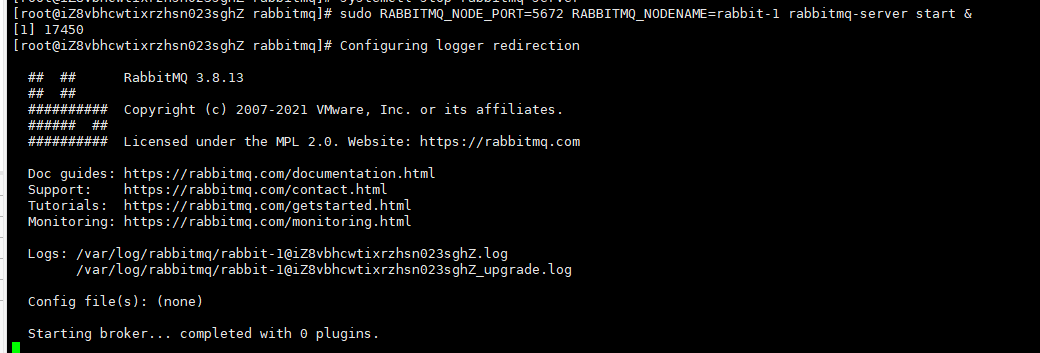
Suppose there are two rabbit MQ nodes, rabbit-1 and rabbit-2. Rabbit-1 is the master node and rabbit-2 is the slave node.
Start the first node rabbit-1
sudo RABBITMQ_NODE_PORT=5672 RABBITMQ_NODENAME=rabbit-1 rabbitmq-server start &
Start the second node rabbit-2
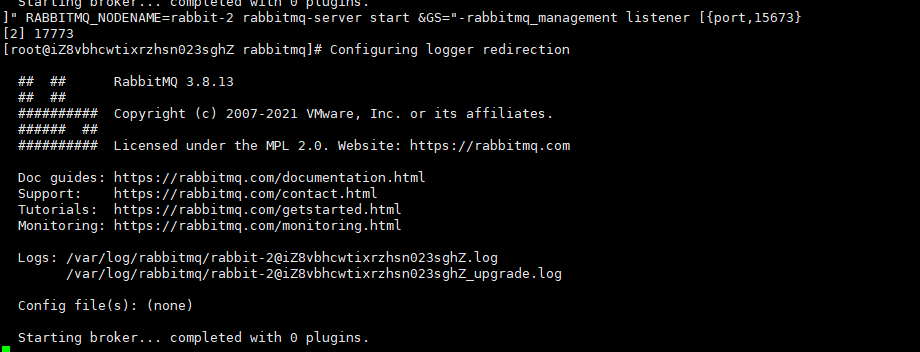
sudo RABBITMQ_NODE_PORT=5673 RABBITMQ_SERVER_START_ARGS="-rabbitmq_management listener [{port,15673}]" RABBITMQ_NODENAME=rabbit-2 rabbitmq-server start &
Review the rabbitmq process again
Use rabbit-1 as the master node
#Stop application
> sudo rabbitmqctl -n rabbit-1 stop_app
#The purpose is to clear the historical data on the node (if it is not cleared, the node cannot be added to the cluster)
> sudo rabbitmqctl -n rabbit-1 reset
#Start application
> sudo rabbitmqctl -n rabbit-1 start_app
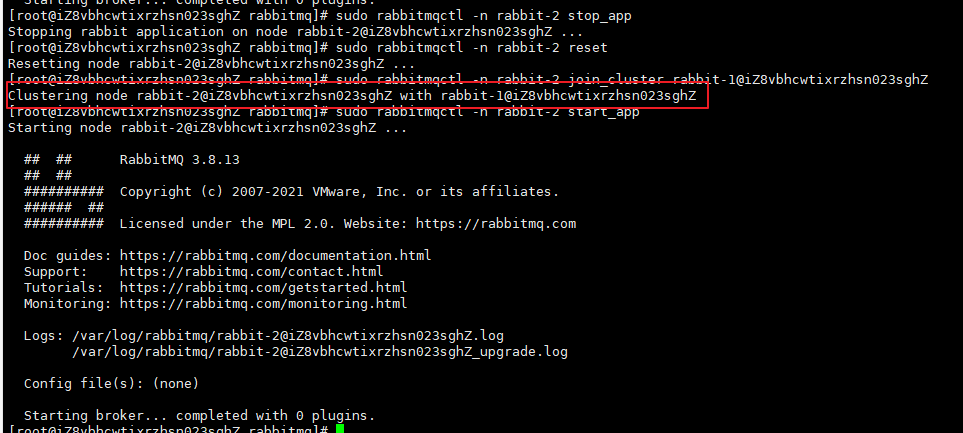
Using rabbit-2 as the slave node
# Stop application
> sudo rabbitmqctl -n rabbit-2 stop_app
# The purpose is to clear the historical data on the node (if it is not cleared, the node cannot be added to the cluster)
> sudo rabbitmqctl -n rabbit-2 reset
# Add rabbit2 node to rabbit1 cluster [host name of server node server]
> sudo rabbitmqctl -n rabbit-2 join_cluster rabbit-1@'Server-node'
# Start application
> sudo rabbitmqctl -n rabbit-2 start_app
Operate rabbitmqctl instruction on rabbitmq, - n followed by node name
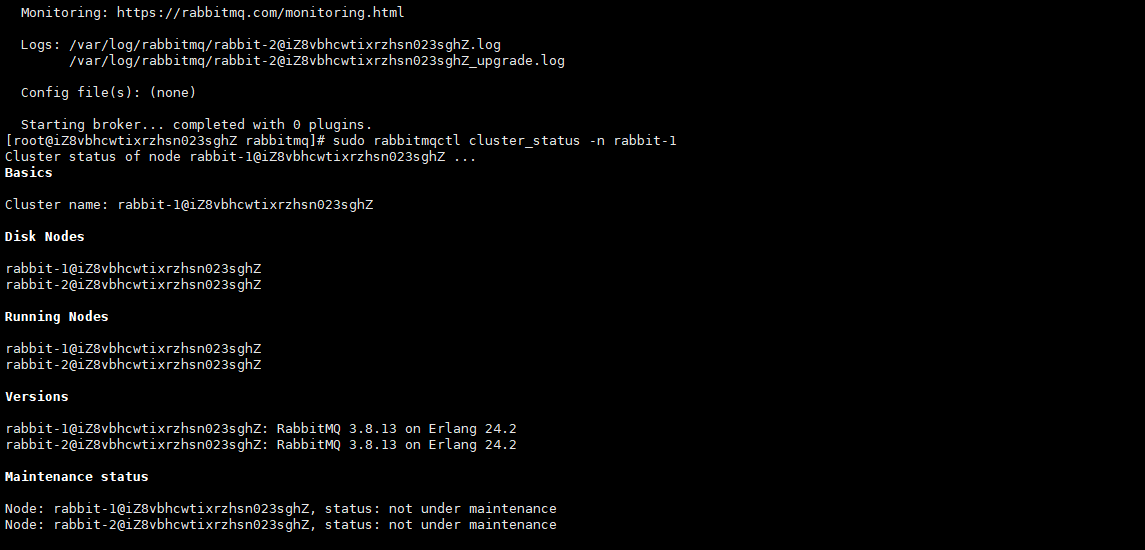
Verify cluster status
sudo rabbitmqctl cluster_status -n rabbit-1
Web view
The default is to close the Web graphical interface and open it
rabbitmq-plugins enable rabbitmq_management
Set account and password for two cluster nodes
rabbitmqctl -n rabbit-1 add_user admin admin
rabbitmqctl -n rabbit-1 set_user_tags admin administrator
rabbitmqctl -n rabbit-1 set_permissions -p / admin ".*" ".*" ".*"

rabbitmqctl -n rabbit-2 add_user admin admin
rabbitmqctl -n rabbit-2 set_user_tags admin administrator
rabbitmqctl -n rabbit-2 set_permissions -p / admin ".*" ".*" ".*"
docker builds rabbitmq cluster
Create mapped data volume directory
[root@iZ8vbhcwtixrzhsn023sghZ ~]# cd /
[root@iZ8vbhcwtixrzhsn023sghZ /]# mkdir rabbitmqcluster
[root@iZ8vbhcwtixrzhsn023sghZ /]# cd rabbitmqcluster/
[root@iZ8vbhcwtixrzhsn023sghZ rabbitmqcluster]# mkdir rabbitmq01 rabbitmq02 rabbitmq03
Create and run three rabbitmq node containers
docker run -d --hostname rabbitmq01 --name rabbitmqcluster01 -p 15672:15672 -p 5672:5672 -e RABBITMQ_ERLANG_COOKIE='rabbitmq_cookie' rabbitmq:management

docker run -d --hostname rabbitmq02 --name rabbitmqcluster02 -p 5673:5672 --link rabbitmqcluster01:rabbitmq01 -e RABBITMQ_ERLANG_COOKIE='rabbitmq_cookie' rabbitmq:management

docker run -d --hostname rabbitmq03 --name rabbitmqcluster03 -p 5674:5672 --link rabbitmqcluster01:rabbitmq01 --link rabbitmqcluster02:rabbitmq02  -e RABBITMQ_ERLANG_COOKIE='rabbitmq_cookie' rabbitmq:management
After the container is successfully started, it can be accessed
http: / / (server ip):15672
http: / / (server ip):15673
http: / / (server ip):15674
Web management interface
Container nodes join the cluster
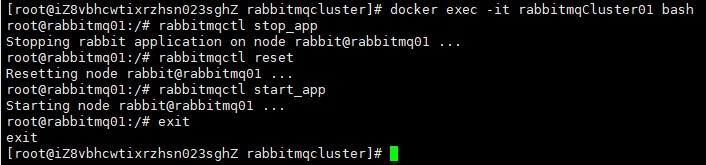
Enter the first rabbitmq node container
docker exec -it rabbitmqCluster01 bash
Complete the operation of restarting and clearing historical data
rabbitmqctl stop_app
rabbitmqctl reset
rabbitmqctl start_app
exit
Enter the second node container and execute the following command:
[root@iZ8vbhcwtixrzhsn023sghZ rabbitmqcluster]# docker exec -it rabbitmqCluster02 bash
root@rabbitmq02:/# rabbitmqctl stop_app
Stopping rabbit application on node rabbit@rabbitmq02 ...
root@rabbitmq02:/# rabbitmqctl reset
Resetting node rabbit@rabbitmq02 ...
root@rabbitmq02:/# rabbitmqctl join_cluster rabbit@rabbitmq01
Clustering node rabbit@rabbitmq02 with rabbit@rabbitmq01
root@rabbitmq02:/# rabbitmqctl start_app
Starting node rabbit@rabbitmq02 ...
 completed with 3 plugins.
root@rabbitmq02:/# exit
exit
Then there is the third node:
[root@iZ8vbhcwtixrzhsn023sghZ ~]# docker exec -it rabbitmqCluster03 bash
root@rabbitmq03:/# rabbitmqctl stop_app
Stopping rabbit application on node rabbit@rabbitmq03 ...
root@rabbitmq03:/# rabbitmqctl reset
Resetting node rabbit@rabbitmq03 ...
root@rabbitmq03:/# rabbitmqctl join_cluster --ram rabbit@rabbitmq01
Clustering node rabbit@rabbitmq03 with rabbit@rabbitmq01
root@rabbitmq03:/# rabbitmqctl start_app
Starting node rabbit@rabbitmq03 ...
 completed with 3 plugins.
root@rabbitmq03:/# exit
exit