Raytheon SpringBoot learning notes
Tip: there may be typos in the notes while watching the video. Please forgive me. Video address: https://www.bilibili.com/video/BV19K4y1L7MT?p=86&spm_id_from=pageDriver# 1, Background of the times
1. Microservice Era
-
Microservices are an architectural style
-
An application is split into a group of small services
-
Each service runs in its own process, that is, it can be deployed and upgraded independently
-
Lightweight HTTP interaction is used between services (lightweight HHTP mainly refers to REST API)
-
Services are split around business functions
-
It can be deployed independently by the fully automatic deployment mechanism
-
Decentralization and service autonomy. Services can use different languages and different storage technologies
2. Distributed
-
Distributed difficulties:
-
Remote call: generally, http is used for service interaction
-
Service discovery: it is to see which services are available
-
Load balancing: moving multiple servers
-
Service fault tolerance: how to handle various error situations
-
Configuration management: the configuration center modifies the configuration so that the services can synchronize themselves
-
Service monitoring: resource consumption and health status of multiple services and cloud platforms
-
Link tracking: a complex business process may need to call multiple microservices continuously. We need to record the operation status of each microservice involved in a complete business logic, and then display it through a visual link diagram to help software engineers analyze and solve problems in case of system errors. Common solutions include Zipkin and SkyWalking.
-
Log management: the microservice architecture stores the application logs on each microservice node by default. When the system performs user behavior analysis and data statistics, it must collect all node log data, which is very inconvenient. At this time, we need an independent log platform to collect the log data of all nodes, summarize and analyze them, and then display them visually. Common solutions are:
ELK(Elasticsearch+Logstash+Kibana),EFK(Elasticsearch+Fluentd+Kibana).
-
task scheduling
-
...
-
-
Distributed solution
SpringBoot + SpringCloud
3. Cloud primordial
-
How native applications go to the cloud. Cloud Native
-
Difficulties in going to the cloud:
-
Service self-healing: how to recover from an error in one of the services
-
Elastic scaling: allocate more servers according to different performance requirements
-
Service isolation: services do not affect each other
-
Automated Deployment: Automated Deployment
-
Gray Publishing: there are multiple servers running the same service. First deploy the service on one or two of them to see the operation effect. If there is no problem, then slowly upgrade them all
-
Flow management: control flow
-
...
-
2, springboot
- springboot official website address: https://spring.io/projects/spring-boot#overview
- View version new feature address: https://github.com/spring-projects/spring-boot/wiki#release-notes
1. Getting started with SpringBoot2
1. System requirements
- Java 8 &Compatible with Java 14
- Maven 3.3+
Modify maven's configuration file settings xml
<mirrors>
    <!-- mirror
     | Specifies a repository mirror site to use instead of a given repository. The repository that
     | this mirror serves has an ID that matches the mirrorOf element of this mirror. IDs are used
     | for inheritance and direct lookup purposes, and must be unique across the set of mirrors.
     |
    <mirror>
      <id>mirrorId</id>
      <mirrorOf>repositoryId</mirrorOf>
      <name>Human Readable Name for this Mirror.</name>
      <url>http://my.repository.com/repo/path</url>
    </mirror>
     -->
      <!--Just mirrors Add the following contents under the tag, and import and download after adding jar Faster-->
	  <mirror>
	  <id>alimaven</id>
	  <name>aliyun maven</name>
	  <url>http://maven.aliyun.com/nexus/content/groups/public/</url>
	  <mirrorOf>central</mirrorOf>
	  </mirror>
  </mirrors>

<profiles>
    <!--Just profiles Add the following under the label-->
    <profile>
        <id>jdk-1.8</id>
         <activation>
            <activeByDefault>true</activeByDefault>
            <jdk>1.8</jdk>
          </activation>
        <properties>
        <maven.compiler.source>1.8</maven.compiler.source>
        <maven.compiler.target>1.8</maven.compiler.target>
        <maven.compiler.compilerVersion>1.8</maven.compiler.compilerVersion>
        </properties>
    </profile>
  </profiles>
2,HelloWorld
Requirements: browse, send / Hello request, respond to Hello, Spring Boot 2
1. Create maven project
2. Introduce dependency
<parent>
    <groupId>org.springframework.boot</groupId>
    <artifactId>spring-boot-starter-parent</artifactId>
    <version>2.5.3</version>
    <relativePath/> <!-- lookup parent from repository -->
</parent>

<dependencies>
    <dependency>
        <!--springboot web Scenario dependency-->
        <groupId>org.springframework.boot</groupId>
        <artifactId>spring-boot-starter-web</artifactId>
    </dependency>

    <dependency>
        <!--springboot Test dependency-->
        <groupId>org.springframework.boot</groupId>
        <artifactId>spring-boot-starter-test</artifactId>
        <scope>test</scope>
    </dependency>
</dependencies>
3. Create main program
/**
 * Main program class
 * @SpringBootApplication: Tag this is a SpringBoot application
 */
@SpringBootApplication
public class Springboot_1Application {
    public static void main(String[] args) {
        SpringApplication.run(Springboot_1Application.class, args);
    }
}
4. Write business code
@RestController //Marked as controller and the class returns json
public class HelloWordController {
    @RequestMapping("/hello")
    public String handle01(){
        return "Hello, Spring Boot 2!";
    }
}
5. Run & test
- Run the MainApplication class
- Browser input http://localhost:8080/hello , will output Hello, Spring Boot 2!.
6. springboot configuration
After that, you can configure the springboot project and create the application. In the resource folder of the maven project Properties file.
All configured addresses: https://docs.spring.io/spring-boot/docs/2.3.7.RELEASE/reference/html/appendix-application-properties.html#common-application-properties-server
# Set port number access required http://localhost:8888/hello
server.port=8888
7. Simplify deployment (just print the project into a jar package and execute it directly on the target server)
Click clean and package on Maven plug-in of IDEA to package helloworld project into jar package,
The packaged jar package is generated in the target folder of the helloworld project.
Run Java - jar boot-01-helloworld-1.0-snapshot. With cmd Jar, you can run the HelloWorld project.
Execute the jar package directly on the target server.
<!-- Import dependent plug-ins -->
<build>
	<plugins>
         <!--2.3.4.RELEASE Version springboot Can not guide 2.5.3 Import required-->
        <plugin>
            <groupId>org.apache.maven.plugins</groupId>
            <artifactId>maven-resources-plugin</artifactId>
            <version>3.1.0</version>
        </plugin>

		<plugin>
			<groupId>org.springframework.boot</groupId>
			<artifactId>spring-boot-maven-plugin</artifactId>
		</plugin>
	</plugins>
</build>

2. Understand the principle of automatic configuration
1. SpringBoot features
1.1. Dependency management
1. Dependency management for parent project
<!--  springboot The parent project of a dependency is generally used for dependency management-->
<parent>
        <groupId>org.springframework.boot</groupId>
        <artifactId>spring-boot-starter-parent</artifactId>
        <version>2.5.3</version>
        <relativePath/> <!-- lookup parent from repository -->
</parent>

<!-- The above parent project depends on the following parent project, which declares the version number of almost all commonly used dependencies in development, and the automatic version arbitration mechanism-->
<parent>
    <groupId>org.springframework.boot</groupId>
    <artifactId>spring-boot-dependencies</artifactId>
    <version>2.5.3</version>
</parent>
2. Develop and import starter scenario launcher
-
1. See a lot of spring boot starters - *: * some scenarios (jdbc, tomcat, web, json, thymeleaf, etc.)
-
2. As long as the starter is introduced, we will automatically introduce all the conventional dependencies of this scenario
-
3. All scenarios supported by SpringBoot https://docs.spring.io/spring-boot/docs/current/reference/html/using-spring-boot.html#using-boot-starter
-
4. Seen * - spring boot starter: a scenario starter provided by a third party to simplify development.
- 5. The lowest level dependency of all scenario initiators
<dependency>
	<groupId>org.springframework.boot</groupId>
    <artifactId>spring-boot-starter</artifactId>
    <version>2.5.3</version>
</dependency>
3. No need to pay attention to the version number, automatic version arbitration
1. When importing dependencies, you can not write the version by default
2. When importing jar s that are not version arbitrated, write the version number. (you can search the version number in the spring-boot-dependencies.xml file. If not, you need to configure it yourself. If yes, you don't need to configure it yourself.)
4. You can modify the default version number
1. Check the key for the current dependent version specified in spring boot dependencies.
2. Rewrite the configuration in the current project
<!-- In your own project xml Configure one in propertys  Version proximity principle, in pom After modification in, first follow pom The version number in the parent class, otherwise the version in the parent class is followed.-->
<properties>
     <mysql.version>5.1.43</mysql.version>
</properties>
2.1 automatic configuration
1. Automatically configure Tomcat
- Introduce Tomcat dependency. If you want to automatically configure tomcat, you need to introduce Tomcat dependencies. However, we have already introduced the Tomcat scenario when dependency management is introduced into the web scenario.
- Configure Tomcat
<!--spring-boot-dependencies Automatically introduced Tomact rely on-->
<groupId>org.springframework.boot</groupId>
        <artifactId>spring-boot-starter-tomcat</artifactId>
        <version>2.5.3</version>
</dependency>
2. Automatically configure spring MVC
-
Introducing a full set of spring MVC components
-
Automatically configure common spring MVC components (functions)
-
As follows:
Front end controller dispatcher servlet: intercept all front-end requests;
Character encoding: solve the problem of garbled Chinese string returned;
View resolver: render the returned view;
File upload parser multipatResolver: file upload;
3. Automatically configure common Web functions, such as character coding
- SpringBoot helped us configure all the common scenarios for web development
@SpringBootApplication
public class Springboot_1Application {

    public static void main(String[] args) {
        //Return to IOC container
        ConfigurableApplicationContext run =
                SpringApplication.run(Springboot_1Application.class, args);
        //Get all components in the container
        String[] names = run.getBeanDefinitionNames();
        for (String name : names) {
            System.out.println(name);
        }
    }
}

4. Default package structure
-
The components in the package where the main program is located and all its sub packages will be scanned by default. This is particularly important. Be sure to put the main program in the right position, otherwise it will not be scanned. For example, the main program is on COM pj. Under the boot package, all classes marked with component annotations under the package or sub package will be automatically scanned
-
No previous package scan configuration is required
-
Want to change the scan path
@SpringBootApplication(scanBasePackages="com.lun")
@ComponentScan specifies the scan path -
@SpringBootApplication is equivalent to
@Springbootconfiguration (declared as a configuration class, which will be scanned into the container)
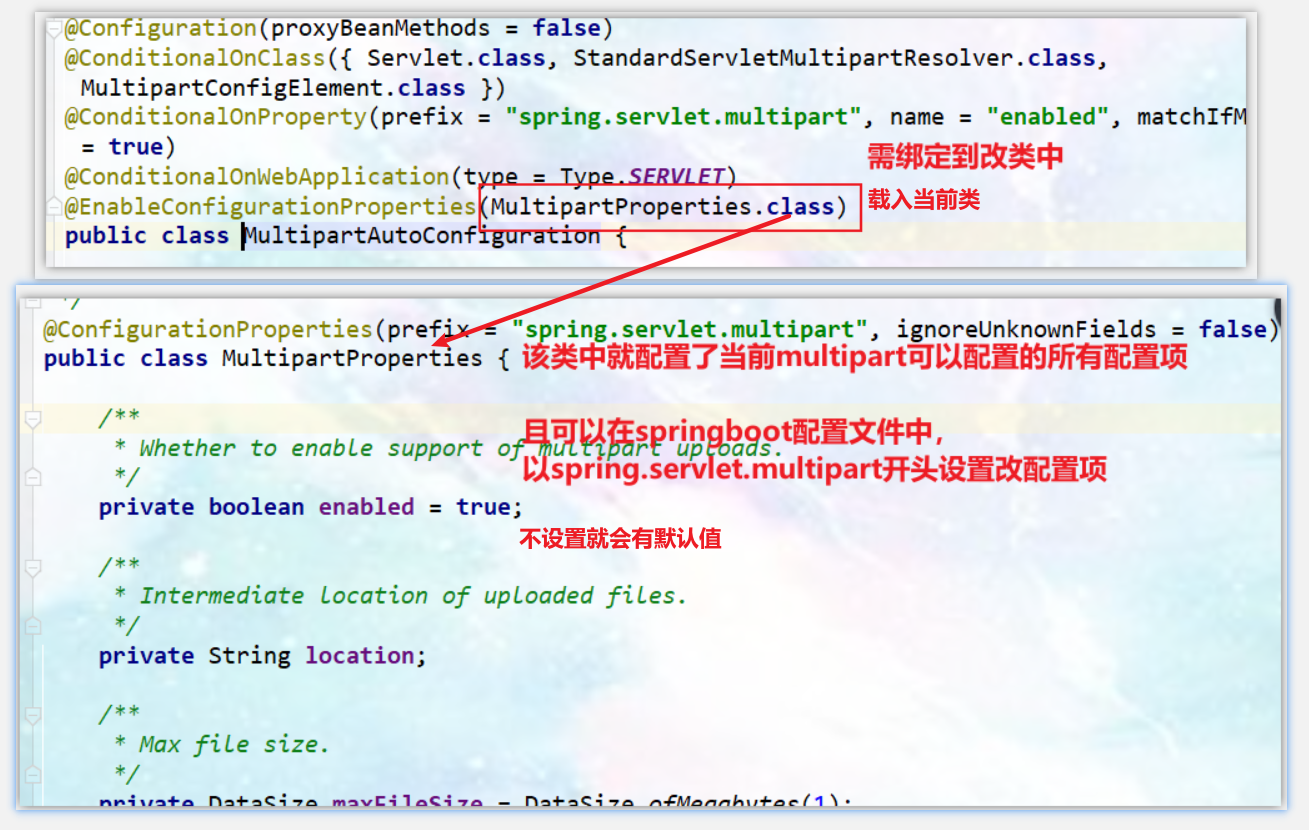
@Enableautoconfiguration (automatically load all beans required by the application) @ enableconfigurationproperties (MultipartProperties. Class) will load MultipartProperties into the current class
@ComponentScan("com.lun") (scan path)
5. Various configurations have default values
-
-
The default configuration is ultimately mapped to a class, such as MultipartProperties
-
The value of the configuration file will eventually be bound to a class that will create objects in the container
-
6. Load all auto configuration items on demand
-
-
There are many starters, such as starter web and starter batch
-
What scenarios are introduced and the automatic configuration of this scenario will be enabled
<!--Introducing batch scenarios-->
<dependency>
    <groupId>org.springframework.boot</groupId>
    <artifactId>spring-boot-starter-batch</artifactId>
    <version>2.4.4</version>
</dependency>
-
-
-
All auto configuration functions of spring boot are in the spring boot autoconfigure package (all auto configuration functions of spring boot depend on
@EnableAutoConfiguration)
-
3. Container function (com.pj.boot.container code is all under the package change)
2.1. Component addition
1,@Configuration
-
Basic use
Full mode and Lite mode: -
Full mode and Lite mode are for spring configuration and have nothing to do with xml configuration.
-
When is Lite mode:
- 1. There is @ Component annotation on the class
- 2. There is @ ComponentScan annotation on the class
- 3. There is @ Import annotation on the class
- 4. There is @ ImportResource annotation on the class
- 5. There are no annotations on the class, but there are @ Bean methods in the class
- 6. There is @ Configuration(proxyBeanMethods = false) annotation on the class
Lite summary: there is no need to generate CGLIB subclasses at runtime, which can improve running performance and reduce startup time. It can be used as a common class. However, dependencies between @ beans cannot be declared
- When is Full mode:
Classes marked with @ Configuration or @ Configuration(proxyBeanMethods = true) are called Configuration classes in Full mode.
Summary of Full mode: single case mode can effectively avoid errors in Lite mode. Performance without Lite mode
-
code
- TestMyConfigConfiguration startup class
//@The SpringBootApplication annotation is equivalent to the following three annotations @ SpringBootApplication(exclude = {RedisAutoConfiguration.class}) / / automatic configuration of items
@SpringBootConfiguration
@EnableAutoConfiguration
@ComponentScan(basePackages = "com.pj.boot")
public class Springboot_1Application {

    public static void main(String[] args) {
        //Return to IOC container
        ConfigurableApplicationContext run =
                SpringApplication.run(Springboot_1Application.class, args);
        //Get all components in the container
        String[] names = run.getBeanDefinitionNames();
        for (String name : names) {
            System.out.println(name);
        }

        System.out.println("======container======");
        //Get component from container
        User user01 = run.getBean("user01", User.class);
        User user02 = run.getBean("user01", User.class);
        //If the @ Configuration(proxyBeanMethod = true) proxy object calls the method, springboot will always check whether the component has a single instance of the component in the container
        //It is true under full and under lite, because the objects in the container are the same object
        System.out.println("container:user01 == user02;"+ (user01 == user02));

            MyConfig myconfig = run.getBean(MyConfig.class);
            /*
               full : myconfigcom.pj.boot.container.config.MyConfig$$EnhancerBySpringCGLIB$$ead26534@5308decf  proxy class
                lite : myconfigcom.pj.boot.container.config.MyConfig@4e2eb16  If it is not a proxy object, it will directly call the method to new an object
             */
            System.out.println("myconfig"+myconfig);

           User user011 = myconfig.user01();
            User user012 = myconfig.user01();
            //If it is true under full and false under lite, configuring class objects to call methods will produce different effects
            System.out.println("container:user011 == user012: "+ (user011 == user012));

            Pet pet = run.getBean("pet", Pet.class);
            Pet pet2 = run.getBean("pet", Pet.class);
           //It is true under full and under lite, because the objects in the container are the same object 							 System.out.println("container:pet == pet2: "+ (pet == pet2));

            //true under full and false under lite. When there is a dependency between classes, use full mode to ensure a single instance of the object (the proxy class will be used to check whether there is the object). If there is no dependency, use lite mode to ensure faster springboot startup
           System.out.println("container:user01.getPet()==pet: "+(user01.getPet()==pet));
          }
    }
- MyConfigConfiguration configuration class
/*
  @Configuration : Mark as a configuration class
  Custom configuration class
     1,In the configuration class, the @ bean tag is used to register components on the method to the container. By default, it is single instance (if the @ bean method is marked, only one object will be generated in the container, regardless of whether proxyBeanMethods is true or false)
     2,The configuration class itself is also a component and will be scanned into the container
     3,proxyBeanMethods: The method container object of the proxy bean calls different methods, that is, the method called by the MyConfig class is different
          full: (proxyBeanMethods = true) How many times each @ bena method is called and the returned component is guaranteed to be single instance
          lite:(proxyBeanMethods = false) How many times is each @ bean method called and the returned component is newly created
*/
@Configuration(proxyBeanMethods = true) //Tell springboot that this is a configuration class = = configuration file
public class MyConfig {
  /**
   * full (proxyBeanMethods = true): No matter how many external method calls are made to this component in the configuration class, the single instance object in the previous registration container is obtained
   * lite (proxyBeanMethods = false): External acquisition is a new object at a time
   * @return
   */
  @Bean //Add components to the container. Take the method name as the id of the component. The return type is the component type, and the return value is the instance of the component in the container
  public User user01(){
      User zs = new User(1 ,"Zhang San",12);
      //Container user dependent component pet
      zs.setPet(pet());
      return zs;
  }

  @Bean(value = "pet") //By default, the method name is used as the id of the component. You can also customize the component id value = "component name"
  public Pet pet(){
      Pet pet = new Pet(1,"tom");
      return pet;
  }
}

3. Example
Best practical configuration
1. Configure that there is no dependency between class components. Use Lite mode to speed up the container startup process and reduce judgment (when a pojo depends on the default pojo, an object may need another object, and check whether there are registered instances in the container)
2. There are dependencies between configuration class components. The method will be called to get the previous single instance component. Use the Full mode (Full should be checked every time, which will be slow, Lite does not check every time, and fast)
2,@Bean,@Component,@Controller,@Service,@Repository
They are the basic labels of Spring, and their original functions have not been changed in Spring Boot.
3,@ComponentScan,@Import
-
@ ComponentScan: @ComponentScan(basePackages = "com.pj.boot") scans all components under the specified package
-
The advantage of @ Import is that external classes can be introduced to Import a component into the container
-
code
-
MyConfigImport configuration class
/* @Import({User.class, DBHelper.class}) : The User and DBHelper are loaded into the container */ @Import({User.class, DBHelper.class}) @Configuration public class MyConfigImport { } -
TestMyConfigConfiguration startup class (add the following code)
System.out.println("======TestMyConfigImport======"); DBHelper dbHelper = run.getBean(DBHelper.class); //TestMyConfigImport:dbHelper:ch.qos.logback.core.db.DBHelper@4a81af81 System.out.println("TestMyConfigImport:dbHelper:"+dbHelper); -
Imported classes
-

4,@Conditional
-
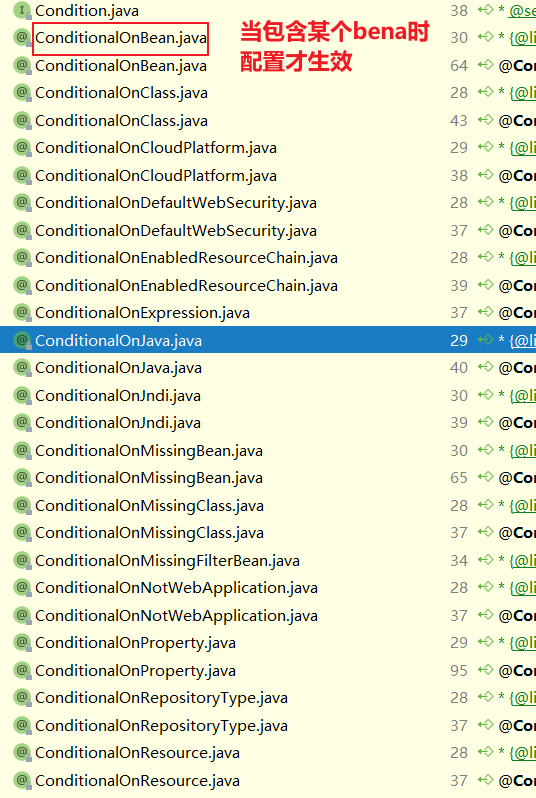
Conditional assembly: component injection is performed when the conditions specified in conditional are met
-
It is placed on the configuration class to indicate that the components in the configuration class will take effect only when the conditions in the container are met; When it is placed on the configuration method, it means that the configuration method will take effect only when the conditions are met;
-
-
Code and results
-
MyConfigImport test Conditional
/* @Import({User.class, DBHelper.class}) : The User and DBHelper are loaded into the container */ @Import({User.class, DBHelper.class}) @Configuration @ConditionalOnMissingBean(name = "pet") //Only the bean MyConfigImport configuration class without pet name in the container can take effect. The pet component id is injected into MyConfigConfiguration, so there will be no DBHelper and User in the current class. If the pet1 component id injected into MyConfigConfiguration will have DBHelper and User public class MyConfigImport { } -
Does MyConfigConfiguration put pet with component id into the container
@Configuration(proxyBeanMethods = true) //Tell springboot that this is a configuration class = = configuration file public class MyConfigConfiguration { @Bean(value = "pet") //Fill the container with pet // @Bean(value = "pet1") / / inject pet1 into the container public Pet pet(){ Pet pet = new Pet(1,"tom"); return pet; } } -
Main program test class
System.out.println("======TestConditional======"); DBHelper dbHelper = run.getBean(DBHelper.class); //Get DBHlper System.out.println("TestMyConfigImport:dbHelper:"+dbHelper); -
There is a result with component id pet in the container

-
There is no result with component id pet in the container
-

2.2. Importing native configuration files
1. Meaning:
Refer to The configuration file at the end of xml is parsed by SpringBoot after being imported through @ ImportResource to complete the corresponding component registration location: above the main configuration class
2. @ ImportResource import Spring configuration file
-
@Import resource ("classpath:beans.xml"): import the spring configuration file to take effect. For example, the company uses bean.xml XML file generates configuration beans, but you want to continue reusing beans in order to save trouble XML, @ ImportResource.
-
Code and results
-
MyConfigImport import configuration file
@ImportResource("classpath:beans.xml") //The beans. In the classpath will be automatically The contents of the XML configuration file are loaded into the container //@ImportResource("classpath:com/pj/boot/container/resource/beans.xml") public class MyConfigImport { } -
TestMyConfigConfiguration startup class test
System.out.println("======TestImportResource======"); User haha = run.getBean("haha", User.class); System.out.println(haha); System.out.println(run.getBean("hehe", Pet.class)); -
bean.xml
<?xml version="1.0" encoding="UTF-8"?> <beans xmlns="http://www.springframework.org/schema/beans" xmlns:xsi="http://www.w3.org/2001/XMLSchema-instance" xsi:schemaLocation="http://www.springframework.org/schema/beans http://www.springframework.org/schema/beans/spring-beans.xsd"> <bean id="haha" class="com.pj.boot.container.pojo.User"> <property name="name" value="zhangsan"></property> <property name="age" value="18"></property> </bean> <bean id="hehe" class="com.pj.boot.container.pojo.Pet"> <property name="name" value="tomcat"></property> </bean> </beans> -
result

-
2.3. Configure binding
1. Meaning:
How to use java to read the contents of the properties file and encapsulate it into a JavaBean for ready use. Scene example: we are used to writing things that often change in the The properties configuration file, such as database related information (connection pool, URL, etc.) is configured into the configuration file. For convenience, we will parse the contents of the configuration file into JavaBeans. This process is cumbersome to use Java native code.
2. Native traditional way to get configuration files
/*
    Get the properties file in a native way
 */
public class TestProperties {
    public static void main(String[] args) throws IOException {
        Properties properties = new Properties();
        properties.load(new FileInputStream("a.properties"));
        Enumeration<String > enumeration = (Enumeration<String>) properties.propertyNames();
        while (enumeration.hasMoreElements()){
            String  key = enumeration.nextElement();
            String value = properties.getProperty(key);
            System.out.println(key +"="+value);
            //Encapsulate to bean
        }
    }
}
3. Spring Boot configuration binding: the first implementation method: @ Component + @ConfigurationProperties
-
Entity class Car
/* Configure binding test pojo Only the components in the container can have the powerful functions provided by SpringBoot */ @Component //It must be injected into the container, otherwise the following comments will report an error @ConfigurationProperties(prefix = "mycar") //Inject the items starting with mycar in the configuration file into the modified pojo to enable the Car configuration binding function public class Car { private int id; private String name; private int age; } -
Test class
System.out.println("======Test Auto configuration ConfigurationProperties======");
/*
======Test Automatically configure ConfigurationProperties======
Test Autoconfigurationproperties: carcom pj. boot. container. pojo. Car@4258c97a
*/
System.out.println("Test Auto configuration ConfigurationProperties:car"+run.getBean(Car.class));
-
application.properties configuration file
#Inject attribute values into pojo car
mycar.id=1
mycar.name=xiaohu
mycar.age=12
4. Spring Boot configuration binding: the second implementation method: @ EnableConfigurationProperties + @ConfigurationProperties
-
Entity class Car
/* Configure binding test pojo Only the components in the container can have the powerful functions provided by SpringBoot */ @ConfigurationProperties(prefix = "mycar") //Inject the items starting with mycar in the configuration file into the modified pojo to enable the Car configuration binding function 0 public class Car { private int id; private String name; private int age; } -
Configuration class MyConfigImport
@Configuration
@EnableConfigurationProperties({Car.class}) //  The Car component is automatically registered in the container. It must be marked as a configuration class or startup class before it can be used, because it will be loaded into the container. If it is not loaded into the container, an exception will be thrown
public class MyConfigImport {
}
2.4 principle of automatic configuration
1. Boot load auto configuration class (SpringBootApplication)
-
@SpringBootApplication source code
@SpringBootConfiguration //Marked as a Configuration class annotation, @ Configuration @ SpringBootConfiguration is used in the source code, which is only an alternative to the Spring standard @ Configuration annotation. The only difference between the two is that @ SpringBootConfiguration allows Configuration to be found automatically. @EnableAutoConfiguration @ComponentScan(excludeFilters = { @Filter(type = FilterType.CUSTOM, classes = TypeExcludeFilter.class), @Filter(type = FilterType.CUSTOM, classes = AutoConfigurationExcludeFilter.class) }) //Specify which spring annotations to scan public @interface SpringBootApplication {} -
@SpringBootConfiguration source code
@Configuration //Mark as a configuration class @Indexed public @interface SpringBootConfiguration {} -
@EnableAutoConfiguration source code
@AutoConfigurationPackage @Import(AutoConfigurationImportSelector.class) public @interface EnableAutoConfiguration {}-
Key analysis
@AutoConfigurationPackage,@Import(AutoConfigurationImportSelector.class)`.
-
@The label name of AutoConfigurationPackage is translated into: autoconfiguration package, which specifies the default package rules. Principle of automatic package rule
@Target(ElementType.TYPE) @Retention(RetentionPolicy.RUNTIME) @Documented @Inherited @Import(AutoConfigurationPackages.Registrar.class) //Import a component into the container, use @ import to import the Registrar class under the AutoConfigurationPackages package into the container as a component, and then use the methods in the Registrar to complete the component registration in batches. public @interface AutoConfigurationPackage { String[] basePackages() default {}; Class<?>[] basePackageClasses() default {}; }-
Use the Registrar to import a series of components into the container
-
Important source code of AutoConfigurationPackages class
//This class will scan all components under the package where the startup class is located static class Registrar implements ImportBeanDefinitionRegistrar, DeterminableImports { @Override /* metadate Parameter refers to the annotation source new PackaImports(metadata)Import components in package getPackageNames()Get package name toArray Encapsulate into an array. Finally registered */ public void registerBeanDefinitions(AnnotationMetadata metadata, BeanDefinitionRegistry registry) { register(registry, new PackageImports(metadata).getPackageNames().toArray(new String[0])); } } -
Import all components under a specified package into the package where MainApplication is located.
-
-
@Import(AutoConfigurationImportSelector.class)`.
-
Use getautoconfigurationentry (annotation metadata); Batch import some components into the container and initially load the automatic configuration class
-
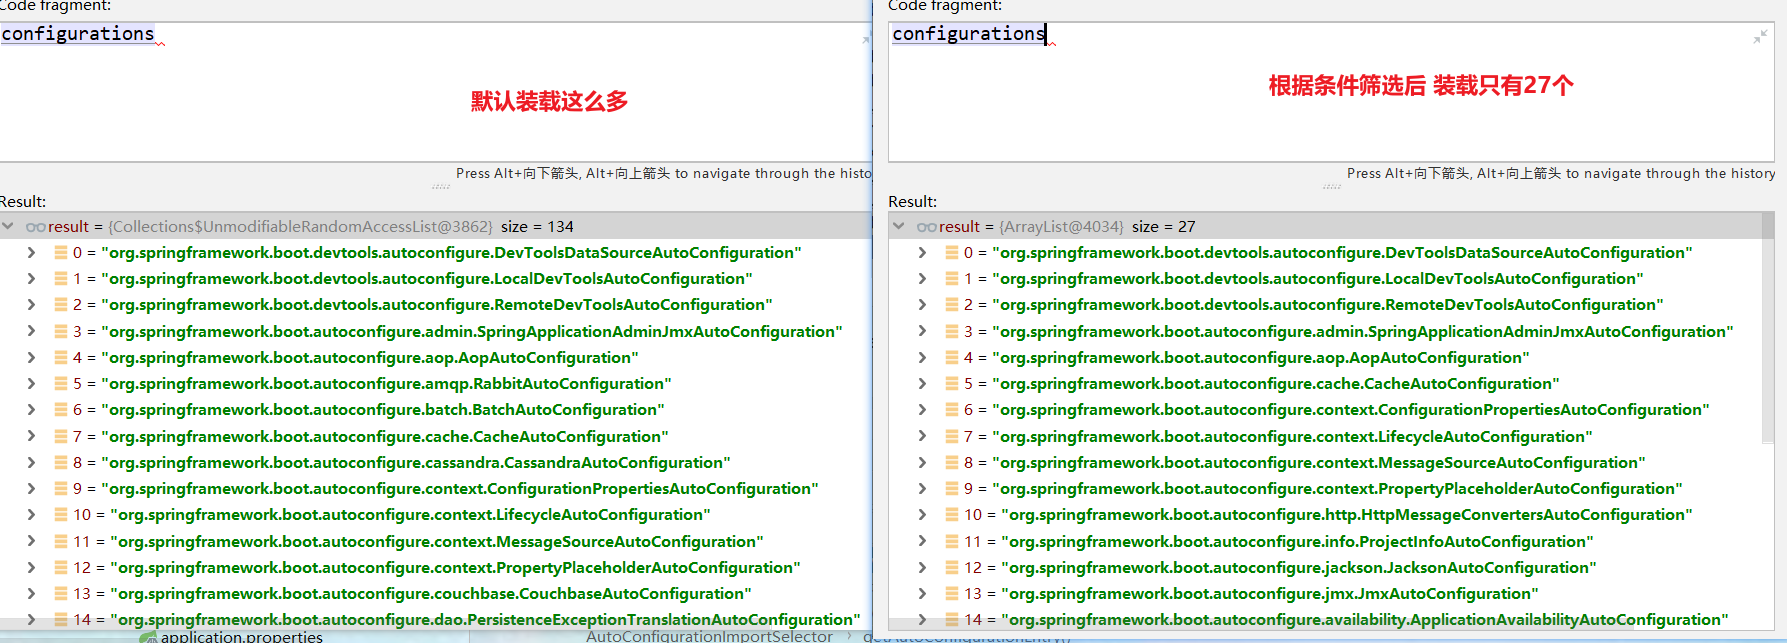
Call list configurations = getcandidateconfigurations (annotation metadata, attributes) to get all 134 configuration classes that need to be imported into the container for automatic assembly
-
Use the factory to load map < string, list > loadspringfactories (@ nullable classloader classloader); Get all the components
-
From meta-inf / spring Factories location to load a file.
-
Scan all meta-inf / spring.net files in our current system by default Files in the factories location
-
spring-boot-autoconfigure-2.3.4. RELEASE. Meta-inf / spring. Jar package also contains meta-inf factories
# It is written in the file that all configuration classes to be loaded into the container as soon as spring boot is started
# spring-boot-autoconfigure-2.3.4.RELEASE.jar/META-INF/spring.factories
# Auto Configure
org.springframework.boot.autoconfigure.EnableAutoConfiguration=\
org.springframework.boot.autoconfigure.admin.SpringApplicationAdminJmxAutoConfiguration,\
org.springframework.boot.autoconfigure.aop.AopAutoConfiguration,\
...
-
-
General process

-
-
2. Turn on automatic configuration items on demand
Although all automatic configurations of 134 scenarios (with different versions and different loading numbers) are loaded by default when they are started, xxxautoconfiguration will be configured on demand according to the Conditional assembly rules (@ Conditional), such as aopaoutoconfiguration class:.
 #Auto Configure loads all classes by default. There may be other auto configuration classes in 131 files
org.springframework.boot.autoconfigure.EnableAutoConfiguration=\
org.springframework.boot.autoconfigure.admin.SpringApplicationAdminJmxAutoConfiguration,\
org.springframework.boot.autoconfigure.aop.AopAutoConfiguration,\
org.springframework.boot.autoconfigure.amqp.RabbitAutoConfiguration,\
org.springframework.boot.autoconfigure.batch.BatchAutoConfiguration,\
org.springframework.boot.autoconfigure.cache.CacheAutoConfiguration,\
org.springframework.boot.autoconfigure.cassandra.CassandraAutoConfiguration,\
org.springframework.boot.autoconfigure.context.ConfigurationPropertiesAutoConfiguration,\
org.springframework.boot.autoconfigure.context.LifecycleAutoConfiguration,\
org.springframework.boot.autoconfigure.context.MessageSourceAutoConfiguration,\
org.springframework.boot.autoconfigure.context.PropertyPlaceholderAutoConfiguration,\
org.springframework.boot.autoconfigure.couchbase.CouchbaseAutoConfiguration,\
org.springframework.boot.autoconfigure.dao.PersistenceExceptionTranslationAutoConfiguration,\
org.springframework.boot.autoconfigure.data.cassandra.CassandraDataAutoConfiguration,\
org.springframework.boot.autoconfigure.data.cassandra.CassandraReactiveDataAutoConfiguration,\
org.springframework.boot.autoconfigure.data.cassandra.CassandraReactiveRepositoriesAutoConfiguration,\
org.springframework.boot.autoconfigure.data.cassandra.CassandraRepositoriesAutoConfiguration,\
org.springframework.boot.autoconfigure.data.couchbase.CouchbaseDataAutoConfiguration,\
org.springframework.boot.autoconfigure.data.couchbase.CouchbaseReactiveDataAutoConfiguration,\
org.springframework.boot.autoconfigure.data.couchbase.CouchbaseReactiveRepositoriesAutoConfiguration,\
org.springframework.boot.autoconfigure.data.couchbase.CouchbaseRepositoriesAutoConfiguration,\
org.springframework.boot.autoconfigure.data.elasticsearch.ElasticsearchDataAutoConfiguration,\
org.springframework.boot.autoconfigure.data.elasticsearch.ElasticsearchRepositoriesAutoConfiguration,\
org.springframework.boot.autoconfigure.data.elasticsearch.ReactiveElasticsearchRepositoriesAutoConfiguration,\
org.springframework.boot.autoconfigure.data.elasticsearch.ReactiveElasticsearchRestClientAutoConfiguration,\
org.springframework.boot.autoconfigure.data.jdbc.JdbcRepositoriesAutoConfiguration,\
org.springframework.boot.autoconfigure.data.jpa.JpaRepositoriesAutoConfiguration,\
org.springframework.boot.autoconfigure.data.ldap.LdapRepositoriesAutoConfiguration,\
org.springframework.boot.autoconfigure.data.mongo.MongoDataAutoConfiguration,\
org.springframework.boot.autoconfigure.data.mongo.MongoReactiveDataAutoConfiguration,\
org.springframework.boot.autoconfigure.data.mongo.MongoReactiveRepositoriesAutoConfiguration,\
org.springframework.boot.autoconfigure.data.mongo.MongoRepositoriesAutoConfiguration,\
org.springframework.boot.autoconfigure.data.neo4j.Neo4jDataAutoConfiguration,\
org.springframework.boot.autoconfigure.data.neo4j.Neo4jReactiveDataAutoConfiguration,\
org.springframework.boot.autoconfigure.data.neo4j.Neo4jReactiveRepositoriesAutoConfiguration,\
org.springframework.boot.autoconfigure.data.neo4j.Neo4jRepositoriesAutoConfiguration,\
org.springframework.boot.autoconfigure.data.r2dbc.R2dbcDataAutoConfiguration,\
org.springframework.boot.autoconfigure.data.r2dbc.R2dbcRepositoriesAutoConfiguration,\
org.springframework.boot.autoconfigure.data.redis.RedisAutoConfiguration,\
org.springframework.boot.autoconfigure.data.redis.RedisReactiveAutoConfiguration,\
org.springframework.boot.autoconfigure.data.redis.RedisRepositoriesAutoConfiguration,\
org.springframework.boot.autoconfigure.data.rest.RepositoryRestMvcAutoConfiguration,\
org.springframework.boot.autoconfigure.data.web.SpringDataWebAutoConfiguration,\
org.springframework.boot.autoconfigure.elasticsearch.ElasticsearchRestClientAutoConfiguration,\
org.springframework.boot.autoconfigure.flyway.FlywayAutoConfiguration,\
org.springframework.boot.autoconfigure.freemarker.FreeMarkerAutoConfiguration,\
org.springframework.boot.autoconfigure.groovy.template.GroovyTemplateAutoConfiguration,\
org.springframework.boot.autoconfigure.gson.GsonAutoConfiguration,\
org.springframework.boot.autoconfigure.h2.H2ConsoleAutoConfiguration,\
org.springframework.boot.autoconfigure.hateoas.HypermediaAutoConfiguration,\
org.springframework.boot.autoconfigure.hazelcast.HazelcastAutoConfiguration,\
org.springframework.boot.autoconfigure.hazelcast.HazelcastJpaDependencyAutoConfiguration,\
org.springframework.boot.autoconfigure.http.HttpMessageConvertersAutoConfiguration,\
org.springframework.boot.autoconfigure.http.codec.CodecsAutoConfiguration,\
org.springframework.boot.autoconfigure.influx.InfluxDbAutoConfiguration,\
org.springframework.boot.autoconfigure.info.ProjectInfoAutoConfiguration,\
org.springframework.boot.autoconfigure.integration.IntegrationAutoConfiguration,\
org.springframework.boot.autoconfigure.jackson.JacksonAutoConfiguration,\
org.springframework.boot.autoconfigure.jdbc.DataSourceAutoConfiguration,\
org.springframework.boot.autoconfigure.jdbc.JdbcTemplateAutoConfiguration,\
org.springframework.boot.autoconfigure.jdbc.JndiDataSourceAutoConfiguration,\
org.springframework.boot.autoconfigure.jdbc.XADataSourceAutoConfiguration,\
org.springframework.boot.autoconfigure.jdbc.DataSourceTransactionManagerAutoConfiguration,\
org.springframework.boot.autoconfigure.jms.JmsAutoConfiguration,\
org.springframework.boot.autoconfigure.jmx.JmxAutoConfiguration,\
org.springframework.boot.autoconfigure.jms.JndiConnectionFactoryAutoConfiguration,\
org.springframework.boot.autoconfigure.jms.activemq.ActiveMQAutoConfiguration,\
org.springframework.boot.autoconfigure.jms.artemis.ArtemisAutoConfiguration,\
org.springframework.boot.autoconfigure.jersey.JerseyAutoConfiguration,\
org.springframework.boot.autoconfigure.jooq.JooqAutoConfiguration,\
org.springframework.boot.autoconfigure.jsonb.JsonbAutoConfiguration,\
org.springframework.boot.autoconfigure.kafka.KafkaAutoConfiguration,\
org.springframework.boot.autoconfigure.availability.ApplicationAvailabilityAutoConfiguration,\
org.springframework.boot.autoconfigure.ldap.embedded.EmbeddedLdapAutoConfiguration,\
org.springframework.boot.autoconfigure.ldap.LdapAutoConfiguration,\
org.springframework.boot.autoconfigure.liquibase.LiquibaseAutoConfiguration,\
org.springframework.boot.autoconfigure.mail.MailSenderAutoConfiguration,\
org.springframework.boot.autoconfigure.mail.MailSenderValidatorAutoConfiguration,\
org.springframework.boot.autoconfigure.mongo.embedded.EmbeddedMongoAutoConfiguration,\
org.springframework.boot.autoconfigure.mongo.MongoAutoConfiguration,\
org.springframework.boot.autoconfigure.mongo.MongoReactiveAutoConfiguration,\
org.springframework.boot.autoconfigure.mustache.MustacheAutoConfiguration,\
org.springframework.boot.autoconfigure.neo4j.Neo4jAutoConfiguration,\
org.springframework.boot.autoconfigure.netty.NettyAutoConfiguration,\
org.springframework.boot.autoconfigure.orm.jpa.HibernateJpaAutoConfiguration,\
org.springframework.boot.autoconfigure.quartz.QuartzAutoConfiguration,\
org.springframework.boot.autoconfigure.r2dbc.R2dbcAutoConfiguration,\
org.springframework.boot.autoconfigure.r2dbc.R2dbcTransactionManagerAutoConfiguration,\
org.springframework.boot.autoconfigure.rsocket.RSocketMessagingAutoConfiguration,\
org.springframework.boot.autoconfigure.rsocket.RSocketRequesterAutoConfiguration,\
org.springframework.boot.autoconfigure.rsocket.RSocketServerAutoConfiguration,\
org.springframework.boot.autoconfigure.rsocket.RSocketStrategiesAutoConfiguration,\
org.springframework.boot.autoconfigure.security.servlet.SecurityAutoConfiguration,\
org.springframework.boot.autoconfigure.security.servlet.UserDetailsServiceAutoConfiguration,\
org.springframework.boot.autoconfigure.security.servlet.SecurityFilterAutoConfiguration,\
org.springframework.boot.autoconfigure.security.reactive.ReactiveSecurityAutoConfiguration,\
org.springframework.boot.autoconfigure.security.reactive.ReactiveUserDetailsServiceAutoConfiguration,\
org.springframework.boot.autoconfigure.security.rsocket.RSocketSecurityAutoConfiguration,\
org.springframework.boot.autoconfigure.security.saml2.Saml2RelyingPartyAutoConfiguration,\
org.springframework.boot.autoconfigure.sendgrid.SendGridAutoConfiguration,\
org.springframework.boot.autoconfigure.session.SessionAutoConfiguration,\
org.springframework.boot.autoconfigure.security.oauth2.client.servlet.OAuth2ClientAutoConfiguration,\
org.springframework.boot.autoconfigure.security.oauth2.client.reactive.ReactiveOAuth2ClientAutoConfiguration,\
org.springframework.boot.autoconfigure.security.oauth2.resource.servlet.OAuth2ResourceServerAutoConfiguration,\
org.springframework.boot.autoconfigure.security.oauth2.resource.reactive.ReactiveOAuth2ResourceServerAutoConfiguration,\
org.springframework.boot.autoconfigure.solr.SolrAutoConfiguration,\
org.springframework.boot.autoconfigure.sql.init.SqlInitializationAutoConfiguration,\
org.springframework.boot.autoconfigure.task.TaskExecutionAutoConfiguration,\
org.springframework.boot.autoconfigure.task.TaskSchedulingAutoConfiguration,\
org.springframework.boot.autoconfigure.thymeleaf.ThymeleafAutoConfiguration,\
org.springframework.boot.autoconfigure.transaction.TransactionAutoConfiguration,\
org.springframework.boot.autoconfigure.transaction.jta.JtaAutoConfiguration,\
org.springframework.boot.autoconfigure.validation.ValidationAutoConfiguration,\
org.springframework.boot.autoconfigure.web.client.RestTemplateAutoConfiguration,\
org.springframework.boot.autoconfigure.web.embedded.EmbeddedWebServerFactoryCustomizerAutoConfiguration,\
org.springframework.boot.autoconfigure.web.reactive.HttpHandlerAutoConfiguration,\
org.springframework.boot.autoconfigure.web.reactive.ReactiveWebServerFactoryAutoConfiguration,\
org.springframework.boot.autoconfigure.web.reactive.WebFluxAutoConfiguration,\
org.springframework.boot.autoconfigure.web.reactive.error.ErrorWebFluxAutoConfiguration,\
org.springframework.boot.autoconfigure.web.reactive.function.client.ClientHttpConnectorAutoConfiguration,\
org.springframework.boot.autoconfigure.web.reactive.function.client.WebClientAutoConfiguration,\
org.springframework.boot.autoconfigure.web.servlet.DispatcherServletAutoConfiguration,\
org.springframework.boot.autoconfigure.web.servlet.ServletWebServerFactoryAutoConfiguration,\
org.springframework.boot.autoconfigure.web.servlet.error.ErrorMvcAutoConfiguration,\
org.springframework.boot.autoconfigure.web.servlet.HttpEncodingAutoConfiguration,\
org.springframework.boot.autoconfigure.web.servlet.MultipartAutoConfiguration,\
org.springframework.boot.autoconfigure.web.servlet.WebMvcAutoConfiguration,\
org.springframework.boot.autoconfigure.websocket.reactive.WebSocketReactiveAutoConfiguration,\
org.springframework.boot.autoconfigure.websocket.servlet.WebSocketServletAutoConfiguration,\
org.springframework.boot.autoconfigure.websocket.servlet.WebSocketMessagingAutoConfiguration,\
org.springframework.boot.autoconfigure.webservices.WebServicesAutoConfiguration,\
org.springframework.boot.autoconfigure.webservices.client.WebServiceTemplateAutoConfiguration
@Configuration(proxyBeanMethods = false)
@ConditionalOnProperty(  //The following conditions are configured to take effect
    prefix = "spring.aop",  //Bind the configuration file with spring AOP start
    name = "auto",
    havingValue = "true",
    matchIfMissing = true //It is on by default
)
public class AopAutoConfiguration {}
For example, CacheAutoConfiguration class: the condition is not established, so it will not be loaded
@Configuration(proxyBeanMethods = false)
@ConditionalOnClass(CacheManager.class)  //This CacheManager class takes effect only when it is configured below in the container. The classes under the CacheManager spirng core package are loaded by default, and the conditions are true
@ConditionalOnBean(CacheAspectSupport.class) //In the test class, you can test whether the current class exists, and the result does not exist, so the class will not be loaded
@ConditionalOnMissingBean(value = CacheManager.class, name = "cacheResolver") //The CacheManager class does not exist in the container before it takes effect
@EnableConfigurationProperties(CacheProperties.class)
@AutoConfigureAfter({ CouchbaseDataAutoConfiguration.class, HazelcastAutoConfiguration.class,
      HibernateJpaAutoConfiguration.class, RedisAutoConfiguration.class })
@Import({ CacheConfigurationImportSelector.class, CacheManagerEntityManagerFactoryDependsOnPostProcessor.class })
public class CacheAutoConfiguration {}
Test whether CacheAspectSupport exists in the container: does not exist
/*
 Judge whether cachespectsupport exists, and the return value is 0
*/
String[] beanNamesForType = run.getBeanNamesForType(CacheAspectSupport.class);
System.out.println("======"+beanNamesForType.length); //0
For example, DispatcherServletConfiguration class: the condition holds, so it will be loaded
@Configuration(proxyBeanMethods = false)
@Conditional(DefaultDispatcherServletCondition.class)
@ConditionalOnClass(ServletRegistration.class)//Determine servletregistration Class exists under the tomcat core package
@EnableConfigurationProperties(WebMvcProperties.class) //Open the configuration binding webmvcproperties Class exists
protected static class DispatcherServletConfiguration {}
Test whether DispatcherServletConfiguration exists in the container:
/*
    Get the component WebMvcProperties from the container, judge whether it exists, and return 1
 */
String[] beanNamesForType1 = run.getBeanNamesForType(WebMvcProperties.class);
System.out.println("======"+beanNamesForType1.length); //1
3. Modify automatic default configuration
-
Take the internal class DispatcherServletConfiguration of DispatcherServletAutoConfiguration as an example: it is mainly reflected in @ ConditionalOnMissingBean. If this bean does not exist, springboot will automatically configure it for you. The existence is our own
@AutoConfigureOrder(Ordered.HIGHEST_PRECEDENCE) //priority @Configuration(proxyBeanMethods = false) //Mark as configuration class @ConditionalOnWebApplication(type = Type.SERVLET) //Judge whether the current project is a native SERVLET severlet, and whether this class will be loaded or not @ConditionalOnClass(DispatcherServlet.class) //Determine whether DispatcherServlet is imported into spring MVC in the container. It must be effective @AutoConfigureAfter(ServletWebServerFactoryAutoConfiguration.class) //Configure this class after configuring ServletWebServerFactoryAutoConfiguration public class DispatcherServletAutoConfiguration { //The general category can take effect only after the above conditions are met. Now it is satisfied @Configuration(proxyBeanMethods = false) @Conditional(DefaultDispatcherServletCondition.class) @ConditionalOnClass(ServletRegistration.class) //If there is a ServletRegistration component, it will not be configured if the classes under the Tomact core package are imported into the Tomact core package @EnableConfigurationProperties(WebMvcProperties.class) //Open the WebMvcProperties of the configuration binding and put it into the container protected static class DispatcherServletConfiguration { //Configure DispatchServlet for some initialization @Bean(name = DEFAULT_DISPATCHER_SERVLET_BEAN_NAME) public DispatcherServlet dispatcherServlet(WebMvcProperties webMvcProperties) { DispatcherServlet dispatcherServlet = new DispatcherServlet(); dispatcherServlet.setDispatchOptionsRequest(webMvcProperties.isDispatchOptionsRequest()); dispatcherServlet.setDispatchTraceRequest(webMvcProperties.isDispatchTraceRequest()); dispatcherServlet.setThrowExceptionIfNoHandlerFound(webMvcProperties.isThrowExceptionIfNoHandlerFound()); dispatcherServlet.setPublishEvents(webMvcProperties.isPublishRequestHandledEvents()); dispatcherServlet.setEnableLoggingRequestDetails(webMvcProperties.isLogRequestDetails()); return dispatcherServlet; } @Bean //The component id injected into the container is multipartResolver by default @ConditionalOnBean(MultipartResolver.class) //This type of component is valid only if it is in the container @ConditionalOnMissingBean(name = DispatcherServlet.MULTIPART_RESOLVER_BEAN_NAME)//There is no multipartResolver component multipart with this name in the container_ RESOLVER_ BEAN_ Name = multipartResolver if there is a component with id multipartResolver in the container, the default automatic configuration will not be used. The following will not take effect. If there is a component with id multipartResolver, use your own configuration public MultipartResolver multipartResolver(MultipartResolver resolver) { //If the method labeled @ Bean passes in the object parameter, the value of the multipartResolver parameter will be found from the container. //SpringMVC multipartResolver. Prevent the file upload parser configured by some users from not conforming to the specification Even without this component called multipartresolver, it will be automatically configured in the container return resolver;//Add a file upload parser to the container; } } } -
SpringBoot will configure all components at the bottom by default, but if the user configures it himself, the user's priority will prevail. Contract greater than configuration
//controller sends request test
@Controller
public class TestController {
    /**
     * Test automatically configured character encoding filters
     */
    @ResponseBody
    @GetMapping("/testCharacterEncodingFilter")
    public String testCharacterEncodingFilter(){
        return "Hello···springboot";
    }
}


//Configuration class
@Configuration
public class MyConfigTest {
    /*
        Custom character encoding filter
     */
    @Bean
    //    @ConditionalOnMissingBean / / if it is not in the container, it will be configured for you
    public CharacterEncodingFilter characterEncodingFilter() {
        CharacterEncodingFilter filter = new OrderedCharacterEncodingFilter();
        filter.setEncoding("ISO-8859-1");
        return filter;
    }

}
4. Auto configuration summary:
- SpringBoot loads all the auto configuration classes first. The frequently changed values in the xxxautoconfiguration component are from application From properties
- Each automatic configuration class takes effect according to conditions, and will bind the value specified in the configuration file by default. (read in xxxProperties, and bind xxxProperties to configuration file)
- The effective configuration class will assemble many components in the container
- As long as these components are in the container, they are equivalent to these functions
- Customized configuration
- Users directly replace the underlying components with @ Bean
- The user can modify the value of the configuration file obtained by this component. You can go to xxxproperties in @ configurationproperties Find the relevant propeties in class Class, and then configure it in application
- General process: xxxxxxautoconfiguration - > components - > xxxxproperties - > application Properties (the idea of user-defined Configuration through the Configuration file, of course, can also be configured through the corresponding interface implemented by the user-defined Configuration class (for example, implementing the WebMvcConfigurer interface for MVC customized Configuration), which is slightly more complex.)
5. Best practices - how to write a SpringBoot application
1. Introduce scenario dependency
https://docs.spring.io/spring-boot/docs/current/reference/html/using-spring-boot.html#using-boot-starter
2. Check which are automatically configured (optional) and judge which are effective and which are not
-
After self analysis, the automatic configuration corresponding to the imported scenario generally takes effect
-
debug=true in the configuration file enables the automatic configuration report. Negative Positive
#Check which automatic configuration class injection is effective or ineffective
debug=true
In application A new line of debug=true is added in the properties configuration file. When the application is running, you can see which components are effective (Positive matches) and which components are not effective (Negative matches) on the console


3. Do you need to modify some configuration items
-
Modify configuration items by referencing documents
-
https://docs.spring.io/spring-boot/docs/current/reference/html/appendix-application-properties.html#common-application-properties
#Modify the default image of springboot
spring.banner.image.location=classpath:banner.txt
-
Analyze yourself. Which of the configuration files are bound by xxproperties. By viewing xxxproperties Properties of Java class. You can view the binding application What are the values in the properties configuration file
-
4. Custom add or replace components. You can use @ bean to add new components or replace the original default components
@Bean,@Component...
5. Customizer xxxxxxcustomizer;
6. Development tips
1,Lombok
Steps:
-
Import dependent idea download lombok plug-in
You do not need to import a version number springboot The version number is automatically arbitrated <dependency> <groupId>org.projectlombok</groupId> <artifactId>lombok</artifactId> </dependency> -
use
/*=======================Simplify JavaBean development========================
    @Data---Help produce getset methods
    @ToString---Help generate ToString method
    @AllArgsConstructor---Generate a parameterized constructor
    @NoArgsConstructor---Generating parameterless construction method
    @EqualsAndHashCode---Generate Equals and HashCode methods	*/
@Data
@NoArgsConstructor
@AllArgsConstructor
//@ToString
//@EqualsAndHashCodepublic
class User {
    private  int id;
    private String name;
    private int age;
    private Pet pet;
    public User(int id, String name, int age) {
        this.id = id;
        this.name = name;
        this.age = age;
    }}
2. Dev tools fake hot update tool (need to restart the project)
You can import dependencies in the IDEA. After the project or page is modified: Ctrl+F9 will automatically restart the project.
<dependencies>
    <dependency>
        <groupId>org.springframework.boot</groupId>
        <artifactId>spring-boot-devtools</artifactId>
        <optional>true</optional>
    </dependency>
</dependencies>
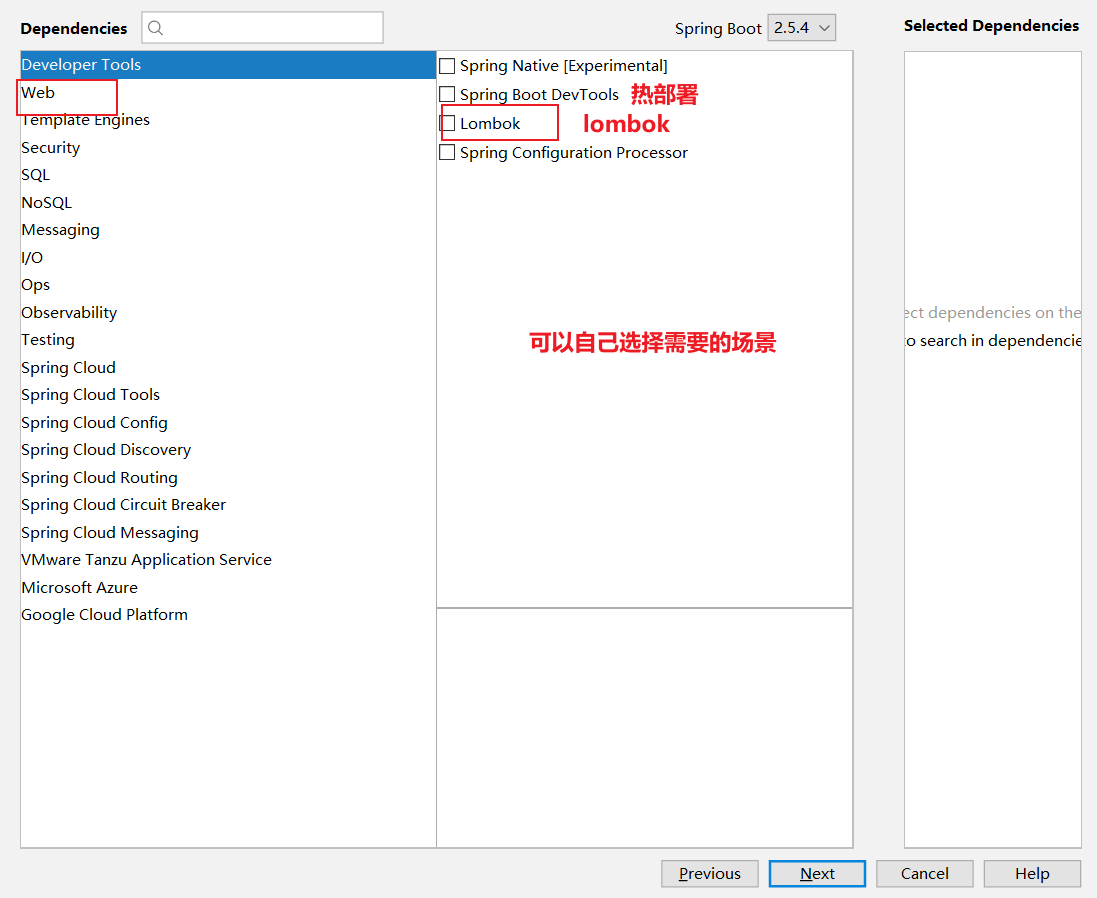
3. Spring Initailizr (project initialization wizard for rapid development of springboot project)
Automatically create the project structure, automatically write the main configuration class, and automatically import dependencies
4. Configuration file
1.1 document type
1,properties
Same as previous properties usage
2,yaml
-
Introduction: YAML is a recursive abbreviation of "YAML Ain't Markup Language" (YAML is not a markup language (markup language: tags are simpler and lighter than xml). When developing this language, YAML actually means "Yet Another Markup Language". It is very suitable for data centric configuration files
-
Basic grammar
-
key: value; There is a space between kv
-
Case sensitive
-
Use indentation to represent hierarchical relationships
-
tab is not allowed for indentation, only spaces are allowed
-
The number of indented spaces is not important, as long as the elements of the same level are aligned to the left
-
'#' indicates a comment
-
There is no need to quote the string. If you want to add, '' and '' means that the string content will be escaped / not escaped
-
-
data type
-
Literal: a single, non separable value. There are spaces between date, boolean, string, number, null kv
k: v
-
Object: a collection of key value pairs. map,hash,set,object
#Inline writing: k: {k1:v1,k2:v2,k3:v3} #or k: k1: v1 k2: v2 k3: v3 -
Array: a set of values arranged in order. array,list,queue
#Inline writing:
k: [v1,v2,v3]
#perhaps
k: - v1 - v2 - v3
-
-
case
pojo class
/*
    Test yaml profile
 */
@Data
@Component
@ConfigurationProperties("my.person") //Bind the properties configuration file to my Beginning with person
public class Person {
    private String userName;
    private Boolean boss;
    private Date birth;
    private Integer age;
    private Pet pet;
    private String[] interests;
    private List<String> animal;
    private Map<String, Object> score;
    private Set<Double> salarys;
    private Map<String, List<Pet>> allPets;
}


@Data
public class Pet {
    private String name;
    private Double weight;
}
Startup class;
@SpringBootConfiguration@EnableAutoConfiguration@ComponentScan(basePackages = "com.pj.boot.yaml")
public class TestMyYaml {
    public static void main(String[] args) {
        //Return to IOC container
    ConfigurableApplicationContext run =                SpringApplication.run(Springboot_1Application.class, args);
}}
Controller class
@Controller
public class TestYamlController {

    //Auto inject person
    @Autowired
    Person person;
    /**
     * Test yaml profile
     * @return
     */
    @ResponseBody
    @GetMapping("testYaml")
    public Person testYaml(){
        //Single quote input: zhangsan \n aaa
        //Double quotation mark output: zhangsan
        // aaa
        System.out.println(person.getUserName());
        return person;
    }
}
application.yaml
my:
  person:
    userName: "zhangsan \n aaa"
    #Single quotation mark output "userName": "zhangsan \n aaa", which will output \ n as a string
    #Double quotes output "userName": "zhangsan \n aaa", which will output line breaks. Double quotes will not escape, and single quotes will escape
    boss: true
    birth: 2019/12/9
    age: 18
    #private String[] interests;
    #interests: [basketball, swimming] either way
    interests:
      - Basketball
      - Swimming
    #private List<String> animal;
    animal: [jerry,mario]
    #private Pet pet;
    pet:
      name: A Mao
      weight: 20.02
    #private Map<String, Object> score;
    #    score:
    #      english: 80
    #      math: 90
    score: { english: 80,math: 90}
    #private Set<Double> salarys;
    salarys:
      - 999
      - 7788
    #private Map<String, List<Pet>> allPets;
    allPets:
      sick:
        - {name: a,weight: 12}
        - name: people of little importance
          weight: 13
        - name: Ah worm
          weight: 14
      health:
        - {name: b,weight: 15}
        - {name: c,weight: 16}
1.2. Configuration tips for custom class binding
Custom class and configuration file binding are generally not prompted. To prompt, add the following dependencies: configure the corresponding pom file and exclude it during packaging
 <!--Custom class configuration tips-->
<dependency>
    <groupId>org.springframework.boot</groupId>
    <artifactId>spring-boot-configuration-processor</artifactId>
    <optional>true</optional>
</dependency>


<plugins>
    <plugin>
        <groupId>org.springframework.boot</groupId>
        <artifactId>spring-boot-maven-plugin</artifactId>
        <!--When packaging, the prompt that you can customize the configuration class is discharged-->
          <configuration>
              <excludes>
                  <exclude>
                      <groupId>org.springframework.boot</groupId>
                      <artifactId>spring-boot-configuration-processor</artifactId>
                  </exclude>
              </excludes>
          </configuration>
    </plugin>
</plugins>
5. WEB development
1. Overview of spring MVC autoconfiguration
1.1. We don't need custom configuration for most spring MVC scenarios
- Content negotiation view parser and BeanName view parser
- Static resources (including webjars)
- Automatically register Converter, GenericConverter, Formatter (Converter, Formatter)
- Support HttpMessageConverters (later we cooperated with content negotiation to understand the principle)
- Automatically register MessageCodesResolver (for internationalization)
- Static index HTML (welcome page) page support
- Customize favicon (website icon)
- Automatically use ConfigurableWebBindingInitializer (DataBinder is responsible for binding request data to JavaBean)
1.2. Customized configuration
- No @ EnableWebMvc annotation. Use @ Configuration + WebMvcConfigurer to customize rules (WebMvcConfigurer is an interface. All methods in it are default methods and can be implemented selectively. We modify the MVC Configuration by rewriting the methods in it. Therefore, we can implement this interface and customize MVC components with @ Configuration annotation.) (adding this type of component to the container or configuring the class to implement this interface can achieve the purpose of customizing MVC)
- Declaring WebMvcRegistrations changes the default underlying components
- Use @ EnableWebMvc+@Configuration+DelegatingWebMvcConfiguration to fully take over spring MVC
2. Simple functional analysis
2.1 static resources
-
Static resource directory (static resources generally include pictures, videos, js and css files)
-
As long as the static resources are placed in the classpath: resources/static (or /public or /resources or /META-INF/resources)
Static resource access path priority:
- META-INF/resources
- resources
- static
- public
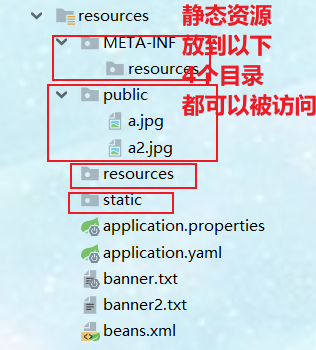
-
Access: current project root path / + static resource name, such as: http://localhost:8888/a2.jpg
-
Principle: static mapping / * *.
-
/**Yes Ant style The two asterisks represent paths that match any level
-
Please come in and find the Controller first to see if you can handle it. All requests that cannot be processed are handed over to the static resource processor. If the static resource cannot be found, the 404 page will be responded. (look for dynamic resources first, and then look for static resources if they can't be found)

Conroller request class: TestWebController
@Controller
public class TestWebController {
	//Test the static resource (there is a static resource a.jpg with the same name), and test whether to access the request or the static resource first
    //Result: access request first
    @ResponseBody
    @GetMapping("a.jpg")
    public String testGetStaticResource(){
        return "Hello a.jpg";
    }
}
Startup class: TestWeb
@SpringBootConfiguration @EnableAutoConfiguration @ComponentScan(basePackages = "com.pj.boot.web") public class TestWeb { public static void main(String[] args) { //Return to IOC container ConfigurableApplicationContext run = SpringApplication.run(Springboot_1Application.class, args); } } -
You can also change the default static resource path. The default configured resource paths / static, / public,/resources, /META-INF/resources are invalid
application.yaml:
spring:
  web:
   resources:
    #Configure the default path of static resources. You can configure multiple arrays. After configuration, the default other paths will become invalid
    #Click to view the source code. You can find that the rules of the default configuration path only change the stored path
     static-locations: [classpath:/haha/,classpath:/hehe/]
-
2.2. Static resource access prefix
Current project + static path pattern (/ RES / * *) + static resource name = static resource folder. Find that static path pattern is virtual. The path is not real. For example: http://localhost:8888/res/a2.jpg You do not need to create a folder
In order to distinguish static resources from dynamic resources during interception, it is required to add a prefix in front of static resources, and the interceptor will release when it sees the specified prefix, so as to achieve the purpose of dynamic and static separation.
application.yaml:
#Configure prefix for static resource access
spring:
 mvc:
  static-path-pattern: /res/**
2.3,webjar
-
You can add css, js and other resource files by jar
-
Official address: https://www.webjars.org/
-
For example, if you add jQuery dependencies, the js files related to jQuery will be imported to you automatically
Access address: http://localhost:8888/webjars/jquery/3.5.1/jquery.js You can access the JS file (the following address should be based on the package path in the dependency.)
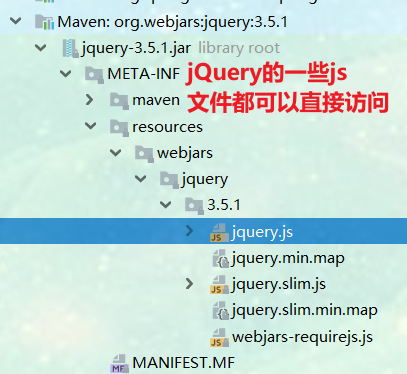
pom.xml
<!--webjars Import jquery-->
<dependency>
    <groupId>org.webjars</groupId>
    <artifactId>jquery</artifactId>
    <version>3.5.1</version>
</dependency>
2.4. Welcome page support
Official website address: https://docs.spring.io/spring-boot/docs/2.3.8.RELEASE/reference/htmlsingle/#boot-features-spring-mvc-welcome-page
1. Index. Under static resource path html
-
Static resource paths can be configured
-
However, the access prefix of static resources cannot be configured. Otherwise, index HTML cannot be accessed by default
spring:
  mvc:
   #The static resource access prefix cannot be configured, otherwise the welcome page will become invalid#
   static-path-pattern: /res/**
 web:
   resources:
  #Configure the default path of static resources to configure, but the welcome page needs to be in the following folder: hahaha or hehe or static
    static-locations: [classpath:/hahaha/,classpath:/hehe/,classpath:/static]
2. controller can handle / index.
There is a way: set the mapping path to * @ RequestMapping * ("/"), and then return the welcome page to visit
2.5. Customize Favicon
1. Refers to the small icon on the web page label. favicon.ico can be placed in the static resource directory.
- You can configure the static resource path (specify the folder where the static file is located)
- However, the access prefix of static resources cannot be configured. Failure to do so will result in favicon ICO failure

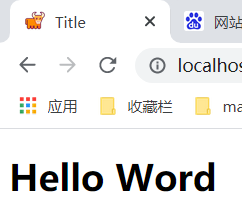

3. Static resource allocation principle
3.1. Start SpringBoot and load the xxxAutoConfiguration class (autoconfiguration class) by default
3.2. The automatic configuration class * * webmvcoautoconfiguration * * of spring MVC function takes effect
@Configuration(proxyBeanMethods = false)
@ConditionalOnWebApplication(type = Type.SERVLET)//Is a native type The servlet application is effective, not ineffective. The current is
@ConditionalOnClass({ Servlet.class, DispatcherServlet.class, WebMvcConfigurer .class })  //Dependencies imported from springmvc will naturally be imported into DispatcherServlet and WebMvcConfigurer. These three classes will take effect in the container
@ConditionalOnMissingBean(WebMvcConfigurationSupport.class) //It takes effect only when there is no such component in the container. You can fully take over spring MVC. You will need this class
@AutoConfigureOrder(Ordered.HIGHEST_PRECEDENCE + 10)
@AutoConfigureAfter({ DispatcherServletAutoConfiguration.class, TaskExecutionAutoConfiguration.class,      ValidationAutoConfiguration.class })
public class WebMvcAutoConfiguration {}
3.3 what is configured in the container by webmvcoautoconfiguration
-
rest style filters and format converters

-
Internal class of webmvcoautoconfiguration: webmvcoautoconfigurationadapter
@Configuration(proxyBeanMethods = false) //Is a configuration class @Import(EnableWebMvcConfiguration.class) @EnableConfigurationProperties({ WebMvcProperties.class, org.springframework.boot.autoconfigure.web.ResourceProperties.class, WebProperties.class }) //The current configuration class binds WebMvcProperties, ResourceProperties and WebProperties, and puts the three classes into the container @Order(0) public static class WebMvcAutoConfigurationAdapter implements WebMvcConfigurer, ServletContextAware {} -
The related properties of the configuration file are bound with the xxx prefix: WebMvcProperties binding configuration file prefix: spring MVC, the prefix of resource properties binding configuration file is spring Resources, the prefix of the WebProperties binding configuration file is spring web
-
Methods related to static resources will have caching policies (Methods in webmvccautoconfigurationadapter)
  @Override
public void addResourceHandlers(ResourceHandlerRegistry registry) {
    if (!this.resourceProperties.isAddMappings()) {  //A property in resourceProperties is addMappings. You can disable the default static resource configuration. You can configure addMappings in properties or yaml. Set addMappings to false. Enter if, and the subsequent configuration will not take effect. If you access the static resource, you will report 404
        logger.debug("Default resource handling disabled");
        return;
    }
    addResourceHandler(registry, "/webjars/**", "classpath:/META-INF/resources/webjars/"); //If the dependency of webjars is imported, all requests to access / webjars / * * will be mapped to / META-INF/resources/webjars /, and the following static resources can be accessed. This explains how to access the resources under webjars http://localhost:8888/webjars start

    /*
    getStaticPathPattern()Method to obtain the property in mvcProperties class as staticPathPattern (default: private String staticPathPattern = "/ * *";) The value of staticPathPattern (static resource access prefix) can be configured in properties or yaml. If it is configured, we will get the staticPathPattern that we configured to map to the resourceProperties class. The property is staticlocations (default value private string [] staticlocations = {"classpath: / meta-inf / resources /", "classpath: / resources /", "classpath: / static /", "classpath:/public/" };  Explains why static resources can be placed in the above directory and can be accessed directly). You can configure the static locations value in properties or yaml. If you configure it, you will get the cache policy we configured        */
    addResourceHandler(registry, this.mvcProperties.getStaticPathPattern(), (registration) -> {
        registration.addResourceLocations(this.resourceProperties.getStaticLocations());
        if (this.servletContext != null) {
            ServletContextResource resource = new ServletContextResource(this.servletContext, SERVLET_LOCATION);
            registration.addResourceLocations(resource);
        }
    });
}
private void addResourceHandler(ResourceHandlerRegistry registry, String pattern, String... locations) {
			addResourceHandler(registry, pattern, (registration) -> registration.addResourceLocations(locations));
		}
private void addResourceHandler(ResourceHandlerRegistry registry, String pattern,
				Consumer<ResourceHandlerRegistration> customizer) {
			if (registry.hasMappingForPattern(pattern)) {
				return;
			}
			ResourceHandlerRegistration registration = registry.addResourceHandler(pattern);
			customizer.accept(registration);
			registration.setCachePeriod(getSeconds(this.resourceProperties.getCache().getPeriod()));//Add to the cache. You can configure the value period of the property in resourceProperties in properties or yaml to set the cache time
			registration.setCacheControl(this.resourceProperties.getCache().getCachecontrol().toHttpCacheControl());
			registration.setUseLastModified(this.resourceProperties.getCache().isUseLastModified());
			customizeResourceHandlerRegistration(registration);
		}
application.yaml:
spring:
 mvc:
#  Static resource access prefix
   static-path-pattern: /res/**
 web:
   resources:
	#Configure the default path of static resources
    static-locations: [classpath:/hahaha/,classpath:/hehe/,classpath:/static]
	#Set static resource cache time
    cache:
      period: 1100
      #Turn off the configuration of the default static resource
	  add-mappings: false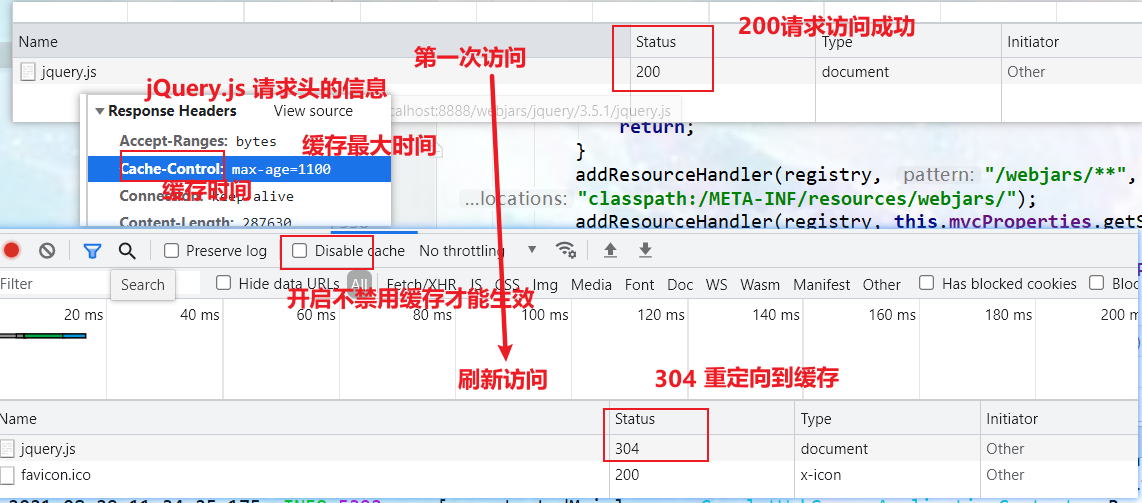
-
Configuration of welcome page
- The internal class enablewebmvcautoconfiguration of webmvccautoconfiguration
//=============EnableWebMvcConfiguration=============== @Configuration(proxyBeanMethods = false) @EnableConfigurationProperties(WebProperties.class) public static class EnableWebMvcConfiguration extends DelegatingWebMvcConfiguration implements ResourceLoaderAware { //Handler mapping: processor mapping. It saves which requests each handler can handle @Bean //Put welcome pagehandlermapping in the container public WelcomePageHandlerMapping welcomePageHandlerMapping(ApplicationContext applicationContext, FormattingConversionService mvcConversionService, ResourceUrlProvider mvcResourceUrlProvider) { /* this.mvcProperties.getStaticPathPattern() The value of the static resource prefix is also obtained WelcomePageHandlerMapping The source code is as follows */ WelcomePageHandlerMapping welcomePageHandlerMapping = new WelcomePageHandlerMapping( new TemplateAvailabilityProviders(applicationContext), applicationContext, getWelcomePage(),this.mvcProperties.getStaticPathPattern()); welcomePageHandlerMapping.setInterceptors(getInterceptors(mvcConversionService, mvcResourceUrlProvider)); welcomePageHandlerMapping.setCorsConfigurations(getCorsConfigurations()); return welcomePageHandlerMapping; } } //=============The source code of welcome pagehandlermapping is as follows=============== WelcomePageHandlerMapping(TemplateAvailabilityProviders templateAvailabilityProviders, ApplicationContext applicationContext, Resource welcomePage, String staticPathPattern) { if (welcomePage != null && "/**".equals(staticPathPattern)) //If the static access resource prefix is not / * * the welcome page will become invalid. This explains that the staticPathPattern cannot be configured in the configuration file logger.info("Adding welcome page: " + welcomePage); setRootViewName("forward:index.html"); //Redirect to welcome page } else if (welcomeTemplateExists(templateAvailabilityProviders, applicationContext)) { //Call Controller /index logger.info("Adding welcome page template: index"); setRootViewName("index"); } } -
favicon
The browser will send a / favicon request to obtain the icon, which will not be obtained during the whole session and will not be managed by springboot
-
Extension:
- The configuration class webmvcoautoconfigurationadapter has only one constructor with parameters
//The values of all parameters of a parameterized constructor are determined from the container (provided that there is only one parameterized constructor) /* resourceProperties: Get and spring Of all objects bound by resources webProperties:Get and spring Of all objects bound to the web mvcProperties:Get and spring MVC binds all the value objects ListableBeanFactory: Spring beanFactory(bean factory) messageConvertersProvider:Find all HttpMessageConverters resourceHandlerRegistrationCustomizerProvider:Locate the customizator for the resource processor. (related to static resources) dispatcherServletPath: Front end controller servletRegistrations: Registering native servlets and filters for applications requires custom configuration and class modification */ public WebMvcAutoConfigurationAdapter( org.springframework.boot.autoconfigure.web.ResourceProperties resourceProperties, WebProperties webProperties, WebMvcProperties mvcProperties, ListableBeanFactory beanFactory, ObjectProvider<HttpMessageConverters> messageConvertersProvider, ObjectProvider<ResourceHandlerRegistrationCustomizer> resourceHandlerRegistrationCustomizerProvider, ObjectProvider<DispatcherServletPath> dispatcherServletPath, ObjectProvider<ServletRegistrationBean<?>> servletRegistrations) { this.resourceProperties = resourceProperties.hasBeenCustomized() ? resourceProperties : webProperties.getResources(); this.mvcProperties = mvcProperties; this.beanFactory = beanFactory; this.messageConvertersProvider = messageConvertersProvider; this.resourceHandlerRegistrationCustomizer = resourceHandlerRegistrationCustomizerProvider.getIfAvailable(); this.dispatcherServletPath = dispatcherServletPath; this.servletRegistrations = servletRegistrations; this.mvcProperties.checkConfiguration(); }- Conclusion: if a configuration class has only one parameter constructor, the values of all parameters of the parameter constructor will be determined from the container
4. Request parameter processing
4.1. Request mapping
1. Use and principle of rest
-
@xxxMapping: @GetMapping,@PostMapping,@PutMapping,@DeleteMapping
-
Rest style support (use HTTP request mode verbs to indicate the operation of resources)
- Previously:
- /getUser get user
- /deleteUser delete user
- /editUser modify user
- /saveUser save user
- Now: / user
- GET - GET user
- DELETE - DELETE user
- PUT modify user
- POST save user
- Core Filter; HiddenHttpMethodFilter
- Previously:
-
usage
-
Enable the Rest function of the page form (it is not enabled by default and needs to be enabled in the configuration file)
spring: #Turn on rest style filters mvc: hiddenmethod: filter: enabled: true #The default value is false -
Property method=post of page form, hidden field_ method=put, delete, etc. (if you get or post directly, you don't need to hide the field)
========index.html======= <h2>Rest Style test</h2> <form action="/user" method="get"> <input value="REST-GET Submit" type="submit"/> </form> <form action="/user" method="post"> <input value="REST-POST Submit" type="submit"/> </form> <form action="/user" method="post"> <input name="_method" type="hidden" value="DELETE"/> <input value="REST-DELETE Submit" type="submit"/> </form> <form action="/user" method="post"> <input name="_method" type="hidden" value="PUT"/> <input value="REST-PUT Submit" type="submit"/> </form> -
Write request mapping
@RestControllerpublic class TestWebController {
    @PostMapping("/user")
    //@RequestMapping(value = "/user",method = RequestMethod.POST)
    public String saveUser(){
        return "POST-Zhang San";
    }
    @PutMapping("/user")
    //@RequestMapping(value = "/user",method = RequestMethod.PUT)
    public String putUser(){
        return "PUT-Zhang San";
    }
    @DeleteMapping("/user")
    //@RequestMapping(value = "/user",method = RequestMethod.DELETE)
    public String deleteUser(){
        return "DELETE-Zhang San";
    }
}
-
-
Rest principle (when rest is used for form submission)
- The form will be submitted with_ method=PUT
- The request was intercepted by HiddenHttpMethodFilter
- Is the request normal and POST
- Get_ The value of method.
- Compatible with the following requests; PUT.DELETE.PATCH
- Native request (post). The wrapper pattern requestwrapper overrides the getMethod method method and returns the passed in value.
- The wrapper is used when the filter chain is released. Future method calls getMethod by calling requestwrapper.
//======Methods under webmvcoautoconfiguration class=================== @Bean @ConditionalOnMissingBean(HiddenHttpMethodFilter.class) //HiddenHttpMethodFilter class bound @ConditionalOnProperty(prefix = "spring.mvc.hiddenmethod.filter", name = "enabled" /*, matchIfMissing = false*/)//In spring mvc. hiddenmethod. All configurations prefixed with filter will be mapped to the property of HiddenHttpMethodFilter class. The value of matchIfMissing property is not configured. It is false by default. It is not enabled by default and needs to be enabled in the configuration file public OrderedHiddenHttpMethodFilter hiddenHttpMethodFilter() { return new OrderedHiddenHttpMethodFilter(); } //======Methods under HiddenHttpMethodFilter class=================== public class HiddenHttpMethodFilter extends OncePerRequestFilter { private static final List<String> ALLOWED_METHODS = Collections.unmodifiableList(Arrays.asList(HttpMethod.PUT.name(), HttpMethod.DELETE.name(), HttpMethod.PATCH.name())); /** Default method parameter: {@code _method}. */ public static final String DEFAULT_METHOD_PARAM = "_method"; private String methodParam = DEFAULT_METHOD_PARAM; /** * Set the parameter name to look for HTTP methods. * @see #DEFAULT_METHOD_PARAM */ public void setMethodParam(String methodParam) { Assert.hasText(methodParam, "'methodParam' must not be empty"); this.methodParam = methodParam; } @Override protected void doFilterInternal(HttpServletRequest request, HttpServletResponse response, FilterChain filterChain) throws ServletException, IOException { HttpServletRequest requestToUse = request; if ("POST".equals(request.getMethod()) && request.getAttribute(WebUtils.ERROR_EXCEPTION_ATTRIBUTE) == null) {//Is it submitted in POST mode and whether there are exceptions String paramValue = request.getParameter(this.methodParam);//Get_ The value of the parameter of method if (StringUtils.hasLength(paramValue)) {//Judgment is acquired_ Is the value length of the method parameter greater than 0 String method = paramValue.toUpperCase(Locale.ENGLISH);//Convert to uppercase if (ALLOWED_METHODS.contains(method)) {//Judge whether the obtained parameter value is the allowed request method. The allowed request methods are put, delete and PATCH requestToUse = new HttpMethodRequestWrapper(request, method); //Use the constructor to change the request mode, wrap the request, rewrite the get method inside, and change the method value of the package request mode to the value passed in by yourself } } } filterChain.doFilter(requestToUse, response); //The released request is the request after self packaging, and this request object will be used in the future } /** * Simple {@link HttpServletRequest} wrapper that returns the supplied method for * {@link HttpServletRequest#getMethod()}. */ private static class HttpMethodRequestWrapper extends HttpServletRequestWrapper { private final String method; public HttpMethodRequestWrapper(HttpServletRequest request, String method) { super(request); this.method = method; } @Override public String getMethod() { return this.method; } } } -
Rest uses client tools.
- For example, PostMan can directly send put, delete and other requests. The above packaging request can be sent directly without going.
-
How to change the default carry_ method
-
@ConditionalOnMissingBean(HiddenHttpMethodFilter.class) means that hiddenHttpMethodFilter() is executed only when there is no HiddenHttpMethodFilter. Therefore, we can customize the filter and change the default_ method
/*    web Configuration class for */
@Configuration(proxyBeanMethods = false)
public class WebConfig {
    @Bean
    public HiddenHttpMethodFilter hiddenHttpMethodFilter(){
        //The hiddenHttpMethodFilter() method is not executed
        HiddenHttpMethodFilter filter = new HiddenHttpMethodFilter();     				 			    filter.setMethodParam("_m"); //Set the obtained parameter value to its own value
        return filter;
    }
}
<form action="/user" method="post"> <input name="_m" type="hidden" value="DELETE"/> //Can get delete <input value="REST-DELETE Submit" type="submit"/> </form> <form action="/user" method="post"> <input name="_method" type="hidden" value="PUT"/>//Cannot get put because the parameter name '_m' was not changed <input value="REST-PUT Submit" type="submit"/> </form>
-
2. Request mapping principle
-
Spring MVC functional analysis is from org springframework. web. servlet. DispatcherServlet -> `doDispatch()``

-
DispatchServlet -- part of the source code of "doDispatch()"
//=========Methods under the DispatchServlet class======= protected void doDispatch(HttpServletRequest request, HttpServletResponse response) throws Exception { HttpServletRequest processedRequest = request; HandlerExecutionChain mappedHandler = null; boolean multipartRequestParsed = false; //Determine whether the file upload request is false by default WebAsyncManager asyncManager = WebAsyncUtils.getAsyncManager(request); //Is it an asynchronous request try { ModelAndView mv = null; Exception dispatchException = null; try { processedRequest = checkMultipart(request); //Detect whether it is a file upload request multipartRequestParsed = (processedRequest != request); // Determines the Handler for the current request. A HandlerExecutionChain object is found in HandlerMapping, which can handle the requested controller of the requested Handler (Controller.method()) and obtain all interceptors. mappedHandler = getHandler(processedRequest); //Find the Hnadler(Controller processor (class)) that can execute the current request // ..... } } -
Graphic flow
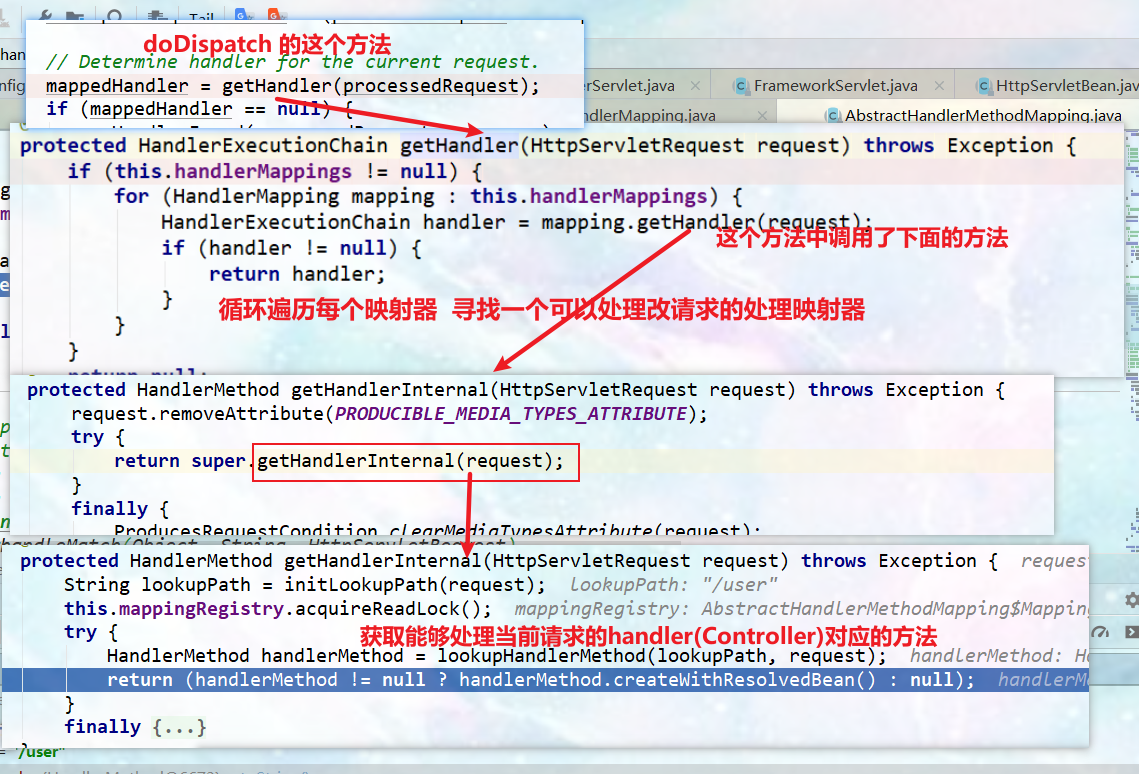
-
this. Handler mappings shows @ RequestMapping and handler mapping rules in Debug mode.


-
All request mappings are in HandlerMapping:
-
SpringBoot automatically configures the welcome pagehandlermapping of the welcome page. Access / be able to access index html;
-
SpringBoot automatically configures the default RequestMappingHandlerMapping

-
When the request comes in, try all the HandlerMapping one by one to see whether the current HandlerMapping can handle the currently sent request.
- If it can be processed, find the handler mapping corresponding to the request. After obtaining it, obtain the method corresponding to the Handler(Controller class) that can process the current request
- If not, loop through the next HandlerMapping
-
We need some custom mapping processing. We can also put HandlerMapping in the container ourselves. Customize HandlerMapping (sometimes, for example, the same set of APIs has different versions, such as v1 and v2. We can write two sets of mapping (such as v1/user and v2/user) in the controller, but we can also put them under two packages, both of which are / user. At this time, we can customize HandlerMapping and map v1/user to / user under one package, Map v2/user to / user under another package)
-
4.2 general parameters and basic notes
1. Use of common Parameter annotation
-
@PathVariable path variable ((rest style {...} represents a parameter)
@RequestHeader get request header
@RequestParam get request parameters (refer to the parameters after the question mark, URL? A = 1 & B = 2)
@Cookie value get cookie value
@RequestBody get request body [POST]
@ModelAttributeGeneral principle of parameter parsing: there are 26 parameter parsers, which find the corresponding parameter parser by circular traversal (after the parameter parser is loaded for the first time, it will be put into the cache), 15 return value processors, and the most commonly used return value types: ModelAndView, Model, View, ResponseBody
  //  rest form: car/2/owner/zhangsan
@GetMapping("/car/{id}/owner/{username}")
public Map<String ,Object> testParameter(
    @PathVariable("id") int id,
    @PathVariable("username") String name,
    @PathVariable Map<String ,String > map,//Get the parameter key value pair id: value username: value passed in the rest style
    @RequestHeader("User-Agent") String userAgent, //Get single header
    @RequestHeader Map<String ,String > heads, //Get all request headers
    @RequestParam("age") int age, //A parameter is an acquisition of a single value
    @RequestParam("like")List<String> likes, //Parameter is the acquisition of multiple values
    @RequestParam Map<String , String > params,//Get all request parameter values
    @CookieValue("Idea-f4788bfe") String cookie, //Gets the value of the cookie and converts it to a string
    @CookieValue("Idea-f4788bfe") Cookie cookie2 //The obtained cookie is converted into an object
){
    Map<String,Object> maps = new HashMap<>();
    maps.put("id", id);
    maps.put("username", name);
    maps.put("map", map);
    maps.put("userAgent", userAgent);
    maps.put("heads", heads);
    maps.put("age", age);
    maps.put("likes", likes);
    maps.put("params", params);
    map.put("cookie",cookie);
    System.out.println(cookie2);
    map.put("cookieName",cookie2.getName());
    return maps;
}
@PostMapping("/testRequestBody")
public Map<String ,Object> testParameter2(@RequestBody String content){
    //Get request body (only POST requests have body) "content": "username = dsadsa & password = dasdsa"
    Map<String,Object> maps = new HashMap<>();
    maps.put("content", content);
    return maps;
}
index.html
<h2>Test Request Parameter annotation</h2>
<a href="car/2/owner/zhangsan?age=12&like=nv&like=Launch/The Start">Test PathVariable</a><br/>
<a href="car/2/owner/zhangsan?age=12&like=nv&like=Launch/The Start">Test RequestHeader</a>
<br/>
<a href="car/2/owner/zhangsan?age=12&like=nv&like=Launch/The Start">Test RequestParam</a>
<br/>
<a href="car/2/owner/zhangsan?age=12&like=nv&like=Launch/The Start">Test CookieValue</a>
<br/>
<form action="testRequestBody"  method="post">
    <input name="username" type="text">
    <input name="password" type="password">
    <input type="submit" value="Test RequestBody">
</form>
- @RequestAttribute get request domain attribute
@GetMapping("goto")
public String goToPage(HttpServletRequest request){
    request.setAttribute("msg", "succeed...");
    request.setAttribute("code", 200);
    return "forward:/success";//Forward to / success request
}
@GetMapping("/params")
public String testParam(
    Map<String,Object> map,
    Model model,
    HttpServletRequest request,
    HttpServletResponse response){
    map.put("hello", "world666");
    model.addAttribute("world", "hello666");
    request.setAttribute("message", "HelloWorld");
    Cookie cookie = new Cookie("c1", "v1");
    response.addCookie(cookie);
    return "forward:/success";
}
//< ------------------ protagonist @ RequestAttribute in this method
@ResponseBody@GetMapping("/success")
public Map success(@RequestAttribute(value = "msg",required = false) String msg,
                   @RequestAttribute(value = "code",required = false)String code,
                   @RequestAttribute(value = "hello" ,required = false) String hello,
                   @RequestAttribute(value = "world" ,required = false) String world,
                   @CookieValue("c1") String c1,
                   HttpServletRequest request){
    Object msg1 = request.getAttribute("msg");
    Map<String,Object> map = new HashMap<>();
    Object hello1 = request.getAttribute("hello");
    Object world1 = request.getAttribute("world");
    Object message = request.getAttribute("message");
    map.put("annotation_msg",msg);
    map.put("annotation_code",code);
    map.put("annotation_hello",hello);
    map.put("annotation_world",world);
    map.put("reqMethod_msg1",msg1);
    map.put("reqMethod_hello1",hello1);
    map.put("reqMethod_world1",world1);
    map.put("message",message);
    map.put("cookie",c1);
    return map;
}
index.html
<a href="goto">Test RequestAttribute</a>><br/><a href="params">Test RequestAttribute2</a>><br/>
-
@MatrixVariable matrix variable: it is turned off by default and needs to be turned on manually
-
Syntax: request path: / cars/sell;low=34;brand=byd,audi,yd mapping path: / cars/{path}
/boss/1;age=20/2;age=10 /boss/{path1}/{path2}
-
SpringBoot disables matrix variables by default
Manual opening: principle. Processing of paths. The removeSemicolonContent of the UrlPathHelper is set to false to support the of matrix variables. The matrix variable must have a url path variable to be resolved
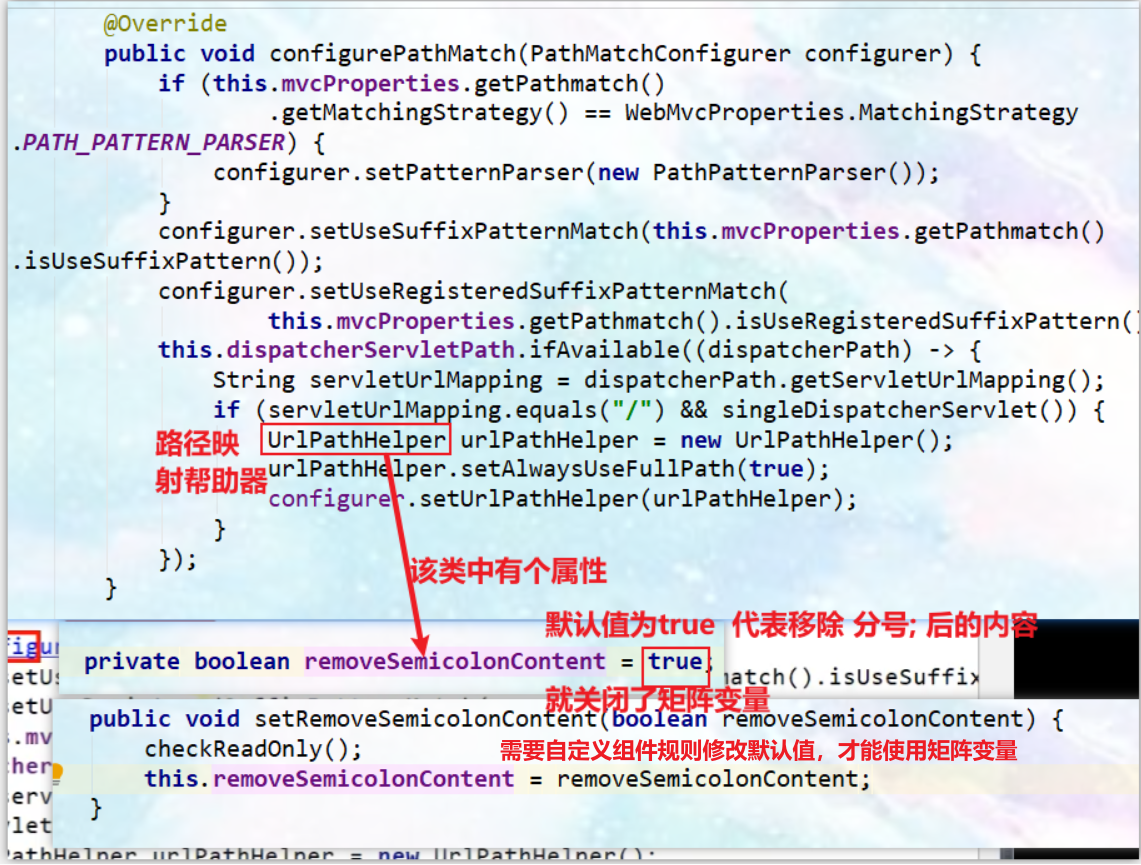
-
Manually turn on the matrix variable:
//========WebMvcConfigurer========
    @Configuration(proxyBeanMethods = false)
    public class WebConfig implements WebMvcConfigurer {
        /*        The first method is to manually open the matrix variable: @ Bean injects a WebMvcConfigurer (an interface) into the container. The second method implements WebMvcConfigurer and overrides the method configurePathMatch that needs to be modified     */
        /*
        @Bean
        public WebMvcConfigurer webMvcConfigurer(){
        return new WebMvcConfigurer(){
        @Override
        public void configurePathMatch(PathMatchConfigurer configurer) {
        UrlPathHelper urlPathHelper = new UrlPathHelper();
        urlPathHelper.setRemoveSemicolonContent(false); //Modifying the default value is equivalent to the effectiveness of the matrix variable function, that is, the semicolon is not removed; Content of
        configurer.setUrlPathHelper(urlPathHelper);
        }
        };
        }*/
        @Override
        public void configurePathMatch(PathMatchConfigurer configurer) {
            UrlPathHelper urlPathHelper = new UrlPathHelper();
            urlPathHelper.setRemoveSemicolonContent(false); //Modifying the default value is equivalent to the effectiveness of the matrix variable function, that is, the semicolon is not removed; Content of
            configurer.setUrlPathHelper(urlPathHelper);
        }
    }

//=========TestWebController class===========
    //      /cars/sell;low=34;brand=byd,audi,yd
    @GetMapping("/cars/{path}") //Cannot be written as cars/sell, a sell;low=34;brand=byd,audi,yd bind a {path} otherwise 404 will appear
    @ResponseBody
    public Map carsSell(@MatrixVariable("low") Integer low,
                        @MatrixVariable("brand") List<String > brand,
                        @PathVariable("path") String path){
    Map<String ,Object> map = new HashMap<>();
    map.put("low", low);
    map.put("brand", brand);
    map.put("path", path);
    return map;
}
//     /boss/1;age=20/2;age=10
@GetMapping("/boss/{bossId}/{empId}")
@ResponseBody
public Map boss(@MatrixVariable(value = "age" ,pathVar = "bossId") Integer boosId,
                @MatrixVariable(value = "age" ,pathVar = "empId") Integer empId){
    Map<String ,Object> map = new HashMap<>();
    map.put("boosId", boosId);
    map.put("empId", empId);
    return map;
}
index.html
/cars/{path}?xxx=xx&aaa=ccc queryString Query string:@RequestParam;<br>
/cars/sell;low=34;brand=byd,audi,yd; Matrix variable
<br>
Page development, cookie Disabled, session How to use the contents; session.set(a,b)---->jsessionid=xx--->cookie---->Carry disable per request cookie Cause the whole chain to fail
<br>
url rewrite : /abc;jsessionid=xxx hold cookie The value of is passed by matrix traversal
<br>
<a href="/cars/sell;low=34;brand=byd,audi,yd">Test MatrixVariable</a>
<br>
<a href="/cars/sell;low=34;brand=byd,audi,yd;brand=aa">Test MatrixVariable</a>
<br>
<a href="/boss/1;age=20/2;age=10">Test MatrixVariable /boss/{bossId}/{bossId2}</a>
<br>
-
2. Principle of requesting Parameter annotation
-
This starts with the dispatcher servlet: all requests for access are from the dispatcher servlet
//====================Under the DispatchServlet class=============== protected void doDispatch(HttpServletRequest request, HttpServletResponse response) throws Exception { HttpServletRequest processedRequest = request; HandlerExecutionChain mappedHandler = null; boolean multipartRequestParsed = false; WebAsyncManager asyncManager = WebAsyncUtils.getAsyncManager(request); try { ModelAndView mv = null; Exception dispatchException = null; try { processedRequest = checkMultipart(request); multipartRequestParsed = (processedRequest != request); //A HandlerExecutionChain object is found in HandlerMapping, which can handle the requested controller of the requested Handler (Controller.method()) and obtain all interceptors. mappedHandler = getHandler(processedRequest); if (mappedHandler == null) { noHandlerFound(processedRequest, response); return; } // Determines the handler adapter for the current request. HandlerAdapter ha = getHandlerAdapter(mappedHandler.getHandler()); // Process the last modified header (if supported by the handle) String method = request.getMethod(); boolean isGet = HttpMethod.GET.matches(method); //Determine whether it is a get request if (isGet || HttpMethod.HEAD.matches(method)) { long lastModified = ha.getLastModified(request, mappedHandler.getHandler()); if (new ServletWebRequest(request, response).checkNotModified(lastModified) && isGet) { return; } } //Execute the applyPreHandle method of the interceptor. If the method returns false, it will be intercepted if (!mappedHandler.applyPreHandle(processedRequest, response)) { return; } // When the target method is called, the methods in the controller written by ourselves will be used for parameter parsing (the method for processing parameter parsing) and return value parsing mv = ha.handle(processedRequest, response, mappedHandler.getHandler()); // ...... -
Find the appropriate adapter (the previous process of finding Handler will not be repeated)
- The Handler (Controller.method()) that can handle the request is found in the HandlerMapping. (the rest style principle of the previous process has been analyzed in detail)
- Find an adapter HandlerAdapter for the current Handler. The most used is RequestMappingHandlerAdapter. (all handleradapters will be loaded by default)
- @ RequestMapping is marked on the support method of 0 subscript
- 1 subscript supports functional programming
- 3 subscript access to static resources
- Find an adapter HandlerAdapter for the current Handler. The most used is RequestMappingHandlerAdapter. (all handleradapters will be loaded by default)
- Use the adapter to execute the target method and determine each value of the method parameter.

- The Handler (Controller.method()) that can handle the request is found in the HandlerMapping. (the rest style principle of the previous process has been analyzed in detail)
-
Call and execute the request method in the controller written by yourself (this section focuses on MV = ha. Handle (processedrequest, response, mapedhandler. Gethandler());)
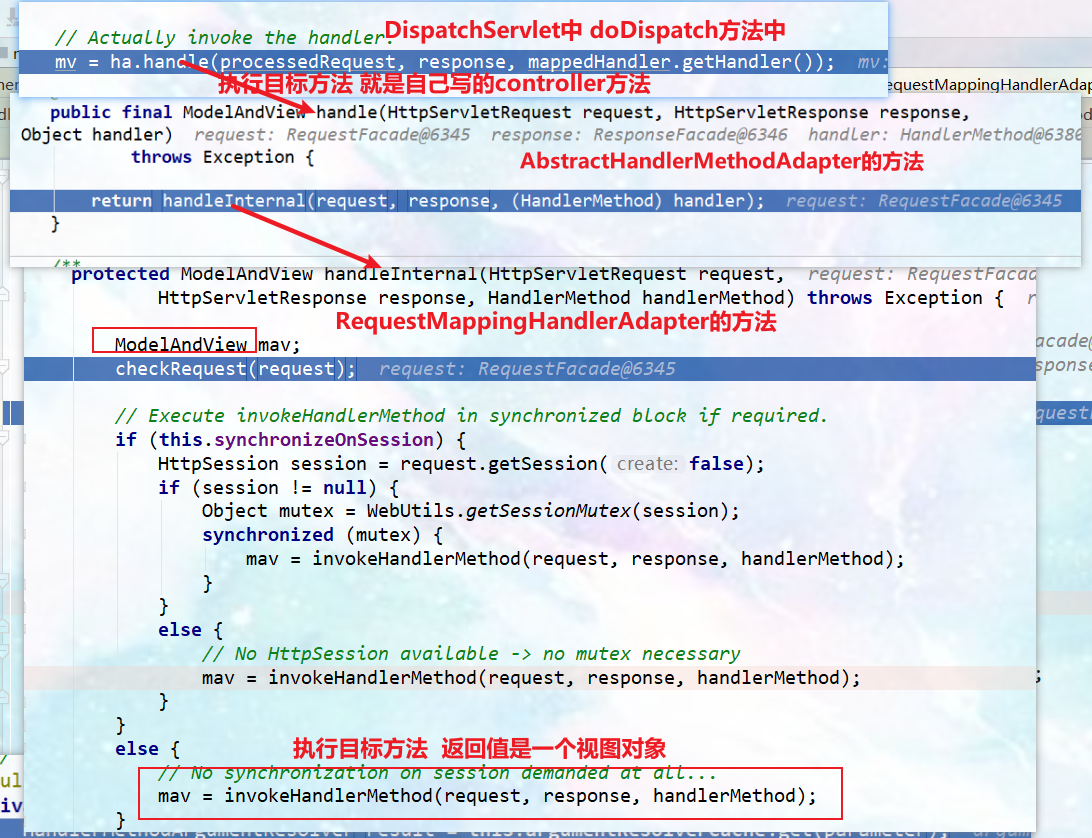
-
The source code of the invokeHandlerMethod() method used by the parameter parser and return value processor to process the above methods is as follows:
-
Get the parameter parser and return value processor, and how many parameter types the spring MVC target method can write. Depends on the parameter resolver argumentResolvers. There are multiple parameter parsers argumentResolvers.
[external chain picture transfer failed. The source station may have anti-theft chain mechanism. It is recommended to save the picture and upload it directly (img-9rywiyzj-1642169239539)( https://gitee.com/PJGitee/images/raw/master/springboot%E7%AC%94%E8%AE%B0.assets/image -20210830120914785. png)]
-
*this. Argumentresolvers (parameter resolver) * * initialized in the requestmappinghandleradapterafterpropertieset() method
-
If (this. Argumentresolvers! = null) {} / / < ----- concerns\
public class RequestMappingHandlerAdapter extends AbstractHandlerMethodAdapter		implements BeanFactoryAware, InitializingBean {
    @Nullable
    private HandlerMethodArgumentResolverComposite argumentResolvers;
    @Override
    public void afterPropertiesSet() {
        //...
            if (this.argumentResolvers == null) {
                //Initializing argumentResolvers
                List<HandlerMethodArgumentResolver> resolvers = getDefaultArgumentResolvers();
                this.argumentResolvers = new HandlerMethodArgumentResolverComposite().addResolvers(resolvers);
            }
        //...
    }
    //Initializes a bunch of interfaces that implement the HandlerMethodArgumentResolver interface
    private List<HandlerMethodArgumentResolver> getDefaultArgumentResolvers() {
        List<HandlerMethodArgumentResolver> resolvers = new ArrayList<>(30);
        //Annotation based parameter resolution adds these parameters by default
        resolvers.add(new RequestParamMethodArgumentResolver(getBeanFactory(), false));
        resolvers.add(new RequestParamMapMethodArgumentResolver());
        resolvers.add(new PathVariableMethodArgumentResolver());
        resolvers.add(new PathVariableMapMethodArgumentResolver());
        resolvers.add(new MatrixVariableMethodArgumentResolver());
        resolvers.add(new MatrixVariableMapMethodArgumentResolver());        resolvers.add(new ServletModelAttributeMethodProcessor(false));
        resolvers.add(new RequestResponseBodyMethodProcessor(getMessageConverters(), this.requestResponseBodyAdvice));
        resolvers.add(new RequestPartMethodArgumentResolver(getMessageConverters(), this.requestResponseBodyAdvice));
        resolvers.add(new RequestHeaderMethodArgumentResolver(getBeanFactory()));
        resolvers.add(new RequestHeaderMapMethodArgumentResolver());
        resolvers.add(new ServletCookieValueMethodArgumentResolver(getBeanFactory()));
        resolvers.add(new ExpressionValueMethodArgumentResolver(getBeanFactory()));
        resolvers.add(new SessionAttributeMethodArgumentResolver());
        resolvers.add(new RequestAttributeMethodArgumentResolver());
        // Type-based argument resolution
        resolvers.add(new ServletRequestMethodArgumentResolver());
        resolvers.add(new ServletResponseMethodArgumentResolver());
        resolvers.add(new HttpEntityMethodProcessor(getMessageConverters(), this.requestResponseBodyAdvice));
        resolvers.add(new RedirectAttributesMethodArgumentResolver());
        resolvers.add(new ModelMethodProcessor());
        resolvers.add(new MapMethodProcessor());
        resolvers.add(new ErrorsMethodArgumentResolver());
        resolvers.add(new SessionStatusMethodArgumentResolver());
        resolvers.add(new UriComponentsBuilderMethodArgumentResolver());
        if (KotlinDetector.isKotlinPresent()) {
            resolvers.add(new ContinuationHandlerMethodArgumentResolver());
        }
        // Custom arguments
        if (getCustomArgumentResolvers() != null) {
            resolvers.addAll(getCustomArgumentResolvers());
        }
        // Catch-all
        resolvers.add(new PrincipalMethodArgumentResolver());
        resolvers.add(new RequestParamMethodArgumentResolver(getBeanFactory(), true));
        resolvers.add(new ServletModelAttributeMethodProcessor(true));
        return resolvers;
    }
}
-
-
HandlerMethodArgumentResolver parameter is the interface definition of the parser (the current parser judges whether it supports parsing this parameter, and if so, it calls resolveArgument for parsing)

-
Return value processor this Returnvaluehandlers is initialized in the requestmappinghandleradapterafterpropertieset() method
If (this. Returnvaluehandlers! = null) {} / / < - Focus
public class RequestMappingHandlerAdapter extends AbstractHandlerMethodAdapter implements BeanFactoryAware, InitializingBean { @Nullable private HandlerMethodReturnValueHandlerComposite returnValueHandlers; @Override public void afterPropertiesSet() { ... if (this.returnValueHandlers == null) { List<HandlerMethodReturnValueHandler> handlers = getDefaultReturnValueHandlers(); this.returnValueHandlers = new HandlerMethodReturnValueHandlerComposite().addHandlers(handlers); } } //Initializes a bunch of interfaces that implement the HandlerMethodReturnValueHandler interface private List<HandlerMethodReturnValueHandler> getDefaultReturnValueHandlers() { List<HandlerMethodReturnValueHandler> handlers = new ArrayList<>(20); // Single-purpose return value types handlers.add(new ModelAndViewMethodReturnValueHandler()); handlers.add(new ModelMethodProcessor()); handlers.add(new ViewMethodReturnValueHandler()); handlers.add(new ResponseBodyEmitterReturnValueHandler(getMessageConverters(), this.reactiveAdapterRegistry, this.taskExecutor, this.contentNegotiationManager)); handlers.add(new StreamingResponseBodyReturnValueHandler()); handlers.add(new HttpEntityMethodProcessor(getMessageConverters(), this.contentNegotiationManager, this.requestResponseBodyAdvice)); handlers.add(new HttpHeadersReturnValueHandler()); handlers.add(new CallableMethodReturnValueHandler()); handlers.add(new DeferredResultMethodReturnValueHandler()); handlers.add(new AsyncTaskMethodReturnValueHandler(this.beanFactory)); // Annotation-based return value types handlers.add(new ServletModelAttributeMethodProcessor(false)); handlers.add(new RequestResponseBodyMethodProcessor(getMessageConverters(), this.contentNegotiationManager, this.requestResponseBodyAdvice)); // Multi-purpose return value types handlers.add(new ViewNameMethodReturnValueHandler()); handlers.add(new MapMethodProcessor()); // Custom return value types if (getCustomReturnValueHandlers() != null) { handlers.addAll(getCustomReturnValueHandlers()); } // Catch-all if (!CollectionUtils.isEmpty(getModelAndViewResolvers())) { handlers.add(new ModelAndViewResolverMethodReturnValueHandler(getModelAndViewResolvers())); }else { handlers.add(new ServletModelAttributeMethodProcessor(true)); } return handlers; } } -
HandlerMethodReturnValueHandler returns the definition of the processor interface

-
-
-
It really implements our custom method
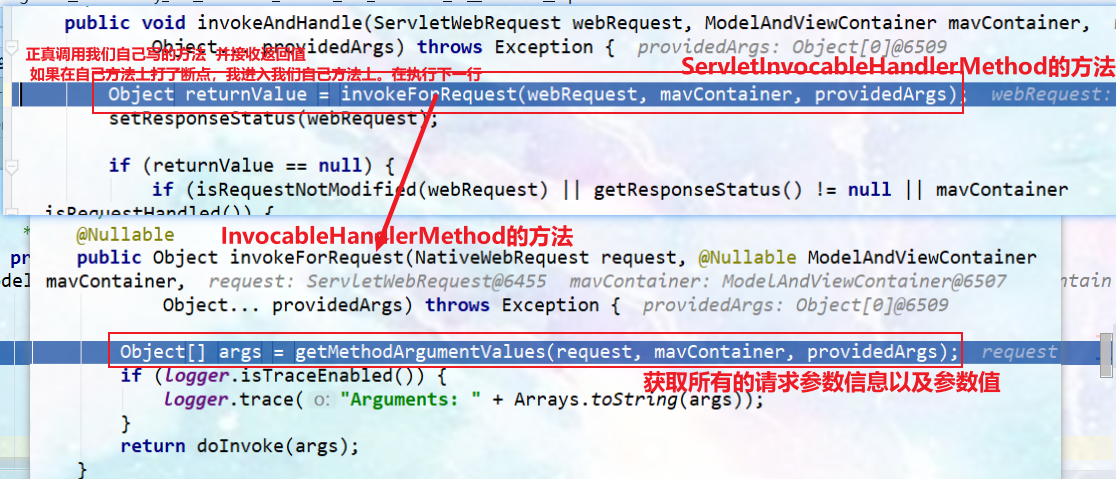
-
The source code of the above getMethodArgumentValues() method
//============InvocableHandlerMethod this method is used to determine the corresponding value of each parameter============== protected Object[] getMethodArgumentValues( NativeWebRequest request, @Nullable ModelAndViewContainer mavContainer, Object... providedArgs) throws Exception { MethodParameter[] parameters = getMethodParameters(); //Get the details of all parameters, including type, annotation, etc if (ObjectUtils.isEmpty(parameters)) { //Judge whether there are parameters. If there are no parameters, return null parameters directly return EMPTY_ARGS; } Object[] args = new Object[parameters.length]; //Create an array to hold the values of each parameter for (int i = 0; i < parameters.length; i++) { //Traverse all parameters MethodParameter parameter = parameters[i]; //Get the i th parameter parameter.initParameterNameDiscovery(this.parameterNameDiscoverer); args[i] = findProvidedArgument(parameter, providedArgs); if (args[i] != null) { continue; } if (!this.resolvers.supportsParameter(parameter)) { //Judge whether each parameter parser (27 of my version) supports the parsing of this parameter type (the screenshot of parameter parsing above) and why it can support so many parameter types, that is, there are many implementations of this interface, each of which supports, implements and parses different parameter types (annotations). throw new IllegalStateException(formatArgumentError(parameter, "No suitable resolver")); } try { args[i] = this.resolvers.resolveArgument(parameter, mavContainer, request, this.dataBinderFactory); //Resolve parameter value this is the method resolution parameter value in the parameter resolution interface } catch (Exception ex) { // Leave stack trace for later, exception may actually be resolved and handled... if (logger.isDebugEnabled()) { String exMsg = ex.getMessage(); if (exMsg != null && !exMsg.contains(parameter.getExecutable().toGenericString())) { logger.debug(formatArgumentError(parameter, exMsg)); } } throw ex; } } return args; -
The above source code: the method source code called by if (!this.resolvers.supportsParameter(parameter))

-
getArgumentResolver () method source code
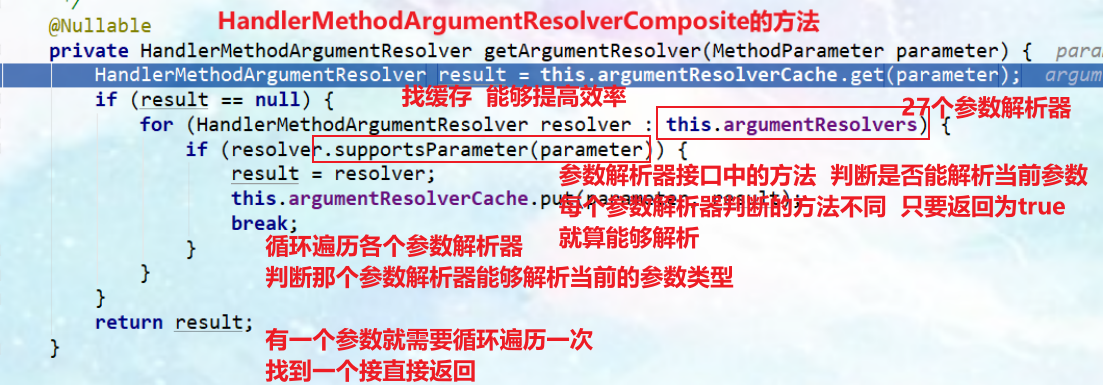
//====The function of HandlerMethodArgumentResolverComposite is to find a suitable parameter parser to parse various parameters===========
    private HandlerMethodArgumentResolver getArgumentResolver(MethodParameter parameter) {
    HandlerMethodArgumentResolver result = this.argumentResolverCache.get(parameter); //The cache is empty for the first time. Finding the cache can improve efficiency
    if (result == null) {
        for (HandlerMethodArgumentResolver resolver : this.argumentResolvers)
        {
            //argumentResolvers 27 parameter resolver
            if (resolver.supportsParameter(parameter)) {
                //Loop through each parameter resolver. Each parameter resolver determines whether it can handle the current parameter. Each parameter in the method (the current parameter of parameter) will loop through (getMethodArgumentValues() above) The method is to make a loop judgment on each parameter) find a parser that can handle the current parameters and directly return 27 parameters. The methods of the parser to judge whether the current parameters can be parsed are different
                result = resolver;
                this.argumentResolverCache.put(parameter, result); //Put in cache
                break;
            }
        }
    }
    return result;//Returns a parameter parser that can parse the current parameter
}
-
-
After returning the (above result) parameter parser, the parsing method resolveArgument() of the parameter parser will be called. The source code is as follows:
args[i] = this.resolvers.resolveArgument(parameter, mavContainer, request, this.dataBinderFactory); // Parse parameter values. This is the method parsing parameter values in the parameter parsing interface (also the source code in the getMethodArgumentValues() method). The args array stores parsers that can parse parameters
//...... try { args[i] = this.resolvers.resolveArgument(parameter, mavContainer, request, this.dataBinderFactory); //Resolve parameter value this is the method resolution parameter value in the parameter resolution interface } catch (Exception ex) { // Leave stack trace for later, exception may actually be resolved and handled... if (logger.isDebugEnabled()) { String exMsg = ex.getMessage(); if (exMsg != null && !exMsg.contains(parameter.getExecutable().toGenericString())) { logger.debug(formatArgumentError(parameter, exMsg)); } } throw ex; } } return args;-
resolvers.resolveArgument(parameter, mavContainer, request, this.dataBinderFactory); The method source code is as follows
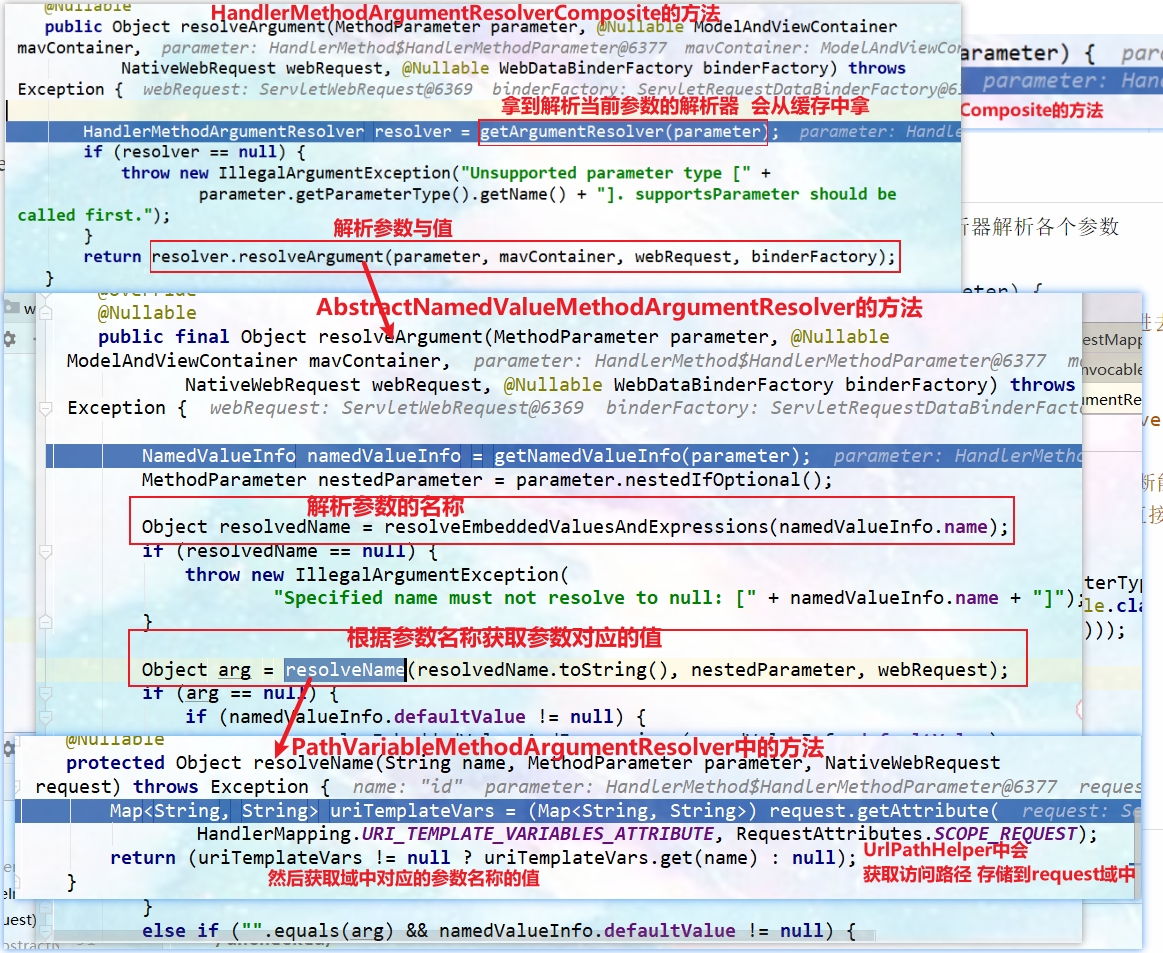
-
-
After the current parameter is parsed, the next parameter will be parsed, and the above steps will be repeated in turn (each parameter will be parsed in turn)
-
-
After the above steps are completed, the parsing of each parameter is completed
-
-
Follow the source code of the following complex parameters
3. Complex parameters and principles
-
Map, * * model (the data in map and model will be placed in the request field of request request.setAttribute), * * Errors/BindingResult, RedirectAttributes (redirect carried data), ServletResponse (response), SessionStatus, UriComponentsBuilder, ServletUriComponentsBuilder
-
Request code
//Test complex parameter @ GetMapping("/params") public String testParam(Map<String,Object> map, Model model, HttpServletRequest request, //All three parameter types can put data request into the request field Getattribute() to get HttpServletResponse response) { map.put("hello", "world666"); model.addAttribute("world", "hello666"); request.setAttribute("message", "HelloWorld"); Cookie cookie = new Cookie("c1", "v1"); cookie.setDomain("localhost"); response.addCookie(cookie); return "forward:/success"; } -
After matching to the parser, call the parser's parsing method (continue with the source analysis process) (here parsing parameter is related).
-
For parameters of Map and Model types, mavcontainer will be returned getModel();—> Bindingawaremodelmap is a Model and a Map
[external chain picture transfer failed. The source station may have anti-theft chain mechanism. It is recommended to save the picture and upload it directly (img-az6vmdol-1642169239543)( https://gitee.com/PJGitee/images/raw/master/springboot%E7%AC%94%E8%AE%B0.assets/image -20210830160544756. png)]
-
Args obtained after parameter parsing (save the values of each parameter)
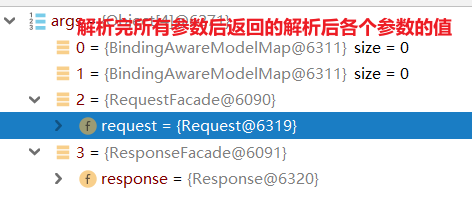
-
-
After each parameter is parsed, the controller request method written by yourself will be executed. After processing, the value to be put into the request field will be stored in the modelAndViewContainer object to obtain the return value. The return value result will be processed
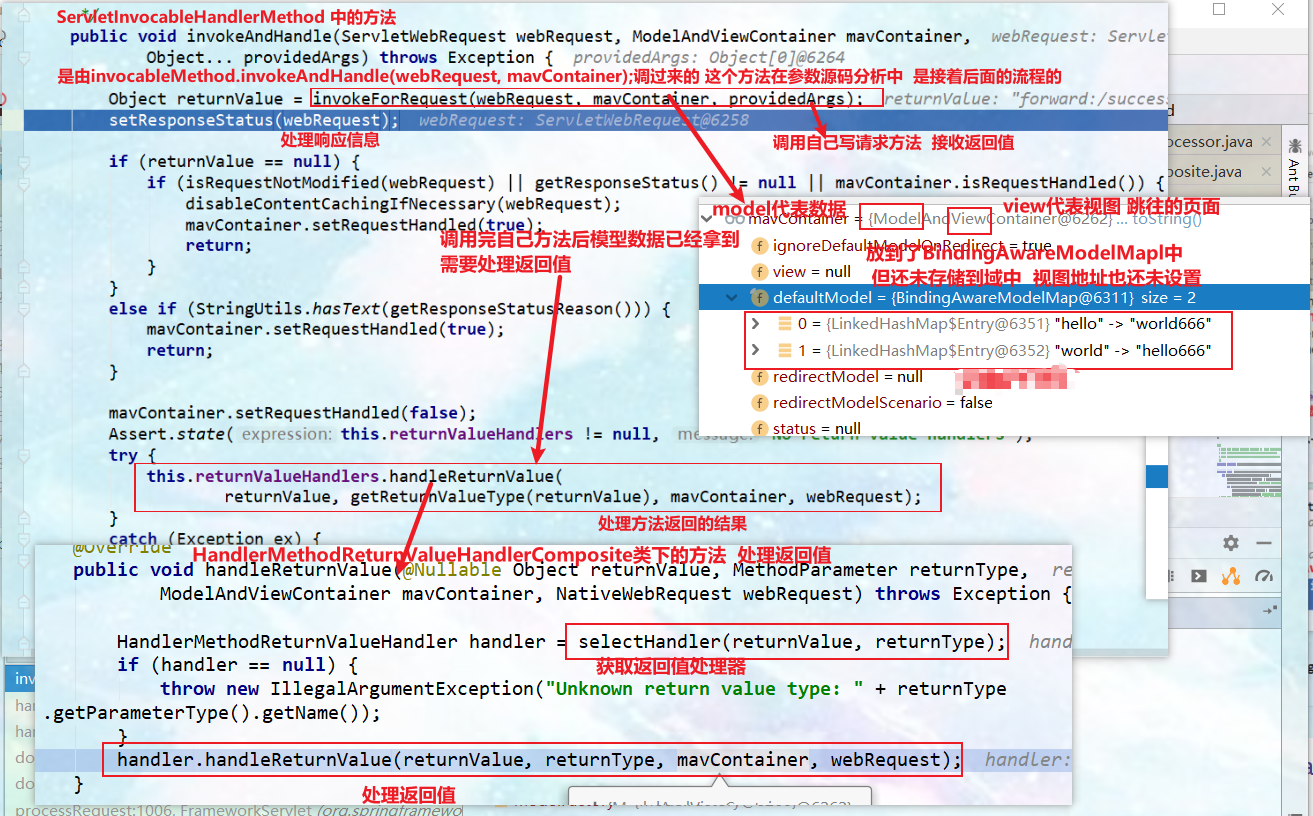
-
In the above picture, the handler handleReturnValue(returnValue, returnType, mavContainer, webRequest); Screenshot of processing method
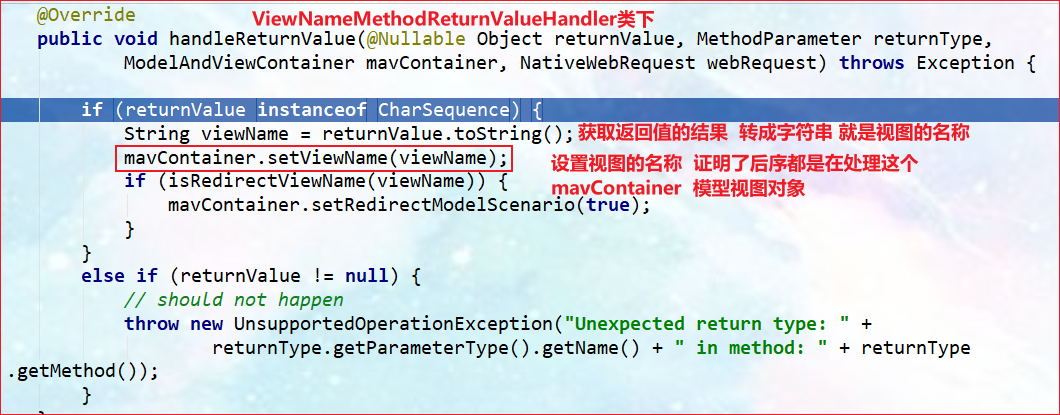
-
After the above method is executed, the view name of the mavContainer() object is also set

-
-
invocableMethod.invokeAndHandle(webRequest, mavContainer); The above is the operation after calling your own method after the method is completed, followed by the operation in step 3-1 (1 of step 3 (principle module for requesting Parameter annotation))
getModelAndView(mavContainer, modelFactory, webRequest) is called; Method, the ModelAndView object is returned after the method is executed
MV of DispatchServlet = ha handle(processedRequest, response, mappedHandler.getHandler()); Execution complete
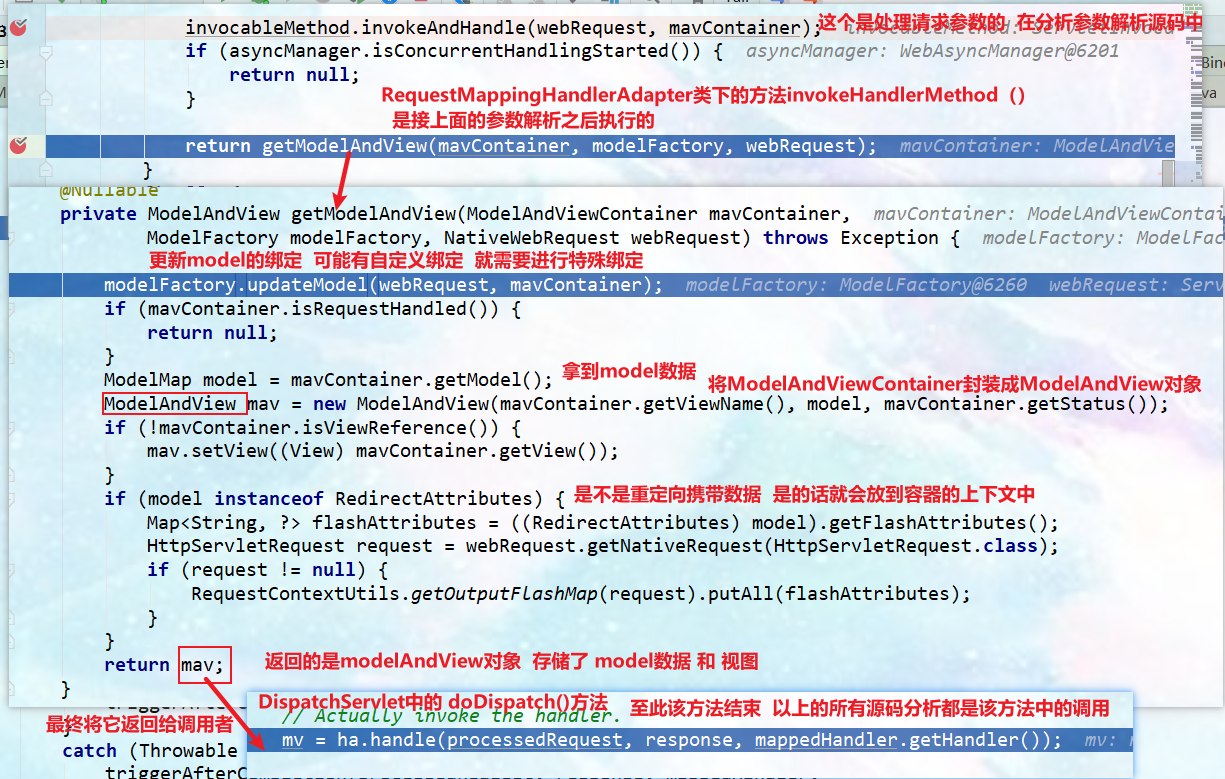
//====================Under the DispatchServlet class=============== protected void doDispatch(HttpServletRequest request, HttpServletResponse response) throws Exception { HttpServletRequest processedRequest = request; HandlerExecutionChain mappedHandler = null; boolean multipartRequestParsed = false; WebAsyncManager asyncManager = WebAsyncUtils.getAsyncManager(request); try { ModelAndView mv = null; Exception dispatchException = null; try { processedRequest = checkMultipart(request); multipartRequestParsed = (processedRequest != request); //A HandlerExecutionChain object is found in HandlerMapping, which can handle the requested controller of the requested Handler (Controller.method()) and obtain all interceptors. mappedHandler = getHandler(processedRequest); if (mappedHandler == null) { noHandlerFound(processedRequest, response); return; } // Determines the handler adapter for the current request. HandlerAdapter ha = getHandlerAdapter(mappedHandler.getHandler()); //Method of processing parameter analysis // Process the last modified header (if supported by the handle) String method = request.getMethod(); boolean isGet = HttpMethod.GET.matches(method); //Determine whether it is a get request if (isGet || HttpMethod.HEAD.matches(method)) { long lastModified = ha.getLastModified(request, mappedHandler.getHandler()); if (new ServletWebRequest(request, response).checkNotModified(lastModified) && isGet) { return; } } //Execute the applyPreHandle method of the interceptor. If the method returns false, it will be intercepted if (!mappedHandler.applyPreHandle(processedRequest, response)) { return; } // When the target method is called, the methods in the controller written by ourselves will be used for parameter analysis, return value analysis and other processes, and a modelAndView object will be returned mv = ha.handle(processedRequest, response, mappedHandler.getHandler()); if (asyncManager.isConcurrentHandlingStarted()) { return; } applyDefaultViewName(processedRequest, mv); //Method of processing interceptor mappedHandler.applyPostHandle(processedRequest, response, mv); } catch (Exception ex) { dispatchException = ex; } catch (Throwable err) { // As of 4.3, we're processing Errors thrown from handler methods as well, // making them available for @ExceptionHandler methods and other scenarios. dispatchException = new NestedServletException("Handler dispatch failed", err); } //Processing the development results will put the data of the model into the domain processDispatchResult(processedRequest, response, mappedHandler, mv, dispatchException); } //...... -
The above processdispatchresult (processedrequest, response, mapedhandler, MV, dispatchexception); The source code is shown in the figure below
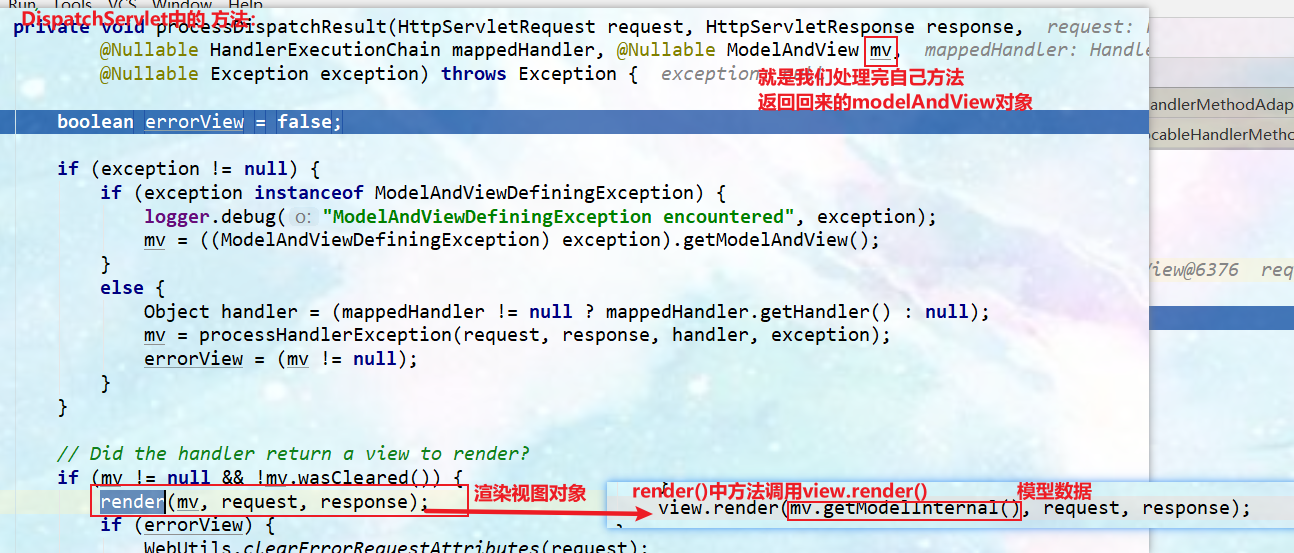
-
Above view The source code of render () method is as follows:

-
The source code of the renderMerOutputModel() method is as follows: the data is stored in the request field
[external chain picture transfer failed. The source station may have anti-theft chain mechanism. It is recommended to save the picture and upload it directly (IMG nfhrmwxn-1642169239547)( https://gitee.com/PJGitee/images/raw/master/springboot%E7%AC%94%E8%AE%B0.assets/image -20210830171618012. png)]
-
4,Servlet API:
-
WebRequest,ServletRequest,MultipartRequest, HttpSession,javax.servlet.http.PushBuilder,Principal,InputStream,Reader,HttpMethod,Locale,TimeZone,ZoneId
-
**ServletRequestMethodArgumentResolver * * parameter resolver is used to process the above parameters: the above "goto" request can be tested through debug
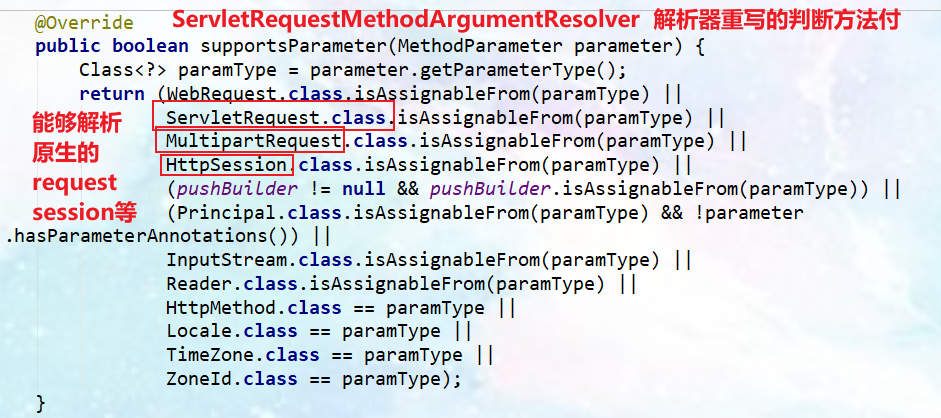
5. User defined parameter binding principle POJO
-
Practice code
pojo class
@Datapublic class Person {
    private String userName;
    private Integer age;
    private Date birth;
    private Pet pet;
}
@Datapublic class Pet {
    private String name;
    private String age;
}
controller class:
/*    Test encapsulation pojo data binding: the request data (GET, POST) submitted by the page can be bound with the object attribute @ param person @ return */
@ResponseBody@PostMapping("testPojo")
public Person testPojo(Person person){
    return person;
}
index.html
<h2>Test POJO</h2> <form action="testPojo" method="post"> full name: <input name="userName"/> <br/> Age: <input name="age"/> <br/> birthday: <input name="birth"/> <br/> Pet name:<input name="pet.name"/><br/> Pet age:<input name="pet.age"/> <input type="submit" value="Submit"> </form> -
Find a parameter parser that can parse pojo classes. The parameter parser is: ServletModelAttributeMethodProcessor parser
[the external chain image transfer fails. The source station may have an anti-theft chain mechanism. It is recommended to save the image and upload it directly (img-mcvvvu0-1642169239548) (C: \ users \ Peng Jun \ appdata \ roaming \ typora user images \ image-20210831105928008. PNG)]
-
After you find the parser, call the parser's parsing method args[i] = this.resolvers.resolveArgument(parameter, mavContainer, request, this.dataBinderFactory); // Resolve parameter value this is the method resolution parameter value in the parameter resolution interface
The source code of the resolveArgument() method used by the ServletModelAttributeMethodProcessor parameter parser to parse parameters is as follows:
public final Object resolveArgument( MethodParameter parameter, @Nullable ModelAndViewContainer mavContainer, NativeWebRequest webRequest, @Nullable WebDataBinderFactory binderFactory) throws Exception { Assert.state(mavContainer != null, "ModelAttributeMethodProcessor requires ModelAndViewContainer"); Assert.state(binderFactory != null, "ModelAttributeMethodProcessor requires WebDataBinderFactory"); String name = ModelFactory.getNameForParameter(parameter); //Get the name of the parameter type through the passed parameter ModelAttribute ann = parameter.getParameterAnnotation(ModelAttribute.class); if (ann != null) {//Determine whether the ModelAttribute annotation is included mavContainer.setBinding(name, ann.binding()); } Object attribute = null; BindingResult bindingResult = null; if (mavContainer.containsAttribute(name)) { //If the mavContainer contains the name of the current parameter type, it will be integrated with the name in the mavContainer attribute = mavContainer.getModel().get(name); } else { try { // Create an empty instance of parameter type attribute = createAttribute(name, parameter, binderFactory, webRequest); } catch (BindException ex) { if (isBindExceptionRequired(parameter)) { // No BindingResult parameter -> fail with BindException throw ex; } // Otherwise, expose null/empty value and associated BindingResult if (parameter.getParameterType() == Optional.class) { attribute = Optional.empty(); } else { attribute = ex.getTarget(); } bindingResult = ex.getBindingResult(); } } if (bindingResult == null) { //Bean attribute binding and validation; // Skip in case of construction binding failure. //Binder web data binding function: convert and encapsulate each passed parameter into an attribute (this is a circular process, and each parameter needs to be converted and encapsulated) //webRequest: a native request that contains the data to be encapsulated WebDataBinder binder = binderFactory.createBinder(webRequest, attribute, name); if (binder.getTarget() != null) { if (!mavContainer.isBindingDisabled(name)) { bindRequestParameters(binder, webRequest);//To convert and encapsulate, first convert the passed parameter type into the target data type, and then change the method in the encapsulated object. The values of each attribute in the attribute have been encapsulated } validateIfApplicable(binder, parameter); if (binder.getBindingResult().hasErrors() && isBindExceptionRequired(binder, parameter)) { throw new BindException(binder.getBindingResult()); } } // Value type adaptation, also covering java.util.Optional if (!parameter.getParameterType().isInstance(attribute)) { attribute = binder.convertIfNecessary(binder.getTarget(), parameter.getParameterType(), parameter); } bindingResult = binder.getBindingResult(); } // Add resolved attribute and BindingResult at the end of the model Map<String, Object> bindingResultModel = bindingResult.getModel(); mavContainer.removeAttributes(bindingResultModel); mavContainer.addAllAttributes(bindingResultModel); return attribute; } -
WebDataBinder uses its Converters to convert the requested data into the specified data type. Encapsulated into JavaBean s again
In the process, GenericConversionService is used: when setting each value, find all converter s in it, which can convert this data type (string with parameter brought by request) to the specified type * * (such as Integer type in JavaBean)**
General interface of converter: @ functionalinterface public interface converter < s, t > s source data type T target data type
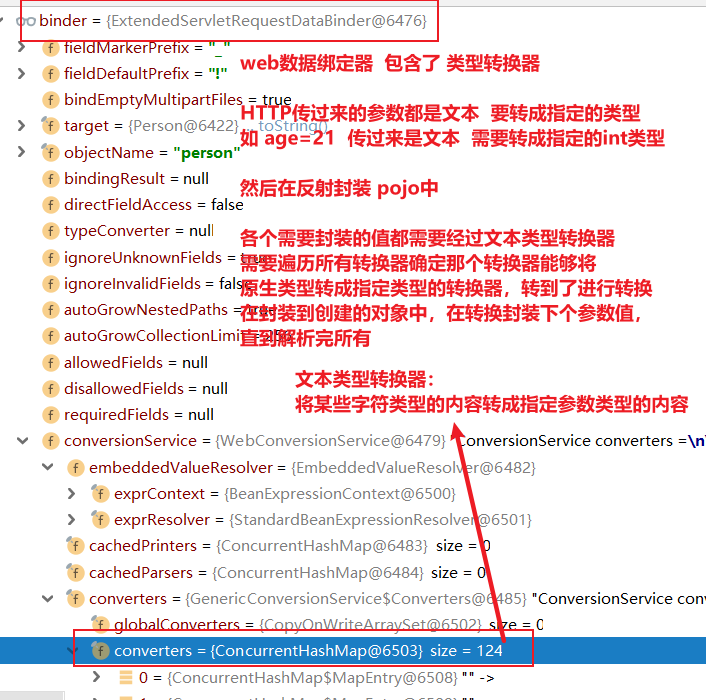
-
In the future, we can put our own Converter in WebDataBinder;
Private static final class stringtonumber < T extensions number > implementations converter < string, t > stir - > number
-
Custom Converter
-
Practice code
index.html
<form action="testPojo" method="post">
    full name: <input name="userName"/> <br/>
    Age: <input name="age"/> <br/>
    birthday: <input name="birth"/> <br/>
    <!--Pet name:<input name="pet.name"/><br/>
		Pet age:<input name="pet.age"/>
	-->
    Pets:<input name="pet" value="people of little importance,12">
    <input type="submit" value="Submit">
</form>
If the above type converter is not customized, an error will be reported as follows:

Add a custom Converter to the container
@Configuration(proxyBeanMethods = false)
public class WebConfig   implements WebMvcConfigurer {
    @Override
    public void addFormatters(FormatterRegistry registry) {
        registry.addConverter(new Converter<String, Pet>(){
            @Override
            public Pet convert(String source) {
                if (StringUtils.hasLength(source)){
                    Pet pet = new Pet();
                    String[] split = source.split(",");
                    pet.setName(split[0]);
                    pet.setAge(split[1]);
                    return pet;
                }
                return null;
            }
        });
    }
}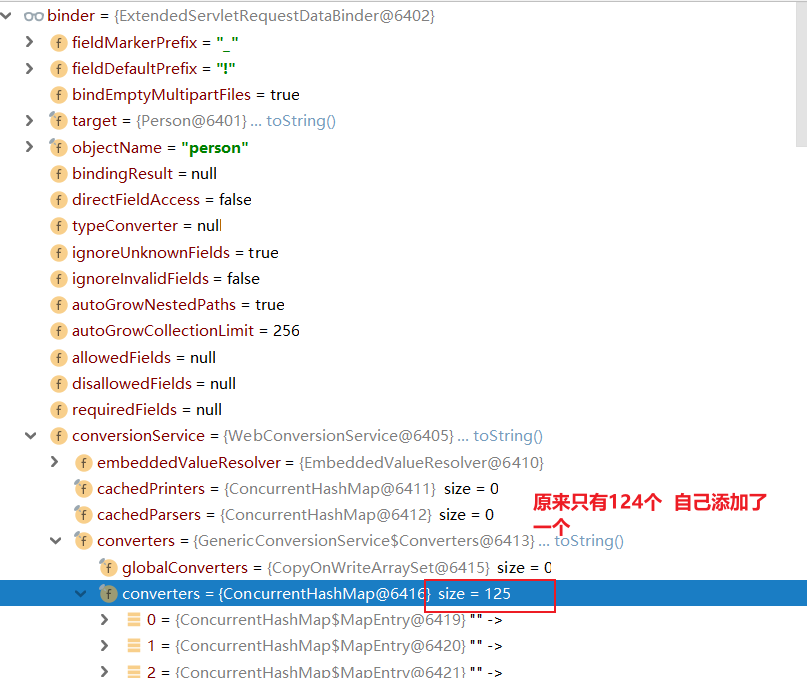
-
-
5. Data response and content negotiation
5.1. Response JSON
1,jackson.jar+@ResponseBody
-
After the web dependency is introduced, the json scenario is automatically imported
<dependency> <groupId>org.springframework.boot</groupId> <artifactId>spring-boot-starter-web</artifactId> </dependency> <!-- Introduced the above web The scene is automatically imported json scene --> <dependency> <groupId>org.springframework.boot</groupId> <artifactId>spring-boot-starter-json</artifactId> <version>2.5.3</version> <scope>compile</scope> </dependency> -
controller code test
/*    Test return json */
@ResponseBody@GetMapping("testJson")
public Person testJson(){
    Person person = new Person();
    person.setUserName("Zhang San");
    person.setAge(12);
    person.setBirth(new Date());
    return person;
}
index.html
<h2>Test Json</h2><a href="testJson">Test Json</a>
-
Marked with @ ResponseBody, you can directly return json data to the front end
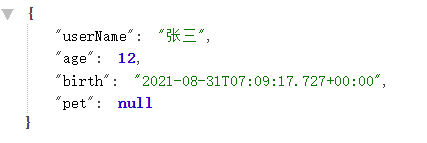
2. Analysis of response json principle
-
The total interface of the return value processor is HandlerMethodReturnValueHandler

-
Get all the return value processors and call the request method written by yourself (the principle of the previous process is the same as that of the above request Parameter annotation)
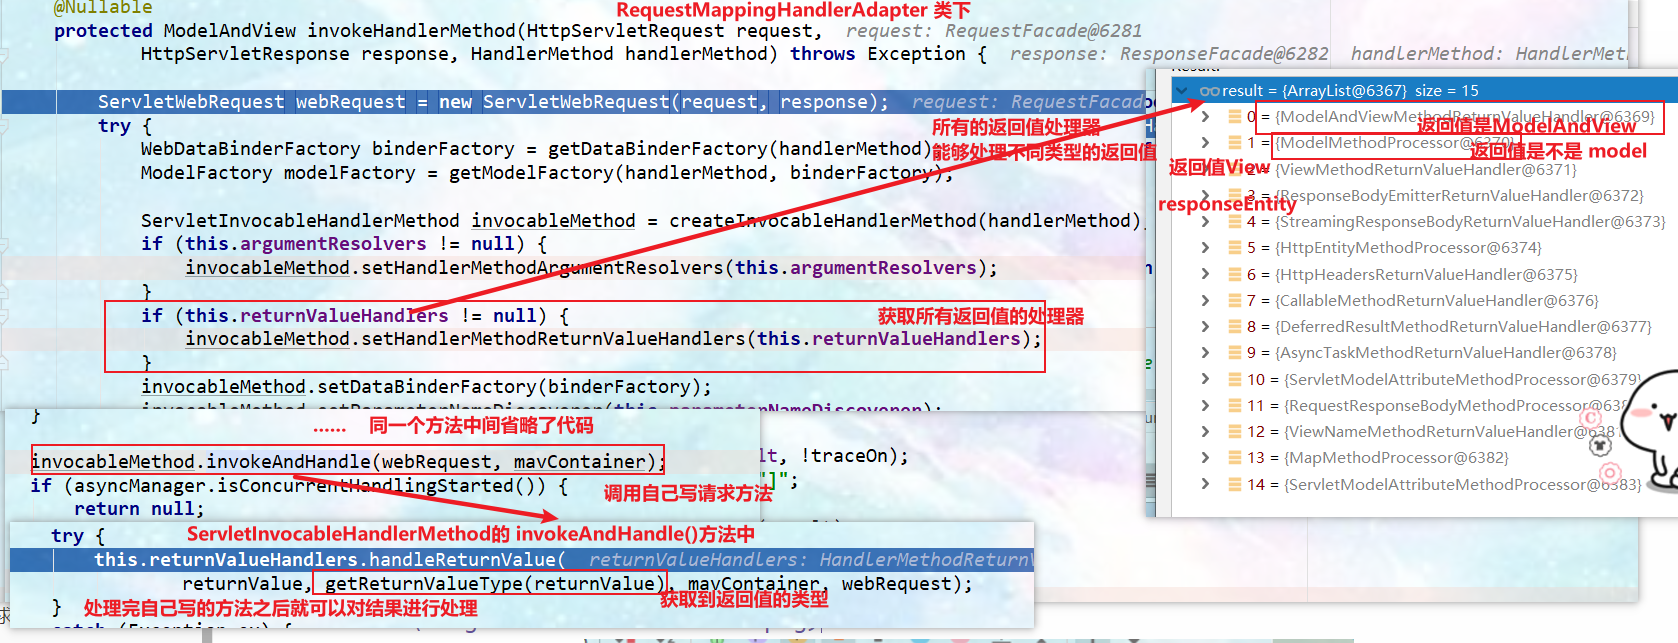
-
Select an appropriate return value processor method (the source code of the handleReturnValue() method above)
[external chain picture transfer failed. The source station may have anti-theft chain mechanism. It is recommended to save the picture and upload it directly (img-g98dforp-1642169239551)( https://gitee.com/PJGitee/images/raw/master/springboot%E7%AC%94%E8%AE%B0.assets/image -20210831155048480. png)]
-
After finding the appropriate return value processor, the processing method of the returned value processor is called.
handler.handleReturnValue(returnValue, returnType, mavContainer, webRequest);
-
The source code is as follows: process the return value
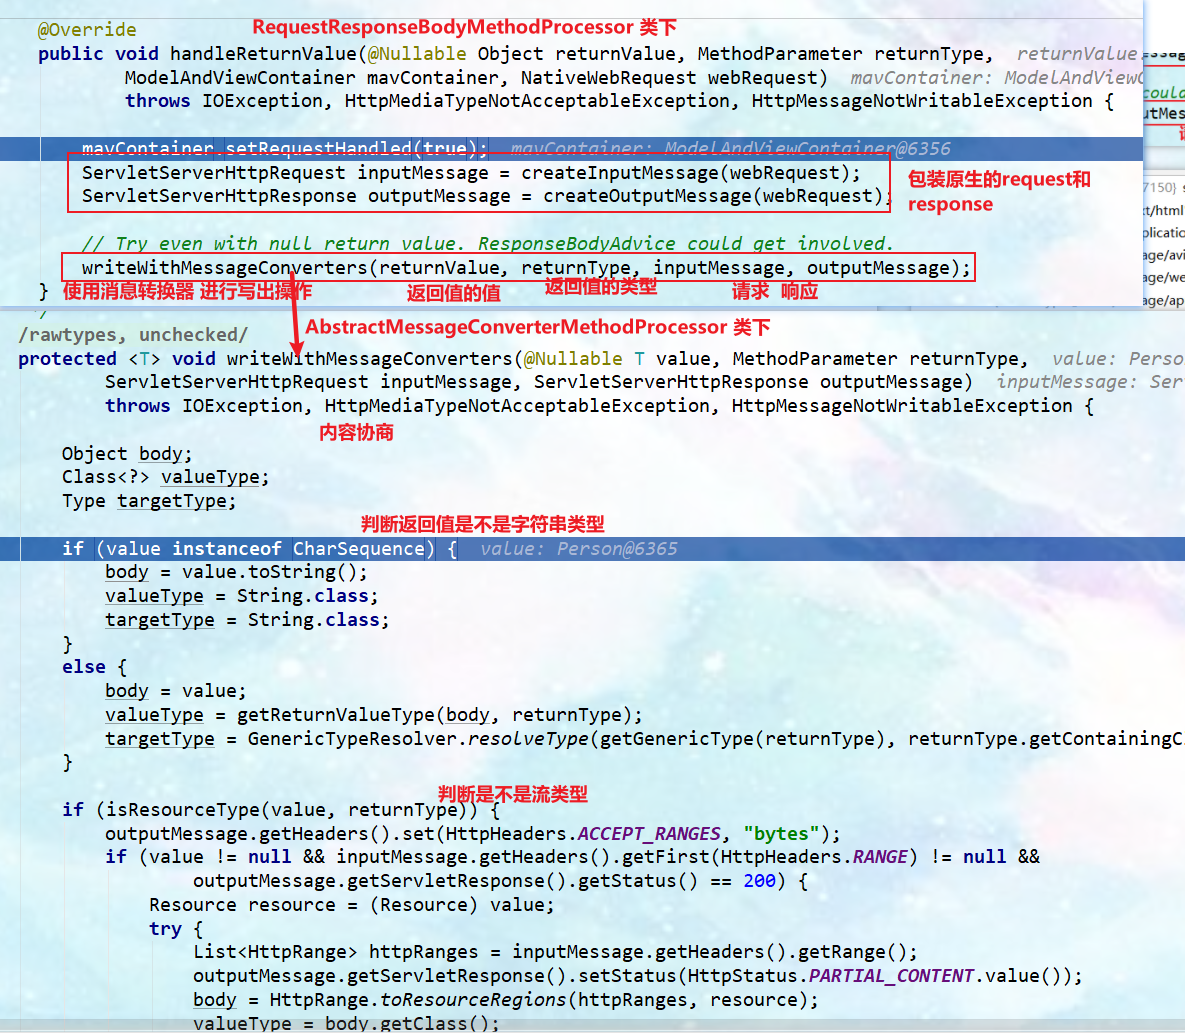
-
Message converter general interface HttpMessageConverter: see whether it supports converting objects of this Class type into data of MediaType type.
Example: if the Person object is converted to JSON or JSON is converted to Person, the MappingJackson2HttpMessageConverter will be used
-
Follow the contents of the writeWithMessageConverters() method above (some codes may be omitted in the middle). Important points: MediaType media type
Content Negotiation: by default, the browser will tell the server what type of content it can receive in the form of header
The server will generate the types that can respond to the browser
Both parties need to negotiate (loop traversal) to get a negotiation result, which is the data type that the browser can receive and the server can respond
See 3 content negotiation principle analysis for source code analysis:

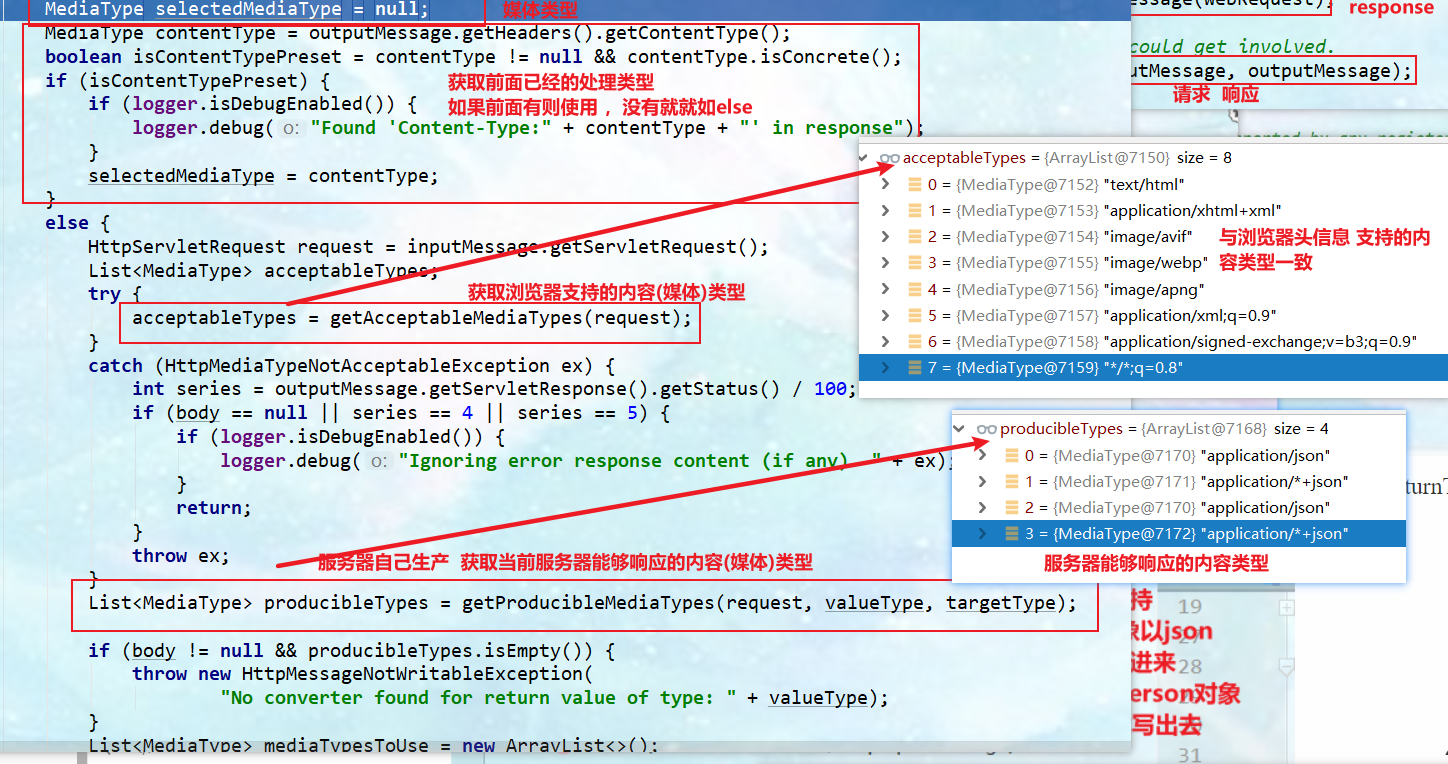
Content negotiation loop traversal:
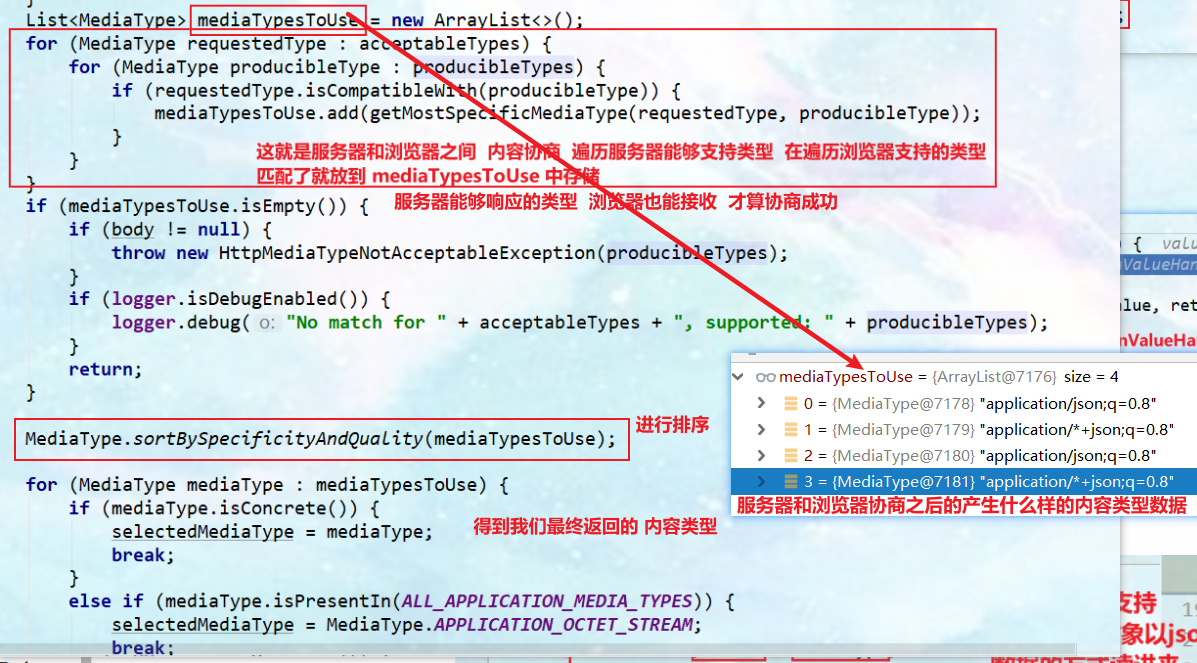
Loop through all message converters in the system to find a message converter that can handle the current response type (determined in the above process (determined by content negotiation))
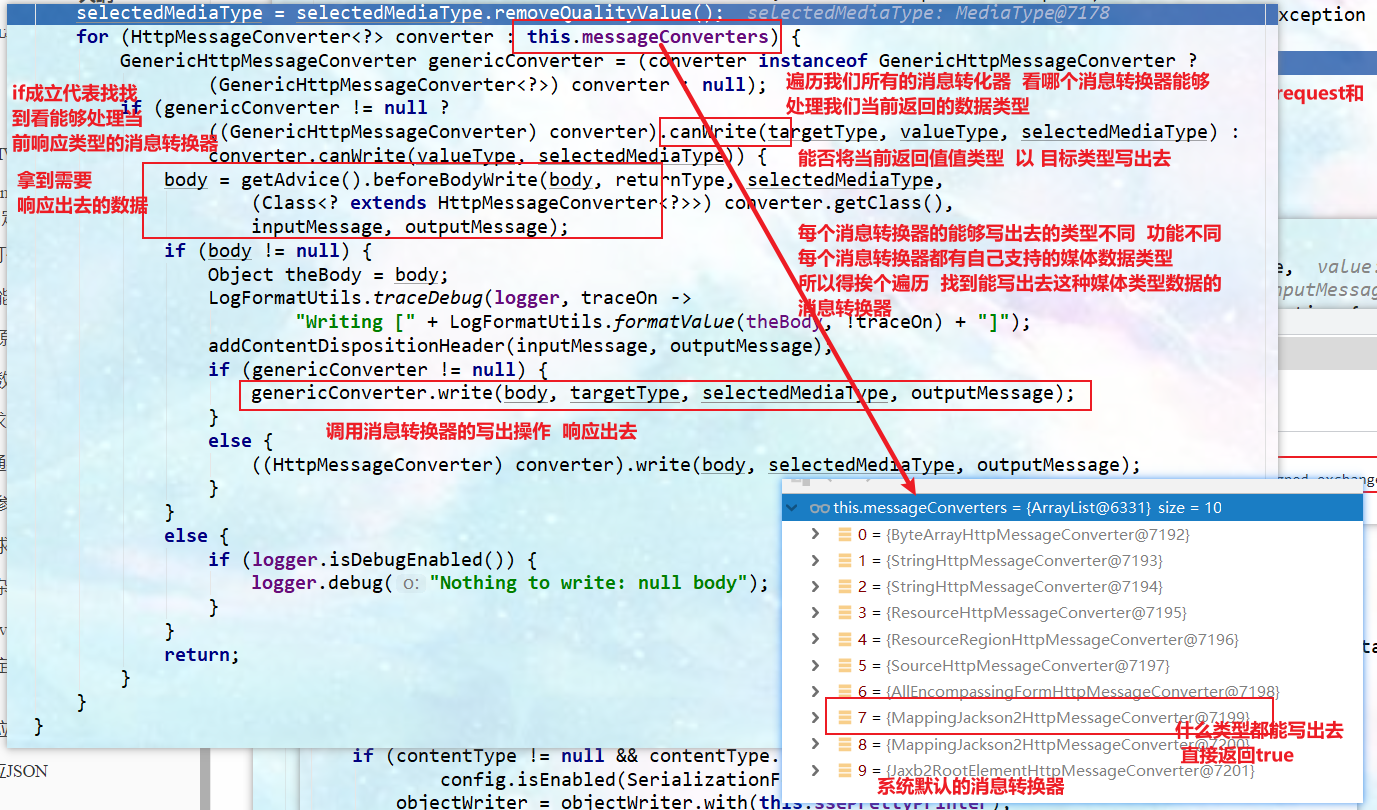
The default message converter supports the following data types:
0 - only Byte type
1 - String
2 - String
3 - Resource
4 - ResourceRegion
5 - DOMSource.class \ SAXSource.class) \ StAXSource.class \StreamSource.class \Source.class
6 - MultiValueMap
7 - true
8 - true
9 - supports xml processing in annotation mode. -
After finding the appropriate message converter, call the message converter write() method to convert the data and write it out.
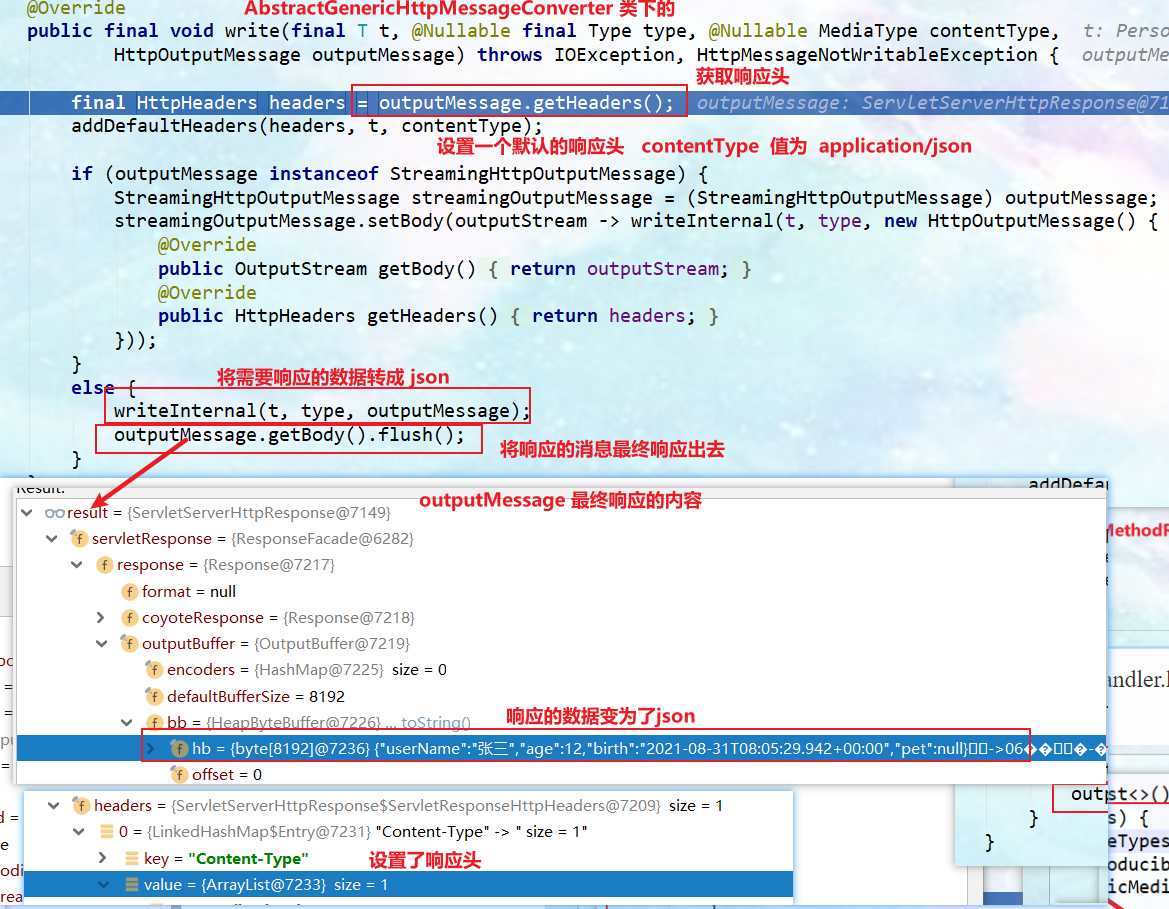
The source code of the writeInternal() method in the above picture: finally, the MappingJackson2HttpMessageConverter converts the object into JSON (converted by the underlying jackson's objectMapper)
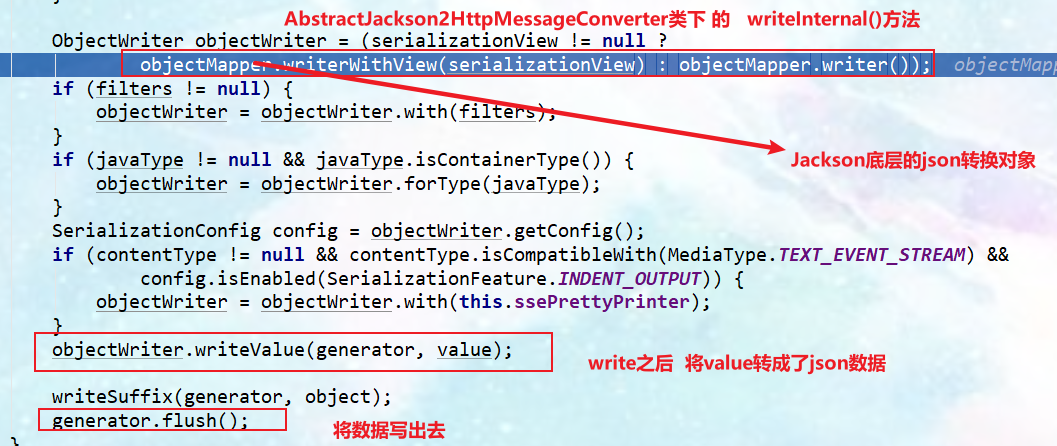
-
-
-
spring can support those return value types
ModelAndView
Model
View
ResponseEntity
ResponseBodyEmitter
StreamingResponseBody
HttpEntity
HttpHeaders
Callable
DeferredResult
ListenableFuture
CompletionStage
WebAsyncTask
 have @ModelAttribute And is of object type
@ResponseBody annotation ---> RequestResponseBodyMethodProcessor;
-
Summary: return value handler principle
- The return value processor determines whether this type is supported. The return value is determined by the supportsreturnantype() method
- If the above judgment is successful, the return value processor calls handleReturnValue() for processing
- The RequestResponseBodyMethodProcessor can process the returned value annotated with @ ResponseBody.
- Use the MessageConverters message converter to process and write the data as json
- Content negotiation (by default, the browser will tell the server what content type it can accept in the form of request header)
- The server finally determines what kind of content type data the server can produce according to its own ability,
- Spring MVC will traverse the HttpMessageConverter at the bottom of all containers one by one to see who can handle it?
- Get MappingJackson2HttpMessageConverter and write the object as json
- Use MappingJackson2HttpMessageConverter to convert the object into json and write it out.
- Use the MessageConverters message converter to process and write the data as json
3. Analysis of content negotiation principle
-
Return data of different media types according to different receiving capabilities of the client (browser). If the client cannot parse the content returned by the server, that is, the media type does not match, the response is 406
-
Introduce the dependency of response client (browser) xml
Postman software can be used to test the returned json and xml respectively: only the Accept fields (application/json and application/xml) in the request header need to be changed.
As specified in the Http protocol, the Accept field tells the server the data type that the client can receive.
<!--Introduction can respond xml The dependent version of is arbitrated--> <dependency> <groupId>com.fasterxml.jackson.dataformat</groupId> <artifactId>jackson-dataformat-xml</artifactId> </dependency> -
After introducing the above dependencies, use the browser to send the request "testjason"


-
Send a "testjason" request using Postman
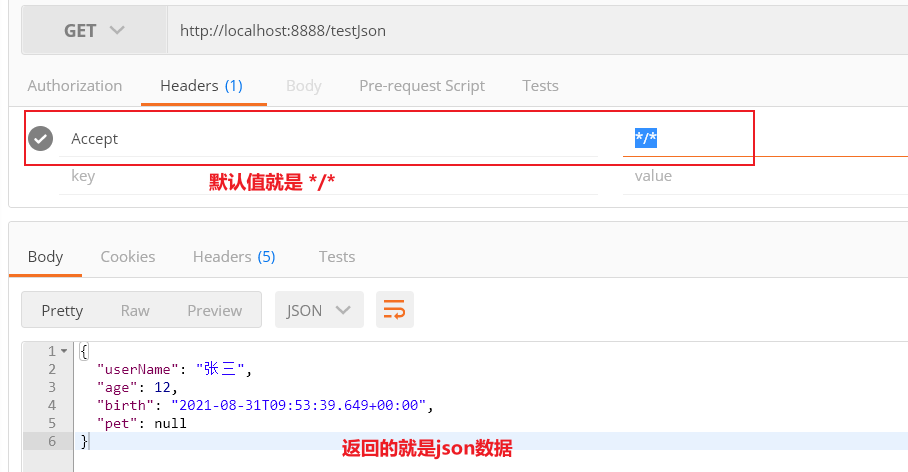
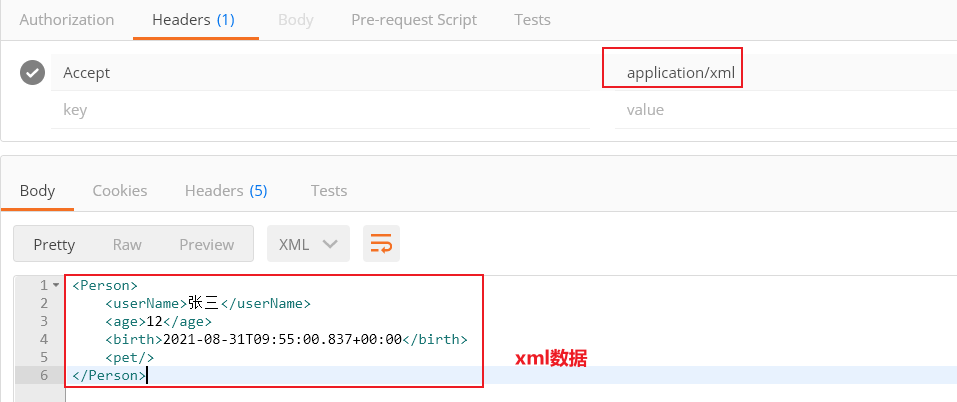
-
The above proves that the message converter will use different message converters to convert the data to be responded into the type of data to be received selected by the client according to the different receiving capabilities of the client
-
Content negotiation principle analysis:
-
acceptableTypes = getAcceptableMediaTypes(request); The source code obtains the media types that can be received by the client (browser and postMan) (see 4 sub chapters: content negotiation principle based on request parameters, 6 sub chapters: analysis of custom convert principle, and 7 sub chapters: complete adaptation of browser and PostMan content negotiation)
[the external chain picture transfer fails. The source station may have an anti-theft chain mechanism. It is recommended to save the picture and upload it directly (img-gwjd1mel-1642169239556)( https://gitee.com/PJGitee/images/raw/master/springboot%E7%AC%94%E8%AE%B0.assets/image -20210831192049564. png)]
-
List producibleTypes = getProducibleMediaTypes(request, valueType, targetType); Source code. The acquisition server can process the message converter of the current return value type. After obtaining the message converter, obtain the media type that the message converter can respond to, store it in the collection of media types, and return.
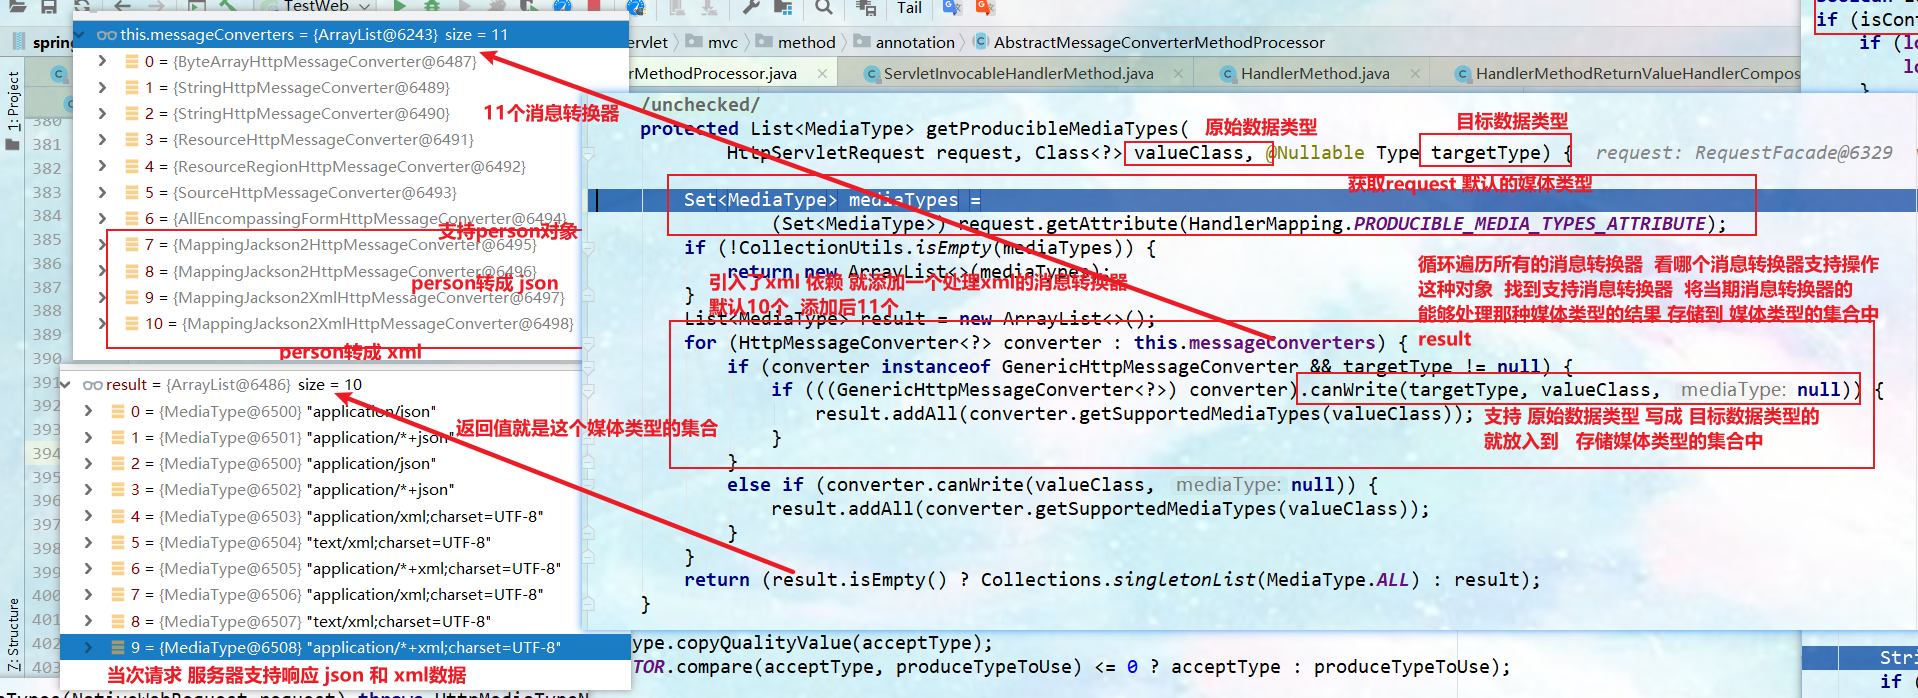
-
mediaTypesToUse is the result of the cyclic best match between the data types that the server can respond to and the data types that the client can receive (only if the response and the received data types are the same, they will be added to the mediaTypesToUse media collection), and then select the specific response data type as long as it is not *
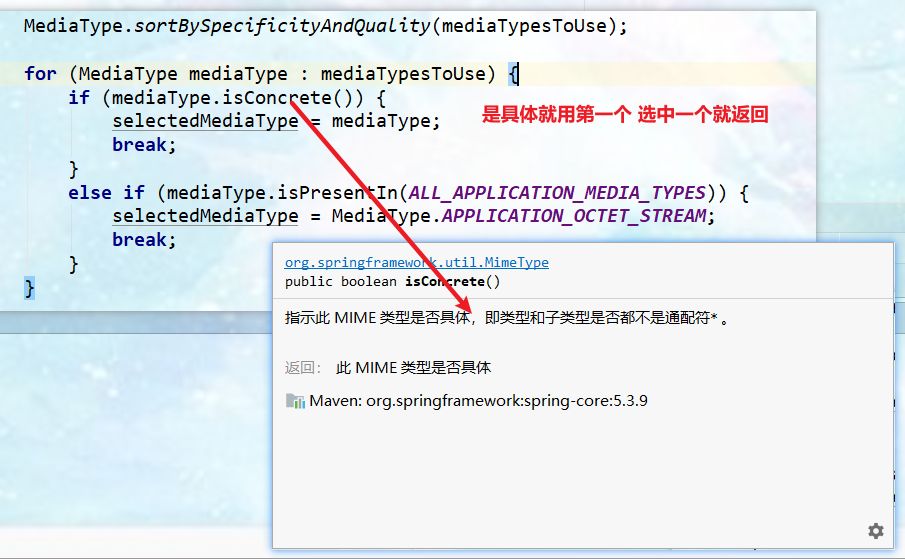
-
-
Explain that the request "testjason" sent by the browser returns xml data

-
summary
- Judge whether there is a determined media type MediaType in the current response header.
- Get the content types supported by the client (PostMan, browser). (obtain the client Accept request header field application/xml) (this step is described in detail in the next section)
- The content negotiation manager uses the request header based policy by default
- The headercontentnegotiation strategy determines the type of content that the client can receive
- Gets the media data type that the server can respond to
- Cycle through all the messageconverters of the current system to see who supports the operation of this object (Person)
- Find the converter that supports the operation Person and count the media types supported by the converter.
- The client needs application/xml, and the server has 10 mediatypes.
- Best matching media type for content negotiation
- Traverse and loop all the messageconverters of the current system, and use the converter that supports converting the object to the best matching media type. Call it for conversion. The MessageConverter uses two loop comparisons
4. Principle of content negotiation based on request parameters
-
When the parameter based request is not enabled, the header content negotiation strategy is used by default. The analysis is as follows:
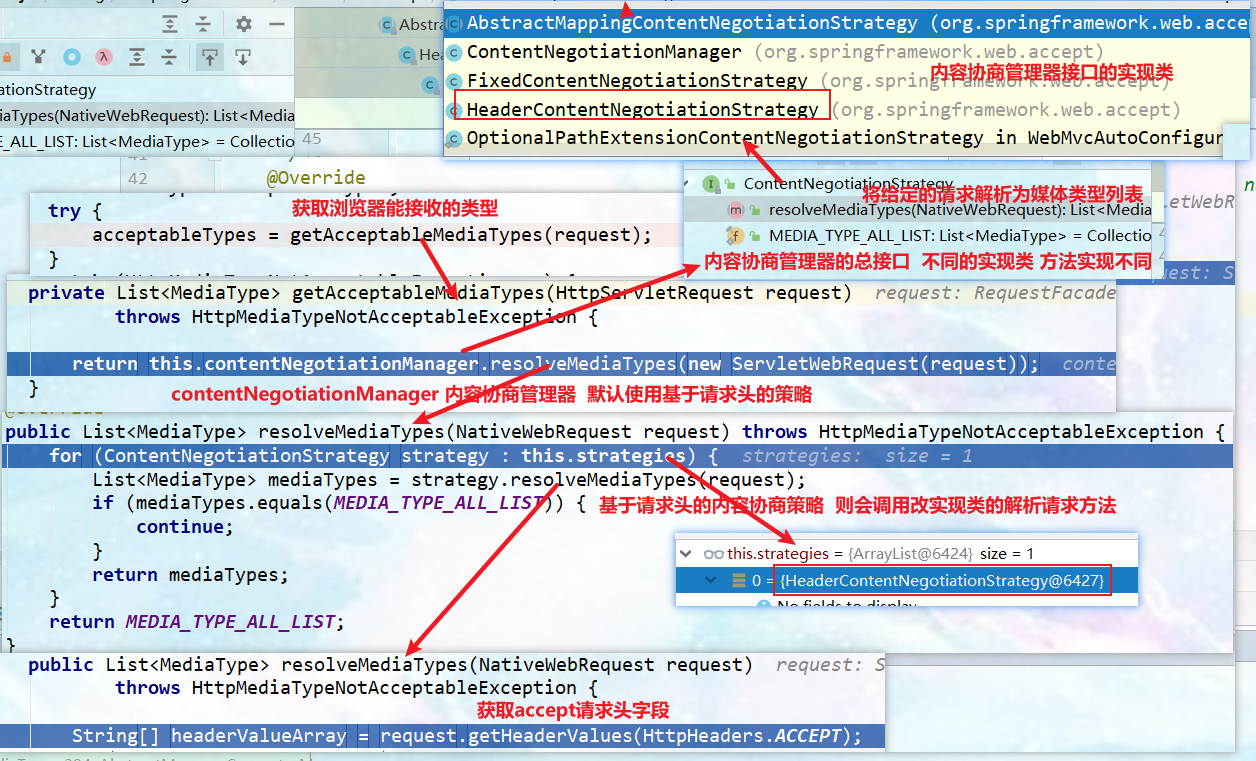
-
Because the browser can't support us to send the request header ourselves (except for adding the content type field to ajax), spring boot provides our content negotiation manager based on the request parameters
In order to facilitate content negotiation, the content negotiation function based on request parameters is enabled.
spring:
	mvc:
    	contentnegotiation:
        	favor-parameter: true  #Enable request parameter content negotiation mode. The default value is false
Browser address enter URL with format parameter:
http://localhost:8080/test/person?format=json Or http://localhost:8080/test/person?format=xml
-
When the content negotiation function based on request parameters is enabled, there will be two content negotiation managers by default
Parametercontentnegotiation strategy (injected by Spring container, parameter based Content Negotiation Manager)
Headercontentnegotiation strategy (Content Negotiation Manager Based on request header)
The two content negotiation managers will be iterated. Since the parametercontentnegotiation strategy will be traversed first, the value of the parameter named format will be obtained to determine the data type that the client needs to receive. The parameter value can only be json or xml
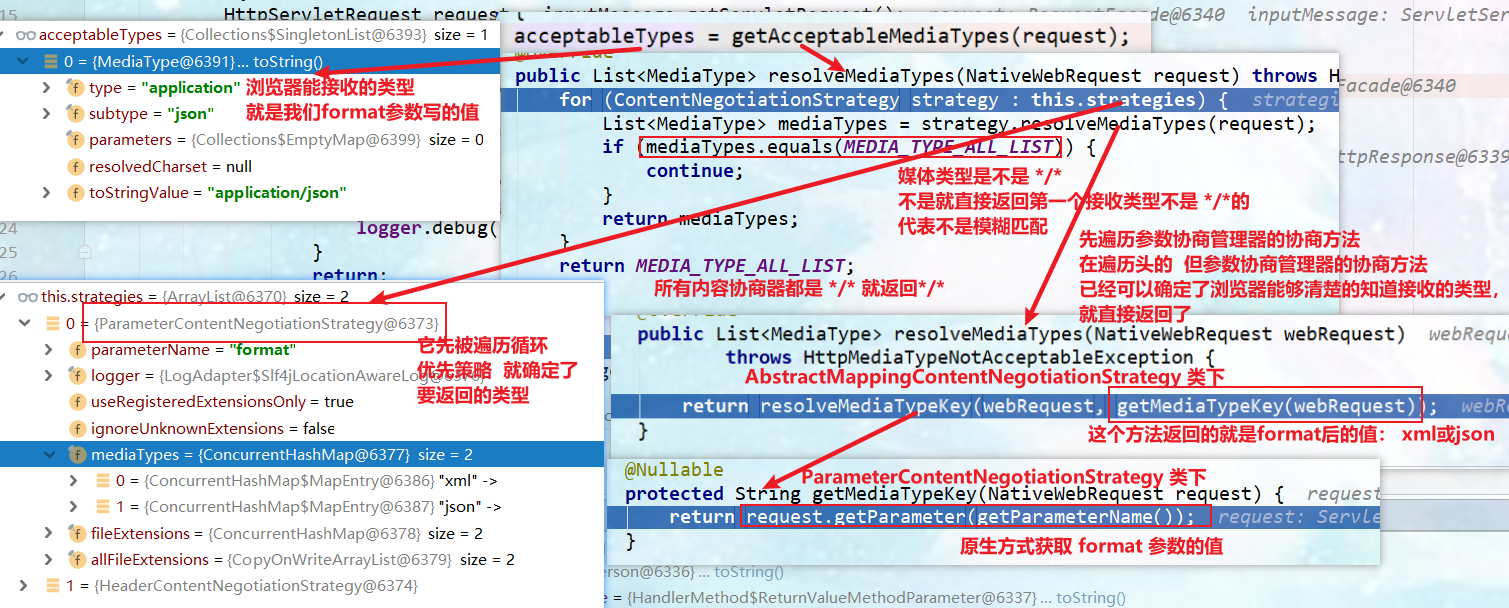
5. Custom converter
-
Realize multi protocol data compatibility. json, xml, myPj (this is self created)
- @The ResponseBody response data goes out and calls the RequestResponseBodyMethodProcessor processing method to return the value
- The return value of the Processor processing method. Handle the server response through the MessageConverter and the negotiation operation received by the client
- All messageconverters together can support data operations (read and write) of various media types
- The content negotiation finds the final messageConverter and responds or reads it into the parameters of the request method
-
Some convers are added by default
[external chain picture transfer failed. The source station may have anti-theft chain mechanism. It is recommended to save the picture and upload it directly (img-8vnks0ef-1642169239558)( https://gitee.com/PJGitee/images/raw/master/springboot%E7%AC%94%E8%AE%B0.assets/image -20210901100207974. png)]
-
Custom convert steps
-
Customize a convert class to implement the methods in HttpMessageConverter, the general interface of message converter
/* Custom convert Implement the general interface HttpMessageConverter of message converter */ public class MyConvert implements HttpMessageConverter<Person> { @Override public boolean canRead(Class<?> clazz, MediaType mediaType) { //Read @ Response can read, write and read. On the parameters of the method, the parameter values of the front end (json, xml and other types) can be encapsulated on the parameters / / false means that the data sent by the browser cannot be read return false; } public boolean canWrite(Class<?> clazz, MediaType mediaType) { //Whether the server can respond and return true means that any type can respond //Only when it is a person type can the server respond to the media type application/myPj return clazz.isAssignableFrom(Person.class); } /* The server needs to count what content types can be written out by all messageconverters */ public List<MediaType> getSupportedMediaTypes() { return MediaType.parseMediaTypes("application/myPj"); //Add the media type accept. If the hair is sent, the receiving of this type will match this. If the matching is successful, call the canWrite() and canRead() methods, and return the corresponding write() and read() methods of true } //After the server obtains all messageconversions, it will cycle to judge whether each messageConvert can read or write. Only when it is satisfied will the following methods be called /* This method will not be called until canRead() returns true */ public Person read(Class<? extends Person> clazz, HttpInputMessage inputMessage) throws IOException, HttpMessageNotReadableException { return null; } /* Can read canWrite() and return true before calling this method */ public void write(Person person, MediaType contentType, HttpOutputMessage outputMessage) throws IOException, HttpMessageNotWritableException { OutputStream body = outputMessage.getBody();//Get stream data //Content of custom response format String result = person.getUserName()+";"+person.getAge()+";"+ person.getBirth(); //Respond, get out, get out body.write(result.getBytes()); } } -
Add this messageConvert to spring MVC: what are the functions of spring MVC? Add a WebMvcConfigurer to the container through an entry, and rewrite the methods inside to add and modify the specific functions of spring MVC
/* web Configuration class for */ @Configuration(proxyBeanMethods = false) public class WebConfig implements WebMvcConfigurer { /* Overwrite all conversions. This method overrides the system default. All messageconversions will become invalid @Override public void configureMessageConverters(List<HttpMessageConverter<?>> converters) { }*/ /* Extend some convert on the original basis */ @Override public void extendMessageConverters(List<HttpMessageConverter<?>> converters) { converters.add(new MyConvert()); //Add the custom convert to the server, and the server can respond to the request of application/myPj type } } -
Write request method
/* Custom MessageConverter 1,The browser sends a request and directly returns XML [application / XML] jacksonxmlconverter 2,If it is an ajax request, return JSON [application / JSON] jacksonjsonconverter 3,If the Silicon Valley app sends a request, it returns the custom protocol data [application / mypj] xxxconverter Custom response format: attribute value 1; Attribute value 2; Property value 3 Steps: 1,Add a custom MessageConverter to the bottom of the system 2,The bottom layer of the system will count which types all messageconverters can operate 3,Client and server content negotiation [mypj - > mypj] */ @ResponseBody@GetMapping("testMyConvert") public Person testMyConvert(){ Person person = new Person(); person.setUserName("Li Si"); person.setAge(6); person.setBirth(new Date()); return person; } -
test
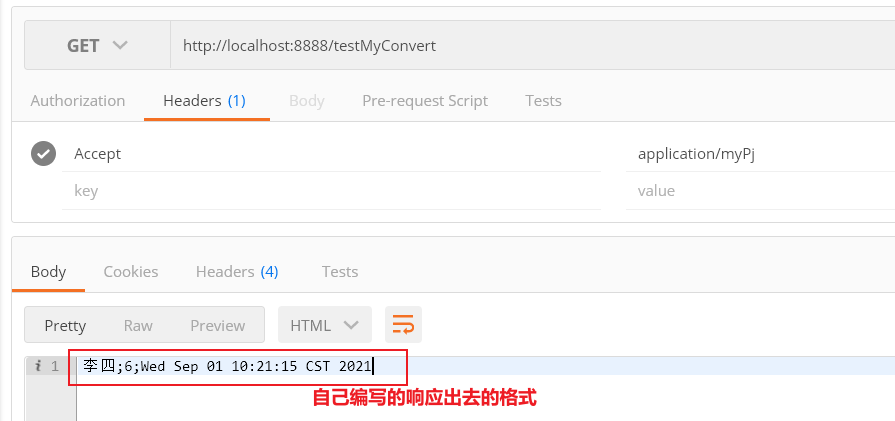
-
6. Principle analysis of custom convert
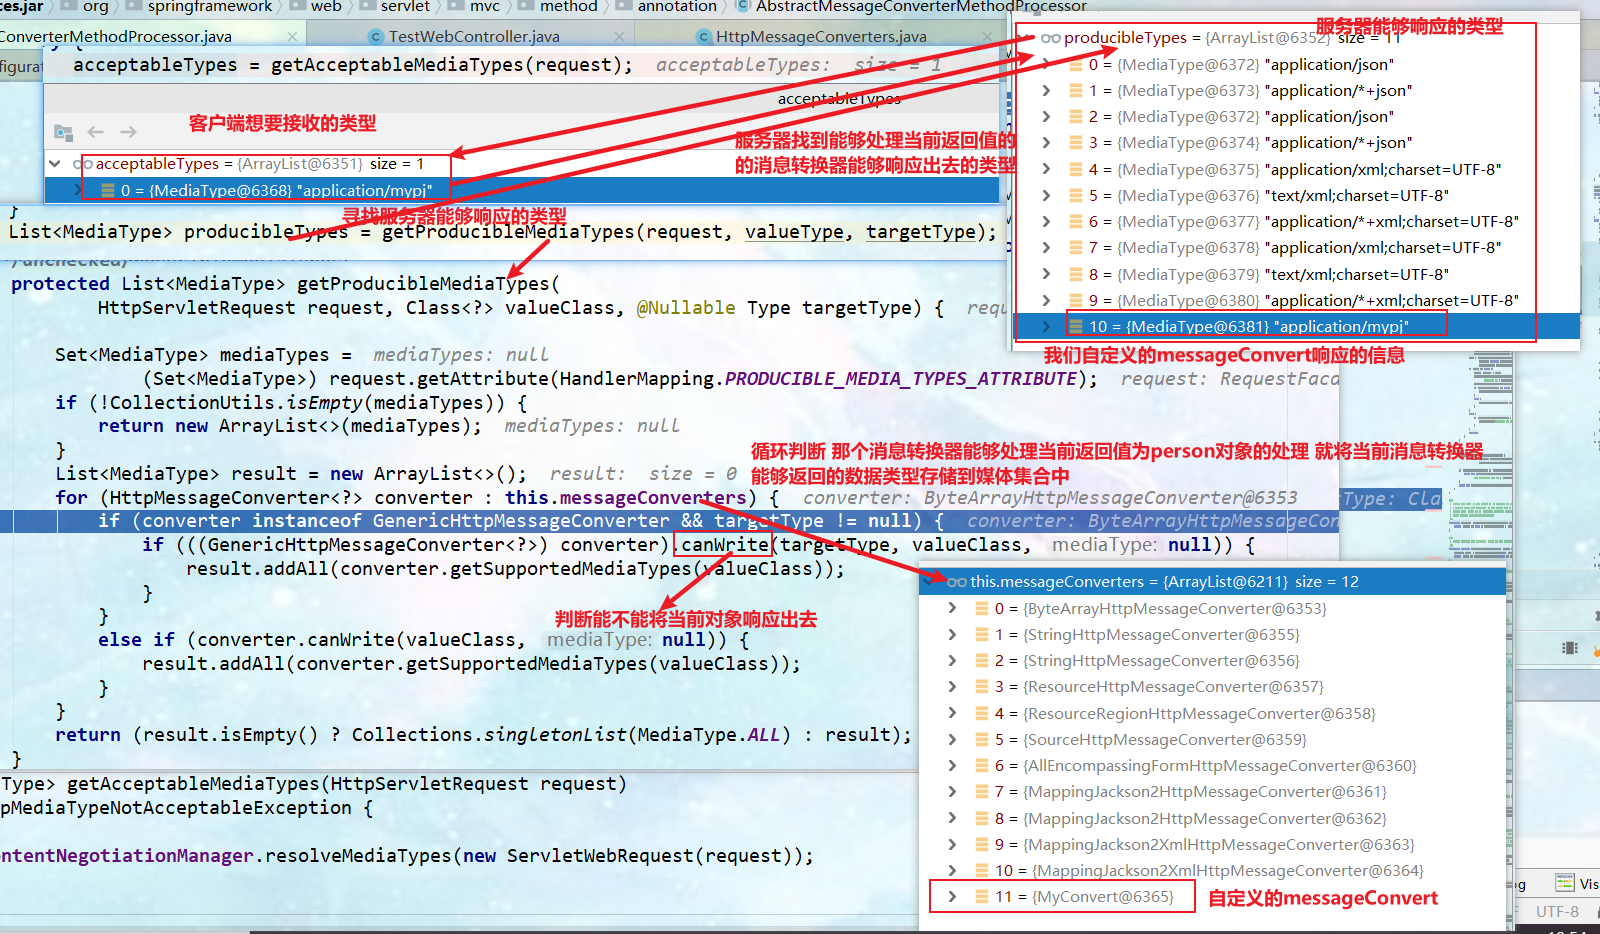
- After finding the acceptable types received by the client and the producibletypes of the server's response, start negotiation (loop traversal matching). After accurate matching, determine that the response type is application/myPj, and then recycle all messageconversions to find messageconversions that can handle the current response type, When the match is reached, the write() method of the current messageConvert is called for formatting, and finally the response is sent to a client
7. The browser negotiates full adaptation with PostMan content
-
The browser specifies what content needs to be responded to through format, but the value of format can only be json or xml. If the value is other, it will not respond (how to negotiate content in the form of parameters)
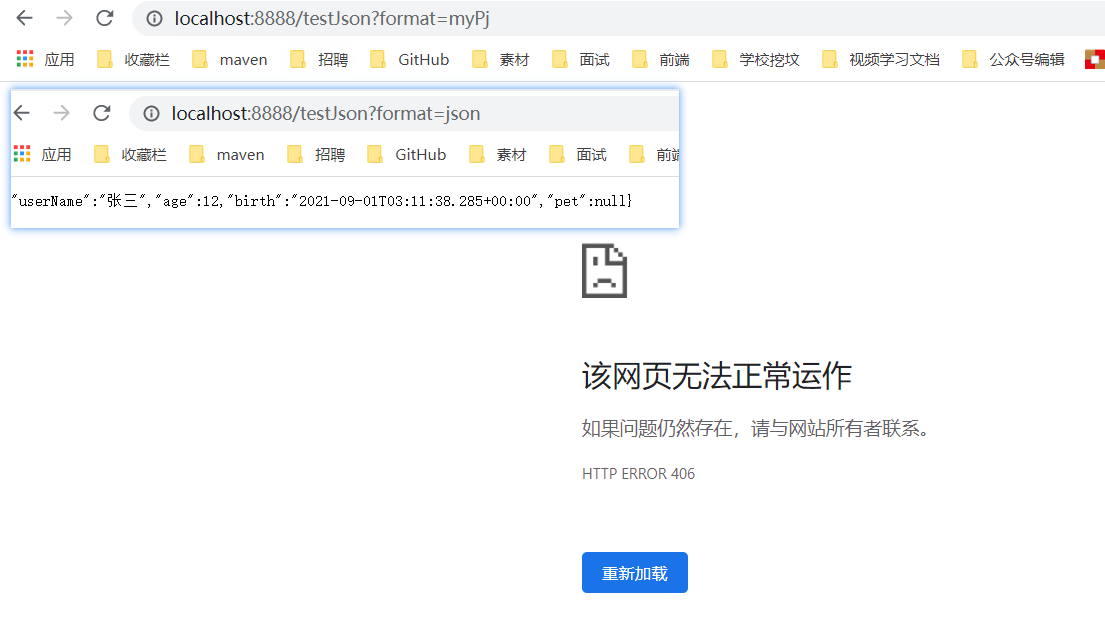
Parametercontentnegotiation strategy the content negotiator supports two data types of response
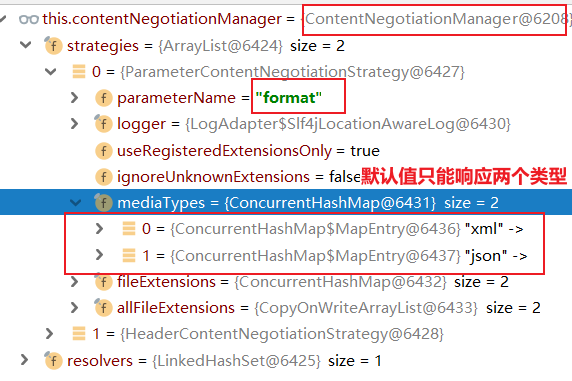
-
Negotiation steps for changing the default browser request parameters:
-
Content negotiation based on request parameters must be enabled
spring: mvc: contentnegotiation: favor-parameter: true #Enable request parameter content negotiation mode. The default value is false -
Modify content negotiation policy
- The first approach:
/* web Configuration class for */ @Configuration(proxyBeanMethods = false) public class WebConfig implements WebMvcConfigurer { /* Extend some convert on the original basis */ @Override public void extendMessageConverters(List<HttpMessageConverter<?>> converters) { converters.add(new MyConvert()); //Add the custom convert to the server, and the server can respond to the request of application/myPj type } /** * Configure content negotiation options * how to conduct content negotiation in the form of parameters */ public void configureContentNegotiation(ContentNegotiationConfigurer configurer) { Map<String, MediaType> mediaTypes = new HashMap<>(); mediaTypes.put("json", MediaType.APPLICATION_JSON);//The value of the method parameter is json mapping to json media type mediaTypes.put("xml", MediaType.APPLICATION_XML);//The value of the method parameter is xml Mapping to xml media type mediaTypes.put("gg", MediaType.parseMediaType("application/myPj")); //The value of the method parameter is gg mapping to adding a custom media type //The parameter requires map < string, mediatype > mediatypes ParameterContentNegotiationStrategy parameterStrategy = new ParameterContentNegotiationStrategy(mediaTypes); parameterStrategy.setParameterName("format"); //Please set the name of the ball parameter //The parameter requires list < contentnegotiationstrategy > configurer.strategies(Arrays.asList(parameterStrategy)); } }-
The second method is to add a content negotiation policy to the configuration file
spring:
	mvc:
		contentnegotiation:
        	favor-parameter: true
            media-types:        gg: application/myPj
-
After modifying the content negotiation strategy, the parametercontentnegotiation strategy supports three data types of response
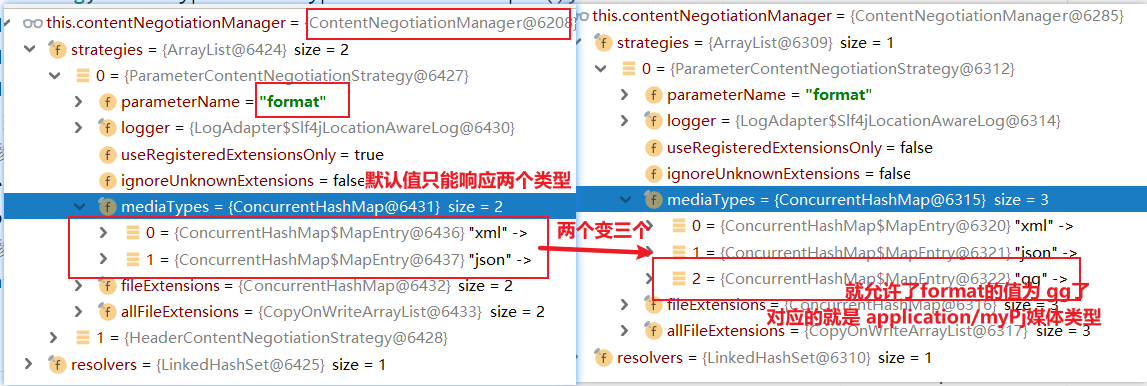
-
-
The problem is that the request is sent using postMan. No matter what the data type of the accept header is, the return is json. As you can see from the figure above, there is no problem
Headercontentnegotiation strategy (Content Negotiation Manager Based on request header), so if there is no content negotiation manager that can parse the request header, it will return/
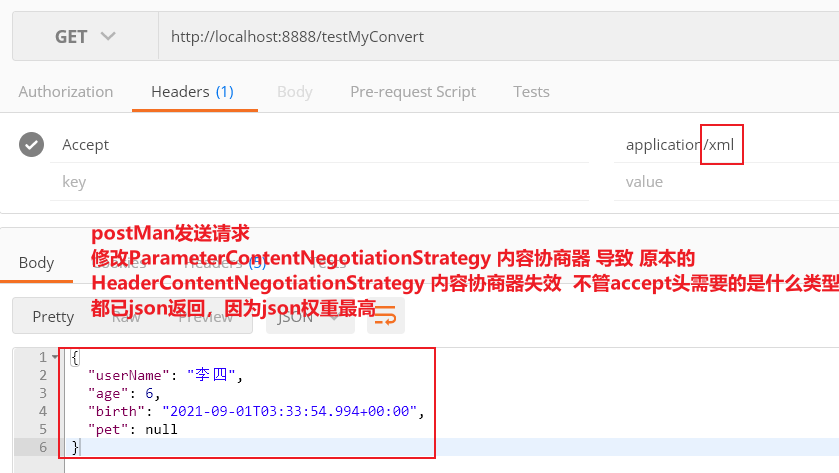
Cause of the problem: it is possible that the custom functions we added will overwrite many default functions, resulting in some default functions invalid.
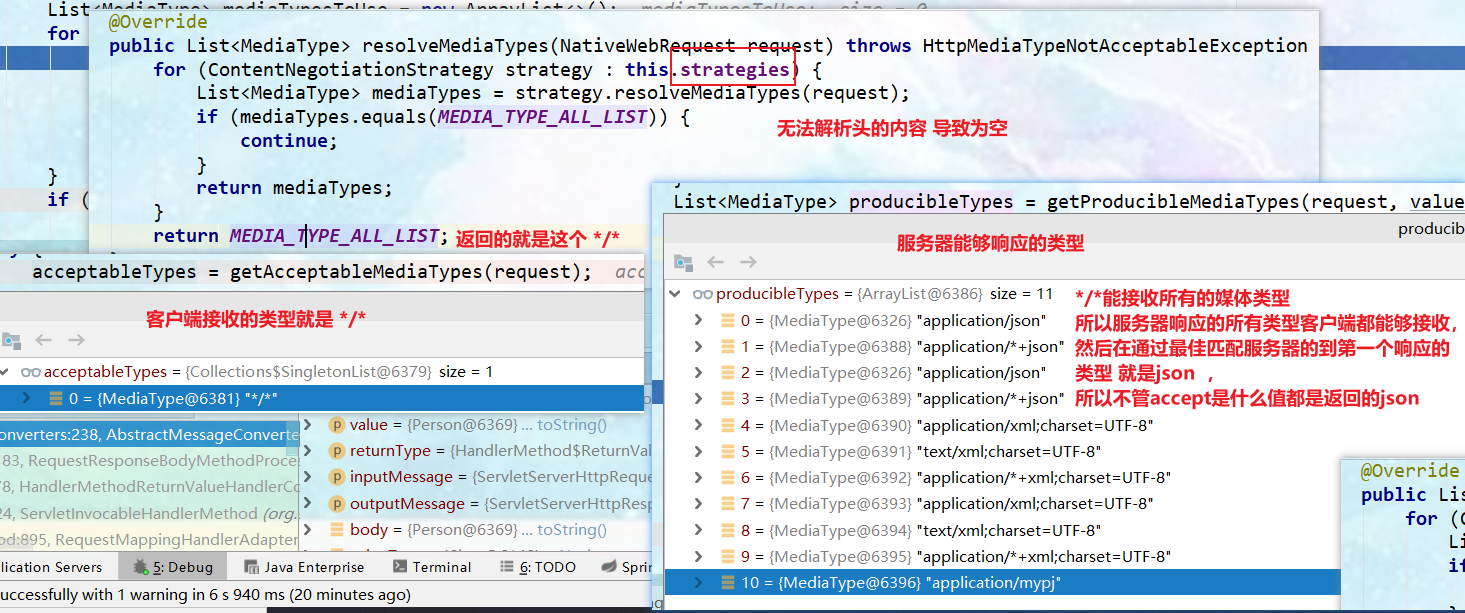
Solution: add a content negotiation manager that parses request headers
/*    web Configuration class for */
@Configuration(proxyBeanMethods = false)
public class WebConfig   implements WebMvcConfigurer {
    /*        Extend some convert on the original basis     */
    @Override
    public void extendMessageConverters(List<HttpMessageConverter<?>> converters) {
        converters.add(new MyConvert());//Add the custom convert to the server, and the server can respond to the request of application/myPj type
    }
    /**     * Configure content negotiation options * how to conduct content negotiation in the form of parameters     */
    public void configureContentNegotiation(ContentNegotiationConfigurer configurer) {
        Map<String, MediaType> mediaTypes = new HashMap<>();
        mediaTypes.put("json", MediaType.APPLICATION_JSON);//The value of the method parameter is json mapping to json media type
        mediaTypes.put("xml", MediaType.APPLICATION_XML);//The value of the method parameter is xml Mapping to xml media type
        mediaTypes.put("gg", MediaType.parseMediaType("application/myPj")); //The value of the method parameter is gg mapping to adding a custom media type
        //The parameter requires map < string, mediatype > mediatypes
        ParameterContentNegotiationStrategy parameterStrategy = new ParameterContentNegotiationStrategy(mediaTypes);
        parameterStrategy.setParameterName("format"); //Please set the name of the ball parameter
        HeaderContentNegotiationStrategy headerStrategy = new HeaderContentNegotiationStrategy();//Added content negotiation manager that resolves request headers
        //The parameter requires list < contentnegotiationstrategy >
        configurer.strategies(Arrays.asList(parameterStrategy,headerStrategy));	}}
-
Results after resolution
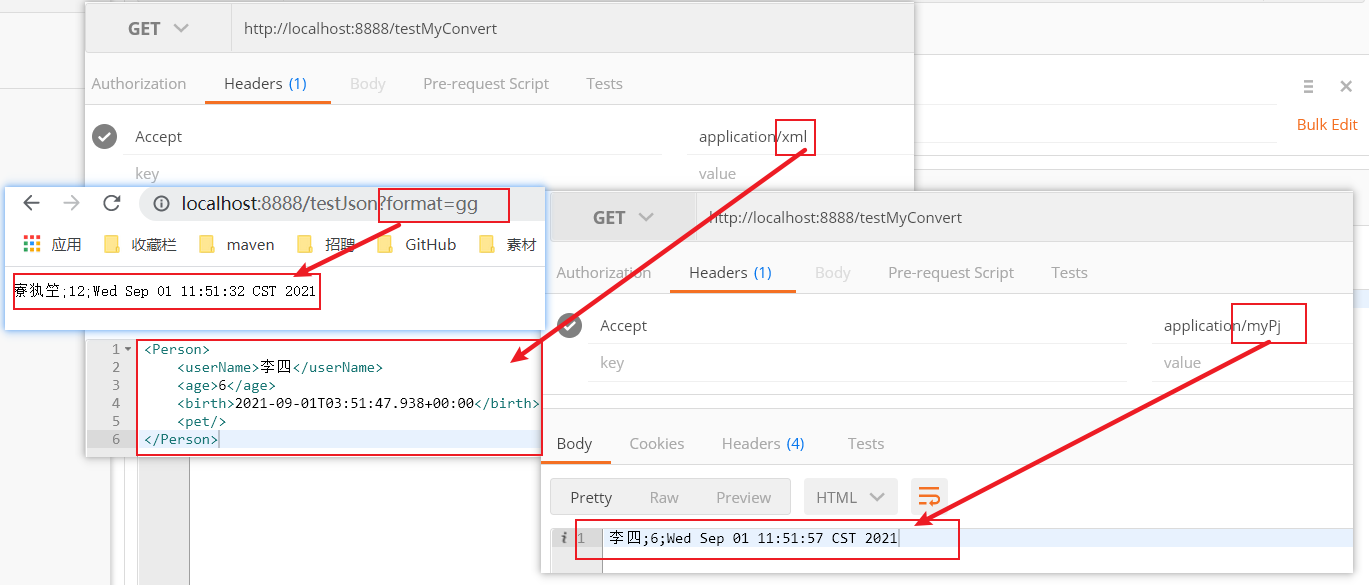
-
Let's consider, in addition to our complete customization of the above functions? Does SpringBoot provide us with the ability to quickly modify media types based on configuration files? How to configure it? [Note: refer to the section on web development content negotiation in the official SpringBoot document]
spring.mvc.contentnegotiation.media-types: {gg: application/x-guigu}
spring:
	mvc:
    	contentnegotiation:
        	favor-parameter: true
            media-types:        gg: application/myPj
5.2 view parser and template engine
SpringBoot does not support JSP by default, so it is necessary to introduce third-party template engine technology to realize page rendering.
1. Template engine Thymeleaf
-
Thymeleaf official website document address: https://www.thymeleaf.org/documentation.html
- Introduction: Thymeleaf is a modern server-side Java template engine suitable for Web and independent environments.
- Thymeleaf's main goal is to introduce elegant natural templates into your development workflow - HTML can be displayed correctly in the browser or as a static prototype, allowing development teams to collaborate more.
- It is not suitable for highly concurrent projects, but for single projects.
-
Basic grammar
-
Basic grammar website: https://www.thymeleaf.org/doc/tutorials/3.0/usingthymeleaf.html#setting-attribute-values
-
expression
Expression name grammar purpose Variable value ${...} Get request domain, session domain, object equivalent Select variable *{...} Get context object value news #{...} Get international equivalent link @{...} Generate link Fragment Expression ~{...} jsp:include function to introduce public page fragments -
Literal
- Text values: 'one text', 'Another one!'
- Numbers: 0, 34, 3.0, 12.3
- Boolean: true, false
- Null value: null
- Variables: one, two,... Variables cannot have spaces
-
Text operation
- String splicing:+
- Variable replacement: | The name is ${name}|
-
Mathematical operation
- Operators: +, -, *, /,%
-
Boolean operation
- Operators: and, or
- Unary operation:, not
-
Comparison operation
- Comparison: >, <, > =, < = (GT, lt, Ge, Le)
- Equation: = == ( eq , ne )
-
Conditional operation
- If-then: (if) ? (then)
- If-then-else: (if) ? (then) : (else)
- Default: (value) ?: (defaultvalue)
-
Special operation
- No operation:_
-
Set attribute value syntax: th:attr
-
Set a single value
<form action="subscribe.html" th:attr="action=@{/subscribe}"> <fieldset> <input type="text" name="email" /> <input type="submit" value="Subscribe!" th:attr="value=#{subscribe.submit}"/> </fieldset> </form> -
Set multiple values
<img src="../../images/gtvglogo.png" th:attr="src=@{/images/gtvglogo.png},title=#{logo},alt=#{logo}" />
-
-
All h5 compatible label writing
https://www.thymeleaf.org/doc/tutorials/3.0/usingthymeleaf.html#setting-value-to-specific-attributes
-
Iteration (loop)
<tr th:each="prod : ${prods}"> <td th:text="${prod.name}">Onions</td> <td th:text="${prod.price}">2.41</td> <td th:text="${prod.inStock}? #{true} : #{false}">yes</td> </tr> <tr th:each="prod,iterStat : ${prods}" th:class="${iterStat.odd}? 'odd'"> <td th:text="${prod.name}">Onions</td> <td th:text="${prod.price}">2.41</td> <td th:text="${prod.inStock}? #{true} : #{false}">yes</td> </tr> -
Conditional operation
<a href="comments.html" th:href="@{/product/comments(prodId=${prod.id})}" th:if="${not #lists.isEmpty(prod.comments)}">view</a> <div th:switch="${user.role}"> <p th:case="'admin'">User is an administrator</p> <p th:case="#{roles.manager}">User is a manager</p> <p th:case="*">User is some other thing</p> </div> -
Attribute priority
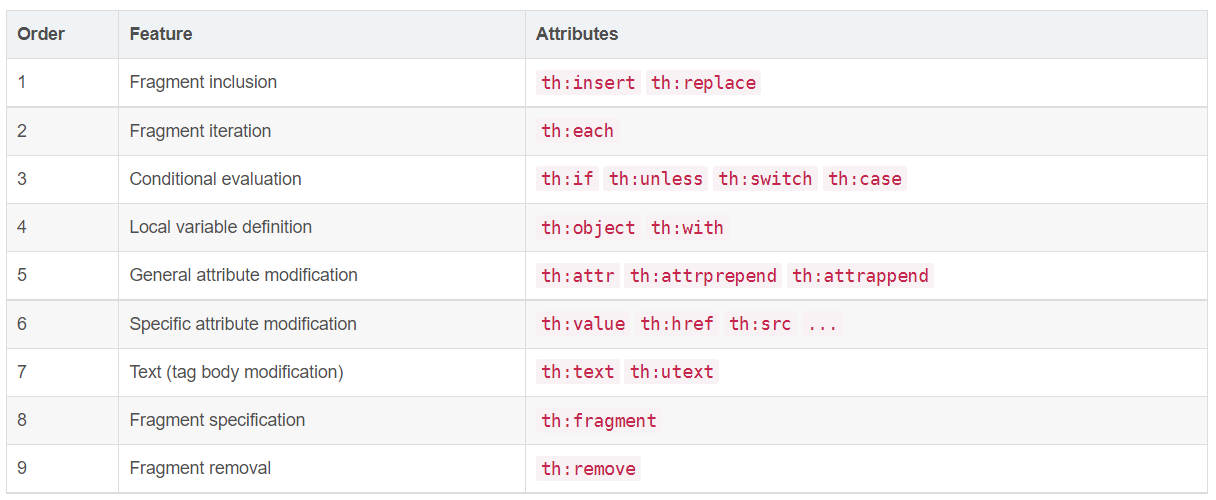
-
-
Use of Thymeleaf
-
Introducing Starter
<!--introduce Thymeleaf Dependence of--> <dependency> <groupId>org.springframework.boot</groupId> <artifactId>pring-boot-starter-thymeleaf</artifactId> </dependency> -
Thymeleaf is already configured

//===========ThymeleafAutoConfiguration autoconfiguration class================== @Configuration(proxyBeanMethods = false) //Configuration class @EnableConfigurationProperties(ThymeleafProperties.class) // Automatically load all beans required by the application @ConditionalOnClass({ TemplateMode.class, SpringTemplateEngine.class }) @AutoConfigureAfter({ WebMvcAutoConfiguration.class, WebFluxAutoConfiguration.class }) public class ThymeleafAutoConfiguration {} -
The following items are automatically configured in the ThymeleafAutoConfiguration auto configuration class
-
The class ThymeleafProperties is bound, and all settings are in this class
-
The spring template engine is configured
-
The ThymeleafViewResolver view parser is configured
Pre suffix of view parser
//Default values of properties under the ThymeleafProperties class
public static final String DEFAULT_PREFIX = "classpath:/templates/";//Place of formwork
public static final String DEFAULT_SUFFIX = ".html";//File suffix
-
-
We just need to develop the page directly
-
Page code
controller.java
/* thymeleaf Testing of template engine */ @GetMapping("testThymeleaf") public String testThymeleaf(Model model){ model.addAttribute("msg", "Interesting"); model.addAttribute("link", "www.baidu.com"); return "success"; //The suffix classpath: / templates / success. Before frequent writing html } success.html (namespace that must be introduced: xmlns:th)=“ http://www.thymeleaf.org ”)
<!DOCTYPE html>
<html lang="en" xmlns:th="http://www.thymeleaf.org">
<head>
    <meta charset="UTF-8">
    <title>Title</title>
</head>
<body>
<!--el Expression:<h1>${msg}</h1>-->
<h1 th:text="${msg}">ha-ha</h1><br>
<a href="www.aitigui.com" th:href="${link}">Go to Baidu</a><br/> <!--Display as stored values-->
<a href="www.aitigui.com" th:href="@{link}">Go to Baidu 2</a><!--The stored key indicates that the access link will be dynamically added with the string in front of the key. If the project has a pre access path, it will also be added-->
</body>
</html>
-
Add a pre access path to the project, and change the pre access path to access the current project after adding
server:
  servlet:
    context-path: /myPj #Add front path of project
After this setting, the URL should be inserted into / mypj, such as http://localhost:8888/myPj/testThymeleaf
-
-
2. Background management system (Springboot-2 project)
-
Form duplicate submission problem

@Controller public class ThymeleafController { @GetMapping(value = {"/","/login"}) public String goToLogin(){ return "login"; } /* Going directly to the main page will lead to repeated submission of the page by pressing the refresh button after successful login */ /* @PostMapping("/login") public String login(User user){ return "main"; }*/ /* Login successfully redirected to / main The HTML request jumps to the main page. If you click the refresh button, the current request will not be refreshed, but only / main HTML the request jumps directly to the main page */ /* @PostMapping("/login") public String login(User user){ return "redirect:/main.html"; } /* Redirect to prevent duplicate submission of login Finally, the method of going to the main page This will cause you to go to the main page without logging in */ /* @GetMapping("/main.html") public String goToMain(){ return "main"; }*/ The above will cause you to go without logging in main page -
Solve the problem of not logging in to the mian page
@PostMapping("/login") public String login(User user , HttpSession session, Model model){ //Judge whether the entered user name and password are empty. If the password is 123, the login is successful if (StringUtils.hasLength(user.getPassword()) && "123".equals(user.getPassword())){ //Not empty //Put the logged in user into the session session.setAttribute("loginUser", user); //Jump to main page return "redirect:/main.html"; }else { //Empty //Save the error and return to the login page model.addAttribute("errorMessage", "Wrong user name and password"); return "login"; } } @GetMapping("/main.html") public String goToMain(HttpSession session,Model model){ Object loginUser = session.getAttribute("loginUser"); if (loginUser!=null){ //Log in successfully and visit the main page. Generally, the interceptor 'filter is used return "main"; }else { //Save the error and return to the login page model.addAttribute("errorMessage", "Not logged in"); return "login"; } } -
thyeleaf is written in line to directly obtain the value in a field

-
Extract the content of the public page (left navigation and header)
-
Extract official documents from public pages: https://www.thymeleaf.org/doc/tutorials/3.0/usingthymeleaf.html#template-layout
-
Mark a piece of code as a public page (the first way): mark it as a public label using the th:fragment = "public module name" attribute of thymeleaf
-
Introducing public Tags: use thymeleaf's th:insert = "page name:: public module name" th:replace = "page name:: public module name" th:include = "page name:: public module name"
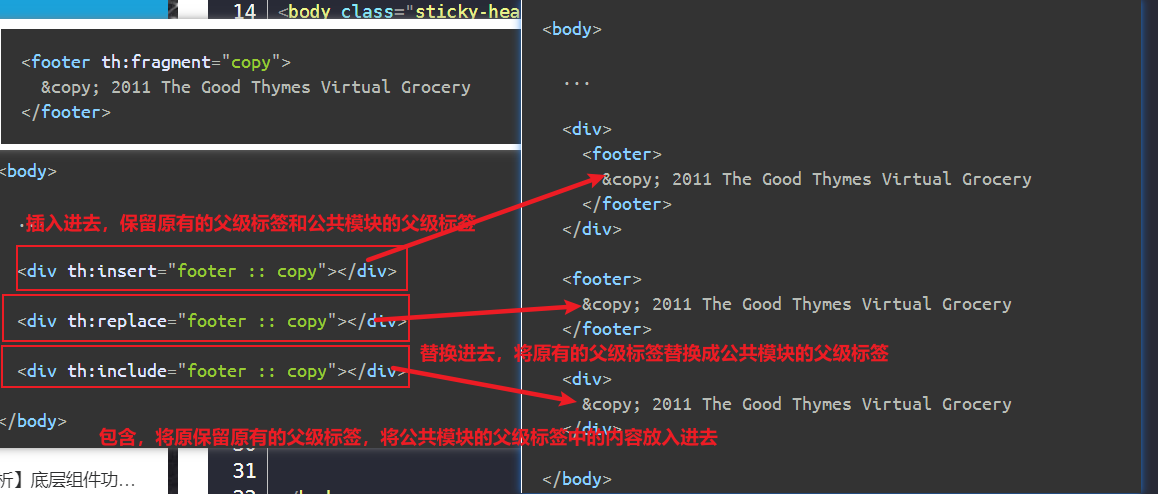
-
Mark a piece of code as a public page (the second way): mark it as a public label using the id = "ID name" attribute of the label
-
Introducing public Tags: th:insert = "page name:: #id name" th:replace = "page name:: #id name" th:include = "page name:: #id name"

-
-
Loop through the data. Use thymeleaf's th:each = "to traverse the name 1 and state name of a single object (write when necessary) 😒 {collection stored in domain} "
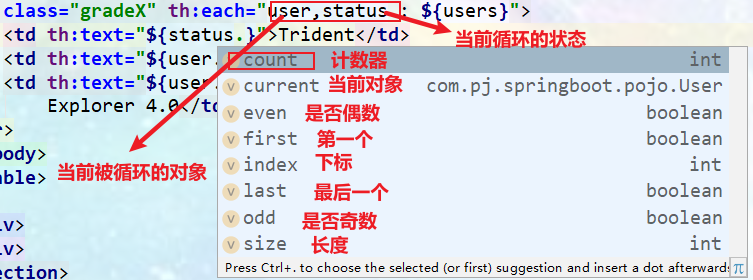
3. Process analysis of view resolution
-
The target method is executed according to the return value of the target method, and the data of the returned value message converter can be determined to handle the current return value, and the processing method of the converter is invoked after finding the returned value message processor.
(all data and view information will be stored in the ModelAndViewContainer. The ViewNameMethodReturnValueHandler returns a value that the message processor can handle.)
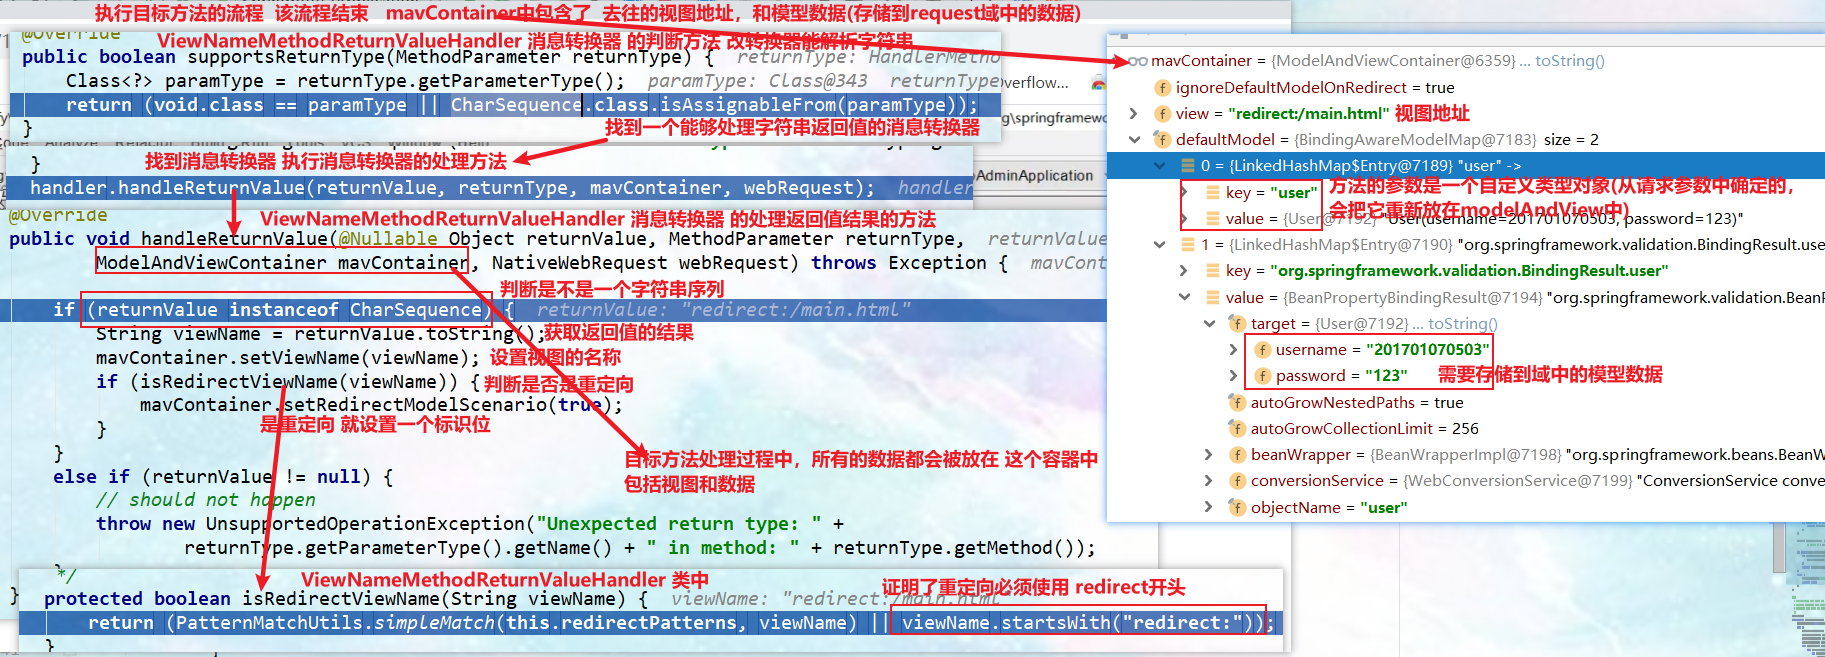
-
Encapsulate the modelAndView object processed by the above return value processor into the modelView object

-
Judge whether it is empty according to the modelView object returned above. If it is empty, a default view address will be set.

-
When you render the modelView object, you will find all the view parsers in the system and cycle through them to see which view parser can resolve the view name of the modelView object. There may be multiple view objects that can resolve the view name of the modelView object. After best matching, you will get a view object to return
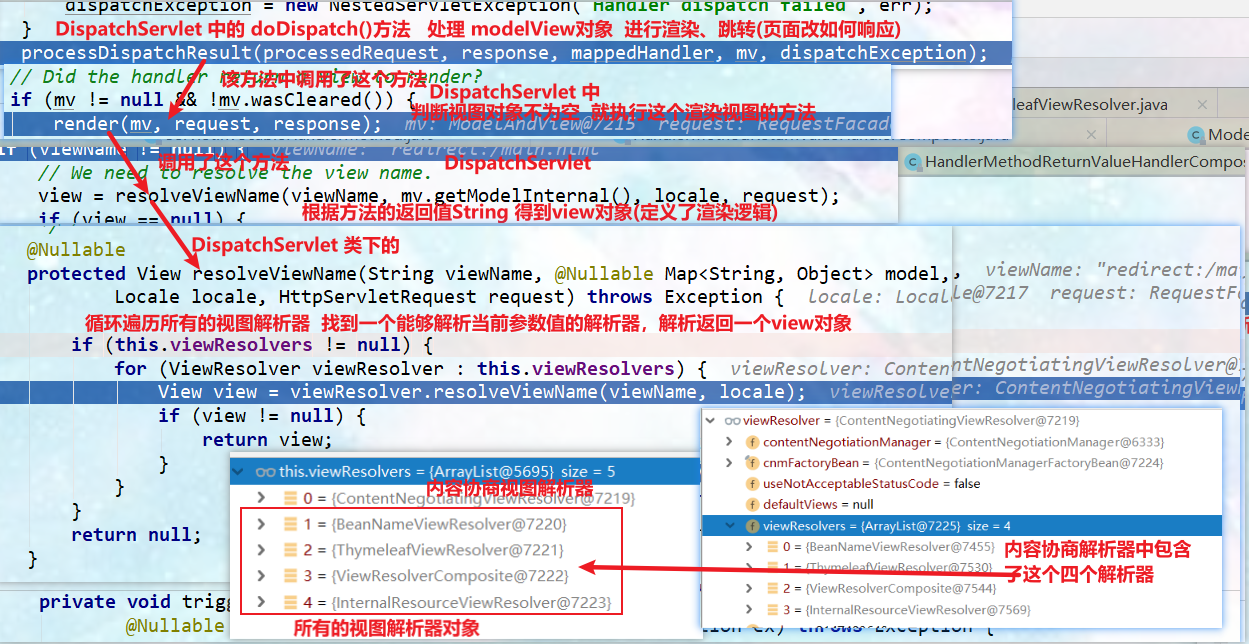
-
The above source code for parsing the view name of modelView object. ContentNegotiatingViewResolver contains four other view parsers. It will cycle through the four view parsers to obtain our candidate view objects. Whether each view parser object can resolve the current view name into a view object will be encapsulated in a set of stored views (candidate view objects), and finally return the candidate view objects
[the external chain picture transfer fails. The source station may have an anti-theft chain mechanism. It is recommended to save the picture and upload it directly (img-ddkzs5lc-1642169239567)( https://gitee.com/PJGitee/images/raw/master/springboot%E7%AC%94%E8%AE%B0.assets/image -20210902113341778. png)]
-
The source code of the above resolution view name: the source code of the resolveViewName() method
[external chain picture transfer failed. The source station may have anti-theft chain mechanism. It is recommended to save the picture and upload it directly (img-d7vui6qt-1642169239568)( https://gitee.com/PJGitee/images/raw/master/springboot%E7%AC%94%E8%AE%B0.assets/image -20210902113520411. png)]
-
Source code of extended view name: source code of resolveViewName() method
Processing method when the return value prefix is forward or ordinary string:
[external chain picture transfer failed. The source station may have anti-theft chain mechanism. It is recommended to save the picture and upload it directly (img-fsitwqub-1642169239568)( https://gitee.com/PJGitee/images/raw/master/springboot%E7%AC%94%E8%AE%B0.assets/image -20210902121636484. png)]
The returned string does not start with redirect or forward. Details of the returned view object:
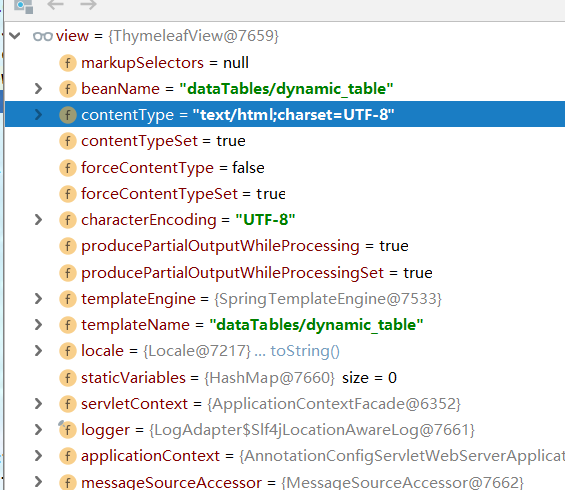
-
-
General interface of view object

-
For the above returned view object, call the customized rendering method of the returned view for forwarding or redirection, or the template engine creates HTML pages for rendering. The current request is a redirection request, and the call is the render() method of RedirectView class. After rendering the combined output model, redirect the operation
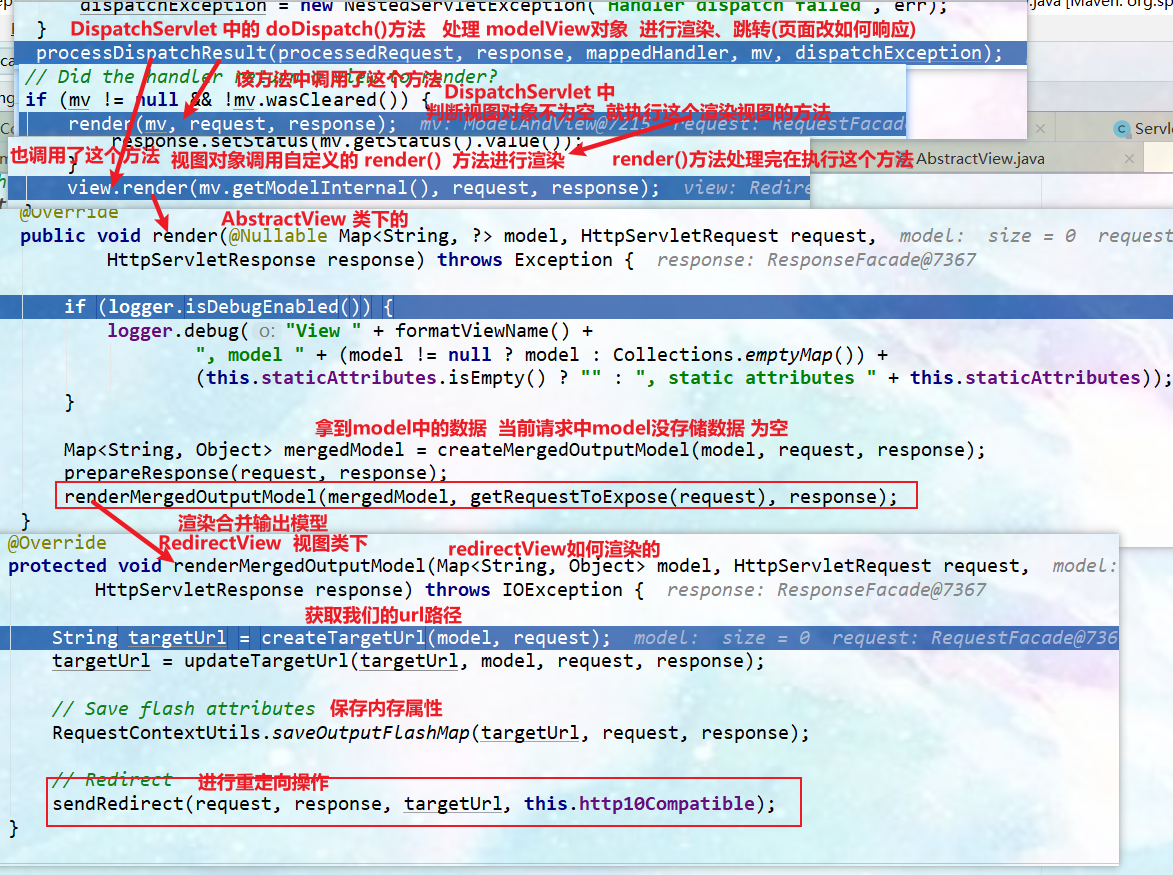
- The redirection operation uses the native redirection method response sendRedirect(encodedURL); Redirect
-
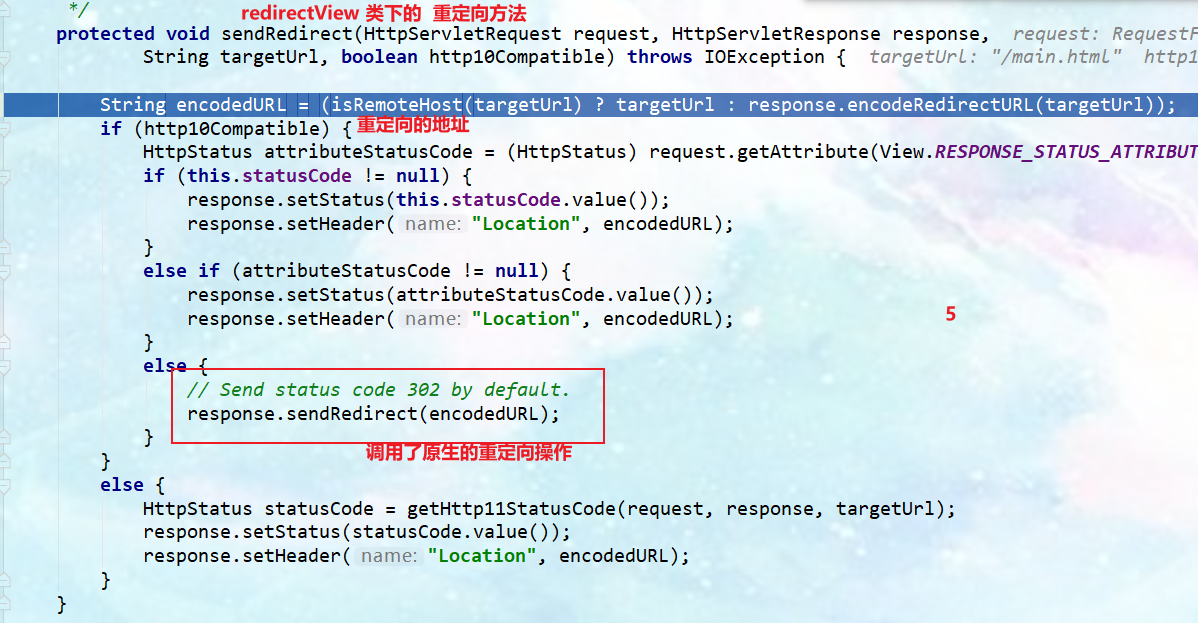
-
summary
- During the processing of the target method (read the source code of dispatcher servlet), all data will be placed in ModelAndViewContainer, including data and view address.
- The parameter of the method is a custom type object (determined from the request parameter), and put it back in the ModelAndViewContainer.
- ModelAndView (data and view address) will be returned after the execution of any target method.
- processDispatchResult() handles the dispatch result (how to respond to page changes)
- render(mv, request, response); Page rendering logic
- Return the value to the View object according to the String of the method [defines the rendering logic of the page]
- All View parsers try to find the View object based on the current return value
- Got redirect: / main html --> Thymeleaf new RedirectView().
- The content negotiation viewresolver contains all of the following view parsers. Internally, it uses all of the following view parsers to get the view object.
- view.render(mv.getModelInternal(), request, response); The view object calls the custom render to render the page.
- How to render RedirectView [redirect to a page]
- Get destination url address
- response.sendRedirect(encodedURL); redirect:/main.html creates a RedirectView object through thymeleaf, and then the object calls the sendRedirect(url) method of the native response
- render(mv, request, response); Page rendering logic
-
How different return values are handled
-
The return value starts with forward:
new InternalResourceView(forwardUrl); --> Forward request getRequestDispatcher(path). forward(request, response);
-
The return value starts with redirect: new redirectview() -- > render is redirect
-
The return value is an ordinary string: new ThymeleafView() - then the process method of the template engine is invoked for page rendering (output with writer).
-
6. Summary of web development source code process (Chapter 4-5)
1. From DispatcherServlet as the entry
`1.1. Take the doDispatch() method as the method entry
-
Call mappedHandler = getHandler(processedRequest); Find the Hnadler(Controller processor (class)) that can execute the current request, such as access / is the WelcomePageHandlerMapping of access
-
HandlerAdapter ha = getHandlerAdapter(mappedHandler.getHandler()); Determines the handler adapter for the current request. Determines the handler adapter for the current request.
Find an adapter HandlerAdapter for the current Handler. The most used is RequestMappingHandlerAdapter. (all handleradapters will be loaded by default)
-
mv = ha.handle(processedRequest, response, mappedHandler.getHandler());) Use the adapter to execute the target method and determine each value of the method parameter. Call and execute the request method in the controller written by yourself
- The invokeHandlerMethod() method gets the parameter parser and the return value processor
- invokeForRequest() actually executes our custom method
- getMethodArgumentValues() gets all the parameters we passed in the past
2,
7. Interceptor
7.1 general interface definition of interceptor

7.2 use of interceptors
1. Use steps
-
Write an interceptor to implement the HandlerInterceptor interface
/* Landing interceptor steps 1,Write an interceptor to implement the handlerInterceptor interface and implement the three methods in the interface 2,Add the current interceptor to the container and specify the intercepted path and released path. This is the function of configuring springmvc. Write a configuration class to implement the methods in the WebMvcConfigurer implementation interface, customize the functions of springmvc, and add the interceptors () method in the interface */ @Slf4j public class LoginInterceptor implements HandlerInterceptor { /* Execute before executing the target method written by yourself */ @Override public boolean preHandle(HttpServletRequest request, HttpServletResponse response, Object handler) throws Exception { log.info("The intercepted paths are{}",request.getRequestURL());//Print blocked path HttpSession session = request.getSession(); Object loginUser = session.getAttribute("loginUser"); if (loginUser != null){ return true;//Release } //forward request.setAttribute("errorMessage", "You haven't logged in yet"); request.getRequestDispatcher("/").forward(request, response);// session.setAttribute("msg", "you haven't logged in yet"); //response.sendRedirect("/"); // Not logged in redirect to login page return false;//intercept } /* Execute after executing the target method written by yourself */ @Override public void postHandle(HttpServletRequest request, HttpServletResponse response, Object handler, ModelAndView modelAndView) throws Exception { log.info("postHandle implement",modelAndView); } /* Execute after rendering is complete */ @Override public void afterCompletion(HttpServletRequest request, HttpServletResponse response, Object handler, Exception ex) throws Exception { log.info("afterCompletion implement",handler); } } -
Register the interceptor in the container (implement addInterceptors() of WebMvcConfigurer) and specify the interception rules (note that if all static resources are intercepted, they will also be intercepted]
/** * webMvc Customization function */ @Configuration public class MyWebMvcConfig implements WebMvcConfigurer { @Override public void addInterceptors(InterceptorRegistry registry) { registry.addInterceptor(new LoginInterceptor()) //Add interceptor .addPathPatterns("/**") //Add interceptor's interception path / * * intercept all static resources .excludePathPatterns(Arrays.asList("/","/login"))//Do not block some paths .excludePathPatterns("/css/**","/fonts/**","/images/**","/js/**","/favicon.ico");//To release static resources, you can put static resources into a directory, release the static resource directory, or configure the static resource access prefix, and release the prefix path}} -
Execution sequence of interception methods

7.3 source code analysis of interceptor
1. doDispatch() entire method source code
//====================The entire method source code of doDispatch() under the DispatchServlet class===============
    protected void doDispatch(HttpServletRequest request, HttpServletResponse response) throws Exception {
    HttpServletRequest processedRequest = request;
    HandlerExecutionChain mappedHandler = null;
    boolean multipartRequestParsed = false;
    WebAsyncManager asyncManager = WebAsyncUtils.getAsyncManager(request);
    try {
        ModelAndView mv = null;
        Exception dispatchException = null;
        try {
            processedRequest = checkMultipart(request);
            multipartRequestParsed = (processedRequest != request);
            //A HandlerExecutionChain object is found in HandlerMapping, which can handle the requested controller of the requested Handler (Controller.method()) and obtain all interceptors.
            mappedHandler = getHandler(processedRequest);
            if (mappedHandler == null) {
                noHandlerFound(processedRequest, response);
                return;
            }
            // Determines the handler adapter for the current request.
            HandlerAdapter ha = getHandlerAdapter(mappedHandler.getHandler());
            //Method of processing parameter analysis
            // Process the last modified header (if supported by the handle)
            String method = request.getMethod();
            boolean isGet = HttpMethod.GET.matches(method); //Determine whether it is a get request
            if (isGet || HttpMethod.HEAD.matches(method)) {
                long lastModified = ha.getLastModified(request, mappedHandler.getHandler());
                if (new ServletWebRequest(request, response).checkNotModified(lastModified) && isGet) {
                    return;
                }
            }
            //The applyPreHandle method of the interceptor is executed before the target method. If the method returns false, it will be intercepted
            if (!mappedHandler.applyPreHandle(processedRequest, response)) {
                return;
            }
            // When the target method is called, the methods in the controller written by ourselves will be used for parameter analysis, return value analysis and other processes, and a modelAndView object will be returned
            mv = ha.handle(processedRequest, response, mappedHandler.getHandler());
            if (asyncManager.isConcurrentHandlingStarted()) {
                return;
            }
            applyDefaultViewName(processedRequest, mv);
            //Process the postHandle() method of the interceptor after the target method executes
            mappedHandler.applyPostHandle(processedRequest, response, mv);
        }
        catch (Exception ex) {
            dispatchException = ex;
        }
        catch (Throwable err) {
            // As of 4.3, we're processing Errors thrown from handler methods as well,
            // making them available for @ExceptionHandler methods and other scenarios.
            dispatchException = new NestedServletException("Handler dispatch failed", err);
        }
        //Processing the development results will put the data of the model into the domain for rendering. After processing, the afterCompletion() method of each interceptor will be executed in reverse order
        processDispatchResult(processedRequest, response, mappedHandler, mv, dispatchException);
    }
    catch (Exception ex) {
        //If exceptions are thrown in the above phase, the afterCompletion() method of each interceptor will be executed in reverse order
        triggerAfterCompletion(processedRequest, response, mappedHandler, ex);
    }		catch (Throwable err) {
        //If exceptions are thrown in the above phase, the afterCompletion() method of each interceptor will be executed in reverse order
        triggerAfterCompletion(processedRequest, response, mappedHandler,
                               new NestedServletException("Handler processing failed", err));
    }
    finally {
        if (asyncManager.isConcurrentHandlingStarted()) {
            // Instead of postHandle and afterCompletion
            if (mappedHandler != null) {
                mappedHandler.applyAfterConcurrentHandlingStarted(processedRequest, response);
            }
        }
        else {
            // Clean up any resources used by a multipart request.
            if (multipartRequestParsed) {
                cleanupMultipart(processedRequest);
            }
        }
    }
}
2. Get the execution chain of the handler
-
mappedHandler = getHandler(processedRequest); Get the execution chain, including the controller and all interceptors that process the request

3. Execute the applyPreHandle() method of the interceptor
-
mappedHandler.applyPreHandle(processedRequest, response) executes the applyPreHandle method of the interceptor before the target method. If the method returns false, it will be intercepted. The source code is as follows:
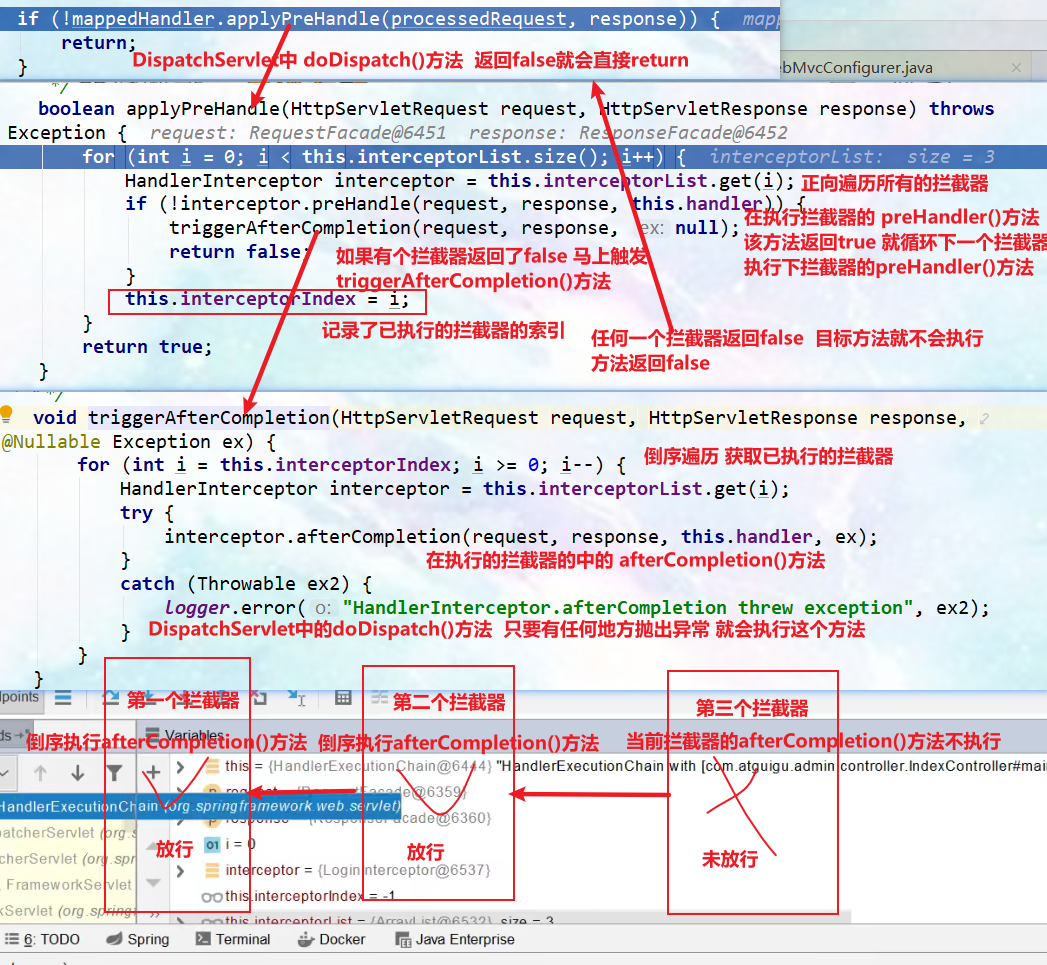
4. After executing the target method, execute mappedhandler applyPostHandle(processedRequest, response, mv);
-
Traverse all interceptors in reverse order and execute the POSTHandel() method of the interceptor

5. After the above method is executed, the jump view is rendered, and after the execution, the interceptor's afterCompletion() method is executed

6. Summary
-
According to the current request, find the HandlerExecutionChain (the handler that can handle the request and all interceptors of the handler)
-
First, execute the preHandle() method of all interceptors in sequence.
- If the current interceptor preHandle() returns true. Then execute the preHandle() of the next interceptor
- If the current interceptor returns false. Execute afterCompletion(); of all interceptors that have been executed directly in reverse order;.
-
If any interceptor returns false, it will jump out without executing the target method.
-
All interceptors return true before executing the target method.
-
Execute the postHandle() method of all interceptors in reverse order.
-
Any exception in the previous steps will trigger afterCompletion() in reverse order.
-
After the page is successfully rendered, afterCompletion() will also be triggered in reverse order.
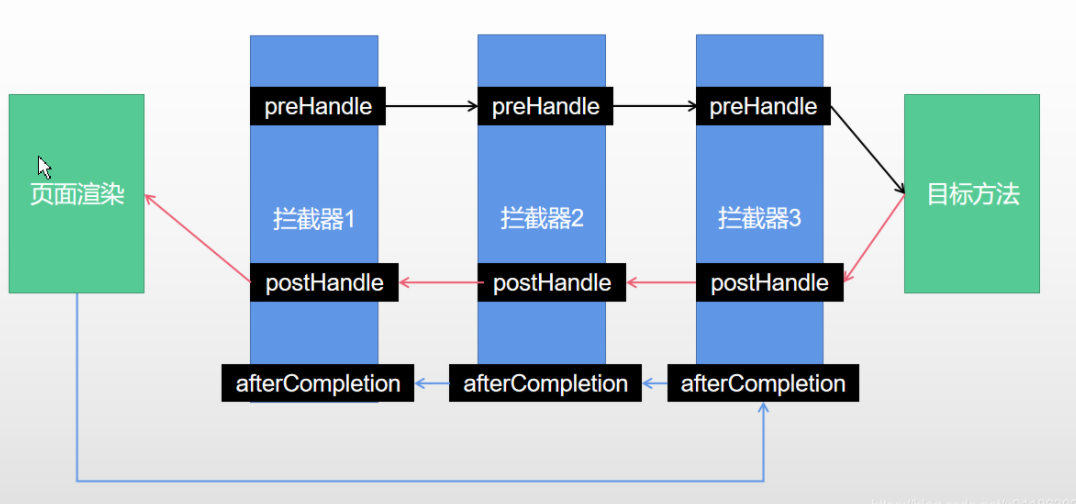 )
)
8. File upload
1. Use steps
1. Write front-end page upload request:
- Note:
- multiple file upload
- method = "post" enctype = "multipart / form data" file upload is required
<form role="form" th:action="@{/upload}" method="post" enctype="multipart/form-data">
    <!--method="post" enctype="multipart/form-data" File upload required-->
    <div class="form-group">
        <label for="exampleInputEmail1">Email</label>
        <input type="email" name="email" class="form-control" id="exampleInputEmail1" placeholder="Enter email">
    </div>
    <div class="form-group">
        <label for="exampleInputPassword1">full name</label>
        <input type="text" name="name" class="form-control" id="exampleInputPassword1" placeholder="Password">
    </div>
    <div class="form-group">
        <label for="exampleInputFile">head portrait</label>
        <input type="file" name="headImage" id="exampleInputFile">
    </div>
    <div class="form-group">
        <label for="exampleInputFile">Life photos</label>
        <input type="file" name="photos" multiple> <!--multiple Multi file upload-->
    </div>
    <div class="checkbox">
        <label>
            <input type="checkbox"> Check me out
        </label>
    </div>
    <input type="submit" class="btn btn-primary" value="Submit">
</form>
2. Write the method to process the request
- @RequestPart("name") handles file upload requests
  @PostMapping("/upload")
public String upload(@RequestParam("email") String email,
                     @RequestParam("name") String name,
                     @RequestPart("headImage")MultipartFile headImage,
                     @RequestPart("photos") MultipartFile[] photos) throws IOException {
    //Uploaded information: email=1464847406@qq.com , name=201801421038,headImage file size = 277362, number of photos files = 4
    log.info("Uploaded information: email={},name={},headImage file size={},photos Number of files={}",email,name,headImage.getSize(),photos.length);//
    String s = ResourceUtils.getURL("classpath:").getPath() + "static/upload/";
    if (!headImage.isEmpty()){
        //Judge whether the file is not empty
        //  InputStream inputStream = multipartFile.getInputStream();   Get the stream data, and you can directly manipulate the stream data
        String originalFilename = headImage.getOriginalFilename();//Gets the name of the source file
        //Save to file server, OSS server
        headImage.transferTo(new File("F:\\test\\"+originalFilename));//Directly specify which location to upload to
        //  headImage.transferTo(new File(s +originalFilename));// Directly specify which location to upload to
    }
    if (photos.length > 0){
        //The number of multiple files uploaded is greater than 0
        for (MultipartFile file : photos) {
            if (!file.isEmpty()){ //The current file is not empty data
                String originalFilename = file.getOriginalFilename();//Gets the name of the source file
                file.transferTo(new File("F:\\test\\"+originalFilename));//Directly specify which location to upload to
                //file.transferTo(new File(s +originalFilename));// Directly specify which location to upload to
            }
        }
    }
    return "main";
}
3. Attention
-
The general configuration class for file upload is MultipartAutoConfiguration
@Configuration(proxyBeanMethods = false) //Configuration class @ConditionalOnClass({ Servlet.class, StandardServletMultipartResolver.class, MultipartConfigElement.class }) @ConditionalOnProperty(prefix = "spring.servlet.multipart", name = "enabled", matchIfMissing = true) //By default, it is imported into the container @ConditionalOnWebApplication(type = Type.SERVLET)@EnableConfigurationProperties(MultipartProperties.class)//Binding MultipartProperties components public class MultipartAutoConfiguration {} -
The MultipartProperties component of the configuration file bound to the file. All relevant configurations are under the modified class
@ConfigurationProperties(prefix = "spring.servlet.multipart", ignoreUnknownFields = false) public class MultipartProperties { /** * The maximum file size is no more than 1MB */ private DataSize maxFileSize = DataSize.ofMegabytes(1); /** * Maximum total requested file size the total file size for multiple file transfers does not exceed 10MB */ private DataSize maxRequestSize = DataSize.ofMegabytes(10); } -
The configuration class sets the maximum file size and the maximum request file size by default. If the total size exceeds, the following exception will be thrown
Servlet.service() for servlet [dispatcherServlet] in context with path [] threw exception [Request processing failed; nested exception is org.springframework.web.multipart.MaxUploadSizeExceededException: Maximum upload size exceeded; nested exception is java.lang.IllegalStateException: org.apache.tomcat.util.http.fileupload.impl.SizeLimitExceededException: the request was rejected because its size (13983920) exceeds the configured maximum (10485760)] with root cause
2. Principle analysis of file upload
1. The configuration items of the auto configuration class and the bound bean component uploaded from the file
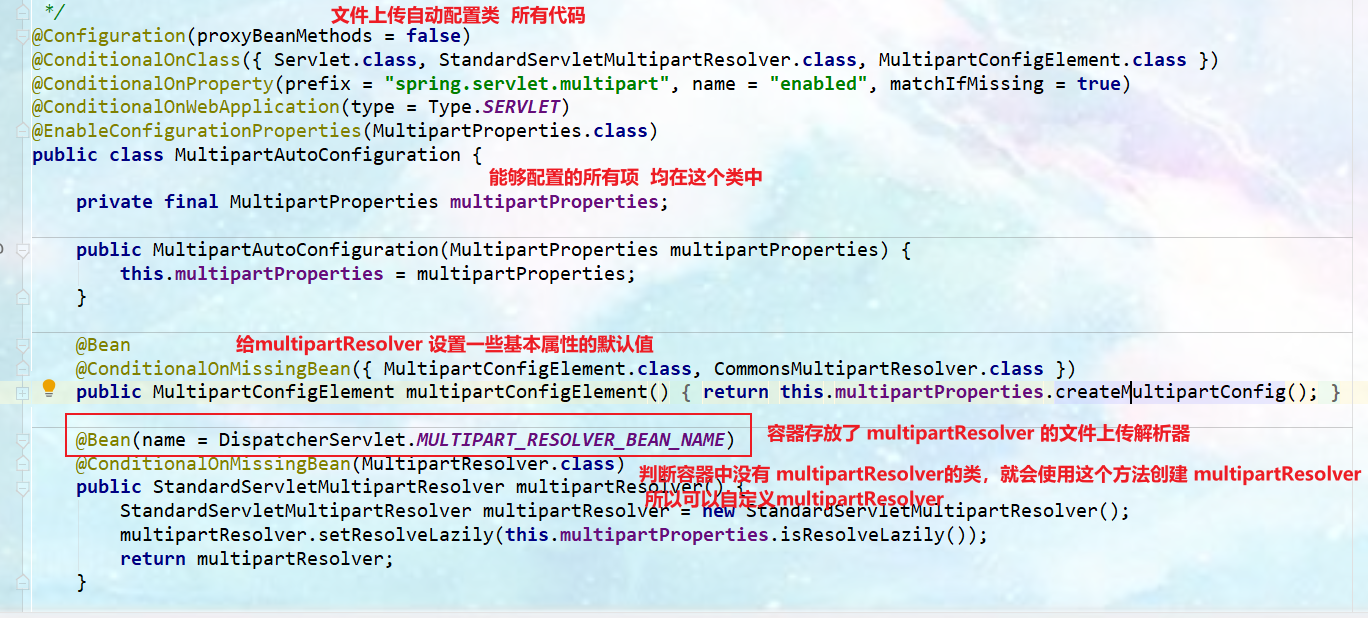
2. Check whether it is a file upload request. It is a wrapped request after wrapping the native request (MultipartHttpServletRequest)
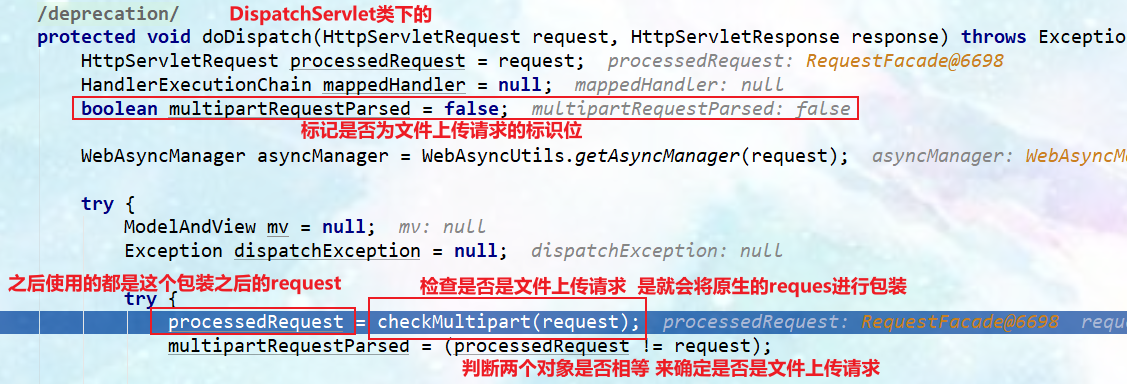
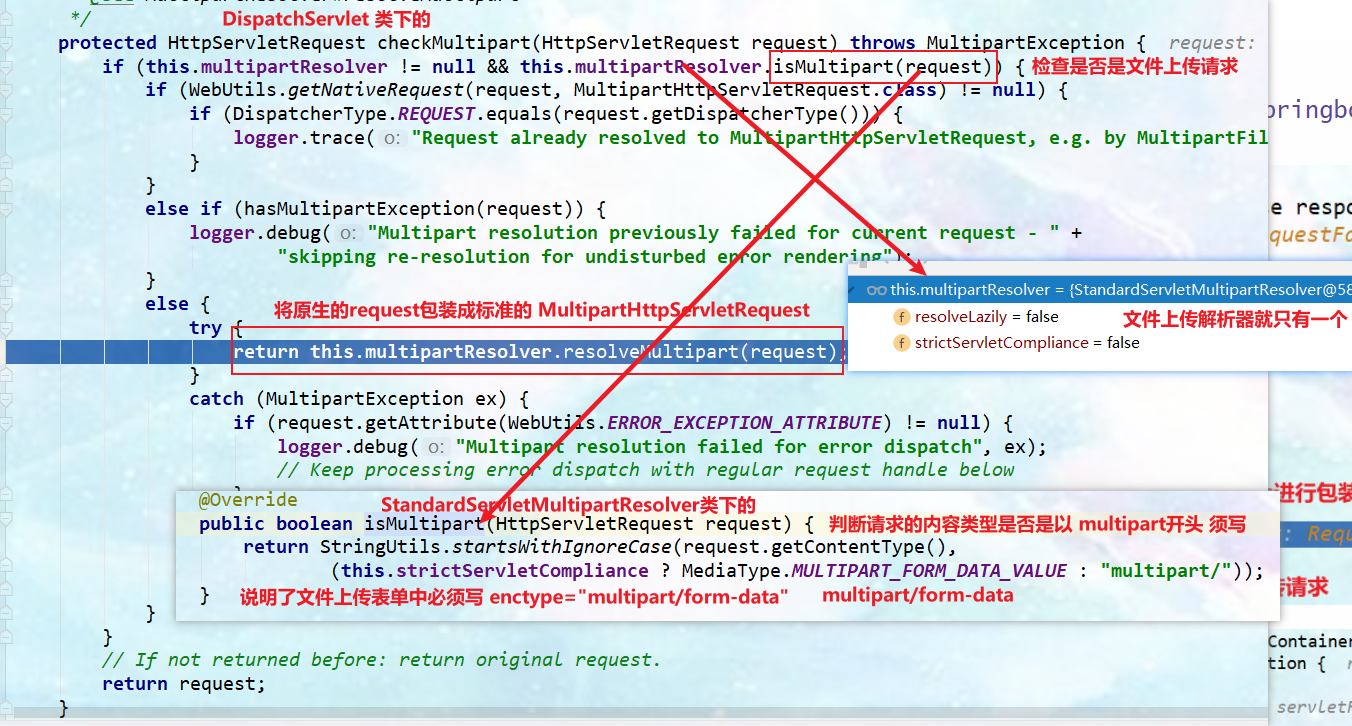
3. Execute the target method, obtain all parameter parsers and return value parsers, and determine each parameter value of the method
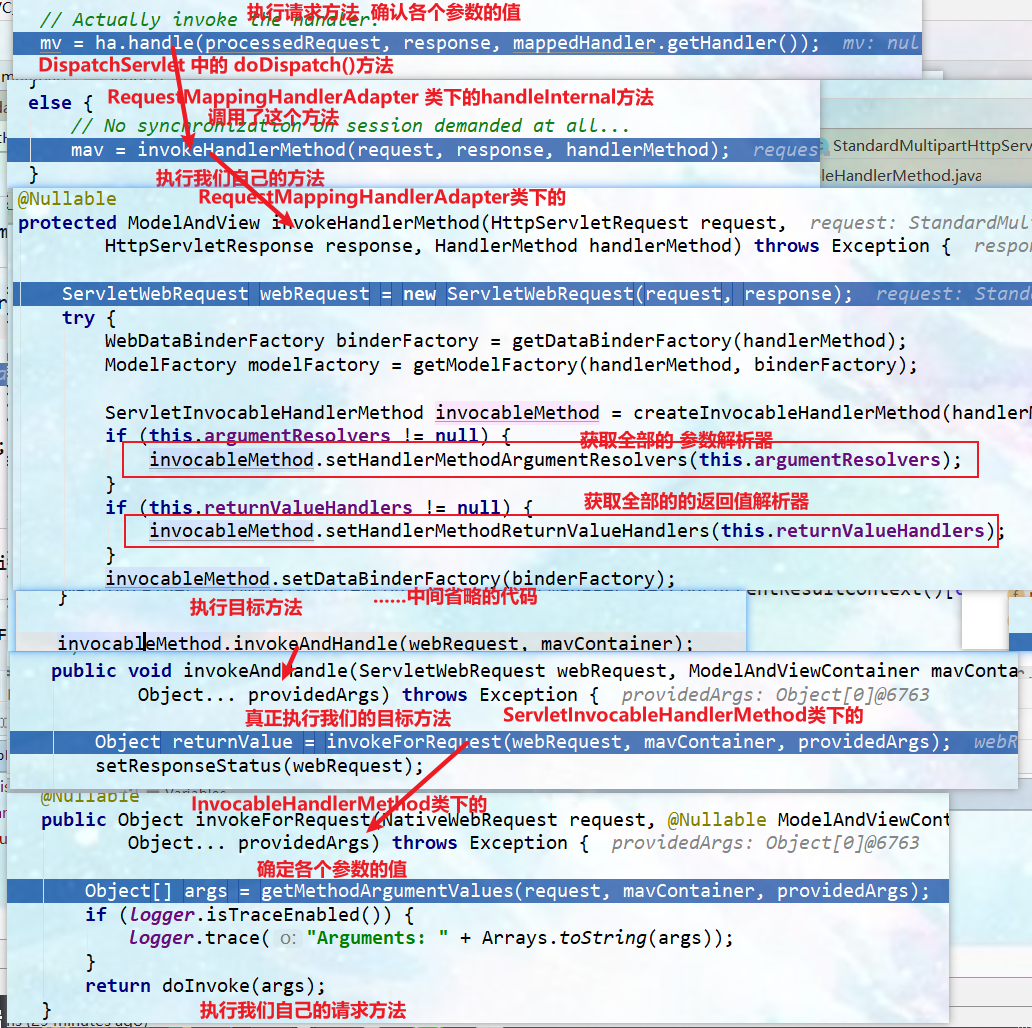
4. Get all method parameters, traverse one by one, determine the specific parameter parser, and then use the parameter parser to parse the current parameter value of the method. If it is a file upload request, use the RequestPartMethodArgumentResolver parameter parser to parse
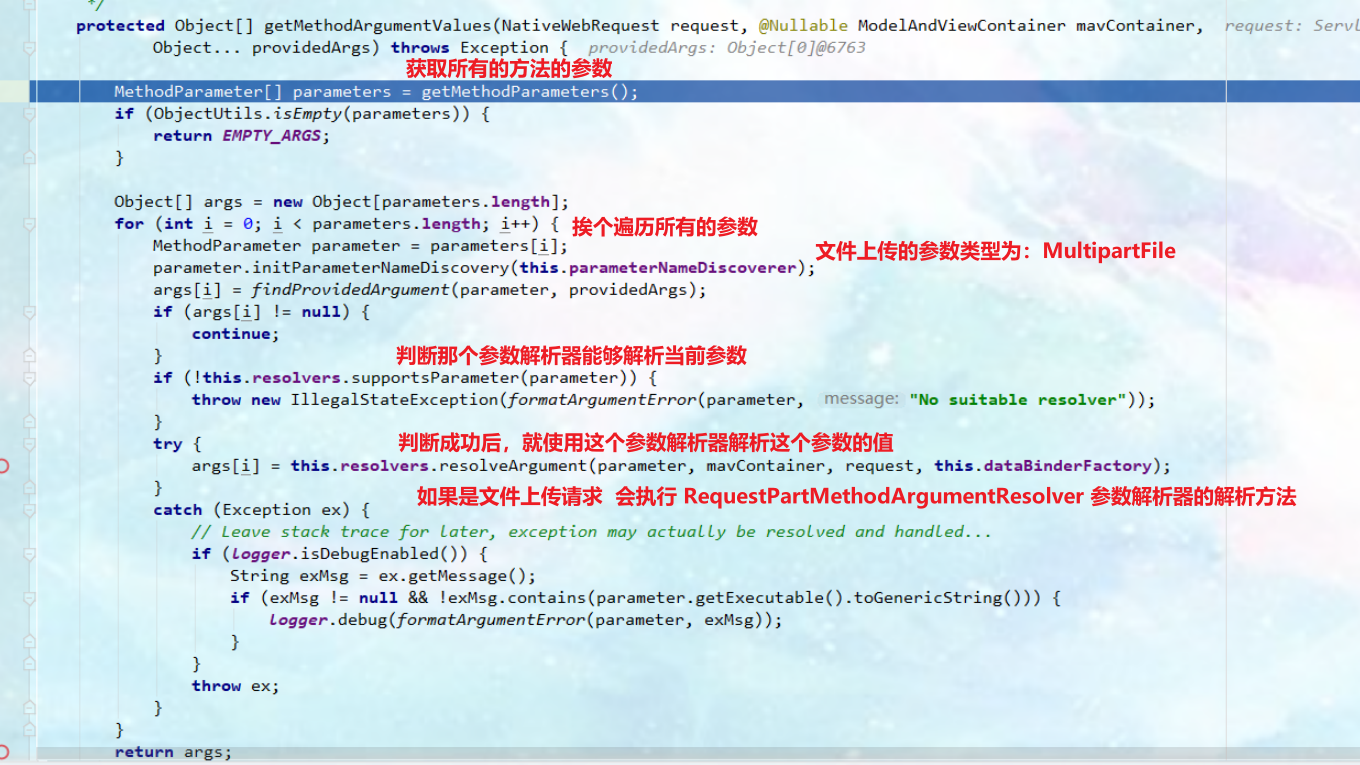
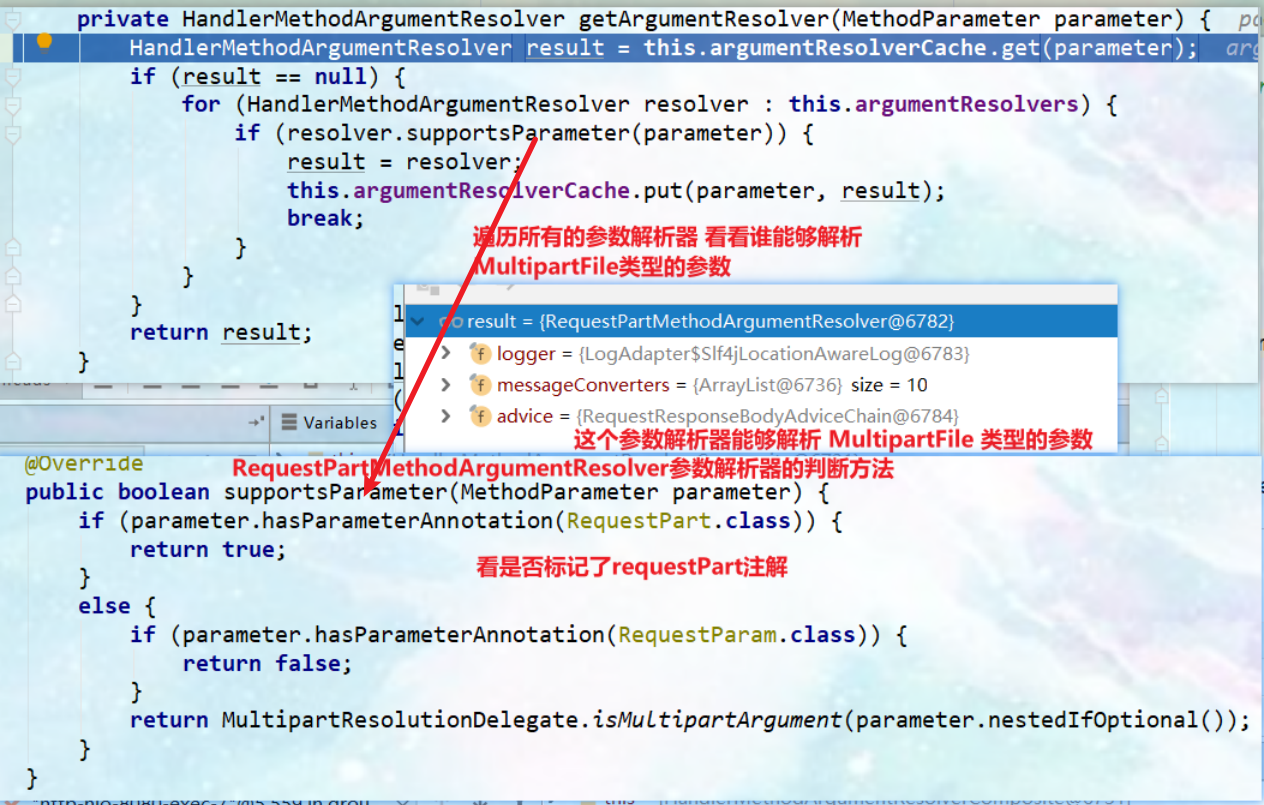
5. Use the parsing method of the RequestPartMethodArgumentResolver parameter parser to parse the parameters
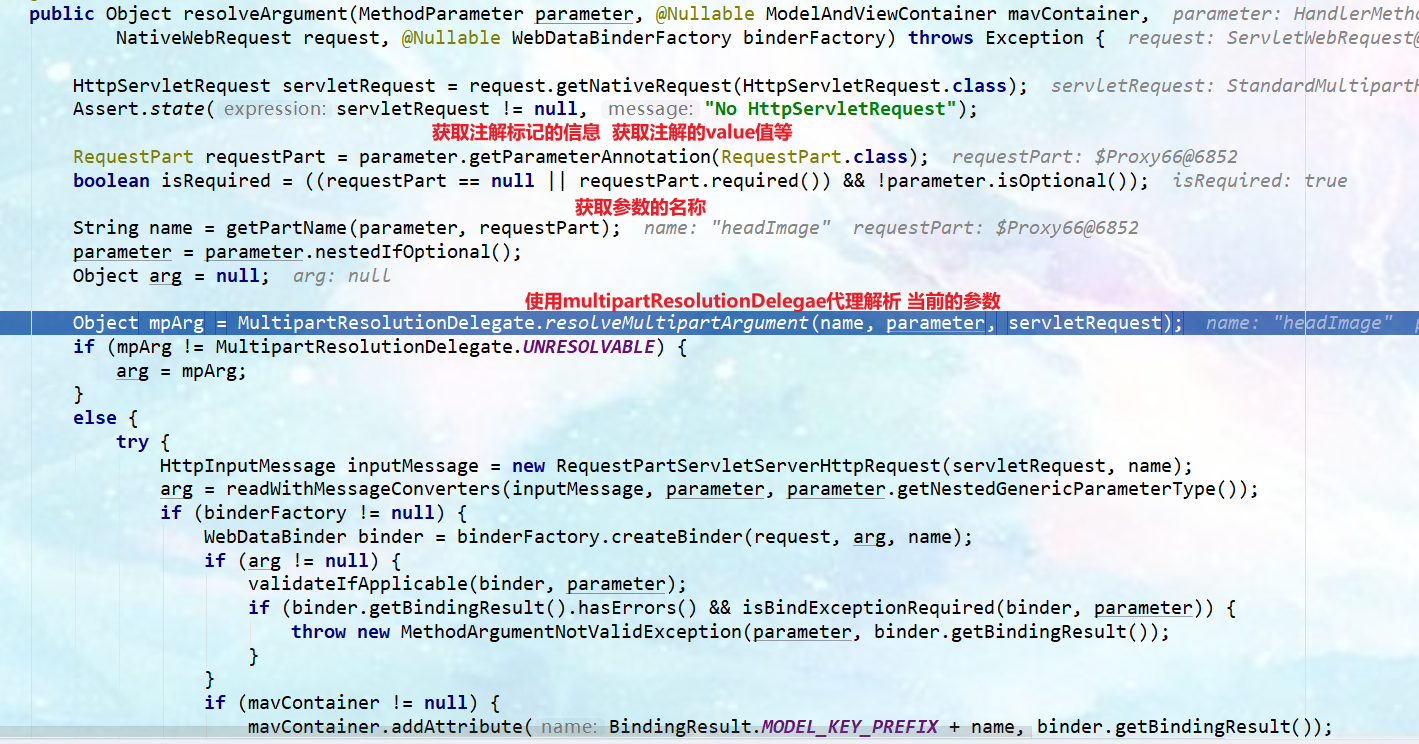
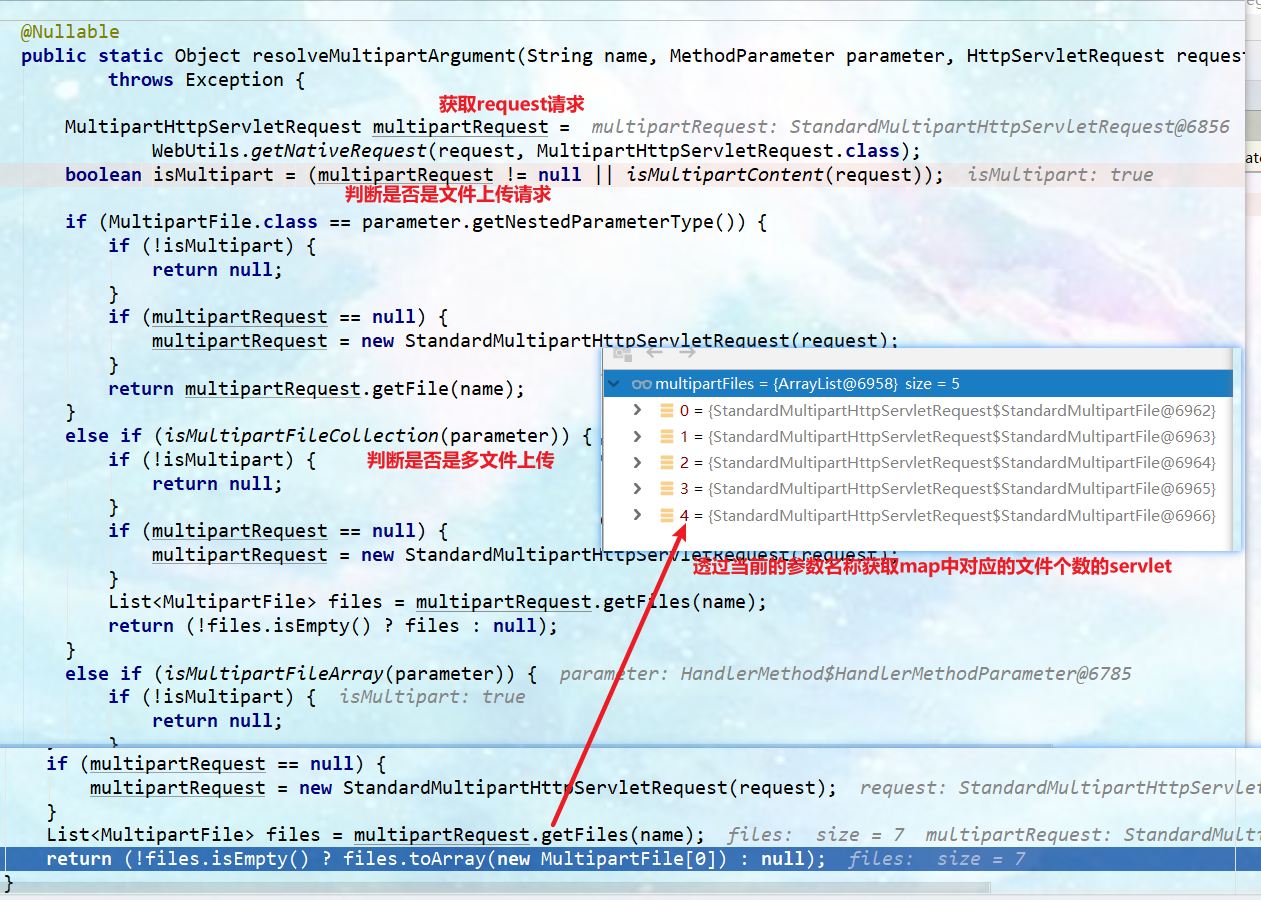
Multipartrequest Source code of getfiles () method
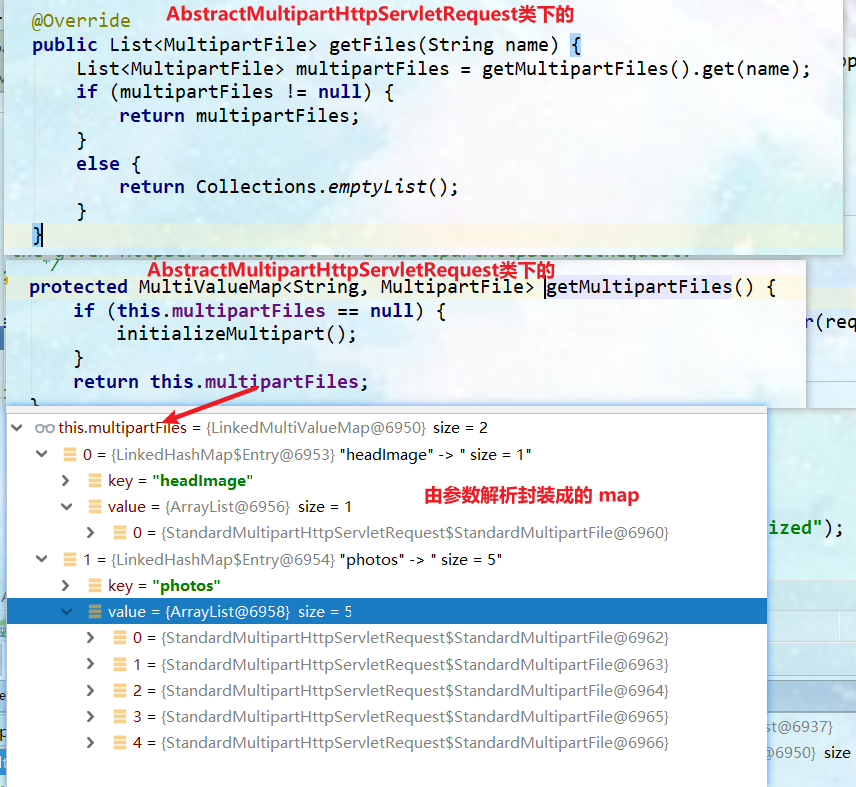
6. Summary
- File upload autoconfiguration class multipartautoconfiguration multipartproperties
- The standardservlet multipartresolver [file upload parser] is automatically configured
- Principle steps
1. When the request comes in, use the file upload parser to determine (isMultipart) and encapsulate (resolveMultipart, return MultipartHttpServletRequest) the file upload request
2. Parameter parser to parse the file content in the request and package it into MultipartFile
3. Encapsulate the file information in the request into a Map; Multivaluemap < string, multipartfile > corresponds to the parameter name and multipart object of the file - FileCopyUtils is used in the Multipart class. Realize the copy of file stream
9. Exception handling
9.1. SpringBoot default error handling mechanism
1. Default rule:
-
By default, Spring Boot provides / error mapping to handle all errors
-
Machine client, which will generate a JSON response containing details of error, HTTP status and exception messages. For the browser client, respond to a "whitelabel" error view and render the same data in HTML format
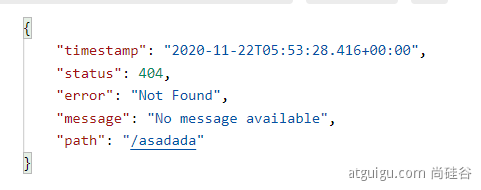

-
To customize it, add a View that resolves to error
-
To completely replace the default behavior, you can implement ErrorController and register the Bean definition of this type, or add a component of ErrorAttributes type to use the existing mechanism but replace its contents.
-
/4xx and 5xx pages under templates/error / will be automatically parsed
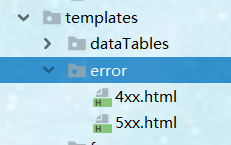
@GetMapping("editable_table")public String goToeDitable_table(){ int i = 10/0; return "dataTables/editable_table";}

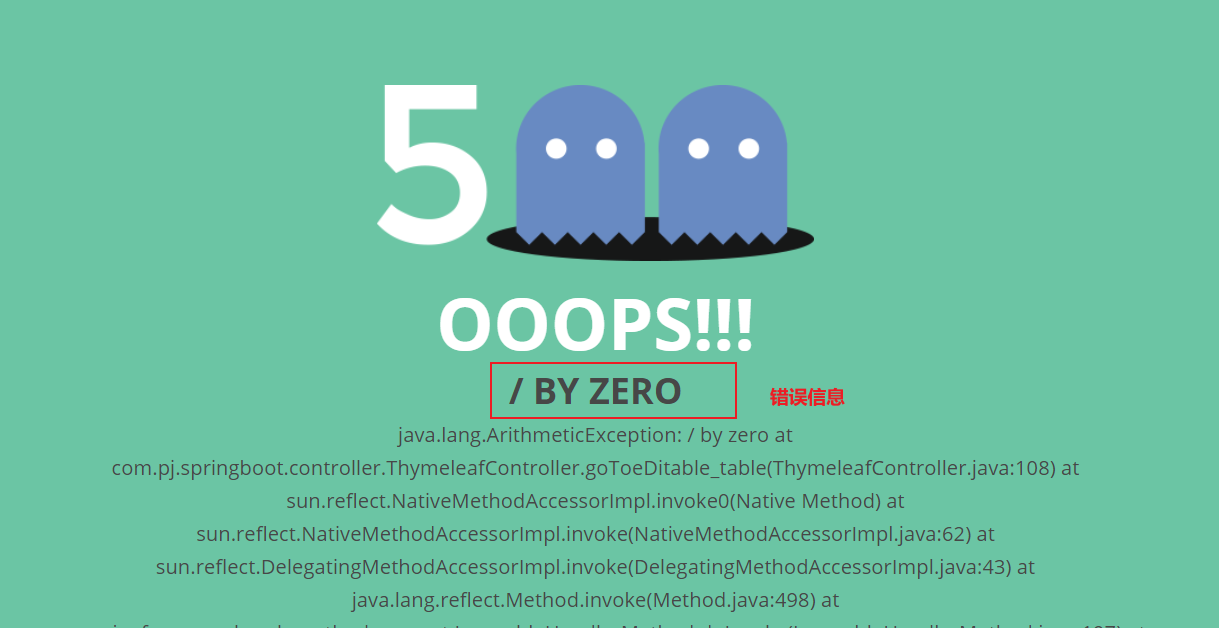
9.2. Automatic configuration principle of exception handling
1. Autoconfiguration class ErrorMvcAutoConfiguration
@Configuration(proxyBeanMethods = false)
@ConditionalOnWebApplication(type = Type.SERVLET)
@ConditionalOnClass({ Servlet.class, DispatcherServlet.class })
// Load before the main WebMvcAutoConfiguration so that the error View is available
@AutoConfigureBefore(WebMvcAutoConfiguration.class)
@EnableConfigurationProperties({ ServerProperties.class, WebMvcProperties.class })
public class ErrorMvcAutoConfiguration {}
2. Automatically configure exception handling rules
-
Component 1 in container: Type: defaulterrorattributes - > ID: errorAttributes custom error page attributes
-
public class DefaultErrorAttributes implements ErrorAttributes, HandlerExceptionResolver
-
DefaultErrorAttributes: define that the error page can contain data (exception details, stack information, etc.).
-
Data stored in the request field
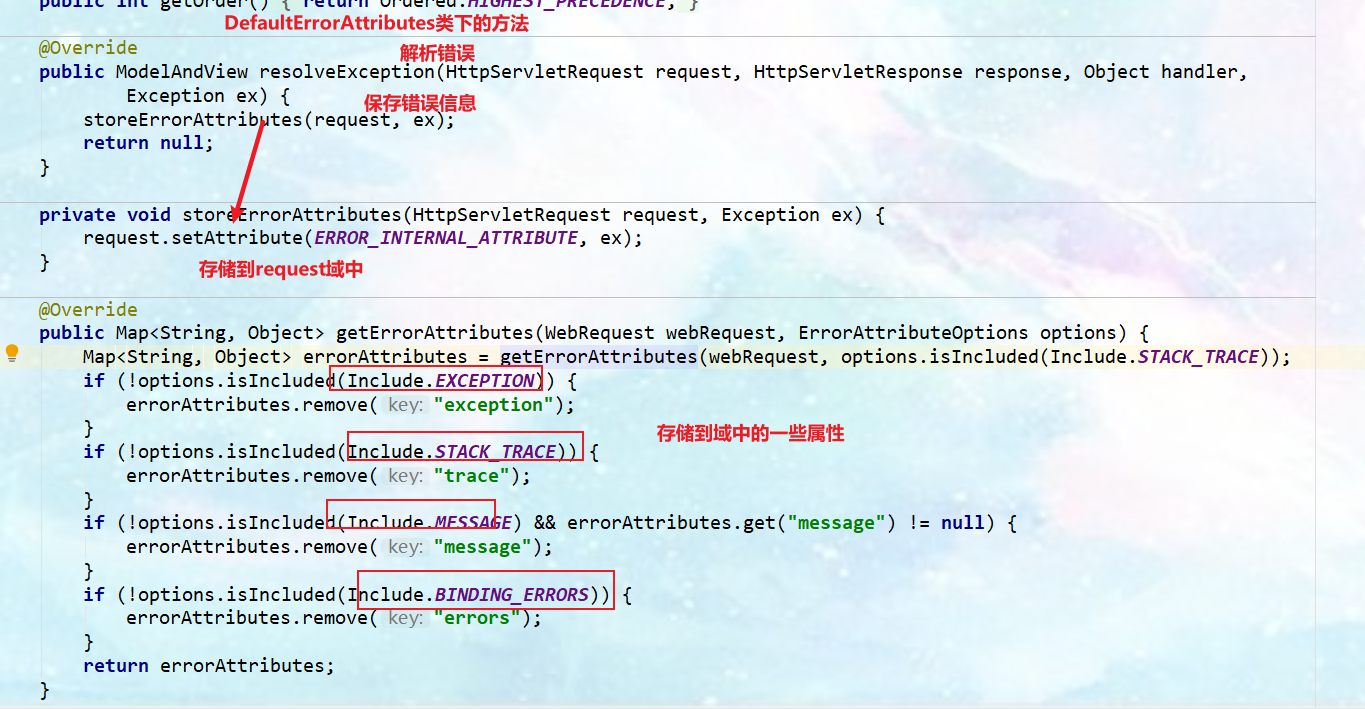
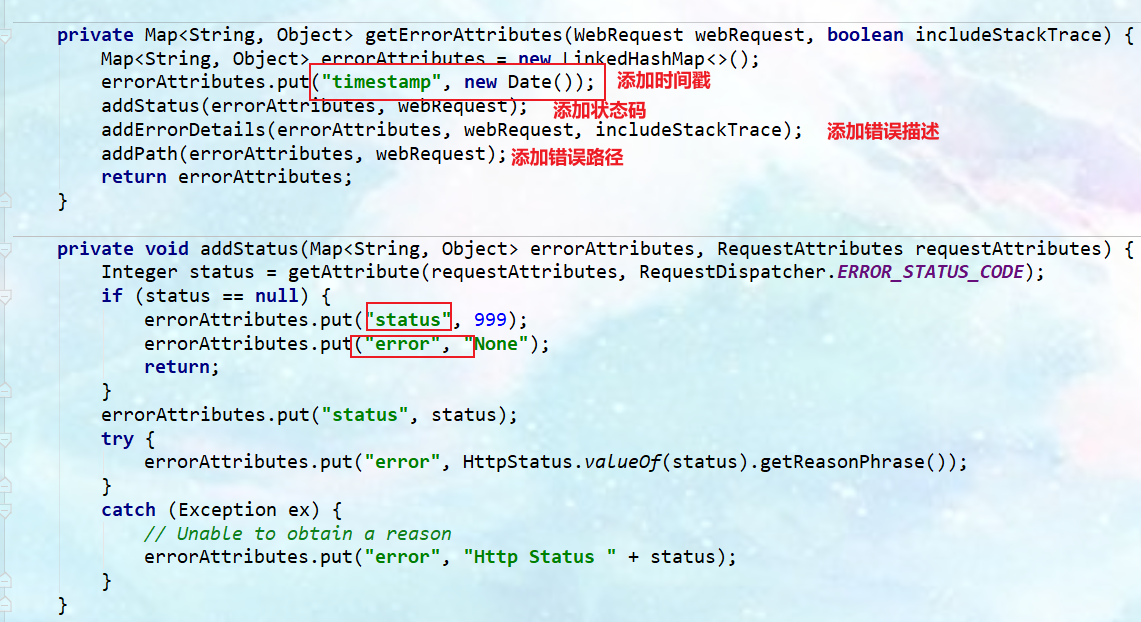
-
-
Component 2 in container: Type: basicErrorController -- > ID: basicErrorController (function: json(postman) + white page (browser) adaptation response) custom page Jump logic
-
Either respond to a modelandvie (page) or a responseentity (json)
-
Definition of BasicErrorController
@Controller@RequestMapping("${server.error.path:${error.path:/error}}")//Default request path to handle errors
public class BasicErrorController extends AbstractErrorController {}
# The default request path for handling errors can be set in the configuration file server.error.path=/error
-
Process the request for the default / error path, and the page responds to new ModelAndView("error", model); Page data: new responseentity < > (body, status);
-
There is a component in the container. View - > ID is error; (response to default error page)
-
Put the component BeanNameViewResolver (View resolver) in the container; Use the returned View name as the id of the component to find the View object in the container.
-
If you want to return to the page; You will find the error view [StaticView]. (the default is a white page)
-
graphic
Send the error request, use the BeanNameViewResolver view parser to find an object named error view from the container and render it to the client
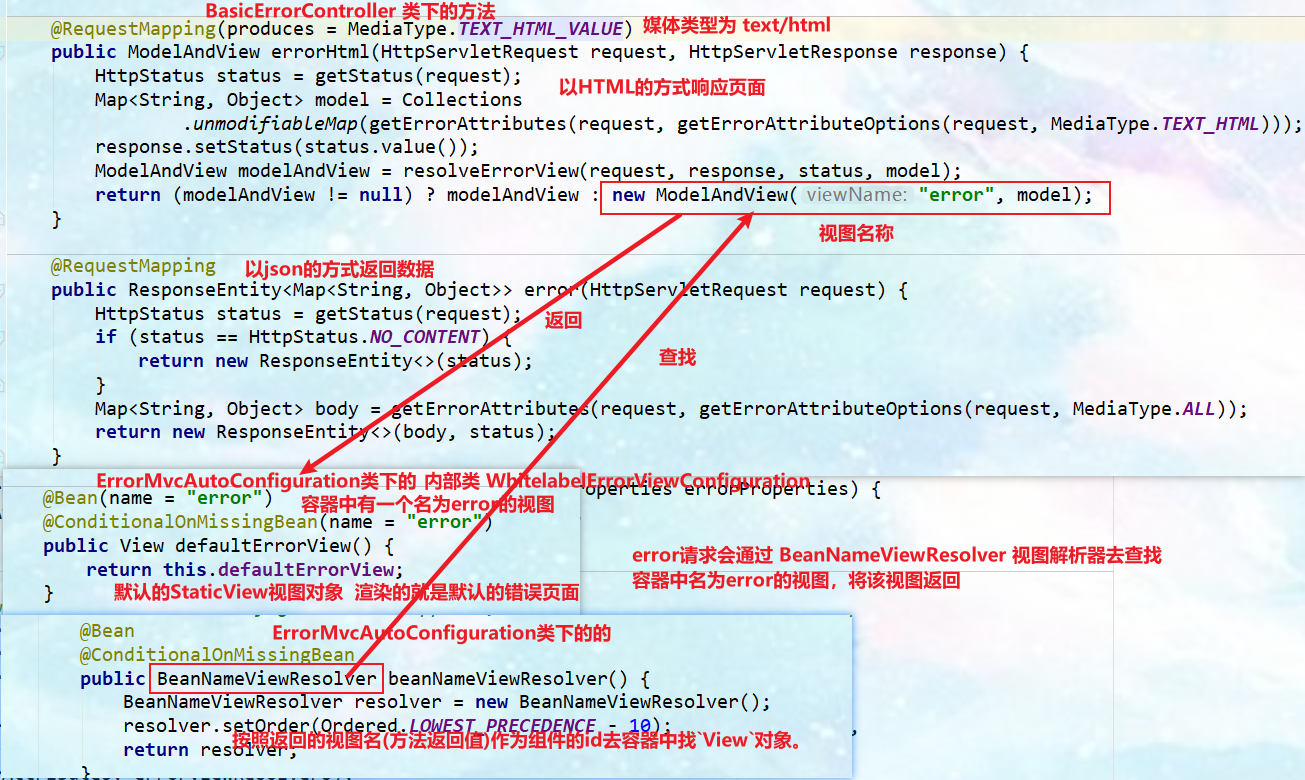
Default error page rendering logic (StaticView view object):
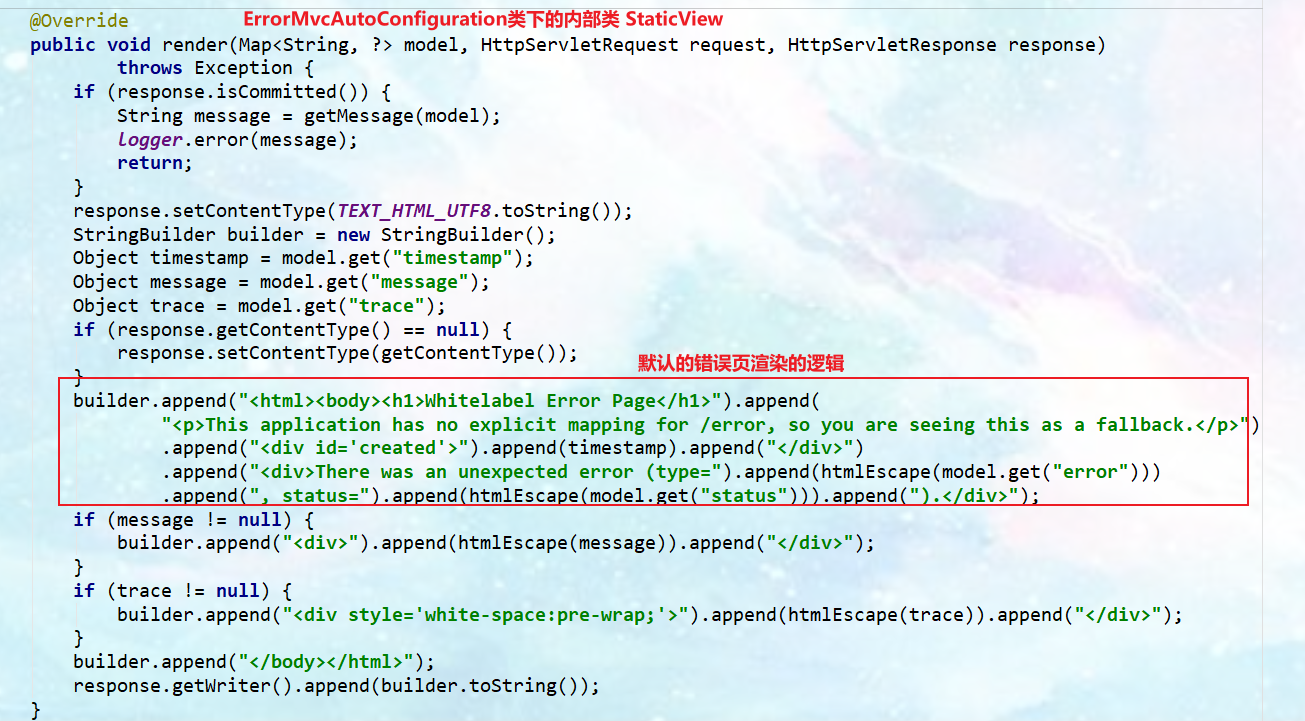
-
-
Component 3 in container: Type: defaulterrorviewresolver - > ID: conventionErrorViewResolver custom error page html path
-
If an abnormal error occurs, the HTTP status code will be used as the view page address (viewName) to find the real page (main function)
-
error/4xx,5xx.html
-
Explained that 4xx and 5xx pages under / templates/error / will be automatically parsed, and errors will automatically jump to these two pages
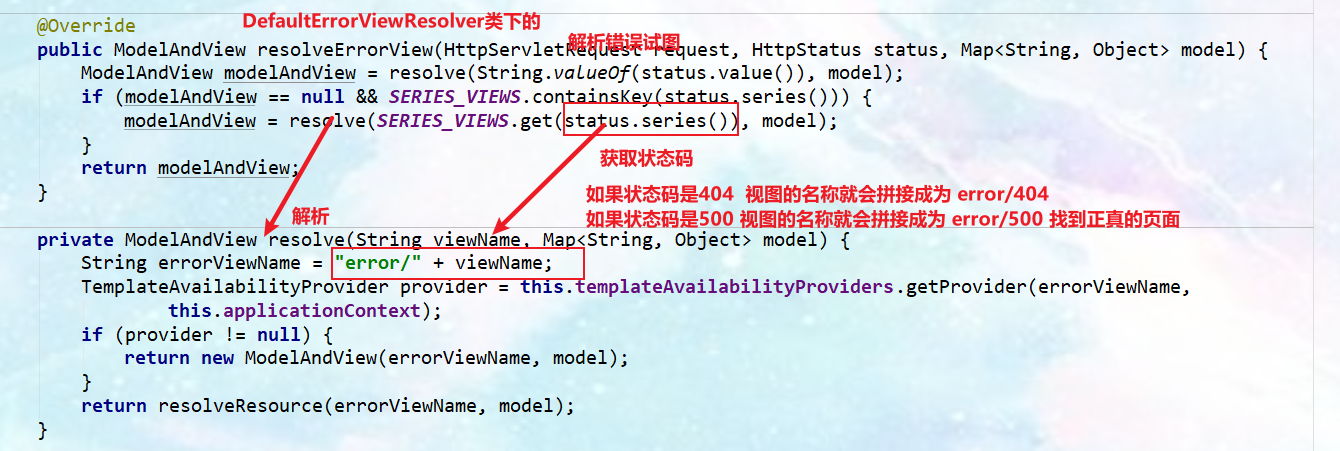
-
-
summary
- If you are not satisfied with the default functions of any of the above default configurations, you can customize the default components.
- You can customize the error page attributes (configure components similar to DefaultErrorAttributes), customize the page Jump logic (configure components similar to BasicErrorController), and customize the error page html path (configure components similar to DefaultErrorViewResolver)
9.3 exception handling steps and processes
1,mv = ha.handle(processedRequest, response, mappedHandler.getHandler()); Execute the target method, throw an exception, catch it, and encapsulate it in Exception dispatchException
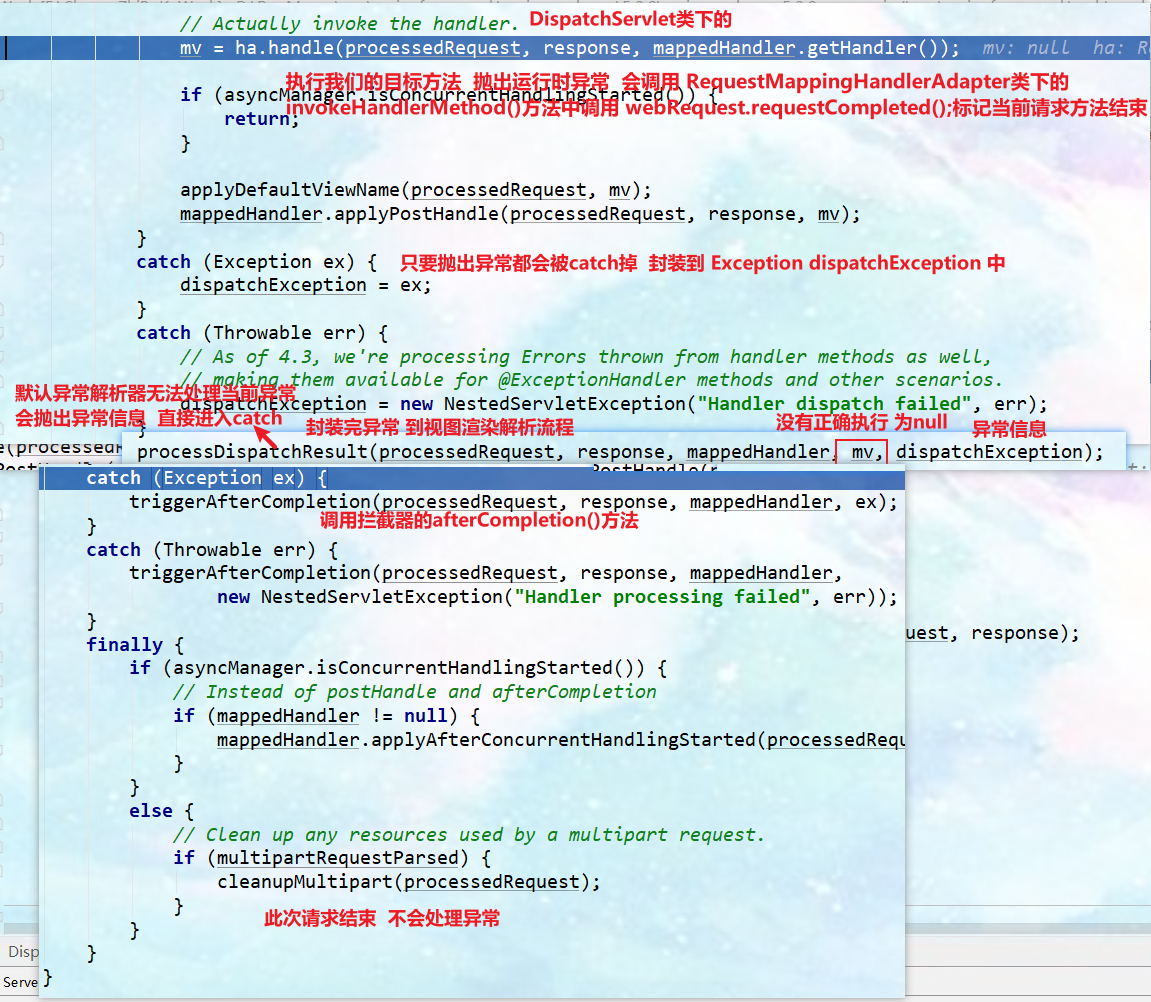
2. After throwing an exception, processdispatchresult (processedrequest, response, mapedhandler, MV, dispatchexception); Execute the view rendering and parsing process, mv = processHandlerException(request, response, handler, exception); Handle exceptions sent by handler
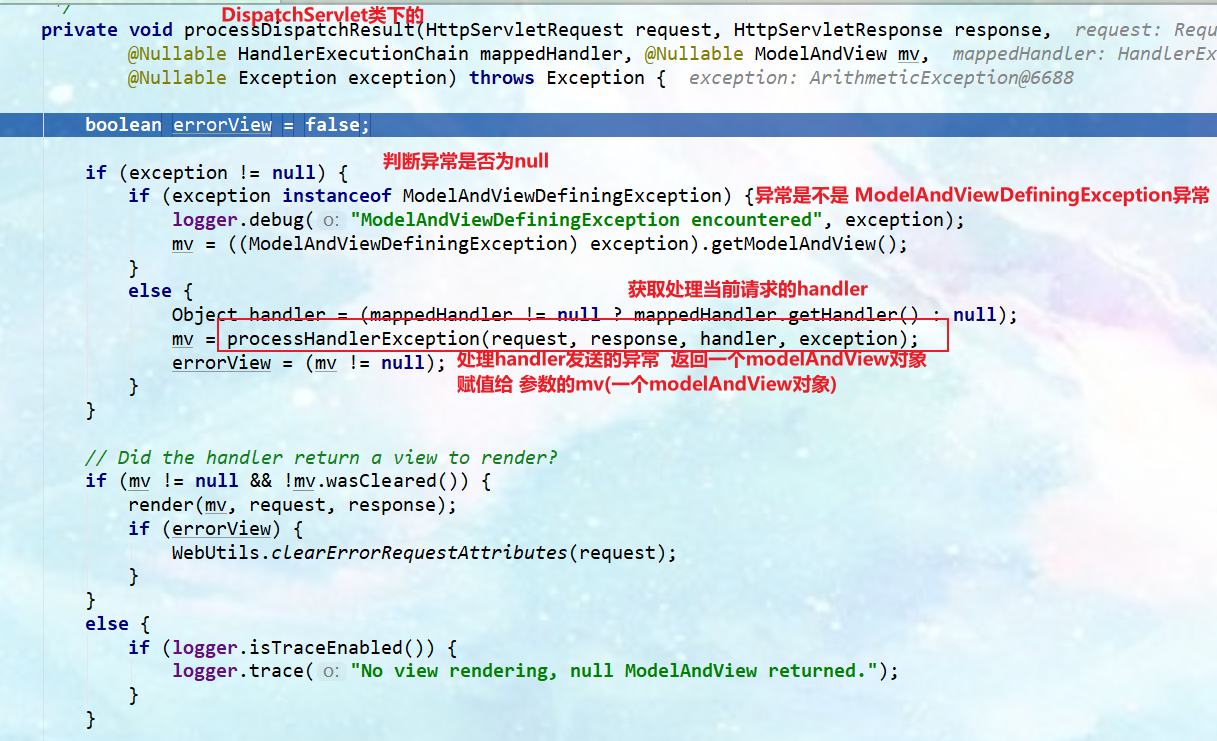
3. Traverse each exception parser and call the resolution method (resolveException()) of each exception parser. The implementation of each exception parser is different. If it is found that the default exception parser cannot resolve the current exception, throw the exception to mv = processHandlerException(request, response, handler, exception);, Can catch
[the external chain image transfer fails. The source station may have an anti-theft chain mechanism. It is recommended to save the image and upload it directly (img-gphswdg5-1642169239581)( https://gitee.com/PJGitee/images/raw/master/springboot%E7%AC%94%E8%AE%B0.assets/image -20210903183008469. png)]
4. After the capture is completed, if the exception is not handled, the system will send an error request to handle the exception

5. MV of executing error request = ha handle(processedRequest, response, mappedHandler.getHandler()); Jump to the following figure. The component injected into the container by the automatic configuration class (ErrorMvcAutoConfiguration) (BasicErrorController) will be used for processing, and the default error view parser in the system will be iterated. Only one of them is also the component injected into the container by the automatic configuration class (ErrorMvcAutoConfiguration) (DefaultErrorViewResolver) error view parser

6. DefaultErrorViewResolver error view resolver, get the status code, add the pre suffix, and use the template engine to respond to the page
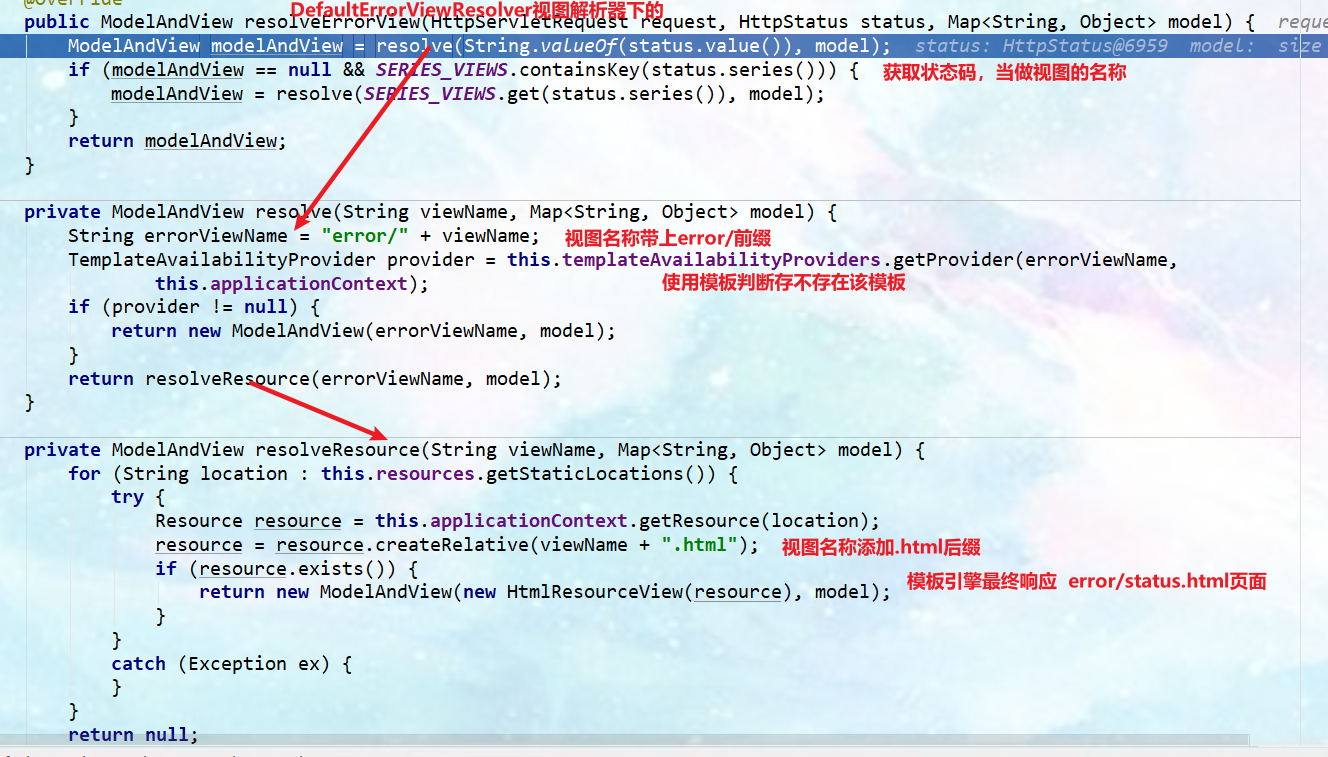
7. Summary:
1. Execute the target method. Any exception during the operation of the target method will be caught and mark the end of the current request; And use dispatchException to store exception information
2. Enter the view parsing process (page rendering)
processDispatchResult(processedRequest, response, mappedHandler, mv, dispatchException); When there is an exception, MV is empty, and the exception is saved in dispatchexception
3,mv = processHandlerException(); Handle the exception occurred in handler, and return ModelAndView after processing;
-
1. Traverse all handlerExceptionResolvers to see who can handle the current exception [HandlerExceptionResolver handler exception resolver]
-
2. The default exception parser of the system;
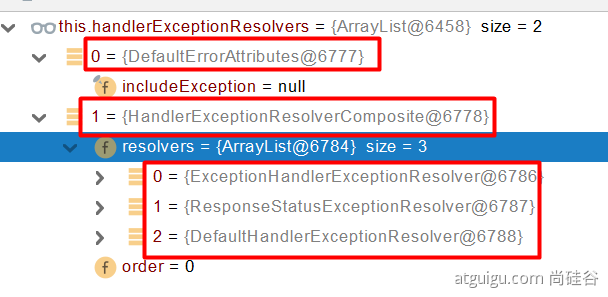
-
- 1. DefaultErrorAttributes handles exceptions first. Save the exception information to the rrequest field and return null;
- 2. By default, no exception parser can handle exceptions, so exceptions will be thrown
-
-
-
1. If no one can handle it, the bottom layer will send the / error request. Will be handled by the underlying BasicErrorController
-
2. Parse error view; Traverse all errorviewresolvers to see who can resolve them.

-
3. The default DefaultErrorViewResolver uses the response status code as the address of the error page, error / 500 html
-
4. The template engine finally responds to this page error / 500 html
-
5. Search order: '/ templates/error/500.', '/ static/error/500.html’,’/templates/error/5xx.’,’/ static/error/5xx.html’
-
-
-
9.4. Customize error handling logic
1. Custom error page
-
error/404.html error/5xx.html; If there is an accurate error status code, the page will match accurately. If not, find 4xx html; If none, trigger the white page
/*    If you do not pass the a parameter, a 400 error will be thrown. If the error page name under error under templates is 404, you will not be able to find the page change error or the original page. If the error page name under error under templates is 4xx, you will find the page change error. This page will prove that it will be accurately matched first, and fuzzy matching will be carried out
*/
@GetMapping("editable_table")
public String goToeDitable_table(@RequestParam("a") int a){
    int i = 10/0;
    return "dataTables/editable_table";
}
2. ControllerAdvice+@ExceptionHandler handles global exceptions
-
The bottom layer is the analysis supported by ExceptionHandlerExceptionResolver. We marked the method of @ ExceptionHandler and determined the returned view object through the return value of this method
Thymelefcontroller class
/* Web Global exception handling controller */ @Slf4j@ControllerAdvice //Put it in the container. The annotation source code contains @Component public class WebException { /** * The global exception handler * @ param e will encapsulate the thrown exception information into this parameter * @ return returns the name of the view */ @ExceptionHandler({ArithmeticException.class,NullPointerException.class}) //The exception handler is marked as a method to handle exception information. Throwing these two exceptions will execute the following process (usually some defined exceptions) public /*ModelAndView You can customize the modelAndView return*/ String goToException(Exception e){ log.info("Abnormal information={}" ,e); //Throw the above ArithmeticException\NullPointerException exception and jump return "login"; } } -
design sketch
-
In the schematic diagram, find the exceptionHandlerExceptionResolver exception parser, find the method annotated by our own exceptionHandler, and return the view name or modelAndView object after execution
[external chain picture transfer failed. The source station may have anti-theft chain mechanism. It is recommended to save the picture and upload it directly (img-ybrvq4tn-1642169239584)( https://gitee.com/PJGitee/images/raw/master/springboot%E7%AC%94%E8%AE%B0.assets/image -20210904105053008. png)]
3. @ ResponseStatus + custom exception
-
The bottom layer is ResponseStatusExceptionResolver. The bottom layer will send the / error request by default, that is, the current exception parser cannot process the view information, and can only encapsulate the error information. Call response through the bottom layer with the information annotated by responsestatus Senderror (statuscode, resolvedreason) sending; If there is no controller that can handle the / error request sent by tomcat, it will respond to Tomcat's own error page. When the springboot has a controller that handles the / error request, it is the automatically imported BasicErrorController
tomcat custom error page

/*    Custom exception 2 */
@ResponseStatus(value = HttpStatus.FORBIDDEN,reason = "Too many users") //Throw an exception response 403 status code to respond to the current user-defined exception. The exception information is that the number of users is too large
public class UserTooManyException extends RuntimeException {
    public UserTooManyException() {    }
    public UserTooManyException(String message) {        super(message);    }
}
Thymelefcontroller class
@GetMapping("dynamic_table") public String goToDynamic_table(Map<String ,Object> map){ List<User> users = Arrays.asList(new User("Zhang San", "123"), new User("Li Si", "12343"), new User("Wang Wu", "12321"), new User("Laugh to death", "1213223")); if(users.size() > 3){ throw new UserTooManyException();//Throw custom exception } map.put("users", users); return "dataTables/dynamic_table"; } -
design sketch
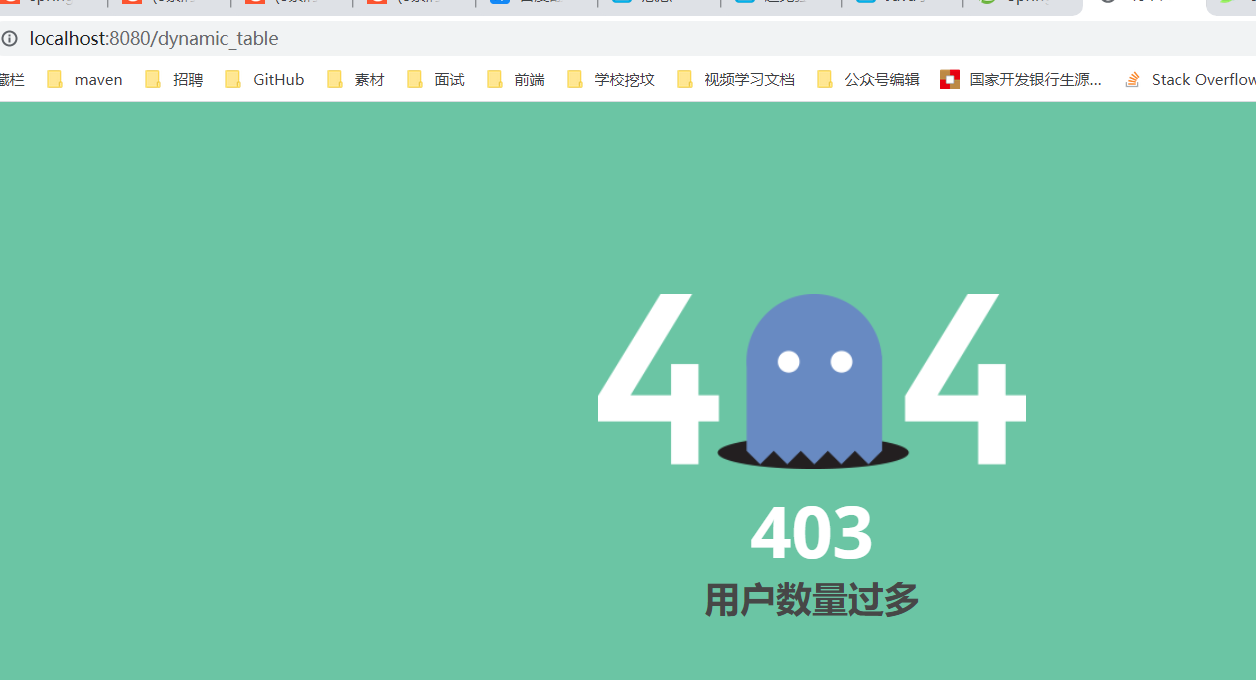
-
In the schematic diagram, find the exception parser of ExceptionHandlerExceptionResolver, call the method of analyzing exceptions, judge whether the responseStatus annotation is marked, and analyze the annotation information, such as status code, error information, etc
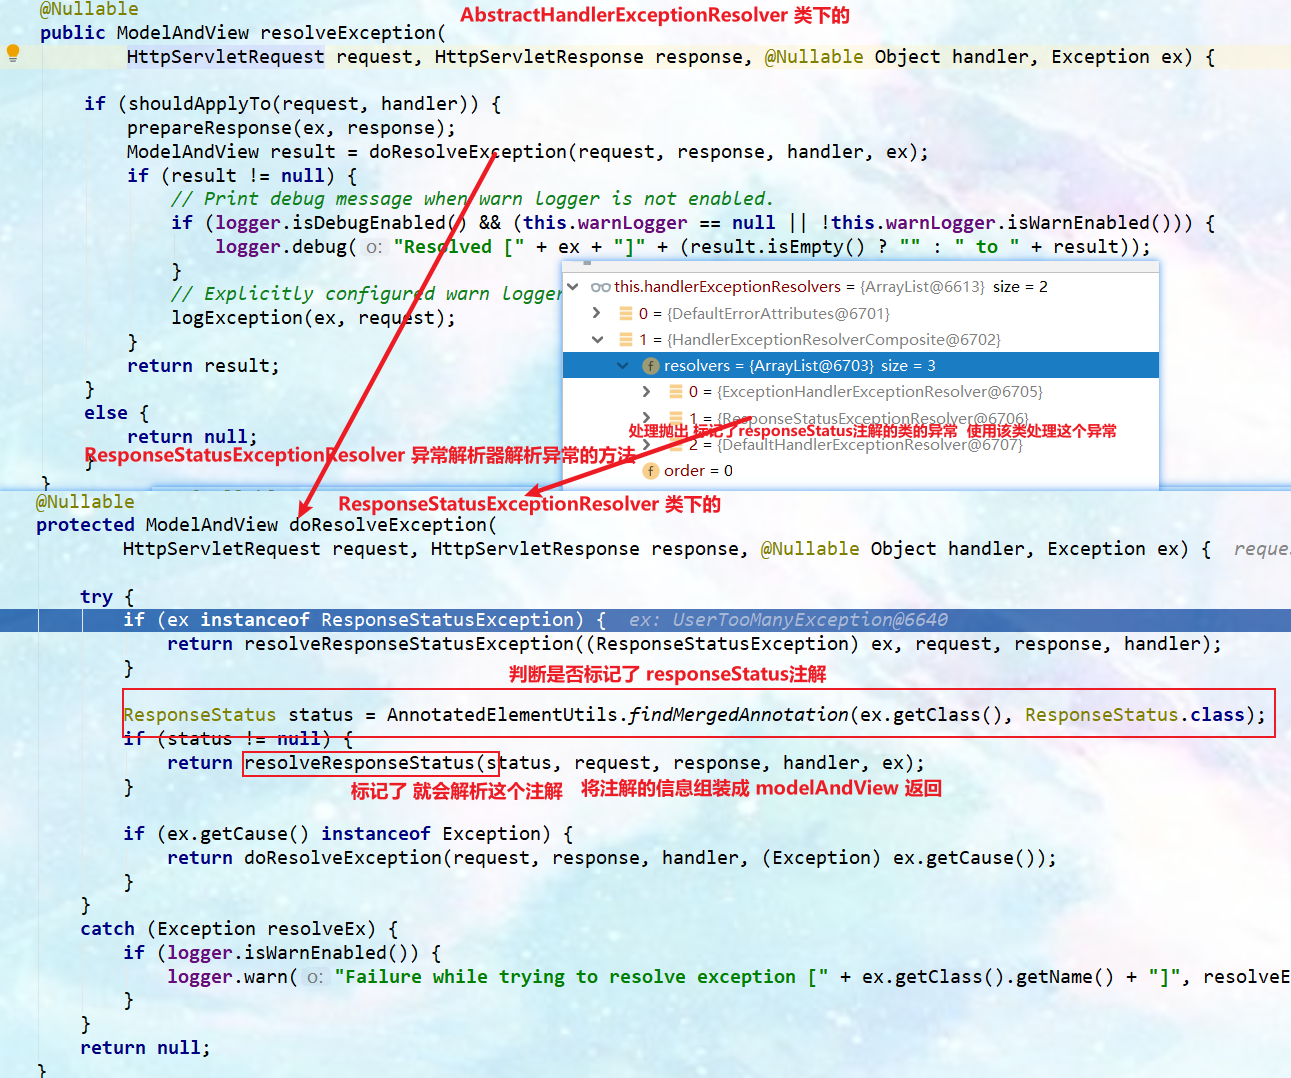
resolveResponseStatus() method source code, obtain status code, error information, application status code and error information, and return an empty modelAndView object when tomcat sends / error request directly
response.sendError(statusCode, resolvedReason)
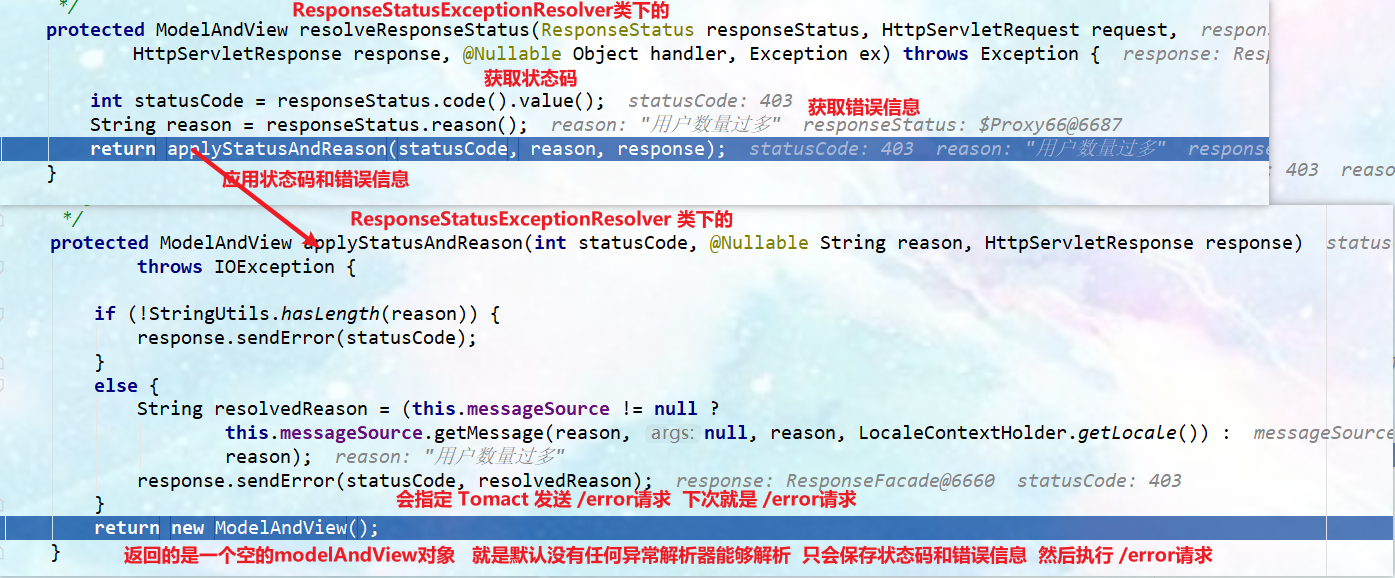
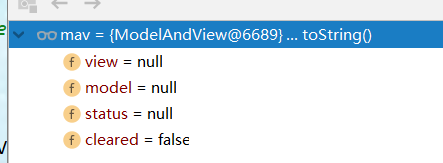
4. Spring underlying exceptions, such as parameter type conversion exceptions;
-
DefaultHandlerExceptionResolver handles exceptions at the bottom of the framework. The bottom layer will send the / error request by default, that is, the current exception parser cannot process the view information. It can only encapsulate the error information and call the response through the bottom layer sendError(HttpServletResponse.SC_BAD_REQUEST, ex.getMessage()); Send it out; If there is no controller that can handle the / error request sent by tomcat, it will respond to Tomcat's own error page. When the springboot has a controller that handles the / error request, it is the automatically imported BasicErrorController
//Experiment code: /* If you do not pass the a parameter, a 400 error will be thrown. If the error page name under error under templates is 404, you will not be able to find the page change error or the original page. If the error page name under error under templates is 4xx, you will find the page change error. This page will prove that it will be accurately matched first, and fuzzy matching will be carried out */ @GetMapping("editable_table") public String goToeDitable_table(@RequestParam("a") int a){ int i = 10/0; return "dataTables/editable_table"; } -
design sketch
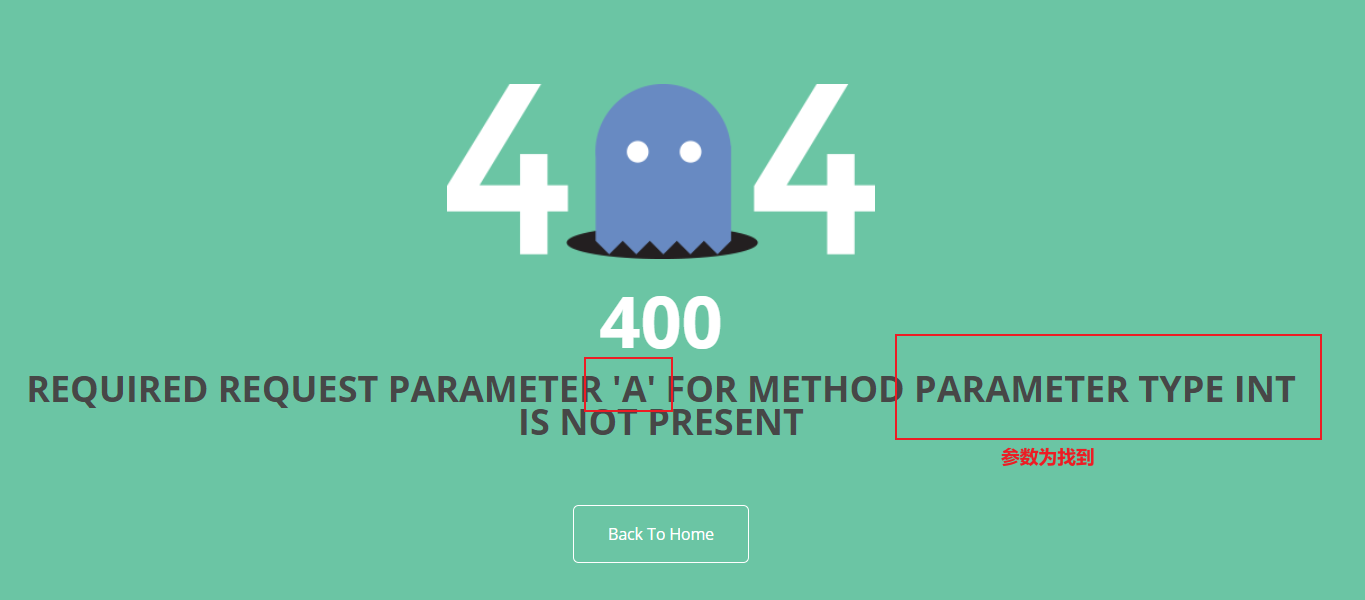
-
In the schematic diagram, find the DefaultHandlerExceptionResolver exception parser and call the method to resolve the exception
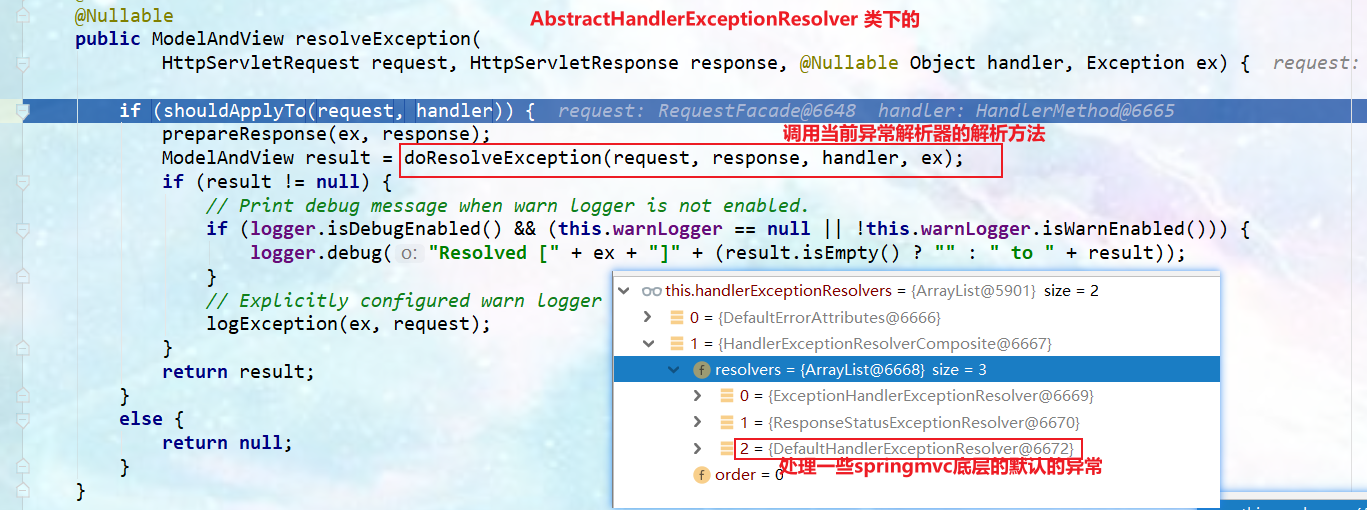
The exception parser can handle many exceptions thrown by the bottom layer of spring MVC. If these exceptions are thrown by the bottom layer, it will send the / error request, and send the error information and error status. When an empty modelAndView object is returned, it will handle the / error request sent by tomcat
response.sendError(HttpServletResponse.SC_BAD_REQUEST, ex.getMessage());
[external chain picture transfer failed. The source station may have anti-theft chain mechanism. It is recommended to save the picture and upload it directly (IMG oimmxsef-1642169239587)( https://gitee.com/PJGitee/images/raw/master/springboot%E7%AC%94%E8%AE%B0.assets/image -20210904113123105. png)]
5. Custom exception parser
-
The general interface of the exception parser can be used as the default global exception handling rule

-
Write custom exception parser code, implement the general interface of HandlerExceptionResolver exception parser, and realize the method of parsing exceptions
/* Custom exception parser */ @Component //Mark into container public class MyHandlerExceptionResolver implements HandlerExceptionResolver { @Override public ModelAndView resolveException(HttpServletRequest request, HttpServletResponse response, Object handler, Exception ex) { try { response.sendError(511, "My custom exception parser"); } catch (IOException e) { e.printStackTrace(); } //If there is a view address and model data in modelAndView, it will automatically jump to our own view address return new ModelAndView(); } } -
Currently, the "parameter exception error will be thrown if the a parameter is not passed" is thrown. The DefaultHandlerExceptionResolver exception resolver will return an empty modelAndView object and send the / error request. We will not use our own defined exception resolver
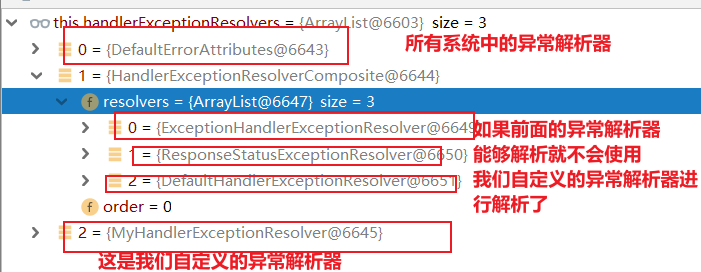
-
All the parsers of our custom exceptions have to be given priority. After that, all exceptions will be resolved by this custom exception resolution. Because there is no accurate resolution of that exception, any exception will directly send a / error request, respond to "511" and "my custom and exception parser", and return an empty modelAndView object
/* Custom exception parser */ @Order(value = Integer.MIN_VALUE) //The default value is the maximum value. The smaller the value, the higher the priority @Component //Mark into container public class MyHandlerExceptionResolver implements HandlerExceptionResolver { @Override public ModelAndView resolveException(HttpServletRequest request, HttpServletResponse response, Object handler, Exception ex) { try { response.sendError(511, "My custom exception parser"); } catch (IOException e) { e.printStackTrace(); } //If there is a view address and model data in modelAndView, it will automatically jump to our own view address return new ModelAndView(); } } -
As a result, when the custom exception parser is traversed first, it will call the resolveException() method of our own exception parser, and tomcat will send / error request with status code and error information, and then return an empty view object modelAndView. It will not cycle other exception parsers, but directly return an empty modelAndView object, In response to / error request
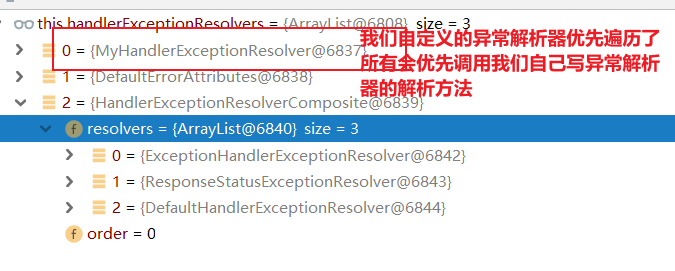
-
design sketch
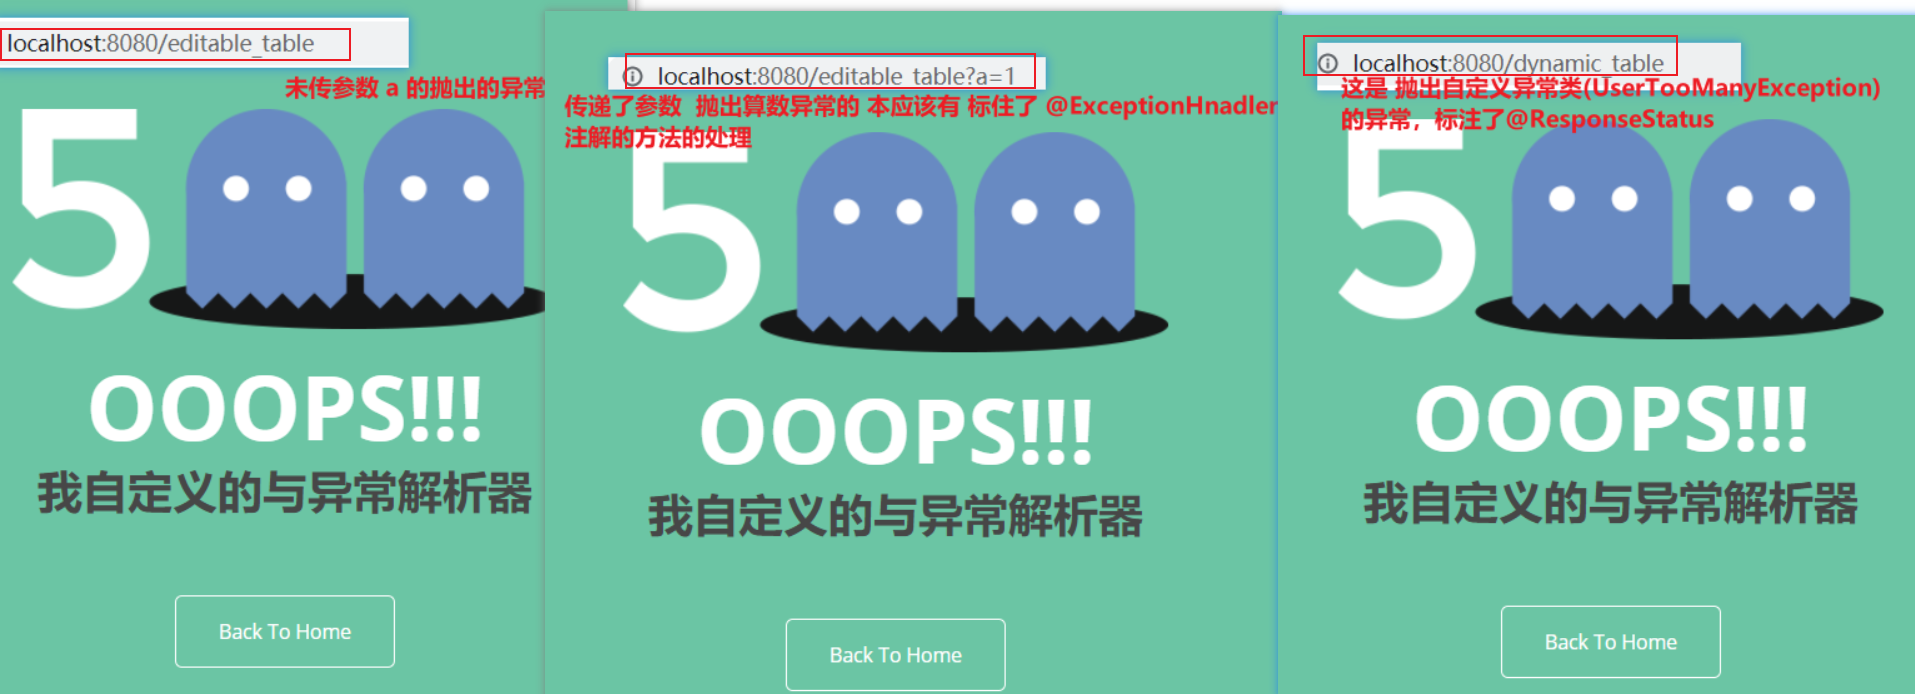
6. ErrorViewResolver implements custom exception handling;
- The default exception parsers of the system are (DefaultHandlerExceptionResolver, exceptionhandlerexceptionresolver) response sendError (). The error request will be forwarded to the controller
- No exception parser can handle your exception. tomcat bottom response sendError(). The error request will be forwarded to the controller
- The page address of basicErrorController is errorviewresolver (the system defaults to the rule defined by DefaultErrorViewResolver)
10. web native components (servlet, filter, listener)
10.1. Using servlet API
Official website address: https://docs.spring.io/spring-boot/docs/2.4.2/reference/htmlsingle/#howto-add-a-servlet-filter-or-listener
1. Provides support for native annotations
@ServletComponentScan(basePackages = "com.atguigu.admin"): specifies where the native Servlet components are placed
@WebServlet(urlPatterns = "/ my"): effect: direct response without Spring interceptor?
@WebFilter(urlPatterns={"/css/*","/images/*"})
@WebListener
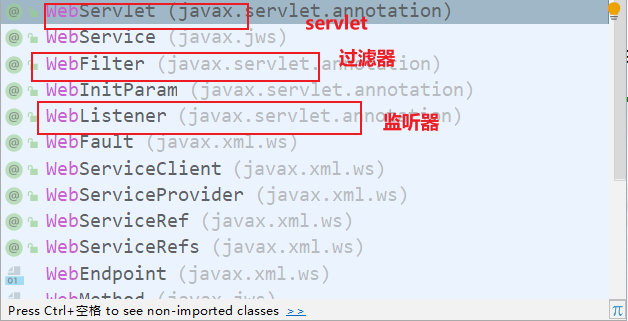
2. Use of servlet s
/*    Native servlet */
@WebServlet(urlPatterns = "/myServlet") //Must add
public class MyServlet extends HttpServlet {
    @Override
    protected void doGet(HttpServletRequest req, HttpServletResponse resp) throws ServletException, IOException {
        resp.getWriter().write("Our native servlet~~");
    }
}
@ServletComponentScan(basePackages = "com.pj.springboot") //Scan all sub packages under the modified package and sweep in the native component servlet
@SpringBootApplicationpublic class Springboot2Application {
    public static void main(String[] args) {
        SpringApplication.run(Springboot2Application.class, args);
    }
}
3. Use of Filter native components
/*    Native filter */
@Slf4j@WebFilter(urlPatterns = {"/css/*","/images/*","/myServlet"}) //Intercept all requests under css, image and myServlet
/*servlet Writing method / * * spring family writing method, single * is servlet writing method, and double * * is spring family writing method*/
public class MyFilter implements Filter {
    @Override
    public void init(FilterConfig filterConfig) throws ServletException {
        log.info("init Initialization complete");
    }
    @Override
    public void doFilter(ServletRequest request, ServletResponse response, FilterChain chain) throws IOException, ServletException {
        log.info("doFilter start-up");
        chain.doFilter(request, response); //Release
    }
    @Override
    public void destroy() {
        log.info("destroy Destruction complete");
    }
}

4. Use of Listener native components
/*Custom listener */
@Slf4j@WebListenerpublic class MyListener implements ServletContextListener {
    @Override
    public void contextInitialized(ServletContextEvent sce) {
        log.info("MyListener It is detected that the project has been initialized successfully~~");
    }
    @Override
    public void contextDestroyed(ServletContextEvent sce) {
        log.info("MyListener It is detected that the item has been destroyed successfully~~");
    }
}

10.2. Use RegistrationBean
/*Remove the above annotation of the class of the native registered servlet component, configure it with the configuration class, and configure the native servlet component through the configuration class */
@Configuration(proxyBeanMethods = true) //Ensure that the components in the container are single instance and will not cause redundant servlet objects in the container
public class MyRegisterConfig {
    @Bean
    public ServletRegistrationBean servletRegistrationBean(){
        MyServlet myServlet = new MyServlet();
        return new ServletRegistrationBean(myServlet,"/my","/my02");//This servlet maps multiple paths
    }
    @Bean    public FilterRegistrationBean filterRegistrationBean(){
        MyFilter myFilter = new MyFilter();        //The first way
        FilterRegistrationBean filterRegistrationBean = new FilterRegistrationBean(myFilter);
        filterRegistrationBean.setUrlPatterns(Arrays.asList("/my","/css/*")); //Customize the method of intercepting all items under / my and / css / / the second method / / return new FilterRegistrationBean(myFilter,servletRegistrationBean())// By default, the paths my and my02 of servletRegistrationBean registered servlets are intercepted
        return filterRegistrationBean;
    }
    @Bean
    public ServletListenerRegistrationBean listenerRegistrationBean(){
        MyListener myListener = new MyListener();
        return new ServletListenerRegistrationBean(myListener);
    }
}
10.3. Explain why the native servlet did not pass through the Spring interceptor
-
There are now two servlets in the container, i.e. MyServlet with mapping path of / my and DispatchServlet with mapping path of/
-
Analyze how the DispatchServlet is configured into the container
@AutoConfigureOrder(Ordered.HIGHEST_PRECEDENCE)@Configuration(proxyBeanMethods = false) @ConditionalOnWebApplication(type = Type.SERVLET) //Determine whether the current project is of servlet type @ConditionalOnClass(DispatcherServlet.class) //No dispatchservlet Class exists @AutoConfigureAfter(ServletWebServerFactoryAutoConfiguration.class) public class DispatcherServletAutoConfiguration { public static final String DEFAULT_DISPATCHER_SERVLET_BEAN_NAME = "dispatcherServlet"; public static final String DEFAULT_DISPATCHER_SERVLET_REGISTRATION_BEAN_NAME = "dispatcherServletRegistration"; @Configuration(proxyBeanMethods = false) @Conditional(DefaultDispatcherServletCondition.class) @ConditionalOnClass(ServletRegistration.class) @EnableConfigurationProperties(WebMvcProperties.class) protected static class DispatcherServletConfiguration { @Bean(name = DEFAULT_DISPATCHER_SERVLET_BEAN_NAME) //Inject the bean component of DispatchServlet into the container public DispatcherServlet dispatcherServlet(WebMvcProperties webMvcProperties) { //Bind the configuration of webMvcProperties bean. All configuration items are configured in WebMvcPropertiesWebMvcProperties with the prefix spring mvc DispatcherServlet dispatcherServlet = new DispatcherServlet(); dispatcherServlet.setDispatchOptionsRequest(webMvcProperties.isDispatchOptionsRequest()); dispatcherServlet.setDispatchTraceRequest(webMvcProperties.isDispatchTraceRequest()); dispatcherServlet.setThrowExceptionIfNoHandlerFound(webMvcProperties.isThrowExceptionIfNoHandlerFound()); dispatcherServlet.setPublishEvents(webMvcProperties.isPublishRequestHandledEvents()); dispatcherServlet.setEnableLoggingRequestDetails(webMvcProperties.isLogRequestDetails()); return dispatcherServlet; } } @Configuration(proxyBeanMethods = false) @Conditional(DispatcherServletRegistrationCondition.class) @ConditionalOnClass(ServletRegistration.class) @EnableConfigurationProperties(WebMvcProperties.class) @Import(DispatcherServletConfiguration.class) protected static class DispatcherServletRegistrationConfiguration { @Bean(name = DEFAULT_DISPATCHER_SERVLET_REGISTRATION_BEAN_NAME) @ConditionalOnBean(value = DispatcherServlet.class, name = DEFAULT_DISPATCHER_SERVLET_BEAN_NAME) public DispatcherServletRegistrationBean dispatcherServletRegistration(DispatcherServlet dispatcherServlet, WebMvcProperties webMvcProperties, ObjectProvider<MultipartConfigElement> multipartConfig) { //Register in the container through DispatcherServletRegistrationBean, that is, ServletRegistrationBean //The value of the parameter is injected from the container DispatcherServletRegistrationBean registration = new DispatcherServletRegistrationBean(dispatcherServlet,webMvcProperties.getServlet().getPath()); // private String path = "/"; path default registration.setName(DEFAULT_DISPATCHER_SERVLET_BEAN_NAME); registration.setLoadOnStartup(webMvcProperties.getServlet().getLoadOnStartup()); multipartConfig.ifAvailable(registration::setMultipartConfig); return registration; } } } -
Modify the default mapping path of DispatchServlet. Generally, do not change the default mapping / path
#Modify the default mapping path of DispatchServlet
spring.mvc.servlet.path=/mvc
-
Tomcat-Servlet;
Multiple servlets can handle the same layer path. If / my/1 is sent, B will be called
A: /my/
B: /my/1
-
Explanation: according to the principle of precision first, DispatcherServlet handles "/" requests, and MyServlet handles "/ my" requests. Sending / my, MyServlet is more accurate, so it is processed by the native servlet (Tomcat), and only the requests processed by DispatcherServlet(Spring) will pass through the spring interceptor
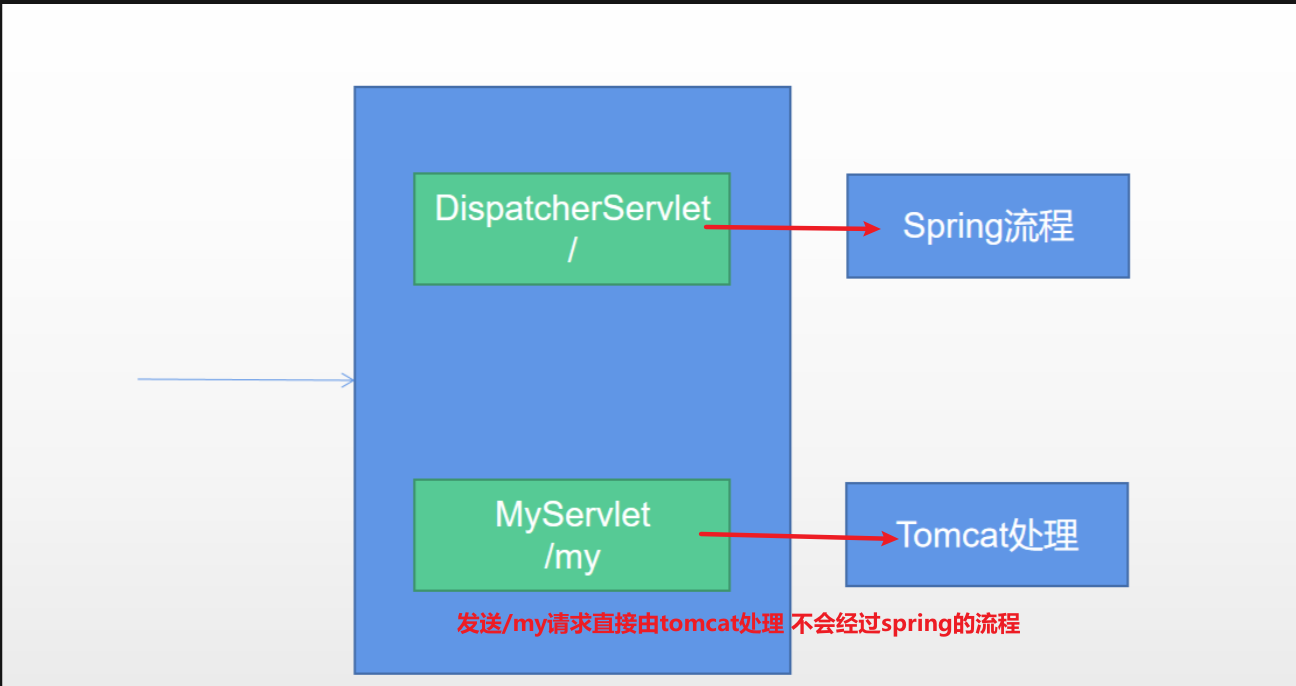
11. Embedded Servlet container
11.1. Switch embedded Servlet container
Official documents: https://docs.spring.io/spring-boot/docs/2.4.2/reference/htmlsingle/#howto-use-another-web-server
1. Default supported webServer
-
- Tomcat, Jetty, or Undertow
- The servletwebserver ApplicationContext container starts looking for the ServletWebServerFactory and guides the creation of the server
2. Switch server
-
The underlying servers supported by default are as follows. Spring Boot uses Tomcat server by default. If other servers need to be changed, modify the project POM xml:
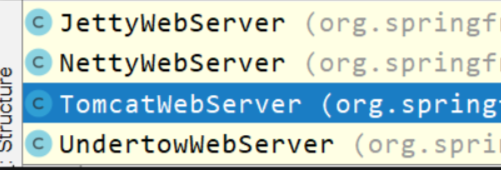
-
Import server dependencies
<dependency>
    <groupId>org.springframework.boot</groupId>
    <artifactId>spring-boot-starter-web</artifactId>
    <exclusions>
        <exclusion>
            <!--spring-boot-starter-web The scene is automatically imported tomcat Server, so it needs to be drained tomcat The server-->
            <groupId>org.springframework.boot</groupId>
            <artifactId>spring-boot-starter-tomcat</artifactId>
        </exclusion>
    </exclusions>
</dependency>
<!--Import the scenario using the server you want to use jetty The server-->
<dependency>
    <groupId>org.springframework.boot</groupId>
    <artifactId>spring-boot-starter-jetty</artifactId>
</dependency>
3. Principle
-
- SpringBoot application startup found that it is currently a web application. Web scenario package - Import tomcat
- The web application will create a web version of the IOC container servletwebserver ApplicationContext
-
-
When the servletwebserver ApplicationContext is started, look for the ServletWebServerFactory (the web server factory of a Servlet corresponds to the web server of a Servlet). When the ServletWebServerFactory is started, it will load the corresponding ServletWebServerFactory according to the imported dependency, and the corresponding ServletWebServerFactory will look for the web server of the corresponding Servlet
-
There are many WebServer factories at the bottom of SpringBoot by default; TomcatServletWebServerFactory, JettyServletWebServerFactory, or UndertowServletWebServerFactory will be injected into the container according to conditions in ServletWebServerFactoryConfiguration. The condition is that if there is a dependent jar package of that webserverfactory, it will be imported. For example, importing tomcat dependency will inject into tomcatServletWebServerFactory factory, and importing Jetty dependency will inject into JettyServletWebServerFactory factory
[external chain picture transfer failed. The source station may have anti-theft chain mechanism. It is recommended to save the picture and upload it directly (IMG jrokujcs-1642169239591)( https://gitee.com/PJGitee/images/raw/master/springboot%E7%AC%94%E8%AE%B0.assets/image -20210904165802569. png)]
-
There will be an automatic configuration class directly at the bottom. This configuration class will be preferentially loaded into the container, ServletWebServerFactoryAutoConfiguration` WebServer factory configuration class
@Configuration(proxyBeanMethods = false)@AutoConfigureOrder(Ordered.HIGHEST_PRECEDENCE)@ConditionalOnClass(ServletRequest.class)@ConditionalOnWebApplication(type = Type.SERVLET)@EnableConfigurationProperties(ServerProperties.class) //ServerProperties is bound to the configuration component, and the configurable properties are in this class @Import({ ServletWebServerFactoryAutoConfiguration.BeanPostProcessorsRegistrar.class, ServletWebServerFactoryConfiguration.EmbeddedTomcat.class, ServletWebServerFactoryConfiguration.EmbeddedJetty.class, ServletWebServerFactoryConfiguration.EmbeddedUndertow.class })//Imported ServletWebServerFactoryConfiguration class public class ServletWebServerFactoryAutoConfiguration {} -
ServletWebServerFactoryAutoConfiguration imported ServletWebServerFactoryConfiguration (configuration class)
-
The ServletWebServerFactoryConfiguration configuration class dynamically determines which Web Server package is imported into the system. (the default is to import the tomcat package from the web starter), and there is TomcatServletWebServerFactory in the container
-
Tomcat servlet webserverfactory creates a Tomcat server and starts it; The constructor of TomcatWebServer has initialization method initialize(). In this method, this. is called. tomcat. start();`
-
The embedded server is to manually call the code to start the server (the tomcat core jar package exists) in the factory getWebServer(getSelfInitializer()); Embodied in the source code
-
-
[the external chain picture transfer fails. The source station may have an anti-theft chain mechanism. It is recommended to save the picture and upload it directly (img-ibej6elg-16421692391)( https://gitee.com/PJGitee/images/raw/master/springboot%E7%AC%94%E8%AE%B0.assets/image -20210904170004049. png)]
- This webServer = factory. getWebServer(getSelfInitializer()); Source code
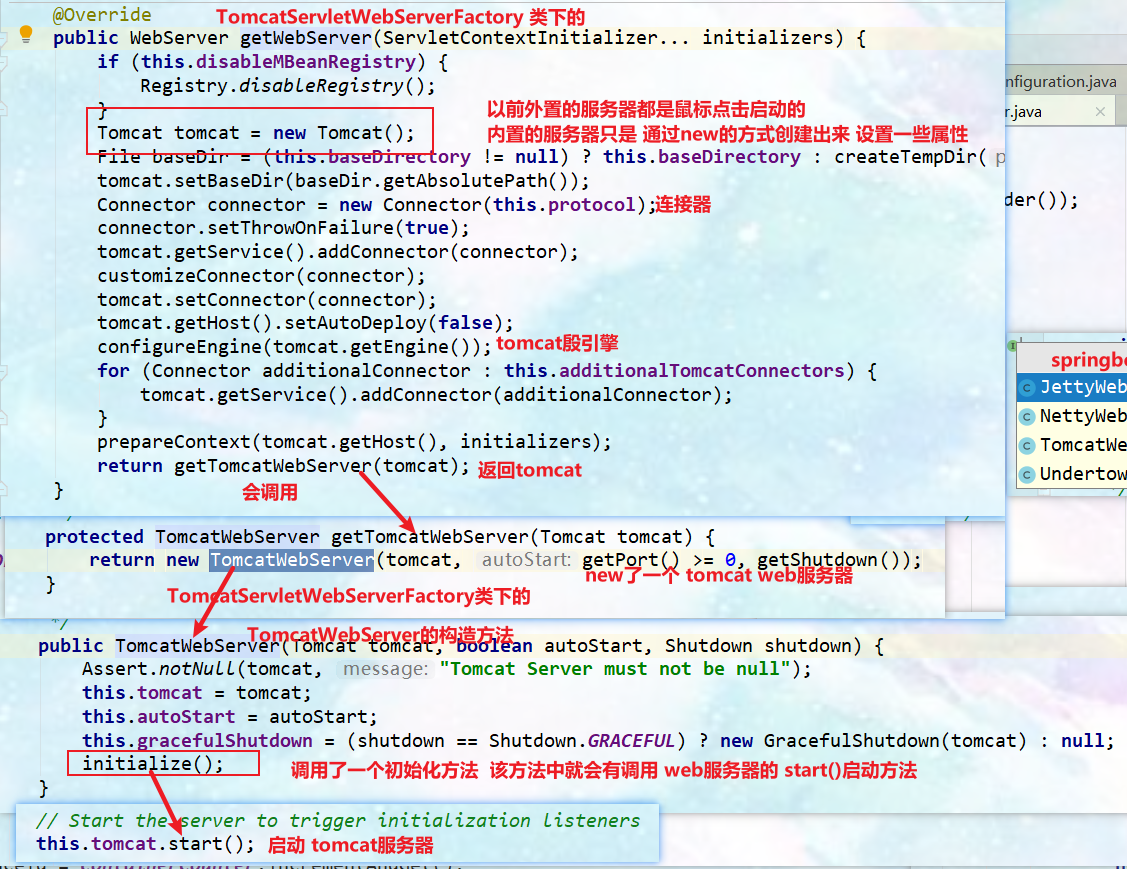
4. Custom Servlet container
-
Modify the configuration file server XXX (configurableservletwebserverfactory is bound with ServerProperties component) is recommended
#Modify the configuration of the server#Modify port number
server.port=8081
#Modify some configurations of other web services
server.undertow.accesslog.dir=/tem
#Set session expiration time
server.servlet.session.timeout=30s
-
Directly customize the Servlet Web server factory configured by the configurableservlet webserverfactory

-
Implement webserverfactorycustomizer < configurableservletwebserverfactory >
-
In the servlet webserverfactoryautoconfiguration configuration class, put a component of servlet webserverfactorycustomizer (servlet web server factory customizer) into the container
-
The value of the configuration file is bound to the servlet webserverfactory through the servlet webserverfactory customizer
@Overridepublic void customize(ConfigurableServletWebServerFactory factory) { PropertyMapper map = PropertyMapper.get().alwaysApplyingWhenNonNull(); map.from(this.serverProperties::getPort).to(factory::setPort); map.from(this.serverProperties::getAddress).to(factory::setAddress); map.from(this.serverProperties.getServlet()::getContextPath).to(factory::setContextPath); map.from(this.serverProperties.getServlet()::getApplicationDisplayName).to(factory::setDisplayName); map.from(this.serverProperties.getServlet()::isRegisterDefaultServlet).to(factory::setRegisterDefaultServlet); map.from(this.serverProperties.getServlet()::getSession).to(factory::setSession); map.from(this.serverProperties::getSsl).to(factory::setSsl); map.from(this.serverProperties.getServlet()::getJsp).to(factory::setJsp); map.from(this.serverProperties::getCompression).to(factory::setCompression); map.from(this.serverProperties::getHttp2).to(factory::setHttp2); map.from(this.serverProperties::getServerHeader).to(factory::setServerHeader); map.from(this.serverProperties.getServlet()::getContextParameters).to(factory::setInitParameters); map.from(this.serverProperties.getShutdown()).to(factory::setShutdown); for (WebListenerRegistrar registrar : this.webListenerRegistrars) { registrar.register(factory); }} -
Custom ServletWebServerFactoryCustomizer configures the default settings for the web server factory

-
-
Xxxxxxcustomizer: a customizer that can change the default rules (default configuration) of xxxx
12. Customization principle - several ways of customizing components in SpringBoot (summary)
12.1 common ways of customization
1. Write a custom configuration class xxconfiguration + @ bean to replace and add the default components in the container, which is recommended by the view parser
-
For example:
@Configurationpublic class WebConfig   implements WebMvcConfigurer {
    //Add a format converter
    @Override    public void addFormatters(FormatterRegistry registry) {}
    //Add a message converter
    @Override
    public void extendMessageConverters(List<HttpMessageConverter<?>> converters) {}
    @Bean
    //replace
    public CharacterEncodingFilter characterEncodingFilter() {
        CharacterEncodingFilter filter = new OrderedCharacterEncodingFilter();
        filter.setEncoding("ISO-8859-1");
        return filter;
    }}
2. Modify profile
3. Xxxxxxcustomizer: customizer, which can change the default rules (default configuration) of xxxx
4. Write a configuration class for a web application to implement WebMvcConfigurer, which can customize web functions + @ Bean and recommend some more components to be extended in the container
@Configuration
public class AdminWebConfig implements WebMvcConfigurer{}

perhaps
 @Configuration
 public class AdminWebConfig implements WebMvcConfigurer{
     //Too low level not recommended
     @Bean
     public WebMvcRegistrations webMvcRegistrations(){
         /*        The interface used to register the key components of WebMvcConfigurationSupport is the default component provided by Spring MVC. All custom instances are handled later by Boot and Spring MVC configurations. A single instance of this component should be registered, otherwise you will not be able to select from redundant MVC components         */
         return new WebMvcRegistrations() {};
     }}
5. @ EnableWebMvc + WebMvcConfigurer - @ Bean can fully take over spring MVC, and all rules can be reconfigured by itself; Realize customization and extension functions (advanced functions, beginners retreat).
- use
/** *  @EnableWebMvc Take over the configuration of mvc in an all-round way. The default configuration does not take effect. You need to configure it yourself 	 Static resources, view parser, welcome page All failure */
@EnableWebMvc
@Configuration
public class MyWebMvcConfig implements WebMvcConfigurer {}
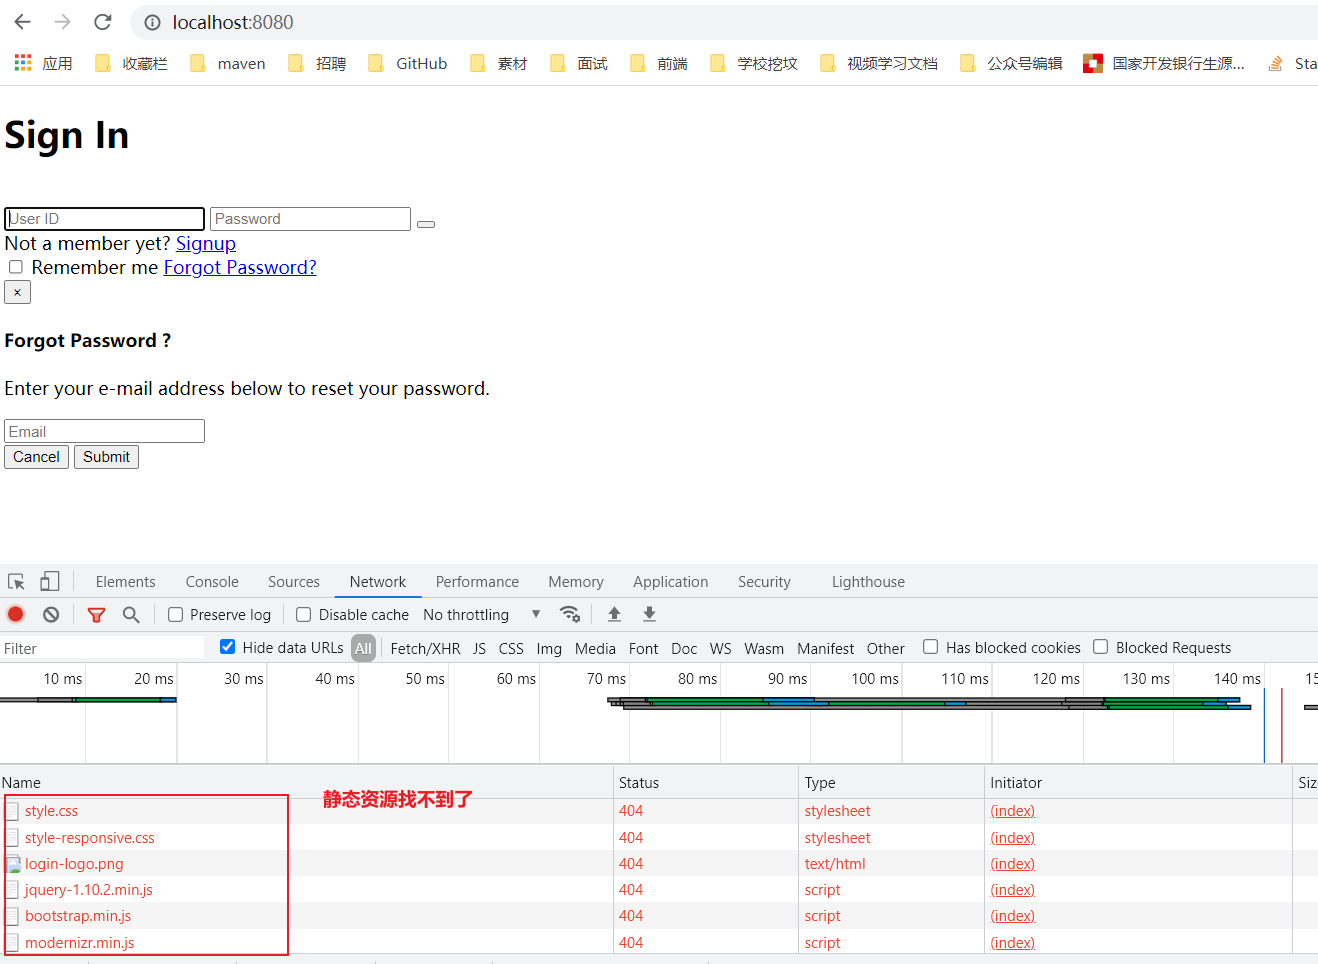
- Add static mapping rule
@EnableWebMvc
@Configuration
public class MyWebMvcConfig implements WebMvcConfigurer {
    //Add static resource mapping
    @Override
public void addResourceHandlers(ResourceHandlerRegistry registry) {
     	registry.addResourceHandler("/aa/**") //Requests starting with aa this access path will
        		.addResourceLocations("classpath:/static/"); //Map to the static directory under classpath
   }
}
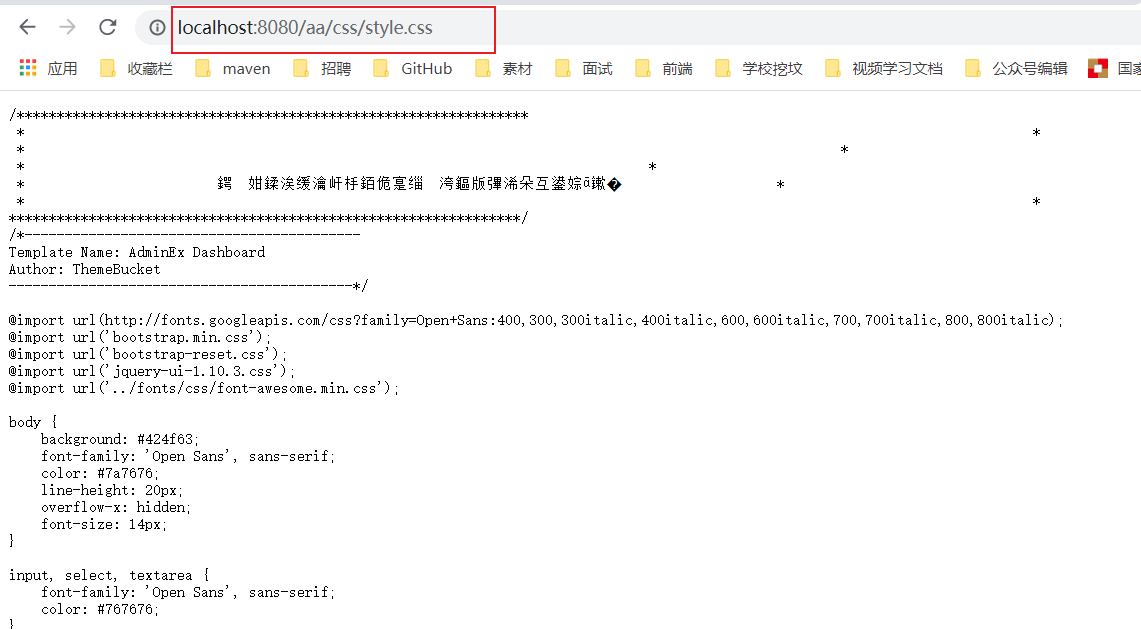
-
Principle:
-
Webmvcoautoconfiguration is the default spring MVC auto configuration function class, such as static resources, welcome page and other functions.
-
@EnableWebMvc annotation
@Retention(RetentionPolicy.RUNTIME) @Target(ElementType.TYPE) @Documented@Import(DelegatingWebMvcConfiguration.class) //The class was imported public @interface EnableWebMvc {} -
DelegatingWebMvcConfiguration only guarantees the most basic use of spring MVC
-
Take over the classes that implement the WebMvcConfigurer interface in all systems. The customization of all functions takes effect together with these webmvcconfigurers.
-
DelegatingWebMvcConfiguration automatically configures some very low-level components, such as RequestMappingHandlerMapping. The components that these components depend on are obtained from the container.
-
Complete declaration: if DelegatingWebMvcConfiguration is imported, WebMvcConfigurationSupport will be imported
@Configuration(proxyBeanMethods = false)
public class DelegatingWebMvcConfiguration extends WebMvcConfigurationSupport {}
-
-
The configuration in webmvcoautoconfiguration must be effective
@ConditionalOnMissingBean(WebMvcConfigurationSupport.class). Delegatingwebmvcconfigurationsupport can take effect without this webmvcconfigurationsupport component. Delegatingwebmvcconfigurationsupport inherits webmvcconfigurationsupport, so if it does not take effect, it will not use the modified configuration class
@Configuration(proxyBeanMethods = false) @ConditionalOnWebApplication(type = Type.SERVLET) @ConditionalOnClass({ Servlet.class, DispatcherServlet.class, WebMvcConfigurer.class }) @ConditionalOnMissingBean(WebMvcConfigurationSupport.class) //There is no WebMvcConfigurationSupport component to take effect @AutoConfigureOrder(Ordered.HIGHEST_PRECEDENCE + 10) @AutoConfigureAfter({ DispatcherServletAutoConfiguration.class, TaskExecutionAutoConfiguration.class, ValidationAutoConfiguration.class }) public class WebMvcAutoConfiguration {} -
@EnableWebMvc caused webmvcaiutoconfiguration not to take effect.
-
12.2 principle analysis routine
Importing scenario starter - some xxxautoconfiguration configuration classes will be introduced - xxx components (@ Bean annotation) will be imported into the configuration class - the configuration class will also bind xxxProperties(@EnableConfigurationProperties(xxxx.class)) -- binding configuration file items.
6. Data access
In the project springboot-1
1,SQL
1. Automatic configuration of data sources
1.1. Import JDBC usage scenarios
-
Import JDBC dependencies
<!--jdbc Usage scenario--> <dependency> <groupId>org.springframework.boot</groupId> <artifactId>spring-boot-starter-data-jdbc</artifactId> </dependency> -
After importing the dependency, the dependency is imported in the modified dependency, except that there is no database driven dependency
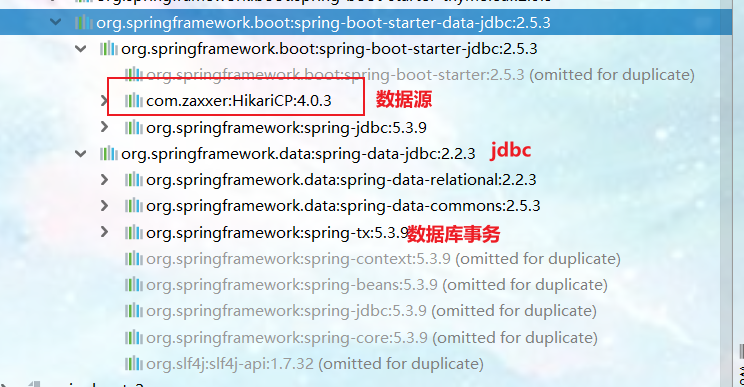
-
Why is the JDBC scenario imported and the official driver is not imported? Because the authorities don't know what database we're going to operate next.
-
The official version of the imported database driver was arbitrated
<!--The database driver does version arbitration-->
<dependency>
    <groupId>mysql</groupId>
    <artifactId>mysql-connector-java</artifactId>
</dependency>
-
Your own database version should correspond to the driver version
Default version:<mysql.version>8.0.26</mysql.version> Want to modify the version 1,Import specific version directly( maven (principle of proximity) <dependency> <groupId>mysql</groupId> <artifactId>mysql-connector-java</artifactId> <version>5.1.47</version> </dependency> 2,Redeclare version( maven (principle of proximity priority of attributes) <properties> <mysql.version>5.1.47</mysql.version> </properties> -
maven's three principles: dependent delivery principle, dependent proximity principle (shortest path principle) and declaration priority principle
1.2. Automatic configuration
-
Automatic configuration class of data source DataSourceAutoConfiguration
@Configuration(proxyBeanMethods = false) @ConditionalOnClass({ DataSource.class, EmbeddedDatabaseType.class }) @ConditionalOnMissingBean(type = "io.r2dbc.spi.ConnectionFactory") //There are no classes based on responsive programming in the container @EnableConfigurationProperties(DataSourceProperties.class) //Enable the profile binding function. The bound class is DataSourceProperties. The prefix of the binding profile is spring datasource @Import({ DataSourcePoolMetadataProvidersConfiguration.class, DataSourceInitializationConfiguration.InitializationSpecificCredentialsDataSourceInitializationConfiguration.class, DataSourceInitializationConfiguration.SharedCredentialsDataSourceInitializationConfiguration.class }) public class DataSourceAutoConfiguration { //..... @Configuration(proxyBeanMethods = false) @Conditional(PooledDataSourceCondition.class) @ConditionalOnMissingBean({ DataSource.class, XADataSource.class }) //If there is no DataSource in the container, the XADataSource response will help you configure a connection pool @Import({ DataSourceConfiguration.Hikari.class, DataSourceConfiguration.Tomcat.class, DataSourceConfiguration.Dbcp2.class, DataSourceConfiguration.OracleUcp.class, DataSourceConfiguration.Generic.class, DataSourceJmxConfiguration.class })//DataSourceConfiguration will inject different data sources according to the imported dependencies. The default Hikari data source can also be through the configuration item spring. In the configuration file datasource. Type specifies the data source protected static class PooledDataSourceConfiguration { } // ..... } //A default data source configuration under the DataSourceConfiguration class @Configuration(proxyBeanMethods = false) @ConditionalOnClass(HikariDataSource.class) @ConditionalOnMissingBean(DataSource.class) //Configure the data source with you only when there is no data source in the container @ConditionalOnProperty(name = "spring.datasource.type", havingValue = "com.zaxxer.hikari.HikariDataSource", matchIfMissing = true) static class Hikari { @Bean @ConfigurationProperties(prefix = "spring.datasource.hikari") HikariDataSource dataSource(DataSourceProperties properties) { HikariDataSource dataSource = createDataSource(properties, HikariDataSource.class); if (StringUtils.hasText(properties.getName())) { dataSource.setPoolName(properties.getName()); } return dataSource; } }-
Enable the profile binding function. The bound class is DataSourceProperties. The prefix of the binding profile is spring datasource
-
Data source url, username, password and driverclass need to be configured
spring:
	datasource:
    	password: 123
        username: root
        driver-class-name: com.mysql.jdbc.Driver
        url: jdbc:mysql://localhost:3306/test
-
If the data source configuration is not imported, the project will fail to start

-
-
The configuration of database connection pool is automatically configured only when there is no DataSource in its own container
-
The DataSourceConfiguration class will inject different data sources according to the imported dependencies. The default Hikari data source. If there are multiple data source dependencies, you can also use the configuration item spring. In the configuration file datasource. Type specifies the data source, which can be as follows:
org.apache.tomcat.jdbc.pool.DataSourcecom.zaxxer.hikari.HikariDataSource default org.apache.commons.dbcp2.BasicDataSourceoracle.ucp.jdbc.PoolDataSource
-
The bottom configured connection pool is HikariDataSource
-
-
-
Transaction autoconfiguration class of database DataSourceTransactionManagerAutoConfiguration
-
dbcTemplateAutoConfiguration: the automatic configuration of JdbcTemplate, which can be used to crud the database
-
You can modify the configuration item @ ConfigurationProperties(prefix = "spring.jdbc") to modify the JdbcTemplate
spring: jdbc: template: query-timeout: 3 #Set query timeout -
@ Bean@Primary JdbcTemplate; There is this component in the container
@Configuration(proxyBeanMethods = false) @ConditionalOnClass({ DataSource.class, JdbcTemplate.class }) @ConditionalOnSingleCandidate(DataSource.class) @AutoConfigureAfter(DataSourceAutoConfiguration.class) @EnableConfigurationProperties(JdbcProperties.class) //Enable the configuration file binding function. The bound class is JdbcProperties. The prefix of the binding configuration file is spring jdbc @Import({ DatabaseInitializationDependencyConfigurer.class, JdbcTemplateConfiguration.class, NamedParameterJdbcTemplateConfiguration.class }) //The JdbcTemplateConfiguration configures some basic settings of jdbc public class JdbcTemplateAutoConfiguration { } //JdbcTemplateConfiguration class @Configuration(proxyBeanMethods = false) @ConditionalOnMissingBean(JdbcOperations.class) class JdbcTemplateConfiguration { @Bean @Primary //The JDBC template is imported into the container JdbcTemplate jdbcTemplate(DataSource dataSource, JdbcProperties properties) { JdbcTemplate jdbcTemplate = new JdbcTemplate(dataSource); JdbcProperties.Template template = properties.getTemplate(); jdbcTemplate.setFetchSize(template.getFetchSize()); jdbcTemplate.setMaxRows(template.getMaxRows()); if (template.getQueryTimeout() != null) { jdbcTemplate.setQueryTimeout((int) template.getQueryTimeout().getSeconds()); } return jdbcTemplate; } } -
-
JndiDataSourceAutoConfiguration: automatic configuration of jndi
-
XADataSourceAutoConfiguration: distributed transaction related
-
Unit test code
@Slf4j
@SpringBootTestclass
SpringBoot_1TestsMysql {
    @Autowired
    JdbcTemplate jdbcTemplate;
    @Test    void testJdbcTemplate() {
        //        jdbcTemplate.queryForObject("", User.class);
        List<User> users = jdbcTemplate.queryForList("select * from user", User.class);
        log.info("The data in the database is={}",users);
    }
}
2. Integrating druid data sources in a custom way
Official website address: https://github.com/alibaba/druid
2.1 what is Druid?
It is a database connection pool, which can provide powerful monitoring and expansion functions. Druid connection pool is born for monitoring. It has built-in powerful monitoring function. The monitoring feature does not affect the performance. Powerful function, can prevent SQL injection, and built-in login can diagnose Hack application behavior.
Introduction to the official website: https://github.com/alibaba/druid/wiki/Druid%E8%BF%9E%E6%8E%A5%E6%B1%A0%E4%BB%8B%E7%BB%8D
2.2. Spring Boot integrates third-party technologies in two ways:
- custom
- Find starter scenario
2.3. Customize and integrate druid data sources
-
Add dependencies for druid data sources:
<!--Import Druid data source driver--> <dependency> <groupId>com.alibaba</groupId> <artifactId>druid</artifactId> <version>1.1.19</version> </dependency> -
Configure Druid data source
/*Configuration class */ @Configurationpublic class MyConfig { /* Customize the data source because the default data source configuration condition is that there is no data source in the @ ConditionalOnMissingBean(DataSource.class) container When you add a data source into the container, you can use our customized data source */ @ConfigurationProperties("spring.datasource") //Binding configuration file spring Configuration starting with datasource @Bean public DataSource dataSource(){ DruidDataSource druidDataSource = new DruidDataSource(); //Manually set the configuration of the data source /* druidDataSource.setUrl(); druidDataSource.setUsername(); druidDataSource.setPassword(); druidDataSource.setDriverClassName(); */ return druidDataSource; } } /* Configurable data items <bean id="dataSource" class="com.alibaba.druid.pool.DruidDataSource" destroy-method="close"> <property name="url" value="${jdbc.url}" /> <property name="username" value="${jdbc.username}" /> <property name="password" value="${jdbc.password}" /> <property name="maxActive" value="20" /> <property name="initialSize" value="1" /> <property name="maxWait" value="60000" /> <property name="minIdle" value="1" /> <property name="timeBetweenEvictionRunsMillis" value="60000" /> <property name="minEvictableIdleTimeMillis" value="300000" /> <property name="testWhileIdle" value="true" /> <property name="testOnBorrow" value="false" /> <property name="testOnReturn" value="false" /> <property name="poolPreparedStatements" value="true" /> <property name="maxOpenPreparedStatements" value="20" /> </bean> */ -
Unit tests are conducted to verify whether the data source type is customized
@AutowiredDataSource dataSource; @Testvoid testDataSource() { log.info("The type of data source is:"+dataSource.getClass()); //The type of data source is: class com alibaba. druid. pool. DruidDataSource } -
More configuration items: https://github.com/alibaba/druid/wiki/DruidDataSource%E9%85%8D%E7%BD%AE
2.4. Configure the monitoring page function of Druid
Official address: https://github.com/alibaba/druid/wiki/%E9%85%8D%E7%BD%AE_StatViewServlet%E9%85%8D%E7%BD%AE
- Provide html page for monitoring information display
- JSON API that provides monitoring information
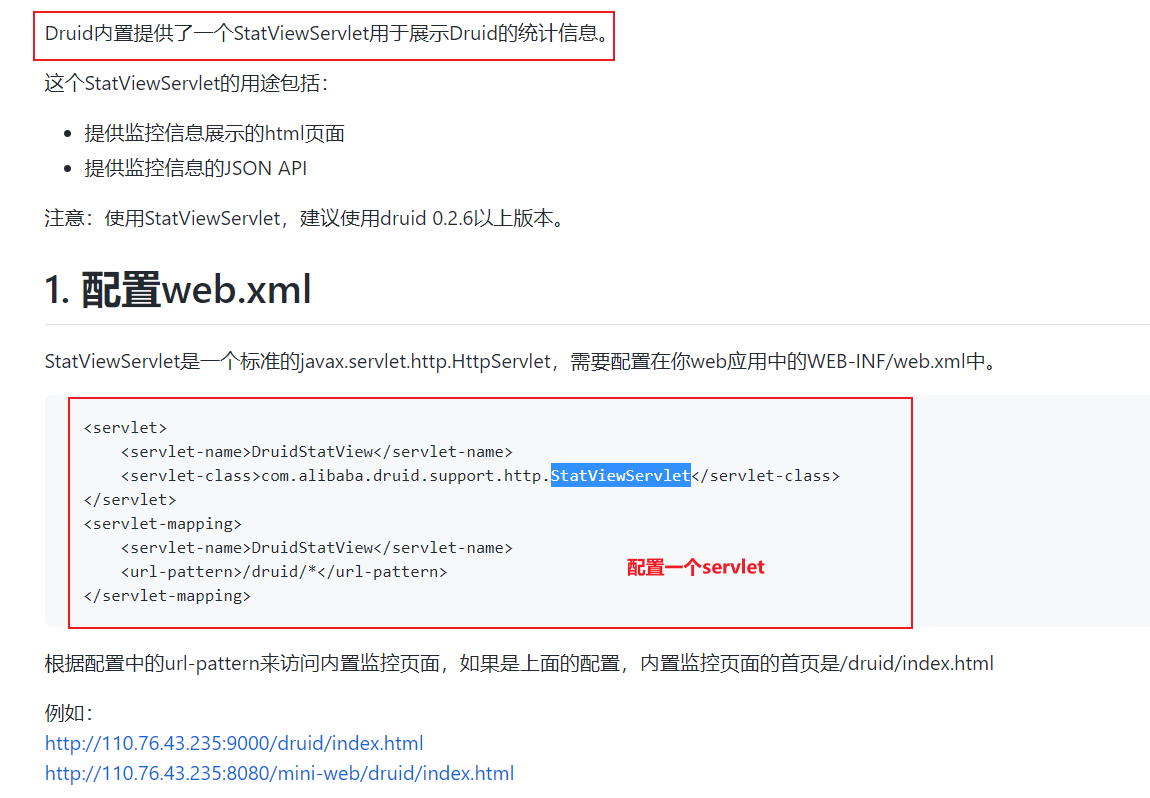
-
Inject a StatViewServlet into the container to enable the monitoring page function, but the monitoring function is not enabled
@Configurationpublic class MyConfig { /* Configuring the monitoring page function of the druid data source relies on the StatViewServlet to inject the servlet into the container */ @Bean public ServletRegistrationBean<StatViewServlet> statViewServletServletRegistrationBean(){ StatViewServlet statViewServlet = new StatViewServlet();//Create a StatViewServlet servlet ServletRegistrationBean<StatViewServlet> registrationBean = new ServletRegistrationBean<>(statViewServlet,"/druid/*"); //The path mapped by the servlet is all paths under / druid return registrationBean; } } -
Rendering website: http://localhost:8888/druid/index.html
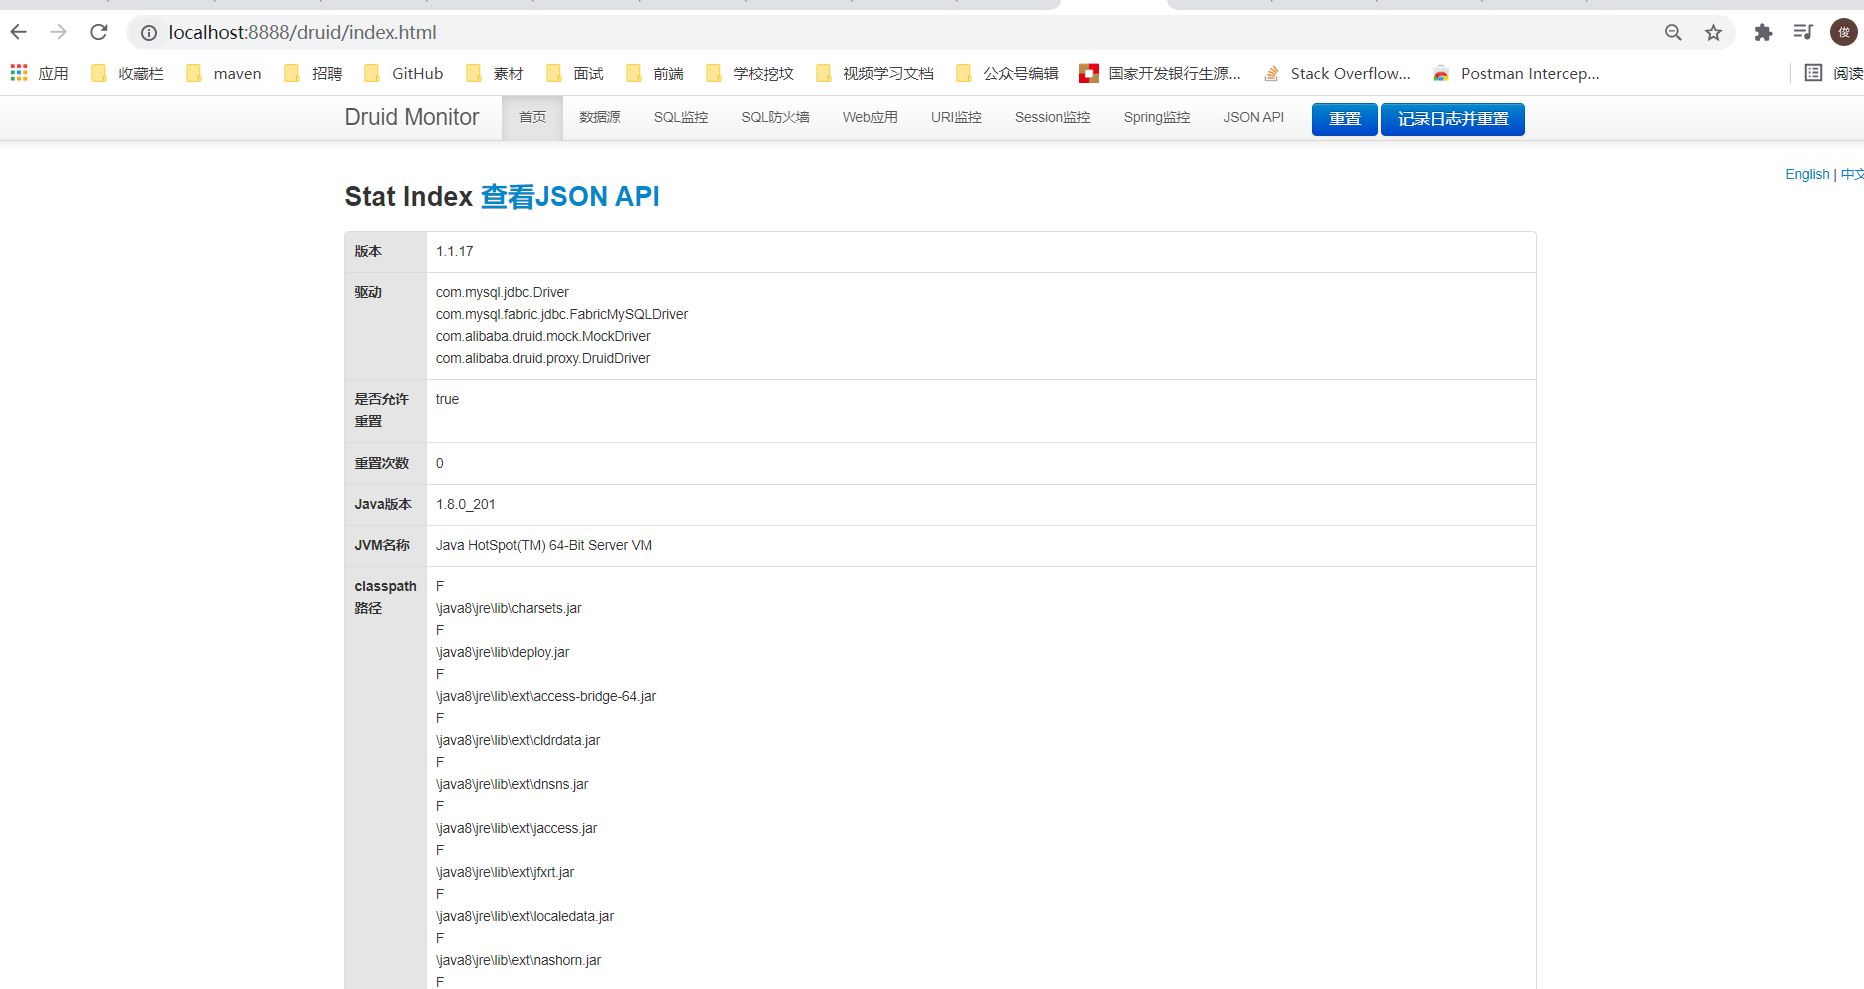
-
Configure monitoring page access password
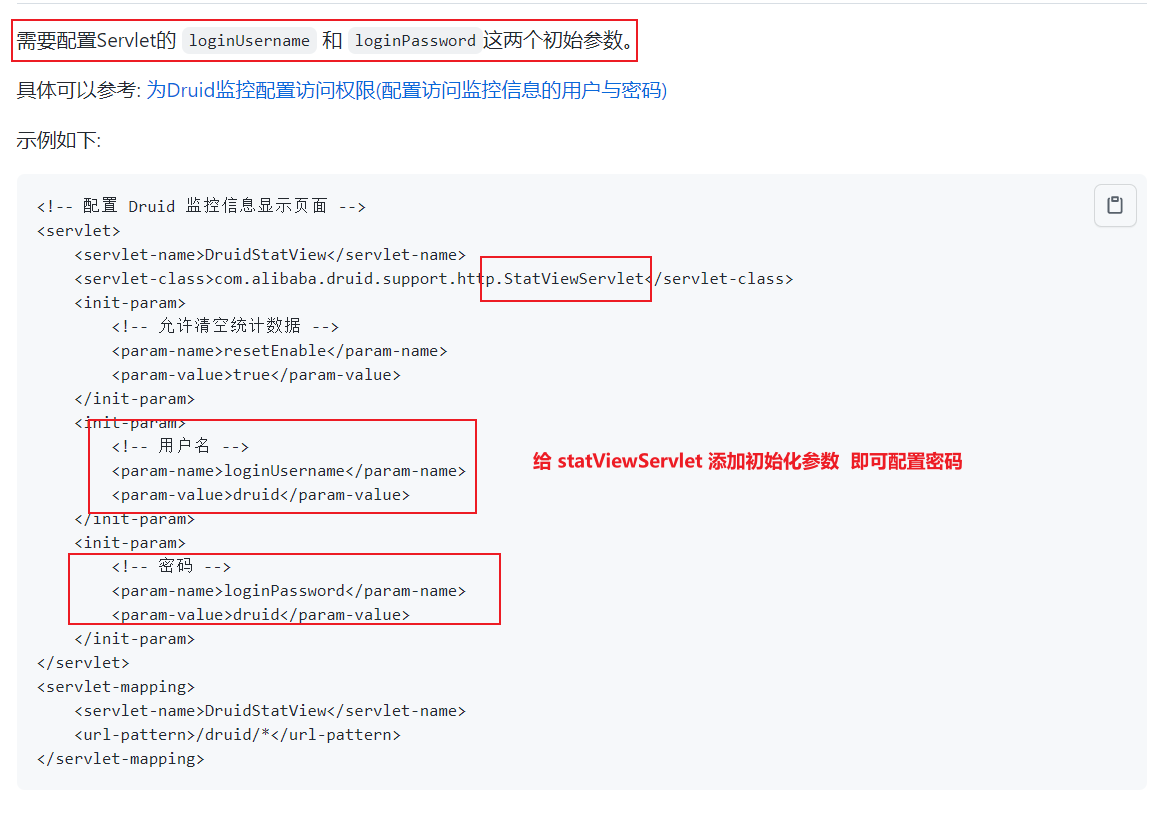
@Configurationpublic class MyConfig {
    @Bean
    public ServletRegistrationBean<StatViewServlet> statViewServletServletRegistrationBean(){
        StatViewServlet statViewServlet = new StatViewServlet();//Create a StatViewServlet servlet
        ServletRegistrationBean<StatViewServlet> registrationBean = new ServletRegistrationBean<>(statViewServlet,"/druid/*"); //The path mapped by the servlet is all paths under / druid
        //Set login user name and password
        registrationBean.addInitParameter("loginUsername", "pj");
        registrationBean.addInitParameter("loginPassword","123");
        return registrationBean;
    }
}
After configuration, you need to log in to view the monitoring page information:

-
Set ip black and white list
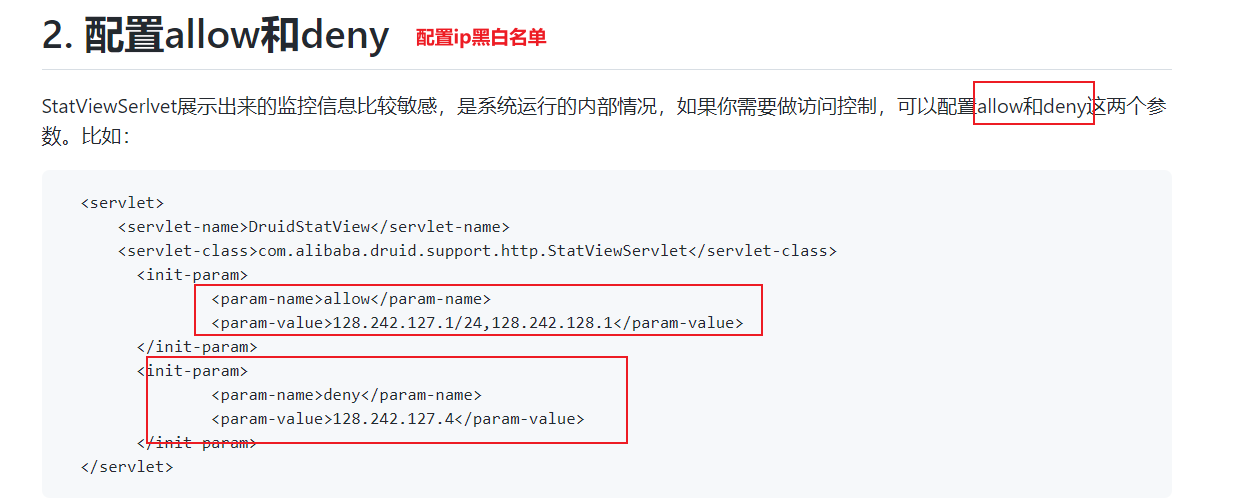
2.5. Turn on Druid's monitoring and statistics function
-
The monitoring function is not turned on by default

-
The official way to turn on the monitoring function
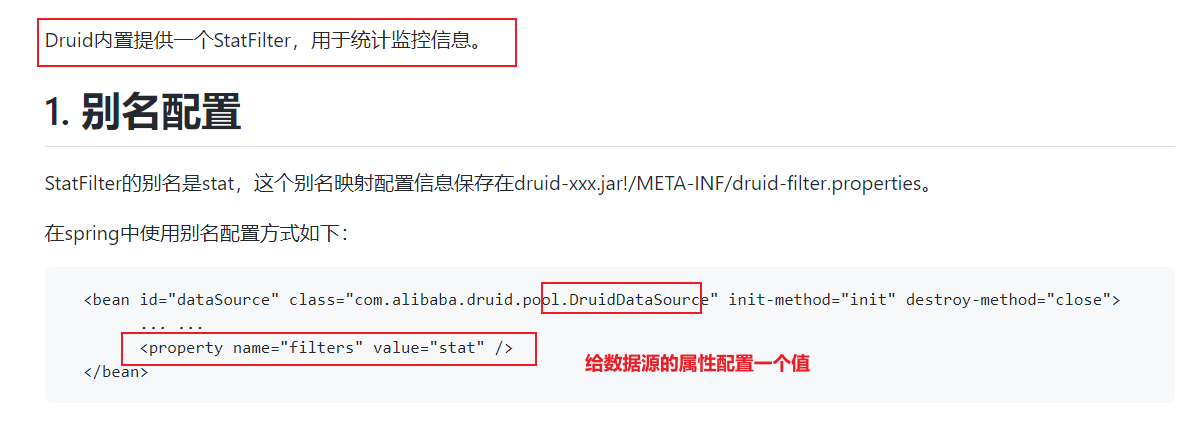
-
Set the properties of the druid data source
/*
Configuration class
 */
@Configuration
public class MyConfig {
    @ConfigurationProperties("spring.datasource") //Binding configuration file spring Configuration starting with datasource
    @Bean
    public DataSource dataSource() throws SQLException {
        DruidDataSource druidDataSource = new DruidDataSource();
        //Manually set the configuration of the data source
      /*  druidDataSource.setUrl();
        druidDataSource.setUsername();
        druidDataSource.setPassword();
        druidDataSource.setDriverClassName();*/

        //Enabling the monitoring function can also be configured in the configuration file
        druidDataSource.setFilters("stat");
        return druidDataSource;
	}
}
spring: datasource: # Turn on the monitoring function and firewall function filters: stat,wall # Set maximum active number maxActive: 10
-
effect
Description of each field: https://github.com/alibaba/druid/wiki/Druid%E8%BF%9E%E6%8E%A5%E6%B1%A0%E4%BB%8B%E7%BB%8D
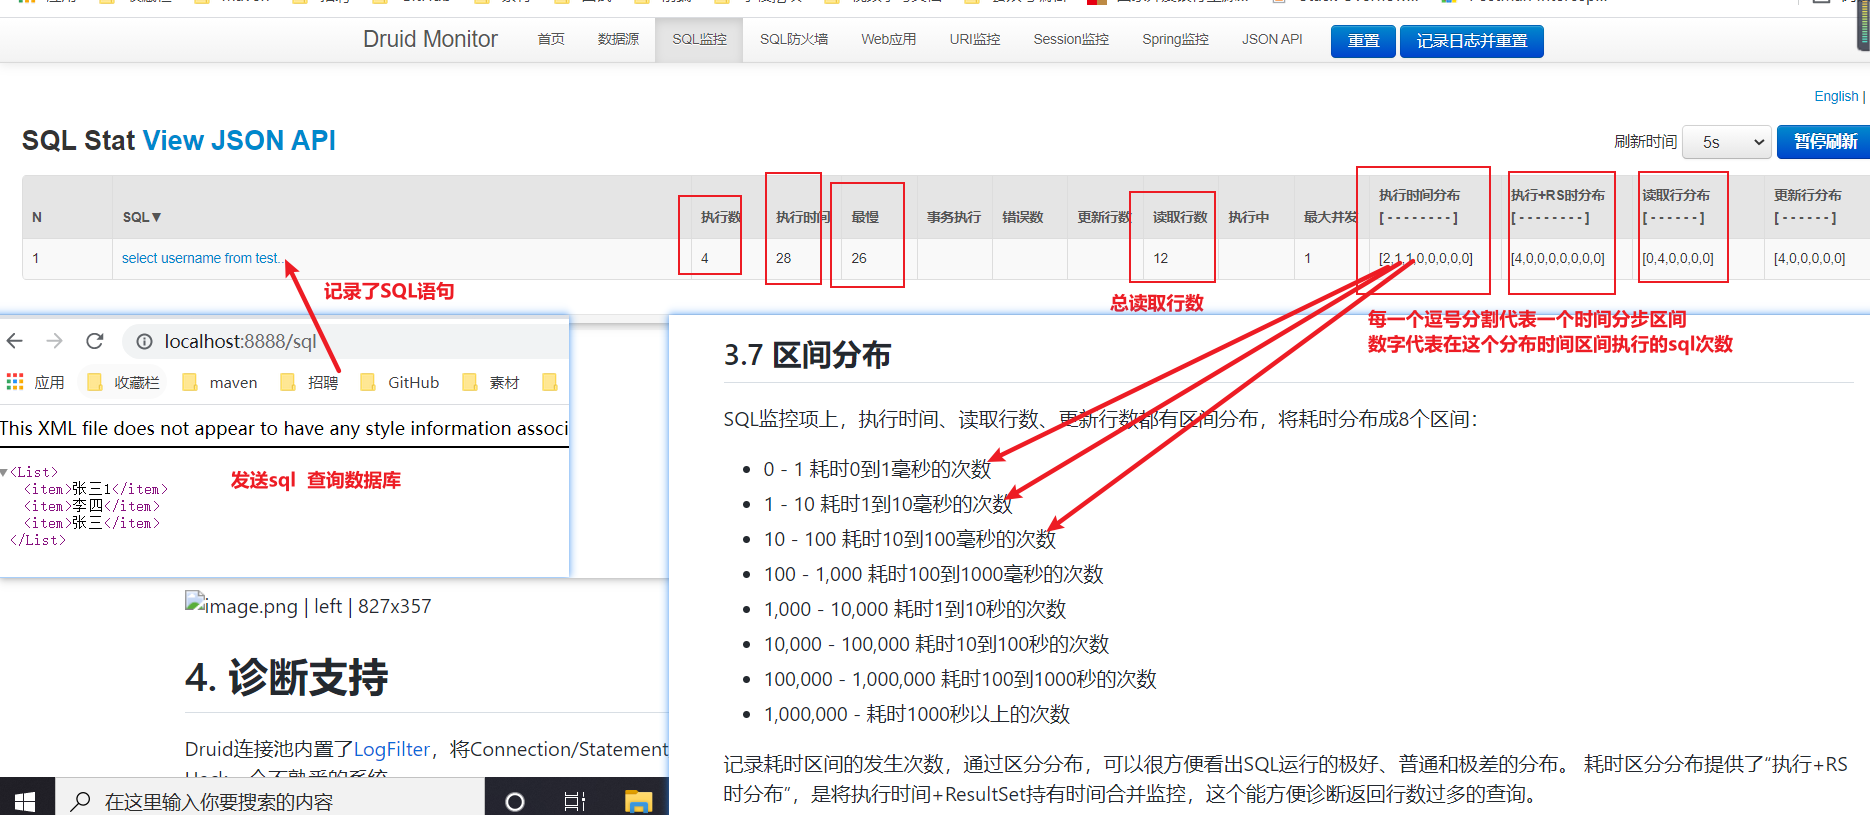
-
All filter s in the system
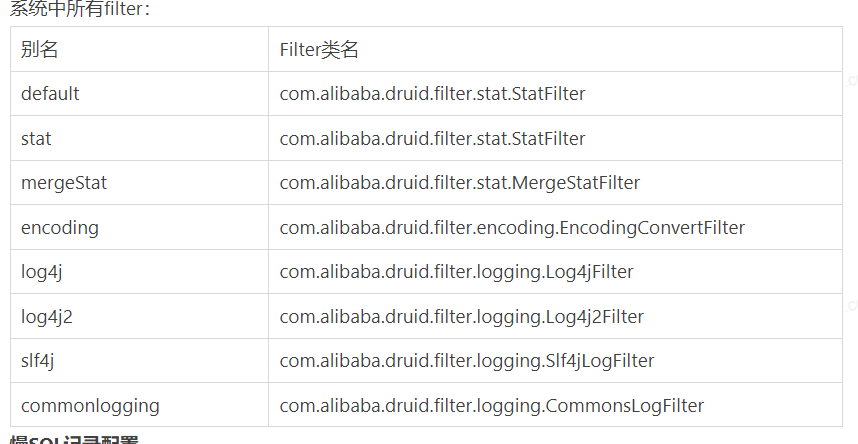
-
Slow sql
<bean id="stat-filter" class="com.alibaba.druid.filter.stat.StatFilter">
    <property name="slowSqlMillis" value="10000" />
    <property name="logSlowSql" value="true" />
</bean>
<!-- use slowSqlMillis Define slow SQL Duration of -->
2.6. Web association monitoring configuration in built-in monitoring
-
web application monitoring and URL monitoring are not enabled by default

-
Official method of opening function
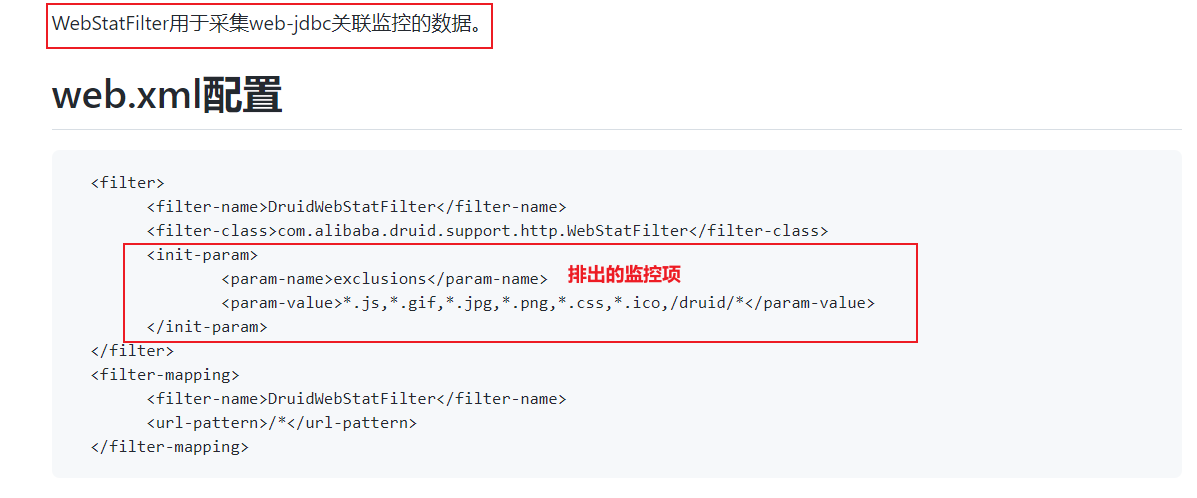
-
Add WebStatFilter to the container to enable web application monitoring and URL monitoring
@Configuration public class MyConfig { /* Enabling the web application monitoring function relies on WebStatFilter to inject the Filter into the container */ @Bean public FilterRegistrationBean<WebStatFilter> webStatFilterFilterRegistrationBean(){ WebStatFilter webStatFilter = new WebStatFilter(); FilterRegistrationBean<WebStatFilter> filterRegistrationBean = new FilterRegistrationBean<>(); filterRegistrationBean.setUrlPatterns(Arrays.asList("/*"));//Block all paths filterRegistrationBean.addInitParameter("exclusions","*.js,*.gif,*.jpg,*.png,*.css,*.ico,/druid/*");//Add parameter exclusion item parameter information to exclude requests for static resources and / druid / * return filterRegistrationBean; } } -
effect
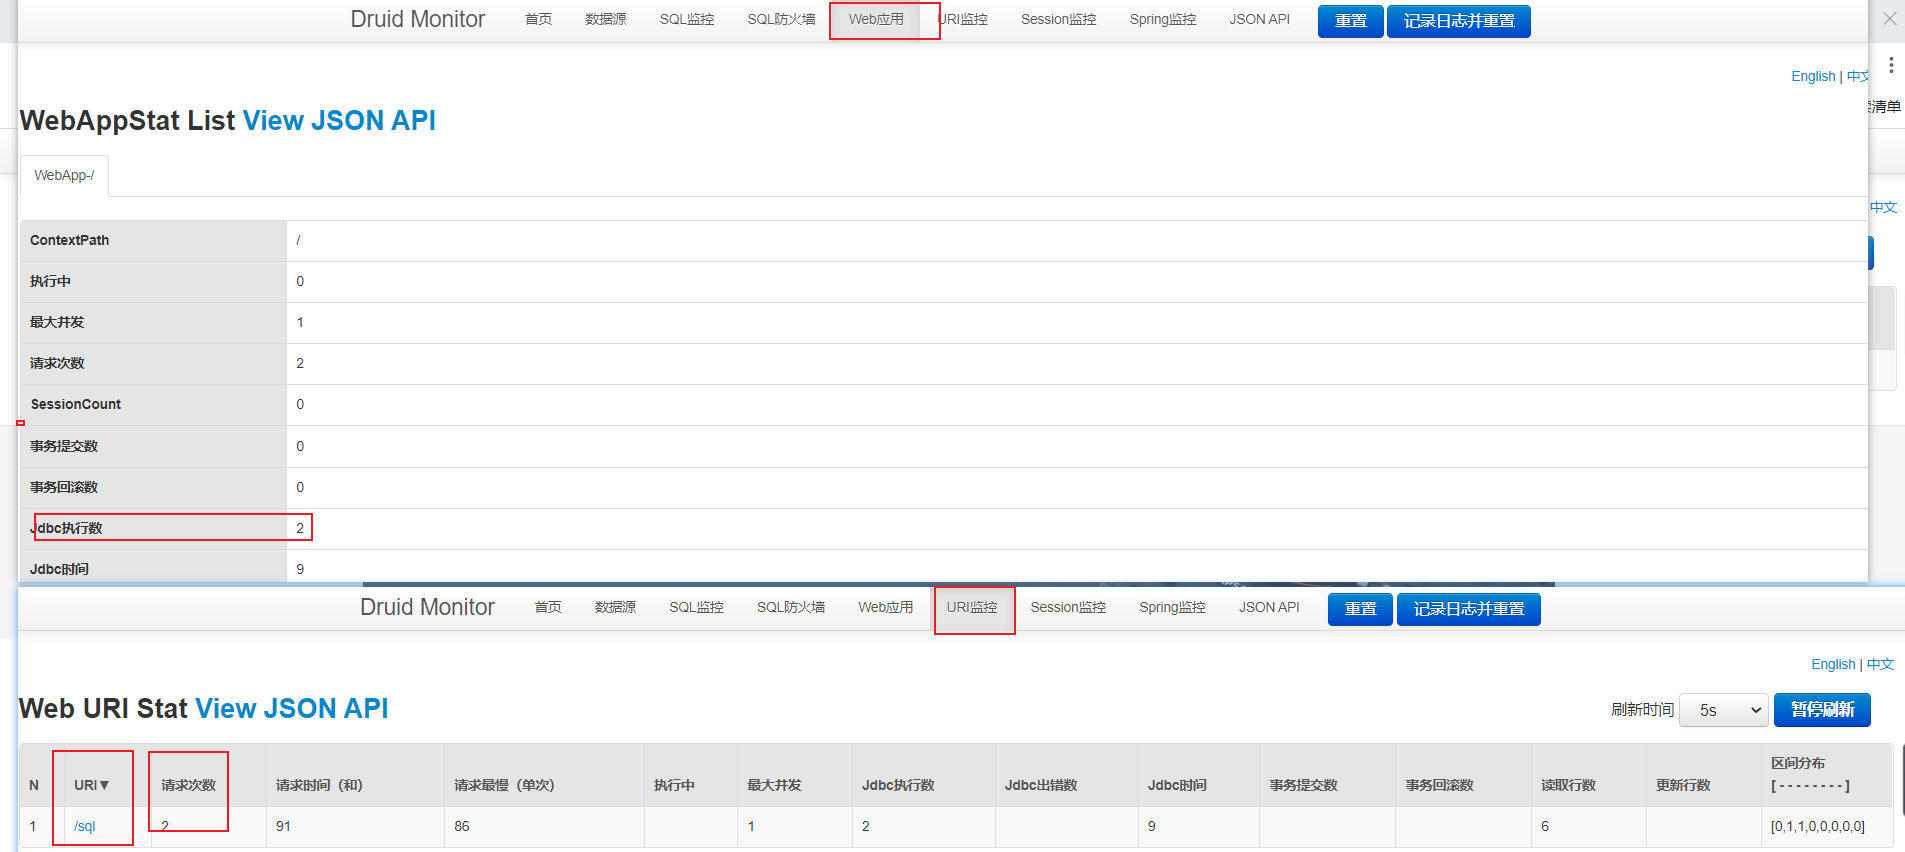
2.7 configure Druid and Spring Association monitoring configuration
-
spring monitoring is not enabled by default. You can monitor which components are in the container

-
Official opening method: https://github.com/alibaba/druid/wiki/%E9%85%8D%E7%BD%AE_Druid%E5%92%8CSpring%E5%85%B3%E8%81%94%E7%9B%91%E6%8E%A7%E9%85%8D%E7%BD%AE
2.8. Configure defense against SQL injection attacks
-
SQL firewall is not enabled by default
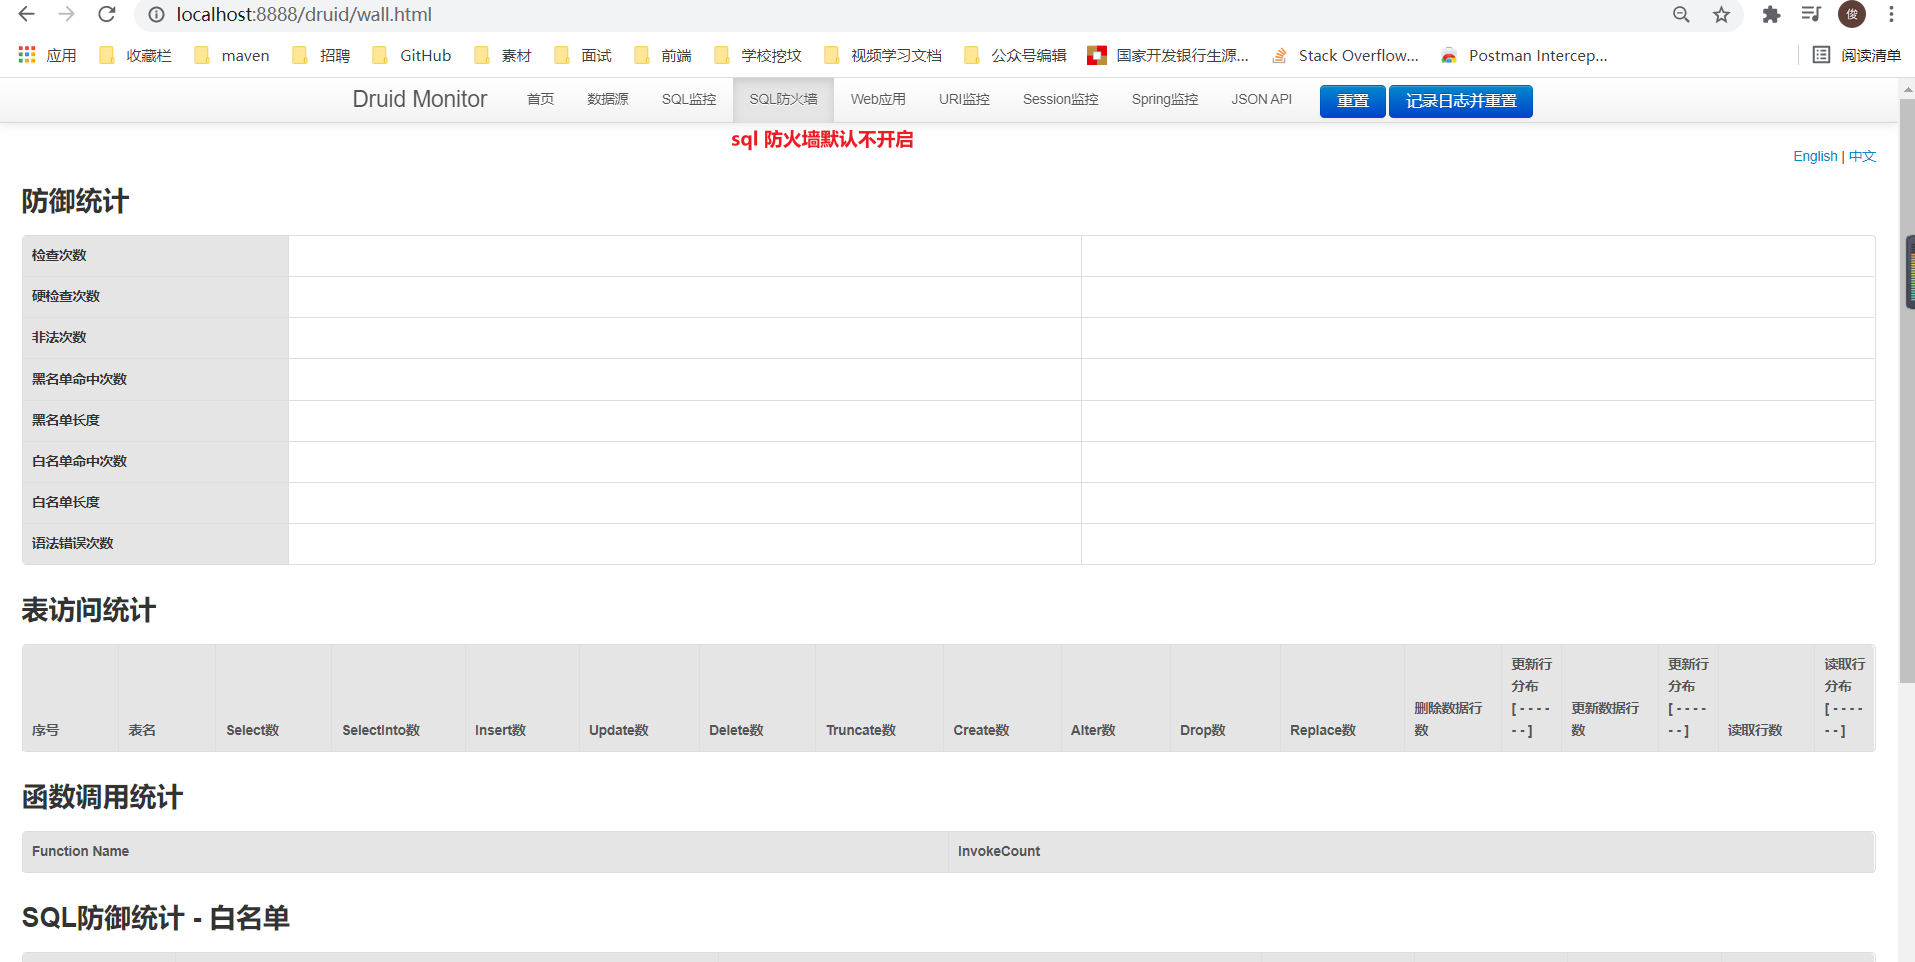
-
The official way to open the firewall
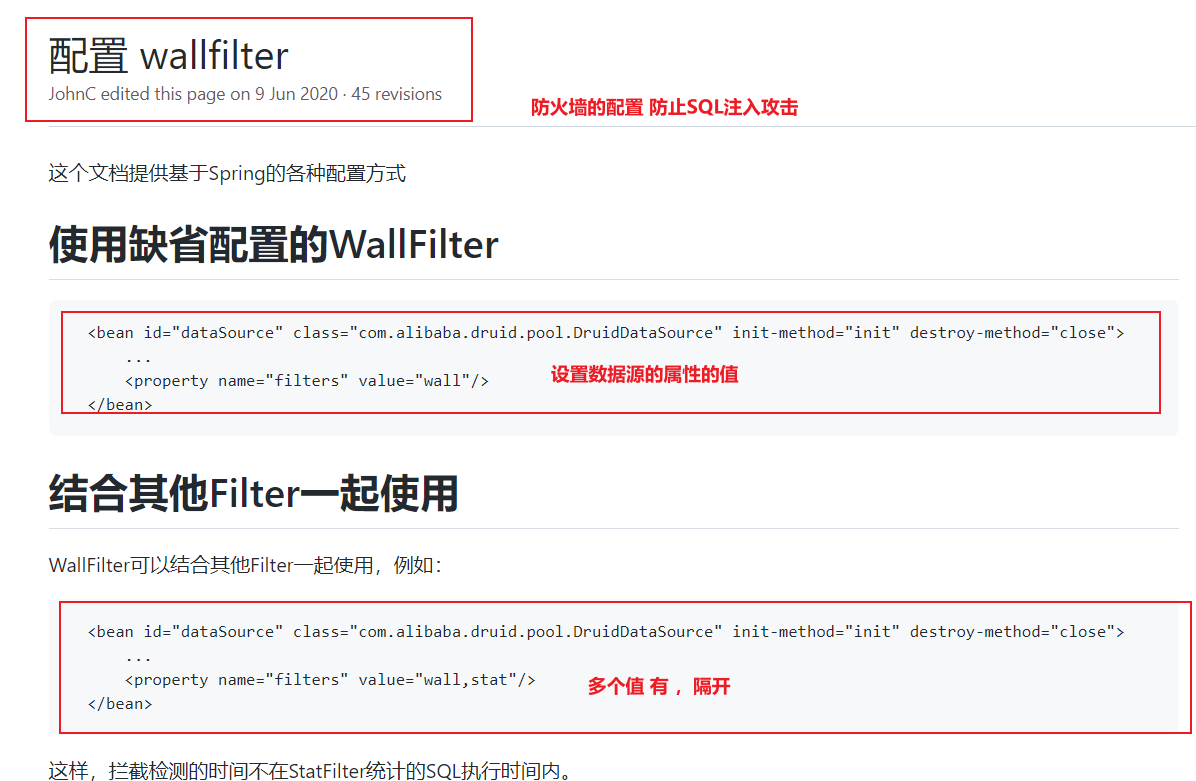
-
Set the property value of the data source
/* Configuration class */ @Configuration public class MyConfig { @ConfigurationProperties("spring.datasource") //Binding configuration file spring Configuration starting with datasource @Bean public DataSource dataSource() throws SQLException { DruidDataSource druidDataSource = new DruidDataSource(); //Manually set the configuration of the data source /* druidDataSource.setUrl(); druidDataSource.setUsername(); druidDataSource.setPassword(); druidDataSource.setDriverClassName();*/ //Enabling the monitoring function can also be configured in the configuration file druidDataSource.setFilters("stat,wall"); return druidDataSource; } } -
design sketch
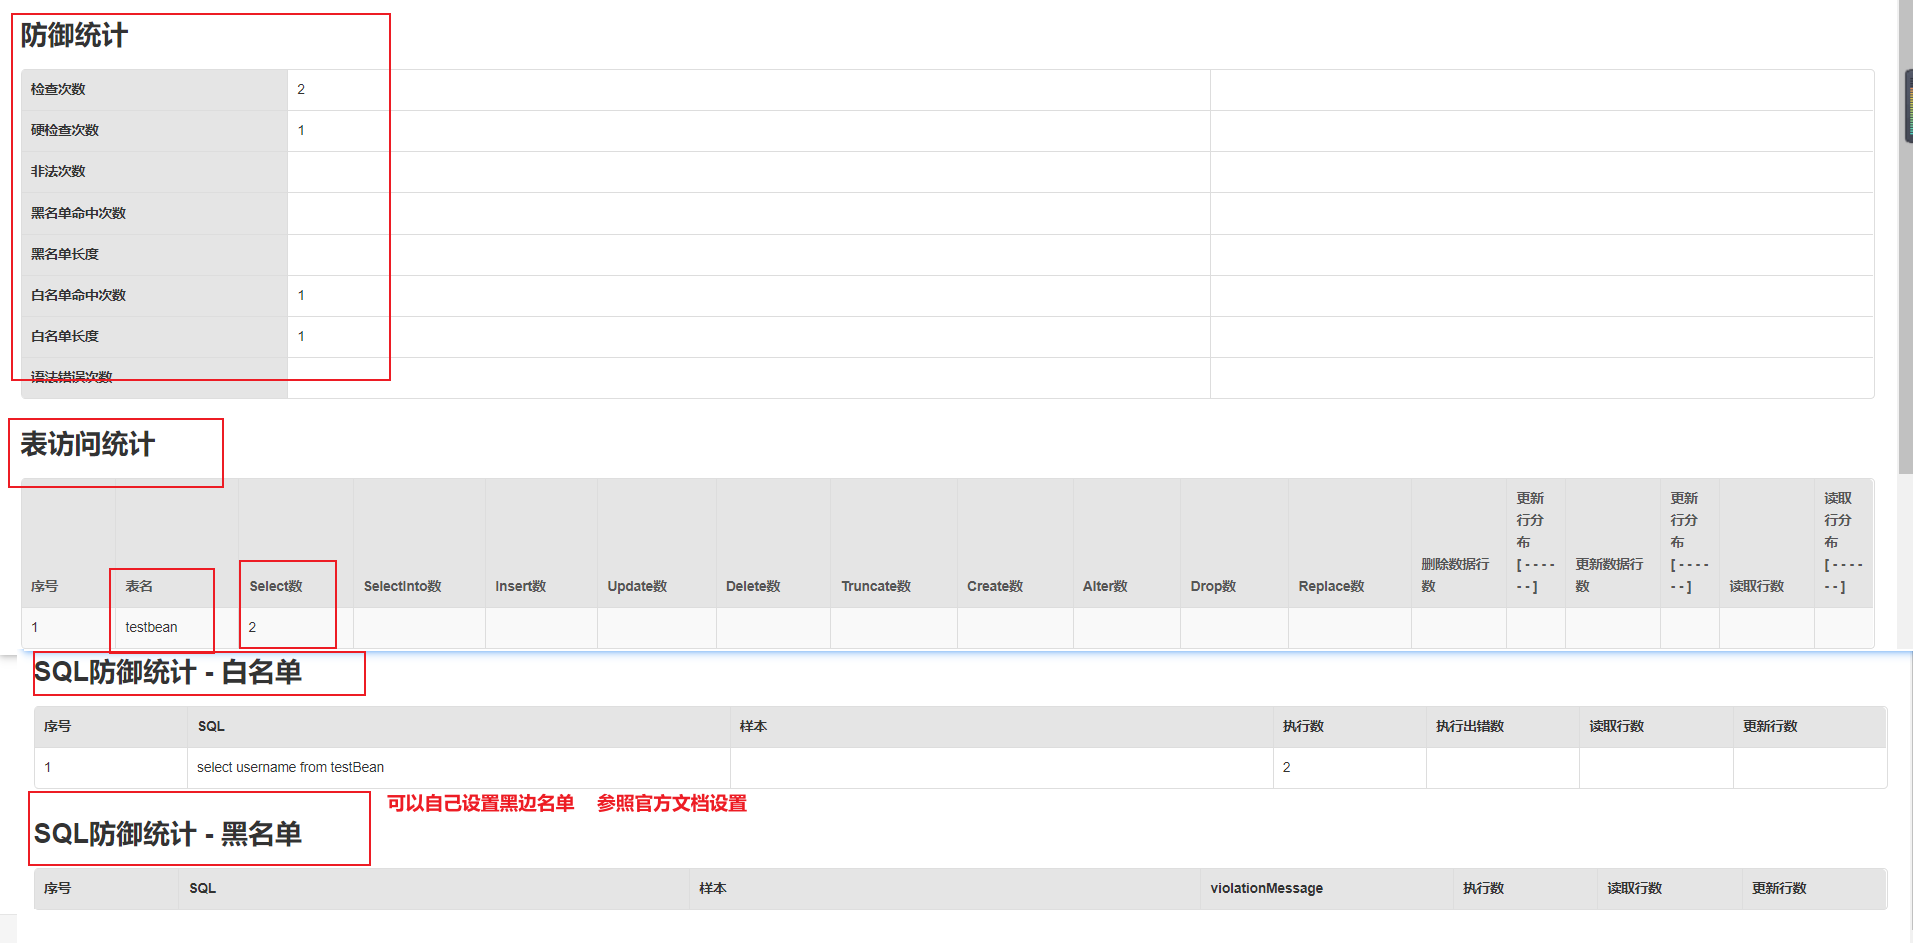
Rendering of accessing several more requests:

3. druid data source starter integration mode
Official address: https://github.com/alibaba/druid/tree/master/druid-spring-boot-starter
Note out the above configuration class. The configuration class is invalid
//@Configuration
public class MyConfig {}
3.1. Import dependency
<!--introduce druid Monitoring function of data source-->
<dependency>
    <groupId>com.alibaba</groupId>
    <artifactId>druid-spring-boot-starter</artifactId>
    <version>1.1.17</version>
</dependency>
-
After importing dependencies
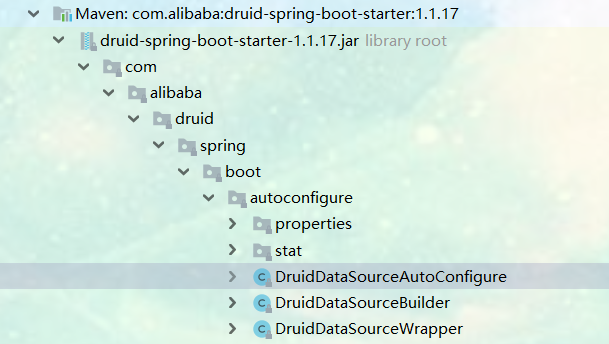
3.2. Automatic configuration
@Configuration@ConditionalOnClass(DruidDataSource.class) // DruidDataSource data source in container
@AutoConfigureBefore(DataSourceAutoConfiguration.class) //Configure the DataSourceAutoConfiguration before the official configuration
@EnableConfigurationProperties({DruidStatProperties.class, DataSourceProperties.class}) //Binding configuration component binding to spring datasource. druid  spring. Configuration of datasource prefix
@Import({DruidSpringAopConfiguration.class,//Configure Druid and Spring Association monitoring configuration binding Spring datasource. Druid. aop-patterns
         DruidStatViewServletConfiguration.class, //Configure Druid's monitoring page function binding spring datasource. druid. The stat view servlet is enabled with the default value of true
         DruidWebStatFilterConfiguration.class,//Web association monitoring configuration binding in built-in monitoring spring datasource. druid. The default value of Web stat filter is true. It is enabled
         DruidFilterConfiguration.class}  //Configure functions such as defending against SQL injection attacks and Druid's monitoring and statistics functions
        /*
        private static final String FILTER_STAT_PREFIX = "spring.datasource.druid.filter.stat"; Monitoring statistics function
        private static final String FILTER_CONFIG_PREFIX = "spring.datasource.druid.filter.config";
        private static final String FILTER_ENCODING_PREFIX = "spring.datasource.druid.filter.encoding";
        private static final String FILTER_SLF4J_PREFIX = "spring.datasource.druid.filter.slf4j";
        private static final String FILTER_LOG4J_PREFIX = "spring.datasource.druid.filter.log4j";
        private static final String FILTER_LOG4J2_PREFIX = "spring.datasource.druid.filter.log4j2";
        private static final String FILTER_COMMONS_LOG_PREFIX = "spring.datasource.druid.filter.commons-log";
        private static final String FILTER_WALL_PREFIX = "spring.datasource.druid.filter.wall"; firewall
        private static final String FILTER_WALL_CONFIG_PREFIX = FILTER_WALL_PREFIX + ".config";        */
       )
public class DruidDataSourceAutoConfigure {
    private static final Logger LOGGER = LoggerFactory.getLogger(DruidDataSourceAutoConfigure.class);
    @Bean(initMethod = "init")
    @ConditionalOnMissingBean //This is not configured, so you need to configure this configuration class first. When configuring datasourceautoconfiguration, the datasourceautoconfiguration configuration class will configure HikariDataSource by default
    public DataSource dataSource() {
        LOGGER.info("Init DruidDataSource");
        return new DruidDataSourceWrapper();
    }
}
3.3 configuration file configuration
spring:
  datasource:
    #Basic information about configuring data sources
    password: 123
    username: root
    driver-class-name: com.mysql.jdbc.Driver
    url: jdbc:mysql://localhost:3306/test
    druid:
      #Configure monitoring page
      stat-view-servlet:
        #Turn on the monitoring page function
        enabled: true
        #Configure user password
        login-username: pj
        login-password: 123
        #Is there a reset button
        resetEnable: false
      #Configure web association monitoring
      web-stat-filter:
        #Enable web association monitoring
        enabled: true
        #Intercept path
        url-pattern: /*
        #The discharge path has a default value of * js,*.gif,*.jpg,*.png,*.css,*.ico,/druid/*
        exclusions:  '*.js,*.gif,*.jpg,*.png,*.css,*.ico,/druid/*'
      #Enable firewall and monitoring statistics
      filters: wall,stat
      #Configure the specific configuration of a single filter function
      filter:
        #Monitoring statistics function
        stat:
          #The slow query time of sql is 1000ms, and the default is 3000ms
          slow-sql-millis: 1000
          #Logging slow query
          log-slow-sql: true
          #Enable monitoring statistics function
          enabled: true
        #Configure firewall features
        wall:
          #Turn on the firewall
          enabled: true
          config:
            #Delete operation is not allowed, and update operation will be blocked by firewall
            delete-allow: false
      #Open Druid and Spring associated monitoring configuration com pj. All components under boot are monitored
      aop-patterns: com.pj.boot.*

    #    Turn on the monitoring function and firewall function
    #    filters: stat,wall
    # Set maximum active number
  #    maxActive: 10
3.4 refer to official documents for specific configuration information
https://github.com/alibaba/druid
4. Integrate mybatis
Official address: https://github.com/mybatis
4.1. Import dependency
<!--introduce mybatis scene-->
<dependency>
    <groupId>org.mybatis.spring.boot</groupId>
    <artifactId>mybatis-spring-boot-starter</artifactId>
    <version>2.1.4</version>
</dependency>

4.2 configuration mode
-
Auto configuration class
//@org.springframework.context.annotation.Configuration @ConditionalOnClass({ SqlSessionFactory.class, SqlSessionFactoryBean.class }) //If the classes of SqlSessionFactory and SqlSessionFactoryBean in the container are imported into the mybatis dependency, there will be @ConditionalOnSingleCandidate(DataSource.class) //There is only one data source in the entire container @EnableConfigurationProperties(MybatisProperties.class) //Enable the configuration of the binding configuration component starting with mybatis prefix to modify all the configuration components starting with mybatis in the configuration file @AutoConfigureAfter({ DataSourceAutoConfiguration.class, MybatisLanguageDriverAutoConfiguration.class }) public class MybatisAutoConfiguration implements InitializingBean { @Bean //If the value of sqlSessionFactory parameter is put into the container, the data source will be obtained from the container together with the information in the MybatisProperties class configuration file to obtain sqlSessionFactory @ConditionalOnMissingBean public SqlSessionFactory sqlSessionFactory(DataSource dataSource) throws Exception {....} @Bean //A sqlsessiontemplate is placed in the container. Sqlsessiontemplate combines SqlSession @ConditionalOnMissingBean public SqlSessionTemplate sqlSessionTemplate(SqlSessionFactory sqlSessionFactory) {...} //@org.springframework.context.annotation.Configuration @Import(AutoConfiguredMapperScannerRegistrar.class)//Import autoconfiguratedmapperscannerregistrar @ Mapper will be automatically scanned as long as we write the interface standard for the operation MyBatis @ConditionalOnMissingBean({ MapperFactoryBean.class, MapperScannerConfigurer.class }) //There are no MapperFactoryBean, and mappercannerconfigurer in the container. Autoconfiguratedmappercannerregister will be imported public static class MapperScannerRegistrarNotFoundConfiguration implements InitializingBean {}-
Global configuration file: can be specified through the configuration file
-
SqlSessionFactory: Auto configured
-
SqlSession: SqlSessionTemplate is automatically configured and SqlSession is combined
-
@Import(AutoConfiguredMapperScannerRegistrar.class);
-
Mapper: autoconfiguredmappercannerregister @ mapper will be automatically scanned as long as we write the interface standard for the operation MyBatis
-
-
Use steps
-
Write a global configuration file (you can omit the information of configuring the global configuration file through the configuration file)
mybatis-config.xml
<?xml version="1.0" encoding="UTF-8" ?> <!DOCTYPE configuration PUBLIC "-//mybatis.org//DTD Config 3.0//EN" "http://mybatis.org/dtd/mybatis-3-config.dtd"> <configuration> <!-- because Spring Boot Because of automatic configuration, it is not necessary to configure here. It is only used for sampling.--> <!-- <settings> The hump naming policy can be enabled through the configuration file <setting name="mapUnderscoreToCamelCase" value="true"/> </settings> --> </configuration> -
The standard @ Mapper annotation is required to write the Mapper interface. You can also add @ mapperscan (specify the path under the scanned Mapper package) to the startup class to replace @ Mapper
TestBeanMapper
@Mapper public interface TestBeanMapper { public TestBean selectTestBeanById(int id); } -
Write a mapping file for the interface
TestBeanMapper.xml
<?xml version="1.0" encoding="UTF-8" ?> <!DOCTYPE mapper PUBLIC "-//mybatis.org//DTD Mapper 3.0//EN" "http://mybatis.org/dtd/mybatis-3-mapper.dtd"> <mapper namespace="com.pj.boot.mysqlDate.mapper.TestBeanMapper"> <select id="selectTestBeanById" resultType="com.pj.boot.mysqlDate.pojo.TestBean"> select * from testBean where id=#{id} </select> </mapper> -
The path to configure the mapping of the global configuration file and the mapper interface
mybatis: #The location of the global configuration file is configured with configuration: the config location attribute cannot be configured, so you can not write the global configuration file, and you can not write the global configuration file; Configuration file. The configuration of all global configuration files can be placed in the configuration item #config-location: classpath:mybatis/mybatis-config.xml #Specifies the location of the mapper mapping file mapper-locations: classpath:mybatis/mapper/*.xml #Configure mybatis global profile configuration: #Mapping hump naming map-underscore-to-camel-case: true-
Write service layer
TestBeanService
@Servicepublic class TestBeanService { @Autowired TestBeanMapper testBeanMapper; public TestBean getTestBean(int id){ return testBeanMapper.selectTestBeanById(id); } } -
Write controller layer
@Controller
public class MySqlController {
    @Autowired
    TestBeanService testBeanService;
    @ResponseBody
    @GetMapping("/getTestBean")
    public TestBean getTestBean(@RequestParam("id") int id){
        return testBeanService.getTestBean(id);
    }
}
-
4.3 mixing annotation mode and configuration mode
-
mapper layer
@Mapper
public interface TestBeanMapper {
    public TestBean selectTestBeanById(int id);    //Annotated version only
    @Insert("insert into testBean(username,password) values(#{username},#{password})")
    @Options(useGeneratedKeys = true,keyProperty = "id") //Returns the id value of the self incrementing primary key
    public int insertTestBean(TestBean testBean);
}
<!-- public int insertTestBean(TestBean testBean);--> <insert id="insertTestBean" useGeneratedKeys="true" keyProperty="id"> <!--Can return id Value after self increment--> insert into testBean(username,password) values(#{username},#{password}) </insert> -
service layer
@Service public class TestBeanService { @Autowired TestBeanMapper testBeanMapper; public TestBean getTestBean(int id){ return testBeanMapper.selectTestBeanById(id); } public int insetTestBean(TestBean testBean){ return testBeanMapper.insertTestBean(testBean); } } -
controller layer
@ResponseBod
@GetMapping("/insertTestBean")
public int insertTestBean(@RequestParam("username") String username,
                          @RequestParam("password") String password){
    return testBeanService.insetTestBean(new TestBean(username,password));
}
//visit: http://localhost:8888/insertTestBean?username=pj&password=123
4.4 summary
-
Best practice:
-
Introducing mybatis starter
-
Configure application In yaml, specify the mapper location
-
Write Mapper interface and annotate @ Mapper annotation
-
Simple method direct annotation method
-
Write mapper with complex method XML binding mapping
-
@MapperScan("com.atguigu.admin.mapper") is simplified, and other interfaces do not need to be annotated with @ mapper annotation
-
5. Integrate mybatis plus (you can view the project mybatis plus)
5.1. Import dependency
<!--introduce mybatis-plus  You don't need to import mybatis and jdbc I'm dependent on you-->
<dependency>
    <groupId>com.baomidou</groupId>
    <artifactId>mybatis-plus-boot-starter</artifactId>
    <version>3.0.5</version>
</dependency>
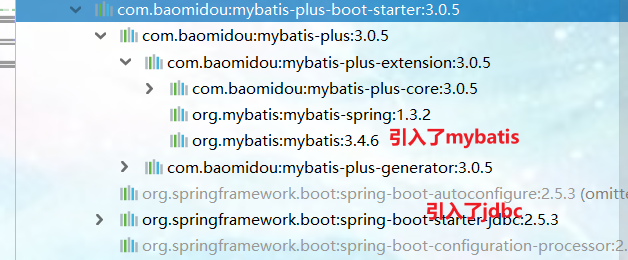
5.2. Automatic configuration
-
Automatic configuration class MybatisPlusAutoConfiguration
@org.springframework.context.annotation.Configuration @ConditionalOnClass({SqlSessionFactory.class, SqlSessionFactoryBean.class}) @ConditionalOnSingleCandidate(DataSource.class) @EnableConfigurationProperties(MybatisPlusProperties.class) //The configuration item MybatisPlusProperties is bound, and the configuration item prefixed with mybatis plus is bound @AutoConfigureAfter(DataSourceAutoConfiguration.class) public class MybatisPlusAutoConfiguration { @Bean //SqlSessionFactory is automatically configured @ConditionalOnMissingBean public SqlSessionFactory sqlSessionFactory(DataSource dataSource) throws Exception {....} @Bean //The sqlsessiontemplate is automatically configured, and the sqlsessiontemplate combines SqlSession @ConditionalOnMissingBean public SqlSessionTemplate sqlSessionTemplate(SqlSessionFactory sqlSessionFactory) {} //Mapper interface for scanning @ mapper annotations public static class AutoConfiguredMapperScannerRegistrar implements BeanFactoryAware, ImportBeanDefinitionRegistrar { private BeanFactory beanFactory; @Override public void registerBeanDefinitions(AnnotationMetadata importingClassMetadata, BeanDefinitionRegistry registry) {....} } } -
MybatisPlusProperties configuration item class
Maperlocations defaults to classpath *: / mapper / * * / * All xml files in the mapper folder under the classpath of any xml package are sql mapping files. It is recommended to put the sql mapping file under mapper in the future
@ConfigurationProperties(prefix = Constants.MYBATIS_PLUS) public class MybatisPlusProperties { private static final ResourcePatternResolver resourceResolver = new PathMatchingResourcePatternResolver(); .... /** * Locations of MyBatis mapper files. * * @since 3.1.2 add default value 3.1.2 Default value added */ private String[] mapperLocations = new String[]{"classpath*:/mapper/**/*.xml"}; .... } -
Summary auto configuration
- The MybatisPlusAutoConfiguration configuration class is bound to the MybatisPlusProperties configuration item.
- SqlSessionFactory is automatically configured, and the underlying layer is the default data source in the container.
- Maperlocations is automatically configured with the default value classpath *: / mapper / * * / * xml, which means that all xml in any path under all mapper folders under the classpath of any package is an sql mapping file. It is recommended to put the sql mapping file under mapper in the future.
- SqlSessionTemplate is also automatically configured in the container.
- @The interfaces marked by mapper will also be automatically scanned. It is recommended to directly scan @ MapperScan("com.lun.boot.mapper") in batches.
- One of the advantages of MyBatisPlus: as long as our Mapper inherits the BaseMapper of MyBatisPlus, it can have CRUD capability and reduce development work.
5.3 use of paging (in springboot-2 project)
-
The mapper layer inherits BaseMapper and contains the basic crud
@Mapper public interface UserMapper extends BaseMapper<User> { } -
The service layer inherits serviceimpl < usermapper, user >, which is a simple service and contains basic crud
@Service public class UserService extends ServiceImpl<UserMapper, User> { } -
controller layer
@Controller @Slf4j public class ThymeleafController { @Autowired UserService userService; //Delete user by id @GetMapping("/delete/{id}") public String deleteUser(@PathVariable("id") Long id, @RequestParam(value = "pn",defaultValue = "1") Integer pn, RedirectAttributes redirectAttributes){ //Delete data userService.removeById(id); //The deleted page data stays on that page and will be added to the link in the form of url redirectAttributes.addAttribute("pn", pn); //Redirect to dynamic_ In table request return "redirect:/dynamic_table"; } @GetMapping("dynamic_table") public String goToDynamic_table(Map<String ,Object> map, @RequestParam(value = "pn",defaultValue = "1") int pn){//pn page //Querying all users uses the method defined in the simple service // List<User> users = userService.list(); //Current: current page size: how many pieces of data are displayed on each page to create paging Page<User> page = new Page<>(pn,2); //Paging query data Page<User> userPage = userService.page(page); map.put("userPage", userPage); return "dataTables/dynamic_table"; } } -
The config configuration class injects a paging filter into the same processor
@Configuration public class MyPagesConfig { @Bean public MybatisPlusInterceptor mybatisPlusInterceptor() { MybatisPlusInterceptor interceptor = new MybatisPlusInterceptor(); interceptor.addInnerInterceptor(new PaginationInnerInterceptor(DbType.H2)); return interceptor; } } -
HTML layer
<table class="display table table-bordered table-striped" id="dynamic-table"> <thead> <tr> <th>#</th> <th>id</th> <th>full name</th> <th>Age</th> <th>mailbox</th> <th>operation</th> </tr> </thead> <tbody> <tr class="gradeX" th:each="user,status:${userPage.records}"> <td th:text="${status.count}">Trident</td> <td th:text="${user.id}">Internet Explorer 4.0 </td> <td th:text="${user.name}">Win 95+</td> <td class="center hidden-phone" th:text="${user.age}">4</td> <td class="center hidden-phone" th:text="${user.email}">X</td> <td class="center hidden-phone"> <a th:href="@{/delete/{id}(id=${user.id},pn=${userPage.current})}" class="btn btn-danger" type="button">delete</a> </td> </tr> </tbody> </table> <!--Paging information--> <div class="row-fluid"> <div class="span6"> <div class="dataTables_info" id="dynamic-table_info">Current section [[${userPage.current}]] Page total [[${userPage.pages}]] Total pages [[${userPage.total}]] Data bar </div> </div> <div class="span6"> <div class="dataTables_paginate paging_bootstrap pagination"> <ul> <li class="prev disabled" th:class="${userPage.hasPrevious}? 'prev':'prev disabled'" ><a href="#" th:href="@{/dynamic_table(pn=${userPage.current-1})}">← Previous</a></li> <!--th:class="${num ==userPage.current?'active':''} Judge if it is the current page, the current page number will be highlighted--> <li class="active" th:each="num:${#numbers.sequence(1,userPage.pages)}" th:class="${num == userPage.current?'active':''}" > <!-- th:each="${#numbers.sequence(1,userPage.pages)} "number of generated 1 to userPage.pages -- > <!-- th:href="@{/dynamic_table(pn=${num})} thymeleaf Links with parameters--> <a href="#" th:href="@{/dynamic_table(pn=${num})}">[[${num}]]</a> </li> <li class="next disabled" th:class="${userPage.hasNext}? 'next':'next disabled'" ><a href="#" th:href="@{/dynamic_table(pn=${userPage.current+1})}">Next → </a></li> </ul> </div> </div> </div> -
pojo
@Data
@AllArgsConstructor
@NoArgsConstructor
//@TableName("user") / / specify the mapped table name
public class User {
    @TableField(exist = false) //Marked as not an attribute in the table
    private String username;
    @TableField(exist = false)
    private String password;

    private Long id;
    private String name;
    private Integer age;
    private String email;
}
2,NoSQL
1. Redis (see redis springboot project)
1. Import scene dependency
<!--springBoot operation Redis Imported jar-->
<dependency>
    <groupId>org.springframework.boot</groupId>
    <artifactId>spring-boot-starter-data-redis</artifactId>
</dependency>
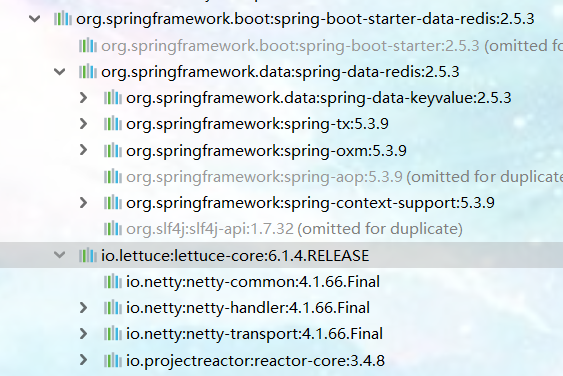
2. Auto configuration
-
Automatic configuration class RedisAutoConfiguration
@Configuration(proxyBeanMethods = false) @ConditionalOnClass(RedisOperations.class) @EnableConfigurationProperties(RedisProperties.class)// Bind the configuration property RedisProperties with the prefix spring Redis configuration @Import({ LettuceConnectionConfiguration.class, //The connection factory uses Lettuce by default JedisConnectionConfiguration.class }) public class RedisAutoConfiguration { //RedisTemplate operations are loaded. Redis connections k:v are all object s @Bean @ConditionalOnMissingBean(name = "redisTemplate") @ConditionalOnSingleCandidate(RedisConnectionFactory.class) public RedisTemplate<Object, Object> redisTemplate(RedisConnectionFactory redisConnectionFactory) { RedisTemplate<Object, Object> template = new RedisTemplate<>(); template.setConnectionFactory(redisConnectionFactory); return template; } //The connection k:v of Redis loaded with StringRedisTemplate operation string type is string @Bean @ConditionalOnMissingBean @ConditionalOnSingleCandidate(RedisConnectionFactory.class) public StringRedisTemplate stringRedisTemplate(RedisConnectionFactory redisConnectionFactory) { StringRedisTemplate template = new StringRedisTemplate(); template.setConnectionFactory(redisConnectionFactory); return template; } } -
RedisProperties configuration property, prefixed with spring Redis configuration
-
The lettucconnectionconfiguration connection factory uses Lettuce as the connection by default
-
The JedisConnectionConfiguration connection factory imports the dependent jar package of jedis to specify the configuration of spring redis. Client type: jedis is a connection factory with jedis
-
summary
- RedisAutoConfiguration auto configuration class, RedisProperties property class -- > spring redis. XXX is the redis configuration.
- The connection factories lettucconnectionconfiguration and JedisConnectionConfiguration are ready.
- Redistemplate < object, Object > and xxtemplate are automatically injected.
- The StringRedisTemplate, key and value are automatically injected
- At the bottom layer, Redis can be operated as long as we use StringRedisTemplate and RedisTemplate.
3. Establishment of external network Redis environment:
- Alibaba cloud pays for Redis on a volume basis, in which classic networks are selected.
- Apply for the public network connection address of Redis.
- Modify the white list to allow 0.0.0.0/0 access.
4. Redis operation and statistics of website visits
-
Write basic configuration files
spring: redis: # url: redis://lfy:Lfy123456@r-bp1nc7reqesxisgxpipd.redis.rds.aliyuncs.com:6379 host: r-bp1nc7reqesxisgxpipd.redis.rds.aliyuncs.com #Connected host address port: 6379 #Port number password: lfy:Lfy123456 #password client-type: jedis #Configure Redis operation using jedis jedis: pool: max-active: 10 #Sets the maximum number of active in the pool # lettuce:# Another java framework for connecting redis # pool: # max-active: 10 # min-idle: 5 -
Test connection
@SpringBootTest public class Boot05WebAdminApplicationTests { @Autowired StringRedisTemplate redisTemplate; @Autowired RedisConnectionFactory redisConnectionFactory; @Test void testRedis(){ ValueOperations<String, String> operations = redisTemplate.opsForValue(); operations.set("hello","world"); String hello = operations.get("hello"); System.out.println(hello); System.out.println(redisConnectionFactory.getClass()); } } -
URL statistics Interceptor:
@Component public class RedisUrlCountInterceptor implements HandlerInterceptor { @Autowired StringRedisTemplate redisTemplate; @Override public boolean preHandle(HttpServletRequest request, HttpServletResponse response, Object handler) throws Exception { String uri = request.getRequestURI(); //By default, each access to the current uri counts + 1 redisTemplate.opsForValue().increment(uri); return true; } } -
Add interceptor to container
@Configuration public class AdminWebConfig implements WebMvcConfigurer{ @Autowired RedisUrlCountInterceptor redisUrlCountInterceptor; @Override public void addInterceptors(InterceptorRegistry registry) { registry.addInterceptor(redisUrlCountInterceptor) .addPathPatterns("/**") .excludePathPatterns("/","/login","/css/**","/fonts/**","/images/**", "/js/**","/aa/**"); } } -
Filter and Interceptor have almost the same functions? Which one do you use?
- Filter is a native component defined by Servlet. Its advantage is that it can be used without Spring applications.
- Interceptor is a Spring defined interface, which can use Spring's automatic assembly and other functions.
-
Call statistics in Redis:
@Slf4j
@Controller
public class IndexController {

	@Autowired
    StringRedisTemplate redisTemplate;

	@GetMapping("/main.html")
    public String mainPage(HttpSession session,Model model){

        log.info("The current method is:{}","mainPage");

        ValueOperations<String, String> opsForValue =
                redisTemplate.opsForValue();

        String s = opsForValue.get("/main.html");
        String s1 = opsForValue.get("/sql");

        model.addAttribute("mainCount",s);
        model.addAttribute("sqlCount",s1);

        return "main";
    }
}
7. Unit test
1. JUnit 5 changes
-
Spring boot version 2.2.0 began to introduce JUnit 5 as the default library for unit testing
-
As the latest version of JUnit framework, JUnit 5 is very different from the previous version of JUnit framework. It consists of several different modules of three different subprojects.
-
JUnit 5 = JUnit Platform + JUnit Jupiter + JUnit Vintage
-
JUnit Platform: Junit Platform is the basis for starting the test framework on the JVM. It supports not only Junit's self-made test engine, but also other test engines.
-
JUnit Jupiter: JUnit Jupiter provides a new programming model of JUnit 5 and is the core of JUnit 5's new features. A test engine is included internally to run on the Junit Platform.
-
JUnit Vintage: since JUint has developed for many years, in order to take care of old projects, JUnit Vintage provides JUnit 4.0 compatible services x,JUnit3.x test engine.
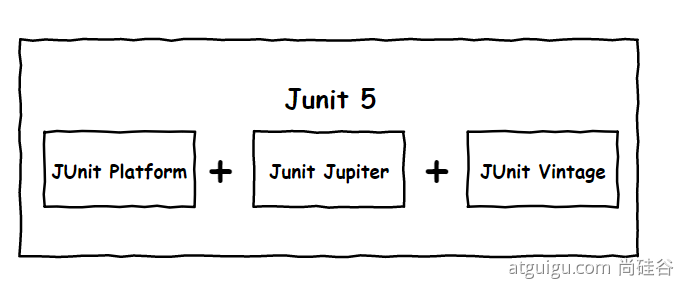
-
-
be careful:
Springboot versions above 2.4 remove the default dependency on Vintage. If you need to be compatible with JUnit 4, you need to introduce it yourself (you can't use the function @ Test of JUnit 4)
JUnit 5's Vintage has been removed from spring boot starter test. If you need to continue to be compatible with Junit4(@Test annotation), you need to introduce the vintage dependency:
<dependency> <groupId>org.junit.vintage</groupId> <artifactId>junit-vintage-engine</artifactId> <scope>test</scope> <exclusions> <exclusion> <groupId>org.hamcrest</groupId> <artifactId>hamcrest-core</artifactId> </exclusion> </exclusions> </dependency> -
Use JUnit 5 to add the corresponding starter:
<dependency> <groupId>org.springframework.boot</groupId> <artifactId>spring-boot-starter-test</artifactId> <scope>test</scope> </dependency> -
The basic unit test template of Spring JUnit 5 (Spring JUnit 4 is @ SpringBootTest+@RunWith(SpringRunner.class)):
import org.junit.jupiter.api.Assertions; import org.junit.jupiter.api.Test;//Note that it's not org junit. Test (this is the version of JUnit 4) import org.springframework.beans.factory.annotation.Autowired; import org.springframework.boot.test.context.SpringBootTest; @SpringBootTest class SpringBootApplicationTests { @Autowired private Component component; @Test //@After the transaction is marked, the test is completed, and the connected database has the function of automatic rollback public void contextLoads() { Assertions.assertEquals(5, component.getFive()); } }
2. Common test notes
1,Official documents - Annotations
2. Common notes
- @Test: indicates that the method is a test method. However, unlike JUnit4's @ test, it has a very single responsibility and cannot declare any attributes. Jupiter will provide additional tests for expanded tests
- @ParameterizedTest: indicates that the method is a parametric test.
- @RepeatedTest: indicates that the method is repeatable.
- @DisplayName: set the display name for the test class or test method.
- @Before each: indicates that it is executed before each unit test.
- @After each: means to execute after each unit test.
- @Before all: indicates that all unit tests are executed before.
- @After all: means to execute after all unit tests.
- @Tag: indicates the unit test category, similar to @ Categories in JUnit4.
- @Disabled: indicates that the test class or test method is not executed, similar to @ Ignore in JUnit 4.
- @Timeout: indicates that the test method will return an error if it exceeds the specified time.
- @ExtendWith: provides an extension class reference for a test class or test method.
3. Test code
@DisplayName("junit5 test") //Add comments to the current test class
@SpringBootTest //The test class marked as springboot can use the functions in the springboot container and cannot be used without @ Autowired annotation
/*
@BootstrapWith(SpringBootTestContextBootstrapper.class)
@ExtendWith(SpringExtension.class)
*/
class Junit5Tests {
@DisplayName("test displayName") //Add comments to the current test method
@Test
void testDisplayName() {
System.out.println(1);
}
@Disabled //When the entire class is run, it is marked as a test method that can not be executed
@DisplayName("test test2") //Add comments to the current test method
@Test
void test2() {
System.out.println(2);
}
@DisplayName("test testRepeatedTest") //Add comments to the current test method
@RepeatedTest(value = 5) //Specifies how many times the current method is executed
@Test
void testRepeatedTest() {
System.out.println(3);
}
/*
@Timeout Specify method timeout
java.util.concurrent.TimeoutException: testTimeout() timed out after 500 milliseconds
*/
@Timeout(value = 500,unit = TimeUnit.MILLISECONDS) //If it exceeds 500ms, an exception will be thrown
@DisplayName("test Timeout") //Add comments to the current test method
@Test
void testTimeout() {
try {
TimeUnit.MILLISECONDS.sleep(600);
} catch (InterruptedException e1) {
e1.printStackTrace();
}
}
/*
Run before each test method and execute multiple times for each method
*/
@BeforeEach
void testBeforeEach(){
System.out.println("The test begins");
}
/*
Run before each test method
*/
@AfterEach
void testAfterEach(){
System.out.println("The test is over");
}
/*
Before the entire test class is run, it is executed only once for the class
Must be marked as static or an exception will be thrown
org.junit.platform.commons.JUnitException: @BeforeAll method 'void com.pj.springboot.Junit5Tests.testBeforeAll()' must be static unless the test class is annotated with @TestInstance(Lifecycle.PER_CLASS).
*/
@BeforeAll
static void testBeforeAll(){
System.out.println("All test methods begin testing");
}
/*
After the entire test class is run, it is executed only once for the class
*/
@AfterAll
static void testAfterAll(){
System.out.println("All test methods are completed");
}
}
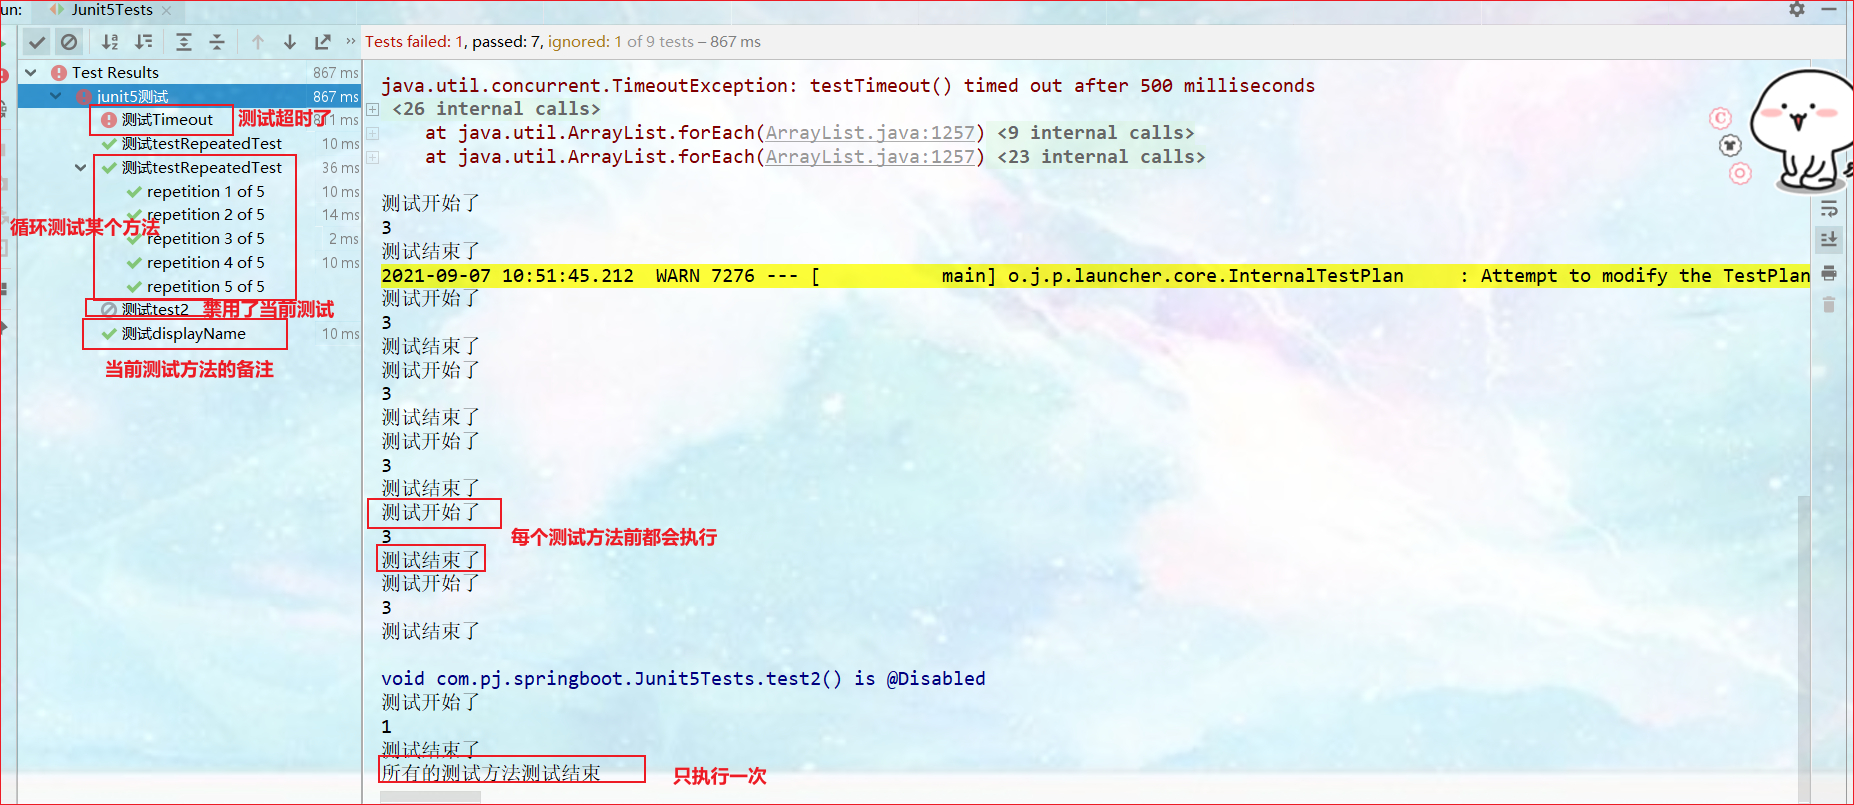
3. Assertion mechanism
1. Meaning
Assertion is the core part of the test method, which is used to verify the conditions that the test needs to meet. These assertion methods are org junit. jupiter. api. Static method for assertions. Check whether the data returned by the business logic is reasonable. After all test runs are completed, there will be a detailed test report.
2. Classification
2.1 simple assertion
Used for simple validation of a single value
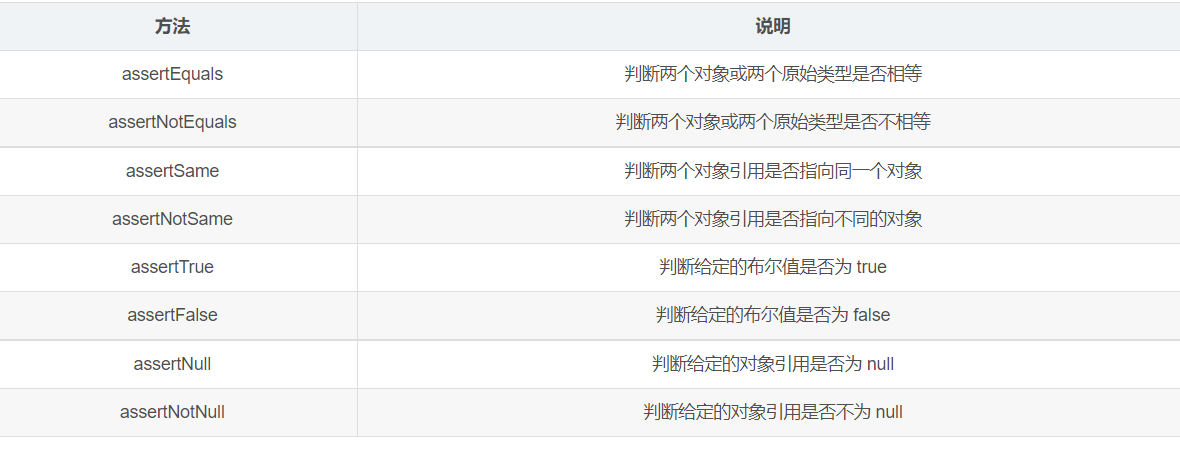
/*
One assertion failed, and the subsequent assertions will not be executed
*/
@DisplayName("Test simple assertions")
@Test
void testAssertions(){
int call = call(3, 3);
// assertEquals(6,call); // 6 estimated value call actual value
assertEquals(6,call,"Calculation error"); //If the error specifies an error message, the following assertion will not be executed if this calculation error occurs
Object o1 = new Object();
Object o2 = new Object();
assertSame(o1,o2,"The two objects are different");
}


2.2 array assertion
Use the assertArrayEquals method to determine whether two objects or arrays of original types are equal.
@Test
@DisplayName("array assertion")
public void array() {
assertArrayEquals(new int[]{1, 2}, new int[] {1, 2}); //The elements of each subscript are equal
assertArrayEquals(new int[]{2,1}, new int[] {1, 2},"Array contents are not equal"); //This will throw an exception
}
2.3. Combination assertion
The assertAll() method accepts multiple org junit. jupiter. api. The instance of the executable functional interface (the functional interface returned with null parameters) is used as the assertion to be verified. These assertions can be easily provided through lambda expressions.
/*
Only when all assertions are successful can the combined assertions succeed. One failure is failure
*/
@Test
@DisplayName("Composite assertion")
void all() {
assertAll("Combined assertion 1", //The name of the composite assertion
()-> assertTrue(true && true),//Combining assertions requires judging each assertion
()-> assertEquals(3, 3));
assertAll("Combined assertion 2",
()-> assertTrue(true && true),
()-> assertEquals(2, 3,"The result is not expected"));
}

2.4. Exception assertion
In JUnit 4, when you want to test the exception of a method, the ExpectedException variable annotated with @ Rule is still troublesome. JUnit 5 provides a new assertion method, assertions Assertthrows() can be used in conjunction with functional programming.
@Test
@DisplayName("Assertion exception test")
void exceptionTest() {
/*
The first parameter is the expected exception type,
The second parameter is the Executable interface,
The third parameter is the information thrown when the first exception is not met
*/
assertThrows(ArithmeticException.class,
()->{int i = 10/0;}); //The execution is successful only when ArithmeticException is thrown
assertThrows(ArithmeticException.class,
()->{int i = 10/2;},
"When the business logic is running normally");
}
2.5. Timeout assertion
Unit5 also provides assertions Asserttimeout() sets a timeout for the test method.
@Test
@DisplayName("Timeout tests ")
public void timeoutTest() {
//If the test method takes more than 1s, it will be abnormal
Assertions.assertTimeout(Duration.ofMillis(1000), () -> Thread.sleep(500));
}
2.6 rapid failure
The test fails directly through the fail method.
@Test
@DisplayName("Rapid failure")
public void shouldFail() {
if (1==2){
fail("Values are not equal");
}
if (2==2){
fail("Values are not equal");
}
}
3. Total test report for assertions
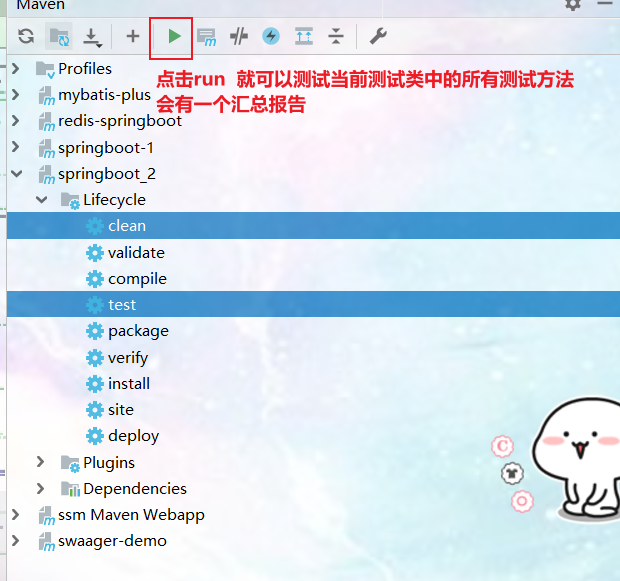
4. Preconditions
1. Meaning
Preconditions (assumptions) in Unit 5 are similar to assertions. The difference is that unsatisfied assertions will fail the test method, while unsatisfied preconditions will only terminate the execution of the test method.
Preconditions can be regarded as the premise of test method execution. When the premise is not met, there is no need to continue execution.
/*==================Test preconditions=====================*/
@DisplayName("Test preconditions")
void testAssumptions(){
Assumptions.assumeTrue(true,"The result is not true");//The precondition must meet this condition to execute the following code. If the condition is not met, the following code will be skipped
System.out.println(111);
}
@DisplayName("Preconditions")
public class AssumptionsTest {
private final String environment = "DEV";
/*
assumeTrue And assumFalse ensure that the given condition is true or false. If the condition is not met, the test execution will be terminated.
assumingThat The parameter of is the Boolean value representing the condition and the implementation object of the corresponding Executable interface. The Executable object will be executed only when the conditions are met; When the conditions are not met, the test execution does not terminate.
*/
@Test
@DisplayName("simple")
public void simpleAssume() {
assumeTrue(Objects.equals(this.environment, "DEV"));
assumeFalse(() -> Objects.equals(this.environment, "PROD"));
}
@Test
@DisplayName("assume then do")
public void assumeThenDo() {
assumingThat(
Objects.equals(this.environment, "DEV"),
() -> System.out.println("In DEV")
);
}
}
5. Nested test
1,Official documentation - Nested Tests
2. Meaning
JUnit 5 can implement Nested tests through internal classes and @ Nested annotations in Java, so as to better organize relevant test methods together. You can use @ BeforeEach and @ AfterEach annotations in internal classes, and there is no limit to the nesting level.
3. Code
@DisplayName("Nested test")
class TestingAStackDemo {
Stack<Object> stack;
@Test
@DisplayName("new Stack()")
void isInstantiatedWithNew() {
new Stack<>();
//In case of nested Test; The outer Test cannot drive the inner @ BeforeEach/ALL and other methods to run in advance / later
assertNull(stack);
}
@Nested //Mark as nested test class
@DisplayName("when new")
class WhenNew {
@BeforeEach //Before all tests
void createNewStack() {
stack = new Stack<>();
}
@Test
@DisplayName("is empty")
void isEmpty() {
assertTrue(stack.isEmpty()); //Run successfully
}
@Test
@DisplayName("throws EmptyStackException when popped")
void throwsExceptionWhenPopped() {
assertThrows(EmptyStackException.class, stack::pop); //Run successfully. stack::pop takes out the top element of the stack
}
@Test
@DisplayName("throws EmptyStackException when peeked")
void throwsExceptionWhenPeeked() {
assertThrows(EmptyStackException.class, stack::peek);
}
@Nested//Mark as nested test class
@DisplayName("after pushing an element")
class AfterPushing {
String anElement = "an element";
//In nested tests, the inner Test can drive the outer @ BeforeEach/ALL and other methods to run in advance / later
@BeforeEach
void pushAnElement() {
//An element is added on the premise that the stack should be new
stack.push(anElement);
}
@Test
@DisplayName("it is no longer empty")
void isNotEmpty() {
assertFalse(stack.isEmpty());//Successful execution
}
@Test
@DisplayName("returns the element when popped and is empty")
void returnElementWhenPopped() {
assertEquals(anElement, stack.pop()); //Successful execution
assertTrue(stack.isEmpty());
}
@Test
@DisplayName("returns the element when peeked but remains not empty")
void returnElementWhenPeeked() {
assertEquals(anElement, stack.peek());//Successful execution
assertFalse(stack.isEmpty());
}
}
}
}
6. Parametric test
1,Official documentation - Parameterized Tests
2. Meaning
Parametric testing is a very important new feature of JUnit 5. It makes it possible to run tests multiple times with different parameters, and also brings a lot of convenience to our unit testing.
Using @ ValueSource and other annotations to specify input parameters, we can use different parameters for multiple unit tests without adding a unit test every time a parameter is added, saving a lot of redundant code.
3. Parametric annotation
- @ValueSource: Specifies the input parameter source for parametric testing. It supports eight basic classes, String type and Class type
- @NullSource: indicates that a null input parameter is provided for the parameterized test
- @EnumSource: indicates that an enumeration input parameter is provided for the parameterized test
- @CsvFileSource: read the contents of the specified CSV file as the parametric test input parameter
- @MethodSource: means to read the return value of the specified method as the parameterized test input parameter (note that the method return needs to be a stream)
4. Expand
Of course, if the parametric test can only specify ordinary input parameters, it can not reach the point that makes me feel amazing. What makes me really feel his strength is that he can support all kinds of external participation. For example, CSV,YML,JSON files and even the return value of methods can also be used as input parameters. You only need to implement the ArgumentsProvider interface, and any external file can be used as its input parameter.
/*=================Parametric test=====================*/
@ParameterizedTest //Mark as parametric test
@DisplayName("Parametric test")
@Test
@ValueSource(ints = {1,2,34,5,6})
void testParameterizedTest(int i){ //Different parameter types have different attributes. int corresponds to ints. See the source code for details
System.out.println(i); //The value of the i parameter will be taken from the ints corresponding to the ValueSource
}
Stream<String > stringStream(){
return Stream.of("a","b","c");
}
@ParameterizedTest //Mark as parametric test
@DisplayName("Parametric test")
@Test
@MethodSource("stringStream") //The method return value type is Stream and must be a static method
void testParameterizedTest(String s){
System.out.println(s); //The value of the s parameter will be taken from the stream returned by the stringStream method
}
7. Migration guide
1,Official document - Migrating from JUnit 4
2. The following changes should be noted during migration:
- Annotations at org junit. jupiter. In the API package, the assertions are in org junit. jupiter. api. In the assertions class, the preconditions are in org junit. jupiter. api. In the assumptions class.
- Replace @ Before and @ After with @ BeforeEach and @ AfterEach.
- Replace @ BeforeClass and @ AfterClass with @ BeforeAll and @ AfterAll.
- Replace @ Ignore with @ Disabled.
- Replace @ Category with @ Tag.
- Replace @ RunWith, @ Rule and @ ClassRule with @ ExtendWith.
8. Indicator monitoring
1,SpringBoot Actuator
Official documentation - spring boot actuator: production ready features
1.1 INTRODUCTION
In the future, after every micro service is deployed on the cloud, we need to monitor, track, audit and control it. SpringBoot extracts the actor scenario, so that we can quickly reference each micro service to obtain production level application monitoring, audit and other functions.
1.2,1.x and 2 Difference of X
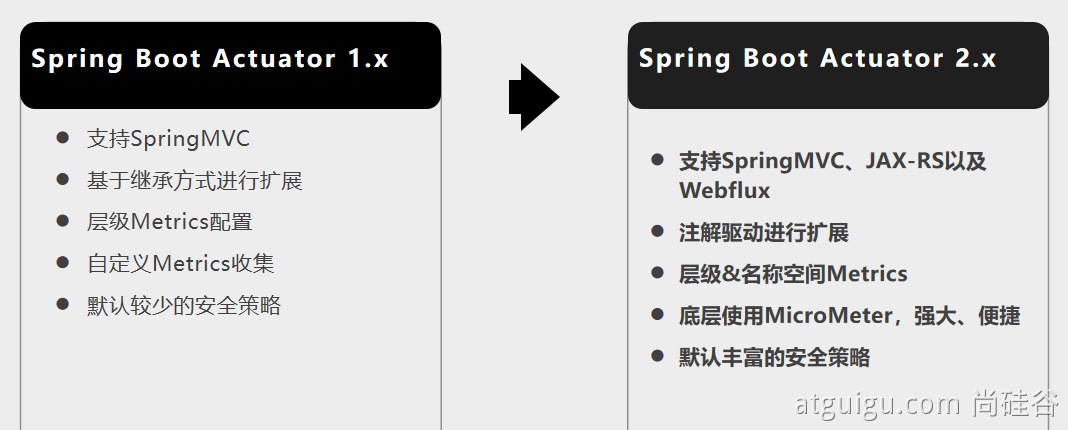
3. How to use
3.1. Introduction scenario
<!--introduce SpringBoot Actuator Monitoring function-->
<dependency>
<groupId>org.springframework.boot</groupId>
<artifactId>spring-boot-starter-actuator</artifactId>
</dependency>

3.2 access
- visit http://localhost:8080/actuator/ **. Page of monitoring function
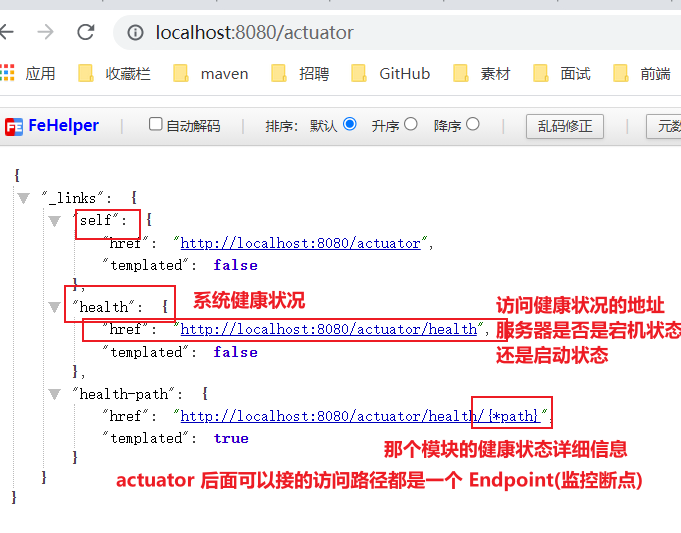
4. Monitoring endpoint
All monitoring breakpoints are not enabled by default. They can be accessed only when they are set.
4.1 frequently used endpoints and enabling and disabling
-
Frequently used endpoints
ID describe auditevents Expose audit event information for the current application. An AuditEventRepository component is required. beans Displays a complete list of all spring beans in the application. caches Expose available cache. conditions Displays all condition information automatically configured, including the reason for the match or mismatch. configprops Displays all @ ConfigurationProperties. env Expose Spring's property ConfigurableEnvironment flyway Displays all Flyway database migrations that have been applied. One or more Flyway components are required. health Displays application health information. httptrace Displays HTTP trace information (by default, the last 100 HTTP request responses). An HttpTraceRepository component is required. info Displays application information. integrationgraph The spring integration graph is displayed. You need to rely on spring integration core.
"simple")
public void simpleAssume() {
assumeTrue(Objects.equals(this.environment, "DEV"));
assumeFalse(() -> Objects.equals(this.environment, "PROD"));
}
@Test
@DisplayName("assume then do")
public void assumeThenDo() {
assumingThat(
Objects.equals(this.environment, "DEV"),
() -> System.out.println("In DEV")
);
}
}
#### 5. Nested test
###### 1,[Official documents - Nested Tests](https://junit.org/junit5/docs/current/user-guide/#writing-tests-nested)
###### 2. Meaning
JUnit 5 Can pass Java Inner classes and`@Nested` Annotations implement nested tests, which can better organize related test methods together. Can be used in internal classes`@BeforeEach` and`@AfterEach`Annotations, and there is no limit to the level of nesting.
###### 3. Code
```java
@DisplayName("Nested test")
class TestingAStackDemo {
Stack<Object> stack;
@Test
@DisplayName("new Stack()")
void isInstantiatedWithNew() {
new Stack<>();
//In case of nested Test; The outer Test cannot drive the inner @ BeforeEach/ALL and other methods to run in advance / later
assertNull(stack);
}
@Nested //Mark as nested test class
@DisplayName("when new")
class WhenNew {
@BeforeEach //Before all tests
void createNewStack() {
stack = new Stack<>();
}
@Test
@DisplayName("is empty")
void isEmpty() {
assertTrue(stack.isEmpty()); //Run successfully
}
@Test
@DisplayName("throws EmptyStackException when popped")
void throwsExceptionWhenPopped() {
assertThrows(EmptyStackException.class, stack::pop); //Run successfully. stack::pop takes out the top element of the stack
}
@Test
@DisplayName("throws EmptyStackException when peeked")
void throwsExceptionWhenPeeked() {
assertThrows(EmptyStackException.class, stack::peek);
}
@Nested//Mark as nested test class
@DisplayName("after pushing an element")
class AfterPushing {
String anElement = "an element";
//In nested tests, the inner Test can drive the outer @ BeforeEach/ALL and other methods to run in advance / later
@BeforeEach
void pushAnElement() {
//An element is added on the premise that the stack should be new
stack.push(anElement);
}
@Test
@DisplayName("it is no longer empty")
void isNotEmpty() {
assertFalse(stack.isEmpty());//Successful execution
}
@Test
@DisplayName("returns the element when popped and is empty")
void returnElementWhenPopped() {
assertEquals(anElement, stack.pop()); //Successful execution
assertTrue(stack.isEmpty());
}
@Test
@DisplayName("returns the element when peeked but remains not empty")
void returnElementWhenPeeked() {
assertEquals(anElement, stack.peek());//Successful execution
assertFalse(stack.isEmpty());
}
}
}
}
6. Parametric test
1,Official documentation - Parameterized Tests
2. Meaning
Parametric testing is a very important new feature of JUnit 5. It makes it possible to run tests multiple times with different parameters, and also brings a lot of convenience to our unit testing.
Using @ ValueSource and other annotations to specify input parameters, we can use different parameters for multiple unit tests without adding a unit test every time a parameter is added, saving a lot of redundant code.
3. Parametric annotation
- @ValueSource: Specifies the input parameter source for parametric testing. It supports eight basic classes, String type and Class type
- @NullSource: indicates that a null input parameter is provided for the parameterized test
- @EnumSource: indicates that an enumeration input parameter is provided for the parameterized test
- @CsvFileSource: read the contents of the specified CSV file as the parametric test input parameter
- @MethodSource: means to read the return value of the specified method as the parameterized test input parameter (note that the method return needs to be a stream)
4. Expand
Of course, if the parametric test can only specify ordinary input parameters, it can not reach the point that makes me feel amazing. What makes me really feel his strength is that he can support all kinds of external participation. For example, CSV,YML,JSON files and even the return value of methods can also be used as input parameters. You only need to implement the ArgumentsProvider interface, and any external file can be used as its input parameter.
/*=================Parametric test=====================*/
@ParameterizedTest //Mark as parametric test
@DisplayName("Parametric test")
@Test
@ValueSource(ints = {1,2,34,5,6})
void testParameterizedTest(int i){ //Different parameter types have different attributes. int corresponds to ints. See the source code for details
System.out.println(i); //The value of the i parameter will be taken from the ints corresponding to the ValueSource
}
Stream<String > stringStream(){
return Stream.of("a","b","c");
}
@ParameterizedTest //Mark as parametric test
@DisplayName("Parametric test")
@Test
@MethodSource("stringStream") //The method return value type is Stream and must be a static method
void testParameterizedTest(String s){
System.out.println(s); //The value of the s parameter will be taken from the stream returned by the stringStream method
}
7. Migration guide
1,Official document - Migrating from JUnit 4
2. The following changes should be noted during migration:
- Annotations at org junit. jupiter. In the API package, the assertions are in org junit. jupiter. api. In the assertions class, the preconditions are in org junit. jupiter. api. In the assumptions class.
- Replace @ Before and @ After with @ BeforeEach and @ AfterEach.
- Replace @ BeforeClass and @ AfterClass with @ BeforeAll and @ AfterAll.
- Replace @ Ignore with @ Disabled.
- Replace @ Category with @ Tag.
- Replace @ RunWith, @ Rule and @ ClassRule with @ ExtendWith.
8. Indicator monitoring
1,SpringBoot Actuator
Official documentation - spring boot actuator: production ready features
1.1 INTRODUCTION
In the future, after every micro service is deployed on the cloud, we need to monitor, track, audit and control it. SpringBoot extracts the actor scenario, so that we can quickly reference each micro service to obtain production level application monitoring, audit and other functions.
1.2,1.x and 2 Difference of X
[external chain picture transferring... (img-CXLfqf1M-1642169239611)]
3. How to use
3.1. Introduction scenario
<!--introduce SpringBoot Actuator Monitoring function-->
<dependency>
<groupId>org.springframework.boot</groupId>
<artifactId>spring-boot-starter-actuator</artifactId>
</dependency>
[external chain picture transferring... (IMG pnkpkv6-1642169239611)]
3.2 access
- visit http://localhost:8080/actuator/ **. Page of monitoring function
[external chain picture transferring... (img-Zj91k4KC-1642169239612)]
4. Monitoring endpoint
All monitoring breakpoints are not enabled by default. They can be accessed only when they are set.
4.1 frequently used endpoints and enabling and disabling
-
Frequently used endpoints
ID describe auditevents Expose audit event information for the current application. An AuditEventRepository component is required. beans Displays a complete list of all spring beans in the application. caches Expose available cache. conditions Displays all condition information automatically configured, including the reason for the match or mismatch. configprops Displays all @ ConfigurationProperties. env Expose Spring's property ConfigurableEnvironment flyway Displays all Flyway database migrations that have been applied. One or more Flyway components are required. health Displays application health information. httptrace Displays HTTP trace information (by default, the last 100 HTTP request responses). An HttpTraceRepository component is required. info Displays application information. integrationgraph The spring integration graph is displayed. You need to rely on spring integration core. loggers