Re learn redis cache of SpringBoot series
- Using docker to install redis
- redis data structure and application scenario
- Integration of single sentinel and cluster mode
- Using redisTemplate to manipulate data
- Operating data using Redis Repository
- spring cache basic usage
- Details the use of cached declarative annotations
- Cache annotation configuration description
- Writing and value of cache key
- Spring cache uses redis to summarize the cache considerations
Using docker to install redis
The purpose of this section is not to teach you to understand the docker container (talking about docker is divorced from the core of our course. Our course is Spring Boot, not docker), but to quickly build a redis database for you through docker, so as to facilitate your learning and use.
preparation
- First, install docker. How to install docker in CentOS7 can be done by Baidu itself
Get redis image
docker search redis
docker pull redis:5.0.5
docker images
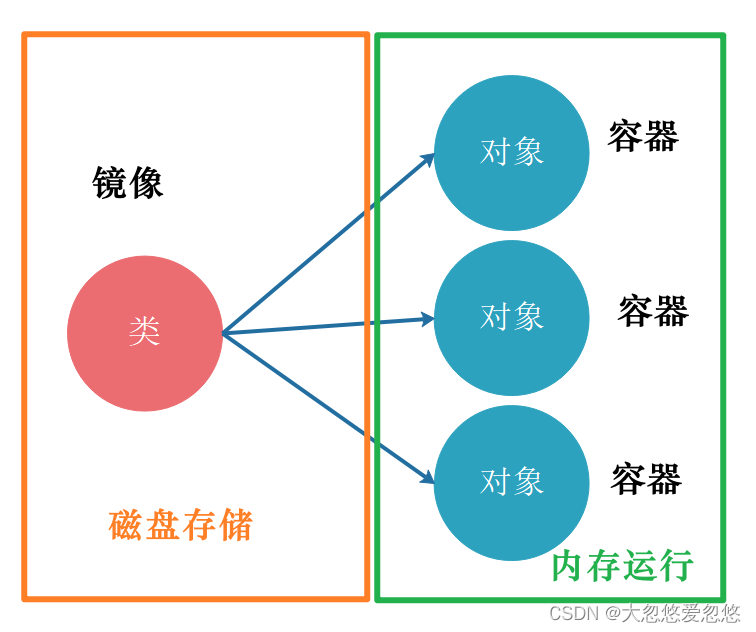
In fact, it is more vivid to understand the relationship between docker image and container, more like the relationship between Class and object. A Class can construct multiple objects, and a mirror can construct multiple containers. Classes and images are real bytecode files; Objects and containers are in system memory and exist as runtime states.
Create container
Create persistent storage directory
The container can run in memory, but the data stored in the container needs to be persisted. Therefore, create a redis container data and configuration file storage directory on the host.
# Here we create it under / home/docker
mkdir /home/docker/redis/{conf,data} -p
cd /home/docker/redis
Note: all subsequent operations should be performed in this directory / home/docker/redis
Get the default profile template of redis
# Get the default configuration template of redis
# The main purpose here is to set the log / password / appendonly of redis
# redis's docker running parameter provides -- appendonly yes, but no password
wget https://gitee.com/hanxt/boot-launch/raw/master/src/main/resources/otherconfig/redis.conf -O conf/redis.conf

# Direct replace edit
sed -i 's/logfile ""/logfile "access.log"/' conf/redis.conf;
sed -i 's/# requirepass foobared/requirepass 123456/' conf/redis.conf;
sed -i 's/appendonly no/appendonly yes/' conf/redis.conf;
sed -i 's/bind 127.0.0.1/bind 0.0.0.0/' conf/redis.conf;
- sed -i is a linux file replacement command in the format of s / replaced content / content after replacement/
- Replace logfile "" with logfile "access.log", specify the name of the log file as access. Log --- > specify the name of the log file
- Replace # requirepass foobared with requirepass 123456, specify the access password as 123456 - > configure the login password, auth 123456
- Replace "appendonly no" with "appendonly yes", and turn on appendonly mode - persistent configuration
- Replace binding * * ip "bind 127.0.0.1" with "bind 0.0.0.0" * * - > any ip can access
Protected mode only allows local loopback 127.0.0.1 access when the bind address is not explicitly defined (i.e. listening to the whole network segment) and the password requires pass is not set. So change to bind 0.0.0.0
Create a container using a mirror
Create and run a container named myredis and put it into the start-redis.sh script
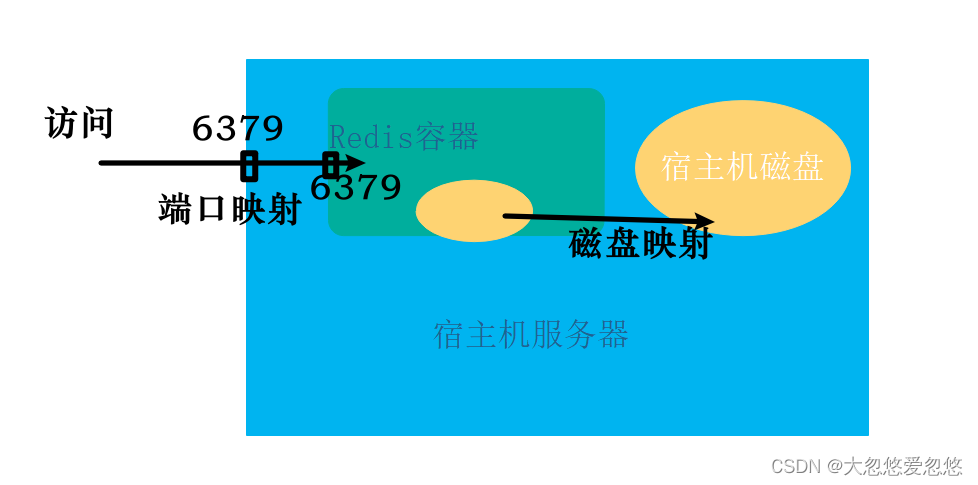
# Create and run a container named myredis
docker run \
-p 6379:6379 \
-v $PWD/data:/data \
-v $PWD/conf/redis.conf:/etc/redis/redis.conf \
--privileged=true \
--name myredis \
-d redis:5.0.5 redis-server /etc/redis/redis.conf
# Command decomposition
docker run \
-p 6379:6379 \ # Port mapping host: container
-v $PWD/data:/data:rw \ # The mapped disk directory rw is read-write, and the host directory is container directory
-v $PWD/conf/redis.conf:/etc/redis/redis.conf:ro \ # The mount configuration file ro is readonly
--privileged=true \ # Give some permission
--name myredis \ # Name the container
-d redis redis-server /etc/redis/redis.conf # deamon runs the container and starts the redis server in the container using the configuration file
- $PWD is the current directory, that is, / home/docker/redis
View active containers
# View active containers
docker ps
# If there is no myredis, it indicates that the startup fails. View the error log
docker logs myredis
# View the ip mount port mapping and other information of myredis
docker inspect myredis
# View the port mapping of myredis
docker port myredis
Accessing redis container service
After installation, you can conduct access test
docker exec -it myredis bash
redis-cli
The above test is to access the docker container in the host. If the redis service can be accessed on the host, and the host other than the host cannot access the redis service, it may be because the firewall of the host is not open. Refer to the following practice.
Open the firewall port to provide external access
Open the host port where the docker container is located and provide access to external services
firewall-cmd --zone=public --add-port=6379/tcp --permanent
firewall-cmd --reload
firewall-cmd --query-port=6379/tcp
redis data structure and application scenario
Redis is an open source, free, key value in memory database, which mainly solves the performance problems of hot data access in high concurrency and big data scenarios, and provides high-performance fast data access.
Part of the data in the project is accessed frequently, causing service pressure on downstream DB (such as MySQL). At this time, cache can be used to improve efficiency.
The main features of Redis include:
- Redis data is stored in memory, which can improve the access efficiency of hotspot data
- Redis not only supports key value data, but also supports the storage of other data structures;
- Redis supports data persistent storage. Data can be stored on disk. When the machine is restarted, data will be reloaded from disk;
Redis as a cache database is compared with MySQL as a structured database.
- In terms of database type, Redis is a NoSQL semi-structured cache database and MySQL is a structured relational database;
- In terms of read-write performance, MySQL is a persistent hard disk storage, with slow read-write speed. Redis data storage is read in memory, and can also be persistent to disk, with fast read-write speed;
- In terms of usage scenarios, redis is generally selected as a technology for MySQL data reading performance optimization and used together. Redis is used to store hot data or cache data, and there is no mutual replacement relationship.
Redis basic data structure and actual combat scenario
- The data structure of redis can be understood as Map < String, Object > in Java data types. Key is String type and value is the following type. It only exists as an independent database, so how to use Map in Java and redis are similar.
- The data structure of string type can be understood as map < string, string >
- The data structure of list type can be understood as map < string, list < string > >
- The data structure of set type can be understood as map < string, set < string > >
- hash type data structures can be understood as map < string, HashMap < string, string > >
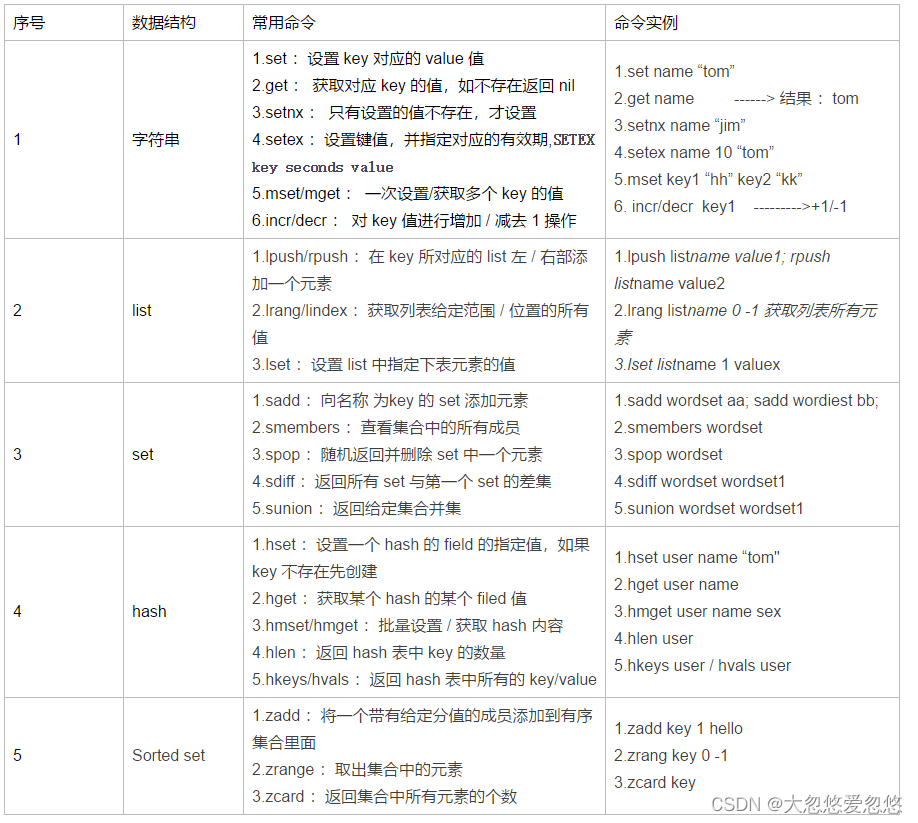
The command line in the above figure corrects: lrange, not lrang
redis application scenario analysis
String type usage scenario
Scenario 1: commodity inventory
In terms of business, commodity inventory data is hot data, and transaction behavior will directly affect inventory. Redis's own String type provides:
incr key     #Add an inventory
decr key    # Reduce one inventory
incrby key 10 # Add 20 inventory
decrby key 15   # Reduce inventory by 15
- set goods_id 10; Set ID to good_ The initial inventory value of goods with ID is 10;
- decr goods_id; When goods are purchased, the inventory data is reduced by 1.
Similar scenarios: the number of views of goods, the number of likes of questions or replies, etc. This counting scenario can be implemented by Redis.
Scenario 2: time effective information storage
Redis's data storage has automatic failure capability. That is, the stored key value can set the expiration time. The second parameter in SETEX mykey 60 "value" is the expiration time.
For example, a user needs to obtain a login verification code to log in to an App, and the verification code is valid within 30 seconds.
- Generate verification code: generate verification code, store the verification code in reids using String type, and set the expiration time of 30 seconds. For example: SETEX validcode 30 "value"
- Verification process: after the user obtains the verification code, we obtain the verification code through get validcode. If we can't obtain the verification code, it means that the verification code has expired.
List type usage scenario
List is a linked list of strings sorted in insertion order. New elements can be inserted at the head and tail (realized by a two-way linked list, and the time complexity of adding elements at both ends is O(1)).
Scenario 1: message queue implementation
At present, there are many professional message queue components, such as Kafka and RabbitMQ. Here we just use the features of list to implement the requirements of message queue. In the process of actual technology selection, we can think carefully.
list storage is the storage form of a queue:
- lpush key value; Add a string element in the header of the list corresponding to the key;
- rpop key; Remove the last element of the list, and the return value is the removed element.
Scenario 2: latest products on the shelves
On the home page of the trading website, there is often a module recommended by new products on the shelf. This module stores the TOP 100 products on the latest shelf. At this time, Redis's list data structure is used to store the newly launched products of TOP 100.
The Redis ltrim instruction trims a list so that the list contains only the specified elements in the specified range.
ltrim key start end
start and end are counted from 0, where 0 is the first element (header) in the list and 1 is the second element.
The following pseudo code demonstrates:
//Add new products to the linked list
ret = r.lpush("new:goods", goodsId)
//Keep the linked list 100 bits
ret = r.ltrim("new:goods", 0, 99)
//Get the list of the top 100 latest product IDS
newest_goods_list = r.lrange("new:goods", 0, 99)
set type usage scenario
Set also stores a set list function. Unlike list, set has the function of de duplication (the same as Java set data type). When a list information needs to be stored and the elements in the list cannot be repeated, set is more appropriate. At the same time, set also provides intersection, union and difference sets.
For example, in the trading website, we will store the information of products that users are interested in. When analyzing similar users, we can provide some basis by calculating the number of products of interest between two different users.
    //userid is the user ID and goodID is the product information of interest.
    sadd "user:userId" goodID

    sadd "user:101" 1
    sadd "user:101" 2
    sadd "user:102" 1
    Sadd "user:102" 3

    sinter "user:101" "user:102"    # The return value is 1
Get the similar products of two users, and then determine the category of similar products for user analysis. Similar application scenarios also include the support of common attention to friends and similar interest tag s in social scenarios.
Hash type usage scenarios
Redis needs to serialize, convert and store objects when storing objects (such as user information). Another form is to convert object data into JSON structure data, and then store JSON strings to redis.
For some object types, there is another convenient type, which is stored according to Redis's Hash type.
hset key field value
For example, we store some basic information of website users. We can use:
    hset user101 name "Xiao Ming"
    hset user101 phone "123456"
    hset user101 sex "male"
In this way, a user's basic information is stored, including: {name: Xiao Ming, phone: "123456", sex: "male"}
Of course, there are many similar scenarios, such as storing order data, product data, merchant basic information, etc. You can refer to for storage selection. However, it is not suitable for storing data with complex association relationship. It is more convenient to use relational database in that scenario.
Sorted Set type usage scenario
The usage scenario of Redis sorted set is similar to that of set. The difference is that set is not automatically ordered, but sorted set can sort the stored data by providing a score parameter. It is automatically sorted and inserted in order.
If you need an ordered and non repetitive set list in the business, you can choose the data structure of sorted set.
For example, the purchase heat of commodities can take the total purchase amount num as the score of the commodity list, so that when obtaining the most popular commodities, it can be automatically ranked according to the total sales amount.
Integration of single sentinel and cluster mode
The highly available installation, operation and maintenance of redis cluster mode and sentinel mode require you to study in a special redis course. We are mainly aimed at Spring Boot developers, not talking about the high availability and operation and maintenance knowledge of redis cluster.
In other words, this section introduces how to connect and use these redis instances in the Spring Boot application after the architect or operation and maintenance personnel have built the redis sentinel or cluster cluster.
Introduction to spring data redis
Spring Boot provides a component package for Redis integration: Spring Boot starter data Redis, which depends on spring data Redis and lettuce. Spring Boot 1.0 uses the Jedis client by default, and lettuce is replaced with Spring Boot 2.0. However, if you switch from Spring Boot 1.5.X, you can hardly feel the difference. This is because Spring Boot starter data Redis isolates the differences for us.
- Lattice: it is a scalable thread safe Redis client. Multiple threads can share the same RedisConnection. It uses excellent Netty NIO framework to efficiently manage multiple connections.
- Spring Data: is a major project in the spring framework, which is designed to simplify the construction based on spring Data access of framework applications, including non relational database, map reduce framework, cloud data services, etc. in addition, it also includes access support for relational database.
- Spring Data Redis: it is a main module in the Spring Data project and implements the Redis client API Highly encapsulated, making the operation of Redis more convenient.
Integrating spring data redis
Import dependent packages
<dependency>
    <groupId>org.springframework.boot</groupId>
    <artifactId>spring-boot-starter-data-redis</artifactId>
</dependency>
<dependency>
    <groupId>org.apache.commons</groupId>
    <artifactId>commons-pool2</artifactId>
</dependency>
Commons pool 2 was introduced because lattice needs to use commons pool 2 to create a Redis connection pool.
redis single instance connection configuration
For the global configuration of application, use the test redis service installed earlier. The single node instance of redis can be connected to the redis single node instance database through the following configuration
spring:
  redis:
    database: 0 # Redis database index (0 by default)
    host: 192.168.161.3 # Redis server address
    port: 6379 # Redis server connection port
    password: 123456 # Redis server connection password (blank by default)
    timeout:  5000  # Connection timeout in ms
    lettuce:
      pool:
        max-active: 8 # The maximum number of connections in the connection pool (negative value indicates no limit) is 8 by default
        max-wait: -1 # Maximum blocking waiting time of connection pool (negative value indicates no limit) default - 1
        max-idle: 8 # The maximum free connections in the connection pool are 8 by default
        min-idle: 0 # The minimum free connections in the connection pool are 0 by default
redis sentinel mode connection configuration
Another very common deployment mode of redis is sentinel mode. If your company uses this deployment mode, it is more highly available than single instance mode.
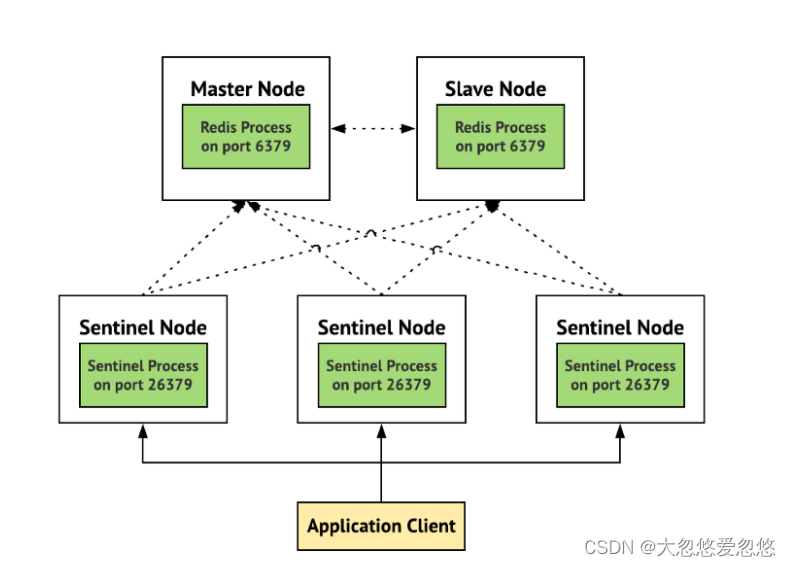
- redis sentinel mode is actually a combination of two modes, namely Master-Slave mode and sentinel mode. When the Master node is offline, the sentinel monitoring node will switch the Slave node to the Master node to ensure high service availability
- Sentinel mode adds sentinel monitoring node on the basis of Master-Slave mode. The simplest sentinel mode requires a redis Master node, a redis Slave, and three sentinel monitoring nodes.
It should be noted that when we use spring boot to connect the sentinel mode redis cluster, the sentinel node is connected, not the redis service instance node. Note the connection sequence in the figure above. Application Client is our application and sentinel node is sentinel node.
spring:
  redis:
    password: 123456
    timeout: 5000
    sentinel:     # Sentinel mode connection configuration
      master: mymaster    #master node name. redis sentinel mode will be configured during installation
      nodes: 192.168.1.201:26379,192.168.1.202:26379,192.168.1.203:26379      # Sentinel's IP:Port list
    lettuce
      pool:
        max-active: 8
        max-wait: -1
        max-idle: 8
        min-idle: 0
Master slave mode and sentry mode are recommended in reference articles
Redis6 - master-slave replication
redis cluster mode connection configuration
Redis Cluster is redis's distributed solution. It was officially launched in redis version 3.0, which effectively solves redis's distributed requirements. In case of single machine memory, concurrency, traffic and other bottlenecks, Cluster architecture can be used to achieve the purpose of load balancing. The primary problem of distributed Cluster is to map the whole data set to multiple nodes according to partition rules, that is, divide the data set to multiple nodes according to certain rules, and each node only saves a subset of the whole data set.
In the redis installation mode we introduced earlier, whether it is a single node or a master slave, its redis service saves a complete copy of the dataset. cluster mode is not. Its redis instance node only contains a subset of the complete dataset.
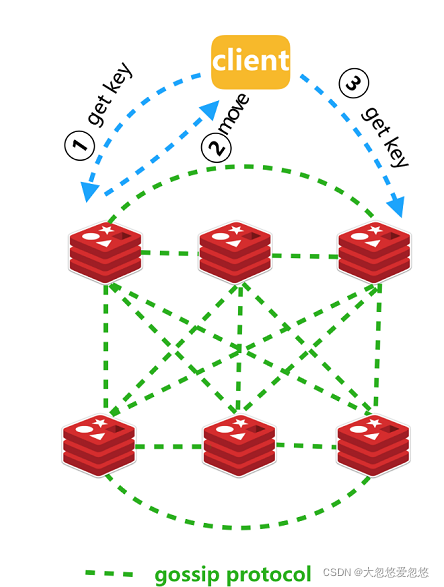
- When the program client accesses a redis node at will, it may find that the data it operates or the data location it should write is not on the current node.
- At this time, the currently accessed redis node will tell the client which node you should go to to access or write data
- Then, the client obtains the address of the target node, redirects to the address of the node, and accesses or writes data.
The following configuration is for redis cluster mode connection access.
spring:
  redis:
    password: 123456
    timeout: 5000
    database: 0
    cluster:     #Cluster mode configuration
      nodes: 192.168.1.11:6379,192.168.1.12:6379,192.168.1.13:6379,192.168.1.14:6379,192.168.1.15:6379,192.168.1.16:6379
      max-redirects: 3  # Maximum number of redirects
    lettuce:
      pool:
        max-active: 8
        max-wait: -1
        max-idle: 8
        min-idle: 0
Cluster cluster mode reference article recommendation
Using redisTemplate to manipulate data
redis template encapsulation class
RedisTemplate encapsulation makes it easier for us to operate redis data, which is much more convenient than directly using Jedis or lattice's java SDK. RedisTemplate is more general as an API template for java to operate redis database, and can operate all redis data types.
// Inject RedisTemplate, which is more general
@Resource
private RedisTemplate<String, Object> redisTemplate;

ValueOperations<String,Object> ValueOperations = redisTemplate.opsForValue();//Operation string
HashOperations<String, String, Object> hashOperations = redisTemplate.opsForHash();//Operation hash
ListOperations<String, Object> listOperations = redisTemplate.opsForList();//Operation list
SetOperations<String, Object> setOperations = redisTemplate.opsForSet();//Operation set
ZSetOperations<String, Object> zSetOperations = redisTemplate.opsForZSet();//Operation order set
ListOperations, ValueOperations, HashOperations, SetOperations, ZSetOperations, etc. all operate on proprietary data types, making them simpler to use.
     @Resource(name = "redisTemplate")
    private ValueOperations<String,Object> valueOperations;   //Accessing Java objects with redis string type (serialization and deserialization)

    @Resource(name = "redisTemplate")
    private HashOperations<String, String, Object> hashOperations; //Store Java objects in the hash type of redis

    @Resource(name = "redisTemplate")
    private ListOperations<String, Object> listOperations; //Store Java objects in redis's list type

    @Resource(name = "redisTemplate")
    private SetOperations<String, Object> setOperations;   //Store Java objects in redis set type

    @Resource(name = "redisTemplate")
    private ZSetOperations<String, Object> zSetOperations;  //Store Java objects in the zset type of redis
Basic data Java class
In order to facilitate the later writing of code to explain the use method of API, write test cases. We need to prepare the data object Person first. Pay attention to implementing the Serializable interface. Why do we have to implement this interface? We explain below.
@Data
public class Person implements Serializable {

  private static final long serialVersionUID = -8985545025228238754L;

  String id;
  String firstname;
  String lastname;
  Address address;   //Note that this is not the basic data type

  public Person(String firstname, String lastname) {
    this.firstname = firstname;
    this.lastname = lastname;
  }
}
Prepare data object Address
@Data
public class Address implements Serializable {

  private static final long serialVersionUID = -8985545025228238771L;

  String city;
  String country;

  public Address(String city, String country) {
    this.city = city;
    this.country = country;
  }
}
StringRedisTemplate
In addition to the RedisTemplate template template class, there is another template class called StringRedisTemplate. Both provide API s for operating redis databases.
@SpringBootTest
public class RedisConfigTest {

    @Resource
    private StringRedisTemplate stringRedisTemplate;   //A generic template class that holds data in String serialization

    @Resource
    private RedisTemplate<String, Person> redisTemplate;   //General template class that saves data in JDK binary mode by default

    @Test
    public void stringRedisTemplate() {
        Person person = new Person("kobe","byrant");
        person.setAddress(new Address("Los Angeles","U.S.A"));
        //Store data in redis database
        stringRedisTemplate.opsForValue().set("player:srt","kobe byrant",20, TimeUnit.SECONDS);
        redisTemplate.opsForValue().set("player:rt",person,20, TimeUnit.SECONDS);
    }
}
The difference between the two is
- The data types of operations are different. Take the List type as an example: RedisTemplate operation List < Object >, stringredistemplate operation List < string >
- The way of serializing data is different. RedisTemplate uses JdkSerializationRedisSerializer to store data. The data will be serialized into byte array first, and then stored in Redis database. StringRedisTemplate uses StringRedisSerializer
To answer the above question, why should the java data class of redis persistence implement the Serializable interface? Because the RedisTemplate uses the JdkSerializationRedisSerializer by default, that is, it uses the Java JDK default serialization method to store data. If the Serializable interface is not implemented, JDK serialization will report an error, which is the basic knowledge of java. If we can not use the default serialization mode of JDK, we do not need to implement this Serializable interface.
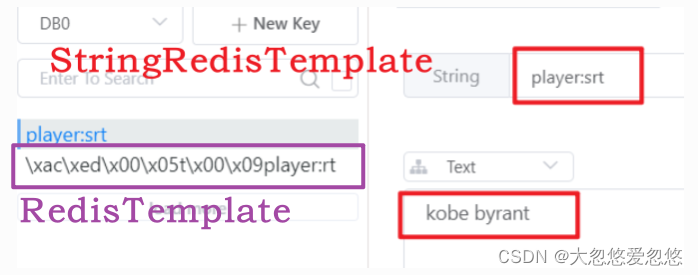
It should be noted that because the default serialization storage methods of RedisTemplate and StringRedisTemplate are different, the data stored by them cannot be common. That is, the data stored in RedisTemplate can only be retrieved with RedisTemplate, and the same is true for StringRedisTemplate.
Solve the problem of key value garbled code
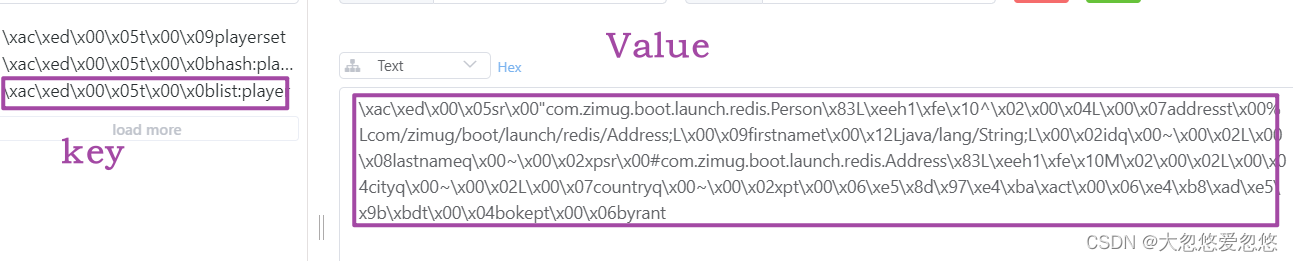
In fact, this is not random code in the strict sense, but the storage method after binary serialization of JDK. People can't understand it, but the program can understand it.
Is there a serialization result that people can understand and the program can understand? See the configuration class code below
- Serialize the key with StringRedisSerializer (string format)
- Use Jackson2JsonRedisSerializer to serialize value (JSON format)
@Configuration
public class RedisConfig {

    @Bean
    public RedisTemplate redisTemplate(RedisConnectionFactory redisConnectionFactory) {
        RedisTemplate redisTemplate = new RedisTemplate();
        redisTemplate.setConnectionFactory(redisConnectionFactory);
        Jackson2JsonRedisSerializer jackson2JsonRedisSerializer = new Jackson2JsonRedisSerializer(Object.class);

        ObjectMapper objectMapper = new ObjectMapper();
        objectMapper.setVisibility(PropertyAccessor.ALL, JsonAutoDetect.Visibility.ANY);
        objectMapper.enableDefaultTyping(ObjectMapper.DefaultTyping.NON_FINAL);

        jackson2JsonRedisSerializer.setObjectMapper(objectMapper);

        //Focus on these four lines of code
        redisTemplate.setKeySerializer(new StringRedisSerializer());
        redisTemplate.setValueSerializer(jackson2JsonRedisSerializer);
        redisTemplate.setHashKeySerializer(new StringRedisSerializer());
        redisTemplate.setHashValueSerializer(jackson2JsonRedisSerializer);

        redisTemplate.afterPropertiesSet();
        return redisTemplate;
    }
}
The crux of the garbled code problem lies in the serialization of objects: RedisTemplate uses JdkSerializationRedisSerializer (binary storage) by default, and StringRedisTemplate uses StringRedisSerializer (redis string format storage) by default.
Comparison of serialization methods:
- JdkSerializationRedisSerializer: use the serialization function provided by JDK. The advantage is that there is no need to provide type information (class) during deserialization, but the disadvantage is that the Serializable interface needs to be implemented. In addition, the result after serialization is very huge, about 5 times that of JSON format, which will consume a lot of memory of redis server. And it is stored in binary form, which natural people can't understand.
- Jackson2JsonRedisSerializer: serialize objects into JSON strings using the Jackson library. The advantages are high speed, the serialized string is short and concise, and there is no need to implement the Serializable interface. There seems to be no shortcomings.
- Natural people can understand the result of StringRedisSerializer serialization, but value can only be of String type, not Object.
Use redis template to access various data types
The following APIs for various data type operations have almost the same meaning as the redis command line api.
@SpringBootTest
public class RedisConfigTest2 {

    @Resource(name = "redisTemplate")
    private ValueOperations<String,Object> valueOperations;   //Accessing Java objects with redis string type (serialization and deserialization)

    @Resource(name = "redisTemplate")
    private HashOperations<String, String, Object> hashOperations; //Store Java objects in the hash type of redis

    @Resource(name = "redisTemplate")
    private ListOperations<String, Object> listOperations; //Store Java objects in redis's list type

    @Resource(name = "redisTemplate")
    private SetOperations<String, Object> setOperations;   //Store Java objects in redis set type

    @Resource(name = "redisTemplate")
    private ZSetOperations<String, Object> zSetOperations;  //Store Java objects in the zset type of redis


    @Test
    public void testValueObj() {
        Person person = new Person("boke","byrant");
        person.setAddress(new Address("Nanjing","China"));
        //Save the data (key,value) to the redis database. The data is valid for 20 seconds
        valueOperations.set("player:1",person,20, TimeUnit.SECONDS); //The data disappears after 20 seconds
        //Get the data according to the key
        Person getBack = (Person)valueOperations.get("player:1");
        System.out.println(getBack);
    }

    @Test
    public void testSetOperation() {
        Person person = new Person("kobe","byrant");
        Person person2 = new Person("curry","stephen");

        setOperations.add("playerset",person,person2);  //Add data item to Set
        //members get all records in Redis Set
        Set<Object> result = setOperations.members("playerset");
        System.out.println(result);  //An array containing kobe and curry
    }

    @Test
    public void HashOperations() {
        Person person = new Person("kobe","byrant");
        //Use the hash method to store object data (one attribute is stored one by one. The next section will teach you a simple method)
        hashOperations.put("hash:player","firstname",person.getFirstname());
        hashOperations.put("hash:player","lastname",person.getLastname());
        hashOperations.put("hash:player","address",person.getAddress());
        //Take out the attribute value of an object. Is there any way to take out the whole object at once? Yes, it will be introduced in the next section
        String firstName = (String)hashOperations.get("hash:player","firstname");
        System.out.println(firstName);   //kobe
    }

    @Test
    public void  ListOperations() {
        //Put data objects on the queue
        listOperations.leftPush("list:player",new Person("kobe","byrant"));
        listOperations.leftPush("list:player",new Person("Jordan","Mikel"));
        listOperations.leftPush("list:player",new Person("curry","stephen"));
        //Save from the left and then take from the left, so the data taken out is the curry put in later
        Person person = (Person) listOperations.leftPop("list:player");
        System.out.println(person); //curry object
    }
}
redisTemplate detailed usage reference article
RedisTemplate operates Redis. This article is enough (I)
redis native data type operations
Operating data using Redis Repository
After integrating spring boot starter data redis, there are three redis hash data operation modes for us to choose from
- One attribute, access to one attribute
- Accessing objects using Jackson2HashMapper
- Object operations using RedisRepository
One attribute, access to one attribute
@Test
public void HashOperations() {
    Person person = new Person("kobe","byrant");
    person.setAddress(new Address("Los Angeles","U.S.A"));
    //Use the hash method to store object data (one attribute is stored one by one. The next section will teach you a simple method)
    hashOperations.put("hash:player","firstname",person.getFirstname());
    hashOperations.put("hash:player","lastname",person.getLastname());
    hashOperations.put("hash:player","address",person.getAddress());

    String firstName = (String)hashOperations.get("hash:player","firstname");
    System.out.println(firstName);
}
The data storage structure in the redis database is as follows
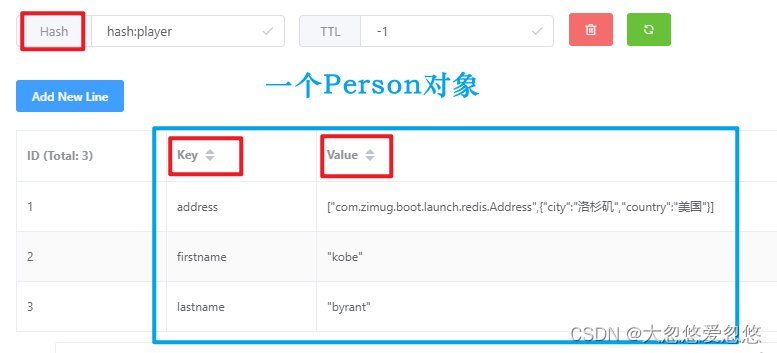
- A hash represents the data of an object
- An object has multiple attribute key and value key value pair data, and each group of key value pairs can be accessed separately
Accessing objects using Jackson2HashMapper
In the previous section, we set one attribute to another when operating hash objects. Is there any way to hash objects at one time?
We can use jacksonHashOperations and Jackson2HashMapper
import static org.junit.jupiter.api.Assertions.assertEquals;
@SpringBootTest
public class RedisConfigTest3 {
@Resource(name="redisTemplate")
private HashOperations<String, String, Object> jacksonHashOperations;
//Note the false here, which will be explained below
private HashMapper<Object, String, Object> jackson2HashMapper = new Jackson2HashMapper(false);
@Test
public void testHashPutAll(){
Person person = new Person("kobe","bryant");
person.setId("kobe");
person.setAddress(new Address("Los Angeles","U.S.A"));
//Put the object into the redis database in the form of hash
Map<String,Object> mappedHash = jackson2HashMapper.toHash(person);
jacksonHashOperations.putAll("player:" + person.getId(), mappedHash);
//Take the object out of the database
Map<String,Object> loadedHash = jacksonHashOperations.entries("player:" + person.getId());
Object map = jackson2HashMapper.fromHash(loadedHash);
Person getback = new ObjectMapper().convertValue(map,Person.class);
//Junit5, verify that the data put in is consistent with the data taken out
assertEquals(person.getFirstname(),getback.getFirstname());
}
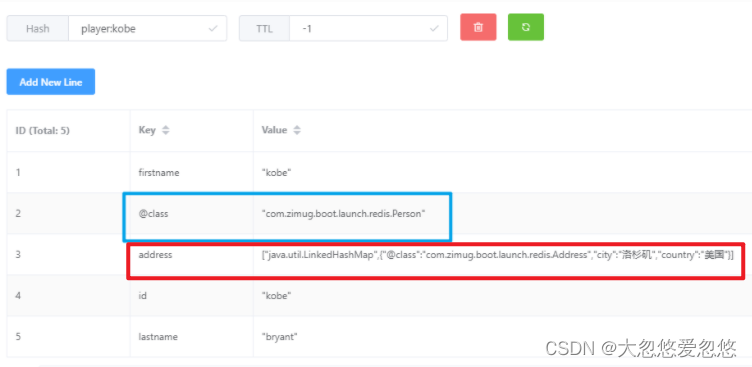
}In this way, you can access the hash data type of redis database at one time. It should be noted that when executing the above test case, Person and Address must have public parameterless construction methods, which are used when converting the map into Person or Address objects. If not, an error will be reported.
- When new Jackson2HashMapper(false), pay attention to the storage format of the attribute object Address (compare the two figures)
- When new Jackson2HashMapper(true), pay attention to the storage format of the attribute object Address (compare the two figures)
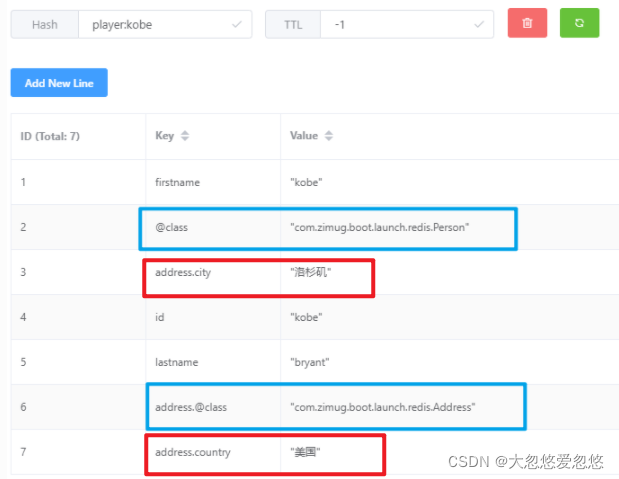
It should be noted that if you use this method to store hash data, you need to add a key value pair @ class to describe the java class corresponding to the hash data. It is used in deserialization to convert hash data into java objects.
Object operations using RedisRepository
The following is an introduction to redis data operations using RedisRepository. It can not only simply access data, but also do a lot of CURD operations. It is almost the same as the single table operation of relational database with JPA.
First, we need to add @ RedisHash annotation on the java entity class to be operated, and use @ id to specify the id for the entity class. Is it similar to JPA?
@RedisHash("people")   //Note the person here, which will be explained below
public class Person {
  @Id
  String id;

  //Other codes are the same as those in the previous section

}
Then write a person repository and inherit the CrudRepository. Is it similar to JPA?
//The second parameter of generic type is the data type of id
public interface PersonRepository extends CrudRepository<Person, String> {
// Inherit the CrudRepository to obtain basic CRUD operations
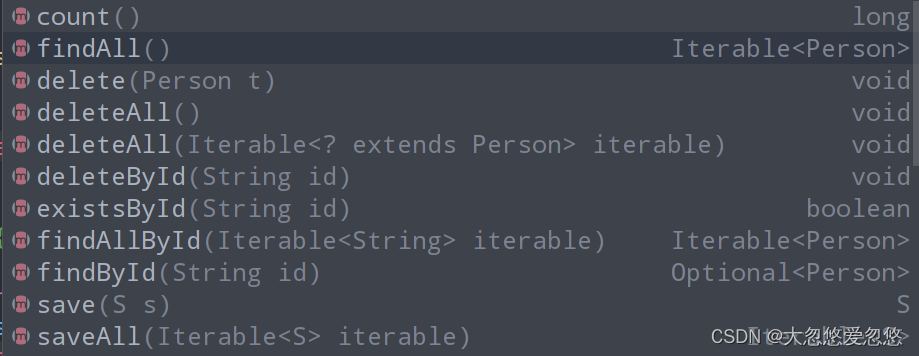
}CrudRepository provides us with the following methods by default. We can call them directly.
Add the annotation @ enablereredisrepositories on the project entry method (the author tested that this annotation does not need to be added in the relatively new version, which is supported by default), and then proceed The following tests
@SpringBootTest
public class RedisRepositoryTest {
@Resource
PersonRepository personRepository;
@Test
public void test(){
Person rand = new Person("zimug", "Han God");
rand.setAddress(new Address("Hangzhou", "China"));
personRepository.save(rand); //Save
Optional<Person> op = personRepository.findById(rand.getId()); //take
Person p2 = op.get();
personRepository.count(); //Count the number of persons
personRepository.delete(rand); //Delete person object rand
}
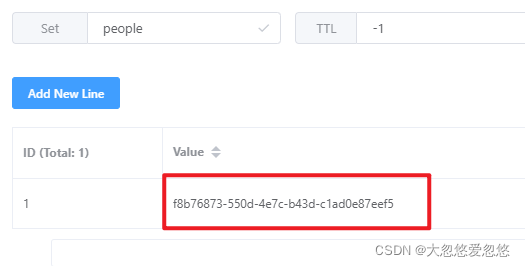
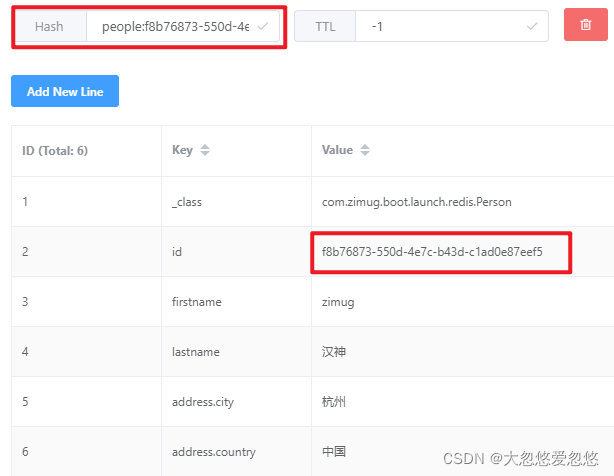
}Test results: it should be noted that RedisRepository actually uses two data types of redis when accessing object data
- The first type is set, which is used to save the id of each object (person) stored in redis. We can use this set to implement the operation of the person object collection class, for example: count() statistics to count the total number of persons saved in the redis database. Note: the key name of the set set in the following figure is obtained from the code above
@RedisHash("people") specifies.
- The second type is Hash, which is used to save Java objects. The id is generated by RedisRepository for us. This id is consistent with the id saved in the set set set in the figure above.
spring cache basic usage
Why cache
- Improve performance
In most cases, select query in relational database is the place with the biggest performance problem. On the one hand, select has many rich semantics such as join, group, order and like, which are very performance consuming; On the other hand, most applications read more and write less, which aggravates the problem of slow query.
Remote call in distributed system will also consume a lot of performance, because there is network overhead, which will reduce the overall response time. In order to save such performance overhead, it is very necessary to use cache when the business allows (not requiring too real-time data).
- Ease database pressure
When user requests increase, the pressure on the database will increase greatly. Caching can greatly reduce the pressure on the database.
Common cache operation process
The key point of using cache is to ensure the data consistency between cache and database. What should I do? The following figure shows the most commonly used cache operation mode to ensure data consistency.
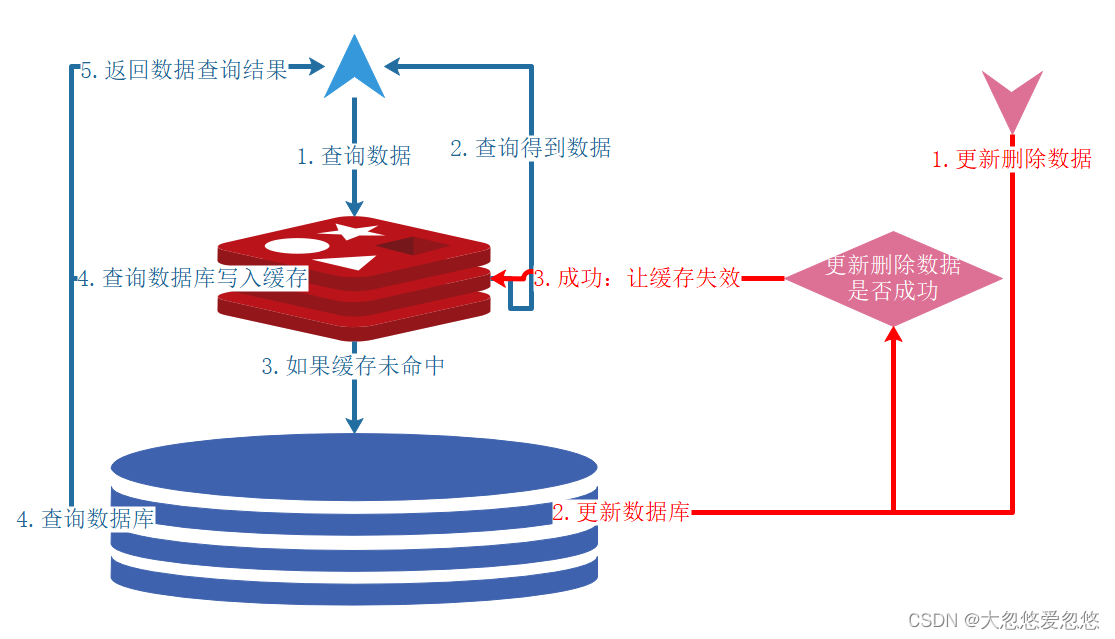
- Update write data: first save the data to the database, and then invalidate or update the cache. Cache operation failed, database transaction rolled back.
- Delete write data: delete data from the database and then from the cache. Cache operation failed, database transaction rolled back.
- Query read data Cache hit: first fetch data from the cache, and then return the result. Cache invalidation: the application first fetches data from the cache. If it does not get the data, it fetches the data from the database. After success, it puts the data into the cache.
If the above update, delete and query processes are all completed by programmers through coding
- Because of adding the cache layer, the amount of coding by programmers increases greatly
- The coupling of cache layer code and business code causes problems that are difficult to maintain.
Integrate Spring Cache
We can use spring cache to solve the above two problems. Spring cache operates the cache by annotation, which reduces the amount of code written by programmers to a certain extent. Annotations are easy to add and remove, not coupled with business code, and easy to maintain.
Step 1: add the jar dependency of Spring Boot to pom.xml:
<dependency>
   <groupId>org.springframework.boot</groupId>
   <artifactId>spring-boot-starter-cache</artifactId>
</dependency>
Step 2: add the entry startup class @ EnableCaching annotation to enable Caching. The example is as follows.
@EnableCaching
In Spring Boot, the @ EnableCaching annotation is used to automatically configure the appropriate cache manager. Spring Boot detects cache providers according to the following order, that is, Spring Cache supports the following caching frameworks:
- Generic
- JCache (JSR-107) (EhCache 3, Hazelcast, Infinispan, and others)
- EhCache 2.x
- Hazelcast
- Infinispan
- Couchbase
- Redis (because we introduced redis before, we use redis as the cache)
- Caffeine
- Simple
Implement a simple example on the ArticleController class
The following example accesses the database for the first time (the breakpoint on the code breaks), and the cache for the second time (without the function code). You can try it yourself.
@Cacheable(value="article")
@GetMapping( "/article/{id}")
public @ResponseBody  AjaxResponse getArticle(@PathVariable Long id) {
Using redis caching, the cached objects (function return values) have several important points to pay attention to:
- A parameterless constructor must be implemented
- You need to implement the Serializable interface and define the serialVersionUID (because the cache needs to be serialized and deserialized using JDK).
Change the serialization method of Redis cache
It is very unfriendly to let the cache use JDK's default serialization and deserialization. We can completely modify it to use JSON serialization and deserialization, which is more readable, smaller and faster
@Configuration
public class RedisConfig {
   //This function is the content of the previous section
   @Bean
   public RedisTemplate redisTemplate(RedisConnectionFactory redisConnectionFactory) {
       RedisTemplate redisTemplate = new RedisTemplate();
       redisTemplate.setConnectionFactory(redisConnectionFactory);
       Jackson2JsonRedisSerializer jackson2JsonRedisSerializer = new Jackson2JsonRedisSerializer(Object.class);

       ObjectMapper objectMapper = new ObjectMapper();
       objectMapper.setVisibility(PropertyAccessor.ALL, JsonAutoDetect.Visibility.ANY);
       objectMapper.enableDefaultTyping(ObjectMapper.DefaultTyping.NON_FINAL);

       jackson2JsonRedisSerializer.setObjectMapper(objectMapper);

       //Focus on these four lines of code
       redisTemplate.setKeySerializer(new StringRedisSerializer());
       redisTemplate.setValueSerializer(jackson2JsonRedisSerializer);
       redisTemplate.setHashKeySerializer(new StringRedisSerializer());
       redisTemplate.setHashValueSerializer(jackson2JsonRedisSerializer);

       redisTemplate.afterPropertiesSet();
       return redisTemplate;
   }

    //This section focuses on configuration. redisTemplate.getValueSerializer() is used for Redis cache serialization
   //JDK default serialization method is no longer used
   @Bean
   public RedisCacheManager redisCacheManager(RedisTemplate redisTemplate) {
       RedisCacheWriter redisCacheWriter = RedisCacheWriter.nonLockingRedisCacheWriter(redisTemplate.getConnectionFactory());
       RedisCacheConfiguration redisCacheConfiguration = RedisCacheConfiguration.defaultCacheConfig()
               .serializeValuesWith(RedisSerializationContext.SerializationPair.fromSerializer(redisTemplate.getValueSerializer()));
       return new RedisCacheManager(redisCacheWriter, redisCacheConfiguration);
   }
}
Details the use of cached declarative annotations
Cache annotation - add, delete, modify query
You must understand this diagram very thoroughly before you can make good use of cache annotations.

- @Cacheable: for query method configuration, the results can be cached according to the request parameters of the query method (complete the caching process of the blue line arrow in the figure above)
- @CacheEvict: delete the cache before or after the annotated method is executed (red line arrow 3: invalidate and delete the cache)
- @CachePut: call the annotated method to update the cache of the returned results (red line arrow 3: update the cache after updating the database)
- @Caching: you can combine the above three annotations
Query cache for a single object
Still take the ArtivleServiceImpl we have been using before as an example (including addition, deletion, modification and query methods) to add cache annotations.
The method annotated by @ Cacheable executes the method body when it is first requested, and puts the return value of the method into the cache. In the second request, since the data is already contained in the cache, the method body of the annotated method will not be executed and the data will be obtained directly from the cache. For the caching operation of the query process, to meet the operation process indicated by the blue arrow line in the figure above, all the operation processes can be realized by adding a @ Cacheable.
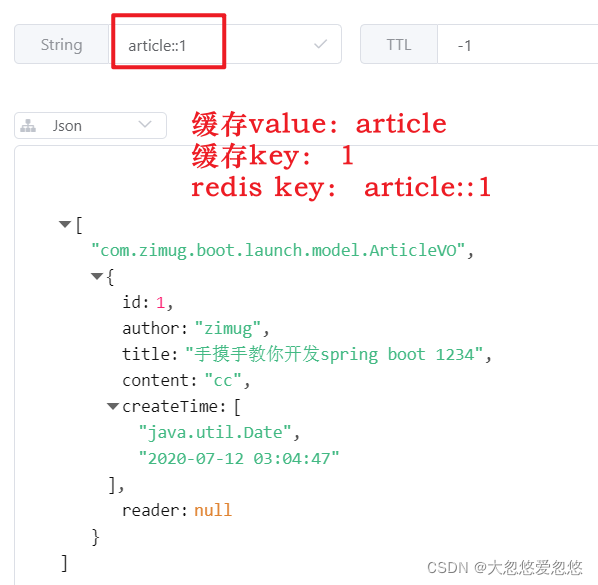
public static final String CACHE_OBJECT = "article";  //Cache name

@Cacheable(value = CACHE_OBJECT,key = "#id ") / / the value and key here can be understood by referring to the following screenshot of redis database
public ArticleVO getArticle(Long id) {
  return dozerMapper.map(articleMapper.selectById(id),ArticleVO.class);
}
It should be noted that the key of the cache annotation is a SPEL expression, "#id" means that the value of the parameter ID of the function is obtained as the key value of the cache. If the parameter id=1, the key of the redis cache is "article::1". The following figure is a screenshot of this cache record in the redis cache database:
Query cache for collection objects
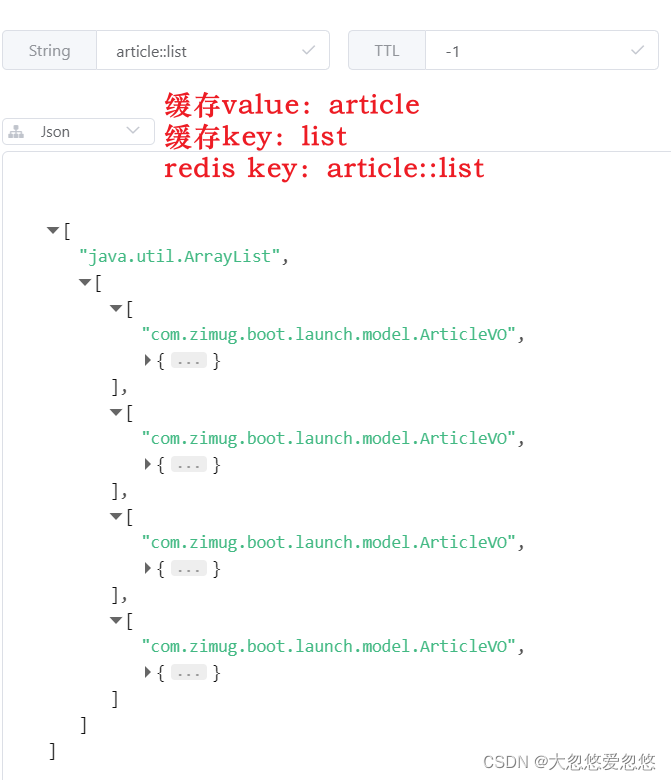
Note that object and list < Object > are two different kinds of business data, so the corresponding cache is also two kinds of cache. Note that in the following, the key of cache annotation is string list, because cache annotation uses SPEL expression by default. If we want to use string, we need to add slash.
public static final String CACHE_LIST_KEY  = "\"list\"";

@Cacheable(value = CACHE_OBJECT,key = CACHE_LIST_KEY)
public List<ArticleVO> getAll() {
  List<Article> articles = articleMapper.selectList(null);
  return DozerUtils.mapList(articles,ArticleVO.class);
}
For the caching operation of the query process, to meet the operation process indicated by the blue arrow line in the figure above, all the operation processes can be realized by adding a @ Cacheable. At present, the article table of MySQL database has 4 data, so the cache result is an array containing 4 article elements
Delete a single object and its cache
As shown in the following code, the cache with redis key "article::1" will be deleted after the function is successfully executed (assuming that the record with id=1 is deleted).
@Override
@Caching(evict = {
        @CacheEvict(value = CACHE_OBJECT,key = CACHE_LIST_KEY),   //Delete List collection cache
        @CacheEvict(value = CACHE_OBJECT,key = "#id ") / / delete a single record cache
})
public void deleteArticle(Long id) {
  articleMapper.deleteById(id);
}- Execute the method to transfer parameter id=1. First execute the method to delete MySQL data; After success, the cache with key "article::1" cached in redis in 1.1. Query cache of single object will also be deleted.
- Deleting any artifice record will cause inconsistency between the article::list cache and the MySQL database records, so you need to delete the article::list collection cache as well.
- Because Java syntax does not allow two @ cacheevicts with the same annotation on the same method, we use the @ Caching annotation to package the two @ cacheevicts.
Add an object
- Add redis cache when adding MySQL data? No, the cache is written back to the cache when the query results are obtained, and the cache is not added when the query results are added.
- Delete the cache when adding "? Yes, because we cache the list set. Once a record is added, there are 4 records in the original MySQL database. After adding, there are 5 records in the MySQL database. There are still 4 records in the redis cache database cache result" article::list ". The data in the redis cache is inconsistent with the data in the MySQL database, so" article::list "is used "Cache deletion.
@CacheEvict(value = CACHE_OBJECT,key = CACHE_LIST_KEY)   //Delete List collection cache
public void saveArticle(ArticleVO article) {
  Article articlePO = dozerMapper.map(article, Article.class);
  articleMapper.insert(articlePO);
}
After the above method is executed, an article record is added to MySQL database; after success, the cache with the key "article::list" cached in 1.2. Query cache of collection objects in redis will also be deleted.
Update an object
Note that when updating objects, we add two cache annotations to this method.
- The following CachePut annotation is used to put the returned value of the method into the cache after successful execution. key ="#article.getId()" indicates that the id attribute of the parameter article is used as the cache key.
- The following CacheEvict annotation is used to delete the cache of "article::list". Because the data of a record is updated, it means that the original cached list collection data is inconsistent with the data in MySQL database, so it is deleted. The cached data can not be inconsistent with the cached relational database data at the back end.
@CachePut(value = CACHE_OBJECT,key = "#article.getId()")
@CacheEvict(value = CACHE_OBJECT,key = CACHE_LIST_KEY)
public ArticleVO updateArticle(ArticleVO article) {
  Article articlePO = dozerMapper.map(article,Article.class);
  articleMapper.updateById(articlePO);
  return article;  //In order to ensure consistency, it is best to check the update results returned from the database
}
The method is completed if the ID of the ArticleVO parameter object is = 1
- The record with id=1 in MySQL database will be updated
- The record of "article::1" in redis database will also be updated (CachePut)
- The record of "article::list" in redis database will be deleted (CacheEvict)
Update an object (another method)
It should be noted that if CachePut annotation is used on the update method, the method must have a return value after data update, because the return value is the cache value.
A simpler approach is to delete the inconsistent cache directly instead of updating the cache.
This operation has lower requirements for programmers and is not easy to make mistakes.
The cached data may not exist, but it cannot be inconsistent with the relational database data cached at the back end.
@Override
@Caching(evict = {
        @CacheEvict(value = CACHE_OBJECT,key = CACHE_LIST_KEY),   //Delete List collection cache
        @CacheEvict(value = CACHE_OBJECT,key = "#article.getId() ") / / delete a single record cache
})
public void updateArticle(ArticleVO article) {
  Article articlePO = dozerMapper.map(article,Article.class);
  articleMapper.updateById(articlePO);
}
Method does not need to have a return value. Execute the method if the ID of the ArticleVO parameter object is = 1
- The record with id=1 in MySQL database will be updated
- The record of "article::1" in redis database will be deleted
- The record of "article::list" in redis database will be deleted
Cache annotation configuration description
@Cacheable is usually applied to query methods for reading data: first read from the cache, if there is no method called to obtain data, and then add the data query results to the cache. If data is found in the cache, the annotated method will not be executed.
@CachePut is usually used to modify the method configuration. It can cache the annotated function return value according to the method's request parameters. Unlike @ Cacheable, it will trigger the call of the annotated method every time.
@CachEvict is usually applied to delete method configuration. It can delete the cache according to certain conditions. One or more caches can be cleared.
In the actual production environment, there is no fixed rule, which annotation must be used in which method, and @ CachEvict annotation is usually used in the update method. For the data cache strategy, make a reasonable cache strategy plan according to the use of resources. Ensure the data consistency between the cache and the business database. Do a good job of testing. For the correct use of the cache, testing is the key King!
Writing and value of cache key
Spring cache uses redis to summarize the cache considerations
Default cached data type
In the default configuration, spring cache caches the serialized data of the trial jdk
We usually cache Json strings because using Json can interact across languages and platforms
So we need to modify its default configuration, including ttl (expiration time), storage format, etc
Principle combing
Process Description:

 CacheAutoConfiguration  =>  RedisCacheConfiguration =>
 Automatically configured RedisCacheManager =>  Initialize all caches =>
 Each cache determines what configuration to use=>
 =>If RredisCacheConfiguration Use the existing configuration if there is one, and use the default configuration if there is no one( CacheProperties)
 =>If you want to change the configuration of the cache, just put one in the container RredisCacheConfiguration that will do
 =>Will be applied to the current RedisCacheManager In all cache partitions managed
Create configuration class
Note: some configurations of the original configuration file should take effect
Enable the function of property binding configuration @EnableConfigurationProperties(CacheProperties.class)
@EnableConfigurationProperties(CacheProperties.class)//Enable the function of property binding configuration
@Configuration //Configuration class
@EnableCaching //Enable cache function
public class MyCacheConfig {
// First, take it from the container
// @Autowired
// CacheProperties cacheProperties;
/**
* Many things in the configuration file are useless
* 1,The original configuration class bound to the configuration file looks like this
* @ConfigurationProperties(
* prefix = "spring.cache"
* )
* public class CacheProperties
*
* 2,Let him take effect
* @EnableConfigurationProperties(CacheProperties.class)//Enable the function of property binding configuration
*
*/
//Second, because the container is injected, spring will find the parameter properties in the container itself (CacheProperties cacheProperties)
@Bean
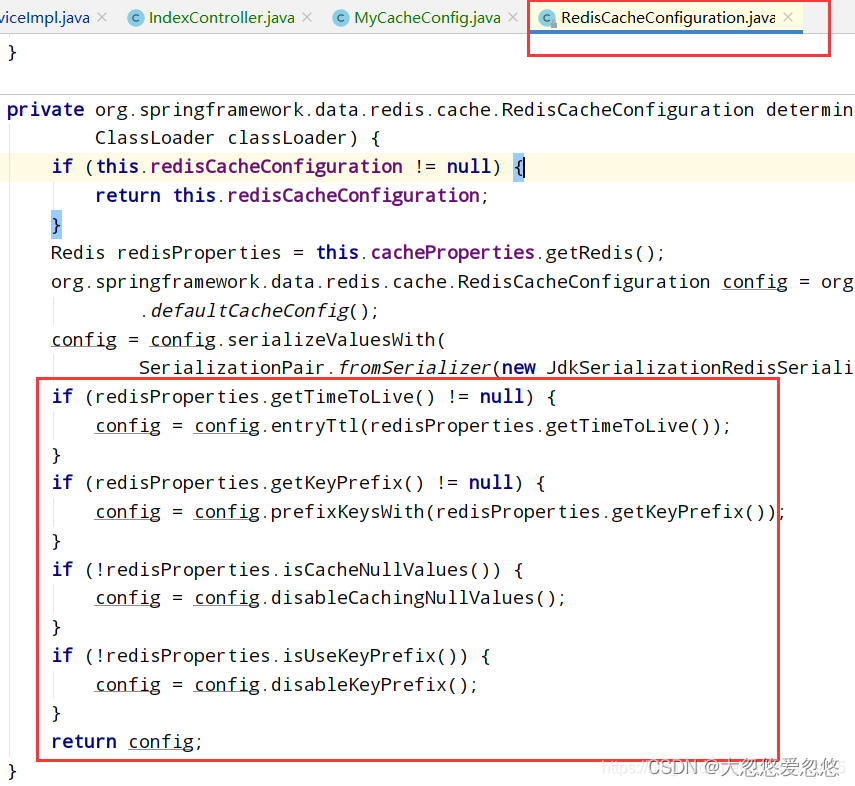
RedisCacheConfiguration redisCacheConfiguration(CacheProperties cacheProperties){
RedisCacheConfiguration config = RedisCacheConfiguration.defaultCacheConfig();
// config=config.entryTtl();
config= config.serializeKeysWith(RedisSerializationContext.SerializationPair.fromSerializer(new StringRedisSerializer()));
/**
* GenericFastJsonRedisSerializer fastjson Familial
* GenericJackson2JsonRedisSerializer spring Its own package org.springframework.data.redis.serializer;
*/
//Retrieve the redis configuration from all configurations
CacheProperties.Redis redisProperties = cacheProperties.getRedis();
//Make all configurations in the configuration file effective (copy RedisCacheConfiguration from the source code)
if (redisProperties.getTimeToLive() != null) {
config = config.entryTtl(redisProperties.getTimeToLive());
}
if (redisProperties.getKeyPrefix() != null) {
config = config.prefixKeysWith(redisProperties.getKeyPrefix());
}
if (!redisProperties.isCacheNullValues()) {
config = config.disableCachingNullValues();
}
if (!redisProperties.isUseKeyPrefix()) {
config = config.disableKeyPrefix();
}
//Specify serialization
config= config.serializeValuesWith(RedisSerializationContext.SerializationPair.fromSerializer(new GenericFastJsonRedisSerializer()));
return config;
}
}Configuration file (application.properties)
#Type specifies redis
spring.cache.type=redis

#One hour in milliseconds
spring.cache.redis.time-to-live=3600000
#A prefix is used for the construction of the cache. If a prefix is specified, we specify it. If not, the cache name is used as the prefix by default. Generally, it is not specified
#spring.cache.redis.key-prefix=CACHE_
#Specifies whether to use a prefix
spring.cache.redis.use-key-prefix=true
#Whether to cache null values to prevent cache penetration
spring.cache.redis.cache-null-values=true
@Cacheable
The results representing the current method need to be cached
If there are two kinds of cache, the method does not need to be called
If there is no in the cache, the method will be called and the result of the method will be put into the cache
@Cacheable(value = {"category"})
Each data to be cached specifies the name to be cached.[Cached partitions(It is recommended to divide by business type)]
Default behavior
1,There are methods in the cache. You don't need to call them
2,key Generated by default, the name of the cache::SimpleKey [](Self generated key value)
3,cache value The default value is jdk Serialization mechanism to save the serialized data to redis
4,default ttl Time is -1 Represents never expires
Custom actions:
1),Specifies the used by the generated cache key: use key Property to receive a spEl expression
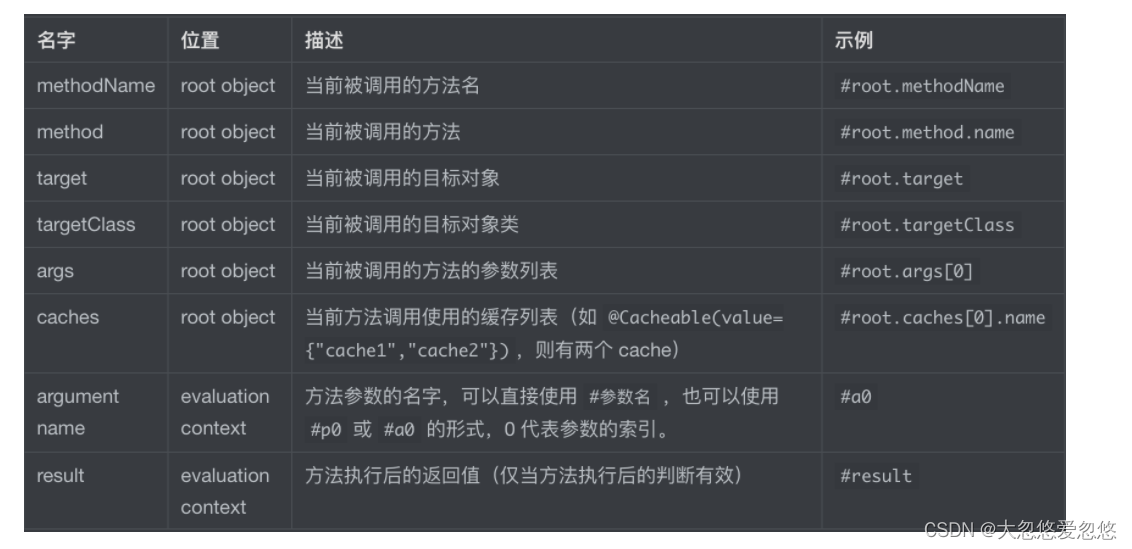
spEl Syntax description==>Official expression address Description: https://docs.spring.io/spring-framework/docs/current/reference/html/integration.html#cache-spel-context
2),Specify the lifetime of cached data: Modify in configuration file ttl
3),Save data as json (because json Cross platform (cross language interaction)
Source class
CacheAutoConfiguration
RedisCacheConfiguration