React is a library developed, open-source and maintained by facebook, and the meaning of react is to use JavaScript to realize user interaction - a JavaScript library for building user interfaces.
Therefore, in essence, React is a library, and its role is to use JavaScript to realize user interaction.
Its core idea is to use JavaScript to realize HTML, CSS and JavaScript, and realize separate functions through the concept of componentization.
What is JSX
For an introduction to JSX, the official website also includes: Introducing JSX And there are also Chinese translations. You can also go to the official website if you need. Although it feels like a rollover
JSX is a JavaScript syntax extension (formerly called syntax sugar) provided by the React team. Its writing method is somewhat similar to HTML, but it should be noted that JSX is not HTML. If JSX is used directly without babel compilation, there will only be a large number of syntax errors. The simplest way to write JSX is as follows:
const element = <h1>Hello World</h1>;

ReactDOM.render(element, document.getElementById('root'));
The rendering effect is as follows:

Of course, I directly created a new project with NPX create react app app, which rewrites the source code in the project to have such an effect - the source code without babel compilation cannot be run directly in the browser.
In addition, JSX can also embed other variables. The specific usage is as follows:
const name = 'John Wick';
const element = <h1>Hello, {name}</h1>;

ReactDOM.render(element, document.getElementById('root'));
The effects are as follows:

It is not necessary to use JSX syntax sugar. You can also use JavaScript to write directly, but the implementation and readability will be much lower. The following is a set of comparisons. The native JavaScript is obtained through babel translation:
-
Only 1 h1 tag
The implementation using JSX is as follows:
const element = <h1>Hello World</h1>;

ReactDOM.render(element, document.getElementById('root'));
The implementation using native JavaScript is as follows:
var element = /*#__PURE__*/ React.createElement('h1', null, 'Hello World'); ReactDOM.render(element, document.getElementById('root')); -
1 variable + 1 h1 label
The implementation using JSX is as follows:
const name = 'John Wick';
const element = <h1>Hello, {name}</h1>;

ReactDOM.render(element, document.getElementById('root'));
The implementation using native JavaScript is as follows:
var name = 'John Wick'; var element = /*#__PURE__*/ React.createElement('h1', null, 'Hello, ', name); ReactDOM.render(element, document.getElementById('root')); -
Nest another component
The implementation using JSX is as follows:
const username = 'John Wick';

const element = (
  <h1>
    Hello, <span>{username}</span>
  </h1>
);

ReactDOM.render(element, document.getElementById('root'));
The implementation using native JavaScript is as follows:
var username = 'John Wick';
var element = /*#__PURE__*/ React.createElement(
  'h1',
  null,
  'Hello, ',
  /*#__PURE__*/ React.createElement('span', null, username)
);
ReactDOM.render(element, document.getElementById('root'));
You can see that the code written with JSX has clearer logic and less code. In addition, front-end projects are always compiled before entering the production environment, which is why JSX is recommended for development.
Let's take a look at the specific usage of JSX.
expression
JSX itself is quite powerful. As can be seen from the above example, JSX can embed an expression. At the same time, JSX can also be used as an expression.
JSX embedded expression
This is the example in case 2 and case 3:
const name = 'John Wick';
const element = <h1>Hello, {name}</h1>;
As you can see, the expression / expression name is embedded in JSX. Because of this feature, JSX can also embed some special expressions.
Using functions in JSX
In many cases, JSX can make simple function calls in {} body, such as array operations:
const fruits = [
  {
    id: 1,
    name: 'apple',
    price: 4,
  },
  {
    id: 2,
    name: 'banana',
    price: 2,
  },
];

const getFruitList = (fruits) => {
  return (
    <ul>
      {fruits.map((fruit) => (
        <li key={id}>
          <p>name: {fruit.name}</p>
          <p>price: {fruit.price}</p>
        </li>
      ))}
    </ul>
  );
};

const fruitList = getFruitList(fruits);
The rendered results are as follows:

JSX as expression
Similarly, JSX can also be assigned to objects as a value, such as:
const component = <ExampleComponent />;

ReactDOM.render(component, document.getElementById('root'));
This is a common usage.
Returns JSX as a ternary representation
This is also a common way to write. Sometimes, you can judge whether to return a component according to conditions:
const child = condition ? <ExampleComponent /> : null;

return (
  <SomeComponent>
    <OtherComponent />
    {child}
  </SomeComponent>
);
Generally speaking, this component will be embedded into other components for rendering.
JSX and objects
The reason why the syntax of JSX is so dynamic is essentially because JSX will be converted into an object by babel after compilation.
As shown in case 1:
const element = <h1>Hello World</h1>;
var element = /*#__PURE__*/ React.createElement('h1', null, 'Hello World');
The two pieces of code are essentially the same. The specific content of createElement () will not be repeated, but all it does is return an object. There is a simplified version of the result returned by createElement() on the official website. You can probably know that it receives some parameters and saves the result in the form of an object:
// Note: this structure is simplified
const element = {
  type: 'h1',
  // Object properties
  props: {
    // Class name, which will be explained later
    className: 'greeting',
    // Sub attribute
    children: 'Hello, world!',
  },
};
attribute
JSX attributes are divided into two types. One is native HTML attributes - note that in order to prevent keyword conflicts, some case will change, and the other is custom attributes, which can be obtained in child components through props to complete the communication between parent and child components.
Since the features of components have not been fully described here, we will take the basic HTML attributes as an example:
const username = 'John Wick';

const element = (
  <h1 className="h1-heading">
    Hello, <span className="username">{username}</span> <br />
    <img
      src="https://img-blog.csdnimg.cn/20210706102601893.png"
      style={{ width: '350px' }}
    />
  </h1>
);

ReactDOM.render(element, document.getElementById('root'));
The effect after compilation is as follows:

It is worth noting that in order to prevent keyword conflicts, the class keyword is used to define the class name in HTML and the className is used in JSX. It can also be seen from this that the hump naming method of traditional JavaScript is recommended in the process of writing React code.
In addition, onClick and onChange events can also be passed to JSX code as attributes. This will be explained in detail in the component part later. Just know here.
Another 2: style can also be used as an attribute. In this case, the style written is an inline style.
Subcomponents
The nesting of JSX has formed parent-child components. Take the above code as an example:
const element = (
  <h1 className="h1-heading">
    Hello, <span className="username">{username}</span> <br />
    <img
      src="https://img-blog.csdnimg.cn/20210706102601893.png"
      style={{ width: '350px' }}
    />
  </h1>
);
In this example, h1 is the parent component and img and span are the child components. Note that if there are no additional subcomponents in the tag, such as img components, you can use self closing tags.
Injection attack
This is also a feature discovered when browsing the official documents again at the beginning of the year. It turns out that JSX native can avoid XSS (cross site scripting) attacks. XSS refers to a malicious program that injects malicious instructions into HTML, causing users to load and execute attacks. Take the following code as an example. If this code is used as the information entered by the user and the front end does not take any precautions, the website will be attacked:
const userinput =
  "<a href='https://www.baibu. Com 'onclick = {alert ('attacked')} > hyperlink < / a > ";
As shown below, the HTML here simply implements an input, and then another node will render user information:
<input type="text" />
<div class="inputValue"></div>

<script>
  const input = document.querySelector('input');
  const inputValue = document.querySelector('.inputValue');
  input.addEventListener('change', () => {
    inputValue.innerHTML = input.value;
  });
</script>
When the above hyperlink code is put into the input box, the page becomes like this:

Once the user clicks the hyperlink, it will trigger the attack:

JSX will translate the code, and the same code will be put into JSX to show that the original code is still rendered:
const userinput =
  "<a href='https://www.baidu. Com 'onclick = {alert ('attacked')} > hyperlink < / a > ";

const element = <input type="text" value={userinput} />;
const inputValue = <div>{userinput}</div>;

ReactDOM.render(
  <Fragment>
    {element}
    {inputValue}
  </Fragment>,
  document.getElementById('root')
);
Display effect:
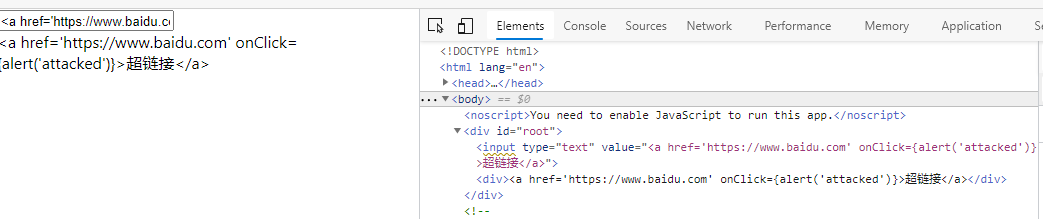
This is because JSX will translate all the input information into strings and then render it to the page, which can effectively avoid XSS attacks.