React high level guidance: Context context & component combination & render props
preface
Today is also to explain the advanced application skills of React. The content may involve the use of some special API s, or the special usage of React components and props. It can be regarded as a design pattern, an exclusive design pattern in React! (for those who are new to React, please move on.) Introduction to React: comprehensive analysis of core features)
The main topics to be explained in this article are
- Use of Context
- Component Composition
- Render props function render component
At the same time, it will cooperate with some use scenarios and sample code. Let's start right away
text
1. Context
1.1 Motivation & scenario
Before we start, let's talk about why we need Context.
In the previous article: React advanced guidance: upgrade from state to high-level component (HOC) , we mentioned that when multiple leaf nodes need to share the state, they can promote the shared state to the nearest common parent component, as shown in the figure below
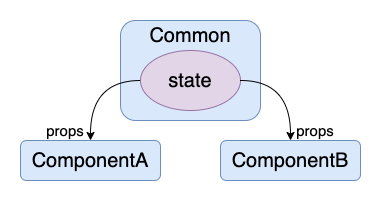
At that time, when our component nesting logic was very complex and the component rendering tree became higher and higher, it was more and more distant to find the nearest common parent component
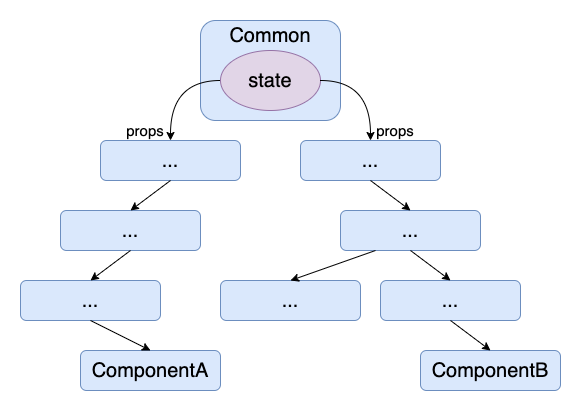
At the same time, the state passed from the parent component needs to be passed down layer by layer according to the component nesting relationship. For the intermediate state independent components, there are not only a lot of props that are not related to themselves to be processed, but also a kind of destruction to the logic of the intermediate components.
At this time, we imagine whether there is a way to penetrate the intermediate components and directly transfer the state to the target components
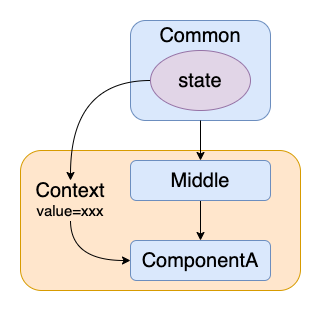
This is the original motivation of the Context object.
Note: however, it is not advisable to abuse Context just to avoid simple props delivery, but let's take it as a goal for the moment. Later, we will explain why it is not advisable to simplify props delivery only
Let's take a look at the different ways and techniques of using Context one by one
1.2 basic usage: Provider + Consumer
First, let's introduce the basic usage of Provider + Consumer
1.2.1 define global data objects
First, we define a data to be shared. When Context is selected, it may be a global shared data object
- src/context/themes.js
const themes = {
  light: {
    foreground: '#000000',
    background: '#eeeeee',
  },
  dark: {
    foreground: '#ffffff',
    background: '#222222',
  },
}

export default themes
We define a global layout theme, which is divided into foreground and background colors of general mode and dark mode
1.2.2 React.createContext creates a context object ThemeContext
The next step is to use react The createcontext API creates our context object
- src/context/ThemeContext.js
import React from 'react'
import themes from './themes'

export const ThemeContext = React.createContext(themes.dark)
React. The parameter of createcontext (defaultValue) passes in the default value. When our Provider component does not define data, it will use the default value passed in when creating the context object at the beginning
Let's see what the so-called Provider is
1.2.3 use themecontext Provider definition context
We have defined the context object and global data, so how do we add this global input to our component tree? The answer is through context Provider is a special component. Taking it as the root will create a local component tree with global data, that is, from context Providers will be able to directly obtain this global data object in some way
- src/context/Version1.jsx
class Version1 extends Component {
  constructor(props) {
    super(props)
    this.state = {
      theme: themes.light,
    }
    this.toggleTheme = this.toggleTheme.bind(this)
  }

  toggleTheme() {
    this.setState({
      theme:
        this.state.theme === themes.light
          ? themes.dark
          : themes.light,
    })
  }

  render() {
    return (
      <div>
        <ThemeContext.Provider value={this.state.theme}>
          <ToolBar changeTheme={this.toggleTheme} />
        </ThemeContext.Provider>
      </div>
    )
  }
}
We can see that the Version1 component first puts the theme data into the component state, and then uses themecontext when rendering Provider special component to create a local component tree with context, and pass in the global data through the value attribute.
As long as themecontext is next Components at any level under the provider can directly obtain the global data object passed in from value in some way
1.2.4 using themecontext Consumer gets global data
In the first example, we first show the most basic one: using context Consumer to obtain local global data objects. We use the ToolBar component as an intermediate component, indicating that the global data (theme) directly skips the ToolBar and is directly transferred from the Version1 component to the ThemedButton component for use
- src/context/Version1.jsx
function ToolBar(props) {
  return (
    <ThemedButton onClick={props.changeTheme}>
      Change theme
    </ThemedButton>
  )
}
// Using Consumer
class ThemedButton extends Component {
  render() {
    const { children, onClick } = this.props
    return (
      <>
        {/* directly Usage Component */}
        <ThemeContext.Consumer>
          {(theme) => (
            <button
              onClick={onClick}
              style={{
                backgroundColor: theme.background,
                color: theme.foreground,
              }}
            >
              {children}
            </button>
          )}
        </ThemeContext.Consumer>
      </>
    )
  }
}
We can see that in the ThemedButton component, we use themecontext Consumer, a special component, can obtain themecontext The global object passed from the provider.
The specific way to receive data is to define a sub Component of Render Props (what is Render Props will be explained later), that is, define a function labeled value = > Component as a sub Component, and the value at this time is passed into themecontext at that time The global data object of the value attribute of the provider Component, and we can render the internal Component component according to the global data object value
The final effect is as follows
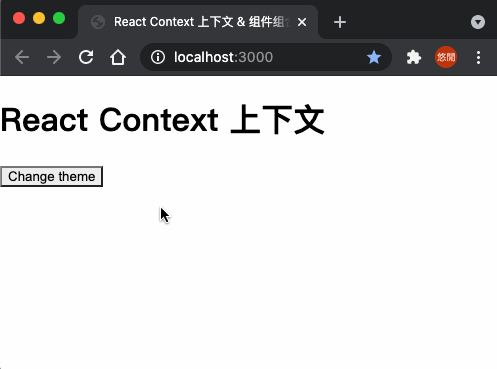
We can see that by clicking the button to call the toggleTheme just passed through the props stream, we can change the global theme data and then change the style of the button.
1.2.5 any component can be used as a consumer
The most basic context Although the usage of consumer is trivial, its function is quite comprehensive. Since the sub component rendered according to the global data value is a JSX, it can be either a class component or a function component
- Consumer class components
// Using Consumer
class ThemedButton extends Component {
  render() {
    const { children, onClick } = this.props
    return (
      <>
        {/* Class Component */}
        <ThemeContext.Consumer>
          {(theme) => {
            const props = {
              children,
              onClick,
              style: {
                backgroundColor: theme.background,
                color: theme.foreground,
              },
            }
            return <StyledButton {...props} />
          }}
        </ThemeContext.Consumer>
      </>
    )
  }
}
class StyledButton extends Component {
  render() {
    console.log('styled button 1')
    const { children, ...props } = this.props
    return <button {...props}>{children}</button>
  }
}
- Consumer is a function component
// Using Consumer
class ThemedButton extends Component {
  render() {
    const { children, onClick } = this.props
    return (
      <>
        {/* Function Component */}
        <ThemeContext.Consumer>
          {(theme) => {
            const props = {
              children,
              onClick,
              style: {
                backgroundColor: theme.background,
                color: theme.foreground,
              },
            }
            return <StyledButton2 {...props} />
          }}
        </ThemeContext.Consumer>
      </>
    )
  }
}
function StyledButton2(props) {
  console.log('styled button 2')
  const { children, ...rest } = props
  return <button {...rest}>{children}</button>
}
1.3 using contextType to simplify class components
However, use context The method of consumer is actually a little troublesome, and it is still a little huge to write, so static is also provided for class components How contexttype works
- src/context/Version2.jsx
import React, { Component } from 'react'
import { ThemeContext } from './ThemeContext'
import themes from './themes'

class ThemedButton extends Component {
  // Use contextType
  static contextType = ThemeContext

  render() {
    const theme = this.context
    const { children, onClick } = this.props
    return (
      <button
        onClick={onClick}
        style={{
          backgroundColor: theme.background,
          color: theme.foreground,
        }}
      >
        {children}
      </button>
    )
  }
}

function ToolBar(props) {
  return (
    <ThemedButton onClick={props.changeTheme}>
      Change theme
    </ThemedButton>
  )
}

class Version2 extends Component {
  constructor(props) {
    super(props)
    this.state = {
      theme: themes.light,
    }
    this.toggleTheme = this.toggleTheme.bind(this)
  }

  toggleTheme() {
    this.setState({
      theme:
        this.state.theme === themes.light
          ? themes.dark
          : themes.light,
    })
  }

  render() {
    return (
      <div>
        <ThemeContext.Provider value={this.state.theme}>
          <ToolBar changeTheme={this.toggleTheme} />
        </ThemeContext.Provider>
      </div>
    )
  }
}

export default Version2
The second version is the same as the first version, and its core lies in
class ThemedButton extends Component {
  // Use contextType
  static contextType = ThemeContext
When we define static contexttype for class components, we can directly use this Context gets the global data objects in the context as follows
class ThemedButton extends Component {
  // Use contextType
  static contextType = ThemeContext

  render() {
    const theme = this.context
    const { children, onClick } = this.props
    return (
      <button
        onClick={onClick}
        style={{
          backgroundColor: theme.background,
          color: theme.foreground,
        }}
      >
        {children}
      </button>
    )
  }
1.4 multiple Context
However, we can see that in the previous two examples, there is only one global data object. What can we do. In fact, we can simply nest context directly Provider:
1.4.1 new context object UserContext
First, we create a new global data
- src/context/users.js
const users = {
  donovan: {
    name: 'Donovan',
    age: 22,
  },
  alice: {
    name: 'Alice',
    age: 18,
  },
}

export default users
Next, create a new context object
- src/context/UserContext.js
import React from 'react'
import users from './users'

export const UserContext = React.createContext(users.donovan)
1.4.2 nested use of providers
Next, let's directly stack the two Provider components together
- src/context/Version3.jsx
class Version3 extends Component {
  constructor(props) {
    super(props)
    this.state = {
      theme: themes.light,
      user: users.donovan,
    }
    this.toggleTheme = this.toggleTheme.bind(this)
    this.signIn = this.signIn.bind(this)
  }

  toggleTheme() {
    this.setState({
      theme:
        this.state.theme === themes.light
          ? themes.dark
          : themes.light,
    })
  }

  signIn(user) {
    this.setState({ user })
  }

  render() {
    return (
      <div>
        <ThemeContext.Provider value={this.state.theme}>
          <UserContext.Provider value={this.state.user}>
            <ToolBar
              toggleTheme={this.toggleTheme}
              signIn={this.signIn}
            />
          </UserContext.Provider>
        </ThemeContext.Provider>
      </div>
    )
  }
}
1.4.3 use different consumers to accept data
When there are multiple contexts, if we use the usage of contextType, we can only use one Context data type, because contextType can only have one type value.
If you want to use multiple global data objects at one time, you need to go back to Context According to the usage of Consumer, the Consumer provided by different Context objects will pass in the corresponding global data value, as follows:
- src/context/Version3.jsx
// multiple context
function ToolBar(props) {
  const { toggleTheme, signIn } = props
  return (
    <>
      <ThemeContext.Consumer>
        {(theme) => (
          <button
            onClick={toggleTheme}
            style={{
              backgroundColor: theme.background,
              color: theme.foreground,
            }}
          >
            Change theme
          </button>
        )}
      </ThemeContext.Consumer>
      <br />
      <button onClick={() => signIn(users.donovan)}>
        Sign in as Donovan
      </button>
      <button onClick={() => signIn(users.alice)}>
        Sign in as Alice
      </button>
      <button onClick={() => signIn(null)}>Sign out</button>
      <UserContext.Consumer>
        {(user) => {
          return (
            <div>
              <h3 style={{ margin: '5px 0' }}>
                User: {user ? `${user.name}, ${user.age}` : ''}
              </h3>
            </div>
          )
        }}
      </UserContext.Consumer>
    </>
  )
}
We can see themecontext The Render Props of the consumer component passes in the theme global data; Usercontext The global data of user is passed in by the consumer. The final effect is as follows
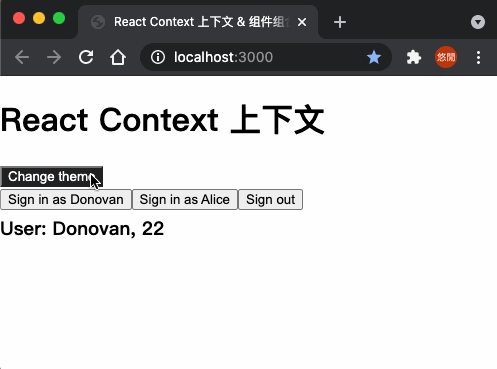
1.5 transfer the state transition function through Context
Previously, we noticed that the methods of changing global data, such as toggleTheme and signIn, are passed down layer by layer through ordinary data stream props. In fact, we can also put the relevant global data update functions into the context object
- src/context/Version4.jsx
class Version4 extends Component {
  constructor(props) {
    super(props)

    this.toggleTheme = this.toggleTheme.bind(this)

    this.state = {
      theme: themes.light,
      // State changes are also passed through the context
      toggleTheme: this.toggleTheme,
    }
  }

  toggleTheme() {
    this.setState({
      theme:
        this.state.theme === themes.light
          ? themes.dark
          : themes.light,
    })
  }

  render() {
    return (
      <div>
        <ThemeContext.Provider value={this.state}>
          <ToolBar />
        </ThemeContext.Provider>
      </div>
    )
  }
}

export default Version4
At this time, there will be no part related to global data in the intermediate component
function ToolBar() {
  return <ThemedButton>Change theme</ThemedButton>
}
Finally, get the global data and update function directly by setting contextType
class ThemedButton extends Component {
  static contextType = ThemeContext

  render() {
    const { theme, toggleTheme } = this.context
    return (
      <button
        onClick={toggleTheme}
        style={{
          backgroundColor: theme.background,
          color: theme.foreground,
        }}
      >
        {this.props.children}
      </button>
    )
  }
}
1.6 Context summary: why use less Context?
So far, we have seen various usage scenarios and usage methods of Context. Now let's go back to what we said earlier: don't use Context just to simplify props.
Context can indeed avoid the trouble of transmitting data through props, but there is a fatal defect in the implementation of context. In fact, all components related to Consumer / contextType are strongly associated with global data, so once the data changes, all components that depend on it will be forcibly updated.
In other words, if we cram the shared data that needs to be transmitted by props into the Context, it will become as follows:
<ThemeContext.Provider value={{
    props1: value1,
    props2: value2,
    props3: value2
}}>
It seems that there is no problem, but in fact, different components in the sub components may only depend on one of the data. However, the Context update data is global, that is, when we update props1, the sub components that depend on props2 and props3 may be re rendered together, resulting in additional and unnecessary rendering and waste of performance.
1.6.1 use specification (recommended)
So far, we have known the usage mode and defects of Context. In a word:
Context is used to transfer global data that is really needed by multiple components
When we just need to simplify the trouble of data transmission layer by layer through props in the component tree, we should use the method of component composition to be described in the next paragraph.
2. Component composition
As mentioned earlier, if we just want to avoid the risk of transferring props layer by layer, rather than using real global data, we should avoid using Context and use the concept of component composition.
2.1 what is component combination?
The core idea of component composition is that since we don't want the shared data to be transmitted layer by layer through props, we first transfer the data bound component into props at the top level, and the sub component only needs to specify the real location of the incoming component
That is, from the following form
function ComponentA() {
    const data = {/* ... */}
    return <ComponentB data={data} />
}

function ComponentB(props) {
    return <ComponentC data={props.data} />
}

function ComponentC(props) {
    return <div>{props.data.toString()}</div>
}
Become this form
function ComponentA() {
    const data = {/* ... */}
    return <ComponentB componentC={<ComponentC data={data} />} />
}

function ComponentB(props) {
    return props.componentC
}

function ComponentC(props) {
    return <div>{props.data.toString()}</div>
}
Even further
function ComponentA() {
    const data = {/* ... */}
    const componentC = <div>{props.data.toString()}</div>
    return <ComponentB componentC={componentC} />
}

function ComponentB(props) {
    return props.componentC
}
In this way, we do not need to transfer data through props, but directly transfer the data bound component to the specified location, which is the core concept of the component.
This approach is equivalent to an embodiment of inversion of control, which promotes the rendering logic of sub components to higher-level components, and in turn, the high-level components provide the implementation of sub components, while the original intermediate components only need to accept the components passed by the parent components and bind them to the correct position
Let's take a look at the different implementations of component composition
2.2 component combination formula 1: render sub node array
The first is the most common children attribute. In React, children is a very special attribute. When we use components and put data between component labels, it will actually appear as a member of the children attribute, that is to say, the following two implementations are equivalent
const component = <div>A Component</div>
const Wrapper = <div children={component} />

// Equivalent to

const component = <div>A Component</div>
const Wrapper = <div>{component}</div>
When children have multiple elements, they will naturally become an array, that is, the form of list rendering. The following is our demonstration code
- src/composition/index.jsx
import React, { Component } from 'react'

import SideBar from './SideBar'
import './index.css'
import Header from './Header'
import Main from './Main'
import Footer from './Footer'

function MenuItem(props) {
  const { label, title, onClick } = props
  return (
    <div className="item" title={title} onClick={onClick}>
      {label}
    </div>
  )
}

class Composition extends Component {
  constructor(props) {
    super(props)
    this.state = {
      menuItems: [
        { label: 'Menu Item 1', title: 'go menu item 1' },
        { label: 'Menu Item 2', title: 'go menu item 2' },
        { label: 'Menu Item 3', title: 'go menu item 3' },
        { label: 'Menu Item 4', title: 'go menu item 4' },
        { label: 'Menu Item 5', title: 'go menu item 5' },
      ],
    }
  }

  handlerMenuItemSelect(item) {
    console.log('item', item)
  }

  render() {
    const items = this.state.menuItems.map((item) => (
      <MenuItem
        {...item}
        key={item.label}
        onClick={() => this.handlerMenuItemSelect(item)}
      />
    ))

    return (
      <div className="composition">
        <div className="container">
          <SideBar>{items}</SideBar>
          {/* ... */}
        </div>
      </div>
    )
  }
}

export default Composition
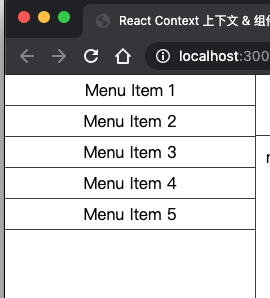
We can see that in the example, we directly assemble the navigation list needed by the sidebar according to the data in the top-level component
function MenuItem(props) {
  const { label, title, onClick } = props
  return (
    <div className="item" title={title} onClick={onClick}>
      {label}
    </div>
  )
}

// ...

    this.state = {
      menuItems: [
        { label: 'Menu Item 1', title: 'go menu item 1' },
        { label: 'Menu Item 2', title: 'go menu item 2' },
        { label: 'Menu Item 3', title: 'go menu item 3' },
        { label: 'Menu Item 4', title: 'go menu item 4' },
        { label: 'Menu Item 5', title: 'go menu item 5' },
      ],
    }

    // ...

    const items = this.state.menuItems.map((item) => (
      <MenuItem
        {...item}
        key={item.label}
        onClick={() => this.handlerMenuItemSelect(item)}
      />
    ))
Then put the list in the middle of the SideBar component, that is, pass it in as the children attribute
render() {
  return (
    <SideBar>{items}</SideBar>
    // ...
Finally, inside the SideBar component, it can be directly placed at the target position
- src/composition/SideBar.jsx
import React, { Component } from 'react'

class SideBar extends Component {
  render() {
    return <div className="sidebar">{this.props.children}</div>
  }
}

export default SideBar
The effect is as follows
2.3 the second type of component combination: slot
Previously, we used the children attribute to pass sub components, but it is only a single attribute, which can not describe the location of sub components very accurately.
The second implementation method is to pass in the sub component through the props with the specified name, and then specify the corresponding position of the special sub component. This implementation is called slot:
- src/composition/Header.jsx
import React, { Component } from 'react'

class Header extends Component {
  render() {
    const { left, right } = this.props
    return (
      <div className="header">
        <div className="left">{left}</div>
        <div className="center">
          <h2>Header</h2>
        </div>
        <div className="right">{right}</div>
      </div>
    )
  }
}

export default Header
First, we define a Header component and leave two slots, left and right, on both sides of the "Header" text
- src/composition/index.jsx
function Title(props) {
  return <h3>{props.title}</h3>
}

function UserInfo(props) {
  return <h4>{props.username}</h4>
}

class Composition extends Component {
  render() {
    return (
      <div className="composition">
        <div className="container">
          <SideBar>{items}</SideBar>
          <div className="container vertical">
            <Header
              left={<Title title="This is a title for Header" />}
              right={<UserInfo username="Alice" />}
            />
          </div>
        </div>
      </div>
    )
  }
}
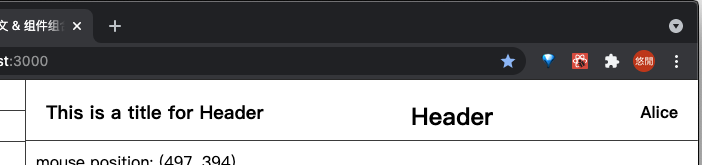
Next, we pass the Title component into the left attribute; Pass the UserInfo component into the right attribute, so that for external components, as long as I specify the passed in attribute, it is equivalent to passing in the specified location, without caring about the specific rendering location or additional props transmission. The effect is as follows
2.4 component combination formula 3: special examples
The third implementation is to extract some instances of special binding values in advance for different implementation effects.
When developing components, we usually follow a principle: try to make the bottom components as simple as possible. It's best to simply rely on props to realize result rendering, that is, we will define the following abstract components first:
- src/composition/Footer.jsx
function ColoredBlock(props) {
  return (
    <div
      style={{
        width: '50px',
        height: '50px',
        backgroundColor: props.color,
      }}
    ></div>
  )
}
But each time you want to use it, you have to pass in the attribute or render the component according to a value passed down from a higher-level component. In fact, we can also define several component instances that pass in specific values in advance, and make these instances into another component as follows
function SkyBlueBlock() {
  return <ColoredBlock color="skyblue" />
}

function CoralBlock() {
  return <ColoredBlock color="coral" />
}

function LimeBlock() {
  return <ColoredBlock color="limegreen" />
}

function CrimsonBlock() {
  return <ColoredBlock color="crimson" />
}
In this way, when we use it, we no longer need to pass in the color attribute for binding, but just use it directly as if we were using a static component
class Footer extends Component {
  render() {
    return (
      <div className="footer">
        <LimeBlock />
        <SkyBlueBlock />
        footer
        <CoralBlock />
        <CrimsonBlock />
      </div>
    )
  }
}
The effect is as follows

2.5 component composition formula 4: Render Props transfer rendering function
The last implementation is special. Remember that when we use props to pass in the components with bound attributes, we pass in a component instance directly, and then directly place the components in a fixed position in the sub components. At this time, can we also pass in a function to delay the components to the sub components for binding? Now let's try
- First, we define a component that tracks the position of the mouse
- src/composition/Main.jsx
class Mouse extends Component {
  constructor(props) {
    super(props)
    this.state = {
      x: 0,
      y: 0,
    }
    this.handleMouseMove = this.handleMouseMove.bind(this)
  }

  handleMouseMove(e) {
    this.setState({
      x: e.clientX,
      y: e.clientY,
    })
  }

  render() {
    const { x, y } = this.state
    return (
      <div className="backbone" onMouseMove={this.handleMouseMove}>
        <span
          style={{ position: 'relative', top: '10px', left: '10px' }}
        >
          mouse position: ({x}, {y})
        </span>
      </div>
    )
  }
}
- Then use it directly in the parent component
class Main extends Component {
  render() {
    return (
      <div className="main">
        <Mouse />
      </div>
    )
  }
}
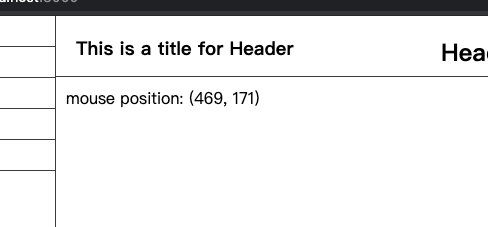
The effect is as follows
Next, we want to render a box and move it with the mouse.
The first is the block class
function Square(props) {
  const { x, y } = props.position
  const width = 100
  return (
    <div
      style={{
        backgroundColor: 'skyblue',
        position: 'fixed',
        left: x - width / 2,
        top: y - width / 2,
        width: width,
        height: width,
      }}
    />
  )
}
Next, we may want to put it directly into the Mouse component as follows
class Mouse extends Component {
  // ...

  render() {
    const { x, y } = this.state
    return (
      <div className="backbone" onMouseMove={this.handleMouseMove}>
        <span
          style={{ position: 'relative', top: '10px', left: '10px' }}
        >
          mouse position: ({x}, {y})
        </span>
        <Square position={this.state} />
      </div>
    )
  }
}
However, there is a problem that the Mouse component is strongly coupled with the Square component, which we don't want to see. When we need to change the Square component in the Mouse component into other components, we will encounter big trouble.
At this time, we can use the concept of Render Props to import the required component (Square) through the parent component; Further, this component can still be associated with a sub component (Mouse). At this time, we cannot directly pass in the component instance, but a Render Props, that is, a method of delaying the binding of the component instance, as follows
class Main extends Component {
  render() {
    return (
      <div className="main">
        <Mouse
          render={(position) => <Square position={position} />}
        />
      </div>
    )
  }
}
It's right that we want to render Square in Mouse, but we can't render it until we get the location information in Mouse, so we pass in a function that accepts position as the parameter to generate a real Square instance, and we can write this inside Mouse
class Mouse extends Component {
  // ...

  render() {
    const { x, y } = this.state
    return (
      <div className="backbone" onMouseMove={this.handleMouseMove}>
        <span
          style={{ position: 'relative', top: '10px', left: '10px' }}
        >
          mouse position: ({x}, {y})
        </span>
        {this.props.render(this.state)}
      </div>
    )
  }
}
As we can see, although Mouse doesn't know who is the component finally rendered to this location, I know that as long as I call props The render method and passing in its own location information can return a component bound with its own Mouse information, which is Render Props
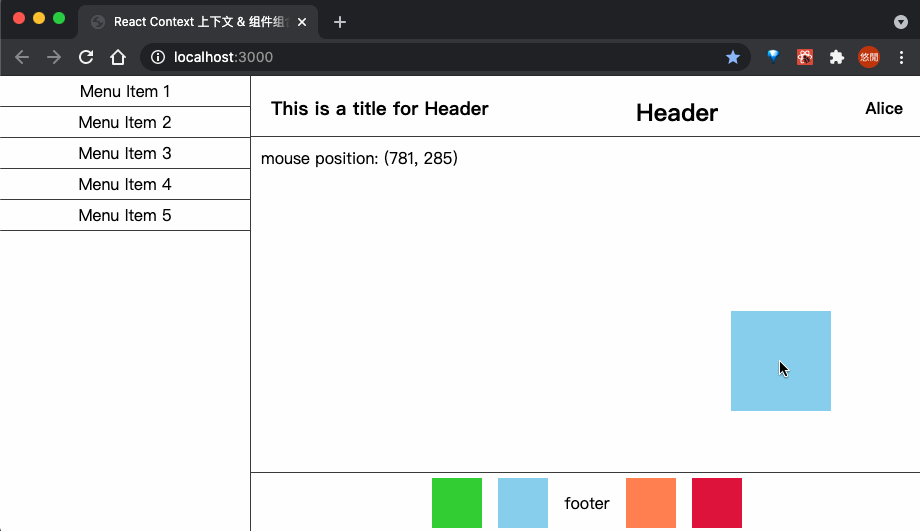
The effect is as follows
Note: the meaning of Render Props here is just "pass in a function that can generate a real component instance", that is, we don't have to use the render attribute. Any attribute is good. The core idea is to pass in a design pattern that generates a real component according to the sub component information.
Is it very similar to the previous context What about the usage of consumer?
render() {
    return (
        <Context.Consumer>
            {value => <Component />}
        </Context.Consumer>
    )
}
Yes, actually, context Consumer uses the method of Render Props to transfer global data into the user-defined value = > component function to bind the global data completely.
epilogue
This chapter introduces the usage of Context and some examples of component combination. Finally, it introduces the characteristics and usage of Render Props and Specific implementation in consumer. These are very practical features in actual development for your reference.
Other resources
Reference connection
| Title | Link |
|---|---|
| React official - Context | https://react.docschina.org/docs/context.html |
| React official - combination vs inheritance | https://react.docschina.org/docs/composition-vs-inheritance.html |
| React official - Render Props | https://react.docschina.org/docs/render-props.html |
| Use of Context and contextType in React | https://blog.csdn.net/landl_ww/article/details/93514944 |