1, Component communication concept
In React, components are independent and closed units. By default, the data in component state is private data, and components can only use their own data. However, in the actual project development process, our page is composed of multiple components, and these components inevitably share some data. This process of transferring data between components is called component communication.
2, props Foundation
In React, closed components that want to receive external data should be implemented through props. Props is a read-only object. The attribute value in the object is the data passed from the outside. The attribute can only be read and cannot be modified. It belongs to one-way data flow.
The way for components to transfer data is to add attributes to the tag when using the component tag. The attribute name and attribute value will be transferred to props. The data type of the value in props depends on the transfer method. If it is a string type value, it can be in the form of key value pair. If it is a numeric type or other data type, it needs to be wrapped with {}:
<Hello name="Tom" age={19} />
The way in which components receive data is different between class components and function components. In function components, props should be used as the parameter of the function, and then through props Property name to access the corresponding received data.
// Function component
function Hello(props) {
    console.log(props)
    return (
    	<div>Received name Data:{ props.name }</div>
    )
}
In the class component, directly use this props. Property name to access the corresponding received data. But one more thing to note: if the constructor is written in the class component and you want to use props in the constructor, you should pass props to super(), otherwise you can't get props in the constructor.
// Class component
class Hello extends React.Component {
    constructor(props) {
        // Pass props to the parent constructor
        super(props)
    }
    render() {
        return (
        	<div>Received age Data:{ this.props.age }</div>
        )
    }
}
3, Four ways of component communication
1. Pass data from parent to child
The process of transferring the data in the parent component state to the child component is relatively simple. The parent component only needs to add attributes when using the child component label to transfer the data to the child component. Then, the corresponding data is received through props in the sub component.
// Transfer data from parent component
class Parent extends React.Component {
state = {
name: 'Zhu Zhuxia'
}
render() {
renturn (
<!-- Transfer data by attributes -->
<div>Pass data to subcomponents:<Child name={this.state.name} age={22} /></div>
)
}
}
// Sub component receiving data
function Child(props) {
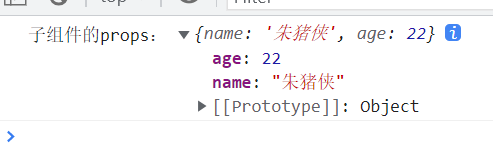
console.log('Of subcomponents props: ', props)
return (
<!-- adopt props Get the passed data -->
<div>Child component, data received from parent component: Name:{props.name} Age:{props.age}</div>
)
}
props of subcomponents:
2. Transfer data from child to parent
If the child component wants to transfer data to the parent component, it needs to use the callback function, that is, define a callback function receiving parameters in the parent component, and then transfer this function to the child component using properties. The child component calls the callback function passed through props, and takes the data to be transferred as the parameters of the callback function, At this point, the callback function in the parent component obtains the data passed by the child component.
// Parent component
class Parent extends React.Component {
    state = {
        parentMsg: ''
    }
    // A callback function is provided to receive the data passed by the sub component
    getChildMsg = data => {
        console.log('Received data passed from subcomponent:', data)
        this.setState({
            parentMsg: data
        })
    }
    render() {
        return (
            <div className="parent">
                Parent component:{this.state.parentMsg}
                {/*Pass the callback function to the child component*/}
                <Child getMsg={this.getChildMsg} />
            </div>
        )
    }
}
// Subcomponents
class Child extends React.Component {
    state = {
        msg: 'I am the data in the subcomponent'
    }
    handleClick = () => {
        // The child component calls the callback function passed from the parent component
        // And take the data you want to pass as a parameter
        this.props.getMsg(this.state.msg)
    }
    render() {
        return (
            <div className="child">
                Subcomponents:
                {/*Trigger event calls callback function*/}
                <button onClick={this.handleClick}>Click me to pass data to the parent component</button>
            </div>
        )
    }
}
3. Transfer data to sibling components at the same level
If you want to transfer data between sibling components at the same level, you need to first promote the data you want to transfer to the nearest public parent component, let the public parent component manage the data, and provide functions to operate the data. First pass the operation function of the data to a sub component A, and then pass the data to sub component B. In this way, when sub component a calls the operation function through props, the data in the parent component will be modified, and the data received in sub component B will change accordingly.
To put it simply: promote the private data that you want to transfer in the sibling component to the public parent component and turn it into shared data. In this way, all sibling components can obtain the data.
// Parent component
class Counter extends React.Component {
    // Provide sharing status
    state = {
        count: 0
    }
    // Provides methods to modify the status
    onIncrement = () => {
        this.setState({
            count: this.state.count + 1
        })
    }
    render() {
        return (
            <div>
                {/*Transfer data to sub component 1*/}
                <Child1 count={this.state.count} />
                {/*Pass the operation method of data to sub component 2*/}
                <Child2 onIncrement={this.onIncrement} />
            </div>
        )
    }
}
// Sub assembly 1 display data
const Child1 = props => {
    return <h1>Counter:{props.count}</h1>
}
// Sub assembly 2 modify data
const Child2 = props => {
    return <button onClick={() => props.onIncrement()}>+1</button>
}
4,Context
The above three methods have been able to realize the data transfer of most scenarios, but if the two components are far away and the components are nested a lot, the above data transfer method is still used at this time, and the code will become very cumbersome. Therefore, React also provides Context as a way to transfer data to deal with the scenario of transferring data across multiple components.
Context provides two components: Provider and Consumer. The Provider component is used to wrap the JSX structure of the sub component transmitting data to the outside as the parent node, and store the data to be transmitted through value. The Consumer component is used to wrap the JSX structure that wants to receive usage data as a child node, and use the stored data through the parameters of the callback function.
// 1. Create context and get two components: Provider and Consumer
const { Provider, Consumer } = React.createContext()

class App extends React.Component {
  render() {
    return (
        //  Wrap the JSX structure and store the data you want to transfer through the value attribute
      <Provider value="pink">
        <div className="app">
          <Node />
        </div>
      </Provider>
    )
  }
}

const Node = props => {
  return (
    <div className="node">
      <SubNode />
    </div>
  )
}

const SubNode = props => {
  return (
    <div className="subnode">
      <Child />
    </div>
  )
}

const Child = props => {
  return (
    <div className="child">
          {/* Use the data stored by the Provider through the parameters of the function */}
      <Consumer>{data => <span>I am a child node -- {data}</span>}</Consumer>
    </div>
  )
}

ReactDOM.render(<App />, document.getElementById('root'))
4, props depth
1. children attribute
In the component, we can obtain the child nodes in the current component label through the children attribute of props. The child nodes can be text, React elements, components and functions.
// children are text nodes and JSX components
const App = props => {
  console.log(props)
  return (
    <div>
      <h1>Child node of component label:</h1>
      {props.children}
    </div>
  )
}
const Test = () => <button>I am button assembly</button>
ReactDOM.render(
    <App>
       {/* <p>I am a child node, a p tag</p> */}
   	   {/* <Test /> */}
       I am a child node
     </App>, document.getElementById('root'))

// children is a function
const App = props => {
  console.log(props)
  props.children()

  return (
    <div>
      <h1>Child node of component label:</h1>
      {/* {props.children} */}
    </div>
  )
}

ReactDOM.render(
  <App>{() => console.log('This is a function child node')}</App>,
  document.getElementById('root')
)
2. Verify the data type of props
For the component itself, props is passed by the user, and the data type and format are determined by the user. But in actual development, we usually only want users to pass the data types we specify. Therefore, react provides a dependency package called prop types, which allows us to specify the data format to be passed to the component, and if the passed data does not conform to the specified data format, it will give a clear error prompt on the console.
To use prop types in a project:
① install dependency package NPM install props types or yarn add prop types
② import and download dependent packages
③ pass the component name PropTypes = {prop Name: PropTypes. Data type} to specify the data type for props of the component
// Import package
import PropTypes from 'prop-types'

const App = props => {
  const arr = props.colors
  const lis = arr.map((item, index) => <li key={index}>{item}</li>)
  return <ul>{lis}</ul>
}

// Add props verification
App.propTypes = {
  colors: PropTypes.array
}

ReactDOM.render(
  <App colors={['red', 'blue']} />,
  document.getElementById('root')
)
Common prop constraint rules:
① common data types: array, bool (i.e. boolean), func (i.e. function), number, object, string, etc
② React element type: element
③ required verification: isRequired, that is, the data must be in props.
④ object with specific structure: shape({}), that is, make constraints on the data types of some attributes in the object.
Note: when you want to use multiple validation rules at the same time, you only need to use chain programming, such as proptypes func. Isrequired, it is required to be both a function and a required item.
import PropTypes from 'prop-types'

const App = props => {
  return (
    <div>
      <h1>props Verification:</h1>
    </div>
  )
}
// Add props verification
// Type of attribute a: numeric (number)
// Type of property fn: function (func) and is required
// Type of attribute tag: React element
// Type of attribute filter: object ({area: 'Shanghai', price: 1999})
App.propTypes = {
  a: PropTypes.number,
  fn: PropTypes.func.isRequired,
  tag: PropTypes.element,
  filter: PropTypes.shape({
    area: PropTypes.string,
    price: PropTypes.number
  })
}

ReactDOM.render(<App fn={() => {}} />, document.getElementById('root'))
3. prop default
We can set the default value for some props of the component. When the component is in use and the prop data is not passed in, we will use the default value to set the component. To set the default value, you need to use the defaultProps property of the component:
const App = props => {
    return (
        <div>
            <h1>props Verification:{ props.a }</h1>
        </div>
    )
}

App.defaultProps = {
    a: 123  // Set the default value for a in props
}
ReactDOM.render(<App />, document.getElementById('root'))