1, Initial project construction
npx create-react-app my-app
cd my-app
npm start
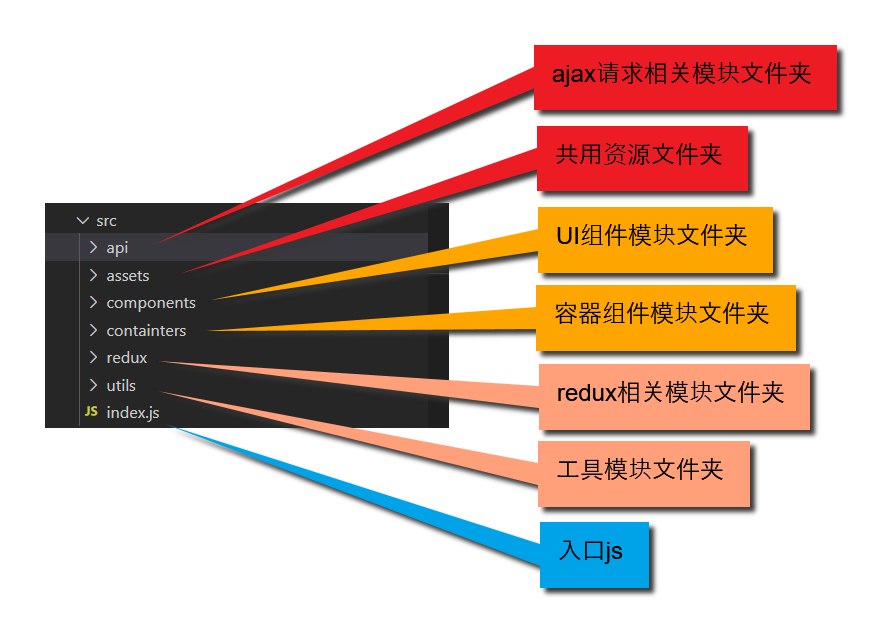
2, Project directory structure design
1. Delete everything under src after creating a new project
2. Then create the relevant directory structure:
3, Initialize and configure the mobile terminal project file
1. Introduce antd mobile
Official website: https://mobile.ant.design/docs/react/introduce-cn
Installation:
npm install antd-mobile --save
2,index.html configuring mobile terminal parameters
<meta name="viewport" content="width=device-width,initial-scale=1.0,minimum-scale=1.0,maximum-scale=1.0,user-scalable=no">
3. Plug in introduction of 300 ms problem on mobile terminal
    <script src="https://as.alipayobjects.com/g/component/fastclick/1.0.6/fastclick.js"></script>
    <script>
      if ('addEventListener' in document) {
        document.addEventListener('DOMContentLoaded', function() {
          FastClick.attach(document.body);
        }, false);
      }
      if(!window.Promise) {
        document.writeln('<script src="https://as.alipayobjects.com/g/component/es6-promise/3.2.2/es6-promise.min.js"'+'>'+'<'+'/'+'script>');
      }
    </script>
4. Realize the on-demand packaging of antd components (which component will be packaged and compiled only when it is used)
See article: https://blog.csdn.net/zwkkkk1/article/details/88823366
You can have a look at the specific introduction Official manual
(1) Introduce react app rewired and modify package Start configuration in JSON. Due to the new react app- rewired@2.x You also need to install customize CRA according to the version.
npm install react-app-rewired customize-cra --save-dev
To modify the configuration of a package:
/* package.json */
"scripts": {
-   "start": "react-scripts start",
+   "start": "react-app-rewired start",
-   "build": "react-scripts build",
+   "build": "react-app-rewired build",
-   "test": "react-scripts test --env=jsdom",
+   "test": "react-app-rewired test --env=jsdom",
}
(2) Then create a config - overrides. Config file in the root directory of the project JS is used to modify the default configuration.
module.exports = function override(config, env) {
  // do stuff with the webpack config...
  return config;
};
(3) Use babel plugin import. babel plugin import is a babel plug-in (principle) for loading component code and styles on demand. Now let's try to install it and modify config overrides JS file.
npm install babel-plugin-import --save-dev
+ const { override, fixBabelImports } = require('customize-cra');

- module.exports = function override(config, env) {
-   // do stuff with the webpack config...
-   return config;
- };
+ module.exports = override(
+   fixBabelImports('import', {
+     libraryName: 'antd-mobile',
+     style: 'css',
+   }),
+ );
So you can use it in the next step:
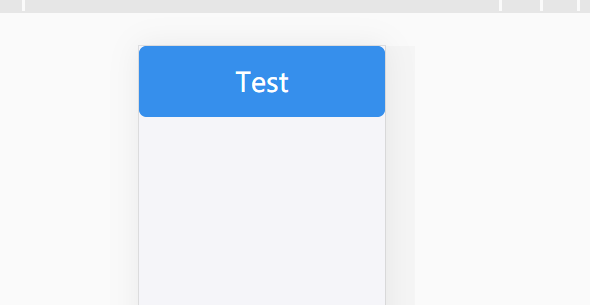
4, Using antd components in applications
1. Entry file:
import React from 'react'
import ReactDOM from 'react-dom'
import {Button} from 'antd-mobile'
ReactDOM.render(<Button type="primary">Test</Button>,document.getElementById('root'))
Then npm run start
2. Install less to modify the default style of antd mobile
npm install --save-dev babel-plugin-import less less-loader style-loader css-loader
It is worth noting that at present, less loader only supports @ 6.0.0. If it is higher than version 6, this error will be reported:

So it's better to specify the version of less loader here. I use 5.0.0
Theme customized official website: https://mobile.ant.design/docs/react/customize-theme-cn
Theme style file: https://github.com/ant-design/ant-design-mobile/blob/master/components/style/themes/default.less
The custom theme is also in config overrides JS file:
const { override, fixBabelImports , addLessLoader } = require('customize-cra')
const theme = require('./antd-theme.json')

module.exports = override(
    addLessLoader({
      javascriptEnabled: true,
      modifyVars: theme,
    }),
    fixBabelImports('import', {
      libraryName: 'antd-mobile',
      libraryDirectory: 'es',
      style: true,
    }),
);
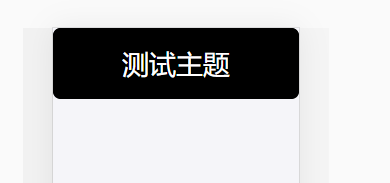
Style file antd theme JSON is created in the root directory:
{
    "brand-primary": "#000000",
    "brand-primary-tap": "#ffccbc"
}
Use addLessLoader to insert less loader, and modify the style to true to ensure that the less file is loaded.
Then restart the project and the style file will take effect:
5, Introduction routing
Download package dependent on real route 1:
Official documents: https://reactrouter.com/web/guides/quick-start
npm install --save react-router-dom
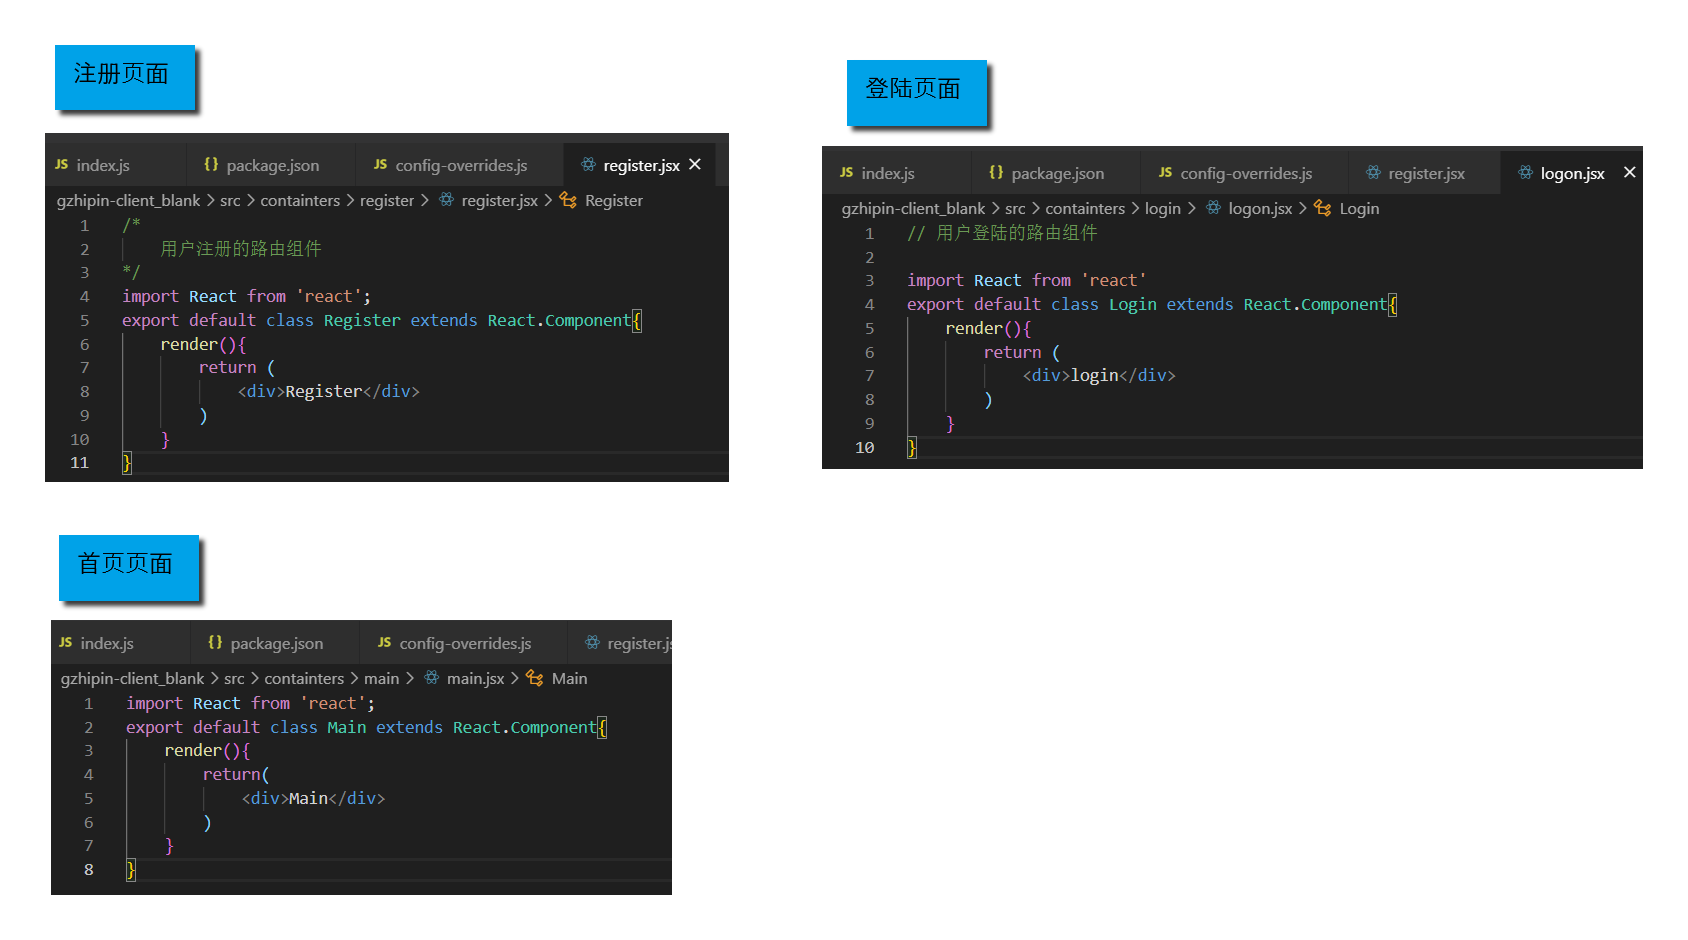
2. Create three page components
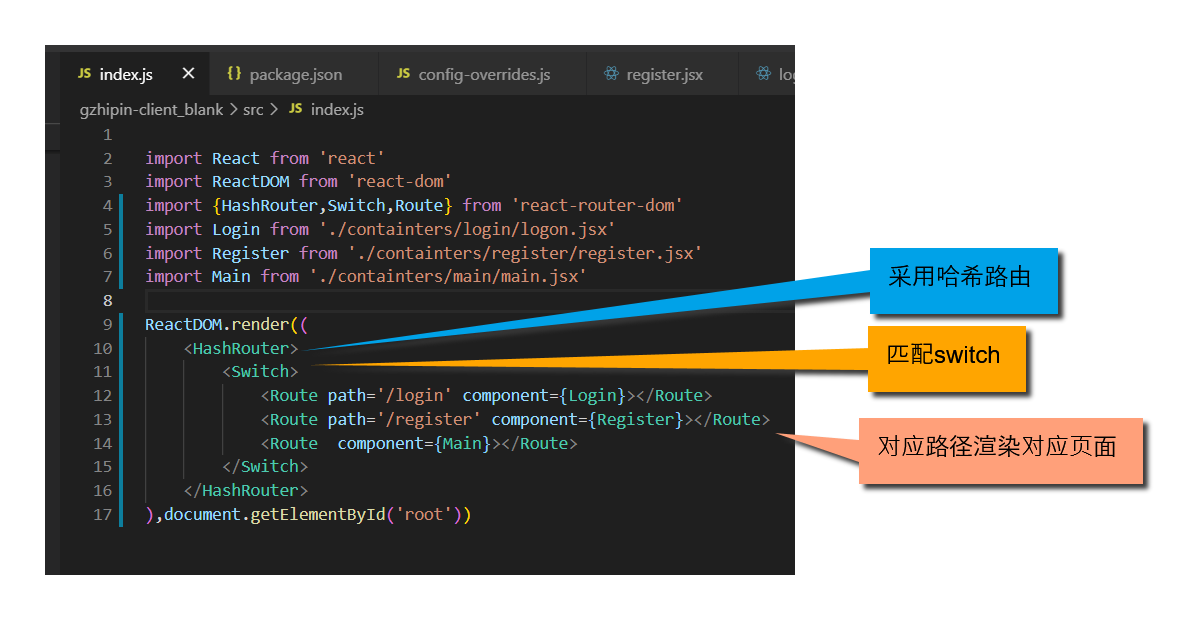
3. Map the route and file in the entry file index
6, Introducing redux
1. Install and download relevant packages
npm install --save redux@3.7.2 react-redux redux-thunk
npm install --save-dev redux-devtools-extension
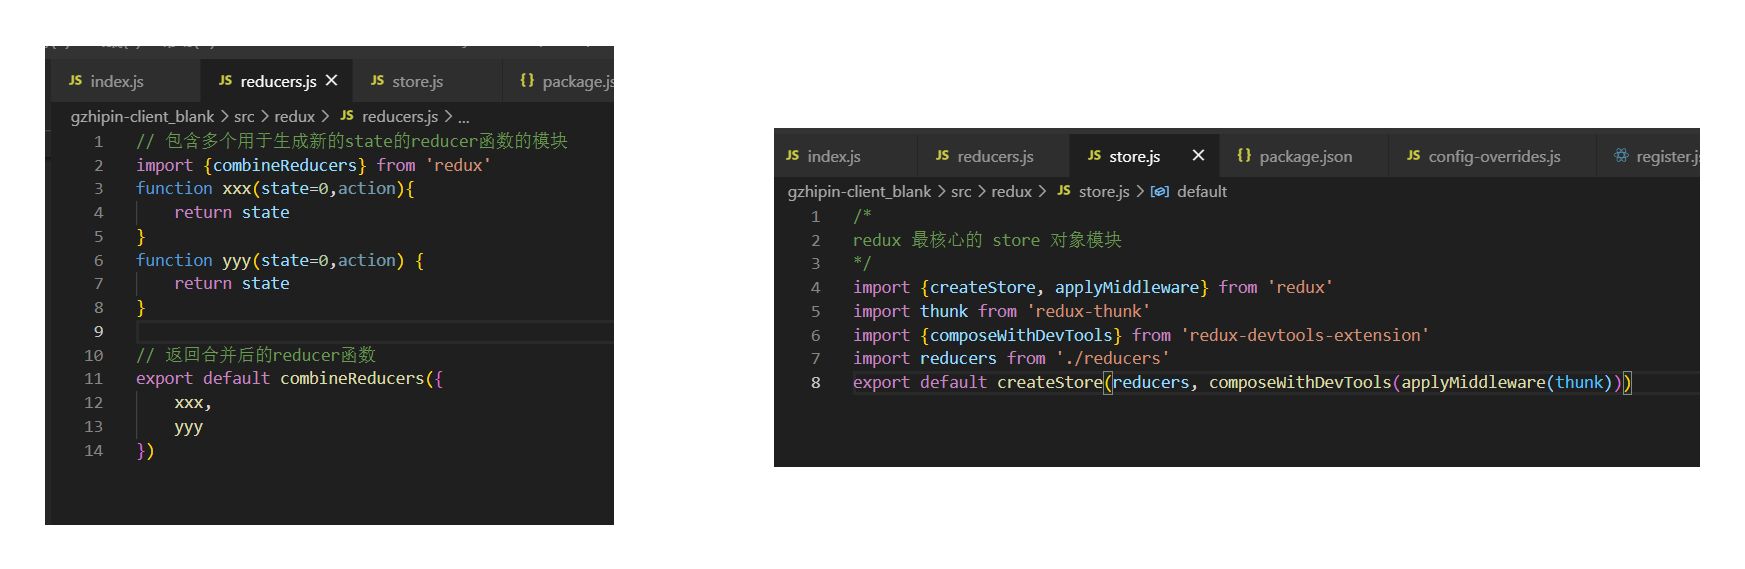
2. Create multiple warehouses and merge them
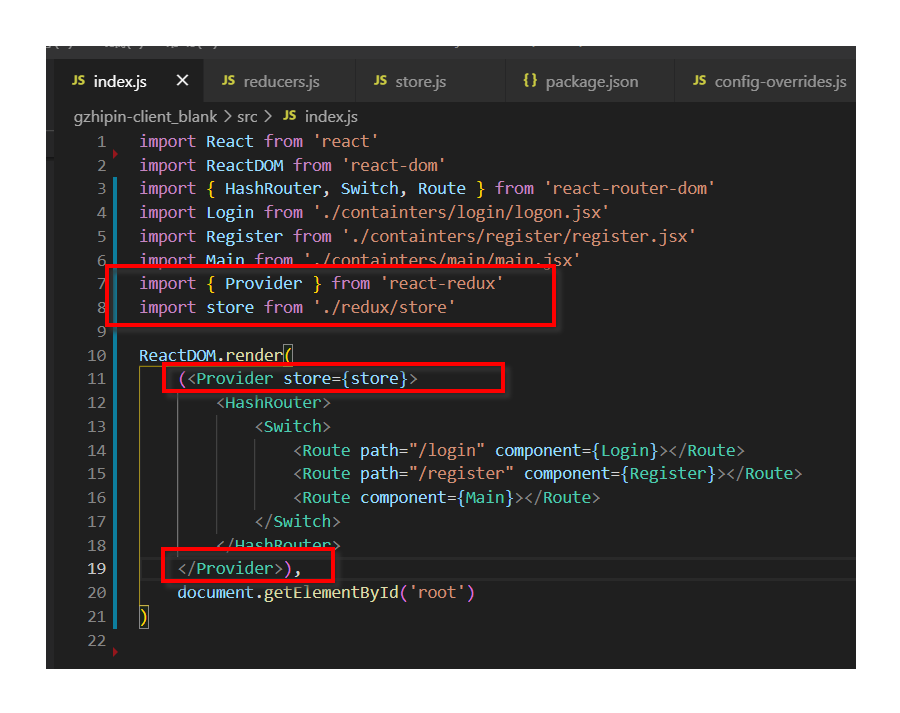
3. Use and designate warehouse in the project
7, Create login and registration components
1. Login
// Routing component for user login
import React from 'react'
import {
NavBar,
WingBlank,
List,
InputItem,
WhiteSpace,
Button
} from 'antd-mobile'
import Logo from '../../components/logo/logo'
export default class Login extends React.Component{
state={
username:'',
password:''
}
//Handle the changes in the input box and collect data to state
handleChange(name,value){
this.setState({[name]:value})
}
//Jump to registered route
toRegister=()=>{
this.props.history.replace('/register')
}
//land
login=()=>{
console.log(this.state)
}
render(){
return (
<div>
<NavBar>Silicon Valley direct employment</NavBar>
<Logo></Logo>
<WingBlank>
<List>
<InputItem placeholder="enter one user name" onChange={val=>this.handleChange('username',val)}>
user name:
</InputItem>
<WhiteSpace></WhiteSpace>
<InputItem type='password' placeholder="Input password" onChange={val=>this.handleChange('password',val)}>
dense code
</InputItem>
<WhiteSpace></WhiteSpace>
<Button type="primary" onClick={this.Login}>Ascend land</Button>
<WhiteSpace></WhiteSpace>
<Button onClick={this.toRegister}>No account yet</Button>
</List>
</WingBlank>
</div>
)
}
}
2. Registration
/*
User registered routing component
*/
import React from 'react'
import { NavBar, WingBlank, List, InputItem, WhiteSpace, Radio, Button } from 'antd-mobile'
import Logo from '../../components/logo/logo'
export default class Register extends React.Component {
state = {
username: '',
password: '',
passwors2: '',
type: 'dashen',
}
//Process changes in input boxes / radio boxes and collect data to state
handleChange = (name, value) => {
this.setState({ [name]: value })
}
//Jump to login route
toLogin = () => {
this.props.history.replace('/login')
}
//register
register = () => {
console.log(JSON.stringify(this.state))
}
render() {
const { type } = this.state
return (
<div>
<NavBar>Silicon Valley direct employment</NavBar>
<Logo/>
<WingBlank>
<List>
<InputItem placeholder="enter one user name" onChange={val=>this.handleChange('username',val)}>
user name:
</InputItem>
<WhiteSpace></WhiteSpace>
<InputItem placeholder="Input password" type="password" onChange={val=>this.handleChange('password',val)}>
dense Code:
</InputItem>
<WhiteSpace></WhiteSpace>
<InputItem placeholder="Enter the confirmation password" type="password" onChange={val=>this.handleChange('password2',val)}>
Confirm password
</InputItem>
<WhiteSpace></WhiteSpace>
<List.Item>
<span style={{marginRight:30}}>customer type</span>
<Radio checked={this.state.type==='dashen'} onClick={()=>{this.handleChange('type','dashen')}}>Okami</Radio>
<Radio checked={this.state.type==='laoban'} onClick={()=>{this.handleChange('type','laoban')}}>boss</Radio>
</List.Item>
<WhiteSpace></WhiteSpace>
<Button type='primary' onClick={this.register}>notes book</Button>
<WhiteSpace></WhiteSpace>
<Button onClick={this.toLogin}>Already have an account</Button>
</List>
</WingBlank>
</div>
)
}
}
8, Encapsulating axios
npm install --save axios