Preface
Some people asked me how to learn a technology and master it most quickly. My answer is to write a blog or explain it to others.
There is one thing in common between these two ways, that is, they all need special research. When we go to study by ourselves, we tend to have a kind of muddle-through mentality, such as: "Forget it, don't study it, I know how to write it." But when you write a blog or explain, you can't have such a mentality. You have to specialize in what he really is, so that you can be more confident in the process of writing a blog or explaining to others. At the same time, you are improving step by step.
No more nonsense. The content of this article is as follows:
- Component Image
- Nine Gongge cases to review the knowledge learned before
Component Image
-
There is a very important component in development, Image, through which various images can be displayed, and in React Native, the component can load image resources in many ways.
-
Load images from the current RN project
<Image source={require("./img/2.png") /}- The content of other files in RN is basically referred to by require, and pictures are no exception.
-
The path behind require is similar to that in src in img, but there are two important points
- In the case of peer directories, require is identified by adding [. /] in front of the path, as shown in the following figure.
 11.png
<Image source={require("./img/2.png")} />-
In html, the path of src in img can be spliced, but the path of require in rn can not be spliced at present. For example, the following two ways of writing can cause errors
var imgSrc = "./img/2.png";
 //Error demonstration 1
<Image source={require(imgSrc )}>
//Error demonstration 2
var imgName = "2.png";
<Image source={require("./img/"+imgName)}>
-
React Native Packager will select the appropriate files according to the platform, such as my_icon.ios.png and my_icon.android.png. When loading, the corresponding files will be selected according to the platform.
-
Load images from Android or iOS projects
<View> <Image source={{uri:"1.jpg"}) style={{width:50,height:50}}} </View>- Pictures must be placed in the asset folder or Android drawable folder of the iOS project (Baidu, if you don't know the two files), when the project runs on the iOS side, the image in the asset will be loaded automatically, and when the project runs on the android side, the image in the drawable will be loaded automatically.
-
Loading pictures from the network
Just like loading pictures in iOS projects and android projects, you need to specify the size of the pictures when loading pictures in the network.
<Image source={{uri:'https://www.baidu.com/img/bd_logo1.png'}} style={{width:200, height:100}}/>
-
Be careful
When you add pictures to android and iOS projects, reload alone will not show the pictures. You have to reinstall the software.
-
Common Properties of Image Components
-
onLayout(function)
This method is called when the Image layout changes
-
onload(function)
When the image is loaded successfully, call back the method
-
onloadEnd(function)
When the image loading completes the callback method, it does not matter whether the image loading succeeds or fails.
-
-
onloadStart(function)
Call this method when the image starts loading
-
resizeMode
Image.resizeMode.cover: The picture is shown in the middle, not stretched, and the excess part is truncated.
Image.resizeMode.contain: The container fully contains pictures, and the pictures are stretched in equal proportions.
Image.resizeMode.stretch: The picture is stretched to fit the size of the container and may deform.
-
source
Make a reference to the tagged image, which can be used as a network url address or a local path
II. Nine Gongge Cases
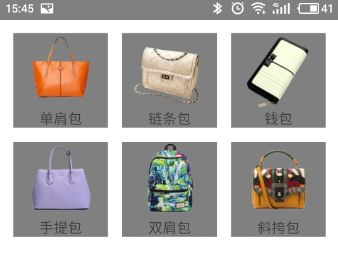
- This case basically reviews what we have learned before. If you can knock it out independently, you can confidently proceed with the next step of learning. If you can't knock it out independently, I suggest you watch it several times, rot the programming method of RN in your heart, and then proceed to the next step of learning. Before you start, first look at the effect we want to do.
-
Dead work
-
Place the BadgeData.json file in the source folder in the same directory as index.android.js
-
Put the pictures in source in the drawable folder of android and the asset folder of iOS. Click Create drawable folder iOS's own Baidu
-
A new js file named index.main.js is created under the same directory of index.android.js
-
-
Coding ideas
-
Looking at the figure, we can roughly draw the UI structure of this project as follows
The bottom white background is a full-screen View, each gray color block is a small View, which contains an Image and Text.
-
After the interface came out, we took a general look at the json data structure, did not understand that json Baidu, UI and data are available, and then we started coding.
 json structure
 -
Specific code
index.main.js
import React, { Component } from 'react';
import {
    AppRegistry,
    StyleSheet,
    Text,
    View,
    Image
} from 'react-native';

/*Setting some global variables*/

//Get the width of the device
var dimensions = require("Dimensions");
var width = dimensions.get("window").width;

//Set up 3 columns per row
var cols = 3;

//Width of each small View
var boxW = 100;

//Calculate the spacing of each View
var vMargin = (width-cols*boxW)/(cols+1);

/*Introducing json data

   A: Here we introduce the json file. How can I see what is in the variable badgeData?

   Q:   1. Direct console.log()
        2. andorid The phone shakes the phone and clicks Debug JS Remotely, which automatically opens a website on the PC (http://localhost:8081/debugger-ui). You can see the content you output from the console, where you can convert the content of the json file into an object and output it to the console.

*/
 var badgeDate = require("./BadgeData.json");
 console.log(badgeDate);

var MyRn = React.createClass({

      render() {

           return (

                //This View is a full-screen View, with container as a specific style
                <View style={styles.container}>

                     /*The renderAllBadge function returns an array with each small View in it.

                      * Reminder:
                      *
                      *  1. At present, we are in the render() function of component object MyRn, renderAllBadge is a function of component object MyRn.
                      *
                      *  2. this This refers to the current component object, which is consistent with the use of functions in js.
                      *
                      */
                     {this.rederAllBadge()}
                </View>

           );
     },

    rederAllBadge(){

       //Each View we have prepared is stored in this array and eventually returned as the return value of this function.
       var allData = [];

       //Data for each small View is fetched through a for loop
       for(var i=0;i<badgeDate.data.length;i++){

           var badge = badgeDate.data[i];

                //After each loop, place the prepared View in the array allData
                allData.push(
                       //Identify each small View by key
                       <View key={i} style={styles.outViewStyle}>
                           <Image source={{uri:badge.icon}}  style={styles.imageStyle}/>
                           <Text style={styles.textStyle}>{badge.title}</Text>
                       </View>
                );
            }

           //Returns allData as a return value
           return allData;

       }
  })

const styles = StyleSheet.create({

    container: {

        flex: 1,
        backgroundColor: 'white',

        flexDirection:"row",
        flexWrap:"wrap",
     },

    outViewStyle:{

        backgroundColor:"gray",

        alignItems:"center",

        width:boxW,
        height:boxW,
        marginLeft:vMargin,
        marginTop:vMargin

    },

    imageStyle:{

      width:80,
      height:80
    },

    textStyle:{
      fontSize:15
    }
});

//Export custom components
module.exports = MyRn;
index.android.js
import {
    AppRegistry,

} from 'react-native';

//Import components in other files
var MyView =  require("./index.main.js");

AppRegistry.registerComponent('myRn', () => MyView);
-
-
Be careful
-
The knowledge points used in this case are all what we have learned before. Through this case, I tell you some programming tips. Now we need to be familiar with this kind of programming, and our case will be in this style in the future.
-
I've commented on everything you haven't seen. Where there's any confusion, you can comment on the message directly.
-