React quick start
As one of the three frameworks today, React has sorted out some notes and shared them after a short-term study: if there are errors, you are welcome to point them out.
1. What is React
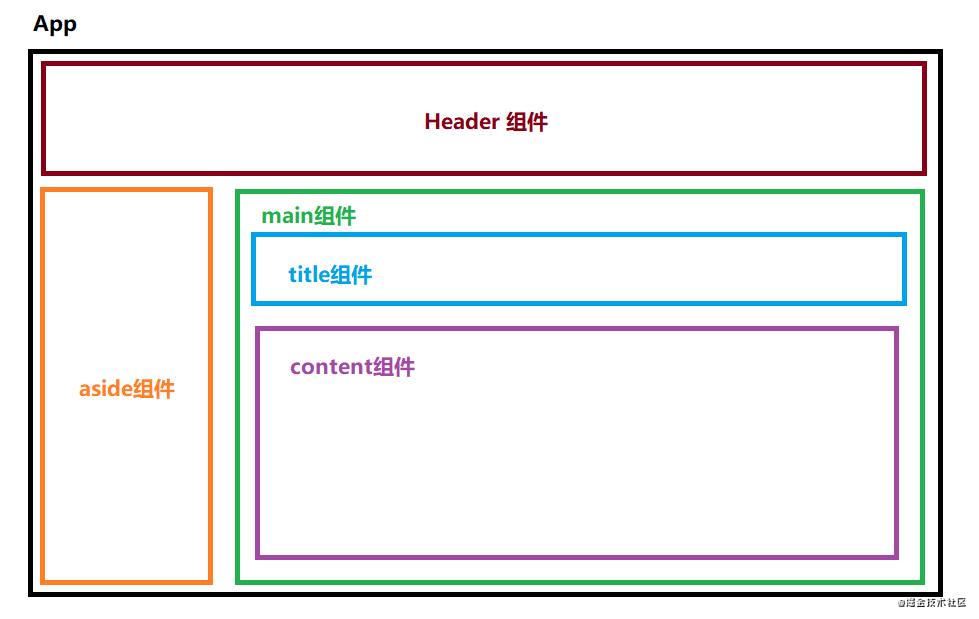
React It's a product made by Facebook Developed to construct a user interface Javascript Library.
React And Vue comparison, vue The syntax is simple and easy to use. It is suitable for small and fine projects, but React The reusability and design of components will be better than vue One chip, applicable to large-scale projects.
React Split and assemble the pages one by one, reuse them and improve efficiency (see the figure below)
React The processing and management of data is clearer than that of native data.
2. Features of react
1. Declarative design − each component of React is created through declarations, which makes the page logic clearer
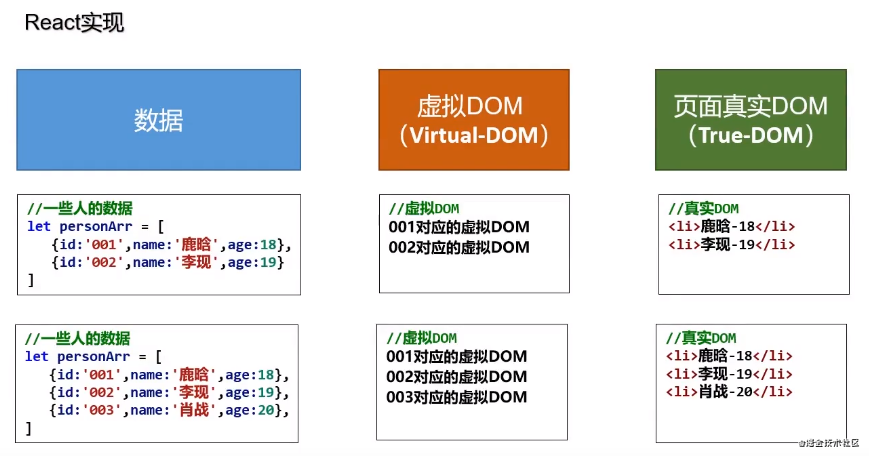
2. Virtual DOM − React creates a virtual DOM every time a page is rendered. It is compared with the existing dom. If there are differences, it will be replaced and re rendered, which improves the efficiency.
3. JSX − JSX is an extension of JavaScript syntax. JSX is not necessarily used for React development, but we recommend it.
// Creating elements in javascript
const DOM = document.createElement("h1"); // Real DOM
DOM.innerText = "This is h1 label";

// Creating elements in jsx
const VDOM = <h1>This is h1 label</h1> // Virtual DOM
4. Component − build components through React, which makes the code easier to reuse and can be well applied in the development of large projects.
// You don't need to understand it now. You only need to know that each component needs to be declared before it can be used
import React, {PureCompoent} from "react";
export default class Header extends PureCompoent{
    render(){
        return <header>This is the head assembly</header>
    }
}
// ------------------------------------------------
// When the header component needs to be used, it can be called for reuse
import Header from "./Header";
<Header></Header>
5. Data flow of one-way response − React realizes the data flow of one-way response, thus reducing duplicate code, which is why it is simpler than traditional data binding. (this will be learned later)
3. Installation and use
1. Use cdn
<script crossorigin src="https://unpkg.com/react@16/umd/react.development.js"></script>
<script crossorigin src="https://unpkg.com/react-dom@16/umd/react-dom.development.js"></script>
2. Import the React package by downloading
<script src="../js/react.development.js"></script>
<script src="../js/react-dom.development.js"></script>
<script src="../js/babel.min.js"></script>
3. Create a project file with react scaffolding create react app
npm i create-react-app -g
create-react-app entry name
Note: Babel. Is required to use React js converts jsx syntax to js syntax. ReactDOM is independent of React (it is disassembled to prevent React from being too big and bulky)
4. Virtual Dom
(1) About virtual DOM
The essence of virtual DOM is an object, and real DOM is also an object, but virtual DOM has fewer attributes and is lighter.
// Virtual DOM
const VDOM = <h1>Hello World</h1>; // Quotation marks are not required here because they are not strings
// Real DOM
const TDOM = document.querySelector("#app");

console.log("fictitious DOM: ", VDOM);   // Object
console.log("real DOM: ", TDOM);   // <div id="app"></div>
console.log("fictitious DOM type: ", typeof VDOM);  // object
console.log("real DOM type: ", typeof TDOM);  // object
console.log(VDOM instanceof Object);    // true
console.log(TDOM instanceof Object);    // true
The virtual DOM will eventually be transformed into a real DOM by React and presented on the page
(2) Create virtual DOM
1. Create a virtual DOM through the createElement() method of React
// React. CreateElement (tag name, tag attribute, tag content)
const VDOM1 = React.createElement("h1", {id: "title"}, "This is Title");
2. Create a virtual DOM using the syntax sugar of method 1
const VDOM2 = <h1 id="title">This is Title</h1>;
5. About JSX
jsx syntax is very similar to javascript syntax, with only a few things to note
// Virtual DOM
const VDOM = (  // It would be more beautiful to use parentheses to frame the jsx tag to represent the hierarchy.
    <h1>
        <span>Hello World</span>
    </h1>
)
const myid = "HeLlO";
const content = "Happy New Year"
const students = [
{id: "001", name: "Tom", age: 18},
{id: "002", name: "Tim", age: 19},
{id: "003", name: "Jerry", age: 20},
];
const VDOM2 = (
    <div>
        <h2 className="title" id={myid.toLowerCase()}>
            <span style={{color: 'pink'}}>{content}</span>
        </h2>
        <ul>{/* Use the map() function of ES6 for list rendering (batch rendering of data to the page) */}
        {
            students.map(student=>{
                return <li key={student.id}>{student.name}---{student.age}</li>
            }
        }
        </ul>
        <input type="text"/>
    </div>
)
jsx syntax rules:
1. Do not write quotation marks when defining virtual DOM
2. When js expressions are mixed into tags, {}
3. The expression will produce a value, which can be placed wherever the value is required
4. A statement is a string of code used to process logic
5. The class name in the tag specifies not to use class, but to use className
6. When the inline style is used in the label, it should be written in double brackets (using the small hump to write css style)
7. When adding event attributes (such as onclick), the first letter of the word after on should be capitalized (such as onclick)
8. The virtual DOM must have only one root tag
9. The label must be closed
10. When the tag starts with lowercase, it will be compiled into html tag by jsx. If html does not correspond to an element with the same name, an error will be reported. When the tag starts with uppercase, it will be recognized as a component by jsx. If the corresponding component is not found, it will be rejected
6. Render to page
In React, there are two ways to create components: functional components and class components. Among them, class components are used more frequently (there are more functional components after Hook in React 16.8)
7. Use of components
In React, there are two ways to create components: functional components and class components. Among them, class components are used more frequently (there are more functional components after Hook in React 16.8)
Functional component
As the name suggests, the component is written by a function
function Demo(props){    // Define a component called Demo
    return <h2>This is a component</h2>;    // The return value is the DOM content of the component
}
ReactDOM.render(<Demo/>, document.querySelector("#root"))
Functional component definition:
- Function names must be uppercase
- When called, it is called as a label and begins with uppercase
- The parameter of functional component is props (which will be described later)
Class component
This Component is built through classes, but it needs to inherit a class Component of React.
// Create class like components using ES6 writing method and inherit from react Component
class Demo extends React.Component{

    // Add the render() function (required), and the return value is the virtual DOM of the component
    render(){
        console.log(this);      // this of the render() function points to the instance object of the component
        return <h1>This is a Title!</h1>
    }
}
ReactDOM.render(<Demo/>, document.querySelector("#root"));
Definition of class component:
- You must inherit the built-in class Component of React
- The method render() must be included
- The parameter of constructor() is props (which will be described later). If you need to use constructor, you must call the constructor super(props) of the parent class
Execution of class component mounting:
- React parsed the component label and found the Demo component
- It is found as a class component, and then new the instance object of the class, and call the render method on the prototype object through the instance
- Convert the virtual DOM returned by the render method into a real DOM, and then render it to the page
Precautions for component definition:
1. There must be a root label between the component label returned by render() of a class component and the component label returned by a functional component
2. All must start with a capital letter
Mounting and unloading of components
I've seen many of them before mounting. Go directly to the code:
// ReactDOM. Render (component, which element to bind to);
ReactDOM.render( <Demo/>, document.querySelector("#app") );
The uninstalled code is longer, and I put it directly:
// ReactDOM. Unmountcomponentatnode (the component on which element to uninstall);
ReactDOM.unmountComponentAtNode( document.querySelector("#app") );
Other small knowledge
1. Components containing form elements are divided into uncontrolled rent price and controlled components
- Controlled component: the input component of the form component stores the content in the status (updated at any time) with the input
- Uncontrolled component: the content of the input component of the form component is stored in the status only when there is a demand (i.e. use and get)
8. Component properties
The essence of a component is an object, and the object naturally has attributes. The three most commonly used attributes in a component are state, props and refs
- state
State refers to the state of the component. What is clear is the data stored (needed) by the component
Use in class components:
class Weather extends React.Component{
    constructor(props){
        super(props);
        // this.state = {weather: "Spring"} / / you can also define state in the constructor
    }

    state = {   // Define state
        weather: "summer",
    }

    render(){
        // The current season is summer
        return <h2>The current season is:{ this.state.weather }</h2>
    }
}
Use this State calls the value class component in state to define state:
- state can be initialized in the constructor
- The class can be initialized by adding the attribute state
Use in functional components - In react16 Before 8, functional components could not have their own state (because initialization data would be repeated)
- To react16 After 8, the Hook method appeared, so that functional components can also use the state feature. You can understand it first and teach later.
function Demo(){
    const [weather, setWeather] = React.useState("Winter");
    return <h2>The current season is:{weather}</h2>     // Current season: Winter
}
Modify state
In the functions of class components, you will find that you can directly modify the value of state, such as:
this.state.count = 1
If you use the value of count in the page, you will find that why hasn't the page changed?
Sort out which function does page rendering rely on? Don't you rely on the render() function?
Wouldn't it be too much trouble if you called the render() function after directly modifying the state every time?
In fact, React does not recommend that state should not be modified directly, but through specific channels, that is, using the method setState() on the prototype object of the class
setState()
this.setState(partialState, [callback]);
- partialState: part of the object whose state needs to be updated
- Callback: callback function after status update
setState can be written in two ways: Method 1:
this.setState({
    count: 1,
})
Writing 2:
// Pass in a function to return the object that x needs to be modified, and the parameter is the current state
this.setState(state => ({count: state.count+1});
What kind of writing is used depends on whether the modified state needs to be used to the current state
forceUpdate()
Another way to modify the status is forceUpdate, which means forced update, that is, forced update status.
The parameter is the callback function after the update status is completed
this.forceUpdate([callback]);
setState update and forceUpdate are both merge operations, not replace operations
- After the setState operation, React will automatically call render() for us
- The execution times of render() is 1+n (1 is the automatic call during initialization, and N is the number of state updates (that is, the number of calls to setState or forceUpdate))
- Try to use less or no forceUpdate
9. Summary
The above is the notes I have prepared. I hope those who come in will read them carefully. In the next issue, I will update the components for you. The two properties, event binding and life cycle. See you in the next issue