Mycat is a database middleware.
Usage scenario:
- High availability and Mysql read / write separation
- Hierarchical storage of business data
- Large table, horizontal splitting, cluster parallel computing
- Database connection pool
- Consolidate multiple data sources
install
Download address: http://dl.mycat.org.cn
Before installing Mycat, you need to install Mysql and JDK. The stable version of Mycat is 1.6.7.1.
Download the installation package file (MYCAT XXX Linux. Tar. GZ) and upload it to the Linux server. It is generally installed under / usr/local for decompression
tar -zxvf Mycat-xxx-linux.tar.gz
The installation is successful. Enter the mycat directory and you can see
- bin: command file
- catlet: empty, extended
- conf: configuration file (server.xml,schema.xml,rule.xml, etc.)
- lib: dependent jar package
Core concept
Slice
We distribute the data stored in the same database to multiple databases to achieve the load effect of a single device. When the database volume exceeds 8 million, it needs to be segmented.
Database segmentation:
- Vertical splitting: if there are too many tables leading to too much data, use vertical splitting to split into different libraries according to business;
- Horizontal splitting: if the data volume of a single table is too large, use horizontal splitting. The order of sub warehouse and sub table should be vertical first, and then horizontal.
Vertical split:
- Vertical split table: split a large table into a small table. Generally, there are many fields in the table. The fields that are not commonly used, with large data and long length are split into the "extended table".
- Vertical warehouse splitting: split different businesses in the system, such as User, product and Order. After segmentation, it is placed on multiple servers. In the high concurrency scenario, the vertical sub database can break through the bottleneck of IO, connections and stand-alone hardware resources to a certain extent.
Horizontal split:
- Horizontal table splitting: for a single table with a large amount of data, it is divided into multiple tables according to certain rules (RANGE,HASH module, etc.). However, these tables are still in the same library, so database operations at the library level still have IO bottlenecks. Not recommended.
- Horizontal database and table splitting: split the data of a single table into multiple servers. Each server has a corresponding database and table, but the data sets in the table are different. Segmentation rules: 1 One table from 0 to 10000 and one table from 10001 to 20000; 2. HASH formwork; 3. Geographical area.
Logical library
Mycat is a database middleware, which can be regarded as a logical library composed of one or more database clusters. Then the following logical table, the table for reading and writing data, is the logical table.
ER table
Table records and all associated parent table records are stored in the same data fragment to ensure that data association query will not collapse.
Global table
Similar to the data dictionary table, these redundant data are defined as global tables.
Fragment node
Data segmentation: a large table is divided into different sharding databases. The database where each table shard is located is the sharding node.
Partition host
There are multiple sharding databases on the same machine. The machine where the sharding node is located is the node host.
Common commands
Start Mycat:
bin/mycat start
bin/mycat stop
bin/mycat status
View Mycat:
Connection command: connection port number: 8066
mysql -h (IP address) -P 8066 -u root -p
Connection management command: connection port number: 9066
mysql -h (IP address) -P 9066 -u root -p
Configure server xml
Common system configuration
- charset value utf8 character set
- useSqlStat value 0 1 on real-time statistics 0 off
- sqlExecuteTimeout value 1000 SQL statement timeout
- processors value 1,2... Specifies the number of threads
- txIsolation value 1,2,3,4 isolation level of transactions
- The serverPort value 8066 uses the port number
- mangerPort value 9066 management port number
The user tag defines the user and authority to log in to Mycat:
<user name="mycat Username 2">
	<property name="password">password</property>
	<property name="schemas">Logical library name</property>
	<property name="readOnly">true(Read only)</property>
	<property name="benchmark">1000(Number of connections, 0 means unlimited)</property>
	<property name="usingDecrypt">1(Encrypted or not, 1 encrypted)</property>
	<!--Permission setting-->
	<privileges check="true">
		<schema name="Logical library name" dml="0000">
			<table name="Logic table" dml="0000"></table>
			<table name="Logic table" dml="0000-Represents the permission to add, modify, query and delete, 1 represents yes, 0 does not"></table>
		</schema>
	</privileges>
</user>
# be careful
# Password encryption is set and needs to be executed in the / lib directory
java -cp Mycat-server-xxx.release.jar io.maycatutil.DecryptUtil 0:root:password
# Then get the encrypted password, and then change the password in the configuration file to the encrypted password
Firewall label defines firewall:
<firewall>
	<!--White list-->
	<whitehost>
		<host user="root" host="IP address"></host>
	</<whitehost>
	<!--Who are the users in the blacklist SQl Permissions for-->
	<blacklist check="true">
		<property name="selelctAllow">true</property>
		<property name="deleteAllow">false</property>
	</<blacklist>
</firewall>
Configure schema xml
Configure logical library, logical table, sharding and sharding nodes.
- There can be multiple schema logic libraries
- Table logical table, its attribute: rult: partition rule name, type: type (global table, ordinary table)
- dataNode defines a data node and cannot be repeated
- dataHost specific database instance, node host
- Database defines the database to which the shard belongs
dataHost label node host:
- Name node name
- maxCon Max connections
- minCon minimum connections
- balance load balancing type 0,1,2,3
- writeType write operation distribution method 0: all read and write operations are sent to the first writeHost 1: randomly sent to the writeHost
- switchType database switching test - 1.1,2,3
writeHost and readHost tags read / write host:
- Host instance host ID
- url database connection address
- Weight weight
- usingDecrypt password encryption 0 No 1 yes
<?xml version="1.0"?>
<!DOCTYPE mycat:schema SYSTEM "schema.dtd">
<mycat:schema xmlns:mycat="http://io.mycat/">
	<schema name="Logical library name" checkSQLschema="false" sqlMaxLimit="100">
		<!-- name:This table is divided into databases and uses data nodes -->
		<table name="Logic table" dataNode="Data node d1,Data node d2,Data node d3" rule="Fragmentation rule"></table>
	</schema>

	<!-- dataNode:data node  dataHost:host name database: Name of sub database -->
	<dataNode name="Data node d1" dataHost="host1" database="Database 1" />
	<dataNode name="Data node d2" dataHost="host2" database="Database 1" />
	<dataNode name="Data node d3" dataHost="host3" database="Database 1" />

	<dataHost name="host1" maxCon="1000" minCon="10" balance="0" writeType="0" dbType="mysql"       dbDriver="native" switchType="1" slaveThreshold="100" >
		<heartbeat>select user()</heartbeat>
	   	<writeHost host="hostM1" url="Address 1:3306" user="root" password="123123"></writeHost>         </dataHost>
	...
</mycat:schema>
Configure rule xml
Define rules for splitting tables
tableRule label:
- Name slice name
- rule segmentation algorithm
- columns fragment column name
- algoorithm algorithm method name
function tag:
- Name algorithm name
- Class concrete class
<tableRule name="mod_rule">
  <rule>
   	 <columns>customer_id</columns>
   	 <algorithm>mod-long</algorithm>
  </rule>
   ...
</tableRule>
<!--Function algorithm, which is split according to the modular rules of the selected field-->
<function name="mod-long" class="io.mycat.route.function.PartitionByMod" >
  <property name="count">2</property>
</function>
Configure sequence xml
The original primary key auto increment does not meet the primary key uniqueness constraint in the cluster. mycat provides a global sequence to ensure global uniqueness.
- Local file mode
- Database mode
- Local timestamp
- Other ways
- Self growing primary key
Slice
Architecture evolution: stand alone database - due to more and more requests, we separate the read and write of the database. The host is responsible for writing and the slave is responsible for reading. The slave library can be expanded horizontally, so more read requests are not a problem. When the amount of data increases and there are more and more write requests, you need to use sub database and sub table to segment the write operations.
Single database is too large: the processing capacity of a single database is limited; Solution: cut into more and smaller libraries
The single table is too large: CRUD is a problem; Index expansion, query timeout; Solution: cut into multiple datasets and smaller tables.
Method of dividing database and table:
It is divided into vertical segmentation and horizontal segmentation. If there are too many tables leading to too much data, use vertical segmentation to divide into different databases according to business; If the amount of data in a single table is too large, use horizontal segmentation. The order of sub warehouse and sub table should be vertical first, and then horizontal.
Split Vertically
Demo: when a database has a large amount of data, slice these tables, split a database into multiple databases, and divide them into user database, order database, information table
Step 1:
Prepare three database instances and create their own libraries (user library, order Library...)
Configure server XML (configuration user, character set, logical library name)
<user name="mycat user name">
	<property name="password">password</property>
	<property name="schemas">Logical library name</property>
</user>
Step 2:
Configure schema xml
<?xml version="1.0"?>
<!DOCTYPE mycat:schema SYSTEM "schema.dtd">
<mycat:schema xmlns:mycat="http://io.mycat/">
	<schema name="Logical library name" checkSQLschema="false" sqlMaxLimit="100">
		<table name="User table 1" dataNode="d1" primaryKey="Primary key ID"></table>
		<table name="User table 2" dataNode="d1" primaryKey="Primary key ID"></table>
		<table name="User table 3" dataNode="d1" primaryKey="Primary key ID"></table>
		<table name="Dictionary table 1" dataNode="dn1,dn2" type="global" ></table>

		<table name="Order form 1" dataNode="d2" primaryKey="Primary key ID"></table>
		<table name="Order form 2" dataNode="d2" primaryKey="Primary key ID"></table>
		<table name="Order form 3" dataNode="d2" primaryKey="Primary key ID"></table>
	</schema>

	<dataNode name="d1" dataHost="host1" database="User library" />
	<dataNode name="d2" dataHost="host2" database="Order form" />

	<dataHost name="host1" maxCon="1000" minCon="10" balance="0" writeType="0" dbType="mysql"       dbDriver="native" switchType="1" slaveThreshold="100" >
		<heartbeat>select user()</heartbeat>
	   	<writeHost host="hostM1" url="Address 1:3306" user="root" password="123123"></writeHost>         </dataHost>
	<dataHost name="host2" maxCon="1000" minCon="10" balance="0" writeType="0" dbType="mysql"       dbDriver="native" switchType="1" slaveThreshold="100" >
		<heartbeat>select user()</heartbeat>
	   	<writeHost host="hostM1" url="Address 2:3306" user="root" password="123123"></writeHost>         </dataHost>
</mycat:schema>
Step 3:
Create data in different databases. If there are dictionary tables, create dictionary tables in different databases to avoid database collapse query
Backup command: mysqldump -uroot -pitcast library name table name > file name
Create the backed up dictionary table data in other databases and configure schema XML, add global table
Dictionary table and associated sub table configuration
<schema name="TESTDB" checkSQLschema="false" sqlMaxLimit="100" dataNode="dn1">
	<table name="customer" dataNode="dn2" ></table>
	<table name="orders" dataNode="dn1,dn2" rule="mod_rule">
		<!-- childTable:Associated sub table primaryKey: Child table primary key joinKey: Associated field parentKey: Associated fields of parent table-->
		<childTable name="orders_detail" primaryKey="id" joinKey="order_id" parentKey="id" />
	</table>

	<!--For example, a dictionary table needs to be host1 host2 Primary keys are created, type: definition global Global table -->
	<table name="dict_order_type" dataNode="dn1,dn2" type="global" ></table>
</schema>
<dataNode name="dn1" dataHost="host1" database="Database 1" />
<dataNode name="dn2" dataHost="host2" database="Database 2" />
Start Mycat and the configuration is completed.
split horizon
Split the data in the same table to multiple database hosts according to certain rules.
Demonstration: when a table has a large amount of data, these tables are divided into three database hosts.
Step 1:
Prepare three database instances and create their own libraries (user libraries) respectively
Configure server XML (configuration user, character set, logical library name)
Step 2:
Configure schema xml
<?xml version="1.0"?>
<!DOCTYPE mycat:schema SYSTEM "schema.dtd">
<mycat:schema xmlns:mycat="http://io.mycat/">
	<schema name="Logical library name" checkSQLschema="false" sqlMaxLimit="100">
		<table name="User table 1" dataNode="d1,d2,d3" primaryKey="Primary key ID" rule="mod_rule(Take mold (split)">
		</table>
	</schema>

	<dataNode name="d1" dataHost="host1" database="User library" />
	<dataNode name="d2" dataHost="host2" database="User library" />
	<dataNode name="d3" dataHost="host3" database="User library" />

	<dataHost name="host1" maxCon="1000" minCon="10" balance="0" writeType="0" dbType="mysql"       dbDriver="native" switchType="1" slaveThreshold="100" >
		<heartbeat>select user()</heartbeat>
	   	<writeHost host="hostM1" url="Address 1:3306" user="root" password="123123"></writeHost>         </dataHost>
	<dataHost name="host2" maxCon="1000" minCon="10" balance="0" writeType="0" dbType="mysql"       dbDriver="native" switchType="1" slaveThreshold="100" >
		<heartbeat>select user()</heartbeat>
	   	<writeHost host="hostM1" url="Address 2:3306" user="root" password="123123"></writeHost>         </dataHost>
	<dataHost name="host3" maxCon="1000" minCon="10" balance="0" writeType="0" dbType="mysql"       dbDriver="native" switchType="1" slaveThreshold="100" >
		<heartbeat>select user()</heartbeat>
	   	<writeHost host="hostM1" url="Address 3:3306" user="root" password="123123"></writeHost>         </dataHost>
</mycat:schema>
Step 3:
Configure rule xml
<tableRule name="mod_rule">
   <rule>
   	    <columns>customer_id</columns>
   	    <algorithm>mod-long</algorithm>
   </rule>
   ...
</tableRule>

<!--Function algorithm, which is split according to the modular rules of the selected field-->
<function name="mod-long" class="io.mycat.route.function.PartitionByMod" >
    <property name="count">3</property>
</function>
Step 4:
Start Mycat, create a table structure under Mycat, and then create table structure data for other databases.
For testing, we create some data, and then create the corresponding data in the corresponding database according to the fragmentation rules.
Fragmentation rules:
-
Mod long module division
-
Auto sharding long range slicing
# Configure autopartition long Txt file
# M=10000 k=1000
0-500M=0
500M-1000M=1
1000M-1500M=2
-
Sharding by IntFile enumeration fragmentation this rule is suitable for splitting data in provinces and states
<tableRule name="sharding-by-intfile"> <rule> <columns>status</columns> <algorithm>hash-int</algorithm> </rule> </tableRule> <function name="hash-int" class="io.mycat.route.function.ParitionByFileMap" > <property name="mapFile">partition-hash-int.txt</property> <property name="type">0</property> <property name="defaultNode">0 ((default node)</property> </function> # partition-hash-int.txt 1=0 2=1 3=2 # Split according to the status field. Value 1 is the first database, value 2 is the second database, and value 3 is the third database -
Auto sharding rang mod range slicing (first perform range slicing, calculate grouping, and then perform intra group module calculation)
<tableRule name="auto-sharding-rang-mod"> <rule> <columns>id</columns> <algorithm>rang-mod</algorithm> </rule> </tableRule> <function name="rang-mod" class="io.mycat.route.function.PartitionByRangeMod" > <property name="mapFile">autopartition-range-mod.txt</property> <property name="defaultNode">0 ((default node)</property> </function> # autopartition-range-mod.txt 0-500M=1 500M1-200M=2 # M=10000 2 is 2 nodes -
Sharding by long hash fixed slice hash algorithm
-
Sharding by prefixpattern string hash modulus range algorithm
-
Sharding by murmur consistency hash algorithm
# Effectively solve the expansion problem of distributed data and evenly distribute it to database nodes <tableRule name="sharding-by-murmur"> <rule> <columns>id</columns> <algorithm>murmur</algorithm> </rule> </tableRule> <function name="murmur" class="io.mycat.route.function.PartitionByMurmurHash" > <property name="seed">0</property> <property name="count">3(Database node to slice)</property> <property name="virtualBucketTimes">160</property> </function> -
Sharding by date date date slicing algorithm
-
Sharding by month natural month segmentation algorithm
Global sequence:
Once the database is divided, mysql is deployed on different machines to add data, and the primary key of the table can be equal. In order to avoid this, set the global sequence.
- Local files: not recommended. Once mycat hangs, local files cannot be accessed.
- Database mode: use a table in the database to count and accumulate. mycat will preload some number segments into mycat's memory, so that most of the read and write sequences are completed in memory. If the number segment in memory runs out, mycat will ask the database again.
- Timestamp method: default, but the timestamp format is long and the performance is poor.
- Self generation: Java code needs to be changed according to business logic combination.
Set database mode:
# 1. Create table
CREATE TABLE MYCAT_SEQUENCE (
	NAME VARCHAR(50) NOT NULL,
	current_value INT NOT NULL,
    increment INT NOT NULL DEFAULT 100,
    PRIMARY KEY(NAME)
) ENGINE=INNODB;

# 2. Create 3 functions
DELIMITER $$
CREATE FUNCTION mycat_seq_currval(seq_name VARCHAR(50)) RETURNS VARCHAR(64)
	DETERMINISTIC
	BEGIN
	DECLARE retval VARCHAR(64);
	SET retval="-999999999,null";
	SELECT CONCAT(CAST(current_value AS CHAR),",",CAST(increment AS CHAR)) INTO retval FROM
	MYCAT_SEQUENCE WHERE NAME = seq_name;
	RETURN retval;
END $$
DELIMITER;

DELIMITER $$
CREATE FUNCTION mycat_seq_setval(seq_name VARCHAR(50),VALUE INTEGER) RETURNS VARCHAR(64)
	DETERMINISTIC
	BEGIN
	UPDATE MYCAT_SEQUENCE
	SET current_value = VALUE
	WHERE NAME = seq_name;
	RETURN mycat_seq_currval(seq_name);
END $$
DELIMITER;

DELIMITER $$
CREATE FUNCTION mycat_seq_nextval(seq_name VARCHAR(50)) RETURNS VARCHAR(64)
	DETERMINISTIC
	BEGIN
	UPDATE MYCAT_SEQUENCE
	SET current_value = current_value + increment WHERE NAME = seq_name;
	RETURN mycat_seq_currval(seq_name);
END $$
DELIMITER;

# 3 insert the table of the sequence and initialize MYCAT_SEQUENCE data
 Field 1: global sequence name, field 2: how many numbers to start, field 3: how many to give at one time
SELECT * FROM MYCAT_SEQUENCE
INSERT INTO MYCAT_SEQUENCE(NAME,current_value,increment) VALUES ('ORDERS', 400000,100);

# 4. Change mycat configuration:
Modify this file: sequence_db_conf.properties
 Change the table to be changed, such as order Change table to = dn1 node

# 5. Change the server XML file:
Changing the following type to type 1 is the database mode. Restart after the change
...
<property name="sequnceHandlerType">1</property>

# 6. Execute the add operation to add the sequence to be used
insert into `orders`(id,amount,customer_id,order_type) values(
    next value for MYCATSEQ_ORDERS
    ,1000,101,102);
Performance monitoring
Mycat-web
Help us with statistical tasks and configuration management tasks. You can count SQL and analyze slow SQL and high-frequency SQL to provide basis for optimizing SQL.
Install MYCAT Web
Step 1:
Before installing MYCAT web, you need to install JDK, zookeeper, official address: http://zookeeper.apache.org
Install zookeeper: download the installation package file (zookeepe XXX. Tar. GZ) and upload it to the Linux server. It is generally installed under / usr/local for decompression
tar -zxvf zookeeper-xxx.tar.gz
After decompression, create a data directory in the current directory (/ usr/loca/zookeeper), switch to the conf directory, and modify the configuration file zoo_sample.cfg renamed zoo CFG, edit the file after modification
dataDir=/usr/loca/zookeeper/data
Start zookeeper
bin/zkServer.sh start
Step 2:
Install MYCAT web, download address: http://dl.mycat.org.cn
Select the files in the MYCAT web directory to download, download the installation package files, upload them to the Linux server, and generally install them under / usr/local for decompression
tar -zxvf Mycat-web-xxx-linux.tar.gz
After decompression, in the current directory (/ usr / loca / MYCAT WEB), if there are more than one, start the program:
sh start.sh
Start program, access http://ip Address: 8082/mycat. Monitor Mycat through this website.
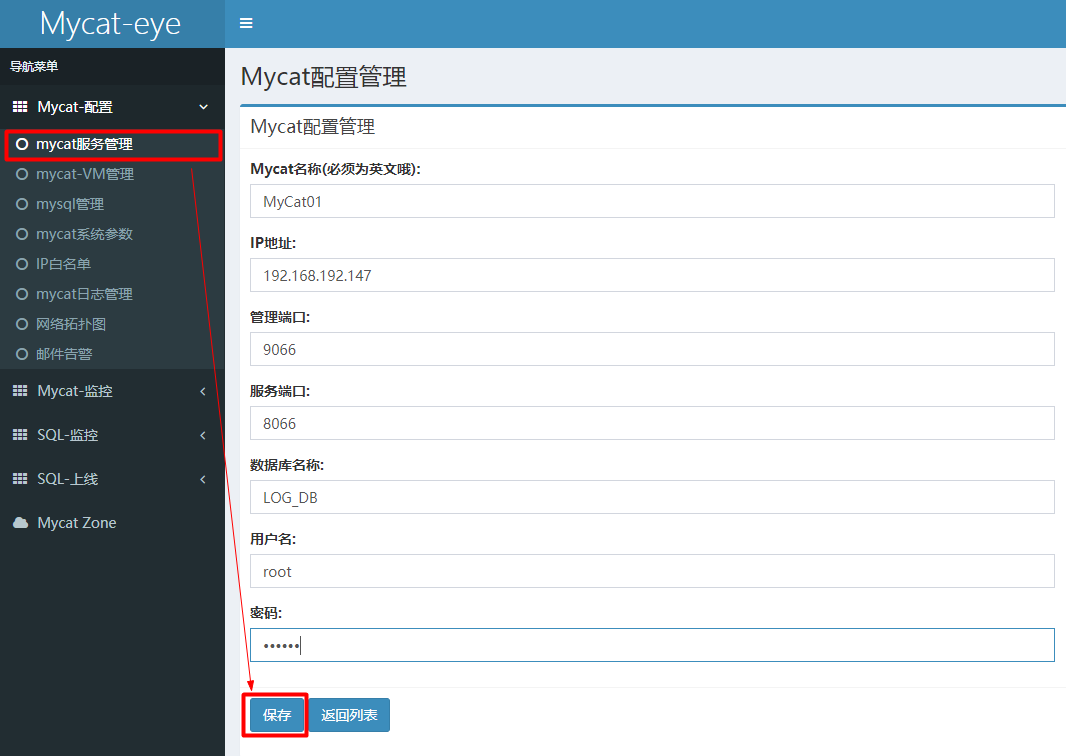
Step 3:
Configure mycat, open the web address, menu bar - mycat service management - add (add mycat to be monitored) Note: management port 9066 service port 8066
Read write separation
Fundamentals of replication
Master-slave replication is used to establish a database environment exactly like the master database, which is called the slave database. There is only one master database. Other servers act as slave servers. The master server writes the update information to a specific binary file. An index of the file is maintained to track the log cycle. This log can be recorded and sent to the update from the server.
Master slave replication configuration
Step 1: Host Configuration
Find the Mysql configuration file and modify the following content under [mysqld]
...
[mysqld]
server-id = 1  # Primary server unique ID

log-bin=Own local path/data/mysqlbin  # Enable binary log, the storage address of the log
log-err=Own local path/data/mysqlerr  # Enable binary log, error log storage address
# basedir="D:/devSoft/MySQLServer5.5/" # Root directory (optional)

# There are three types of logbin format: default state (function support is poor), row (row mode is not efficient for massive modification) MIXED (integrated)
binlog_format=STATEMENT  # Binary log format

read-only=0 # Host, 1 read-only, 0 read-write

binlog-ignore-db=mysql # Set the database not to be copied
binlog-do-db=Name of the primary database to be replicated  # Set the database to be replicated
Step 2: slave configuration
Modify my CNF profile
...
[mysqld]
server-id = 2  # Unique ID of slave server
log-bin=Own local path/data/mysqlbin  # Enable binary log, the storage address of the log
relay-log=mysql-relay # Enable relay log
Step 3: restart the service and close the firewall
After changing the configuration file, restart the Mysql service
Turn off the firewall systemctl stop firewalld
Step 4: create a user and authorize it to the slave
Host creation user:
GRANT REPLICATION SLAVE ON *.* TO 'user name'@'From machine database IP perhaps % All' IDENTIFIED BY 'password';
flush privileges;
Query the status of the host:
show master status;
# Execute the above command to get the File(binlog) position (access point) binlog_ Do_ DB (database to be replicated) Binlog_IgnoreDB()
Slave operation:
Execute on the slave Mysql command line.
Host user is the user and password just created in the host;
The binlog log name is viewed and assigned in the host status;
CHANGE MASTER TO MASTER_HOST='host IP',MASTER_USER='Host user',MASTER_PASSWORD='Host password',
MASTER_LOG_FILE='binlog Log name',MASTER_LOG_POS=Specific access point value;
If the operation fails and needs to be reconfigured, execute the following 2 commands
stop slave;    # Stop synchronization
reset master;  # Reset master-slave configuration
Then execute the following command to start synchronization
start slave;
Step 5: check for success
show slave status\G;  # Check status
# If the field below the result is Yes, the configuration is successful
- Slave_IO_Running: Yes
- Slave_SQL_Running: Yes
Check whether the master-slave replication of Mycat is normal
One master and one slave configuration
First, configure the master-slave replication of the database
Step 1 change the server XML file:
Set the user name and password of mycat, and set the logical library name of mycat in the schemas section.
...
<user name="mycat user name">
	<property name="password">password</property>
	<property name="schemas">TESTDB</property>
</user>
Step 2 change the schema XML file:
<?xml version="1.0"?>
<!DOCTYPE mycat:schema SYSTEM "schema.dtd">
<mycat:schema xmlns:mycat="http://io.mycat/">

	<schema name="Logical library name" checkSQLschema="false" sqlMaxLimit="100">
		<table name="Table 1" dataNode="dn1" primaryKey="Primary key ID"></table>
	</schema>

	<dataNode name="dn1" dataHost="host1" database="Database name" />

	<!-- dataHost: host name balance: Load balancing type 0 does not enable 1 dual master dual slave 2 random distribution 3 master write slave read  -->
	<dataHost name="host1" maxCon="1000" minCon="10" balance="3" writeType="0" dbType="mysql" dbDriver="native" switchType="1" slaveThreshold="100" >
		<heartbeat>select user()</heartbeat>

		<!-- Configure write host host: Write the host name, url: Address of the host user: User name of the host password: Host password -->
	   	<writeHost host="hostm1" url="192.168.67.1:3306" user="root" password="123123">
	   		<!-- Configure the configuration of the slave read Library (slave Library) -->
	    	<readHost host="hosts1" url="192.168.67.131:3306" user="root" password="123123">
	    	</readHost>
	    </writeHost>
	</dataHost>
</mycat:schema>
Step 3 verify database access:
mysql -u root -p password -h Remote access Id address -P 3306 Port number
Step 5 configure Mycat log:
In the / usr/local/mycat/conf configuration, modify log4j2 xml
...
<asyncRoot level="debug" includeLocation="true">...<asyncRoot>
The log is modified to debug pattern
Step 6 start Mycat
# Mode 1 - console startup: go to mycat/bin directory and execute mycat console
[root@... bin]# ./mycat console

# Mode 2 - background start: go to mycat start under mycat/bin directory
[root@... bin]# ./mycat start
If the startup fails, an error is reported and the domain name resolution fails
Solution: modify / etc/hosts and add your machine name after 127.0.0.1. After modification, restart the service network restart
Start successfully, log in to MyCat:
# Background management window:
mysql -uroot -p password -h 192.168.67.131 -P 9066
# Data window:
mysql -uroot -p password -h address -P 8066
# After logging in, query the library
show databases;
After the configuration is completed, the demonstration will be carried out,
Check the log information in / usr/local/mycat/log to see which database is used
tail -f mycat.log # view log
Dual master and dual slave configuration
First, configure the master-slave replication of the database, including 4 databases, 2 hosts and 2 slaves
Step 1: Host Configuration
Find the Mysql configuration file and modify the following content under [mysqld]
...
[mysqld]
server-id = 1  # Primary server unique ID

log-bin=Own local path/data/mysqlbin  # Enable binary log, the storage address of the log

binlog_format=STATEMENT  # Binary log format

binlog-ignore-db=mysql # Set the database not to be copied

binlog-do-db=Name of the primary database to be replicated 1  # Set the database to be replicated
binlog-do-db=Name of primary database to be replicated 2  # Set the database to be replicated
binlog-do-db=Name of primary database to be replicated 3  # Set the database to be replicated

log-slave-updates # In the slave database, the binary log file should also be updated when there is a write operation
The other host is also configured in this way. Note that the server ID cannot be repeated
Step 2: slave configuration
Modify my CNF profile
...
[mysqld]
server-id = 2  # Unique ID of slave server

relay-log=mysql-relay # Enable relay log
The other slave is also configured in this way. Note that the server ID cannot be repeated
Step 3: restart the service and close the firewall
After changing the configuration file, restart the Mysql service
Turn off the firewall systemctl stop firewalld
Step 4: create a user and authorize it to the slave
Create users on 2 hosts:
GRANT REPLICATION SLAVE ON *.* TO 'user name'@'From machine database IP perhaps % All' IDENTIFIED BY 'password';
flush privileges;
Query the status of the host:
show master status;
# Execute the above command to get the File(binlog) position (access point) binlog_ Do_ DB (database to be replicated) Binlog_IgnoreDB()
Configure the host to be replicated on the slave
Copy host 1 from slave 1, copy host 2 from slave 2,
Slave 1 executes:
CHANGE MASTER TO MASTER_HOST='Host 1 IP',MASTER_USER='Host user',MASTER_PASSWORD='Host password',
MASTER_LOG_FILE='binlog Log name',MASTER_LOG_POS=Specific access point value;
Slave 2 executes:
CHANGE MASTER TO MASTER_HOST='Host 2 IP',MASTER_USER='Host user',MASTER_PASSWORD='Host password',
MASTER_LOG_FILE='binlog Log name',MASTER_LOG_POS=Specific access point value;
If the operation fails and needs to be reconfigured, execute the following 2 commands
stop slave;    # Stop synchronization
reset master;  # Reset master-slave configuration
Then the two slaves execute the following command to start synchronization
start slave;
Step 5: two hosts copy each other
Host 1 execution
CHANGE MASTER TO MASTER_HOST='Host 2 IP',MASTER_USER='Host user',MASTER_PASSWORD='Host password',
MASTER_LOG_FILE='binlog Log name',MASTER_LOG_POS=Specific access point value;
Host 2 execution
CHANGE MASTER TO MASTER_HOST='Host 1 IP',MASTER_USER='Host user',MASTER_PASSWORD='Host password',
MASTER_LOG_FILE='binlog Log name',MASTER_LOG_POS=Specific access point value;
Then execute the following steps:
start slave;
Step 6: check for success
show slave status\G;  # Check status
# If the field below the result is Yes, the configuration is successful
- Slave_IO_Running: Yes
- Slave_SQL_Running: Yes
Check whether the master-slave replication of Mycat is normal. Host 1 creates data and slave 1. Host 2 has successfully replicated.
Step 7: configure read / write separation
Configure read-write separation through Mycat and change the server XML file:
Set the user name and password of mycat, and set the logical library name of mycat in the schemas section.
Step 8 change the schema XML file:
<?xml version="1.0"?>
<!DOCTYPE mycat:schema SYSTEM "schema.dtd">
<mycat:schema xmlns:mycat="http://io.mycat/">

	<schema name="Logical library name" checkSQLschema="false" sqlMaxLimit="100">
		<table name="Table 1" dataNode="dn1" primaryKey="Primary key ID"></table>
	</schema>

	<dataNode name="dn1" dataHost="host1" database="Database name" />

	<!-- dataHost: host name balance: Load balancing type 0 does not enable 1 dual master dual slave 2 random distribution 3 master write slave read  -->
	<!-- writeType 0 The write operation is on the first host. If it hangs, it will be connected to the second host 1 and sent to the host randomly -->
	<!-- writeType -1 No automatic Switch1 automatic switch2 is determined based on the heartbeat state-->
	<dataHost name="host1" maxCon="1000" minCon="10" balance="1" writeType="0" dbType="mysql" dbDriver="native" switchType="1" slaveThreshold="100" >
		<heartbeat>select user()</heartbeat>

		<!-- Configure write host host: Write the host name, url: Address of the host user: User name of the host password: Host password -->
	   	<writeHost host="hostm1" url="Host 1:3306" user="root" password="123123">
	    	<readHost host="hosts1" url="Slave 1:3306" user="root" password="123123">
	    	</readHost>
	    </writeHost>

        <writeHost host="hostm2" url="Host 2:3306" user="root" password="123123">
	    	<readHost host="hosts2" url="Slave 2:3306" user="root" password="123123">
	    	</readHost>
	    </writeHost>
	</dataHost>
</mycat:schema>
Step 3 verify database access:
mysql -u root -p password -h Remote access Id address -P 3306 Port number
Step 5 configure Mycat log:
In the / usr/local/mycat/conf configuration, modify log4j2 xml
...
<asyncRoot level="debug" includeLocation="true">...<asyncRoot>
The log is modified to debug pattern
Step 6 start Mycat
# Mode 1 - console startup: go to mycat/bin directory and execute mycat console
[root@... bin]# ./mycat console

# Mode 2 - background start: go to mycat start under mycat/bin directory
[root@... bin]# ./mycat start
Start successfully, log in to MyCat, configure and demonstrate.
Cluster construction
Build a high availability cluster. Two HAProxy can realize the high availability and load balancing of Mycat multi node cluster, while the high availability of HAProxy is realized by keepalived. Keepalived is responsible for preempting VIP (virtual IP) for the server and accessing the host after preemption.
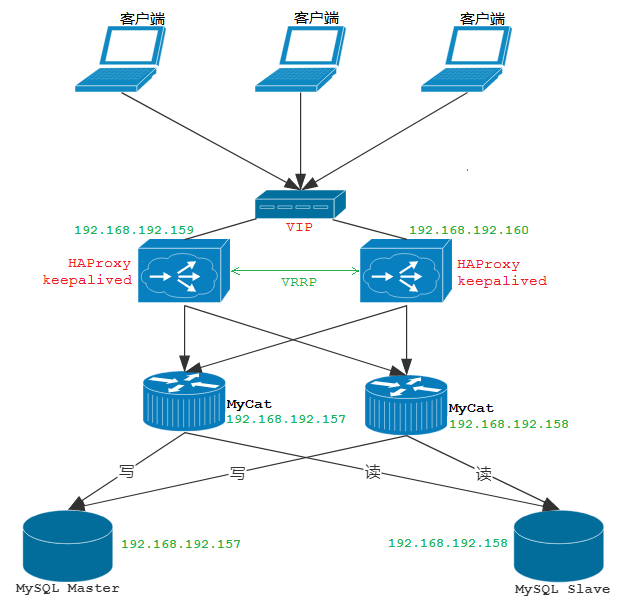
Build a highly available cluster:
The above figure shows the cluster architecture we want to install, including 2 mysql, 2 MYCAT and 2 haproxy
Step 1: install mysql and Mycat
Install and configure the master-slave configuration of the database, and configure the read-write separation of Mycat. The installation is consistent with the above read-write separation steps.
Step 2: install HAProxy
HAProxy
Download address: https://src.fedoraproject.org/repo/pkgs/haproxy
Download the installation package file (haproxy-xxx.tar.gz) and upload it to the Linux server. It is generally installed under / usr/local/src for decompression
tar -zxvf haproxy-1.5.16.tar.gz
After decompression, check the kernel version and compile
cd /usr/local/src/haproxyc  # Switch directory
uname -r   # Check the kernel version (get 2.6.43-431.e16.x86_64)

# HAProxy is developed in C language. It needs to be compiled and compiled
make TARGET=linux2643 PREFIX=/usr/local/haproxy ARCH=x86_64
# TARGET=linux kernel version. The first few bits of uname -r command are the kernel version
# PREFIX haproxyc installation path
# ARCH system bits
After compiling, install
make install PREFIX=/usr/local/haproxy
After successful installation, create a directory (the directory where the haproxy data is stored)
mkdir -p /usr/data/haproxy/
Create HAProxy profile
vim /usr/local/haproxy/haproxy.conf
Profile:
global
	log 127.0.0.1 local0
	maxconn 4096
	chroot /usr/local/haproxy
	pidfile /usr/data/haproxy/haproxy.pid
	uid 99
	gid 99
	daemon
	node mysql-haproxy-01
	description mysql-haproxy-01
defaults
	log global
	mode tcp
	option abortonclose
	option redispatch
	retries 3
	maxconn 2000
	timeout connect 50000ms
	timeout client 50000ms
	timeout server 50000ms
listen proxy_status
	bind 0.0.0.0:48066
		mode tcp
		balance roundrobin
		server mycat_1 mycat1 address:8066 check
		server mycat_2 mycat2 address:8066 check
frontend admin_stats
	bind 0.0.0.0:8888
		mode http
		stats enable
		option httplog
		maxconn 10
		stats refresh 30s
		stats uri /admin
		stats auth admin:123123
		stats hide-version
		stats admin if TRUE
Content analysis:
#Parameters in global configuration are process level parameters, which are usually related to the operating system they are running on
global
	#Define global syslog servers, up to 2; local0 is the log device, corresponding to / etc / rsyslog The configuration in conf collects info level logs by default
	log 127.0.0.1 local0
	#log 127.0.0.1 local1 notice
	#log loghost local0 info
	#Set the maximum number of concurrent connections accepted by each haproxy process;
	maxconn 4096
	#Modifying the working directory of haproxy to the specified directory and executing chroot operation before giving up permission can improve the security level of haproxy
	chroot /usr/local/haproxy
	#Process ID save file
	pidfile /usr/data/haproxy/haproxy.pid
	#Specify user ID
	uid 99
	#Specify group ID
	gid 99
	#Set HAproxy to run as a daemon
	daemon
	#debug
	#quiet
	node mysql-haproxy-01  ## Defines the name of the current node, which is used when multiple haproxy processes share the same IP address in the HA scenario
	description mysql-haproxy-01 ## Description of the current instance

#Defaults: used to provide default parameters for all other configuration segments. The default configuration parameters can be reset by the next "defaults"
defaults
	#Inherit the log definition in global
	log global
	#Processing mode used (tcp: layer 4, http: layer 7, health: status check, only return OK)
	### tcp: the instance runs in pure tcp mode. A full duplex connection will be established between the client and the server, and no type of check will be performed on layer 7 messages. This is the default mode
	### http: the instance runs in http mode. Client requests will be deeply analyzed before being forwarded to the back-end server. All requests that are not compatible with RFC mode will be rejected
	### Health: the instance runs in the health mode. It only responds to the "OK" message and closes the connection to the inbound request without recording any log information. This mode will be used for the monitoring status detection request of the corresponding external component
	mode tcp
	#When the server load is very high, the connection with a long processing time in the current queue will be automatically ended
	option abortonclose

	#When a cookie is used, haproxy will insert the serverID of the requested back-end server into the cookie to ensure the session persistence of the session. At this time, the back-end server is down, but the client's cookie will not be refreshed. Setting this parameter will forcibly direct the client's request to another back-end server to ensure the normal operation of the service.
	option redispatch
	retries 3
	# Maximum number of concurrent connections at the front end (2000 by default)
	maxconn 2000
	# Connection timeout (the default is milliseconds, and the unit can be set to us,ms,s,m,h,d)
	timeout connect 5000
	# Client timeout
	timeout client 50000
	# Server timeout
	timeout server 50000

#listen: used to define a complete proxy by associating the "front end" and "back end". It is usually only useful for TCP traffic
listen proxy_status
	bind 0.0.0.0:48066 # Binding port
		mode tcp
		balance roundrobin # Define a load balancing algorithm, which can be used in "defaults", "listen" and "backend". The default is polling
		#Format: server < name > < address > [: [port]] [param *]
		# Weight: weight. The default value is 1 and the maximum value is 256. 0 means that it does not participate in load balancing
        # backup: set as the standby server. Only other servers in the load balancing scenario can not enable this server
        # Check: start to check the monitoring status of this server, which can be set more finely with the help of additional parameters
        # inter: set the time interval of monitoring status check, in milliseconds. The default is 2000. Fastiter and downinter can also be used to optimize the event delay according to the server-side topics
        # rise: sets the number of times the server needs to be checked to transition from offline state to normal state (if not set, the default value is 2)
        # False: sets the number of times the server needs to be checked when it transitions from normal state to offline state (if it is not set, the default value is 3)
        # Cookie: set the cookie value for the specified server. The value specified here will be checked when the request is inbound. The server selected for this value for the first time will be selected by subsequent requests. Its purpose is to realize the function of persistent connection
        # maxconn: Specifies the maximum number of concurrent connections accepted by this server. If the number of connections sent to this server is higher than the value specified here, it will be placed in the request queue to wait for other connections to be released
		server mycat_1 192.168.192.157:8066 check inter 10s
		server mycat_2 192.168.192.158:8066 check inter 10s

# It is used to match the domain name and uri requested by the receiving customer, and do different request processing for different matches
# Status information statistics page of HAProxy
frontend admin_stats
	bind 0.0.0.0:8888
		mode http
		stats enable
		option httplog
		maxconn 10
		stats refresh 30s
		stats uri /admin
		stats auth admin:123123
		stats hide-version
		stats admin if TRUE
Start HAProxy
/usr/local/haproxy/sbin/haproxy -f /usr/local/haproxy/haproxy.conf
View process
ps -ef|grep haproxy
Access address: http://IP Address: 8888/admin (monitoring address)
Access Mycat through haproxy
mysql -h ip address -P 48066 -u mycat user name -p password;
Step 3: install Keepalived
Keepalived
Download address: https://www.keepalived.org/download.html
Download the installation package file (kept-xxx. Tar. GZ) and upload it to the Linux server. It is generally installed under / usr/local/src for decompression
tar -zxvf keepalived-1.4.5.tar.gz
After decompression, install the dependent plug-ins
yum install -y gcc openssl-devel popt-devel
Enter the extracted directory, configure it and compile it
cd /usr/local/src/keepalived-1.4.5

./configure --prefix=/usr/local/keepalived
Install after completion
make && make install
Pre run configuration
cp /usr/local/src/keepalived-1.4.5/keepalived/etc/init.d/keepalived /etc/init.d/
mkdir /etc/keepalived
cp /usr/local/keepalived/etc/keepalived/keepalived.conf /etc/keepalived/
cp /usr/local/src/keepalived-1.4.5/keepalived/etc/sysconfig/keepalived /etc/sysconfig/
cp /usr/local/keepalived/sbin/keepalived /usr/sbin/
Modify the configuration file / etc / kept / kept conf
Master:
global_defs {
	notification_email {
		javadct@163.com
	}
	notification_email_from keepalived@showjoy.com
	smtp_server 127.0.0.1
	smtp_connect_timeout 30
	router_id haproxy01
	vrrp_skip_check_adv_addr
	vrrp_garp_interval 0
	vrrp_gna_interval 0
}

vrrp_script chk_haproxy {
	script "/etc/keepalived/haproxy_check.sh"
	interval 2
	weight 2
}

vrrp_instance VI_1 {
	#The host is equipped with MASTER and the standby is equipped with BACKUP
	state MASTER
	#Network card of the machine
	interface eth1
	virtual_router_id 51
	#The higher the value, the higher the priority
	priority 120
	advert_int 1
	authentication {
		auth_type PASS
		auth_pass 1111
	}
	## Track_ Add script block to instance configuration block
    track_script {
    	chk_haproxy ## Check whether the HAProxy service is alive
    }
	virtual_ipaddress {
		#Virtual IP
		192.168.192.200
	}
}
BackUP:
global_defs {
	notification_email {
		javadct@163.com
	}
	notification_email_from keepalived@showjoy.com
	smtp_server 127.0.0.1
	smtp_connect_timeout 30
	#Identify this node
	router_id haproxy02
	vrrp_skip_check_adv_addr
	vrrp_garp_interval 0
	vrrp_gna_interval 0
}

# keepalived will execute the script regularly, analyze the execution results of the script, and dynamically adjust the VRRP_ Priority of instance
vrrp_script chk_haproxy {
	# Script path to detect haproxy status
	script "/etc/keepalived/haproxy_check.sh"
	#Detection interval
	interval 2
	#If the condition holds, the weight is + 2
	weight 2
}

vrrp_instance VI_1 {
	#The host is equipped with MASTER and the standby is equipped with BACKUP
	state BACKUP
	#Network card of the machine
	interface eth1
	virtual_router_id 51
	#The higher the value, the higher the priority
	priority 100
	advert_int 1
	authentication {
		auth_type PASS
		auth_pass 1111
	}
	## Track_ Add script block to instance configuration block
    track_script {
    	chk_haproxy ## Check whether the HAProxy service is alive
    }
	virtual_ipaddress {
		#Virtual IP
		192.168.192.200
	}
}
Write a shell script to detect haproxy_check.sh
In the / etc / kept / directory, create haproxy_check.sh script file
#!/bin/bash

A=`ps -C haproxy --no-header | wc -l`

if [ $A -eq 0 ];then

  /usr/local/haproxy/sbin/haproxy -f /usr/local/haproxy/haproxy.conf

  echo "haproxy restart ..." &> /dev/null

  sleep 1

  if [ `ps -C haproxy --no-header | wc -l` -eq 0 ];then

    /etc/init.d/keepalived stop

    echo "stop keepalived" &> /dev/null

  fi

fi
Start test
service keepalived start
validate logon
# Vip (virtual ip) is accessed
mysql -uMycat user name -p password -h 192.168.192.200 -P 48066
