Part I
jacky's consistent idea is to learn not from the surface, but from the essence. Technology is always philosophy.
The video demo of this article is as follows:
https://v.qq.com/x/page/v0890lmkjfo.html
(1) Evolution history of PyQt5
To clarify what PyQt5 is, let's first briefly talk about what Qt is.
1. What is Qt?
First, what is Qt abstractly?
- Qt is a cross-platform C++ graphical user interface application development framework. Qt can support desktop application development, embedded development and mobile development at the same time, covering all the mainstream platforms. In 1991, it was developed by Norwegian Funny Technologies; this Norwegian Funny Technologies, jacky said a few more words, this company also has many famous products, such as KDE, Autodesk Maya, WPS, YY voice, VirtualBox, Opera browser, excellent flying car, which is one of the most popular desktop environments on Linux operating system. Blizzard Warfare Network Clients and so on, in a word, very Niu X.
- And Qt's development purpose, jacky is preferred: "Code Less; Create More; Deploy Anywhere"
2. What is the QT Designer?
Programmers usually have two ways to make UI interfaces. They use UI tools and pure code to write UI interfaces, such as Android and iOS in mobile development. In PyQt5, we also have two ways.
- Qt Desinger is a tool specially used to make UI interface of Qt program. It is very simple to use. It can complete complex interface design by dragging and clicking, and can preview the effect map at any time.
3. What is PyQt5?
- PyQt is a cross-platform toolkit for creating GUI applications, which integrates Python and Qt libraries. That is to say, PyQt allows API s in Qt libraries to be invoked using Python language. The greatest advantage of this method is that while retaining the high operating efficiency of Qt, it greatly improves the development efficiency. Because it is much faster to develop programs in Python than in C++. PyQt encapsulates Qt completely and can do almost anything Qt can do with PyQt.
- Since the latest version of PyQt is 5.11, it is customary to become PyQt as PyQt 5.
-
Here's a question to explain: Is PyQt good or QT good?
- In fact, the friends who pay attention to this question may really want to know the answer, but this question is actually a false proposition. Rather than PyQT or QT, you are more familiar with C++ start or Python development. To be familiar with C++ is to use QT, and to be familiar with Python is to use PyQt.
(2) Development of PyQt5 Desktop GUI
This part of jacky stole a lazy, reproduce an article of a netizen, I think it's very good to share with you.
http://blog.sina.com.cn/s/blog_989218ad0102wz1k.html
First look at the effect: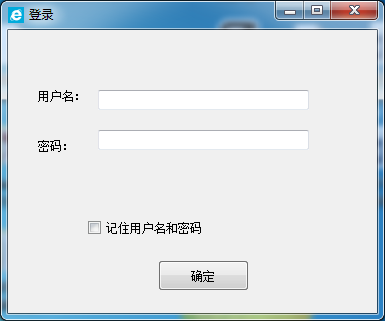
Yes, the students who have studied C# should be familiar with this interface. The style of buttons is very similar to that of the interface. Unexpectedly, python can also make such an interface.
2.1 Installation of python
Why do we say this? Let's open pip, search: PyQt5, or open the following connection directly:
https://pypi.python.org/pypi/PyQt5/5.9.1
As you can see, the python version supported by PyQt5 started with 3.5, which is very important.
Find a python version 3.5 or more to install:
https://www.python.org/downloads/windows/
2.2 Install PyQt5
pip installation is recommended:
pip3 install PyQt5
Wait a moment and continue to install PyQt5-tools
pip install PyQt5-tools
2.3 Configuration of pycharm
Download and install pycharm: https://www.jetbrains.com/pycharm/
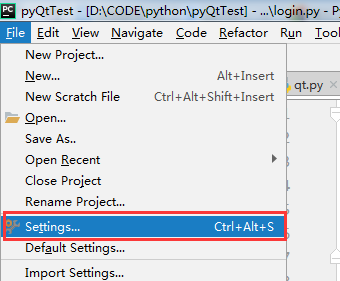
1. Click: File-"Settings
2. Tools - "External Tools -" Click on "+"
(ps: Here is my configuration. Your software is not very normal yet. Keep looking down.)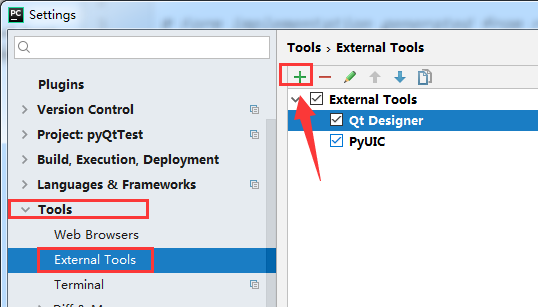
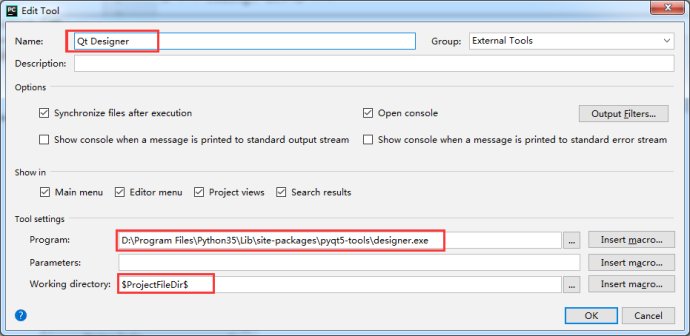
3. Setting up Qt Designer
Modify three places by default:
Name: Qt Designer
Programs: D:Program FilesPython35Libsite-packagespyqt5-toolsdesigner.exe
Working directory: $ ProjectFileDir$
(ps: Programs parameters need to be modified to the "designer.exe" path inside your computer)
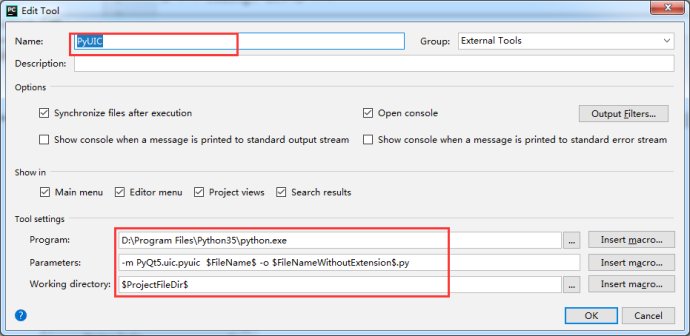
4. Configuring PyUIC
Set up four places, others can default (I don't know how to change, then default)
Name: PyUIC
Programs: D:Program FilesPython35python.exe
Parameters: -m PyQt5.uic.pyuic $FileName$ -o $FileNameWithoutExtension$.py
Working directory: $ ProjectFileDir$
(ps: Programs parameters need to be modified to the python "python.exe" path inside your computer)
2.4 Use Qt Designer
1. After completing the above steps, click Tools-"External Tools-" Qt Designer to start our Qt Designer 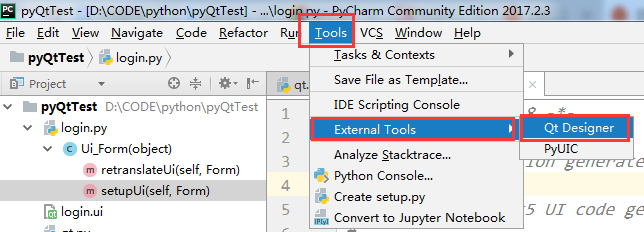
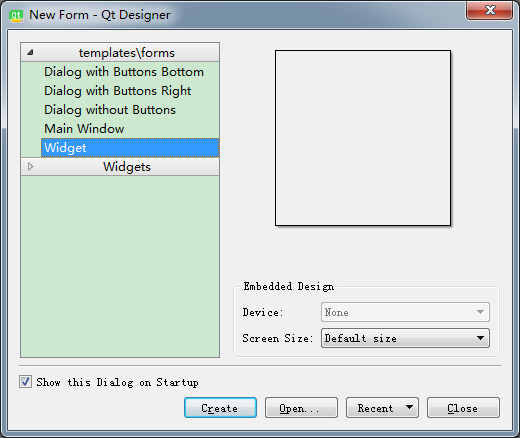
2. Select after startup: Widget, create a blank window, click Create, other defaults will do.
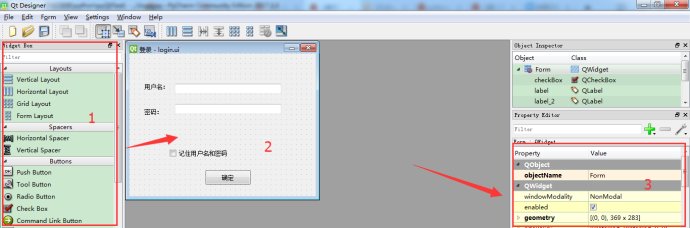
3. Drag from area 1 on the left. Note that the drag control goes to area 2. Modify the corresponding attributes in area 3, much like that of vs.
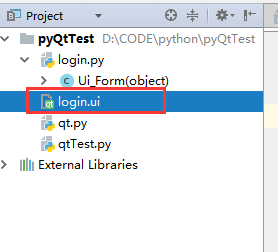
4. After the basic interface settings last night, you will see that a'.ui'file was generated in the same directory.
5. Right-click External Tools - "PyUIC" to convert ".ui" file to ".py" file
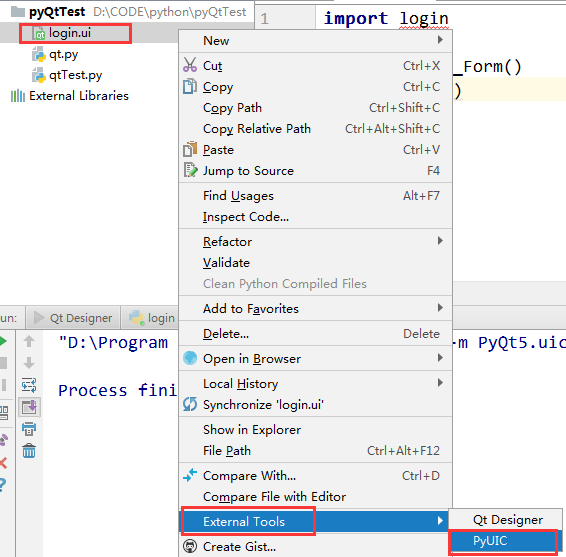
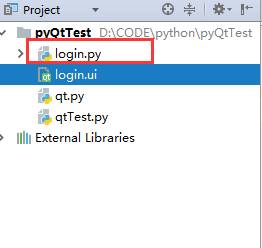
6. At this time, if everything is normal and there is no error, the corresponding ".py" file will be generated in the same directory.
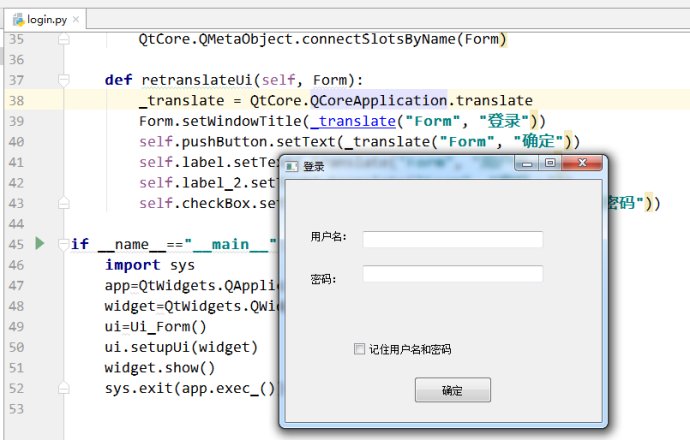
7. Put the following code into the generated'.py'file and put it at the end (note the indentation)
if __name__=="__main__":
    import sys
    from PyQt5.QtGui import QIcon
    app=QtWidgets.QApplication(sys.argv)
    widget=QtWidgets.QWidget()
    ui=Ui_Form()
    ui.setupUi(widget)
    widget.setWindowIcon(QIcon('web.png'))#Add icon icon, if there is no picture, you can not have this sentence
    widget.show()
    sys.exit(app.exec_())
8. Start up. Okay, congratulations. Open the python GUI
(3) Implementation of a landing system
3.1 Previous Supplement
- For the above I reprinted the content of netizens, jacky here add a few points:
- When we download PyQt5, we recommend using Douban Source (what is Douban Source can see my previous article)
pip install -i https://pypi.douban.com/simple/ PyQt5
pip install -i https://pypi.douban.com/simple/ PyQt5-tools
- We can also see the following information about advanced learning
PyQt5 Course http://code.py40.com/pyqt5/
3.2 Realization of Python Intelligent Bank Card Recognition System-Login Function
- Complete code
# -*- coding: utf-8 -*-

# Form implementation generated from reading ui file 'login.ui'
#
# Created by: PyQt5 UI code generator 5.11.3
#
# WARNING! All changes made in this file will be lost!

from PyQt5 import QtCore, QtGui, QtWidgets

class Ui_Form(object):
    def setupUi(self, Form):
        Form.setObjectName("Form")
        Form.resize(380, 245)
        self.widget = QtWidgets.QWidget(Form)
        self.widget.setGeometry(QtCore.QRect(50, 30, 291, 165))
        self.widget.setObjectName("widget")
        self.verticalLayout = QtWidgets.QVBoxLayout(self.widget)
        self.verticalLayout.setContentsMargins(0, 0, 0, 0)
        self.verticalLayout.setObjectName("verticalLayout")
        self.label = QtWidgets.QLabel(self.widget)
        self.label.setObjectName("label")
        self.verticalLayout.addWidget(self.label)
        self.lineEdit = QtWidgets.QLineEdit(self.widget)
        self.lineEdit.setObjectName("lineEdit")
        self.verticalLayout.addWidget(self.lineEdit)
        self.label_2 = QtWidgets.QLabel(self.widget)
        self.label_2.setObjectName("label_2")
        self.verticalLayout.addWidget(self.label_2)
        self.lineEdit_2 = QtWidgets.QLineEdit(self.widget)
        self.lineEdit_2.setObjectName("lineEdit_2")
        self.verticalLayout.addWidget(self.lineEdit_2)
        self.pushButton = QtWidgets.QPushButton(self.widget)
        self.pushButton.setObjectName("pushButton")
        self.verticalLayout.addWidget(self.pushButton)
        self.pushButton_2 = QtWidgets.QPushButton(self.widget)
        self.pushButton_2.setObjectName("pushButton_2")
        self.verticalLayout.addWidget(self.pushButton_2)

        self.retranslateUi(Form)
        QtCore.QMetaObject.connectSlotsByName(Form)

    def retranslateUi(self, Form):
        _translate = QtCore.QCoreApplication.translate
        Form.setWindowTitle(_translate("Form", "Intelligent Bank Card Recognition System v1.0 login"))
        self.label.setText(_translate("Form", "User name:"))
        self.label_2.setText(_translate("Form", "Password:"))
        self.pushButton.setText(_translate("Form", "Sign in"))
        self.pushButton_2.setText(_translate("Form", "Sign out"))

        # Logon button
        self.pushButton.clicked.connect(self.onclick)
        #Exit button
        self.pushButton_2.clicked.connect(quit)


    def onclick(self):
        if self.lineEdit.text() == 'jacky':
            if self.lineEdit_2.text() == '666666':
                MainWindow.close(widget)
            else:
                self.lineEdit_2.setText('Password error please re-enter')
        else:
            self.lineEdit.setText('User error please re-enter')


if __name__=="__main__":
    import sys
    from PyQt5.QtGui import QIcon
    app=QtWidgets.QApplication(sys.argv)
    MainWindow=QtWidgets.QMainWindow
    widget=QtWidgets.QWidget()
    ui=Ui_Form()
    ui.setupUi(widget)
    #widget.setWindowIcon(QIcon('web.png'))#Add icon icon, if there is no picture, you can not have this sentence
    widget.show()
    sys.exit(app.exec_())
Part II
This article is suitable for all levels of Python learners, including AI enthusiasts and technology enthusiasts to learn. Admittedly, AI is a knowledge system with profound mathematical logic, including machine learning, search problems, knowledge representation and so on. This article, strictly forbidden to say, we simply invoked Baidu AI's results, jacky hopes to give you an inspiration through this article, after all, theory is theory, practice, money is money, so on.
This video demo is as follows (due to environmental constraints, this demo video is silent, later jacky in Gitchat, Aliyun and tremble will have live sharing, please pay attention to):
Video demo link
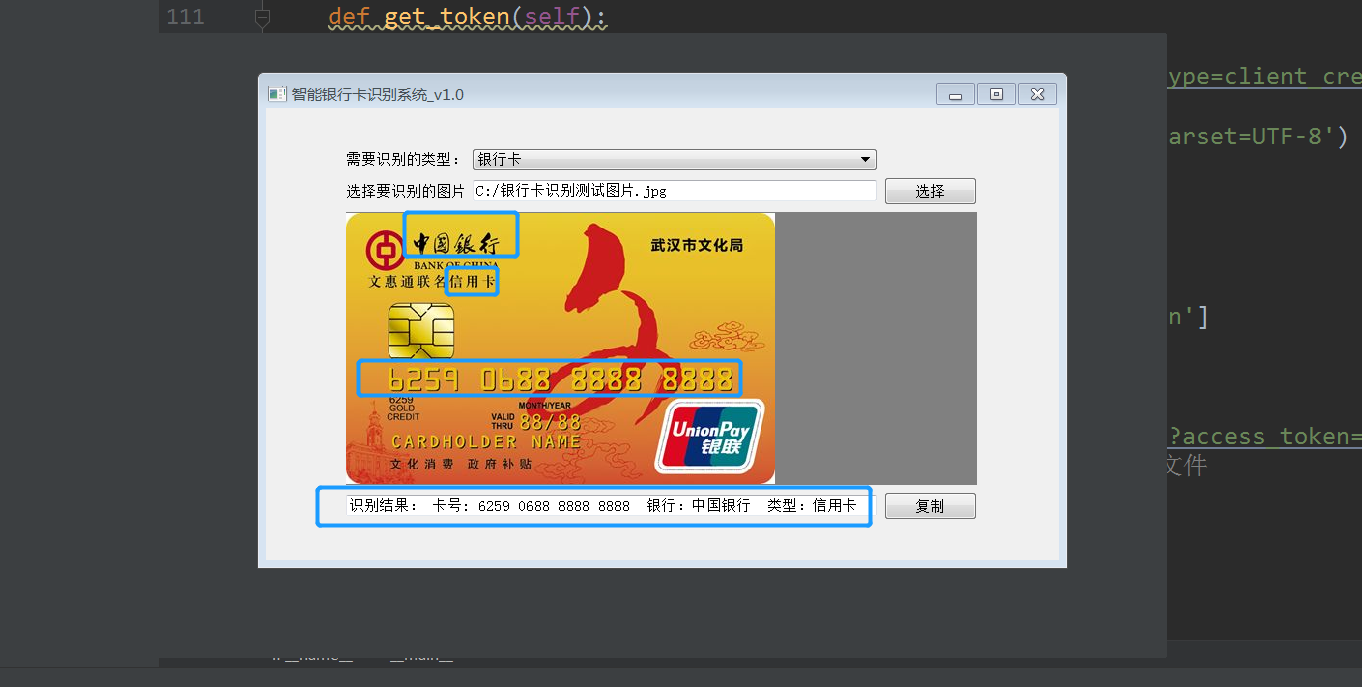
(1) Look at the effect of the system first.

(2) General idea of system realization
The video demo of this article is as follows:
System Development Environment Requirements:
1. Development tools: Pycharm, PyQt5
2. Development module: urllib, urllib.request, Base64, json, PyQt5
3.API Interface: Baidu API
2.1 Image Recognition Tool Interface
-
PyQt5 Desktop GUI Development
- This part is the main sharing content of jacky last time. Friends who are not familiar with this part can refer to "Python Smart Bank Card Recognition System Implementation (1) - PyQt5 Login Function", and can also cooperate with the operation demonstration in front of this video.
2.2 Selection of Recognition Types
- We need to set up identifying bank cards, credit cards or ID cards, etc.
2.3 Select the image to be recognized
- The main difficulty here is to understand this code: self. label_3. set Pixmap (scare Pixmap). Specific code annotations can be seen in the complete code of Part III. Other tips are Qt, the use of QPixmap and so on, because it is not logical, you can Baidu by yourself.
2.4 Recognition results
- The AI interface of Baidu is used here.
2.5 Copy to pasteboard
- This is some of PyQt5's small features, we can Baidu.
(3) Complete code
# -*- coding: utf-8 -*-

# Form implementation generated from reading ui file 'ocr.ui'
#
# Created by: PyQt5 UI code generator 5.11.3
#
# WARNING! All changes made in this file will be lost!

# Originality: jacky: data Shuju

from PyQt5 import QtCore, QtGui, QtWidgets
from PyQt5.QtWidgets import *
from PyQt5.QtGui import *
from PyQt5.QtCore import *
import json
# We are Python 3. When calling Baidu AI token, we do not need urllib2 in the official document to replace it with urllib.request.
import urllib, urllib.request, sys
import ssl
import base64
# Here, enter the AK and SK you got.
API_KEY = "jacky Remind you, enter your own application here. AK,Don't forget it"
SECRET_KEY = "jacky Remind you, enter your own application here. AK,Don't forget it"

class Ui_Form(object):
    def setupUi(self, Form):
        Form.setObjectName("Form")
        Form.resize(793, 452)
        self.widget = QtWidgets.QWidget(Form)
        self.widget.setGeometry(QtCore.QRect(80, 41, 631, 371))
        self.widget.setObjectName("widget")
        self.gridLayout = QtWidgets.QGridLayout(self.widget)
        self.gridLayout.setContentsMargins(0, 0, 0, 0)
        self.gridLayout.setObjectName("gridLayout")
        self.pushButton = QtWidgets.QPushButton(self.widget)
        self.pushButton.setObjectName("pushButton")
        self.gridLayout.addWidget(self.pushButton, 2, 2, 1, 1)
        self.lineEdit = QtWidgets.QLineEdit(self.widget)
        self.lineEdit.setObjectName("lineEdit")
        self.gridLayout.addWidget(self.lineEdit, 2, 1, 1, 1)
        self.label_2 = QtWidgets.QLabel(self.widget)
        self.label_2.setObjectName("label_2")
        self.gridLayout.addWidget(self.label_2, 2, 0, 1, 1)
        self.label_3 = QtWidgets.QLabel(self.widget)
        self.label_3.setObjectName("label_3")
        self.label_3.setStyleSheet("background-color:gray")
        self.gridLayout.setObjectName("label_3")
        self.gridLayout.addWidget(self.label_3, 3, 0, 1, 3)
        self.lineEdit_2 = QtWidgets.QLineEdit(self.widget)
        self.lineEdit_2.setObjectName("lineEdit_2")
        self.gridLayout.addWidget(self.lineEdit_2, 7, 0, 1, 2)
        self.pushButton_2 = QtWidgets.QPushButton(self.widget)
        self.pushButton_2.setObjectName("pushButton_2")
        self.gridLayout.addWidget(self.pushButton_2, 7, 2, 1, 1)
        self.label = QtWidgets.QLabel(self.widget)
        self.label.setObjectName("label")
        self.gridLayout.addWidget(self.label, 0, 0, 1, 1)
        self.comboBox = QtWidgets.QComboBox(self.widget)
        self.comboBox.setObjectName("comboBox")
        self.comboBox.addItem("")
        self.gridLayout.addWidget(self.comboBox, 0, 1, 1, 1)

        self.retranslateUi(Form)
        QtCore.QMetaObject.connectSlotsByName(Form)

    def retranslateUi(self, Form):
        _translate = QtCore.QCoreApplication.translate
        Form.setWindowTitle(_translate("Form", "Intelligent Bank Card Recognition System_v1.0"))
        self.pushButton.setText(_translate("Form", "Choice"))
        self.label_2.setText(_translate("Form", "Select the image to be recognized"))
        self.label_3.setText(_translate("Form", ""))
        self.lineEdit_2.setText(_translate("Form", "Display recognition results"))
        self.pushButton_2.setText(_translate("Form", "copy"))
        self.label.setText(_translate("Form", "Types to be identified:"))
        self.comboBox.setItemText(0, _translate("Form", "Bank card"))
        self.comboBox.setItemText(1, _translate("Form", "ID"))
        self.comboBox.setItemText(2, _translate("Form", "License plate number"))
        # The first step is to let the system click on the selection to get the image we want to upload.
        self.pushButton.clicked.connect(self.openfile)

    # The second step is to set the path of the selected picture.
    def openfile(self):
        self.download_path = QFileDialog.getOpenFileName(self.widget,"Please select the pictures you need to identify.","/","Image File(*.jpg *.png)")
        # Decide whether to select a picture or not
        if not self.download_path[0].strip():
            pass
        else:
            self.lineEdit.setText(self.download_path[0])
            # Automatic image parsing
            pixmap = QPixmap(self.download_path[0])
            # Choose pictures. Pictures may be large or small. Let's simply deal with pictures.
            scarePixmap = pixmap.scaled(QSize(629,271),aspectRatioMode=Qt.KeepAspectRatio)
            # Set the picture in our control
            self.label_3.setPixmap(scarePixmap)
            self.typeTp()

    # Step 3: Select Types

    def typeTp(self):
        if self.comboBox.currentIndex()==0:
            self.get_token()
            self.get_bankcard(self.get_token())


    def get_token(self):
        # client_id is the AK acquired by the official website, and client_secret is the SK acquired by the official website.
        host = 'https://aip.baidubce.com/oauth/2.0/token?grant_type=client_credentials&client_id='+API_KEY+'&client_secret='+SECRET_KEY
        request = urllib.request.Request(host)
        request.add_header('Content-Type', 'application/json; charset=UTF-8')
        response = urllib.request.urlopen(request)
        content = response.read()
        if (content):
            print(content)
            # Explain the returned token data
            self.access_token = json.loads(content)['access_token']
            return self.access_token

    def get_bankcard(self,access_token):
        url = 'https://aip.baidubce.com/rest/2.0/ocr/v1/bankcard?access_token=' + access_token
        f = open(self.download_path[0], 'rb')  # Opening Graph File in Binary Mode
        img = base64.b64encode(f.read())
        params = {"image": img}
        # Baidu AI gives an example of Python 2
        # params = urllib.urlencode(params)
        params = urllib.parse.urlencode(params).encode('utf-8')
        request = urllib.request.Request(url, params)
        request.add_header('Content-Type', 'application/x-www-form-urlencoded')
        response = urllib.request.urlopen(request)
        content = response.read()
        if (content):
            print(content)
            bankcards = json.loads(content)
            stover = 'Recognition results:\n'

            try:
                if bankcards['result']['bank_card_type'] == 0:
                    bank_card_type = "Unrecognizable"
                elif bankcards['result']['bank_card_type'] == 1:
                    bank_card_type = "Debit Card"
                elif bankcards['result']['bank_card_type'] == 2:
                    bank_card_type = "Credit Card"
                stover += 'Card number: {}\n Bank:{}\n Type:{}'.format(bankcards['result']['bank_card_number'],bankcards['result']['bank_name'],bank_card_type)
            except BaseException:
                stover += 'Parsing error'
            self.lineEdit_2.setText(stover)
if __name__ == "__main__":
    import sys
    from PyQt5.QtGui import QIcon
    app = QtWidgets.QApplication(sys.argv)
    MainWindow = QtWidgets.QMainWindow
    widget = QtWidgets.QWidget()
    ui = Ui_Form()
    ui.setupUi(widget)
    # widget.setWindowIcon(QIcon('web.png'))#Add icon icon, if there is no picture, you can not have this sentence
    widget.show()
    sys.exit(app.exec_())