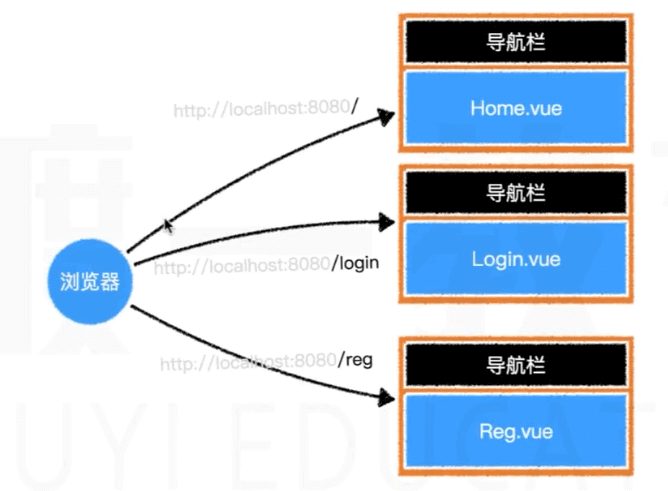
1. Meaning:
No matter what address the browser visits, the real page visited is always index HTML and vue render different components according to different addresses. Because the real page is unique, the page switching seen by the user is actually the switching of components. This kind of application is called single page application

2. Developing a single page application involves two core issues:
- Where to switch components
- How do access paths correspond to components
2, First acquaintance with Vue router
1. Vue router # is Vue JS is the official routing manager. Using Vue router # can easily build a single page application.
Official website address: https://router.vuejs.org/zh/
2. In fact, routing can be understood as pointing, that is, when I click a button on the page, I need to jump to the corresponding page, which is route jump.
3. First, let's learn three words:
- Route: first, it is an odd number, which is translated as route, that is, we can understand it as a single route or a route;
- Routes: it is a complex number, which means that a set of multiple can be a complex number; That is, we can understand it as a set of multiple routes. There are only two forms of sets representing multiple different states in JS: array and object. In fact, the official definition of routes is an array; So we remember that routes represent a collection of multiple arrays;
- Router: the above is a router. We can understand that a container contains the above two, or it is a manager responsible for managing the above two; Take an example of a common scenario: when the user clicks the button on the page, the router will go to the routes to find the route, that is, the router will go to the route set to find the corresponding route;
4. Routing mode:
- hash: the path comes from the value in # the address bar. This mode has good compatibility, but it is not good-looking and does not conform to user habits
- history: the path comes from the real address path, which is incompatible with the old browser (we use this one here)
- abstract: the path comes from memory (generally used for mobile terminal)
2, Vue Router case
1. Create project named vue route
2. Open the router project terminal and install the Vue router plug-in library with the following instructions
npm install vue-router

3. Create a new header under components vue,Footer.vue common component
1)Header.vue code - main implementation menu
<template>
    <!-- Header menu -->
    <div class="header">
        <!-- use router-link Components to navigate. -->
        <!-- Pass in `to` Property specifies the link. -->
        <!-- <router-link> By default, it will be rendered as a `<a>` label -->
        <router-link to="/">home page</router-link>
        <router-link to="/blog">Blog</router-link>
        <router-link to="/about">About us</router-link>
    </div>
</template>

<script>
    export default {

    }
</script>

<style scoped>
.header {
    width:1000px;
    margin:0 auto;
    height:80px;
    background:black;
    display:flex;
    justify-content: center;
    align-items:center;
}
.header a{
    font-size:18px;
    text-decoration: none;
    color:white;
    margin:0 10px;
}
</style>
2)Footer.vue code
<template>
    <div class="footer">
        Bottom area
    </div>
</template>

<script>
    export default {

    }
</script>

<style scoped>
.footer{
    width:1000px;
    line-height:80px;
    background: gray;
    margin:0 auto;
    text-align:center;
    color:white;
}
</style>
4. Create a new views directory under src, mainly to put some non-public page components
5. Create a new home under views vue,Blog.vue,About.vue, code home page, blog page and about us
1)Home.vue code
<template>
    <div>
        Here is the content of the home page
    </div>
</template>

<script>
    export default {

    }
</script>

<style scoped>

</style>
2)Blog.vue code
<template>
    <div>
        Here is the blog content
    </div>
</template>

<script>
    export default {

    }
</script>

<style scoped>

</style>
3)About.vue code
<template>
    <div>
        This is about our content
    </div>
</template>

<script>
    export default {

    }
</script>

<style scoped>

</style>
6. Create a router directory under src to store the routing configuration, and create a new config. In the router directory JS and index js
config.js code is as follows:
1) Writing 1 - not recommended
Reason: if there are too many pages, there will be more dependencies, which will lead to the loading of dependencies when loading a page. Therefore, we need to use delayed loading to import the page according to the path we visit
//index.js

// Import page components, @ represents src directory, and compiled represents root path
import Home from '@/views/Home.vue'
import Blog from '@/views/Blog.vue'
import About from '@/views/About.vue'
// Export routing configuration
export default{
    // 1. Routing mode
    mode:"history",
    // 2. Path configuration, in the form of array, a path corresponds to an object
    routes:[
        {
            path:"/",
            component:Home
        },
        {
            path:"/blog",
            component:Blog
        },
        {
            path:"/about",
            component:About
        }
    ]
}
2) writing method 2 - Recommended - lazy loading, loading whichever is used
// Export routing configuration
export default{
    // 1. Routing mode
    mode:"history",
    // 2. Path configuration, in the form of array, a path corresponds to an object
    routes:[
        {
            path:"/",
            component:()=>import('@/views/Home.vue')
        },
        {
            path:"/blog",
            component:()=>import('@/views/Blog.vue')
        },
        {
            path:"/about",
            component:()=>import('@/views/About.vue')
        }
    ]
}
index.js code is as follows:
// 1. Import Vue router
import VueRouter from "vue-router";
// 2. Import vue
import Vue from "vue";
// 3. Installation
import config from "./config.js";
// 4. Vue installs the Vue router plug-in
Vue.use(VueRouter);
// 5. Create routing object
const router = new VueRouter(config);
// 6. Export
export default router;
Of course, you can also merge these two js into index js file, as follows:
// 1. Import Vue router
import VueRouter from 'vue-router'
// 2. Import vue
import Vue from 'vue'
// 3. Installation
Vue.use(VueRouter)
// 4. Create vueroouter instance - routing object
const router = new VueRouter({
    // 5. Configure routing
    //5.1 configuration mode
    mode:"history",
    // 5.2 configuring routing object array
    routes: [
       {
      path: "/",
      name: "Home",
      component: () => import("@/views/Home.vue"),
    },
    {
      path: "/blog",
      name: "Blog",
      component: () => import("@/views/Blog.vue"),
    },
    {
      path: "/about",
      name: "About",
      component: () => import("@/views/About.vue"),
    },
    ]
})
// 6. Export routing object
export default router;
7. In main Using routing in JS
import Vue from 'vue'
import App from './App.vue'
import router from './router'
import store from './store'

Vue.config.productionTip = false

new Vue({
  router,
  store,
  render: h => h(App)
}).$mount('#app')
By injecting into the router, we can pass this in any component$ Router , can also access the router through , this$ Route , access the current route (shown later).
8. On app Importing, registering and using related components in Vue
<template>
  <div id="app">
    <!-- head -->
    <Header/>
    <!-- Intermediate content area -->
    <div class="container">
        <!-- This component will render different components according to different access paths -->
        <router-view></router-view>
    </div>
    <!-- bottom -->
    <Footer/>
  </div>
</template>

<script>
// Import components
import Header from './components/Header.vue'
import Footer from './components/Footer.vue'
export default {
  name: 'app',
  components: {
      // Register components
      Header,
      Footer
  }
}
</script>

<style>
.container{
    border: 1px solid gray;
    margin:30px auto;
    width:1000px;
    min-height: 200px;
}
</style>
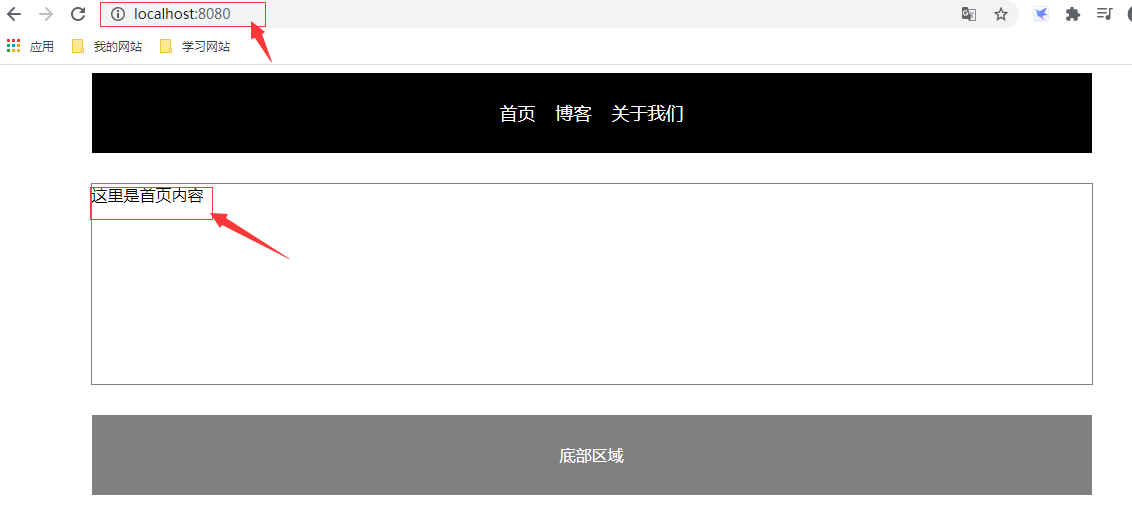
9. Execute the following instructions to start the service, run to the browser and visit

3, Router link declarative navigation component and router view
1,Header. In the template in Vue, the a label is not used. Jump reason:
Because if you use the a tag to jump, you can jump the page, but you will find a problem when you click the menu above, that is, the page will refresh, which will lead to slow response speed of the website, because the process of page refresh is as follows:
Browser input address – > request to the server – > the server returns html+css+js – > browser rendering page, execute js – > create vue instance – > render root component - > router view tag, and render different components according to different paths
The best way is to render different components according to different paths directly through the router view component, which is the router link declarative navigation component we used above.
2. The router link component supports users to click and navigate in applications with routing function. Specify the destination address through the to attribute. The default rendering is a tag with correct connection. You can configure the tag attribute to generate other tags. In addition, when the target route is successfully activated, the link element automatically sets a css class name indicating the activation.
3. The attributes of the router link component are (no exhibition - understand):
- to (required parameter): type string/location, indicating the link of the target route. The value can be a string or a dynamically bound object describing the target location
- Replace type: boolean, default value: false. If the replace attribute is set, router will be called when clicked Replace() instead of router Push (), so the history record will not be left after navigation
- Append type: boolean, default value: false. After the append property is set, the base path is added before the current (relative) path
- tag type: string, default value: "a", specifies that router link is rendered as a label
- Active class type: string, default value: "router link active", set the CSS class name used during link activation. The default value of activelinkclass can be configured through the default value of the global route
- exact # type: boolean, default value: false. The default class name of "activate" is based on inclusive match
- Event type: string | array < string > default value: 'click', declaring the event that can be used to trigger navigation, which can be a string or string array
- Exact active class type: string, default value: "router link exact active", configure the class that should be activated when the link is accurately matched. Note that the default value can also be globally configured through the route constructor option linkexactactactiveclass.
4. Router view component: write it in the place where the component wants to render. When the component jumps over, it will render different components according to different access paths
4, Named route
Above header The value of the to attribute in the router link in the template in Vue is written to death, and the effect is not very good. If the jump address corresponding to the menu routing configuration changes, a lot of modifications may be required. Therefore, we can do the following optimization:
1) We modify config. In the src\router directory JS, name each routing configuration with a name that corresponds to the routing address:
// Export routing configuration
export default{
    // 1. Routing mode
    mode:"history",
    // 2. Path configuration, in the form of array, a path corresponds to an object
    routes:[
        {
            path:"/",
            name:"Home",
            component:()=>import('@/views/Home.vue')
        },
        {
            path:"/blog",
            name:"Blog",
            component:()=>import('@/views/Blog.vue')
        },
        {
            path:"/about",
            name:"About",
            component:()=>import('@/views/About.vue')
        }
    ]
}
2) Modify header to match the name of a route in the template object directly, note:
<template>
    <!-- Header menu -->
    <div class="header">
        <router-link :to="{name:'Home'}">home page</router-link>
        <router-link :to="{name:'Blog'}">Blog</router-link>
        <router-link :to="{name:'About'}">About us</router-link>
    </div>
</template>
3) The test effect is the same as before
5, Dynamic route matching
1. Capture all routes or 404 Not Found routes
If an address entered by our browser does not have a corresponding specific page in our project, that is, 404 cannot be found. There are infinite possibilities for this non-existent address. We hand over these request paths to a 404 page for processing, then for 404 pages, we need to match all non-existent request addresses.
1) Create notfound. In components Vue component
<!-- pure css 3D Stereo style -->
<template>
    <div class="container404">
        <div class="page404">
            <div class="f404"><span>4</span><span>0</span><span>4</span></div>
            <div class="f404-des">
                page not present(´・ω・`)
            </div>
        </div>
    </div>

</template>

<script>
    export default {

    }
</script>

<style scoped>
.container404 {
  background-color: #ECECEC;
  font-family:Arial, Helvetica, sans-serif;
  font-size: 14px;
  color: #3c3c3c;
  padding:150px;
}
.page404 .f404{
  text-align: center;
  font-size: 150px;
  font-weight: bold;
  line-height: 100px;
  letter-spacing: 5px;
  color: #fff;
  margin-bottom:60px;
}

.page404 .f404 span {
  cursor: pointer;
  text-shadow: 0px 0px 2px #686868,
    0px 1px 1px #ddd,
    0px 2px 1px #d6d6d6,
    0px 3px 1px #ccc,
    0px 4px 1px #c5c5c5,
    0px 5px 1px #c1c1c1,
    0px 6px 1px #bbb,
    0px 7px 1px #777,
    0px 8px 3px rgba(100, 100, 100, 0.4),
    0px 9px 5px rgba(100, 100, 100, 0.1),
    0px 10px 7px rgba(100, 100, 100, 0.15),
    0px 11px 9px rgba(100, 100, 100, 0.2),
    0px 12px 11px rgba(100, 100, 100, 0.25),
    0px 13px 15px rgba(100, 100, 100, 0.3);
  -webkit-transition: all .1s linear;
  transition: all .1s linear;
}

.page404 .f404 span:hover {
  text-shadow: 0px 0px 2px #686868,
    0px 1px 1px #fff,
    0px 2px 1px #fff,
    0px 3px 1px #fff,
    0px 4px 1px #fff,
    0px 5px 1px #fff,
    0px 6px 1px #fff,
    0px 7px 1px #777,
    0px 8px 3px #fff,
    0px 9px 5px #fff,
    0px 10px 7px #fff,
    0px 11px 9px #fff,
    0px 12px 11px #fff,
    0px 13px 15px #fff;
  -webkit-transition: all .1s linear;
  transition: all .1s linear;
}

.page404 .f404-des{
  text-align: center;
  color: #666;
  font-family: cursive;
  font-size: 20px;
  text-shadow: 0 1px 0 #fff;
  letter-spacing: 1px;
  line-height: 2em;
}
</style>
2) In the src\router directory, configure JS, add routing configuration matching all requests:
// *No. wildcard. If other configurations are not matched, this configuration will be followed, and / user - * 'will match any path starting with ` / user -'
{
    path:"*",
    name:"404",
    component:()=>import('@/components/NotFound.vue')
}
3) Effect under test:

Supplement:
1. Advanced matching mode:
Vue router uses path to regexp as the path matching engine, so it supports many advanced matching modes, such as optional dynamic path parameters, matching zero or more, one or more, and even custom regular matching. View its file Learn high-order path matching and this example Show # Vue router # how to use this kind of matching
2. Match priority:
Sometimes, the same path can match multiple routes. At this time, the matching priority is in the order of route definition: whoever defines it first will have the highest priority.
2. Respond to changes in routing parameters
1. We often need to map all routes to which a pattern matches to the same component. For example, we have a User component. For all users with different User names, we need to use this component to render. Then, we can use "dynamic segment" in the routing path of "Vue router" to achieve this effect.

2. Create a new user in the views directory Vue component
<template>
    <div>
        welcome {{ $route.params.username }} User back!
    </div>
</template>

<script>
    export default {

    }
</script>

<style scoped>

</style>
3. Modify config. In src\router directory JS, the new configuration is as follows:
{
    path: '/user/:username',
    name:'User',
    component:()=>import('@/views/User.vue')
}
Now, both / user/foo and / user/bar will map to the same route. A path parameter is marked with a colon:. When a route is matched, the parameter value will be set to {this$ route. Params, which can be used within each component.
4. Modify header Vue template new user request:
<!--params: Chuan Shen  -->
<router-link :to="{name:'User',params:{username:'Xiao Ming'}}">user</router-link>
<!-- Or write the address directly and then dynamically splice the parameters -->
<!-- <router-link to="/user/Xiao Ming">user</router-link> -->
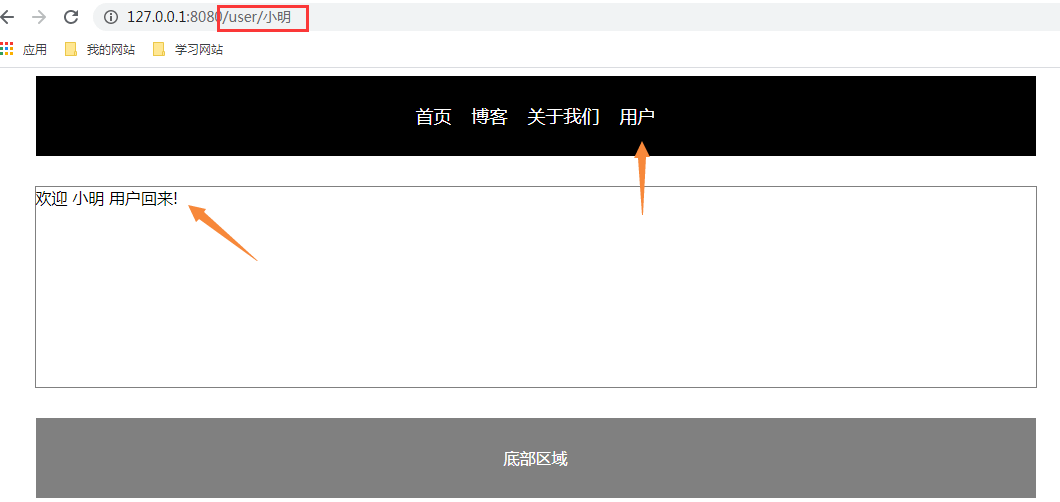
5. Testing

6. The above understanding is similar to / user/:username/post/:post_id multi parameter should also be used
1) Modify config. In src\router directory The dynamic configuration is as follows:
{
    path: '/user/:username/post/:post_id',
    name:'User',
    component:()=>import('@/views/User.vue')
}
2) modify user The template of Vue is as follows:
<template>
    <div>
        welcome {{ $route.params.username }} When the user comes back, post_id:  {{ $route.params.post_id }}
    </div>
</template>
3) modify header Dynamic address in Vue's template:
<!--params: Chuan Shen  -->
<router-link :to="{name:'User',params:{username:'Xiao Ming',post_id:20}}">user</router-link>
<!-- Or write the address directly and then dynamically splice the parameters -->
<!-- <router-link to="/user/Xiao Ming/post/20">user</router-link> -->
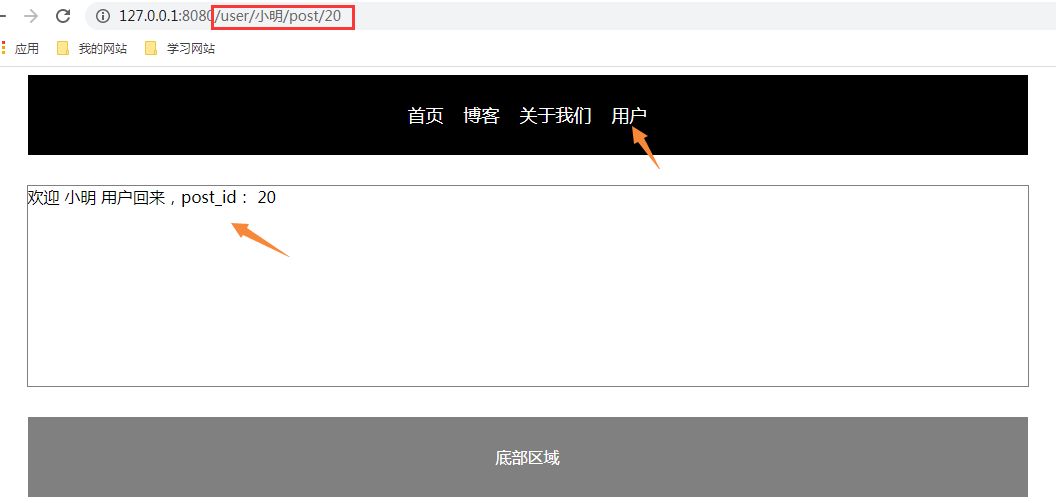
4) Test:
