What is MyBatis
An excellent persistence layer framework. MyBatis uses XML to decouple SQL from programs for easy maintenance. MyBatis has low learning cost and efficient execution. The underlying layer is the encapsulation and extension of JDBC.
- MyBtis official website: https://mybatis.org/mybatis-3/zh/index.html
- GitHub address: https://github.com/mybatis/mybatis-3/releases
The overall process of creating a MyBatis project
- Create database
- Create a data table (the table structure and data in this article are not complex)
- Create a Maven based java project (as you did in the previous section)
- The basic configuration of the project is completed to ensure the successful connection between the project and the database
- Operate the data of the data table in the database through the Java code in the project
- The business function is completed and the project is launched (publish the project)
Among the above six points, the contents before the first three points have actual combat, which will not be introduced in detail here. 4 and 5 are the core contents of this section. The last point is not in the actual combat of this section. After learning the SSM comprehensive framework, we will give a special explanation, which is more suitable at that time.
Ensure that the project is successfully linked to the database
1. Create data table tv_series
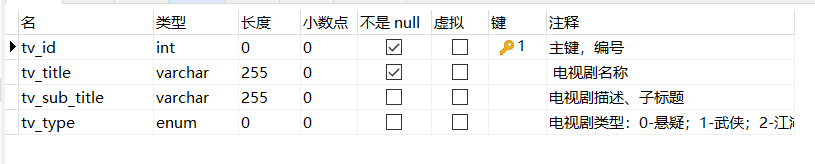
A record is a simple record of a TV play, including these information:
tv_id: self incrementing primary key; cannot be blank.
tv_title: the name of the TV play, that is, the title, which cannot be empty.
tv_sub_title: TV play description, or sub title publicity short text.
tv_type: the type of TV series. Here are six categories: suspense, martial arts, Jianghu, love, court and countryside.
2. Create Maven based Java projects
The creation steps are not explained here, but need to be prompted. When you click the last Nnext button to create a project, a prompt as shown in the following figure will appear in the lower right corner of the new IDE window. Remember to click the arrow here:

If you can see the information marked in red box, it means that the project is built successfully. You can work next!
3. Complete basic project configuration
The following figure adds the necessary configuration on the basis of the project structure after creation. You can compare it with the new projects you created. The arrows indicate that they need to be created manually:

Here is a specific explanation. The operation steps are basically "routine". Ha ha
- Red shear 1, work to be done
Create a directory. There are still some things about the name of this directory. Generally, we are used to calling it domain, bean and entity. Just choose one. All calss in this directory correspond to the table fields in the database. The fields in the data table are separated by underscores, so the variables in this class are named by humps. The example code here is as follows:
   package com.javafirst.bean;

   /**
    * desc: java entity class corresponding to data table
    * author weChat: studyingJava
    */
   public class TVSeriesBean {

       private int tvId;
       private String tvTitle;
       private String tvSubTitle;
       private int tvType;

       public int getTvId() {
           return tvId;
       }

       public void setTvId(int tvId) {
           this.tvId = tvId;
       }

       public String getTvTitle() {
           return tvTitle;
       }

       public void setTvTitle(String tvTitle) {
           this.tvTitle = tvTitle;
       }

       public String getTvSubTitle() {
           return tvSubTitle;
       }

       public void setTvSubTitle(String tvSubTitle) {
           this.tvSubTitle = tvSubTitle;
       }

       public int getTvType() {
           return tvType;
       }

       public void setTvType(int tvType) {
           this.tvType = tvType;
       }

       @Override
       public String toString() {
           return "TVSeriesBean Print information:\n{" +
                   "tvId=" + tvId +
                   ", tvTitle='" + tvTitle + '\'' +
                   ", tvSubTitle='" + tvSubTitle + '\'' +
                   ", tvType=" + tvType +
                   '}';
       }

   }
setXXX() and getXXX() methods are manually generated here. In fact, some plug-ins can be done automatically. There is no use here, which is not suitable for novices.
- Red scissors 2, work to be done
Manually create a folder. The name is generally called dao. You can also define it as your favorite. All files under the package are of interface type, which is specially used to provide interfaces. The corresponding operations of the interface are sql statements, which affect the data in the database, which establishes a connection between the project and the database, but at this step, it is far from accessible.
The sample code of this class is as follows. Others can be extended according to business:
package com.javafirst.dao;

import com.javafirst.bean.TVSeriesBean;

import java.util.List;

/**
 * desc: Business interface related to database operation
 * <p>
 * author weChat: studyingJava
 */
public interface TVSeriesDao {

    /**
     * Query a TV play according to its id
     *
     * @param tvId
     * @return
     */
    TVSeriesBean selectTVSeriesById(Integer tvId);

    /**
     * Query all TV series
     *
     * @return
     */
    List<TVSeriesBean> selectTVSeriesAll();

    /**
     * Add a record (TV play) by field
     *
     * @param title
     * @param subTitle
     * @param type
     */
    void addTVSeriesOne(String title, String subTitle, int type);

    /**
     * Add a record (TV play) through object mode
     *
     * @param tvSeriesBean
     */
    void addTVSeriesObject(TVSeriesBean tvSeriesBean);
}- Red shear 3, work to be done
Create a new java level folder resources in the main directory. When creating a new folder, the IDEA will automatically recognize it. We don't need to manually include the name. Just select enter to create it successfully.
- Red scissors 4, work to be done
On the basis of step 3, create the mapper folder in the resources directory, and then create xxxmapper XML, this file corresponds to the xxxDao file created earlier, so try to keep the name consistent. When the project is complex, it can be recognized at a glance for easy maintenance and understanding. Xiaobian created TVseries mapper XML, the code is as follows:
   <?xml version="1.0" encoding="UTF-8" ?>
   <!DOCTYPE mapper
           PUBLIC "-//mybatis.org//DTD Mapper 3.0//EN"
           "http://mybatis.org/dtd/mybatis-3-mapper.dtd">

   <mapper namespace="com.javafirst.dao.TVSeriesDao">

   </mapper>
Everything else here is written in a fixed way. The only thing that needs to be changed is the namespace value in the mapper tag. It's familiar. This value is the full path of XXXdao we created earlier.
The nodes in the mapper tag are the xml syntax of our daily operation table, including < Select >, < Insert >, < update >, < delete >, and the contents of these tags are what we are in Recommend learning java - data table operation sql statements learned in this chapter. The sample code will be given later in this article.
- Red Scissors 5, work to be done
Based on the third step, create myBatis - config. In the resources directory XML, the name of this file is not fixed, but it is generally written, because its function is to ensure that the myBatis framework can link with the database and operate data through configuration, so there will be many fixed configuration items. The sample code for this article is as follows:
   <?xml version="1.0" encoding="UTF-8" ?>
   <!DOCTYPE configuration
           PUBLIC "-//mybatis.org//DTD Config 3.0//EN"
           "http://mybatis.org/dtd/mybatis-3-config.dtd">
   <configuration>

       <environments default="development">
           <!--    development environment     -->
           <environment id="development">
               <transactionManager type="JDBC"/>
               <dataSource type="POOLED">
                   <!-- mysql drive-->
                   <property name="driver" value="com.mysql.jdbc.Driver"/>
                   <!-- Specify the open port of the database, the name of the database to be connected, and the encoding method-->
                   <property name="url"
                             value="jdbc:mysql://localhost:3306/mybatis_demo?useUnicode=true&characterEncoding=utf8"/>
                   <!-- mysql user name-->
                   <property name="username" value="root"/>
                   <!-- mysql Login password-->
                   <property name="password" value="root"/>
               </dataSource>
           </environment>

       </environments>

       <mappers>
           <!--  Each is configured here mapper file -->
           <mapper resource="mapper/TVSeriesMapper.xml"/>
       </mappers>
   </configuration>
Similarly, the code here is basically a template, which only needs to be modified in a few key places.
   <!-- Specify the open port of the database, the name of the database to be connected, and the encoding method-->
                   <property name="url"
                             value="jdbc:mysql://localhost:3306/mybatis_demo?useUnicode=true&characterEncoding=utf8"/>
                   <!-- mysql user name-->
                   <property name="username" value="root"/>
                   <!-- mysql Login password-->
<property name="password" value="root"/>- The Xiaobian here runs the project locally, so the value of the url localhost:3306 is local. If you modify the port number when installing mySQL, you should use the one you modified here;
- mybatis_demo is the name of the database we created earlier, which is the first step in the overall process of this section;
- The username value corresponds to the account name you log in to mysql, which is in our Recommend learning java -- first knowledge database Explained in the section;
- The password value corresponds to your password to log in to mysql;
- Red Scissors 6, work to be done
pom. The XML file will be automatically generated after the project is successfully created. All we need to do is configure the dependencies in it, which will use the content we learned in the previous section Recommend learning java -- Maven's first knowledge , Xiaobian has made the complete code after mySql driver and mybatis dependency configuration as follows:
   <?xml version="1.0" encoding="UTF-8"?>

   <project xmlns="http://maven.apache.org/POM/4.0.0" xmlns:xsi="http://www.w3.org/2001/XMLSchema-instance"
            xsi:schemaLocation="http://maven.apache.org/POM/4.0.0 http://maven.apache.org/xsd/maven-4.0.0.xsd">
       <modelVersion>4.0.0</modelVersion>

       <groupId>com.javafirst</groupId>
       <artifactId>TV_series</artifactId>
       <version>1.0</version>

       <!-- Note it out for the time being -->
       <!--  <name>TV_series</name>-->
       <!--  <!– FIXME change it to the project's website –>-->
       <!--  <url>http://www.example.com</url>-->

       <properties>
           <project.build.sourceEncoding>UTF-8</project.build.sourceEncoding>
           <maven.compiler.source>1.8</maven.compiler.source>
           <maven.compiler.target>1.8</maven.compiler.target>
       </properties>

       <dependencies>
           <!--    unit testing (Default add)    -->
           <dependency>
               <groupId>junit</groupId>
               <artifactId>junit</artifactId>
               <version>4.11</version>
               <scope>test</scope>
           </dependency>

           <!--    mySql drive-->
           <dependency>
               <groupId>mysql</groupId>
               <artifactId>mysql-connector-java</artifactId>
               <version>8.0.25</version>
           </dependency>

           <!--    mybatis rely on-->
           <dependency>
               <groupId>org.mybatis</groupId>
               <artifactId>mybatis</artifactId>
               <version>3.5.7</version>
           </dependency>
       </dependencies>

       <build>
           <pluginManagement><!-- lock down plugins versions to avoid using Maven defaults (may be moved to parent pom) -->
               <plugins>
                   <!-- clean lifecycle, see https://maven.apache.org/ref/current/maven-core/lifecycles.html#clean_Lifecycle -->
                   <plugin>
                       <artifactId>maven-clean-plugin</artifactId>
                       <version>3.1.0</version>
                   </plugin>
                   <!-- default lifecycle, jar packaging: see https://maven.apache.org/ref/current/maven-core/default-bindings.html#Plugin_bindings_for_jar_packaging -->
                   <plugin>
                       <artifactId>maven-resources-plugin</artifactId>
                       <version>3.0.2</version>
                   </plugin>
                   <plugin>
                       <artifactId>maven-compiler-plugin</artifactId>
                       <version>3.8.0</version>
                   </plugin>
                   <plugin>
                       <artifactId>maven-surefire-plugin</artifactId>
                       <version>2.22.1</version>
                   </plugin>
                   <plugin>
                       <artifactId>maven-jar-plugin</artifactId>
                       <version>3.0.2</version>
                   </plugin>
                   <plugin>
                       <artifactId>maven-install-plugin</artifactId>
                       <version>2.5.2</version>
                   </plugin>
                   <plugin>
                       <artifactId>maven-deploy-plugin</artifactId>
                       <version>2.8.2</version>
                   </plugin>
                   <!-- site lifecycle, see https://maven.apache.org/ref/current/maven-core/lifecycles.html#site_Lifecycle -->
                   <plugin>
                       <artifactId>maven-site-plugin</artifactId>
                       <version>3.7.1</version>
                   </plugin>
                   <plugin>
                       <artifactId>maven-project-info-reports-plugin</artifactId>
                       <version>3.0.0</version>
                   </plugin>
               </plugins>
           </pluginManagement>
       </build>
   </project>
For example, what three-party frameworks will be used later, you can search the configuration in the maven warehouse mentioned in the previous section, and then add it here. This is the convenience of maven.
- Red scissors 7, work to be done
At this step, the basic configuration work has been completed, and the rest is the business code and logic. The previous six steps basically do these work every time we create a project. You need to master the process.
Here's a tip:
XXXmapper.xml and mybatis config XML can actually use the template function of IDEA, which is convenient and fast.
Here we will create a new general package utils. For the time being, we will only create mybatisutil Java, the example code is as follows:
   package com.javafirst.utils;

   import org.apache.ibatis.io.Resources;
   import org.apache.ibatis.session.SqlSession;
   import org.apache.ibatis.session.SqlSessionFactory;
   import org.apache.ibatis.session.SqlSessionFactoryBuilder;

   import java.io.IOException;
   import java.io.InputStream;

   /**
    * desc: MyBatis Tool class
    * <p>
    * author weChat: studyingJava
    */
   public class MyBatisUtil {

       private static SqlSessionFactory sqlSessionFactory = null;

       static {
           String configXml = "mybatis-config.xml";
           try {
               InputStream inputStream = Resources.getResourceAsStream(configXml);
               sqlSessionFactory = new SqlSessionFactoryBuilder().build(inputStream);
           } catch (IOException e) {
               e.printStackTrace();
           }
       }

       public static SqlSession openSqlSession() {
           SqlSession sqlSession = null;
           if (null != sqlSessionFactory) {
               sqlSession = sqlSessionFactory.openSession();
           } else {
               String configXml = "mybatis-config.xml";
               try {
                   InputStream inputStream = Resources.getResourceAsStream(configXml);
                   sqlSessionFactory = new SqlSessionFactoryBuilder().build(inputStream);
                   sqlSession = sqlSessionFactory.openSession();
               } catch (IOException e) {
                   e.printStackTrace();
               }
           }

           return sqlSession;
       }

   }
The reason for this tool class is that we want to avoid duplicate code. You can check it on the official website of MyBatis.
Let's start writing function code and testing link data. The exciting moment is coming!
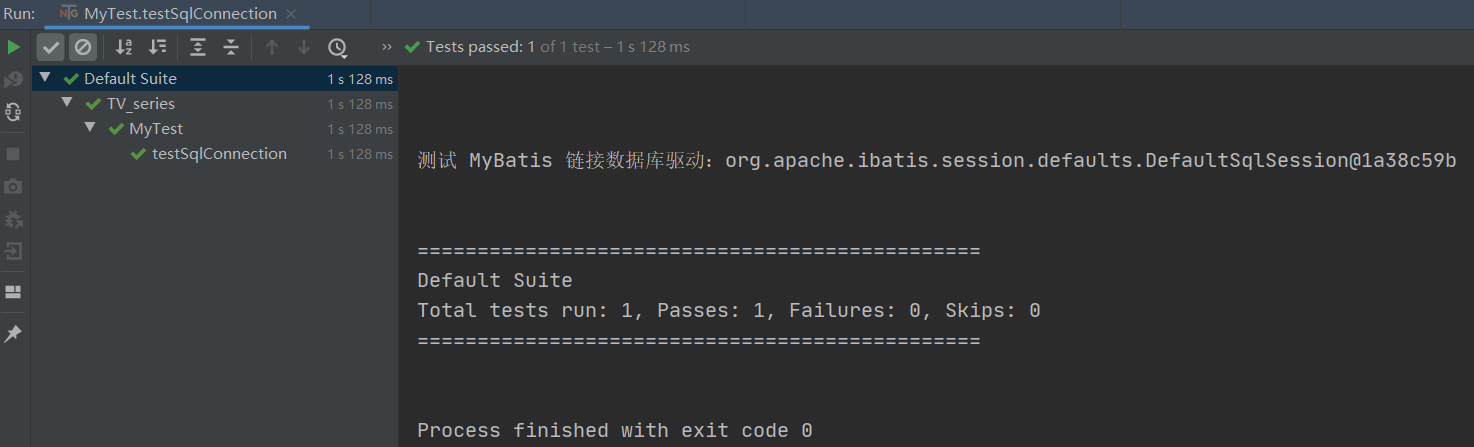
4. Test link succeeded
The core of this article is MyBatis. Now let's test whether the link between MyBatis and the database is successful. The code is as follows:
@Test
public void testSqlConnection() {
    SqlSession sqlSession = MyBatisUtil.openSqlSession();
    System.out.println("test MyBatis Linked database driver:" + sqlSession.toString());
}
In this code, you can create a new java class by yourself, then write this code and conduct unit test. The result is shown in the figure below, which shows that the link is successful, indicating the previous mybatis config There is no error in the configuration in XML.
Operation data sheet
Next, you can operate the tables in the database. At the beginning of this article, we created a new table without any data. Now let's make a query, insert data again, and then make a full query to prove that we can operate the database through the java project.
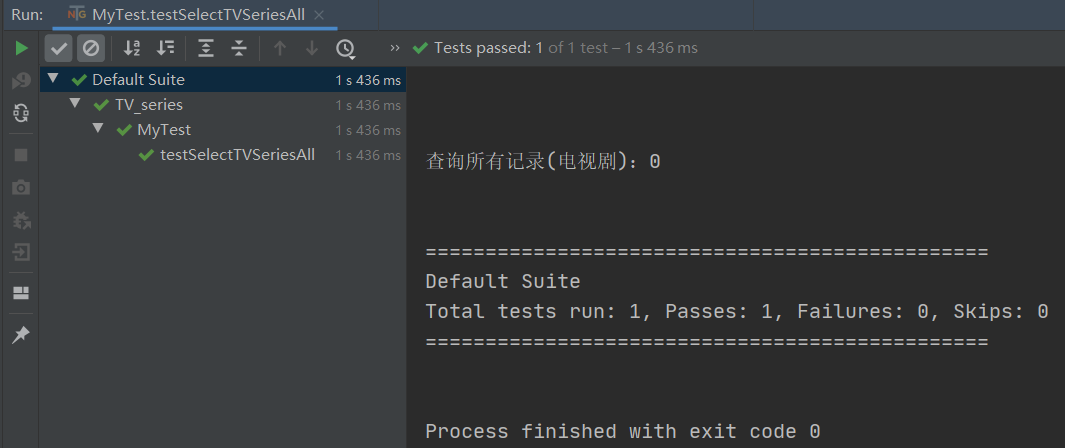
- Query all records
The unit test method is as follows:
   /**
    * Query all records
    */
   @Test
   public void testSelectTVSeriesAll() {
       SqlSession sqlSession = MyBatisUtil.openSqlSession();
       TVSeriesDao tvSeriesDao = sqlSession.getMapper(TVSeriesDao.class);
       List<TVSeriesBean> tvSeriesBeans = tvSeriesDao.selectTVSeriesAll();
       sqlSession.close();

       System.out.println("Query all records(TV play): " + tvSeriesBeans.size());
       for (TVSeriesBean tvSeries : tvSeriesBeans) {
           System.out.println(tvSeries);
       }
   }
Corresponding mapper The select statement in XML is as follows:
   <mapper namespace="com.javafirst.dao.TVSeriesDao">

       <!--  Query all records  -->
       <select id="selectTVSeriesAll" resultType="com.javafirst.bean.TVSeriesBean">
           select * from tv_series
       </select>
   </mapper>
Note that the id here should be consistent with the interface name defined in xxxDao.
sql The difference between the statement and our past is that there is no need to `;` It's over. If the result after execution is as follows, it is correct.
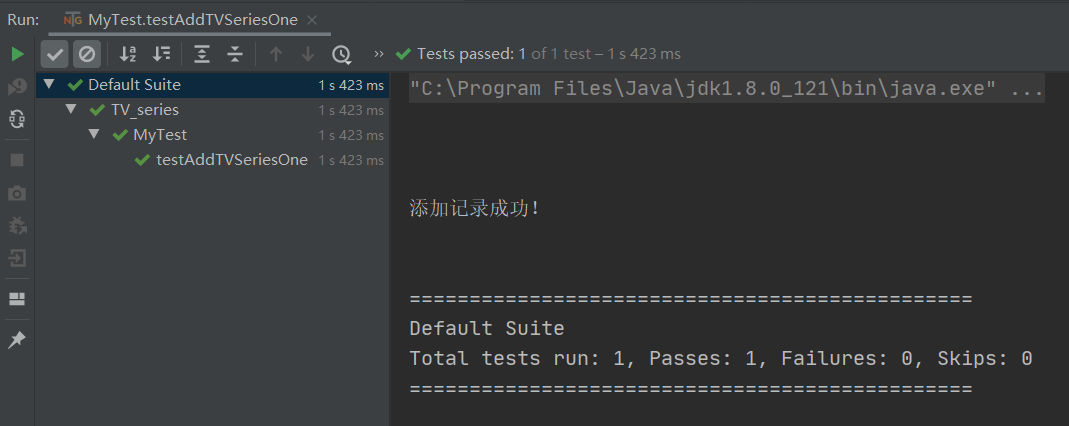
- Add a record
There are two ways to add records: one is to transfer values through fields; One is by creating objects; Both methods need to pay attention to TV in the table_ ID is the primary key and self incremented, so we don't need to set a value for this field.
The first way:
   /**
    * Add a record by field
    */
   @Test
   public void testAddTVSeriesOne() {
       SqlSession sqlSession = MyBatisUtil.openSqlSession();
       TVSeriesDao tvSeriesDao = sqlSession.getMapper(TVSeriesDao.class);

       tvSeriesDao.addTVSeriesOne("<Legend of shooting and carving Heroes", "Jin Yong's martial arts classic, which will be inherited forever", 1);
       sqlSession.commit();
       sqlSession.close();

       System.out.println("Record added successfully!");
   }
Adding records requires one more step than querying, that is, SqlSession Commit(), which is related to the transaction we have learned before. MySQL starts the transaction by default, so we need to manually commit the transaction after inserting the record. Of course, we can also use mybatisutil In the Java tool class, when initializing SqlSession, specify the default automatic submission through parameters, that is:
sqlSession = sqlSessionFactory.openSession(true);
The contents of the insert tag in the corresponding mapper file are as follows:
<insert id="addTVSeriesOne">
    insert into tv_series (tv_title,tv_sub_title,tv_type) values (#{param1},#{param2},#{param3})
</insert>
If the field method is used, it is recommended to use #{param + number} for the column value (also known as parameter) here, otherwise pits may be encountered.
If the execution result is as follows, insert a record correctly. At this time, you can open Navicat to view the data in the table (the screenshot is not shown here).
The second way:
The java code is as follows
/**
 * Add a record by object
 */
@Test
public void testAddTVSeriesObject() {
    SqlSession sqlSession = MyBatisUtil.openSqlSession();
    TVSeriesDao tvSeriesDao = sqlSession.getMapper(TVSeriesDao.class);

    TVSeriesBean tvSeriesBean = new TVSeriesBean();
    tvSeriesBean.setTvTitle("<The eight dragons");
    tvSeriesBean.setTvSubTitle("At the end of the Northern Song Dynasty, there were constant border conflicts between song and Liao, and a big conspiracy was quietly attacking...");
    tvSeriesBean.setTvType(2);

    tvSeriesDao.addTVSeriesObject(tvSeriesBean);
    sqlSession.commit();
    sqlSession.close();

    System.out.println("Record added successfully!!");
}
The contents of the insert tag in the corresponding mapper file are as follows:
<insert id="addTVSeriesObject">
    insert into tv_series (tv_title,tv_sub_title,tv_type) values (#{tvTitle},#{tvSubTitle},#{tvType})
</insert>
Attention should be paid to parameter transfer (column value). This method should be consistent with the field value in the user-defined entity class, otherwise mapping exceptions will occur.
At this step, we have added two records. Use our previous method to query all records to see if there are really two data. See the figure below:
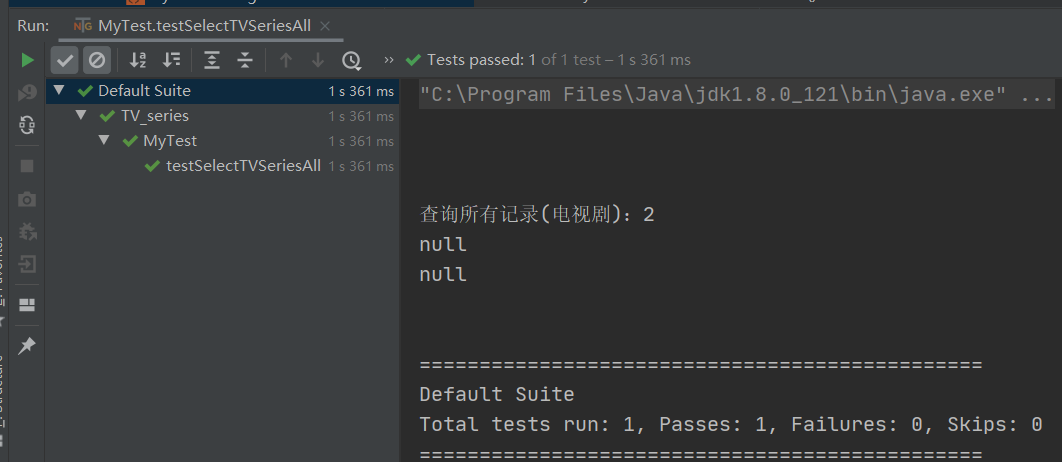
Notice? A strange problem occurred. The total number of data is appropriate, but each record is displayed as null, which is obviously wrong, because we have rewritten the toString() method.
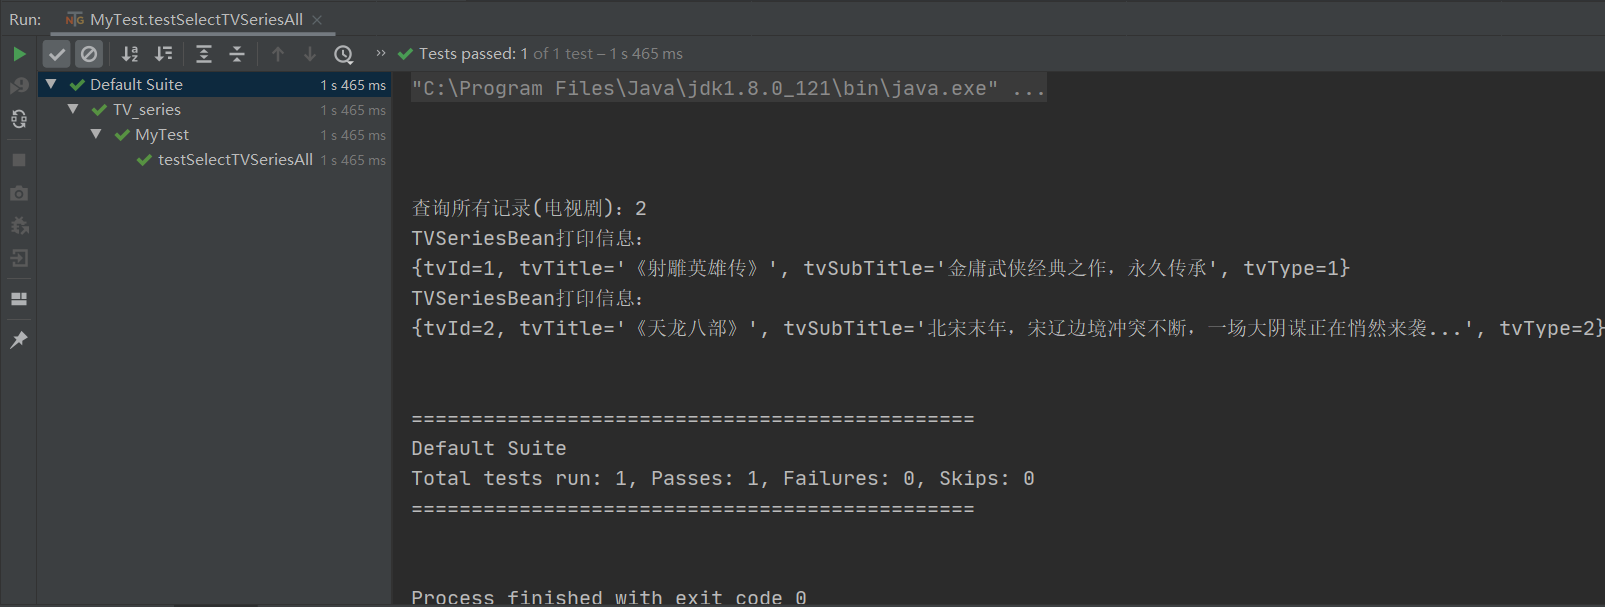
Did careful students notice that when we wrote the entity class in the first step, we mentioned that the use of hump naming can correspond (map) to the underlined fields in the data table, but we didn't do it in mybatis config The hump matching switch is configured in XML. Now add the following code:
 <!--  Enable hump naming mapping  -->
 <settings>
     <setting name="mapUnderscoreToCamelCase" value="true"/>
 </settings>
Execute the query again and the results are as follows:
This is a point that beginners need to pay attention to. Remember!
- Delete a record
We need to add an interface void deleteTVSeriesBeanById(Integer tvId) in TVSeriesDao first, Then add the following methods to the test class:
   /**
     * Delete a record by ID
     */
    @Test
    public void testDeleteTVSeriesBeanById() {
        SqlSession sqlSession = MyBatisUtil.openSqlSession();
        TVSeriesDao tvSeriesDao = sqlSession.getMapper(TVSeriesDao.class);

        tvSeriesDao.deleteTVSeriesBeanById(2);
        sqlSession.commit();
        sqlSession.close();

        System.out.println("Delete a record successfully!!");
    }
It's not over yet. You need to go to TVseries mapper Add the following code to XML:
    <!--  Delete record by ID  -->
    <delete id="deleteTVSeriesBeanById">
        delete from tv_series where tv_id = #{tvId}
    </delete>
At this point, you can run the test method, and the results are as follows:

You can verify the correctness of the results by querying again or directly viewing the data in the table in the database. There is no mapping here.
Have careful students found that after our preliminary work is completed, the rest are basically fixed operation modes, and the places that need to be modified are very procedural.
- Modify record
In order to demonstrate this function, we will change the title of the remaining record to the new version of legend of Shooting Heroes. The following is the complete example code:
Interface code
   /**
    * Modify the title according to the ID
    * @param tvId
    */
   void updateTVSeriesBeanTitleById(Integer tvId,String tvTitle);
TVSeriesMapper. Code in XML:
   <!--  Update record according to ID  -->
   <update id="updateTVSeriesBeanTitleById">
       update tv_series set tv_title = #{param2} where tv_id = #{param1}
   </update>
Test method code:
   /**
    * Modify the data of the specified record
    */
   @Test
   public void testUpdateTVSeriesBeanTitleById() {
       SqlSession sqlSession = MyBatisUtil.openSqlSession();
       TVSeriesDao tvSeriesDao = sqlSession.getMapper(TVSeriesDao.class);

       tvSeriesDao.updateTVSeriesBeanTitleById(1, "<New version of legend of Shooting Heroes");
       sqlSession.commit();
       sqlSession.close();

       System.out.println("update One record succeeded!!");
   }
The results are as follows:
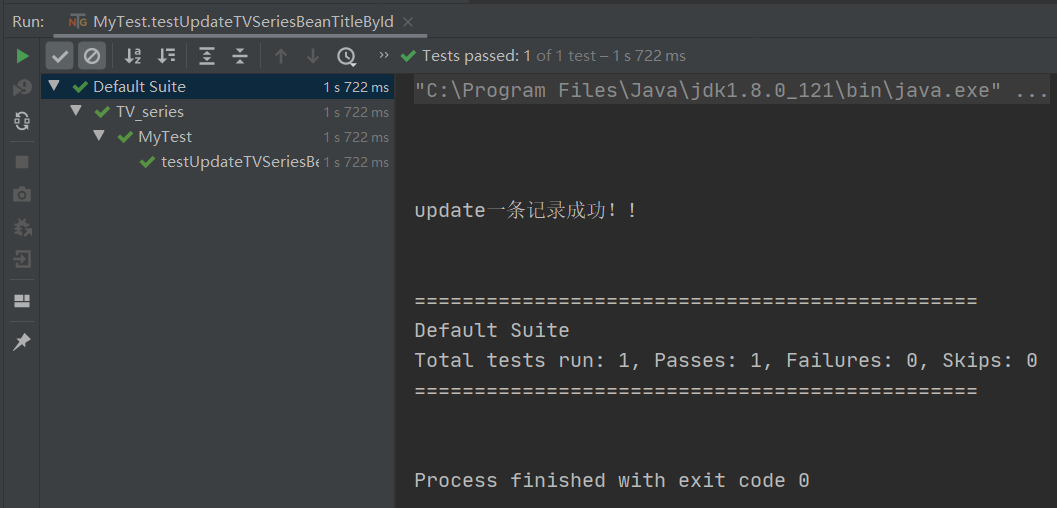
At this time, open the database or execute the query again to view the results, which is the result we have modified.
So far, our basic additions, deletions, modifications and inspections have been implemented once. This is the core content. For the early project configuration, we have implemented it once by ourselves and recorded the process. This is the core content of this section.
However, the operations in this section are based on a single table, and the operation business is particularly simple. For example, there is no way to prove the success of inserting a piece of data. Can you return the primary key of the record to me after inserting? Deletion is also the same reason, because in real business, we can't view the database every time, and in large projects, there may be tens of millions of records in the table, which is unrealistic. Therefore, the advanced content of MyBatis will be explained in the following chapters. Let's hurry up~~
summary
- MyBatis is a framework. Mastering its use process and advanced usage is a prerequisite for a qualified Java Engineer
- The SQL knowledge learned in the early stage should be mastered skillfully, and the content of this section is the same. The knowledge is closely linked
- There is no shortcut to learning programming. Just immerse yourself in hard practice