RecyclerView Summary
RecyclerView is Android 5.0, which started to provide a recyclable container. It is more advanced and flexible than ListView. It can be reused and scrolled efficiently. It can customize various layouts and interaction effects easily. It inherits from ViewGroup, so its display and interaction can not be separated from five steps: measure, layout, draw, touch and adapter. The following five steps will be used to analyze the working principle of cocoon stripping, in which Layout Manager takes the simplest Linear Layout Manager as an example. More classic custom ViewGroup collections
RecyclerView has many auxiliary classes, and closely related classes exist as their internal classes, as shown in the following figure:

In addition to this class, there are three more important classes: Adapter Helper, ChildHelper, ViewInfoStore. Adapter Helper handles preprocessing when data sets in Adapter change; Child Helper manages and accesses sub-views of Recycler View; ViewInfoStor records ViewHolder status information in pre-layout and post-layout stages to facilitate analysis of differences and animation.
Use of RecyclerView
First, you need to introduce the package recyclerview-v7 and add it to the dependencies block of build.gradle
compile 'com.android.support:recyclerview-v7:25.2.0@aar'
//or
compile(name: 'recyclerview-v7-25.2.0', ext: 'aar') //To directly refer to aar files, you need to add an aar directory to flatDirdirs.
When using your own YourAdapter, you need to inherit from RecyclerView. Adapter and YourViewHolder from RecyclerView.ViewHolder.
In addition to setting up Layout Manager for Recycler View, SDK provides three commonly used layout managers: Linear Layout Manager, Grid Layout Manager and Staggered Grid Layout Manager. To set up divider s or other modifications, you can customize them through the addItemDecoration of RecyclerView. Events can be bound in the Adapter's onBindViewHolder. Generally speaking, RecyclerView is highly customized, and its usage is not much discussed. Here's how it works.
Recycler View (25.2.0) Principle analysis (five dimensions in depth).
1. Measurement process, because mAutoMeasure of RecyclerView's default three layout managers is true by default, so the measure ment process is actually taken over by LayoutManager. The key source code is as follows:
protected void onMeasure(int widthSpec, int heightSpec) {
    ......
    if (mLayout.mAutoMeasure) {
        final int widthMode = MeasureSpec.getMode(widthSpec);
        final int heightMode = MeasureSpec.getMode(heightSpec);
        final boolean skipMeasure = widthMode == MeasureSpec.EXACTLY
                && heightMode == MeasureSpec.EXACTLY;
        mLayout.onMeasure(mRecycler, mState, widthSpec, heightSpec);
        if (skipMeasure || mAdapter == null) {
            return;
        }
        if (mState.mLayoutStep == State.STEP_START) {
            dispatchLayoutStep1();
        }
        ......
        dispatchLayoutStep2();
        mLayout.setMeasuredDimensionFromChildren(widthSpec, heightSpec);
        ......
    }else{
        ......
    }
First, the onMeasure of LayoutManager is invoked, while the defaultOnMeasure of RecyclerView is invoked internally. This step is essentially to map the container size without considering the sub-view. When the width and height of RecyclerView itself are exact values, i.e. skipMeasure is true without wrap_content, the mapping of sub-views will be delayed to onLayout process, which will be discussed later. SkpMeasure for true or adapter for space-time is not necessary to map sub-views to determine their size. The following dispatchLayoutStep1 () and dispatchLayoutStep2 () methods will be used only if the size of itself is uncertain (wrap_content exists). The mapping and layout sub-view is completed in dispatch Layout Step 2. When mLayout.setMeasuredDimensionFromChildren is called, the RecyclerView.setMeasuredDimension method is called internally to determine the size of RecyclerView's own container.
Note: dispatchLayoutStep2 is also called in onLayout, which will be discussed later.Its concrete realization.
2. The layout procedure calls dispatchLayout, which calls different dispatchLayout steps based on the value of mState.mLayoutStep. The source code is summarized as follows:
void dispatchLayout() {
    ......
    mState.mIsMeasuring = false;
    if (mState.mLayoutStep == State.STEP_START) {
        dispatchLayoutStep1();
        mLayout.setExactMeasureSpecsFrom(this);
        dispatchLayoutStep2();
    } else if (mAdapterHelper.hasUpdates() || mLayout.getWidth() != getWidth() ||
            mLayout.getHeight() != getHeight()) {
        // First 2 steps are done in onMeasure but looks like we have to run again due to
        // changed size.
        mLayout.setExactMeasureSpecsFrom(this);
        dispatchLayoutStep2();
    } else {
        // always make sure we sync them (to ensure mode is exact)
        mLayout.setExactMeasureSpecsFrom(this);
    }
    dispatchLayoutStep3();
It can be found that the layout process also has similar calls in onMeasure, namely dispatch Layout Step1 and dispatch Layout Step2. This is because the measure and layout of the sub-view of RecyclerView are accomplished by dispatch Layout Step2. Of course, we don't have to worry that it will be repeated, because there is another mState.mLayoutStep to control the mapping step. When the value of STEP_START is STEP_START, dispatchLayoutStep 1 is invoked and mLayoutStep = State.STEP_LAYOUT is assigned. When the value of STEP_LAYOUT, dispatchLayoutStep2 is invoked and mLayoutStep = State.STEP_ANIMATIONS is assigned. When the value of STEP_ANIMATIONS, dispatchLayoutStep3 is invoked and then reassigned to STEP_START. Make sure that each step from onMeasure to onLayout only happens once.
3. The three methods of dispatchLayoutStep and Recycler class are emphatically analyzed.
Each time a data set changes or requestLayout is invoked, dispatch Layout Step is used. This method is also the core of RecyclerView's filling layout and animation of sub-views. Above also appeared many times in onMeasure and onLayout. Here's a comprehensive description of their roles in various stages.
(Review of measure s and Review layout)
The most important way to measure and fill sub-views is to dispatchLayoutStep2 It's, let's talk about it first.
Both dispatch Layout Step1 and dispatch Layout Step3 are closely related to animations that perform different operations and are relatively simple (actions such as add, remove, insert, etc.).
(1) dispatch Layout Step 1 layout preprocessing, step 3 animation basis.
private void dispatchLayoutStep1() {
      ......
      mViewInfoStore.clear();
      if (mState.mRunSimpleAnimations) {
          // Step 0: Find out where all non-removed items are, pre-layout
          int count = mChildHelper.getChildCount();
          for (int i = 0; i < count; ++i) {
              final ViewHolder holder = getChildViewHolderInt(mChildHelper.getChildAt(i));
              if (holder.shouldIgnore() || (holder.isInvalid() && !mAdapter.hasStableIds())) {
                  continue;
              }
              ......
              mViewInfoStore.addToPreLayout(holder, animationInfo);
              if (mState.mTrackOldChangeHolders && holder.isUpdated() && !holder.isRemoved()
                      && !holder.shouldIgnore() && !holder.isInvalid()) {
                  long key = getChangedHolderKey(holder);
                  ......
                  mViewInfoStore.addToOldChangeHolders(key, holder);
              }
          }
      }
      if (mState.mRunPredictiveAnimations) {
        ......
      }
      ......
      mState.mLayoutStep = State.STEP_LAYOUT;
}
This part mainly stores the view Holder preprocessing information classification of View that already exists in the container temporarily in mView InfoStore, which provides the basis for animation difference analysis later.
(2) dispatch Layout Step 3 layout post processing, execution of the corresponding action animation.
private void dispatchLayoutStep3() {
    ......
    mState.mLayoutStep = State.STEP_START;
    if (mState.mRunSimpleAnimations) {
            for (int i = mChildHelper.getChildCount() - 1; i >= 0; i--) {
                ViewHolder holder = getChildViewHolderInt(mChildHelper.getChildAt(i));
                ......
                long key = getChangedHolderKey(holder);
                final ItemHolderInfo animationInfo = mItemAnimator
                        .recordPostLayoutInformation(mState, holder);
                ViewHolder oldChangeViewHolder = mViewInfoStore.getFromOldChangeHolders(key);
                if (oldChangeViewHolder != null && !oldChangeViewHolder.shouldIgnore()) {
                    final boolean oldDisappearing = mViewInfoStore.isDisappearing(
                            oldChangeViewHolder);
                    final boolean newDisappearing = mViewInfoStore.isDisappearing(holder);
                    if (oldDisappearing && oldChangeViewHolder == holder) {
                        mViewInfoStore.addToPostLayout(holder, animationInfo);
                    } else {
                        final ItemHolderInfo preInfo = mViewInfoStore.popFromPreLayout(
                                oldChangeViewHolder);
                        mViewInfoStore.addToPostLayout(holder, animationInfo);
                        ItemHolderInfo postInfo = mViewInfoStore.popFromPostLayout(holder);
                        animateChange(oldChangeViewHolder, holder, preInfo, postInfo,
                                                        oldDisappearing, newDisappearing);
                    }
                } else {
                    mViewInfoStore.addToPostLayout(holder, animationInfo);
                }
            }
            mViewInfoStore.process(mViewInfoProcessCallback);
    }
    .....
}
The view will be updated more or less after dispatch Layout Step2 is refilled. By comparing the pre-layout information temporarily stored in mView InfoStor in dispatch Layout Step1 phase, after some processing, the current ViewHolder and animation information will be added to the post-layout of mView InfoStor. In both stages, addToPreLayout and addToPostLayout will add corresponding tags. Finally, mViewInfoStore. process (mViewInfoProcess Callback) will be called to process the animation internally and then call back to perform the corresponding operation. See the following animation pre-processed callback source code:
private final ViewInfoStore.ProcessCallback mViewInfoProcessCallback =
            new ViewInfoStore.ProcessCallback() {
        @Override
        public void processDisappeared(ViewHolder viewHolder, @NonNull ItemHolderInfo info,
                @Nullable ItemHolderInfo postInfo) {
            mRecycler.unscrapView(viewHolder);
            animateDisappearance(viewHolder, info, postInfo);
        }
        @Override
        public void processAppeared(ViewHolder viewHolder,
                ItemHolderInfo preInfo, ItemHolderInfo info) {
            animateAppearance(viewHolder, preInfo, info);
        }
        ......
}
(3) dispatch Layout Step2 is actually measuring and filling the sub-view.
Subview measurements and layouts of RecyclerView were ultimately delegated to LayoutManager to process the source code:
private void dispatchLayoutStep2() {
    ......
    mLayout.onLayoutChildren(mRecycler, mState);
    ......
}

//On Layout Children Method of Linear Layout Manager
public void onLayoutChildren(RecyclerView.Recycler recycler, RecyclerView.State state) {
    ......
    updateAnchorInfoForLayoutExpose(state, mAnchorInfo);
    ......
    detachAndScrapAttachedViews(recycler);
    if (mAnchorInfo.mLayoutFromEnd) {
        // Fill to start and the following logical branches are the opposite, just look at the following logic for illustration.
        ......
    } else {
        // fill towards end
        updateLayoutStateToFillEndExpose(mAnchorInfo);
        mLayoutState.mExtra = extraForEnd;
        fill(recycler, mLayoutState, state, false);
        endOffset = mLayoutState.mOffset;
        if (mLayoutState.mAvailable > 0) {
            extraForStart += mLayoutState.mAvailable;
        }
        // fill towards start
        updateLayoutStateToFillStartExpose(mAnchorInfo);
        mLayoutState.mExtra = extraForStart;
        mLayoutState.mCurrentPosition += mLayoutState.mItemDirection;
        fill(recycler, mLayoutState, state, false);
        startOffset = mLayoutState.mOffset;
    }
    ......
}- The first step is to find the anchor point and position to determine the relative coordinates and item position.
- For detaching and recycling views on containers, see calling detachAndScrapAttached View s.Explanation of Recovery Process;
- Fill the View into the available space, with anchor as the boundary, and expand in opposite directions to fill the available space in the layout direction. One-way Filling Algorithms.
The algorithm sketch of filling in two directions with the tracing point as the boundary is as follows, in which the red point is the location of the tracing point:
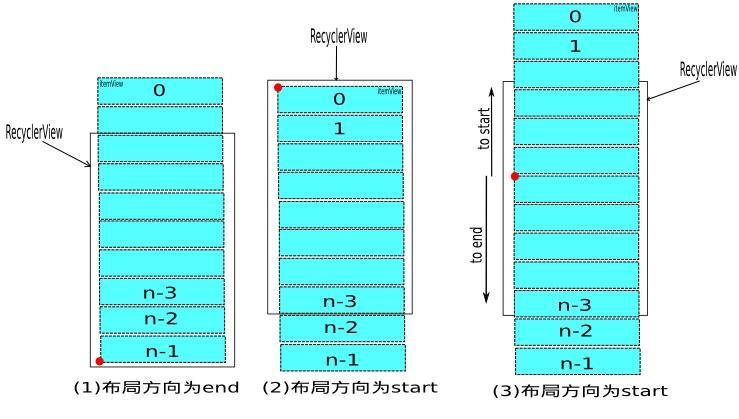
The itemView without tracing points is initialized by (1) or (2). When the long view slides, the filling will appear (3) indicating the filling. The source code of the single direction filling algorithm of Linear Layout Manager is as follows:
protected int fill(RecyclerView.Recycler recycler, LayoutState layoutState,
                       RecyclerView.State state, boolean stopOnFocusable) {
    ......
    if (layoutState.mScrollingOffset != LayoutState.SCOLLING_OFFSET_NaN) {
        ......
        recycleByLayoutStateExpose(recycler, layoutState);
    }
    int remainingSpace = layoutState.mAvailable + layoutState.mExtra;
    while (remainingSpace > 0 && layoutState.hasMore(state)) {
        layoutChunkResultCache.resetInternal();
        layoutChunk(recycler, state, layoutState, layoutChunkResultCache);
        if (layoutChunkResultCache.mFinished) {
            break;
        }
        layoutState.mOffset += layoutChunkResultCache.mConsumed * layoutState.mLayoutDirection;
        if (!layoutChunkResultCache.mIgnoreConsumed || mLayoutState.mScrapList != null
           || !state.isPreLayout()) {
            layoutState.mAvailable -= layoutChunkResultCache.mConsumed;
            // we keep a separate remaining space because mAvailable is important for recycling
            remainingSpace -= layoutChunkResultCache.mConsumed;
        }         ......
    }
    if (DEBUG) {
        validateChildOrderExpose();
    }
    return start - layoutState.mAvailable;
}
First, the sub-view that has already slid out of the screen is removed by recycleByLayoutStateExpose method, then View is added by calling layoutChunk each time in a layout direction through a loop, and the offset of the remaining space and the next layout is adjusted in time until the remaining space is insufficient. Subviews are measured and laid out one by one in the layoutChunk method. Look at the following source code:
protected void layoutChunk(RecyclerView.Recycler recycler, RecyclerView.State state,
                               LayoutState layoutState, LayoutChunkResult result) {
    View view = layoutState.next(recycler);
    ......
    RecyclerView.LayoutParams params = (RecyclerView.LayoutParams) view.getLayoutParams();
    if (layoutState.mScrapList == null) {
        // can not find in scrapList
        if (mShouldReverseLayoutExpose == (layoutState.mLayoutDirection
                == LayoutState.LAYOUT_START)) {
            addView(view);
        } else {
            addView(view, 0);
        }
    }
    ......
    measureChildWithMargins(view, 0, 0);
    result.mConsumed = mOrientationHelper.getDecoratedMeasurement(view);
    int left, top, right, bottom;
    if (getOrientation() == VERTICAL) {
        if (isLayoutRTL()) {
            right = getWidth() - getPaddingRight();
            left = right - mOrientationHelper.getDecoratedMeasurementInOther(view);
        } else {
            left = getPaddingLeft();
            right = left + mOrientationHelper.getDecoratedMeasurementInOther(view);
        }
        if (layoutState.mLayoutDirection == LayoutState.LAYOUT_START) {
            bottom = layoutState.mOffset;
            top = layoutState.mOffset - result.mConsumed;
        } else {
            top = layoutState.mOffset;
            bottom = layoutState.mOffset + result.mConsumed;
        }
    } else {
    ......
    }
    // We calculate everything with View's bounding box (which includes decor and margins)
    // To calculate correct layout position, we subtract margins.
    layoutDecorated(view, left + params.leftMargin, top + params.topMargin,
            right - params.rightMargin, bottom - params.bottomMargin);
    ......
    result.mFocusable = view.isFocusable();
}
This method uses layoutState.next(recycler)Reuse mechanism Get the next View that needs to be laid out, add it to RecyclerView through the addView method of ViewGroup, then measure its size by means of ChildWithMargins (View, 0, 0). Finally, the child.layout(left,top,right,bottom) is actually called through the layoutDecorated method to lay out the child.
(4) Recycler is responsible for the reuse and recycling process, which involves the creation and recycling of ViewHolder. It is an internal class of RecyclerView, with three-level cache structure and an extended cache interface:
public final class Recycler {
    final ArrayList<ViewHolder> mAttachedScrap = new ArrayList<>();
    ArrayList<ViewHolder> mChangedScrap = null;

    final ArrayList<ViewHolder> mCachedViews = new ArrayList<ViewHolder>();

    private final List<ViewHolder>
            mUnmodifiableAttachedScrap = Collections.unmodifiableList(mAttachedScrap);

    private int mRequestedCacheMax = DEFAULT_CACHE_SIZE;
    int mViewCacheMax = DEFAULT_CACHE_SIZE;

    RecycledViewPool mRecyclerPool;

    private ViewCacheExtension mViewCacheExtension;
    ......
}
Let's start with the creation of View and ViewHolder. Next, when layoutChunk added View, it called layoutState.next(recycler) to get the next View, and actually called Recycler's getViewForPosition method.
public View next(RecyclerView.Recycler recycler) {
    if (mScrapList != null) {
        return nextFromLimitedList();
    }
    final View view = recycler.getViewForPosition(mCurrentPosition);
    mCurrentPosition += mItemDirection;
    return view;
}
//next calls the following method.
View getViewForPosition(int position, boolean dryRun) {
    return tryGetViewHolderForPositionByDeadline(position, dryRun, FOREVER_NS).itemView;
}
Finally, it calls Recycler's tryGetViewHolder ForPositionByDeadline method in the following steps:
(1) Check mChangedScrap and return holder if matched
(2) Check mAttachedScrap and return the corresponding holder if it matches and holder is valid.
(3) Check mViewCacheExtension and return holder if matched
(4) Check mRecyclerPool and return holder if matched.
(5) Otherwise, execute Adapter.createViewHolder(), and create a new holder instance
(6) Return to holder and get the View to be added through holder.itemView.
This method is relatively long, look at the following key source code:
ViewHolder tryGetViewHolderForPositionByDeadline(int position,
                boolean dryRun, long deadlineNs) {
    ......
    ViewHolder holder = null;
    // 0) If there is a changed scrap, try to find from there
    if (mState.isPreLayout()) {
        holder = getChangedScrapViewForPosition(position);
        fromScrapOrHiddenOrCache = holder != null;
    }
    // 1) Find by position from scrap/hidden list/cache
    if (holder == null) {
        holder = getScrapOrHiddenOrCachedHolderForPosition(position, dryRun);
        ......
    }
    if (holder == null) {
        ......
        final int type = mAdapter.getItemViewType(offsetPosition);
        // 2) Find from scrap/cache via stable ids, if exists
        if (mAdapter.hasStableIds()) {
            holder = getScrapOrCachedViewForId(mAdapter.getItemId(offsetPosition),
                    type, dryRun);
            ......
        }
        if (holder == null && mViewCacheExtension != null) {
            // We are NOT sending the offsetPosition because LayoutManager does not
            // know it.
            final View view = mViewCacheExtension
                    .getViewForPositionAndType(this, position, type);
            if (view != null) {
                holder = getChildViewHolder(view);
                ......
            }
        }
        if (holder == null) { // fallback to pool
            holder = getRecycledViewPool().getRecycledView(type);
            ......
        }
        if (holder == null) {
            ......
            holder = mAdapter.createViewHolder(RecyclerView.this, type);
            ......
        }
    }
    ......
    boolean bound = false;
    if (!holder.isBound() || holder.needsUpdate() || holder.isInvalid()) {
        if (DEBUG && holder.isRemoved()) {
            throw new IllegalStateException("Removed holder should be bound and it should"
                    + " come here only in pre-layout. Holder: " + holder);
        }
        final int offsetPosition = mAdapterHelper.findPositionOffset(position);
        bound = tryBindViewHolderByDeadline(holder, offsetPosition, position, deadlineNs);
    }
    ......
    return holder;
}
Basically, the view Holder is acquired through caches at all levels, and the mAdapter.createViewHolder is invoked to create if it is not available. The final ViewHolder calls tryBindViewHolder ByDeadline to bind the data if it needs to bind, and it calls mAdapter.bindViewHolder internally.
Now let's look at Recycler's recycling process.
-
When the Adapter is reset or an item variant is notified, the corresponding ViewHolder will add flags such as UPDATE, REMOVE, etc. to wait.onLayoutChildren Then detachAndScrapAttachedViews is called first, and finally Recycler's recycleViewHolderInternal method is called.
Recycling invisible ViewHolder s during sliding, see fill The recycleByLayoutStateExpose in the method finally calls the removeAndRecycleViewAt of LayoutManager.
    //Remove before recycling.
    public void removeAndRecycleViewAt(int index, Recycler recycler) {
        final View view = getChildAt(index);
        removeViewAt(index);
        recycler.recycleView(view);
    }
RemoveViewAts are removed by the help class ChildHelper, and eventually recycleViewHolderInternal, which calls Recycler, is recycled.
RecycleViewHolder International is a very long recycleViewHolder method, and the key source code is as follows:
void recycleViewHolderInternal(ViewHolder holder) {
    ......
    if (forceRecycle || holder.isRecyclable()) {
        if (mViewCacheMax > 0
                && !holder.hasAnyOfTheFlags(ViewHolder.FLAG_INVALID
                        | ViewHolder.FLAG_REMOVED
                        | ViewHolder.FLAG_UPDATE
                        | ViewHolder.FLAG_ADAPTER_POSITION_UNKNOWN)) {
            ......
            mCachedViews.add(targetCacheIndex, holder);
            cached = true;
        }
        if (!cached) {
            addViewHolderToRecycledViewPool(holder, true);
            recycled = true;
        }
    }
    ......
    mViewInfoStore.removeViewHolder(holder);
 }
For removed Views, if there are valid no update or remove actions, add them to mCachedViews, otherwise the invalid ViewHolder will be added to Recycled ViewPool.
In all levels of Recycler cache, only Recycled ViewPool stores and retrieves the cache ViewHolder according to viewType to achieve reuse. Other caches need to match layoutPosition or getItemId plus viewType. The highest level of cache is mChangedScrap, which is added when preprocessing layout, corresponding method dispatchLayoutStep1; mAttachedScrap is the second, it is attach ed to the container without removal of the cache reuse is very suitable for frequent jitter sliding; mCachedViews is the view Holder cache of detach, mViewCacheExtension is a user-extended cache pool which is not implemented by ordinary users. Finally, the Recycler ViewPool only needs to be returned by viewType.
4.draw process is relatively simple, but it simply calls ItemDecoration to draw background and foreground views.
(1) The following are the settings of the ItemDecoration interface and the code used internally.
public void addItemDecoration(ItemDecoration decor) {
    addItemDecoration(decor, -1);
}

public void onDraw(Canvas c) {
    super.onDraw(c);
    final int count = mItemDecorations.size();
    for (int i = 0; i < count; i++) {
        mItemDecorations.get(i).onDraw(c, this, mState);
    }
}
    @Override
public void draw(Canvas c) {
    super.draw(c);
    final int count = mItemDecorations.size();
    for (int i = 0; i < count; i++) {
        mItemDecorations.get(i).onDrawOver(c, this, mState);
    }
    ......
 }
(2) The flexibility of ItemDecoration is relatively high. Users need to implement onDraw, onDrawOver and getItemOffset, which are not necessary.
 public static abstract class ItemDecoration {
    public void onDraw(Canvas c, RecyclerView parent, State state){ }
    public void onDrawOver(Canvas c, RecyclerView parent, State state){}
    public void getItemOffsets(Rect outRect, View view, RecyclerView parent, State state) {}
 }
When decorating the itemView, in order to achieve the spacing between Items or avoid the content of the painting covering the itemView, it is necessary to return through getItem Offsets. The spacing between the four sides of the itemView needs to be reserved, as shown in the following view.
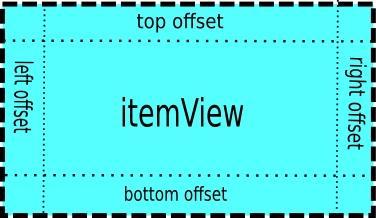
The space occupied by the entire item is the boundary of the outermost dashed line, which is actually taken into account in the measure ment process.
5. Gesture sliding, RecyclerView's gesture sliding and most sliding controls handle onInterceptTouchEvent and onTouchEvent events similarly.
Flying smoothing process is calculated by calling ScrollerCompat tool in ViewFlinger's postOn Animation continuously. Every time we slide dx,dy, this is consistent with the sliding of ACTION_MOVE.
Eventually the gesture sliding or fling sliding will be called back to Layout Manager's scroll HorizontallyBy (dx... ) Or scroll Vertically By (dy...) Internally, scrollBy is called as follows
int scrollBy(int dy, RecyclerView.Recycler recycler, RecyclerView.State state) {
    ......
    final int consumed = mLayoutState.mScrollingOffset
            + fill(recycler, mLayoutState, state, false);
    ......
    mLayoutState.mLastScrollDelta = scrolled;
    return scrolled;
}
Visible sliding also calls the filling method of LinearLayoutManager, which, as mentioned above, recycles View and ViewHolder removed from the screen and fills in new View and ViewHolder.
6. Updating process of advanced Adapter and data set.
Each time a different Adapter is reset or the notify ItemXXX is invoked by changing the data set merge in the Adapter, the tag bits in the existing ViewHolder will eventually change. The label bits of different operations such as FLAG_UPDATE, FLAG_REMOVE are added. Then request Layout will go back to the three processes of dispatch Layout Step mentioned above. The interface changes and updates are also mainly in dispatchLayoutStep2 After completion.
(1) When the Adapter changes
Adapter changes are relatively simple, directly resetting all invalid. Clearing all cached ViewHolder s calls removeAndRecycleViews(); and calling markKnownViewsInvalid marks all Views in the container invalid (FLAG_UPDATE).
(2) Adapter data aggregation operation and call the corresponding notifyItemXXX method.
When you set the Adapter to RecyclerView, you bind an observer DataObserver when the data changes. Users need to call when changing data sets
Notfy Item Changed, notify Item Remove, notify Item Insert and other methods, and then Data Observer will receive the corresponding onItem Chaged, onItem Remove, onItem Insert callbacks and take over by the corresponding onItemXXX of Adapter Helper. Each operation in Adapter Helper corresponds to an UpdateOp
    static class UpdateOp {
        static final int ADD = 1;
        static final int REMOVE = 1 << 1;
        static final int UPDATE = 1 << 2;
        static final int MOVE = 1 << 3;
        static final int POOL_SIZE = 30;

        int cmd;
        int positionStart;
        ......
    }
AdapterHelper's onItemXXX method has bool-type return value. It represents the need for processing for true. It calls triggerUpdateProcessor and finally triggers RecyclerView's consumePendingUpdateOperations method. The process method of AdapterHelper is called internally. After preprocessing the UpdateOpper array, it calls back to RecyclerView through callback, and RecyclerViewer is passed back to RecyclerView. Processing, that is, adding different tags to ViewHolder.
Once the ViewHolder is tagged, onMeasure will be called during the next request Layout, and onLayout will eventually trigger dispatchLayoutStep In three steps, the view will be updated in dispatch Layout Step 2 and animated in dispatch Layout Step 3.
summary
So far, the source code analysis of RecyclerView has been basically completed. There are many auxiliary classes related to RecyclerView. The source code is very long. If you are wrong or not detailed, please give your opinions. Then share VLayout. Welcome to pat the brick.