Reproduced from: Links to the original text
Personal examples of RecycleView: Demo project, run the code directly to see the effect
ListView small example: Demo Project ListView
Remid: The radio button is implemented through ImageView, not CheckBox.
An overview:
The source of demand for this article is relatively simple, but the elegance of the work is still worth exploring.
Source of demand: An interface for choosing e-commerce coupons like hungry?
In fact, it is a common list, which implements the radio function.
The effect is as follows: 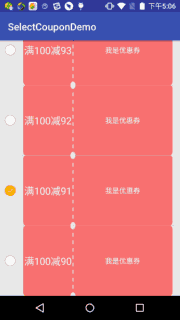
Conventional methods:
Add a boolean isSelected field to the Java bean.
In the Adapter, the selected state of "CheckBox" is set according to the value of this field.
Change the isSelected field in the data source each time a new coupon is selected.
And notify DataSetChanged () refreshes the entire list.
This is very simple to implement, and the amount of code is very small. The only shortcoming is that the performance is impaired, not the most elegant.
As a programmer who pursues today's leisure, I am determined to share a wave of elegant solutions.
This article will list and analyze several schemes for list selection in ListView and Recycler View, and recommend a partial binding scheme for directional refresh, because it is more efficient and elegant.
Second RecyclerView Scheme List:
Recycler View is my favorite, so I'll start with it.
1 Conventional scheme:
For the conventional scheme, read at the speed of light and code directly.
Bean structure:
public class TestBean extends SelectedBean {
    private String name;
    public TestBean(String name,boolean isSelected) {
        this.name = name;
        setSelected(isSelected);
    }
}
There are so many radio requirements in my project that I am too lazy to write the isSelected field, so I have a parent class to inherit from the child class.
public class SelectedBean {
    private boolean isSelected;
    public boolean isSelected() {
        return isSelected;
    }
    public void setSelected(boolean selected) {
        isSelected = selected;
    }
}
Acitivity and other methods of Adapter are the most common ones.
Adapter's onBindViewHolder() is as follows:
Log.d("TAG", "onBindViewHolder() called with: holder = [" + holder + "], position = [" + position + "]");
        holder.ivSelect.setSelected(mDatas.get(position).isSelected());//"CheckBox"
        holder.tvCoupon.setText(mDatas.get(position).getName());//TextView
        holder.ivSelect.setOnClickListener(new View.OnClickListener() {
            @Override
            public void onClick(View view) {
                //The first method is very simple, Lv Rv is general, because they all have notify DataSetChanged () method.
                // Each time you click, first set all selected items to false, and then set the current item to true, refreshing the entire view
                for (TestBean data : mDatas) {
                    data.setSelected(false);
                }
                mDatas.get(position).setSelected(true);
                notifyDataSetChanged();


            }
        });
ViewHolder:
  public static class CouponVH extends RecyclerView.ViewHolder {
        private ImageView ivSelect;
        private TextView tvCoupon;

        public CouponVH(View itemView) {
            super(itemView);
            ivSelect = (ImageView) itemView.findViewById(R.id.ivSelect);
            tvCoupon = (TextView) itemView.findViewById(R.id.tvCoupon);
        }
    }
The advantages of the scheme are as follows:
Simple and rough
The shortcomings of the scheme are as follows:
In fact, there are only two Item s that need to be modified:
An Item - > Ordinary State that is currently in the Selected State
Select the Item - > status of the current finger click
But in the normal scenario, the entire screen of the visible Item will be refreshed and their getView()/onBindViewHolder() method will be restarted.
In fact, a screen generally can see up to 10 + Item s, traversing it once is harmless and elegant.
But we still have to pursue elegance, so we continue to look down.
2 Directional refresh using Rv's notify ItemChanged ():
This program can be read at medium speed.
(1) This scheme needs to add a new field in the Adapter:
private int mSelectedPos = -1;//Implementing radio selection method 2, saving the currently selected positio variables(2) Initialize the value of mSelectedPos when setting the data set (constructor, setData() method, etc.).
 //Implementing radio selection method 2: When setting data set, find the default selected pos
        for (int i = 0; i < mDatas.size(); i++) {
            if (mDatas.get(i).isSelected()) {
                mSelectedPos = i;
            }
        }
(3) The code in onClick is as follows:
   //Implementing radio selection method 2: notify ItemChanged () directional refresh of two views
                //If the Item that has been checked is not checked
                if (mSelectedPos!=position){
                    //Cancel the check status of the last item first
                    mDatas.get(mSelectedPos).setSelected(false);
                    notifyItemChanged(mSelectedPos);
                    //Set the check status of the new Item
                    mSelectedPos = position;
                    mDatas.get(mSelectedPos).setSelected(true);
                    notifyItemChanged(mSelectedPos);
                }
Because notify ItemChanged () is called in this scheme, it will also be accompanied by a "white flash" animation.
The advantages of the scheme are as follows:
This scheme, more elegant, will not go back to the getView()/onBindViewHolder() method of a screen-visible Item.
However, it will still go back to the getView()/onBindViewHolder() method of the two Item s that need to be modified.
3 Rv implements partial binding (recommendation):
Using the findViewHolder ForLayoutPosition () method of RecyclerView, get the ViewHolder of a postion, which may return null according to the annotation of the method in the source code. So we need to pay attention to the blank (empty is invisible on the screen).
Method 2 is different from the onClick code. The core is to use the mSelectedPos field to do things.
 //Method 3: RecyclerView another directional refresh method: no white flash animation and no onBindVIewHolder duplication
    CouponVH couponVH = (CouponVH) mRv.findViewHolderForLayoutPosition(mSelectedPos);
    if (couponVH != null) {//Still on the screen
        couponVH.ivSelect.setSelected(false);
    }else {
        //add by 2016 11 22 for some extreme cases, holder is cached in Recycler's cacheView.
        //ViewHolder is not available at this time, but the onBindViewHolder method is not called back. So add an exception handling
        notifyItemChanged(mSelectedPos);
    }
    mDatas.get(mSelectedPos).setSelected(false);//You need to change data whether you're on or off the screen.
    //Set the check status of the new Item
    mSelectedPos = position;
    mDatas.get(mSelectedPos).setSelected(true);
    holder.ivSelect.setSelected(true);
The advantages of the scheme are as follows:
Directional refresh of two Item s, modify only the necessary parts, do not go back to onBindViewHolder(), belongs to manual partial binding. The amount of code is also moderate, not much.
The shortcomings of the scheme are as follows:
No white flash animation??? (If that's a disadvantage)
4 Rv uses payloads to implement partial binding (not recommended):
This scheme belongs to pioneering thinking. It uses payloads and notify ItemChanged (int position, Object payload) to do things on the basis of scheme 2.
I don't know what payloads are, and if I don't understand this solution, I want Amway: (stamp - >: [Android] to elaborate on the new tool class that 7.0 brings: DiffUtil)
The onClick code is as follows:
 //Method 4 for achieving radio selection:
                if (mSelectedPos != position) {
                    //Cancel the check status of the last item first
                    mDatas.get(mSelectedPos).setSelected(false);
                    //Pass a payload
                    Bundle payloadOld = new Bundle();
                    payloadOld.putBoolean("KEY_BOOLEAN", false);
                    notifyItemChanged(mSelectedPos, payloadOld);
                    //Set the check status of the new Item
                    mSelectedPos = position;
                    mDatas.get(mSelectedPos).setSelected(true);
                    Bundle payloadNew = new Bundle();
                    payloadNew.putBoolean("KEY_BOOLEAN", true);
                    notifyItemChanged(mSelectedPos, payloadNew);
                }
The onBindViewHolder() method with three parameters needs to be overridden:
  @Override
    public void onBindViewHolder(CouponVH holder, int position, List<Object> payloads) {
        if (payloads.isEmpty()) {
            onBindViewHolder(holder, position);
        } else {
            Bundle payload = (Bundle) payloads.get(0);
            if (payload.containsKey("KEY_BOOLEAN")) {
                boolean aBoolean = payload.getBoolean("KEY_BOOLEAN");
                holder.ivSelect.setSelected(aBoolean);
            }
        }
    }
The advantages of the scheme are as follows:
Same method 3
The shortcomings of the scheme are as follows:
There are a lot of codes, and the effect of implementation is the same as that of method three. It is only for exploiting thinking, so method three is chosen.