1, Sentinel mode
In redis3 Before 0, redis used sentinel architecture, which uses sentinel tool to monitor the status of master nodes; If the master node is abnormal, it will make a master-slave switch and use a slave as the master.
Disadvantages of sentinel mode:
(1) When the master hangs up, sentinel will elect a master. There is no way to access Redis during the election, and the access will be interrupted immediately; If the master hangs up when the e-commerce website is promoted, a lot of order data will be lost in a few seconds;
(2) In sentinel mode, only the master node can write to the outside world, and the slave node can only be used for reading. Although a single Redis node can support up to 10W QPS, when e-commerce is promoted, the pressure of writing data is all on the master.
(3) The single node memory of Redis cannot be set too large. If the data is too large, the master-slave synchronization will be slow; When the node starts, the time is very long; (the slave node has all the data of the master node)
2, Redis cluster
1. Introduction to Redis cluster
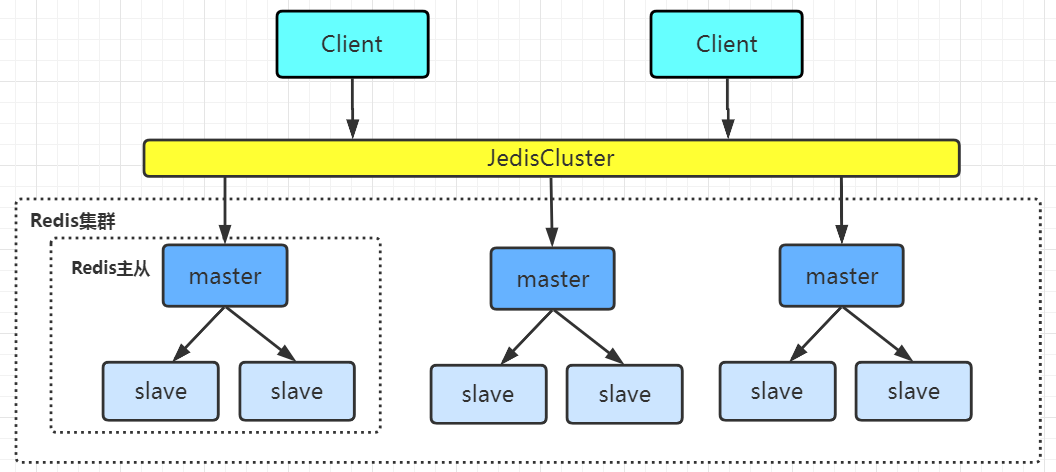
Redis cluster is a distributed service cluster composed of multiple master-slave node groups. It has the characteristics of replication, high availability and fragmentation. Redis cluster can complete node removal and failover without sentinel sentinel. Each node needs to be set into a cluster mode. This cluster mode has no central node and can be expanded horizontally. According to the official document, it can be linearly expanded to tens of thousands of nodes (no more than 1000 nodes are officially recommended). The performance and high availability of redis cluster are better than the sentinel mode of previous versions, and the cluster configuration is very simple.
2. Advantages of Redis cluster:
(1) Redis cluster has multiple master s, which can reduce the impact of access transient interruption;
If a master in the cluster hangs, you just need to write data to the master. This operation needs to wait; However, writing data to other master nodes is not affected.
(2) Redis cluster has multiple master s, which can provide higher concurrency;
(3) Redis cluster can be stored in pieces, so that more data can be stored;
3. Establishment of Redis cluster
At least three master nodes are needed to build a Redis cluster. Here we build three master nodes, each with a slave node under it, a total of six Redis nodes; (3 machines, one master and one slave for each machine)
First machine: 192.168.1.1 port 8001 port 8002 port
Second machine: 192.168.1.2 port 8001 port 8002 port
The third machine: 192.168.1.3 port 8001 port 8002 port
Step 1: create a folder
mkdir -p /usr1/redis/redis-cluster/8001 /usr1/redis/redis-cluster/8002
Step 2: install redis in the redis installation directory The conf files are copied to the 8001 directory respectively
cp /usr1/redis-5.0.3/redis.conf /usr1/redis/redis-cluster/8001
Step 3: modify redis The conf file contains the following
port 8001 daemonize yes
pidfile "/var/run/redis\_8001.pid" #Specify the storage location of data files. You must specify different directory locations, otherwise you will lose data dir /usr1/redis/redis-cluster/8001/ #Start cluster mode
cluster\-enabled yes

#Cluster node information file. Here, 800x should correspond to port
cluster\-config-file nodes-8001.conf

# Timeout of node offline
cluster\-node-timeout 5000 #Remove bind to access ip information
#bind 127.0.0.1 #Turn off protection mode
protected\-mode no

#Start AOF file
appendonly yes

#If you want to set the password, you need to add the following configuration:
#Set redis access password
requirepass redis\-pw

#Set the access password between cluster nodes, consistent with the above
masterauth redis\-pw
Step 4: copy the above modified configuration file to 8002 folder, and modify 8001 to 8002:
cp /usr1/redis/redis-cluster/8001/redis.conf /usr1/redis/redis-cluster/8002 cd /usr1/redis/redis-cluster/8002/ vim redis.conf

#Batch modify string
:%s/8001/8002/g
Step 5: copy the files on the local machine (192.168.1.1) to the other two machines
scp /usr1/redis/redis-cluster/8001/redis.conf  root@192.168.1.2:/usr1/redis/redis-cluster/8001/
scp /usr1/redis/redis-cluster/8002/redis.conf  root@192.168.1.2:/usr1/redis/redis-cluster/8002/
 scp /usr1/redis/redis-cluster/8001/redis.conf  root@192.168.1.3:/usr1/redis/redis-cluster/8001/
scp /usr1/redis/redis-cluster/8002/redis.conf  root@192.168.1.3:/usr1/redis/redis-cluster/8002/
Step 6: start the six redis instances respectively, and then check whether they are started successfully
/usr1/redis/redis-5.0.3/src/redis-server /usr1/redis/redis-cluster/8001/redis.conf /usr1/redis/redis-5.0.3/src/redis-server /usr1/redis/redis-cluster/8002/redis.conf
ps -ef | grep redis

Step 7: create an entire redis cluster using redis cli (the ruby script redis-trib.rb used before redis 5.0)
Run the above commands to complete the construction
/usr1/redis/redis-5.0.3/src/redis-cli -a redis-pw --cluster create --cluster-replicas 1 192.168.1.1:8001 192.168.1.1:8002 192.168.1.2:8001 192.168.1.2:8002 192.168.1.3:8001 192.168.1.3:8002

explain:
-a: Password;
--Cluster replicas 1: indicates that one slave is attached to one master-- Cluster replicas 2: indicates that there are two slave servers under one master.
Extension:
View help command: src/redis ‐ cli --cluster help
create: Create a clustered environment host1:port1 ... hostN:portN
call: Can execute redis command
add\-node: Add a node to the cluster. The first parameter is the name of the new node ip:port,The second parameter is the name of any existing node in the cluster ip:port
del\-node: Remove a node
reshard: Repartition
check: Check cluster status
Step 8: verify the cluster
(1) Connect to any client
/usr1/redis/redis-5.0.3/src/redis-cli -a redis-pw -c -h 192.168.1.1 -p 8001
Note: - a indicates the server password; - a c indicates cluster mode- h specify the ip address- p indicates the port number
(2) View cluster information: cluster info
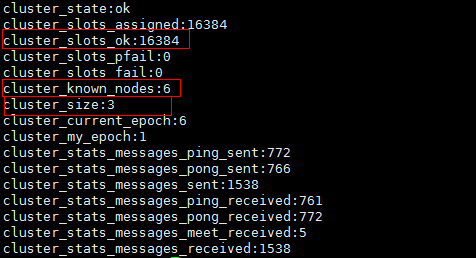
(3) View the node list: the master corresponding to cluster nodes # slave can also be seen from above;
From the above, you can see which master the slave is hanging under;

At / usr1 / redis / redis cluster / 8001 / nodes-8001 The node information is stored in the conf file;
(4) Conduct data operation verification;
(5) You need to shut down the cluster one by one by using the command:
/usr/local/redis‐5.0.3/src/redis‐cli ‐a redis-pw ‐c ‐h 192.168.1.1 ‐p 8001 shutdown /usr/local/redis‐5.0.3/src/redis‐cli ‐a redis-pw ‐c ‐h 192.168.1.1 ‐p 8002 shutdown
......
Note: when creating a cluster, you need to turn off the fire protection on all node machines to ensure that the service port of Redis and the mission port of cluster node communication can be connected;
systemctl stop firewalld # temporarily close the firewall
systemctl disable firewalld # disable startup
4. Principle analysis of Redis cluster
Redis Cluster divides all data into 16384 slots, and each node is responsible for part of the slots. The slot information is stored in each node. Only the master node will be allocated slots, and the slave node will not be allocated slots.
When the client of Redis Cluster connects to the cluster, it will also get a copy of the slot configuration information of the cluster and cache it locally. In this way, when the client wants to find a key, it can directly locate the target node. At the same time, because the slot information may be inconsistent between the client and the server, a correction mechanism is also needed to verify and adjust the slot information.
Slot location algorithm
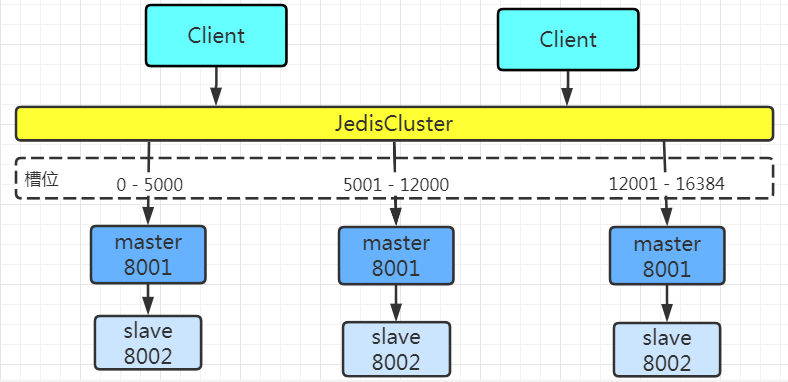
By default, Cluster will hash the key value using crc16 algorithm to get an integer value, and then use this integer value to model , 16384 , to get the specific slot position.
HASH_SLOT = CRC16(key) % 16384
Jump relocation
When the client sends an instruction to a node, first, the current node will calculate the key of the instruction to obtain the slot information, and judge whether the calculated slot is managed by the current node; If the slot is not managed by the current node, it will send a special jump instruction to the client, carry the node address of the target operation, and tell the client to connect to this node to obtain data. After receiving the instruction, the client will not only jump to the correct node for operation, but also synchronously update and correct the local slot mapping table cache. All subsequent keys will use the new slot mapping table.

Communication mechanism between Redis cluster nodes
There are two ways to maintain the metadata of the cluster: centralized and gossip. The communication between Redis cluster nodes adopts the gossip protocol
(1) Centralized:
Advantages: the updating and reading of metadata is very timely. Once the metadata changes, it will be updated to the centralized storage immediately, and other nodes can immediately perceive it when reading;
Disadvantages: the update pressure of all metadata is concentrated in one place, which may lead to the storage pressure of metadata. zookeeper uses this method
(2)gossip:
The gossip protocol contains a variety of messages, including ping, pong, meet, fail and so on..
Advantages: metadata updates are scattered and not concentrated in one place. Update requests will be sent to all nodes to update. There is a certain delay and reduces the pressure;
Disadvantages: metadata update is delayed, which may lead to some lag in some operations of the cluster.
Each node has a port dedicated to inter node communication, that is, the port number of its own service + 10000, such as 7001, so the port used for inter node communication is 17001. Each node will send ping messages to other nodes at regular intervals, and the other nodes will return a pong message after receiving the ping message.
Network jitter
Network jitter is a very common phenomenon. Suddenly, some connections become inaccessible, and then quickly return to normal.
To solve this problem, Redis Cluster provides an option, Redis Cluster- node- Timeout means that when a node loses contact for more than the configured timeout, it can be considered that the node has failed and needs to be switched from master to slave. Without this option, network jitter will lead to frequent master-slave switching (data re replication).
Redis cluster election principle
When an attempt is made to find a new slave, the slave master becomes the slave master. Since there are multiple slaves in the suspended master, these slaves have to compete to become master nodes. The process is as follows:
(1) slave1 and slave2 both find that their connected master status changes to Fail;
(2) They add 1 to their recorded cluster currentEpoch (election cycle), and use the gossip protocol to broadcast FailOver_auth_request information;
(3) Other nodes receive slave1 and salve2 messages (only the master response), judge the legitimacy of the request, and send a failover to slave1 or slave2_ auth_ ACK (only one ack for each epoch); In an election cycle, a master will only respond to the first slave that sends a message to it;
(4) slave1 collects the returned FailOver_auth_ack, which becomes a new master after receiving more than half of the master's acks; (this is why the cluster needs at least three masters. If there are only two masters, and one of them hangs, only one master node can not be elected successfully.)
(5) The new master node broadcasts Pong messages to inform other cluster nodes that there is no need to vote.
The slave node does not attempt to launch an election as soon as the master node enters the FAIL state, but there is a certain delay. A certain delay ensures that we wait for the FAIL state to spread in the cluster. If the slave attempts to vote immediately, other masters may not be aware of the FAIL state and may refuse to vote.
Delay calculation formula: DELAY = 500ms + random(0 ~ 500ms) + SLAVE_RANK * 1000ms
SLAVE_RANK: rank indicating the total amount of data that this slave has copied from the master. The smaller the rank, the newer the copied data. In this way, the slave with the latest data will launch the election first (theoretically)
Why does Redis cluster need at least three master nodes, and the recommended number of nodes is odd?
Because the election of a new master requires the consent of more than half of the cluster master nodes to be successful. If there are only two master nodes, when one of them hangs, the conditions for electing a new master cannot be met.
An odd number of master nodes can save one node on the basis of meeting the election conditions. For example, compared with a cluster of four master nodes, if you have one master node, you can elect a new master node. If you have two master nodes, you can't elect a new master node, Therefore, the odd number of master nodes is more from the perspective of saving machine resources.
Whether the cluster is complete to provide external services
When redis When the configuration cluster require full coverage of conf is no, it means that the cluster is still available when the master library responsible for a slot goes offline and there is no corresponding slave library for fault recovery. If yes, the cluster is not available.
5. Java operation Redis cluster
Mode 1 (Jedis):
(1) Introducing maven coordinates of jedis
<dependency\>
 <groupId\>redis.clients</groupId\>
 <artifactId\>jedis</artifactId\>
 <version\>2.9.0</version\>
</dependency\>
(2) The code written in Java is as follows:
public class JedisClusterTest { public static void main(String\[\] args) throws IOException {

        JedisPoolConfig config \= new JedisPoolConfig();
        config.setMaxTotal(20);
        config.setMaxIdle(10);
        config.setMinIdle(5);

        Set<HostAndPort> jedisClusterNode = new HashSet<HostAndPort>();
        jedisClusterNode.add(new HostAndPort("192.168.1.1", 8001));
        jedisClusterNode.add(new HostAndPort("192.168.1.1", 8002));
        jedisClusterNode.add(new HostAndPort("192.168.1.2", 8001));
        jedisClusterNode.add(new HostAndPort("192.168.1.2", 8002));
        jedisClusterNode.add(new HostAndPort("192.168.1.3", 8001));
        jedisClusterNode.add(new HostAndPort("192.168.1.3", 8002));
        JedisCluster jedisCluster \= null; try { //connectionTimeout: refers to the connection waiting time for connecting to a url / / soTimeout: refers to the return waiting time for connecting to the previous url and obtaining the response
             jedisCluster = new JedisCluster(jedisClusterNode, 6000, 5000, 10, "redis-pw", config);
             System.out.println(jedisCluster.set("name", "zhangsan"));
             System.out.println(jedisCluster.get("name"));
         } catch (Exception e) {
            e.printStackTrace();
         } finally { if (jedisCluster != null) {
                jedisCluster.close();
             }
        }
    }
}
Method 2: spring boot integrates Redis
(1) Introducing maven coordinates
<dependency\>
 <groupId\>org.springframework.boot</groupId\>
 <artifactId\>spring‐boot‐starter‐data‐redis</artifactId\>
</dependency\>

<dependency\>
 <groupId\>org.apache.commons</groupId\>
 <artifactId\>commons‐pool2</artifactId\>
</dependency\>
(2) Configuration file
server:
  port: 8080 spring:
  redis:
  database: 0 timeout: 3000 password: redis\-pw
  cluster:
    nodes: 192.168.0.61:8001,192.168.0.62:8002,192.168.0.63:8003,192.168.0.61:8004,192.168.0.62:8005,192.168.0.6
3:8006 lettuce:
  pool:
  max‐idle: 50 min‐idle: 10 max‐active: 100 max‐wait: 1000
(3) java code, as follows:
@RestController public class TestController { private static final Logger logger = LoggerFactory.getLogger(TestController.class);

    @Autowired private StringRedisTemplate stringRedisTemplate;

    @RequestMapping("/test\_cluster") public void testCluster() throws InterruptedException {
        stringRedisTemplate.opsForValue().set("user:name", "wangwu");
        System.out.println(stringRedisTemplate.opsForValue().get("user:name"));
    }
}