Today, I learned about the use of redis cluster. Here, I will record the problems encountered in the process
1, Environment construction (docker needs to be installed first)
Here, docker will be used to deploy four redis instances (node1-3 as the primary node and node4 as the standby node of 1)
Here, four redis instances are deployed on the same machine. If they are deployed on different machines, the following commands should be executed separately
Download redis image
docker pull redis:5.0.5

Create the data directory of redis instance
mkdir -p /data/redis-data/node1 /data/redis-data/node2 /data/redis-data/node3 /data/redis-data/node4

chmod -R  777 /data
Create four redis containers. The ports of node1, node2 and node3 are 6379, 6380 and 6381 respectively
docker create --name redis-node1 --net host -v /data/redis-data/node1:/data redis:5.0.5 --cluster-enabled yes --cluster-config-file nodes-node-1.conf --port 6379

docker create --name redis-node2 --net host -v /data/redis-data/node2:/data redis:5.0.5 --cluster-enabled yes --cluster-config-file nodes-node-2.conf --port 6380

docker create --name redis-node3 --net host -v /data/redis-data/node3:/data redis:5.0.5 --cluster-enabled yes --cluster-config-file nodes-node-3.conf --port 6381

docker create --name redis-node4 --net host -v /data/redis-data/node4:/data redis:5.0.5 --cluster-enabled yes --cluster-config-file nodes-node-4.conf --port 6382

--name : Container name
--net: Network mode, host Indicates that it is in the same network namespace as the host so that local programs can access it redis colony
-v: File directory mount
--cluster-enabled: Start cluster
--cluster-config-file: configuration file
--port: Service port

Start container
docker start redis-node1 redis-node2 redis-node3 redis-node4

Turn off the firewall (without turning off the firewall, the program cannot connect to the cluster)
systemctl stop firewalld
II. Cluster construction
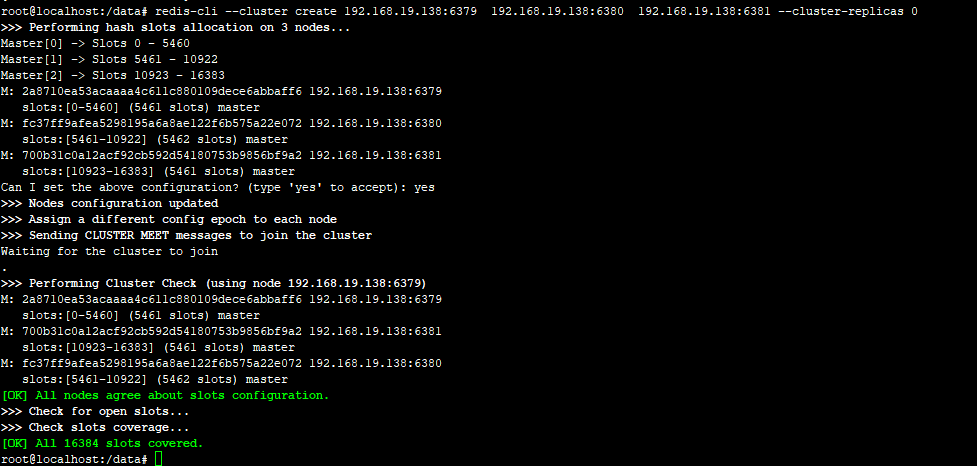
Configure master node cluster
docker exec -it redis-node1 bash

redis-cli --cluster create 192.168.19.138:6379  192.168.19.138:6380  192.168.19.138:6381 --cluster-replicas 0
-- 192 above.168.19.138 Is the name of this server ip,Actually, you need to replace it with your own deployed server ip

In node1, execute redis cli to enter the redis service and query the status of cluster nodes

Copy the id of node1, which is used below
Exit the docker of node1 and enter the main server
Configure the standby node and specify node4 as the standby node of node1
docker exec -it redis-node4 bash

redis-cli --cluster add-node 192.168.19.138:6382 192.168.19.138:6379  --cluster-slave --cluster-master-id 2a8710ea53acaaaa4c611c880109dece6abbaff6

--2 above a8710ea53acaaaa4c611c880109dece6abbaff6,Need to change to actual id

View the cluster status after adding the standby node

III. redis cluster usage
Use springboot to build a simple client to connect to the redis cluster. In the process, stop the node1 node to see if the cluster environment can be switched normally
For shelf package reference, only one jedis is required, and springboot will automatically associate the jedis version
dependencies {
    compile("org.springframework.boot:spring-boot-starter-web")
    compile("org.springframework.boot:spring-boot-starter-log4j2")

    compile("redis.clients:jedis")
    compile("org.projectlombok:lombok:1.18.8")
    annotationProcessor ("org.projectlombok:lombok:1.18.8")
    testCompile group: 'junit', name: 'junit', version: '4.12'
}
Configuration file application Yaml, you need to specify all redis nodes of the whole cluster, and you don't need a password
spring:
  redis:
    cluster:
      nodes: 192.168.19.138:6379,192.168.19.138:6380,192.168.19.138:6381,192.168.19.138:6382
Main entrance
@SpringBootApplication
public class Main {
    public static void main(String[] args) {
        SpringApplication.run(Main.class, args);
    }
}
redis configuration class
@Configuration
public class RedisConfig {

    @Value("${spring.redis.cluster.nodes:}")
    private String clusterNodes;

    @Bean
    public JedisCluster getJedisCluster(){
        String[] serverArray = clusterNodes.split(",");
        Set<HostAndPort> nodes = new HashSet<>();

        for (String ipPort : serverArray) {
            if(StringUtils.isEmpty(ipPort)){
                continue;
            }
            String[] ipPortPair = ipPort.split(":");
            nodes.add(new HostAndPort(ipPortPair[0].trim(), Integer.valueOf(ipPortPair[1].trim())));
        }
        JedisCluster cluster = new JedisCluster(nodes, 1000);
        return cluster;
    }
}
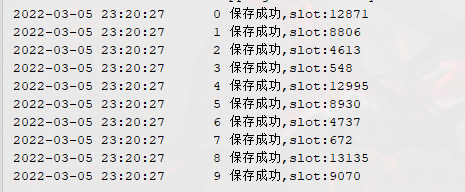
The test class writes data to the cluster every 30 seconds
@Log4j2
@Component
public class Task implements InitializingBean {

    @Autowired
    JedisCluster cluster;

    @Override
    public void afterPropertiesSet() throws Exception {
        while(true) {
            for (int i = 0; i < 10; i++) {
                try {
                    String key = "abc" + i;
                    cluster.set(key, "" + i);
                    int slot = JedisClusterCRC16.getSlot(key);
                    log.info(cluster.get(key)+" Saved successfully,slot:"+slot);
                }catch (Exception e){
                    log.error(e.getMessage());
                }
            }
            Thread.sleep(30000);
        }
    }
}
4, Test results
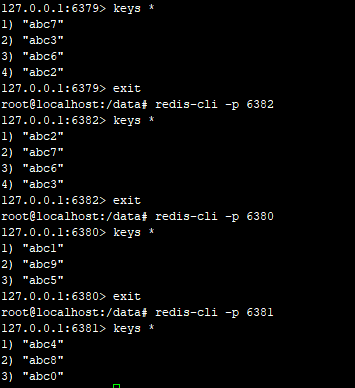
When all nodes in the redis cluster are running normally, node1, node2 and node3 master nodes respectively save some data


The data of node4 is consistent with that of node1
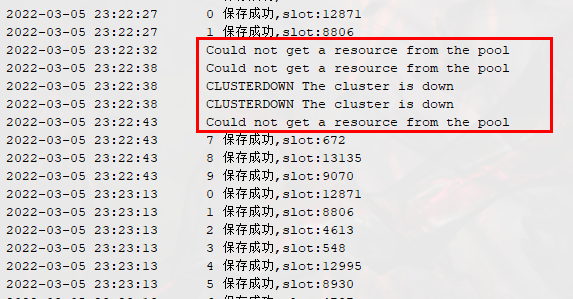
We turn off node1 node

After a few seconds, you can see that in the redis cluster, node1 status changes to fail, node4 status changes to master, and node4's slot partition is consistent with the previous node1

But after 30 seconds, the program still reported an error

After the failure, JedisCluster updates the local status from redis cluster again, and can connect to the standby node again this time.
Afterword
The redis environment deployment section of this article refers to the following articles:
Build Redis cluster (master-slave cluster) - niceyoo - blog Park Based on Docker