catalogue
2. Idle connection is automatically disconnected
8, Geohash (position distance sorting)
1, Distributed lock
1. Implementation principle
Java provides a locking mechanism to ensure thread safety in multithreading. However, in the case of multiple service nodes, distributed applications often encounter concurrency problems in logical processing. At this time, distributed locks are needed. The problem of distributed lock guarantee is that only one thread in a JVM process is executing operations at the same time. We can use the following two commands to implement distributed locks:
SETNX key value    //The key value can only be set when the key does not exist. If it can be set successfully, it indicates that the lock has been obtained
DEL key            //Delete the key. Equivalent to releasing the lock

//For example:
SETNX lock true
//doSomething......
DEL lock
It is not enough to just handle it in the above way. If an exception occurs during doSomething, the DEL instruction may not be called and the lock may not be released, so the lock will never be released. Therefore, the logic of releasing the lock must be executed. When processing the thread lock, the Java program generally uses the finally {} block to release the lock, but multiple JVM processes can't use only finally {}. For example, when a locked JVM hangs before it executes the finally {} block, and the service goes down, it can't release the lock successfully.
To sum up, after you get the lock, you can add an expiration time to the lock, such as 3s. In this way, Redis will release the lock after 3s even if there is a problem in the middle. Note that the operations of acquiring lock and setting time must be performed atomically. If these two operations are not atomic, there may be problems after acquiring the lock and before setting the effective time, resulting in unsuccessful time setting, and the problem still cannot be solved. On Redis2 In version 8, the extended parameters of SET command are introduced, so that SETNX and express commands can be executed atomically. As follows:
set key value [EX seconds] [PX milliseconds] [NX|XX]
//EX seconds: set the failure duration, in seconds
//PX milliseconds: set the expiration time, in milliseconds
//NX: set value when the key does not exist, return OK if successful, and return nil if failed
//20: When the key exists, set value, return OK if successful, and return nil if failed

//For example:
SET lock true EX 5 NX
2. Timeout problem
Redis distributed locks cannot solve the timeout problem. If the logic between locking and releasing locks is executed too long, so that the timeout limit of the lock is exceeded. For example, the first JVM process has not finished processing the lock, but the failure time of redis lock is up, resulting in the second JVM process getting the lock. At this time, a problem occurs. To avoid this problem, redis distributed locks should not be used for long-term tasks. If problems do occur occasionally, the small data disorder may need to be solved manually.
Another problem that needs to be noticed is that in the same JVM process, if thread A obtains the lock, thread B cannot obtain the lock before thread A releases the lock. SETNX can guarantee this. Because the lock already exists, thread B cannot be SET successfully, but there may be A problem that thread B can release the lock, Because the lock release logic is generally executed in the finally {} block, although thread B does not obtain the lock, it may execute the lock release logic (the lock obtained by thread A is released by thread B, which is absolutely impossible). Of course, if the thread uses the lock mechanism provided by Java to control, there will be no problem. This problem can also be solved in this way. When thread A obtains the lock, SET the value parameter of the SET instruction to A random number. When releasing the lock, first match whether the random number is consistent, and then delete the key. It should be noted that the operations of matching random numbers and deleting keys belong to the two steps of "releasing locks", which must be atomic. Since Redis does not provide corresponding instructions, Lua script is required for processing, because Lua script can ensure the atomic execution of consecutive instructions.
3. Reentrancy
Reentrant means that a thread requests to lock again when it holds a lock. If a lock supports multiple locks of the same thread, the lock is reentrant. If Redis distributed locks want to support reentrant, the ThreadLocal variable of the thread can be used to store the count of currently held locks.
Summarizing the above three aspects, the following is the code:
public class RedisLock {
    private ThreadLocal<Map<String,Integer>> threadLocal;
    private Jedis jedis;

    public RedisLock(Jedis jedis){
        this.jedis = jedis;
        this.threadLocal = new ThreadLocal<Map<String, Integer>>();
    }

    private boolean tryLock(String key){
        Map<String, Integer> LockMap = currentLockMap();
        //Generate random number
        Random random = new Random();
        int value = random.nextInt(100000);
        LockMap.put(key + "-threadID", value);
        //The lock timeout is 3s
        return jedis.set(key,value + "",new SetParams().ex(3).nx()) != null;
    }
    private Map<String, Integer> currentLockMap() {
        Map<String, Integer> refs = threadLocal.get();
        if(refs == null){
            refs = new HashMap<String,Integer>();
            threadLocal.set(refs);
        }
        return refs;
    }
    public boolean lock(String key){
        Map<String,Integer> LockMap = currentLockMap();
        //A total of two values are saved in the LockMap of each thread, one of which is used to record the reentry number (key + "-count"). One is used to distinguish different threads (prevent the lock of thread a from being released by thread B)
        Integer count = LockMap.get(key + "-count");
        if(count != null){
            //The current thread has acquired the lock
            LockMap.put(key + "-count",count + 1);
            return true;
        }
        //The current thread acquires the lock for the first time
        boolean ok = tryLock(key);
        if(!ok){
            //Failed to lock. The lock is occupied
            return false;
        }
        //The current thread successfully acquired the lock for the first time
        LockMap.put(key,1);
        return  true;
    }

    public boolean unlock(String key){
        Map<String,Integer> LockMap = currentLockMap();
        Integer count = LockMap.get(key + "-count");
        if(count == null){
            //The current thread has not obtained the lock and returns directly
            return false;
        }
        count -= 1;
        if(count > 0){
            //Reduce reentry count
            LockMap.put(key + "-count",count);
        }else{
            //Release lock
            tryUnLock(key);
        }
        return true;
    }

    private void tryUnLock(String key) {
        Map<String,Integer> lockMap = currentLockMap();
        String value = lockMap.get(key + "-threadID") + "";
        //Use Lua script to ensure atomicity
        String lua = "if redis.call(\"get\",KEYS[1]) == ARGV[1] then " +
                " return redis.call(\"del\", KEYS[1]) " +
                "else" +
                " return 0" +
                "end";
        List<byte[]> keys = Arrays.asList(key.getBytes());
        List<byte[]> args = Arrays.asList(value.getBytes());

        long eval = (Long)jedis.eval(lua.getBytes(),keys,args);
        if(eval == 1){
            //Lock released successfully
            lockMap.remove(key + "-count");
            lockMap.remove(key + "-threadID");
        }
    }

    public static void main(String[] args) {
        Jedis jedis = new Jedis();  //The default connection is localhost:6379
        RedisLock redisLock = new RedisLock(jedis);
        String locakKey = "redisLock";
        try{
            boolean ok = redisLock.lock(locakKey);
            if(ok){
                //doSomething
                System.out.println("Current process:\t" + ManagementFactory.getRuntimeMXBean().getName() + "\t Lock acquisition succeeded");
            }else{
                System.out.println("Current process:\t" + ManagementFactory.getRuntimeMXBean().getName() + "\t Failed to acquire lock");
                 //If locking is not successful here, is blocking necessary? Or throw an exception, or put the task in the delay queue?
            }
        }catch (Exception e){
            e.printStackTrace();
        }finally {
            redisLock.unlock(locakKey);
        }
    }
}
2, Delay queue
In daily life, we can often experience the shadow of delay queue. For example, if there is no payment for a period of time during payment, the platform will cancel the order. We are used to using RabbitMQ and Kafka as message queue middleware to add asynchronous message passing function between applications. Both of them are professional message queue middleware with many excellent features, but they are also complex to use. If our message queue has only one group of consumers, Redis can also be used to solve them, However, Redis's message queue is not a professional message queue. It does not have many advanced features and no ack guarantee. If there are high requirements for the reliability of messages, it is not applicable.
Redis's list data structure is often used as asynchronous message queue. RPUSH and LPUSH are used to operate into the queue and LPOP and RPOP are used to operate out of the queue. It can support multiple producers and consumers to enter and exit messages concurrently. The messages received by each consumer are different list elements.

Using the list structure is simple, but it can cause some problems:
1. What if the queue is empty
If the list structure is used, the LPOP or RPOP operation is used to cancel the message. The consumer fetches the message through the loop, gets the message for processing, and then fetches the message after processing. In this way, if the queue is empty, the consumer client will fall into the dead cycle of pop. There is no data, but just pop constantly. This not only consumes CPU, but also raises Redis's QPS. If there are dozens of empty polling customers, Redis's slow queries may increase significantly.
If you simply solve this problem, you can use BLPOP or BRPOP (blocking reading). When there is no data in the queue, the consumer enters the sleep state. Once the data arrives, it will be awakened immediately. The message latency is almost zero.
2. Idle connection is automatically disconnected
If the above scheme is used to deal with the problem of empty queue, of course, but there will be a new problem at this time. If the threads are consistently blocked there, the Redis client connection will become an idle connection. Over time, the server will actively disconnect and reduce the occupation of idle resources. At this time, BLPOP and BRPOP will throw exceptions. Therefore, be careful when writing client consumers. If exceptions are caught, try again.
The following uses an ordered table structure to implement an asynchronous message queue:
public class RedisDelayingQueue<T> {
//TypeReference is required when generic type exists when fastjson serializes objects
private Type taskType = new TypeReference<T>(){}.getType();
private Jedis jedis;
private String queueKey;
public RedisDelayingQueue(Jedis jedis, String queueKey){
this.jedis = jedis;
this.queueKey = queueKey;
}
public void producer(T msg){
String s = JSON.toJSONString(msg);
//Serialize the message as a string and store it in the sequence table, and use the expiration processing time of the message as the score
jedis.zadd(queueKey,System.currentTimeMillis() + 5000, s);
}
public void consumption(){
while (!Thread.interrupted()){
//The zrangeByScore and zrem operations can be executed atomically using Lua scripts.
//The same task may be taken by multiple processes, and then compete with zrem. It is a waste to take all the processes that have not been taken in vain.
Set<String> values = jedis.zrangeByScore(queueKey,0+"",System.currentTimeMillis()+"",0,1);
if(values.isEmpty()){
try {
Thread.sleep(100);
} catch (InterruptedException e) {
break;
}
continue;
}
String s = values.iterator().next();
if(jedis.zrem(queueKey,s) > 0){
//Got it
T msg = JSON.parseObject(s,taskType);
handleMsg(msg);
jedis.close();
}
}
}
private void handleMsg(T msg) {
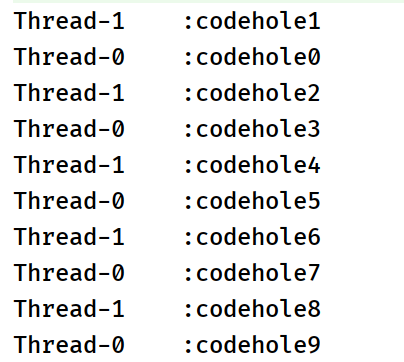
System.out.println(Thread.currentThread().getName() + "\t:" + msg);
}
}
The following are producer and consumer tests:
public class Producer {
    public static void main(String[] args) throws InterruptedException {
        Jedis jedis = new Jedis("localhost",6379);
        RedisDelayingQueue<String> queue = new RedisDelayingQueue<>(jedis,"q-demo");

        for (int i = 0; i < 10; i++) {
            queue.producer("codehole" + i);
        }
        jedis.close();
    }
}
The consumer starts two threads to consume:
public class Customer {

    public static void main(String[] args) throws InterruptedException {
        for (int index = 0; index < 2; index++) {
            Jedis jedis = new Jedis("127.0.0.1",6379);
            RedisDelayingQueue<String> queue = new RedisDelayingQueue<>(jedis,"q-demo");

            Thread t = new Thread(()->{
                queue.consumption();
            }).start();

        }
    }
}
Special attention should be paid to the fact that two threads of the consumer are connected with two Jedis respectively, because Jedis is thread unsafe, and if multiple threads share a Jedis connection, there will be many various exceptions, mostly the underlying Socket connection exceptions.
The following is the output of the consumer side:
3, Bitmap
1. Basic usage
In a business scenario, we now need to access the user's one-year check-in record. There are only two possibilities: check-in or no check-in. If you sign in, use 1. If you don't sign in, use 0. 365 days should be recorded. If ordinary key/value is used, 365 records will be recorded for each user. When the number of users is huge, it requires a lot of storage space. In order to solve this problem, Redis provides a bitmap, which is actually an ordinary string. The string is implemented by character array char []. A character char is a byte, and a byte accounts for 8 bits. Therefore, a string can be regarded as an array composed of many bits. Bitmap operation is a bit of a string. For example, the bit of "he" is as follows:
public static void main(String[] args) {
    byte[] bytes = "he".getBytes();//Get the corresponding bytes of char [] = = > {H ',' e ',' l ',' l ',' o '}
    for (int i = 0; i < bytes.length; i++) {
        System.out.println(Integer.toBinaryString(bytes[i]));
    }
    //Output is:
    //1101000
    //1100101
    //      h         e
    //That is: 01101000 01100101 can be regarded as a bit array. The following table starts from 0 to 15
}
In this way, the daily check-in record only occupies one bit, 365 days is 365 bits, and 46 bytes (a slightly longer string) can be fully accommodated, which greatly saves space. Bitmap operation is bit, so the values can only be 0 and 1. Redis provides, for example, SET or GET instruction operation strings, as well as bitmap operation instructions. As follows:
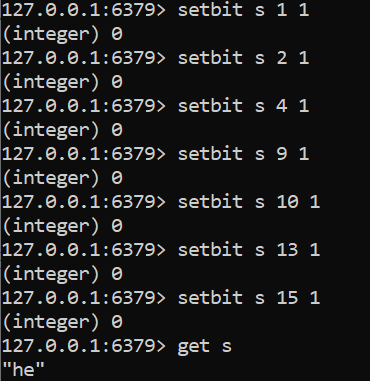
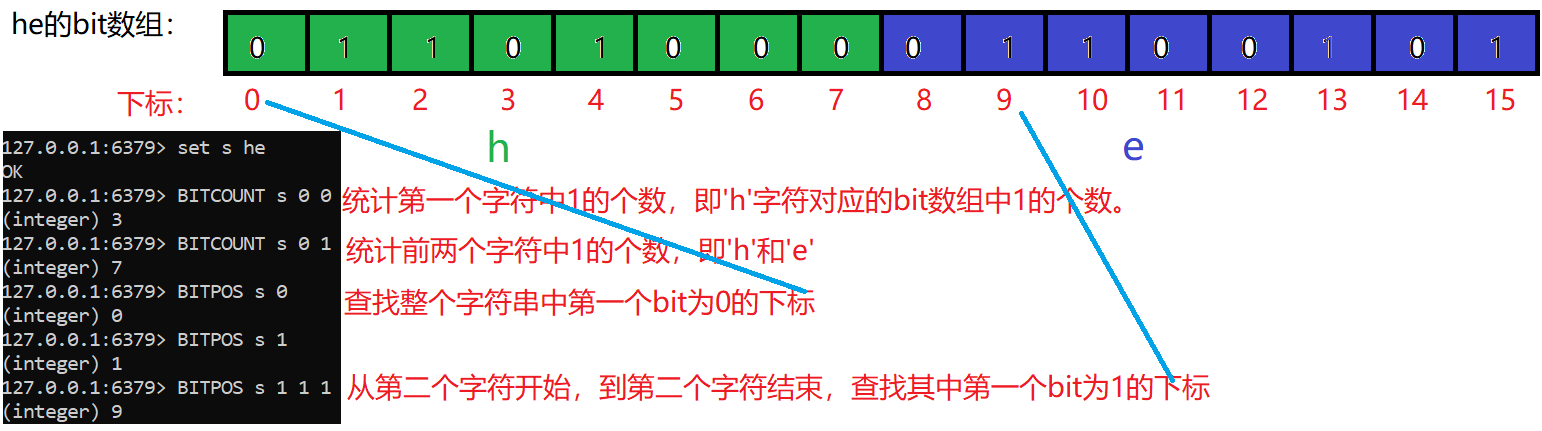
SETBIT key offset value      //For the string value stored by key, set the bit on the specified offset. Value can only be 0 or 1. I understand that if there is no string corresponding to the key, it will create a string with all bits of 0
GETBIT key offset            //Get the bit value (0 or 1) on the offset of the string value corresponding to the key.
BITCOUNT key [start] [end]   //Count the number of 1 in the specified range. For non-existent key s, the return value is 0. start and end indicate the detection range. start means "the beginning subscript of the character in the string to be detected, and end means the end subscript of the character in the string to be detected".
BITPOS key bit [start] [end]  //Find the first 0 or 1 in the specified range. Where bit represents the search target (0 or 1), start and end are the same as above, and the detection range is specified. Note that the return value is the subscript of "digit group"
As follows, use the SETBIT instruction to create a string "he", and the "bit array" of "he" is 01101000(h) 01100101(e). Treat it as a bit array and operate as follows:
2. Statistics and search
Statistics and search use the BITCOUNT and BITPOS instructions, which can be used to count the total number of days that users sign in and the number of days that users sign in from. The following is an example of using BITCOUNT and BITPOS:
3.BITFIELD instruction
The above operations on bitmaps are all operations on a single bit. In redis3 After version 2, a powerful instruction BITFIELD is added, which can operate multiple bits at one time.
BITFIELD key [GET type offset] [SET type offset value] [INCRBY type offset increment] [OVERFLOW WRAP|SAT|FAIL]
//GET, SET, INCRBY, and OVERFLOW are the sub instructions it supports
//Get < type > < offset > -- returns the specified binary bit range.
//Set < type > < offset > < value > -- set the specified binary bit range and return its old value.
//Incrby < type > < offset > < increment > -- performs an addition operation on the specified binary bit range and returns its old value. The user can realize the corresponding subtraction operation by passing a negative value to the increment parameter.
//OVERFLOW [WRAP|SAT|FAIL] can change the behavior of the INCRBY subcommand executed later in case of overflow:

//For the type option of the sub instruction: you can add I before the type parameter to represent a signed integer, or use u to represent an unsigned integer. For example, we can use u8 to represent an 8-bit unsigned integer or i16 to represent a 16 bit signed integer.
//The BITFIELD command supports 64 bit signed integers and 63 bit unsigned integers at most. The 63 bit length limit of unsigned integers is due to the fact that Redis protocol cannot return 64 bit unsigned integers at present.
/*
Users can OVERFLOW Command and the three parameters shown below, specify BITFIELD When the command performs auto increment or auto decrement,
 Bump up overflow( overflow)Or overflow downward( underflow)Behavior in case of:

WRAP :  Use rewind( wrap around)Method to handle the overflow of signed and unsigned integers.
For unsigned integers, wrapping is like performing a modulo calculation using the value itself and the largest unsigned integer that can be stored,
This too C Standard behavior of language. For signed integers, overflow will cause the number to recalculate from the smallest negative number,
Underflow will cause the number to recalculate from the maximum positive number.
For example, if we compare a value of 127 i8 If you add one to an integer, you will get the result -128 .

SAT :  Use saturation calculation( saturation arithmetic)Method handles overflow, that is,
The result of underflow calculation is the smallest integer value, while the result of overflow calculation is the largest integer value.
For example, if we take a value of 120 i8 The integer is calculated by adding 10,
The result of the command will be i8 The maximum integer value that can be stored by type 127.
On the contrary, if a target i8 Value calculation causes underflow, then this i8 The value will be set to -127 .

FAIL :  In the first mock exam, the command will refuse to perform calculations that will lead to overflow or underflow.
And return a null value to the user, indicating that the calculation has not been executed.

It should be noted that, OVERFLOW The subcommand will only be executed on those that follow it INCRBY Commands work,
This effect will continue until the next one executed with it OVERFLOW Until the order is given.
By default, INCRBY Command use WRAP Method to handle overflow calculation.
Instruction usage and result analysis:
127.0.0.1:6379> set w hello
OK
//bit array of hello: 01101000 01100101 01101100 01101100 01101111

//Take 4 bits from the first bit and express the result as an unsigned number (u). The result is 0110 = = 6 (0110)
127.0.0.1:6379> BITField w get u4 0
1) (integer) 6

//Take 4 bits from the first bit and express the result as a signed number (i). The result is 0110 = = 6 (sign bit is 0)
127.0.0.1:6379> BITField w get i4 0
1) (integer) 6

//You can also execute multiple sub instructions at once
127.0.0.1:6379> BITField w get u4 0 get u3 2 get i4 0
1) (integer) 6
2) (integer) 5
3) (integer) 6

//Starting from the 9th bit, replace the next 8 bits with the unsigned number 97. " The ASCII code of a 'is 97
127.0.0.1:6379> BITField w set u8 8 97
1) (integer) 101    //Returned is the old value 01100101 = = 101
127.0.0.1:6379> GET w
"hallo"

//The following is the incrby sub instruction
127.0.0.1:6379> BITFIELD w incrby u4 2 1    //Starting from the third bit, take four bits and increase them by 1 That is, for the unsigned number represented by 1010 + 1 = = > 10 + 1 = = 11
1) (integer) 11
127.0.0.1:6379> BITFIELD w incrby u4 2 1
1) (integer) 12
127.0.0.1:6379> BITFIELD w incrby u4 2 1
1) (integer) 13
127.0.0.1:6379> BITFIELD w incrby u4 2 1
1) (integer) 14
127.0.0.1:6379> BITFIELD w incrby u4 2 1
1) (integer) 15
127.0.0.1:6379> BITFIELD w incrby u4 2 1    //Note that there is an overflow here, because the representation range of 4-bit unsigned integer is 0-15. Binary of unsigned number 15, i.e. 11111111 + 1 = = 10000 (if the previous 1 is discarded, it is 0000 = = 0)
1) (integer) 0
4, Hyperlog (base valuation)
Application scenario of hyperlog:
Two concepts:
- PV data of web pages: page views or clicks.
- UV data of web pages: the number of users whose web pages are clicked by different users. In the same day, if a user visits the page for the first time, it will be counted once, and if the user visits the page again in the same day, it will not be counted.
If we need to count the PV number of each page on the website every day, how can we achieve it? You can assign an independent Redis counter to each web page and add the key suffix of this counter to the date of the day. In this way, you can make a request and execute the incrby instruction once, and finally count the PV data.
But if you want to count the UV number of each page on the website every day? We can set up an independent set set for each page to store the user ID of all the pages visited that day. When a request comes, we can use sadd to store the user ID. The size of this collection can be retrieved through scard, and this number is the UV data of this page. This scheme is feasible, but when the page traffic is huge, each page will correspond to a large set set, which requires very high space. In fact, the data we may need is not too accurate. For example, we don't need to determine 1060002. If we finally get 1.05 million, it can also explain the problem. Based on this, you can use the data structure of hyperlog.
HyperLogLog is an algorithm used for cardinality (non repeating elements) statistics. The advantage of HyperLogLog is that when the number or volume of input elements is very, very large, the space required to calculate the cardinality is always fixed and very small. In Redis, each hyperlog key only needs 12 KB of memory to calculate the cardinality of nearly 2 ^ 64 different elements. This is in sharp contrast to a collection where the more elements consume more memory when calculating the cardinality. However, because HyperLogLog only calculates the cardinality based on the input elements and does not store the input elements themselves, HyperLogLog cannot return the input elements like a collection. The standard error of hyperlog is 0.81%.
The operation instructions provided by Redis are as follows:
//PF is the initials of Philippe Flajolet, the inventor of the data structure.
PFADD key element [element ...]                //Adds the specified element to the hyperlog.
PFCOUNT key [key ...]                          //Returns the cardinality estimate for a given hyperlog.
PFMERGE destkey sourcekey [sourcekey ...]      //Merge multiple hyperloglogs into a new HyperLogLog
public static void main(String[] args) {
    Jedis jedis = new Jedis();
    for (int i = 0; i < 1000000; i++) {
        //Assume user + i is the ID of the user
        jedis.pfadd("codehole","user" + i);
    }
    long total = jedis.pfcount("codehole");

    System.out.println(total);//The output is 10017881 million data, and the visible error is not very large
    jedis.close();
}
5, Bloom filter
Usage scenario of Bloom filter: for example, when we use the news client to watch news, he will constantly recommend new content to us, and it should be repeated every time to remove the content we have seen. Bloom filter is specially designed to solve this problem. While removing the weight, it can save more than 90% of the space, but it is slightly inaccurate and has a certain probability of misjudgment.
Bloom filter can be understood as a slightly imprecise set structure, which can be used to judge whether an object exists. It may misjudge:
- When the bloom filter says a value exists, the value may not exist.
- When the bloom filter says a value does not exist, it must not exist.
What causes the above two situations is its internal principle. The internal structure of Bloom filter can be regarded as a large bit group and several different unbiased hash functions (unbiased means that the hash is relatively uniform, so that the elements are mapped to the position in the bit group by hash and compared with the machine).
When adding a key to the bloom filter, multiple hash functions will be used to hash the key to calculate an integer index value, and then modulo the length of the bit array to obtain a position. Each hash function will calculate a different position. Set the positions of the digit group to 1 The add operation is completed.
As shown in the following figure, assuming that key1 and key2 are calculated, the following figure is obtained:
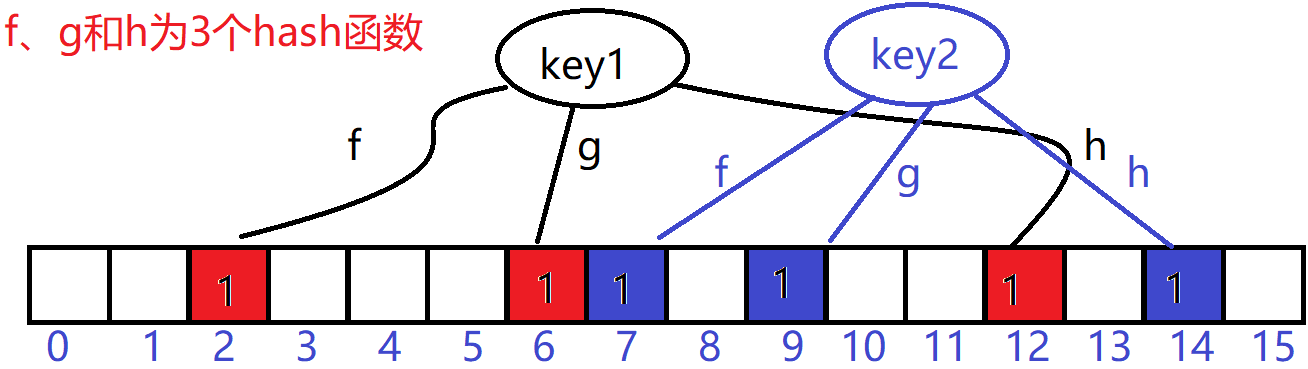
This is how it judges whether it is included. Suppose there is a key3 whose subscript position of the digit group calculated by the three hash functions is "0, 2, 7", he will check whether the three positions of "0, 2, 7" are all 1. It can be seen from the above figure that 0 is not 1, which means that this key3 is not included. Assuming that the calculated position of key3 is "2, 6, 7", he will judge that this key3 is very likely to exist, This does not mean that key3 must exist, but it is very likely. According to the figure, key3 is affected by key1 and key2. At this time, we also need to see the sparsity of the bit array. If the bit group is crowded, the probability of judging the existence of key3 will be lower. If the bit group is sparse, the probability of judging the existence of key3 will be higher. The formula of specific probability calculation is also more complex.
Therefore, after understanding the principle, when using the bloom filter, do not let the actual number be much greater than the initialization number. When the actual number of elements begins to exceed the initialization number, rebuild the bloom filter and reassign a larger size filter, Then add all historical elements in batch (which requires us to record all historical elements in other memory).
To use bloom filter in Redis, you need to download the corresponding plug-ins before subsequent operations.
[Single operation command]
bf.add key value        //Add a single element to the bloom filter corresponding to the key
bf.exists key value     //Judge whether to include key and whether the corresponding bloom filter contains value
[Batch operation command]
bf.madd key value1 [value2......]
bf.mexists key value1 [value2......]
There are also many Bloom filters implemented based on Java, such as: https://github.com/Baqend/Orestes-Bloomfilter There is a detailed introduction to its usage.
6, Simple current limiting
A reasonable flow restriction algorithm can prevent unplanned requests from continuing to put pressure on the system when the system's ability to deal with problems is limited. This is a problem that needs attention. In addition to controlling traffic, flow restriction also has an application purpose to control user behavior and avoid spam requests. For example, users' posting, reply, likes, visits and other behaviors should be strictly controlled. Generally, it is required to strictly limit the number of times that the behavior is allowed within the specified time. Exceeding this is an illegal behavior and is not allowed.
For example, users are now required to send replies no more than 5 times within 10 seconds. How can Redis achieve this?
First, you can select the zset structure. The main purpose of selecting it is to include score. Through score, you can circle a 10s time window. We only need to keep this time window, and the data outside the window can be cut off. However, the value of the zset structure has no special function, so you only need to set it to a unique value, that is, to prevent the user's reply from being overwritten, In order to accurately record the user's operation times.
Specifically, each non repeated value corresponds to a score value, which is changed to the time of the current system. Suppose that the user operates 15 times from the interval of 10000-25000 system time (i.e. once per second), each operation saves a non repeated value into the zset structure, and removes the data of the socre value in the interval [0 to the current time - 10 * 1000] (10 * 1000 represents 10s time), so the data stored in zset is within 10s, If the amount of data exceeds the threshold after an operation, it indicates that the operation is not allowed.

The code implementation is as follows:
public class SimpleRateLimiter {
    private Jedis jedis;

    public SimpleRateLimiter(Jedis jedis){
        this.jedis = jedis;
    }

    public boolean isActionAllowed(String userId,String actionKey,int period, int maxCount){
        String key = String.format("hist:%s:%s", userId, actionKey);
        long nowTs = System.currentTimeMillis();
        //Get pipeline: Redis pipeline technology allows the client to continue sending requests to the server when the server does not respond, and finally read the responses of all servers at one time.
        Pipeline pipeline = jedis.pipelined();
        pipeline.multi();
        pipeline.zadd(key,nowTs,UUID.randomUUID().toString());
        //Removes all members of a given ranking interval from an ordered set
        Response<Long> number = pipeline.zremrangeByScore(key,0,nowTs - period * 1000);
        Response<Long> count = pipeline.zcard(key);
        pipeline.expire(key, period);
        pipeline.exec();
        pipeline.close();
        //Indicates that the current behavior is not allowed
        return count.get() <= maxCount;
    }

    public static void main(String[] args) throws InterruptedException {
        Jedis jedis = new Jedis();
        SimpleRateLimiter srl = new SimpleRateLimiter(jedis);
        for (int i = 0; i < 25; i++) {
            System.out.println(srl.isActionAllowed("yhj","reply",10,5));
            //Operate once a second
            Thread.sleep(1000);
        }
    }
}
7, Funnel current limiting
Funnel current limiting is one of the most commonly used current limiting methods. The inspiration of this algorithm comes from funnel. If the rate of water injection is greater than the rate of water leakage, the funnel will overflow when it is full, and all overflow operations are rejected. The following is the code simulation:
public class FunnelRateLimiter {
        static class Funnel{
            int capacity;        //Funnel Capacity
            float leakingRate;  //Funnel flow rate (indicating the maximum frequency of this behavior allowed by the system)
            int leftQuota;      //Funnel remaining space
            long leakingTs;     //Last leakage time

            public Funnel(int capacity, float leakingRate){
                this.capacity = capacity;
                this.leakingRate = leakingRate;
                this.leftQuota = capacity;
                this.leakingTs = System.currentTimeMillis();
            }

            void makeSpace(){
                long nowTs = System.currentTimeMillis();
                long deltaTs = nowTs - leakingTs;   //Calculate the time difference between this leakage and the last leakage
                int deltaQuota = (int) ((int)(deltaTs / 1000)  * leakingRate); //Calculate the amount of water leaked (per second)
                //Considering the boundary, the int type overflows and the time interval is too large
                if(deltaQuota < 0){
                    this.leftQuota = capacity;
                    this.leakingTs = nowTs;
                    return;
                }
                //No water leakage
                if(deltaQuota < 1){
                    return;
                }
                //The remaining capacity of the funnel increases
                this.leftQuota += deltaQuota;
                this.leakingTs = nowTs;
                //Processing boundary
                if(this.leftQuota > this.capacity){
                    this.leftQuota = this.capacity;
                }
            }

            boolean watering(int quota){    //water flooding
                System.out.println("Current remaining capacity:" + this.leftQuota);
                makeSpace();
                //If water injection can be operated at present (the remaining capacity meets)
                if(this.leftQuota >= quota){
                    //The remaining capacity decreases after each operation
                    this.leftQuota -= quota;
                    return true;
                }
                //Restrictions are needed at this point.
                return false;
            }
        }

        private Map<String,Funnel> funnels = new HashMap<>();

        public  boolean isActionAllowed(String userId,String actionKey,int capacity,float leakingRate){
            String key = String.format("%s:%s",userId,actionKey);
            Funnel funnel = funnels.get(key);
            if(funnel == null){
                funnel = new Funnel(capacity, leakingRate);
                funnels.put(key,funnel);
            }
            return funnel.watering(1);
        }

    public static void main(String[] args) throws InterruptedException {
        FunnelRateLimiter funnelRateLimiter = new FunnelRateLimiter();
        for (int i = 0; i < 10; i++) {
            //The water leakage rate is 2s, one leakage
            boolean ok = funnelRateLimiter.isActionAllowed("yhj","reply", 5,0.5f);
            System.out.println(ok ? "Operation successful" : "Operation restricted");
            Thread.sleep(1000);
        }
    }
}
Redis4.0 provides a current limiting module called redis cell. The module also uses funnel algorithm and provides atomic current limiting instructions. Redis cell plug-in needs to be installed before use. The module has only one instruction cl.throttle.
//The following 15 indicates the funnel capacity
//30 and 60 are used to calculate the rate (30 operations can be performed in 60s) 30 / 60, that is, the rate = = 0.5 (times / s)
//1 indicates quota, which is an optional parameter, and the default value is 1
> cl.throttle yhj:reply 15 30 60 1
1) (integer) 0    // 0 means yes, 1 means No
2) (integer) 15   // Funnel capacity
3) (integer) 14   // Funnel remaining space left_quota
4) (integer) -1   // If rejected, how long will it take to retry, in seconds
5) (integer) 2    // After how long, the funnel is completely empty, in seconds
When the current limiting instruction is executed again, if it is rejected, it needs to be discarded or retried. The cl.throttle instruction has calculated the retry time. Just take the fourth value of the returned result array and sleep. If you don't want to block the thread, you can also retry by asynchronous scheduled task.
8, Geohash (position distance sorting)
The location data of map elements is expressed by two-dimensional longitude and latitude, with the longitude range of [- 180180], the positive and negative are bounded by the primary meridian, positive in the East and negative in the West; The latitude range is [- 90,90], bounded by the equator, and the north is positive rather than negative. If you need to calculate the distance between point A and point B, you need to reach the longitude and latitude of point AB, and then get the distance according to some algorithm. If you need to realize the function of "nearby people", such as finding people 10km nearby, clarify the coordinates of point A, and then calculate the distance between point A and other elements and sort them. Select the people within the first 10km.
GeoHash is a general geographic location distance sorting algorithm in the industry, and redis also uses GeoHash algorithm. The internal principle of the algorithm will not be discussed for the time being. After version 3.2, redis added the Geo module (the underlying storage structure is zset), which means that we can use redis to find "people nearby". Redis provides only 6 Geo instructions. As follows:
- geoadd: add the coordinates of the geographic location. (Note: it is added to the zset structure)
- geopos: get the coordinates of the geographical location.
- geodist: calculate the distance between two locations.
- georadius: obtain the set of geographic locations within the specified range according to the longitude and latitude coordinates given by the user.
- Geordiusbymember: get the geographic location set within the specified range according to a location stored in the location set.
- Geohash: returns the geohash value of one or more location objects.
//Add one or more longitude, latitude and member to the specified key. Note that the key corresponds to a zset
GEOADD key longitude latitude member [longitude latitude member ...]

//Return the positions (longitude and latitude) of all specified members from the given key, and nil if they do not exist.
GEOPOS key member [member ...]

//Returns the distance between two given positions
GEODIST key member1 member2 [m|km|ft|mi]

//Take the given longitude and latitude as the center, and return all position elements in the zset corresponding to the key whose distance from the center does not exceed the given maximum distance
//Longitude and latitude coordinates with longitude and latitude as the center distance
//radius is the maximum distance given
GEORADIUS key longitude latitude radius m|km|ft|mi [WITHCOORD] [WITHDIST] [WITHHASH] [COUNT count] [ASC|DESC] [STORE key] [STOREDIST key]

//Geordiusbymember, like the GEORADIUS command, can find the elements within the specified range,
//However, the center point of geordiusbymember is determined by the given position element (member), rather than using longitude and latitude to determine the center point.
GEORADIUSBYMEMBER key member radius m|km|ft|mi [WITHCOORD] [WITHDIST] [WITHHASH] [COUNT count] [ASC|DESC] [STORE key] [STOREDIST key]
//Parameter Description:
//m: Meter, default unit.
//km: kilometers.
//mi: miles.
//ft: feet.
//WITHDIST: returns the distance between the location element and the center while returning the location element.
//WITHCOORD: return the longitude and dimension of the location element together.
//WITHHASH: returns the ordered set score of the location element encoded by the original geohash in the form of a 52 bit signed integer. This option is mainly used for low-level application or debugging, and has little effect in practice.
//COUNT limits the number of records returned.
//ASC: the search results are sorted from near to far.
//DESC: the search results are sorted from far to near.

//Redis GEO uses geohash to save the coordinates of geographical locations. Geohash is used to obtain the geohash value of one or more location elements.
GEOHASH key member [member ...]
In a map application, there may be millions or even tens of millions of car data and restaurant data. If Redis's Geo data structure is used, they will all be put in a zset set. In the Redis cluster environment, collections may migrate from one node to another. If the data of a single key is too large, it will have a great impact on the migration of the cluster. In the cluster environment, the amount of data corresponding to a single key should not exceed 1MB, otherwise the cluster migration will be stuck and the normal operation of online services will be affected. Therefore, it is recommended that Geo's data be deployed using a separate Redis instance and a cluster environment. If the amount of data is more than 100 million or even larger, the Geo data needs to be split by country, province, and even by Region in populous megacities. This can significantly reduce the size of a single zset set.
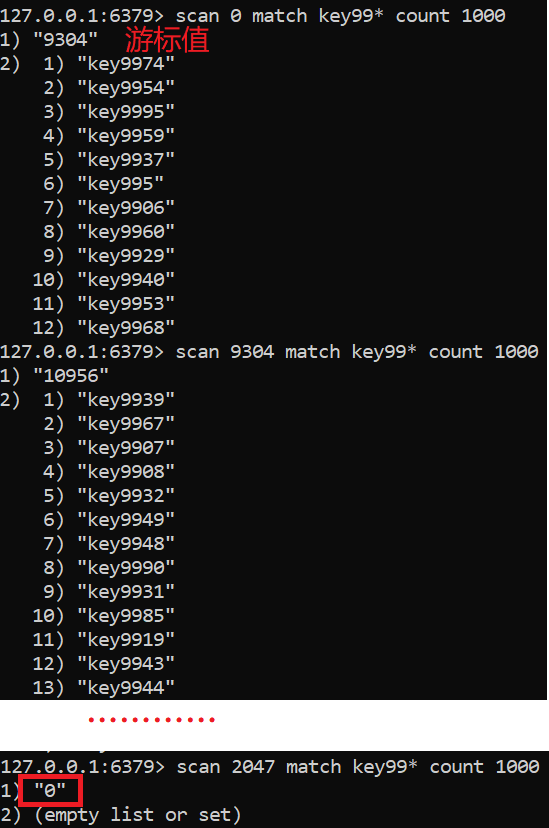
9, scan instruction
Sometimes we need to find a list of keys that meet a specific prefix from thousands of keys in redis instances to manually process data. Redis provides a scan command to list all keys that meet specific regular string rules. The scan instruction has the following characteristics:
SCAN cursor [MATCH pattern] [COUNT limit]
- The complexity is O(n). The search action is carried out step by step through the cursor. Other operations can be done after a single scan.
- The limit parameter is provided to control the number of returned results each time, and the number of returned results can be more or less. (Note: limit does not limit the number of returned results, but the number of bucket bits of the hash bucket traversed by the server in a single time (about equal to)).
- After a single scan, scan will return a cursor integer to the client
- The returned results may be repeated, and the client needs to redo them.
- If there is data modification in the traversal process, it is uncertain whether the changed data can be traversed.
- The result of a single return is empty, which does not mean the end of the traversal, but depends on whether the returned cursor value is 0.
In Redis, all key s are stored in a HashMap (array + linked list) structure. The cursor returned by the scan instruction is the position index (bucket bit) of the array. The limit parameter indicates the number of bucket bits to be traversed in this traversal. Scan's traversal order is not from the 0 position of the array to the end, but uses high-order carry addition to traverse. This is to avoid repeated traversal and omission of slots during HashMap expansion and reduction.
Use the following example to add 10000 pieces of data before traversing:
public static void main(String[] args) {
    Jedis jedis = new Jedis();
    for (int i = 0; i < 10000; i++) {
        jedis.set("key" + i, i + "");
    }
}
scan is a series of instructions. In addition to traversing all key s, it can also traverse the specified container.
- zscan traverses zset elements
- hscan traverses hash elements
- sscan traverses the set element
The principle is similar, because hash tables are used as the underlying structure.
Refer to Redis deep Adventure