Is Redis single threaded and high-performance Redis single threaded?
The single thread of Redis mainly means that the network IO and key value pair reading and writing of Redis are completed by one thread, which is also the main process of Redis providing external key value storage services. However, other Redis functions, such as persistence, asynchronous deletion and cluster data synchronization, are actually executed by additional threads.
Why can Redis single thread be so fast?
Because all its data is in memory, all operations are memory level operations, and single thread avoids the loss of multi-threaded switching performance. Because Redis is a single thread, Redis instructions should be used carefully. For those time-consuming instructions (such as keys), be careful. If you are not careful, Redis may get stuck.
How does Redis single thread handle so many concurrent client connections?
Redis's IO multiplexing: redis uses epoll to realize IO multiplexing. It puts connection information and events into the queue and then into the file event dispatcher. The event dispatcher distributes events to the event processor.
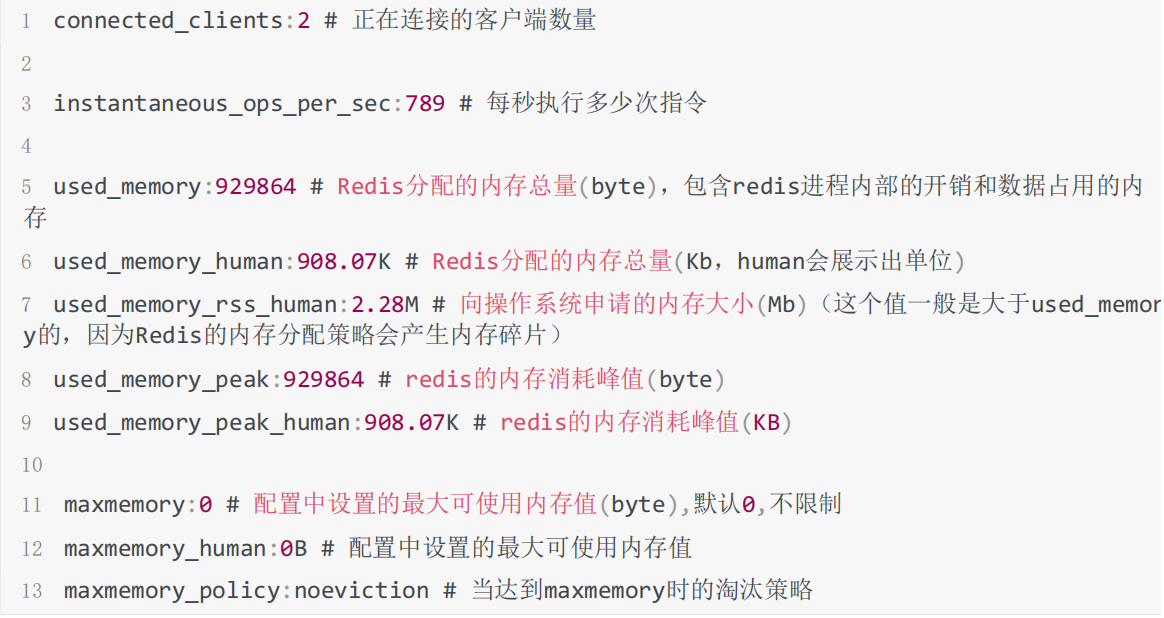
Command: info
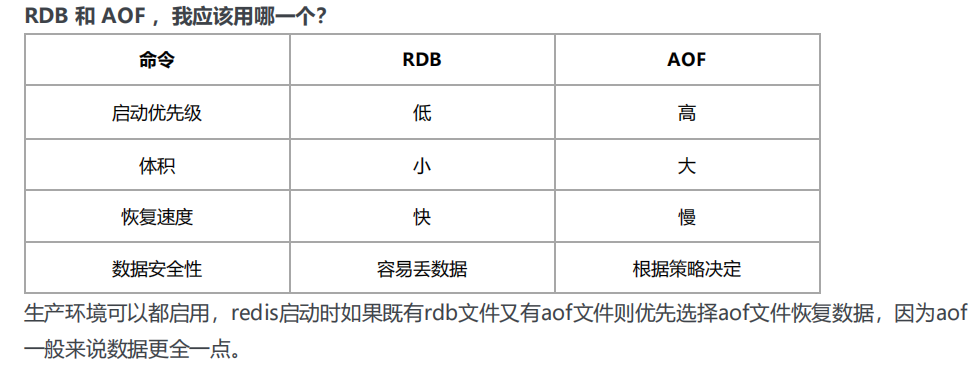
Redis persistence
RDB snapshot dump rdb
Each command execution will snapshot all redis memory into a new rdb file and overwrite the original rdb snapshot file
- Automatic mode
//Default on
save 900 1
save 300 10
save 60 10000 //To close RDB, you only need to comment out all save policies
- Manual mode
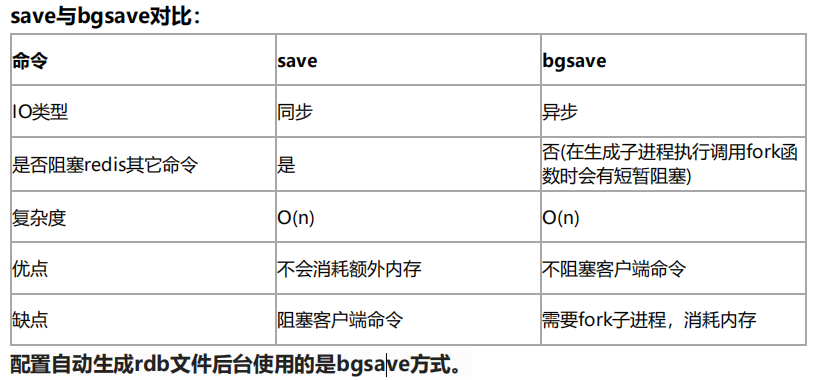
The redis client executes the command save or bgsave
bgsave's copy on write (COW) mechanism
With the help of the copy on write (cow) technology provided by the operating system, Redis can still process write commands normally while generating snapshots. In short, the bgsave subprocess is generated by the main thread fork and can share all memory data of the main thread. After the bgsave subprocess runs, it starts to read the memory data of the main thread and write them to the RDB file. At this time, if the main thread also reads these data, the main thread and the bgsave subprocess do not affect each other. However, if the main thread wants to modify a piece of data, the data will be copied to generate a copy of the data. Then, the bgsave sub process will write the copy data to the RDB file, and in this process, the main thread can still directly modify the original data.
AOF(append-only file)
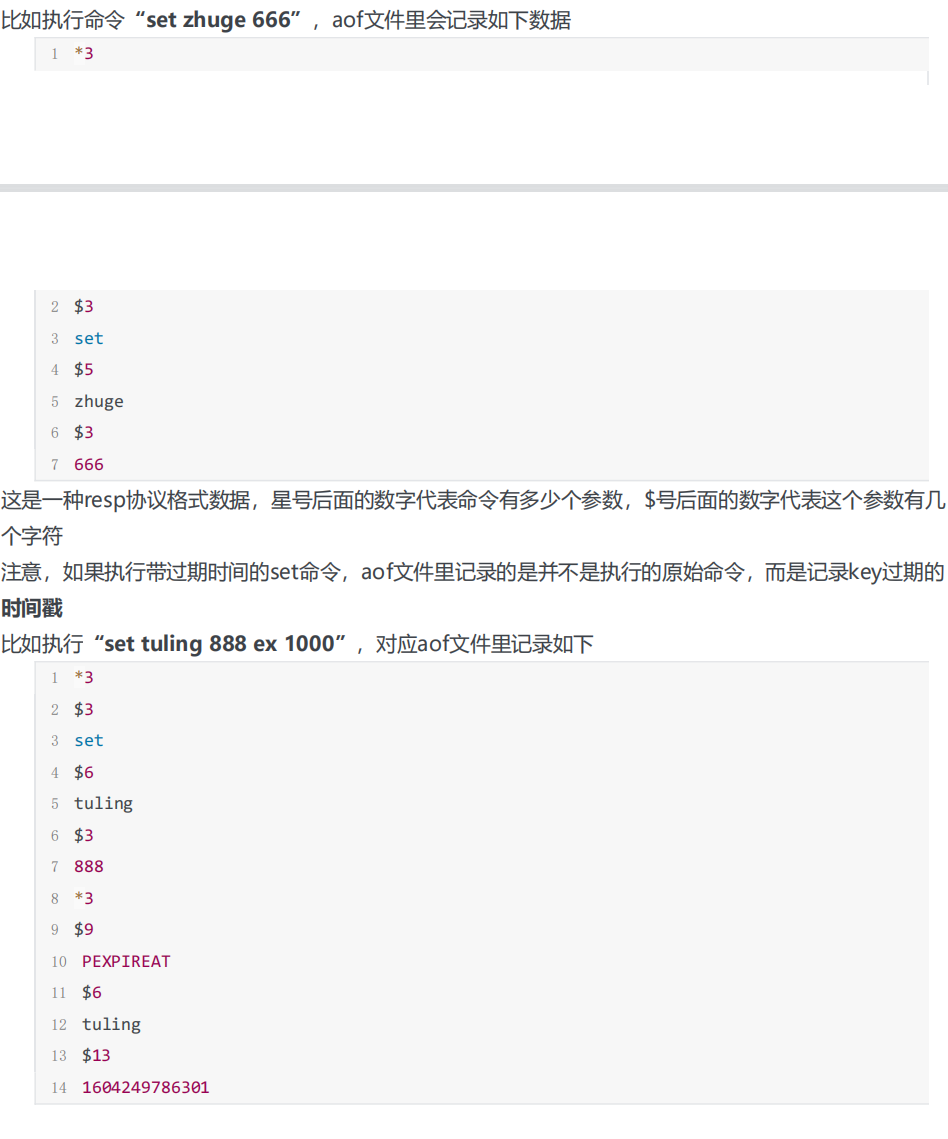
AOF persistence records each modified instruction in the file appendonly AOF (write to os cache first and fsync to disk at regular intervals)
- Automatic mode
appendonly yes //The default is no, not on
# How often is Redis configured to fsync data to disk
# The recommended (and default) measure is fsync once per second. This fsync policy can take into account both speed and security
# appendfsync always: execute fsync every time a new command is added to the AOF file, which is very slow and safe. appendfsync everysec: fsync once per second, fast enough, and only 1 second of data will be lost in case of failure.
# appendfsync no: never fsync, and hand over the data to the operating system for processing. Faster and less secure options.
- Manual mode
The redis client executes the command bgrewriteaof
Aof Rewriting: there may be too many useless instructions in the AOF file, so AOF will periodically generate AOF files according to the latest data in memory
AOF rewriting redis will fork out a sub process to do it (similar to bgsave command), which will not have too much impact on normal redis command processing
# AOF override configuration
 auto‐aof‐rewrite‐min‐size 64mb //aof files will not be rewritten automatically until they reach at least 64M. If the file is too small, the recovery speed is very fast, and rewriting is of little significance
 auto‐aof‐rewrite‐percentage 100 //If the aof file size has increased by 100% since the last rewriting, the rewriting is triggered again
Redis 4.0 hybrid persistence
During AOF rewriting, instead of simply converting memory data into RESP commands and writing them to the AOF file, the memory before rewriting is processed as RDB snapshot, and the RDB snapshot content and the incremental AOF command to modify memory data are written to the new AOF file, overwriting the original appendonly Aof file.
When Redis restarts, RDB content can be loaded first and then replayed. The incremental AOF log can completely replace the previous AOF full file replay, so the restart efficiency is greatly improved
# Open aof
appendonly yes
# Mixed persistence prerequisite aof must be enabled
aof‐use‐rdb‐preamble yes
Redis data backup strategy:
- Write crontab scheduled scheduling script, copy a backup of rdb or aof to a directory every hour, and only keep the backup of the last 48 hours
- Every day, keep a copy of the data of the current day back up to a directory. You can keep the backup of the last month
- Every time a copy is backed up, the old backup is deleted
- Copy a copy of the backup on the current machine to other machines every night to prevent damage to the machine
Redis master-slave working principle
Configure redis conf
1,Make a copy redis.conf file

2,Modify the relevant configuration to the following values:
port 6380
pidfile /var/run/redis_6380.pid # Write the pid process number to the pidfile configuration file
logfile "6380.log"
dir /usr/local/redis‐5.0.3/data/6380 # Specify data storage directory
# bind needs to be commented out
# bind 127.0.0.1 (bind is bound to the ip of the network card of the machine. If multiple network cards can be configured with multiple ip, it represents which network card ip of the machine the client is allowed to access. Bind can not be configured in the intranet. Just comment it out.)

3,Configure master-slave replication
replicaof 192.168.0.60 6379 # Copy data from the redis instance of the local 6379. Before Redis 5.0, slaveof was used
replica‐read‐only yes # Configure slave node read only

4,Start slave node
redis‐server redis.conf

5,Connect slave node
redis‐cli ‐p 6380

6,Test whether the data can be written on the new instance 6379 in time

7,You can configure a 6381 slave node yourself
Working principle of master-slave
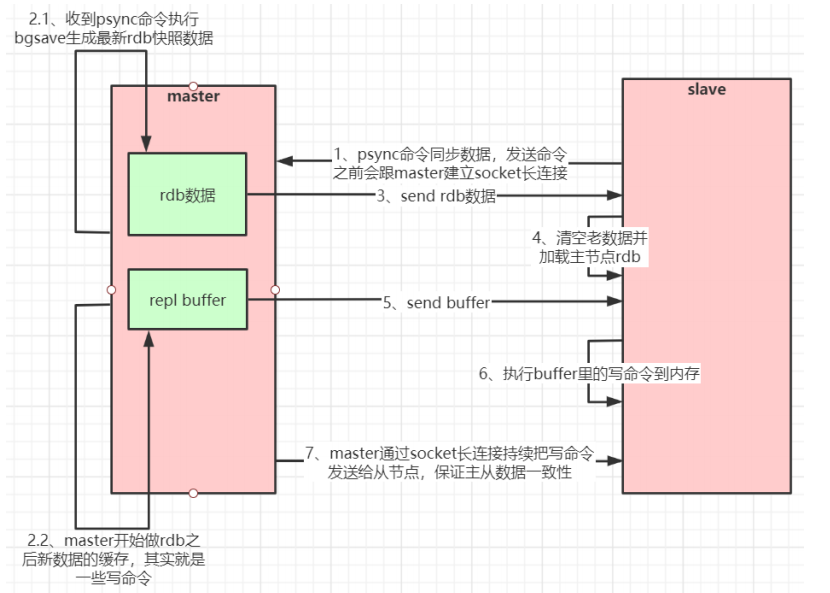
If you configure a slave for the master, whether the slave is connected to the master for the first time or not, it will send a PSYNC command to the master to request data replication.
After receiving the PSYNC command, the master will perform data persistence in the background and generate the latest rdb snapshot file through bgsave. During persistence, the master will continue to receive requests from the client and cache these requests that may modify the dataset in memory.
After the persistence is completed, the master will send the rdb file data set to the slave. The slave will persist the received data to generate rdb, and then load it into memory. Then, the master sends the commands previously cached in memory to the slave.
When the connection between the master and the slave is disconnected for some reason, the slave can automatically reconnect to the master. If the master receives multiple slave concurrent connection requests, it will only persist once instead of once for one connection, and then send this persistent data to multiple slave concurrent connections.
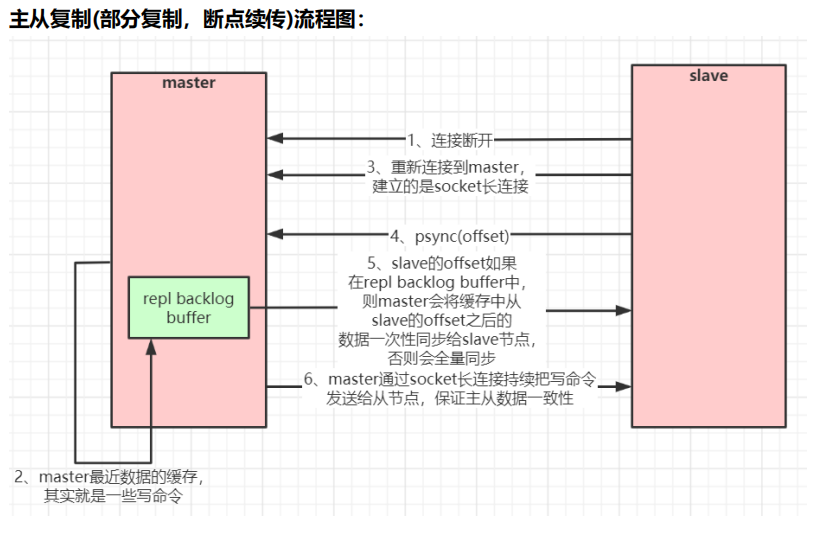
Data partial replication
When the master and slave are disconnected and reconnected, the whole data is usually copied. But from redis2 Since version 8, redis can support
Hold the command of partial data replication PSYNC to synchronize data with the master. slave and master can only perform partial data replication after the network connection is disconnected and reconnected
Data replication (breakpoint continuation).
The master will create a cache queue for copying data in its memory to cache the data of the latest period, the master and all its data
The slave maintains the copied data subscript offset and the process id of the master. Therefore, when the network connection is disconnected, the slave will request the master
Continue with the incomplete replication, starting with the recorded data subscript. If the master process id changes, or the slave node data subscript
The offset is too old and is no longer in the cache queue of the master. Then a full amount of data will be copied.
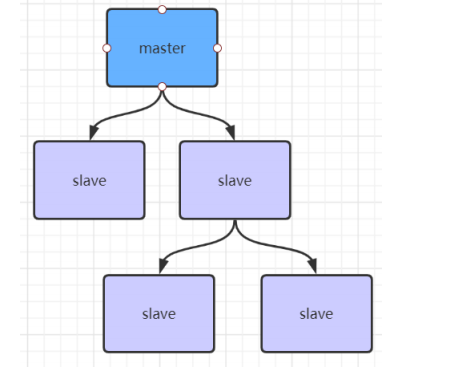
If there are many slave nodes, in order to alleviate the master-slave replication storm (multiple slave nodes replicate the master node at the same time, resulting in excessive pressure on the master node), you can do the following:
Under the architecture, some slave nodes and slave nodes (synchronized with the master node) synchronize data
Redis sentinel high availability architecture
Sentinel sentinel is a special redis service. It does not provide read-write services. It is mainly used to monitor redis instance nodes.
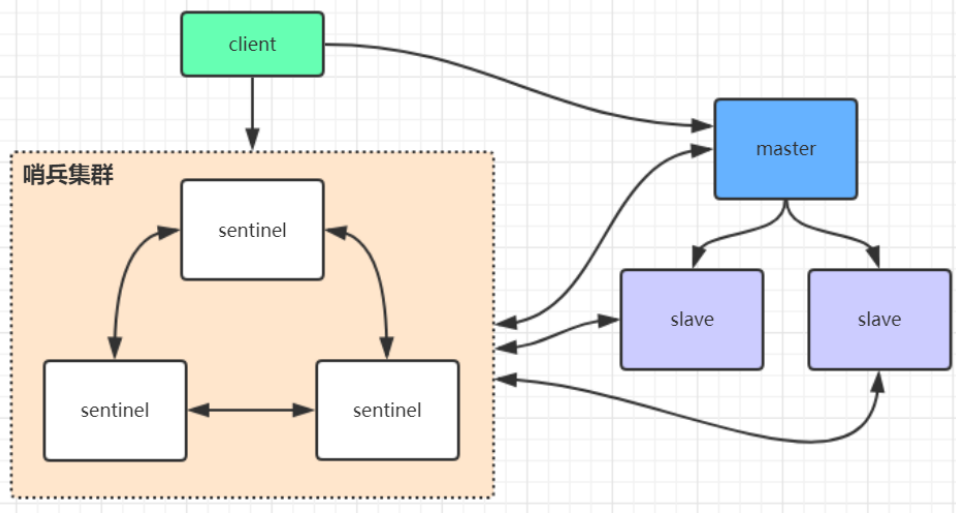
Under the sentinel architecture, the client finds the master node of redis from the sentinel agent for the first time, and then directly accesses the master node of redis. It will not access the master node of redis through sentinel agent every time;
When the primary node of redis changes, the Sentry will perceive it for the first time and notify the client of the new primary node of redis (the client of redis generally implements the subscription function and subscribes to the node change messages published by sentinel)
 1,Make a copy sentinel.conf file
cp sentinel.conf sentinel‐26379.conf

2,Modify the relevant configuration to the following values:
port 26379
daemonize yes
pidfile "/var/run/redis‐sentinel‐26379.pid"
logfile "26379.log"
dir "/usr/local/redis‐5.0.3/data"
# sentinel monitor <master‐redis‐name> <master‐redis‐ip> <master‐redis‐port> <quorum>
# quorum is a number indicating how many sentinels consider a master to be invalid (the value is generally: total number of sentinels / 2 + 1)
sentinel monitor master 192.168.0.60 6379 2 # Take the name mymaster casually and use it when accessing the client

3,start-up sentinel Sentinel instance
src/redis‐sentinel sentinel‐26379.conf

4,see sentinel of info information
src/redis‐cli ‐p 26379
127.0.0.1:26379>info
 Can see Sentinel of info I've identified it in the redis Master-slave

5,You can configure two more sentinel,Ports 26380 and 26381. Note that the corresponding numbers in the above configuration file should be modified
After the sentinel cluster is started, the metadata information of sentinel cluster will be written into all sentinel configuration files (appended at the bottom of the file). Let's check the following configuration file sentinel-26379 Conf, as follows:
sentinel known‐replica master 192.168.0.60 6380 #Represents slave node information
sentinel known‐replica master 192.168.0.60 6381 #Represents slave node information
sentinel known‐sentinel master 192.168.0.60 26380 fc03b6ce7c3c56952d0a5d70c1f90475b4 a5d70c #Represents other sentinel nodes perceived
sentinel known‐sentinel master 192.168.0.60 26381 6ebb8e1686438ba8e9f530d3882f8043f7 86438b #Represents other sentinel nodes perceived
If the redis master node hangs, the sentinel cluster will re elect a new redis master node and modify the cluster metadata information of all sentinel node configuration files. For example, if the redis of 6379 hangs, assuming that the elected new master node is 6380, the cluster metadata information in the sentinel file will become as follows:
sentinel known‐replica master 192.168.0.60 6379 #Represents slave node information
sentinel known‐replica master 192.168.0.60 6381 #Represents slave node information
sentinel known‐sentinel master 192.168.0.60 26380 fc03b6ce7c3c56952d0a5d70c1f90475b4 a5d70c #Represents other sentinel nodes perceived
sentinel known‐sentinel master 192.168.0.60 26381 6ebb8e1686438ba8e9f530d3882f8043f7 86438b #Represents other sentinel nodes perceived

#At the same time, the 6379 port corresponding to the previously configured master in the sentinel file will be modified to 6380
sentinel monitor master 192.168.0.60 6380 2
When the redis instance of 6379 is started again, the sentinel cluster can add the redis node of port 6379 to the cluster as a slave node according to the cluster metadata information
Sentinel leader election process
When a master server is considered offline by a sentinel, the sentinel will negotiate with other sentinels to select the leader of the sentinel for failover.
Each sentinel that finds that the master server goes offline can ask other sentinels to choose themselves as the leader of the sentinel. The election is on a first come, first served basis. At the same time, each sentinel will automatically add a configuration era (election cycle) for each election, and only one sentinel leader will be selected in each era.
If more than half of all sentinels elect a sentinel as a leader. After that, the sentinel performs a failover operation and elects a new master from the surviving slave. This election process is very similar to the master election of the cluster.
There is only one sentinel node in the sentinel cluster. The master and slave of redis can also run normally and elect a master. If the master hangs up, the only sentinel node is the sentinel leader, and a new master can be elected normally. However, for high availability, it is generally recommended to deploy at least three sentinel nodes. Why recommend an odd number of sentinel nodes? The principle is similar to that of an odd number of master nodes in a cluster.
sentinel summary:
In redis3 In versions before 0, to implement clustering, the sentinel tool is usually used to monitor the status of the master node. If the master node is abnormal, it will make a master-slave switch and take a slave as the master,
The sentry configuration is slightly complex, and the performance and high availability are average,
In particular, there is an access transient interruption at the moment of master-slave switching,
Moreover, the sentinel mode has only one master node to provide external services, which can not support high concurrency,
The memory of a single master node should not be set too large, otherwise the persistent file will be too large, affecting the efficiency of data recovery or master-slave synchronization
High availability cluster mode
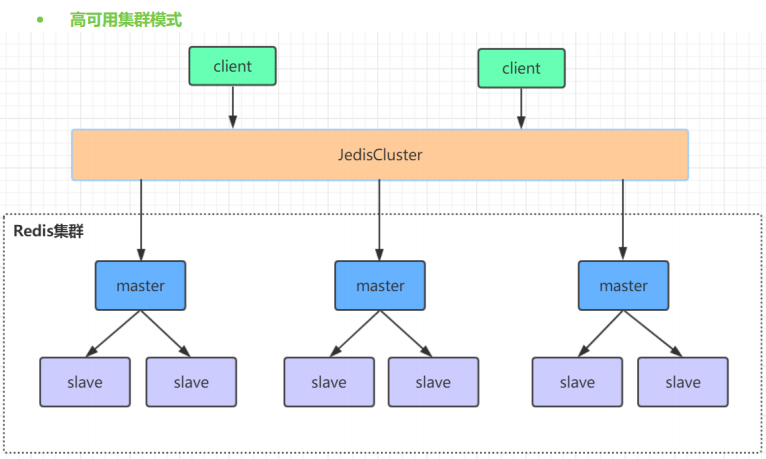
redis cluster is a distributed server cluster composed of multiple master-slave node clusters. It has the characteristics of replication, high availability and fragmentation.
Redis cluster can complete node removal and failover without sentinel sentinel.
Each node needs to be set into a cluster mode. This cluster mode has no central node and can be expanded horizontally. According to the official document, it can be linearly expanded to tens of thousands of nodes (no more than 1000 nodes are officially recommended).
The performance and high availability of redis cluster are better than the sentinel mode of previous versions, and the cluster configuration is very simple.
Build redis cluster
#Step 1: create the folder redis ‐ cluster under / usr/local of the first machine, and then create two folders under it respectively, as follows:
(1)mkdir ‐p /usr/local/redis‐cluster
(2)mkdir 8001 8004

#Step 2: redis The conf configuration file is copied to 8001 and modified as follows:
(1)daemonize yes #yes allow background startup
(2)port 8001 #(set the port number of each machine separately)
(3)pidfile /var/run/redis_8001.pid # Write the pid process number to the pidfile configuration file
(4)dir /usr/local/redis‐cluster/8001/ #(specify the storage location of data files. You must specify different directory locations, otherwise data will be lost)
(5)cluster‐enabled yes #(start cluster mode)
(6)cluster‐config‐file nodes‐8001.conf #(cluster node information file, 800x here should correspond to port)
(7)cluster‐node‐timeout 10000
(8)# bind 127.0.0.1 (bind is bound to the ip of the network card of the machine. If multiple network cards can be configured with multiple ip, it represents which network card ip of the machine the client is allowed to access. Bind can not be configured in the intranet. Just comment it out.)
(9)protected‐mode no #(Turn off protection mode) #Protected mode is a new feature added after 3.2. In order to prevent the public network from accessing the redis cache and strengthen the security of redis. Configure it according to your needs. There are two enabling conditions: no bind IP and no access password
(10)appendonly yes
#If you want to set the password, you need to add the following configuration:
(11)requirepass mypass #(set redis access password)
(12)masterauth mypass #(set the access password between cluster nodes, consistent with the above)

#Step 3: copy the modified configuration file to 8004 and modify the port numbers in Items 2, 3, 4 and 6. You can replace them in batch:
 :%s/Source string/Destination string/g

#Step 4: the other two machines also need to do the above steps. The second machine uses 8002 and 8005, and the third machine uses 8003 and 8006

#Step 5: start six redis instances respectively, and then check whether they are started successfully
(1)/usr/local/redis‐5.0.3/src/redis‐server /usr/local/redis‐cluster/800*/redis.conf
(2)ps ‐ef | grep redis Check whether the startup is successful

#Step 6: create the entire redis cluster with redis ‐ cli (the cluster before redis5 is implemented by relying on the ruby script redis ‐ trib.rb)
# 1 in the following command represents creating a slave server node for each created master server node
# To execute this command, you need to confirm that the redis instances between the three machines can access each other. You can simply turn off the firewall of all machines first. If you do not turn off the firewall, you need to open the redis service port and the cluster node mission communication port 16379 (1W is added to the redis port number by default)
# Turn off firewall
# systemctl stop firewalld # Temporarily turn off the firewall
# systemctl disable firewalld # Prohibit startup

# Note: the following command to create a cluster should not be copied directly. There may be a problem with the space code in it, resulting in the unsuccessful creation of a cluster
/usr/local/redis‐5.0.3/src/redis‐cli ‐a mypass ‐‐cluster create ‐‐cluster‐replicas 1 1 92.168.0.61:8001 192.168.0.62:8002 192.168.0.63:8003 192.168.0.61:8004 192.168.0.62:8005 192.168.0.63:8006

#Step 7: verify the cluster:
(1)Connect to any client:./redis‐cli ‐c ‐h ‐p (‐a Access the server password,‐c Indicates the cluster mode, specifying ip (address and port number)
For example:/usr/local/redis‐5.0.3/src/redis‐cli ‐a mypass ‐c ‐h 192.168.0.61 ‐p 800*
(2)Verify: cluster info(View cluster information) cluster nodes(View node list)
(3)Perform data operation verification
(4)To shut down a cluster, you need to shut it down one by one. Use the command:
/usr/local/redis‐5.0.3/src/redis‐cli ‐a mypass ‐c ‐h 192.168.0.60 ‐p 800* shutdown
Principle analysis of Redis cluster
Slot location algorithm
By default, Cluster will hash the key value using crc16 algorithm to get an integer value, and then use this integer value to model 16384 to get the specific slot position.
HASH_SLOT = CRC16(key) mod 16384
Redis Cluster divides all data into 16384 slots, and each node is responsible for part of the slots. The slot information is stored in each node. When the client of Redis Cluster connects to the cluster, it will also get a copy of the slot configuration information of the cluster and cache it locally. In this way, when the client wants to find a key, it can directly locate the target node. At the same time, because the slot information may be inconsistent between the client and the server, a correction mechanism is also needed to verify and adjust the slot information.
Jump relocation
When the client sends an instruction to a wrong node, the node will find that the slot where the key of the instruction is located is not managed by itself. At this time, it will send a special jump instruction to the client, carry the node address of the target operation, and tell the client to connect to this node to obtain data. After receiving the instruction, the client will not only jump to the correct node for operation, but also synchronously update and correct the local slot mapping table cache. All subsequent keys will use the new slot mapping table

Communication mechanism between Redis cluster nodes
The redis cluster nodes communicate with each other using the gossip protocol;
There are two ways to maintain cluster metadata (cluster node information, master-slave roles, number of nodes, data shared by each node, etc.): centralized and mission
- Centralized: (strong consistency)
Advantages: the metadata is updated and read with good timeliness. Once the metadata changes, it will be updated to the centralized storage immediately, and other nodes can immediately perceive it when reading;
The disadvantage of storing all metadata in one place may lead to the pressure of updating all metadata in one place. Many middleware use zookeeper to centrally store metadata. - Mission: the mission protocol contains a variety of messages, including ping, pong, meet, fail, etc. (final consistency)
- Meet: a node sends a meet to the newly added node to join the cluster, and then the new node will start to communicate with other nodes;
- ping: each node frequently sends pings to other nodes, including its own status and its own maintained cluster metadata. They exchange metadata with each other through ping (similar to their perceived addition and removal of cluster nodes, hash slot information, etc.);
- pong: the return of ping and meet messages, including their own status and other information, can also be used for information broadcasting and updating;
- Fail: after a node judges that another node fails, it sends a fail to other nodes to notify other nodes that the specified node is down.
Advantages: metadata updates are scattered and not concentrated in one place. Update requests will be sent to all nodes to update. There is a certain delay and reduces the pressure;
Disadvantages: metadata update is delayed, which may lead to some lag in some operations of the cluster.
10000 port for gossip communication
Each node has a dedicated port for inter node gossip communication, that is, the port number of its own service + 10000, such as 7001, so the port used for inter node communication is 17001. Each node will send ping messages to other nodes at regular intervals, and the other nodes will return a pong message after receiving the ping message.
Network jitter
The real-world computer room network is often not calm, and they often have all kinds of small problems. For example, network jitter is a very common phenomenon. Suddenly, some connections become inaccessible, and then quickly return to normal.
To solve this problem, Redis Cluster provides an option cluster node Timeout means that when a node loses contact for a timeout, it can be considered that the node has failed and needs to be switched from master to slave. Without this option, network jitter will lead to frequent master-slave switching (data re replication)
Analysis of Redis cluster election principle
When a slave finds that its master is in the FAIL state, it attempts to Failover in order to become a new master. Because the suspended master may have multiple slaves, there is a process in which multiple slaves compete to become the master node. The process is as follows:
1.slave finds that its master becomes FAIL
2. Add 1 to the cluster currentepoch (i.e. election cycle) recorded by yourself, and broadcast failover_ AUTH_ Request (failover verification request information)
3. When other nodes receive this information, only the master responds, judges the legitimacy of the requester, and sends failover_ AUTH_ ACK (failover verification confirmation information), send ack only once for each epoch
4. Try the slave of failover to collect the failover returned by the master_ AUTH_ ACK
5.slave becomes a new master after receiving ack s from more than half of the Masters (this explains why the cluster needs at least three master nodes. If there are only two, when one of them hangs, only one master node can not be elected successfully)
6.slave broadcasts Pong messages to notify other cluster nodes.
The slave node does not attempt to initiate an election as soon as the master node enters the FAIL state, but there is a certain delay. A certain delay ensures that we wait for the FAIL state to spread in the cluster. If the slave attempts to vote immediately, other masters may not be aware of the FAIL state and may refuse to vote.
Delay calculation formula: DELAY = 500ms + random(0 ~ 500ms) + SLAVE_RANK * 1000ms
SLAVE_ The smaller the rank, the newer the replicated data. In this way, the slave with the latest data will launch the election first (theoretically).
Data loss of cluster brain fissure
The redis cluster does not have more than half of the mechanism, and there will be brain crack. After the brain crack is caused by network partition, multiple master nodes provide external write services. Once the network partition is restored, one of the master nodes will become a slave node, and a large amount of data will be lost. The circumvention method can add parameters to the redis configuration (this method can not completely avoid data loss. Refer to the cluster leader election mechanism):
min‐replicas‐to‐write 1 //The minimum number of slave s that can be synchronized successfully when writing data. This number can imitate the configuration of more than half of the mechanism. For example, a total of three nodes in the cluster can be configured with 1, and the leader is 2, which is more than half
#Note: this configuration will affect the availability of the cluster to a certain extent. For example, if there are less than one slave, the cluster can not provide services even if the leader is normal. It needs to be weighed and selected in specific scenarios.
Is the cluster complete to provide external services
When redis When the configuration cluster require full coverage of conf is no, it means that when the primary library responsible for a slot goes offline and there is no corresponding slave library for fault recovery, the cluster is still available. If yes, the cluster is unavailable
Why does the Redis cluster need at least three master nodes and the recommended number of nodes is odd?
Because the election of a new master requires the consent of more than half of the cluster master nodes to be successful. If there are only two master nodes, when one of them hangs, the conditions for electing a new master cannot be met.
An odd number of master nodes can save one node on the basis of meeting the election conditions. For example, compared with a cluster of four master nodes, if you have one master node, you can elect a new master node. If you have two master nodes, you can't elect a new master node, Therefore, the odd number of master nodes is more from the perspective of saving machine resources.
Redis cluster support for batch operation commands
For the native batch operation commands of multiple keys such as mset and mget, the redis cluster only supports the case that all keys fall in the same slot. If multiple keys must be operated on the redis cluster with the mset command, you can add {XX} before the key, so that the parameter data fragment hash will only calculate the value in braces, This ensures that different keys can fall into the same slot. An example is as follows:
mset {user1}:1:name xiaoming {user1}:1:age 18
Assuming that the hash slot values calculated by name and age are different, but this command is executed in the cluster, redis will only use user1 in braces to calculate the hash slot, so the calculated slot values must be the same, and they can all fall in the same slot in the end