About NoSQL overview
1, Development of NoSQL
1. Stand alone MySQL Era
In the 1990s, the number of visits to a website was generally not too large, and a single database was enough. With the increase of users, the website has the following problems:
- When the data volume increases to a certain extent, the stand-alone database cannot be put down (there are more than 3 million data in MySQL, and the index needs to be added)
- The data index (B+ Tree) cannot be stored in a single machine memory
- When the amount of access becomes large (mixed reading and writing), one server can't afford it.

2. Memcached + Mysql + vertical split (read write split)
80% of the website is reading. It's very troublesome to query the database every time! Therefore, we want to reduce the pressure on the database. We can use cache to ensure efficiency
Rate!
The optimization process goes through the following processes:
- Optimize the data structure and index of the database (difficult)
- File cache, which is obtained through IO stream, is slightly more efficient than accessing the database every time, but the IO stream can't bear the explosive growth of traffic
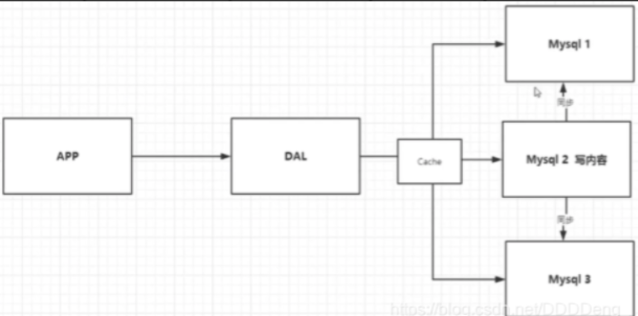
- MemCache, the most popular technology at that time, added a layer of cache between the database and the database access layer. During the first access, the database was queried and the results were saved to the cache. For subsequent queries, the cache was checked first. If it was used directly, the efficiency was significantly improved.
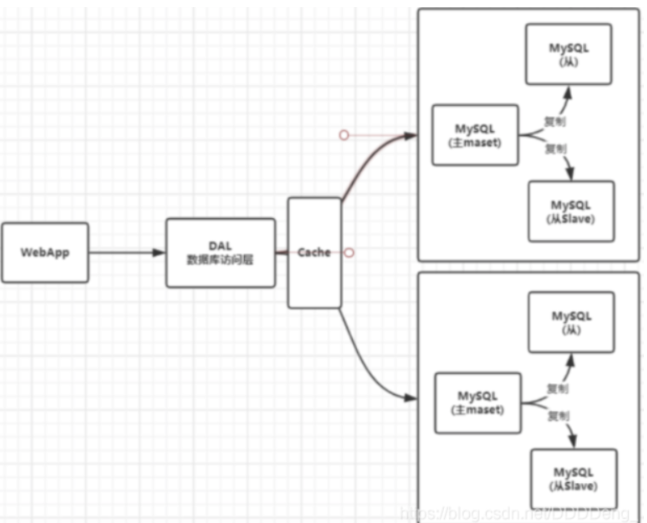
3. Sub database and sub table + horizontal split + Mysql Cluster
4. Today's recent era
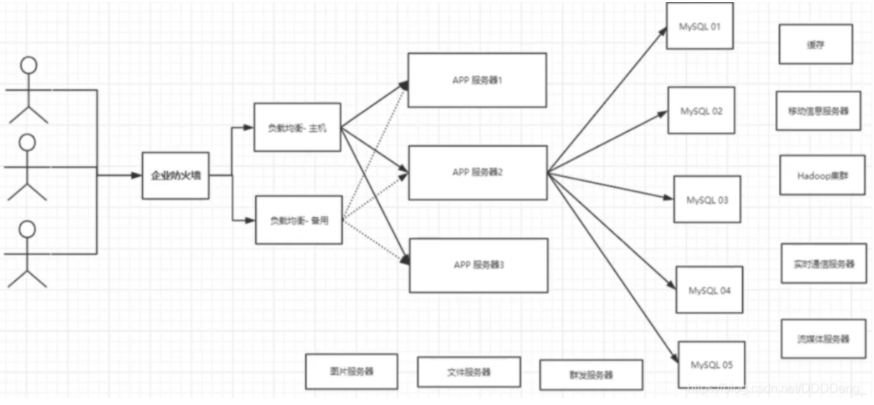
Nowadays, with the rapid growth of information and the emergence of various data (user positioning data, picture data, etc.), relational database (RDBMS) can not meet the requirements of a large number of data under the background of big data. Nosql database can easily solve these problems. At present, a basic Internet Project:
2, Why use NoSQL
User's personal information, social networks, geographical location. User generated data, user logs and so on are growing explosively! At this time, we need to use NoSQL database. NoSQL can handle the above situations well!
1. What is NoSQL
NoSQL = Not Only SQL (not just SQL)
Not Only Structured Query Language
Relational database: column + row. The data structure under the same table is the same.
Non relational database: data storage has no fixed format and can be expanded horizontally.
NoSQL generally refers to non relational databases, with the development of web2 With the birth of the Internet, the traditional relational database is difficult to deal with web2 0 era! In particular, large-scale and highly concurrent communities have exposed many insurmountable problems. NoSQL is developing very rapidly in today's big data environment, and Redis is the fastest growing community.
2... NoSQL features:
1. Easy to expand (there is no relationship between data, so it is easy to expand!)
2. Large amount of data and high performance (Redis can write 80000 times and read 110000 times a second. NoSQL cache is a fine-grained cache with high performance!)
3. Data types are diverse! (there is no need to design the database in advance, and it can be used at any time)
4. Traditional RDBMS and NoSQL
Traditional RDBMS (relational database)
Structured organization
SQL
Both data and relationships exist in a separate table, row col
Operation, data definition language
Strict consistency
Basic transaction
...
Nosql
Not just data
There is no fixed query language
Key value pair storage, column storage, document storage, graphic database (social relationship)
Final consistency
CAP theorem and BASE
High performance, high availability, high scalability
...
5. 3V in the era of big data: it mainly describes problems
- Massive Velume
- Diversity
- Real time Velocity
6. Three highs in the era of big data: mainly the requirements for procedures
- High concurrency
- Highly scalable
- High performance
Real practice in the company: NoSQL + RDBMS is the strongest.
Recommended article: Alibaba cloud lunatics and Alibaba cloud technology architecture
3, Four categories of NoSQL
1.KV key value pair:
# 1. Description:
- This kind of database mainly uses a hash table, which has a specific key and a pointer to specific data.

# 2. Features
- Key/value Model for IT The advantage of the system is that it is simple and easy to deploy.
- But if DBA When only some values are queried or updated, Key/value It's inefficient.

# 3. Related products
- Tokyo Cabinet/Tyrant,
- Redis
- SSDB
- Voldemort
- Oracle BDB
-
Sina: Redis
-
Meituan: Redis+Tair
-
Alibaba, baidu: Redis + Memcache
2. Document database (bson format is the same as json)
- MongoDB (generally must master!)
- MongoDB is a database based on distributed file storage, written in c + +, which is mainly used to process a large number of documents
- MongoDB is an intermediate product between relational database RDBMS and non relational database NoSQL (most like relational database!)
- CouchDB
# 1. Description
- The inspiration of document database comes from Lotus Notes Office software, and it is similar to the first key value storage. This type of data model is a versioned document, and semi-structured documents are stored in a specific format, such as JSON. Document database can be regarded as an upgraded version of key value database, which allows key values to be nested between them. Moreover, the query efficiency of document database is higher than that of key value database

# 2. Features
- Store as document

# 3. Related products
- MongoDB,CouchDB, MongoDb(4.x). There are also document databases in China SequoiaDB,Already open source.
3. Column storage database
- Hbase
- distributed file system
# 1. Description
- This part of the database is usually used to deal with the massive data stored in distributed storage.

# 2. Features
- Keys still exist, but they are characterized by pointing to multiple columns. These columns are arranged by the column family.

# 3. Related products
- Cassandra,HBase,Riak.
4. Graph relational database
- Used to store relationships, not pictures! For example: circle of friends, social network, product recommendation
- Neo4j,InfoGrid
# 1. Description
- The database of graphic structure is the same as other rows and columns and rigid structure SQL Different from the database, it uses a flexible graphical model and can be extended to multiple servers.
- NoSQL The database does not have a standard query language(SQL),Therefore, it is necessary to formulate a data model for database query. many NoSQL All databases have REST Type data interface or query API.

# 2. Features

# 3. Related products
- Neo4J,InfoGrid, Infinite Graph,
Getting started with Redis
I summary
What is Redis?
Redis (Remote Dictionary Server) is the remote dictionary service!
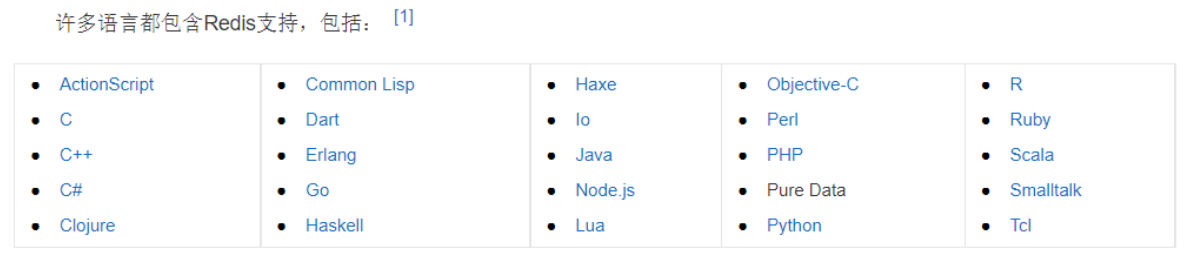
- Is an open source using ANSI C language Write, support network, memory based and persistent log type, key value database , and provides API s in multiple languages
-
redis periodically writes the updated data to the disk or writes the modification operation to the additional record file (data persistence for short), and realizes master-slave synchronization (master-slave replication for short).
-
Free and open source! Is one of the most popular non relational databases, also known as structured database!
What can Redis do?
- Memory storage and persistence. Memory is lost when power is off, so persistence is very important! (rdb,aof)
- Efficient for caching
- Publish subscribe system
- Map information analysis
- Timer, counter (views!)
...
Some features of Redis
-
Diverse data types
-
Persistence
-
colony
-
affair
What you need to learn
Official website: https://redis.io/
Chinese website: http://www.redis.cn/ Note: there is a time error between the Chinese website and the official website. The Chinese website is generally updated slowly and out of sync
Download address: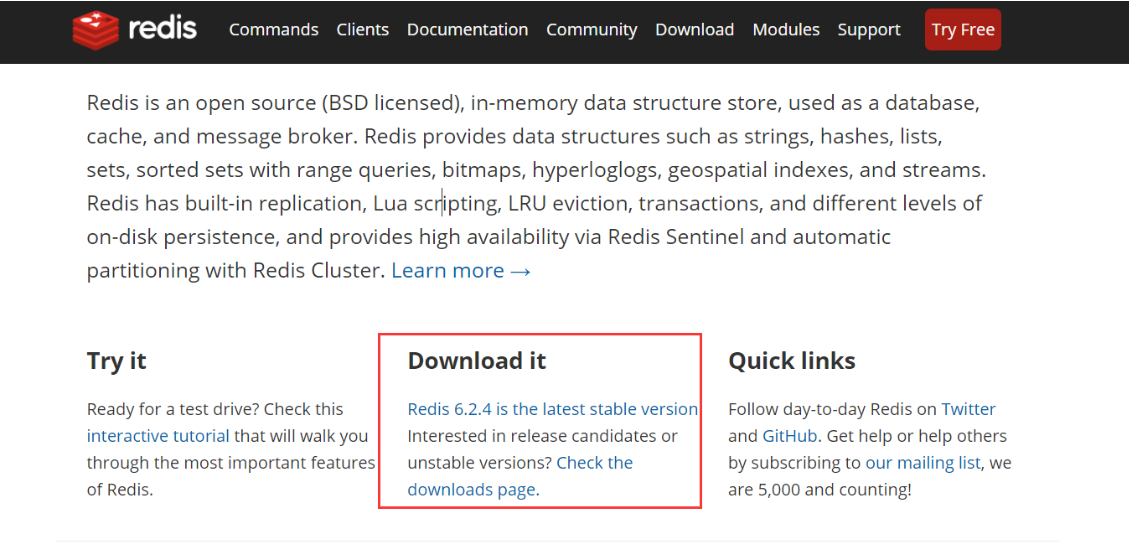
Note: windows is downloaded from GitHub (it has been stopped for a long time, and redis is officially not recommended for Windows). Therefore, we study based on Linux!
II Windows setup
1. Download the installation package: https://github.com/microsoftarchive/redis/releases/tag/win-3.2.100
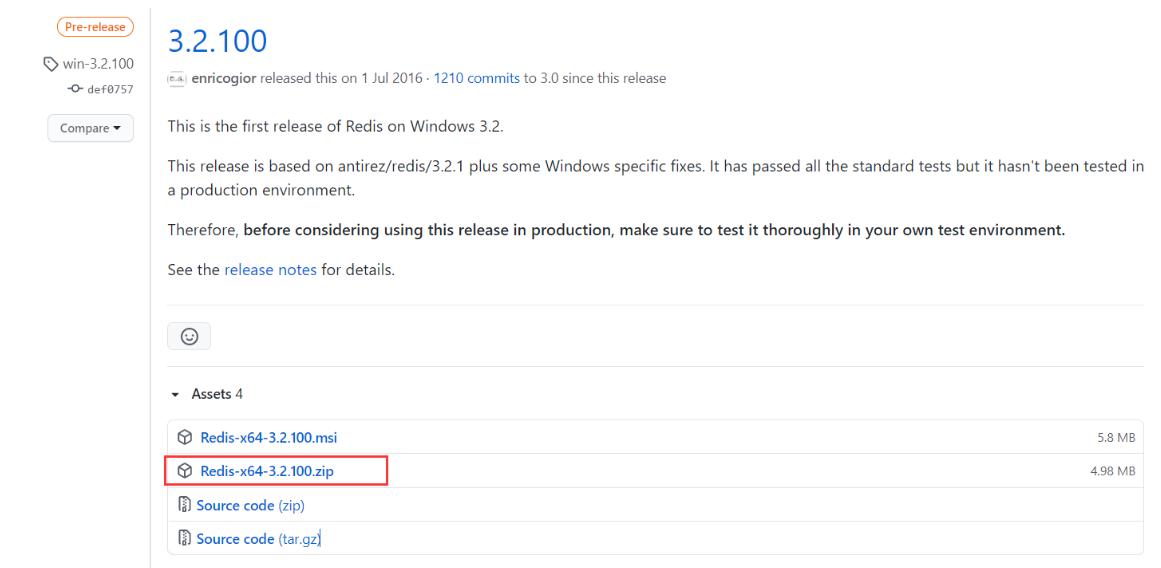
2. Download it and unzip it to your computer windows! Redis is very small, only 5M
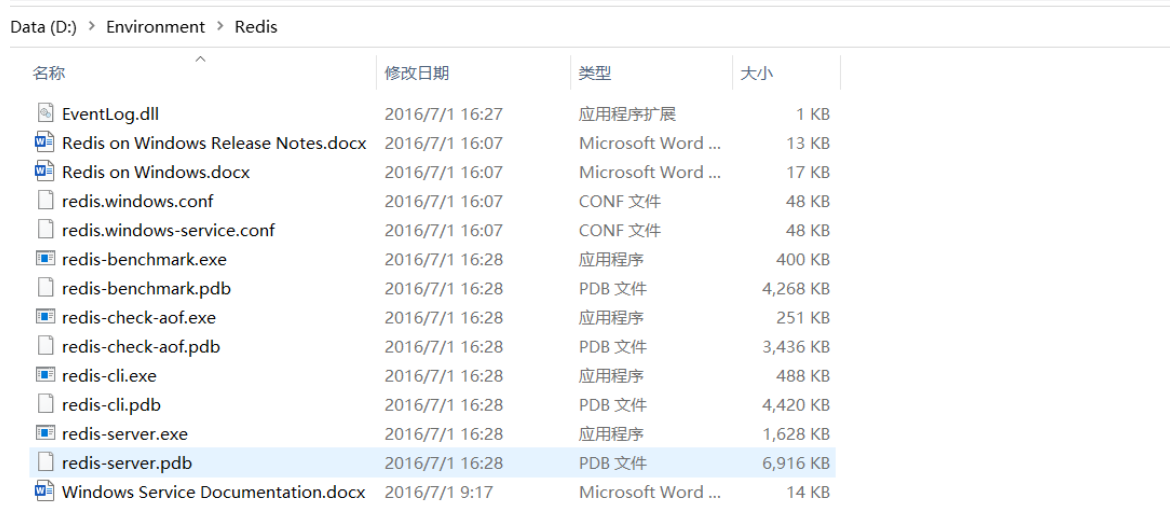
3. Open Redis and double-click to run the service!
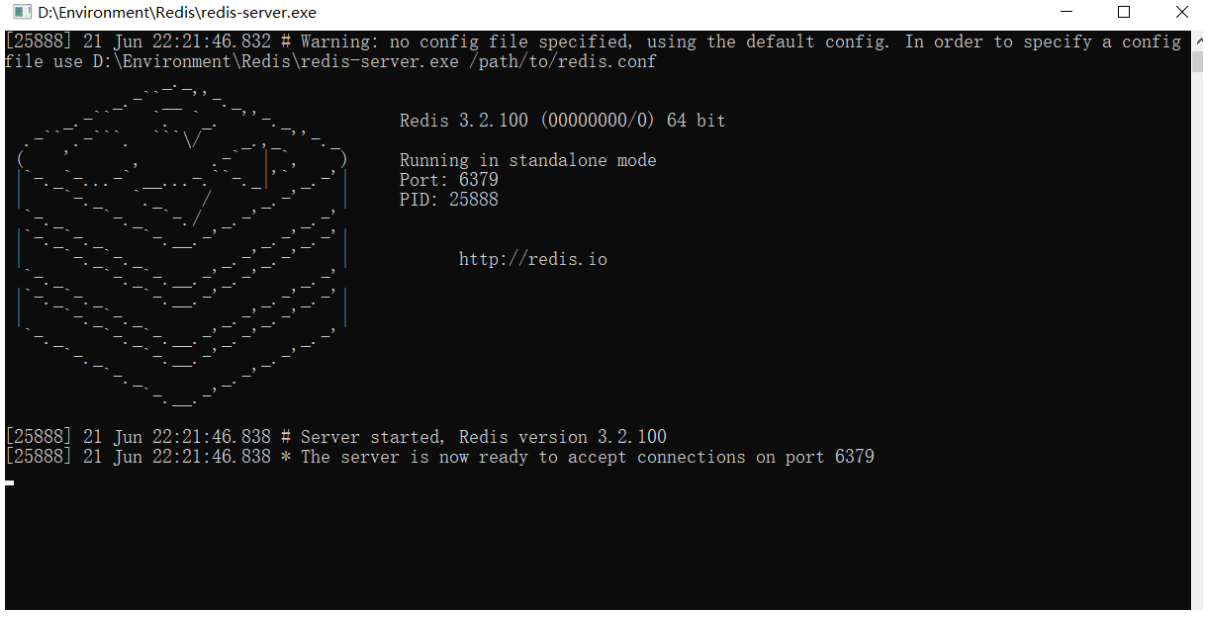
Default port: 6379
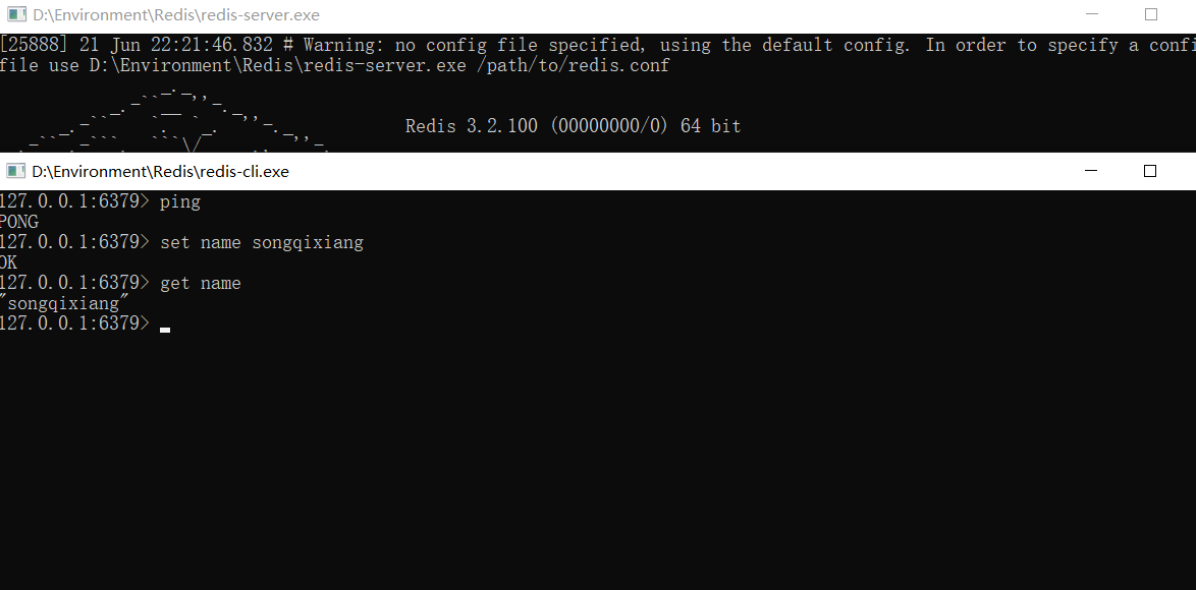
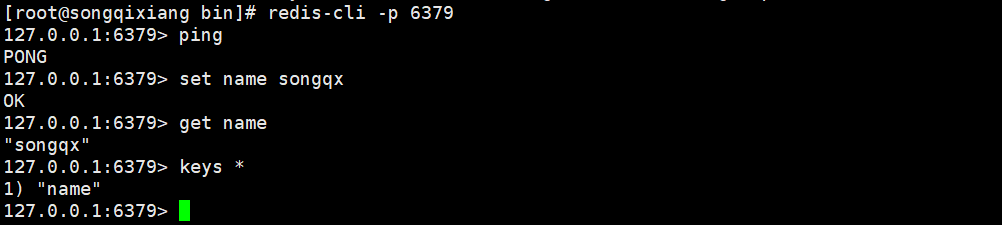
4. Use the redis client to connect to the redis service
Do a simple test on the client, store a data in the form of < K, V > and take it out!
Remember: although it is easy to use under windows, Redis recommends that we use Linux for development and use!
Address: https://www.redis.io/topics/introduction

III Linux Installation
1. Go to the official website to download the installation package:
- Download address: https://redis.io/

2.xftp put the compressed package in the specified directory of the server and directly use the command tar zxcvf to decompress it!
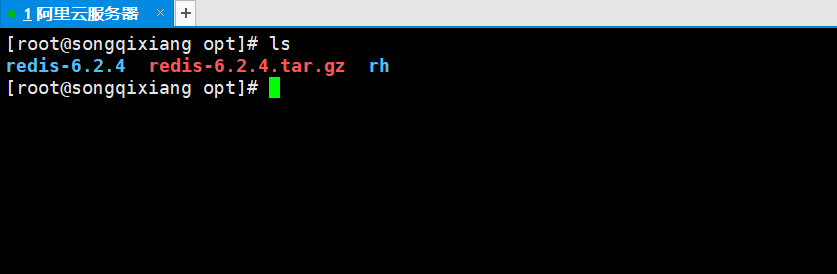
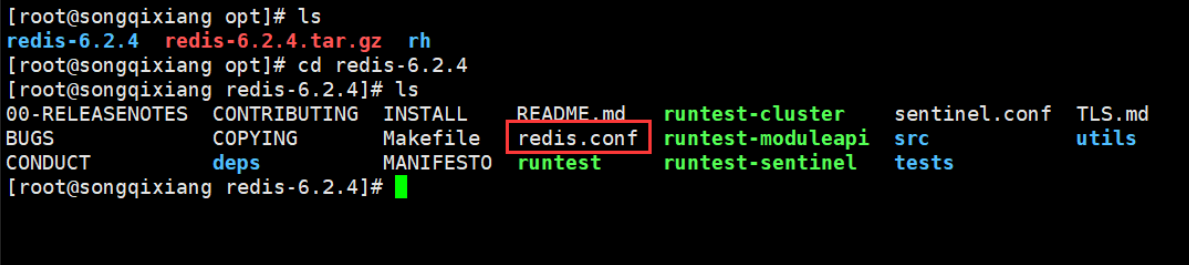
3. Enter the redis decompressed file and you can see the redis configuration file!
4. Basic environmental installation
 1. yum install gcc-c++   #Install gcc (the reason for installing gcc is that redis is written in c language, and gcc environment is required for installation)
 2. gcc -v  #View gcc version
 3. make				#Because the makefile file exists in the redis directory, you can make the installation!
 4. make install
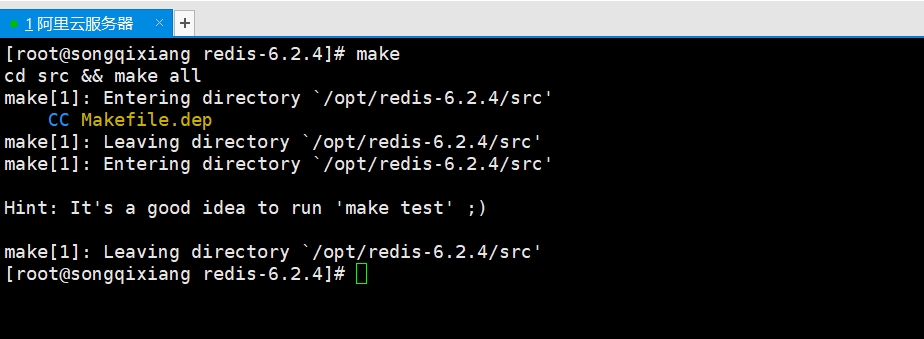
After making, execute make install
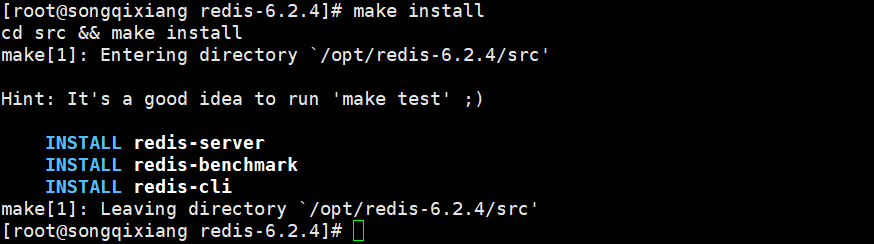
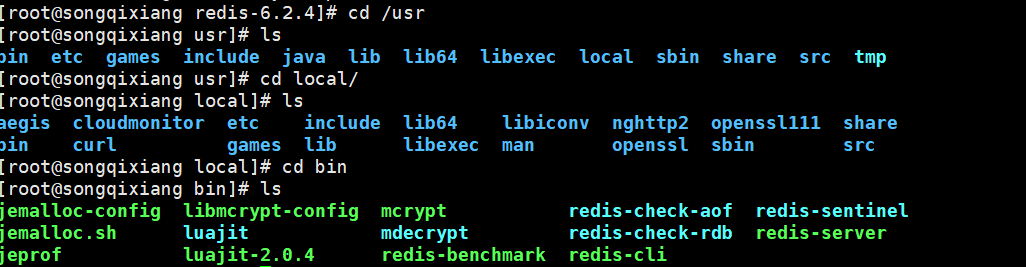
5. You can see that our redis is installed in / usr/local/bin (the default path)
6. Copy the redis configuration file to our current directory (copy it to a new config in the current directory), and then use the copied configuration file redis.config to start

7. By default, our redis is not started in the background, so we use vim to modify the configuration file redis config
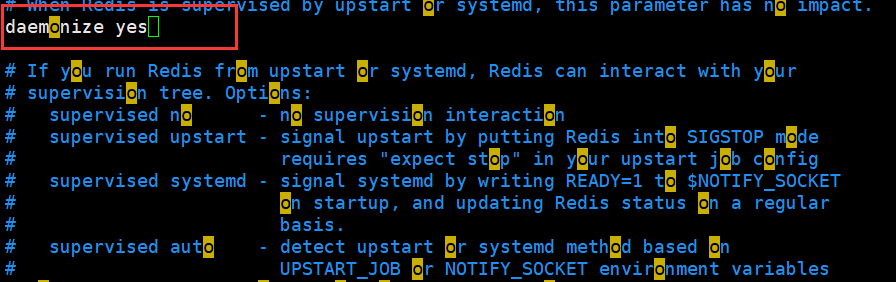
Change the deamonize attribute to yes
8. Start our Redis service (there is no return value after version 6.24 is started, and the old version will return successful startup). If there is no return value, use ps -ef | grep redis to check whether it is started
redis-server config/redis.conf   #Specify profile startup

redis-server  #Start using the default redis configuration

9. After successful startup, we can use redis cli to connect. The test is successful!
redis-cli -h localhost -p 6379

redis-cli -h localhost -p 6379 --raw  #Display Chinese, otherwise redis will give the Chinese default code!
10. Use the command to check whether the redis process is started
ps -ef|grep redis

Process open!
11. How to turn off our redis service
#Mode 1
1. shutdown  Close connection
2. exit	sign out

#Mode 2:
1,ps -ef |grep redis
2,kill + redis Process number!

12. Later, we will start the cluster using single machine and multi Redis!
IV Test performance
Redis benchmark is a stress testing tool to simulate N clients sending M requests at the same time [official performance testing tool]
Optional parameters of redis performance test tool:
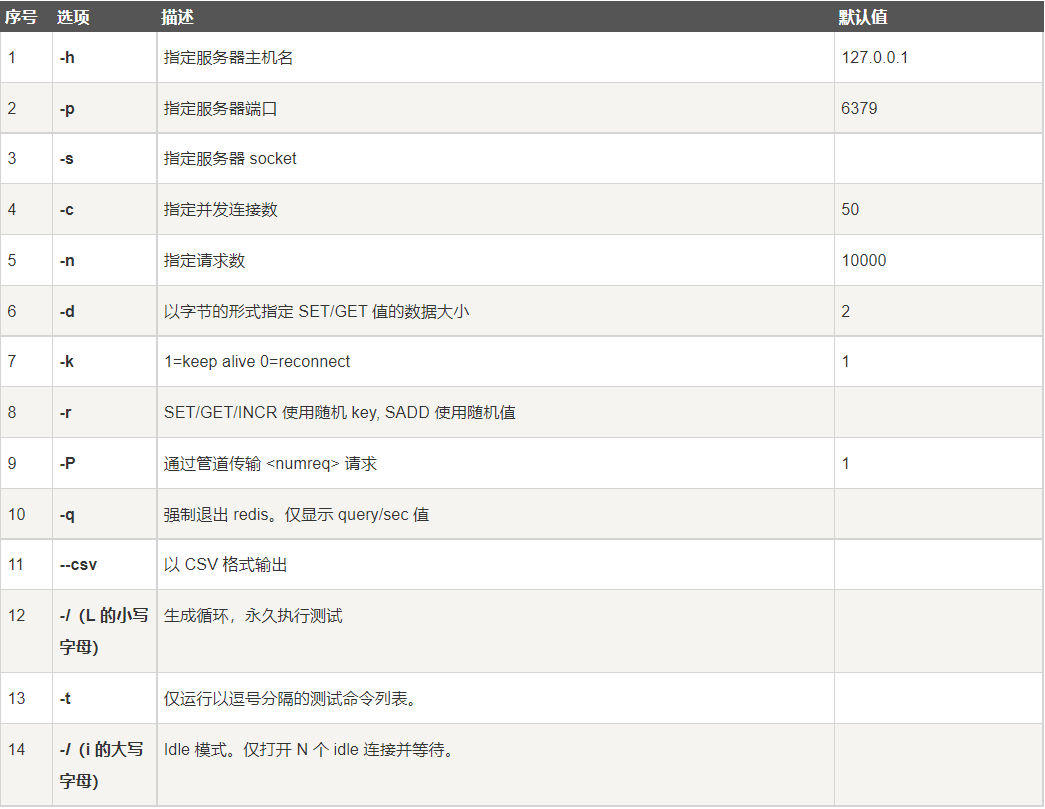
Let's simply test:
#Test 100 concurrent 100000 requests
redis-benchmark -h localhost -p 6379 -c 100 -n 100000
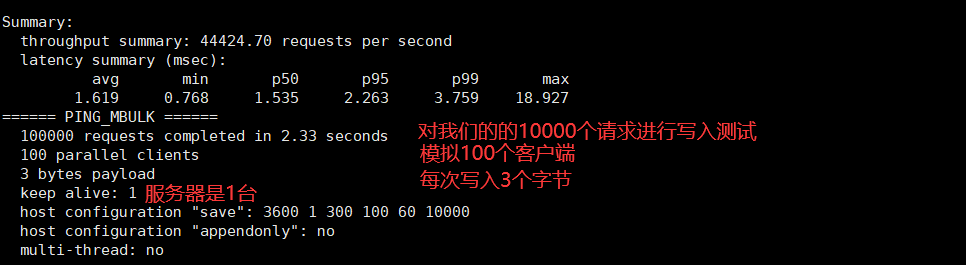
Test the stand-alone performance!
V Basic knowledge
redis has 16 databases by default!

Our 0 is used by default,
You can use select to switch the database, DBSIZE to view the size of the database, keys * to view all the keys in the database, and flush DB to clear the current database data! Flush clear all database contents!

Think: why choose 6379 as the default port of redis? Star name [just know]
Redis is single threaded!
Understand that redis is fast. Officials say that redis is based on memory operation. cpu is not the bottleneck of redis performance, but memory and network bandwidth!
Redis, as we all know, is indeed a single thread model, which means that the core module executing redis commands is a single thread, rather than one thread for the whole redis instance. Other redis modules also have threads of their own modules. Since Redis 4.0, there has been the concept of multithreading, such as redis deleting objects in the background through multithreading and blocking commands implemented through redis module. Redis 6.0 network processing is multithreaded, that is, Theaded IO refers to multithreading in network IO processing!
Why is Redis single thread so fast?
-
Myth 1: a high-performance server must be multi-threaded?
-
Myth 2: multithreading (cpu will switch context and consume certain resources) must be faster than single thread?
The speed of cpu, memory and hard disk needs to be understood
Core: all redis data is stored in memory, so single thread processing efficiency is the highest. Multithreading (context switching: time-consuming operation!) is the highest for memory. If there is no context switching efficiency! Reading and writing on one cpu for many times is the best solution in memory!
Reference articles
Redis is single threaded. Why is it so fast?
Five basic data types
Introduction to Redis official website:
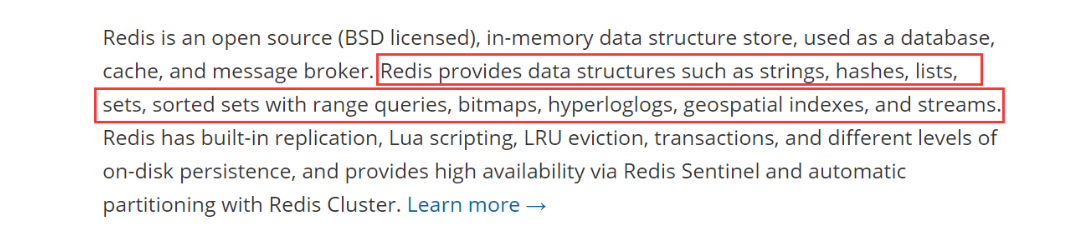
Full paragraph translation:
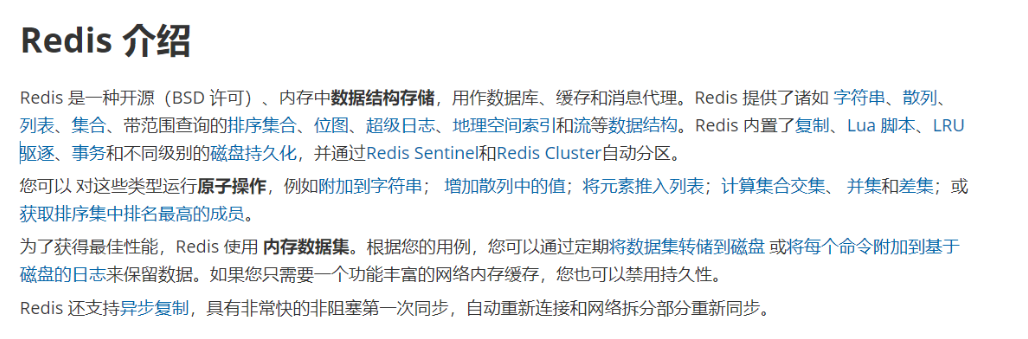
Redis is an open source (BSD licensed) in memory data structure storage system, which can be used as database, cache and message middleware. It supports many types of data structures, such as strings, hashes, lists, sets and ordered sets (sorted sets) and range query, bitmaps, hyperlogs and geospatial index radius query. Redis has built-in replication, Lua scripting, LRU event, transactions and different levels of disk persistence through redis sentinel Sentinel and Cluster provide high availability.
So all the commands mentioned need to be remembered!
Rediskey
How many seconds after the expire key expires, the key disappears, and the unit of time is s (set the survival time of the key!)
ttl key to see how many seconds the key can survive
EXISTS key determines whether the current key exists
move key database number moves the key to a database
type key view a data type of the current key
# 1.DEL instruction
- grammar :  DEL key [key ...]
- effect :  Delete one or more of the given key . Nonexistent key Will be ignored.
- Available versions: >= 1.0.0
- Return value: deleted key Number of.

# 2.EXISTS instruction
- grammar:  EXISTS key
- effect:  Check given key Whether it exists.
- Available versions: >= 1.0.0
- Return value: if key If it exists, it returns 1, otherwise it returns 0.

# 3.EXPIRE
- grammar:  EXPIRE key seconds
- effect:  For given key Set the lifetime when key When expired(The lifetime is 0 ),It will be deleted automatically.
- Available versions: >= 1.0.0
- Time complexity: O(1)
- Return value: 1 returned after setting successfully.

# 4.KEYS
- grammar :  KEYS pattern
- effect :  Find all that match the given pattern pattern of key .
- grammar:
	KEYS * Match all in database key .
	KEYS h?llo matching hello ,hallo and hxllo Wait.
	KEYS h*llo matching hllo and heeeeello Wait.
	KEYS h[ae]llo matching hello and hallo ,But it doesn't match hillo . For special symbols "\" separate
- Available versions: >= 1.0.0
- Return value: the value that conforms to the given pattern key List.

# 5.MOVE
- grammar :  MOVE key db
- effect :  The current database key Move to a given database db among.
- Available versions: >= 1.0.0
- Return value: 1 is returned if the move is successful, and 0 is returned if it fails.

# 6.PEXPIRE
- grammar :  PEXPIRE key milliseconds
- effect :  This command and EXPIRE The command works similarly, but it is set in milliseconds key Life time, not like EXPIRE Command, in seconds.
- Available versions: >= 2.6.0
- Time complexity: O(1)
- Return value: set successfully, return 1  key Does not exist or failed to set, return 0

# 7.PEXPIREAT
- grammar :  PEXPIREAT key milliseconds-timestamp
- effect :  This command and EXPIREAT The command is similar, but it is set in milliseconds key Expiration of unix Timestamp, not like EXPIREAT So, in seconds.
- Available versions: >= 2.6.0
- Return value: returns 1 if the lifetime setting is successful. When key 0 is returned when the lifetime does not exist or cannot be set.(see EXPIRE Command for more information)

# 8.TTL
- grammar :   TTL key
- effect :   Returns the given in seconds key Remaining lifetime of(TTL, time to live).
- Available versions: >= 1.0.0
- Return value:
	When key If it does not exist, return-2 .
	When key Returns when the remaining lifetime exists but is not set-1 .
	Otherwise, it returns in seconds key The remaining lifetime of the.
- Note : stay Redis 2.8 Before, when key Does not exist, or key When the remaining lifetime is not set, the command returns-1 .

# 9.PTTL
- grammar :  PTTL key
- effect :  This command is similar to TTL Command, but it returns in milliseconds key The remaining survival time, not like TTL Command, in seconds.
- Available versions: >= 2.6.0
- Return value: when key If it does not exist, return-2 . When key Returns when the remaining lifetime exists but is not set-1 .
- Otherwise, returns in milliseconds key The remaining lifetime of the.
- be careful : stay Redis 2.8 Before, when key Does not exist, or key When the remaining lifetime is not set, the command returns-1 .

# 10.RANDOMKEY
- grammar :  RANDOMKEY
- effect :  Random return from current database(Do not delete) One key .
- Available versions: >= 1.0.0
- Return value: returns a value when the database is not empty key . When the database is empty, return nil .

# 11.RENAME
- grammar :  RENAME key newkey
- effect :  take key Renamed newkey . When key and newkey Same, or key If it does not exist, an error is returned. When newkey When it already exists, RENAME The command overwrites the old value.
- Available versions: >= 1.0.0
- Return value: prompt when renaming is successful OK ,An error is returned on failure.

# 12.TYPE
- grammar :  TYPE key
- effect :  return key The type of value stored.
- Available versions: >= 1.0.0
- Return value:
	none (key non-existent)
	string (character string)
	list (list)
	set (aggregate)
	zset (Ordered set)
	hash (Hashtable )
If you don't want to order again, you can check the official website

Premise: the data type refers to the value part, and our key part is String
String (string)
Common operations:
| command | explain |
|---|---|
| set | Set a key/value |
| get | Obtain the corresponding value according to the key |
| mset | Set multiple key value s at a time |
| mget | Get the value of multiple key s at one time |
| getset | Get the value of the original key and set the new value at the same time |
| strlen | Get the length of the corresponding key store value |
| append | Append content to the value of the corresponding key |
| getrange index 0 started | Intercept the content of value |
| setex | Set the validity period of a key (seconds) |
| psetex | Set the validity period (MS) of a key |
| setnx | There is no operation, and there is no addition |
| msetnx atomic operation (no operation as long as one exists) | Multiple key s can be set at the same time. Only one exists and will not be saved |
| decr | Perform - 1 operation of numeric type |
| decrby | Subtract according to the data provided |
| Incr | Perform a numeric type + 1 operation |
| incrby | Add according to the data provided |
| Incrbyfloat | Add floating point numbers based on the data provided |
use
##############################################################
127.0.0.1:6379> set key v1   #Set key v1
OK
127.0.0.1:6379> get key    #Get key
"v1"
127.0.0.1:6379> append key hello   #Append a hello, but if the key does not exist, it is equivalent to setting the key to store data
(integer) 7
127.0.0.1:6379> strlen key   #Length of value corresponding to key
(integer) 7
127.0.0.1:6379> append key ",songqixiang"   #Add another one, songqixiang
(integer) 19
127.0.0.1:6379> get key
"v1hello,songqixiang"      #Verify the value corresponding to the key again
###############################################################
General user browsing volume: each person's browsing execution increases by 1, incr 1
127.0.0.1:6379> set views 0		#The initial number of views is 0
OK
127.0.0.1:6379> get views
"0"
127.0.0.1:6379> incr views    #The browsing volume increases by 1. If there is no key, the key will be created with 0 as the initial value and increased by 1
(integer) 1
127.0.0.1:6379> incr views
(integer) 2
127.0.0.1:6379> get views
"2"
127.0.0.1:6379> decr views    #Page views decreased by 1
(integer) 1
127.0.0.1:6379> decr views
(integer) 0
127.0.0.1:6379> INCRBY views 10   #The specified number of views increases automatically
(integer) 10
127.0.0.1:6379> DECRBY views 10   #The number of views is reduced by the specified number
(integer) 0
###############################################################
String range (get partial string) value),amount to java of substring

127.0.0.1:6379> set key1 "hello,redis"  #Set the value of key1
OK
127.0.0.1:6379> getrange key1 0 4     #Intercept string [0,4]
"hello"
127.0.0.1:6379> getrange key1 0 -1   #Getting all strings is the same as getting key
"hello,redis"

Replace string value,amount to java of replace

127.0.0.1:6379> set key abcdefg
OK
127.0.0.1:6379> get key
"abcdefg"
127.0.0.1:6379> setrange key 1 xx   #Replace the string starting from the specified position. Here, start from position 1 and replace with xx
(integer) 7
127.0.0.1:6379> get key
"axxdefg"
###############################################################
setex(set with exprie)		#Set expiration time
setnx(set if not exist)		#If no settings exist

127.0.0.1:6379> setex k3 30 "hello"  #Set a key3 value Hello, which expires after 30s!
OK
127.0.0.1:6379> ttl k3
(integer) 24

127.0.0.1:6379> setnx mykey redis     #If mykey does not exist, create mykey
(integer) 1  #Successfully created, return 1
127.0.0.1:6379> setnx mykey mongodb   #If mykey exists, the creation fails
(integer) 0	 #Creation failed, return 0
127.0.0.1:6379> get mykey
"redis"
###############################################################
Get and set values for batch
mset
mget

127.0.0.1:6379> mset k1 v1 k2 v2 k3 v3  #Set multiple < K, V >
OK
127.0.0.1:6379> keys *
1) "k2"
2) "k3"
3) "k1"
127.0.0.1:6379> mget k1 k2 k3   #Get multiple key s at a time
1) "v1"
2) "v2"
3) "v3"
127.0.0.1:6379> msetnx k1 v1 k4 v4    # msetnx is an atomic operation: either succeed or do nothing
(integer) 0  #Setting failed
127.0.0.1:6379> get key4
(nil)


#Object (advanced usage)
set user:1 {name:zhangsan,age:3}  #Set a user: 1 object (key), and save an object with the (value) value as json string

#there key It's a clever design, user:{id}:{filed}    #This design is completely ok in redis (that is, as a whole)

127.0.0.1:6379> mset user:1:name zhangsan user:1:age 20
OK
127.0.0.1:6379> mget user:1:name user:1:age
1) "zhangsan"
2) "20"

###############################################################
Combination command
getset   before get after set

127.0.0.1:6379> getset db redis   #First, get db is found to be nil, but not retrieved. Then set db to redis
(nil)
127.0.0.1:6379> get db      #Get the redis set
"redis"
127.0.0.1:6379> getset db mongodb    #First get db and find redis, then set db to mongodb
"redis"
127.0.0.1:6379> getset db mongodb   #Get the mongod set
"mongodb"
Usage scenario of String type: value is not only our String, but also our number
-
Counter!
-
Statistical quantity
List
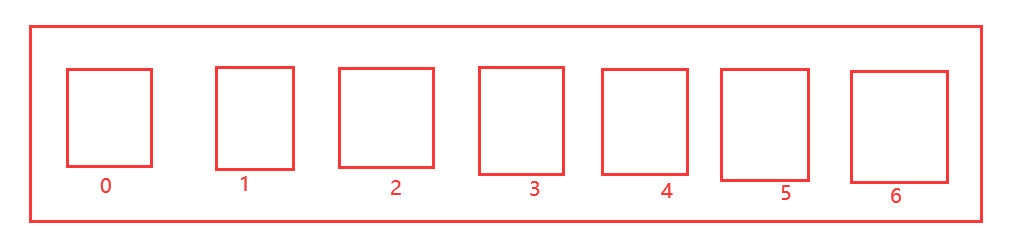
The basic data type, list, is equivalent to the list set in java. The characteristic elements are orderly and repeatable
For example, a list contains four elements. In redis, we can define rules to play the list into stack, queue and blocking queue!
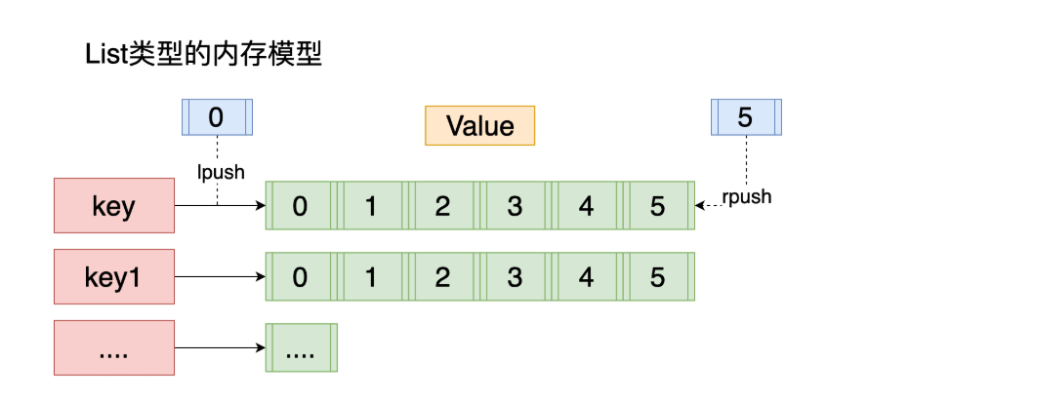
All list commands start with l!
| command | explain |
|---|---|
| lpush | Add a value to the head of a key list |
| lpushx | The same as lpush, but the key must exist |
| rpush | Add a value to the end of a key list |
| rpushx | The same as rpush, but the key must exist |
| lpop | Returns and removes the first element to the left of the list |
| rpop | Returns and removes the first element to the right of the list |
| lrange | Gets the element within a subscript interval |
| llen | Get the number of list elements |
| lset | Sets the value of a specified index (the index must exist) |
| lindex | Gets an element at a specified index position |
| lrem | Delete duplicate elements |
| ltrim | Keep elements within a specific interval in the list |
| linsert | Insert a new element before and after an element |
use
###############################################################
127.0.0.1:6379> lpush list one     #Insert one or more values into the list header (left) lpush (the first character means left)
(integer) 1
127.0.0.1:6379> lpush list two
(integer) 2
127.0.0.1:6379> lpush list three
(integer) 3
127.0.0.1:6379> lrange list 0 -1    #Read from left to right!
1) "three"
2) "two"
3) "one"
127.0.0.1:6379> lrange list 0 1
1) "three"
2) "two"
127.0.0.1:6379> rpush list four    #Insert one or more values into the list header (right) rpush (the first character means right)
(integer) 4
127.0.0.1:6379> lrange list 0 -1	#Read from left to right!
1) "three"
2) "two"
3) "one"
4) "four"

The top can list As a plane, two-way stack (two ends in)!

###############################################################

Similarly, we want to move out list Elements in are also removed in both directions
lpop(left pop)
rpop(right pop)

127.0.0.1:6379> lrange list 0 -1     #View all elements in the list
1) "three"
2) "two"
3) "one"
4) "four"
127.0.0.1:6379> lpop list       #Remove an element from the left and remove three
"three"
127.0.0.1:6379> lrange list 0 -1
1) "two"
2) "one"
3) "four"
127.0.0.1:6379> rpop list       #Remove an element from the right and move out four
"four"
127.0.0.1:6379> lrange list 0 -1
1) "two"
2) "one"

###############################################################

Up there, we pass push and pop Storage and removal have been implemented, and we can also use it index To read
lindex The element is read according to the subscript, which starts with 0 from left to right!

127.0.0.1:6379> lindex list 1   #Get a value in the list by subscript
"one"
127.0.0.1:6379> lindex list 0
"two"

###############################################################
In addition to the above, we can save, retrieve and read, and we can also get our information list Length of
Llen

127.0.0.1:6379> flushdb        #Empty database
127.0.0.1:6379> lpush list 1   #Add data to list
(integer) 1
127.0.0.1:6379> lpush list 2
(integer) 2
127.0.0.1:6379> lpush list 3
(integer) 3
127.0.0.1:6379> lrange list 0 -1   #Read the value of list
1) "3"
2) "2"
3) "1"
127.0.0.1:6379> llen list   #Get the length of the list!
(integer) 3
127.0.0.1:6379>

###############################################################
Removes the specified value
Lrem (list remove)

127.0.0.1:6379> lrem list 1 1     #Remove an element and specify element 1 (the first 1 is the number of count elements and the second 1 is element 1)
(integer) 1
127.0.0.1:6379> lrange list 0 -1  #Get all values
1) "3"
2) "3"
3) "2"
127.0.0.1:6379> lrem list 1 3    #Remove an element and specify element 3
(integer) 1
127.0.0.1:6379> lrange list 0 -1
1) "3"
2) "2"
###############################################################
ltrim Trim to keep only the elements at the specified position

127.0.0.1:6379> rpush mylist hello1
(integer) 1
127.0.0.1:6379> rpush mylist hello2
(integer) 2
127.0.0.1:6379> rpush mylist hello3
(integer) 3
127.0.0.1:6379> rpush mylist hello4   #Add 4 elements to mylist
(integer) 4
127.0.0.1:6379> lrange mylist 0 -1    #Read all elements in mylist
1) "hello1"
2) "hello2"
3) "hello3"
4) "hello4"
127.0.0.1:6379> ltrim mylist 1 2      #Prune to keep only 1 and 2 elements (intercept the specified length through subscript!, which is equivalent to pruning branches)
OK
127.0.0.1:6379> lrange mylist 0 -1
1) "hello2"
2) "hello3"
127.0.0.1:6379>
###############################################################
Combination command: rpoplpush: First remove an element from the right, and then add the element from the left to another list among!
Remove the last element from the list and move it to a new list

127.0.0.1:6379> rpush mylist hello1
(integer) 1
127.0.0.1:6379> rpush mylist hello2
(integer) 2
127.0.0.1:6379> rpush mylist hello3
(integer) 3
127.0.0.1:6379> lrange mylist 0 -1
1) "hello1"
2) "hello2"
3) "hello3"
127.0.0.1:6379> rpoplpush mylist anotherlist   #First remove an element from the right, and then add it to another list from the left
"hello3"
127.0.0.1:6379> lrange mylist 0 -1   #The rightmost element in the original list has been removed
1) "hello1"
2) "hello2"
127.0.0.1:6379> lrange anotherlist 0 -1   #The element moved out in the previous step exists in the target list
1) "hello3"

###############################################################
lset Replace the value of the specified subscript in the list with another value

127.0.0.1:6379> exists list   #Determine whether there is a list
(integer) 0
127.0.0.1:6379> lset list 0 hello   #No replacement failed
(error) ERR no such key
127.0.0.1:6379> lpush list hello1   #add value
(integer) 1
127.0.0.1:6379> lrange list 0 -1
1) "hello1"
127.0.0.1:6379> lset list 0 redis    #Modify the value with subscript, succeeded!
OK
127.0.0.1:6379> lrange list 0 -1
1) "redis"
127.0.0.1:6379> lset list 1 other    #Modify the value without subscript, modification failed!
(error) ERR index out of range

###############################################################
linsert  #Insert a specific value into the list, before or after an element!

127.0.0.1:6379> lpush list hello
(integer) 1
127.0.0.1:6379> lpush list word
(integer) 2
127.0.0.1:6379> linsert list before "word" redis
(integer) 3
127.0.0.1:6379> lrange list 0 -1
1) "redis"
2) "word"
3) "hello"
127.0.0.1:6379> linsert list after "word" after
(integer) 4
127.0.0.1:6379> lrange list 0 -1
1) "redis"
2) "word"
3) "after"
4) "hello"
Section
- In fact, it is a linked list. before, node, after, left and right can insert values!
- key does not exist, create a new linked list
- key exists, new content
- If all values are removed, the empty linked list does not exist!
- Inserting or changing values on both sides is the most efficient! The efficiency of intermediate elements will be relatively low!
It can be used as a message queue: store values on the left and take values on the right to achieve the queuing effect (lpush and rpop) | store values on the left of the stack and take values on the left (lpush and lpop)
Set (unordered set)
The value in set cannot be repeated!

| command | explain |
|---|---|
| sadd | Add elements to the collection |
| smembers | Displays all elements in the collection out of order |
| scard | Returns the number of elements in the collection |
| spop | Returns an element at random and deletes the element from the collection |
| smove | Moving elements from one collection to another must be of the same type |
| srem | Deletes an element from the collection |
| sismember | Determine whether a collection contains this element |
| srandmember | Random return element |
| sdiff | Remove the same elements contained in other sets in the first set |
| sinter | Find intersection |
| sunion | Summation set |
use
###############################################################
set Add element to collection

127.0.0.1:6379> sadd myset hello   #Add element to set set
(integer) 1
127.0.0.1:6379> sadd myset redis
(integer) 1
127.0.0.1:6379> sadd myset mongodb
(integer) 1
127.0.0.1:6379> sadd myset hello     #You can see here that duplicate elements cannot be added successfully!
(integer) 0
127.0.0.1:6379> smembers myset    #View all elements in the set collection
1) "redis"
2) "hello"
3) "mongodb"
127.0.0.1:6379> sismember myset hello   #Judge whether there is a hello element in the myset set. If it exists, it returns 1, and if it does not exist, it returns 0
(integer) 1
127.0.0.1:6379> sismember myset hello1
(integer) 0
127.0.0.1:6379>
###############################################################
obtain set Length of collection
127.0.0.1:6379> scard myset     #Gets the length of the set set
(integer) 3
###############################################################
srem Remove an element
127.0.0.1:6379> srem myset hello    #Remove the hello element from the myset collection
(integer) 1
127.0.0.1:6379> smembers myset		#Check myset, the hello element has been removed!
1) "redis"
2) "mongodb"

###############################################################
set Is an unordered non repeating set, srandmember Random! (just get elements randomly!)

127.0.0.1:6379> sadd myset lovesqx
(integer) 1
127.0.0.1:6379> smembers myset
1) "redis"
2) "lovesqx"
3) "mongodb"
127.0.0.1:6379> srandmember myset            #Select an element at random!
"mongodb"
127.0.0.1:6379> srandmember myset
"lovesqx"
127.0.0.1:6379> srandmember myset
"lovesqx"
127.0.0.1:6379> srandmember myset
"redis"
127.0.0.1:6379> srandmember myset 2			#Randomly select the specified number of elements!
1) "redis"
2) "mongodb"
127.0.0.1:6379> srandmember myset 2
1) "redis"
2) "lovesqx"
127.0.0.1:6379>

###############################################################
spop Randomly remove an element

127.0.0.1:6379> spop myset   #Randomly delete elements in a set set!
"mongodb"
127.0.0.1:6379> smembers myset
1) "redis"
2) "lovesqx"
###############################################################
Moves a specified element to another set In the collection
smove [Data source] [destination] [element]
127.0.0.1:6379> sadd myset hello
(integer) 1
127.0.0.1:6379> sadd myset redis
(integer) 1
127.0.0.1:6379> sadd myset mongodb
(integer) 1
127.0.0.1:6379> sadd myset2 songqixiang
(integer) 1
127.0.0.1:6379> smembers myset
1) "redis"
2) "hello"
3) "mongodb"
127.0.0.1:6379> smembers myset2
1) "songqixiang"
127.0.0.1:6379> smove myset myset2 hello   #Move the hello element in myset to the myset2 set!
(integer) 1
127.0.0.1:6379> smembers myset
1) "redis"
2) "mongodb"
127.0.0.1:6379> smembers myset2
1) "songqixiang"
2) "hello"
127.0.0.1:6379>         #Move succeeded!

###############################################################
Microblog b Station common concern (intersection!)
Numeric collection class:
	-Difference set: sdiff
	-Intersection: sinter
	-Union: sunion

127.0.0.1:6379> sadd key1 a    #Initialize two set sets, key1 and key2
(integer) 1
127.0.0.1:6379> sadd key1 b
(integer) 1
127.0.0.1:6379> sadd key1 c
(integer) 1
127.0.0.1:6379> sadd key2 c
(integer) 1
127.0.0.1:6379> sadd key2 d
(integer) 1
127.0.0.1:6379> sadd key2 e
(integer) 1
127.0.0.1:6379> sdiff key1 key2     #The difference between key1 and key2 is! (compared with key2, key1 is unique)
1) "a"
2) "b"
127.0.0.1:6379> sinter key1 key2    #Intersection of key1 and kkey2
1) "c"
127.0.0.1:6379> sunion key1 key2    #Union of key2 and key1
1) "b"
2) "c"
3) "a"
4) "d"
5) "e"
127.0.0.1:6379>
Microblog: put all the people concerned by user A in A set, and his fans in A set!
Common concern, common hobby, recommend friends!
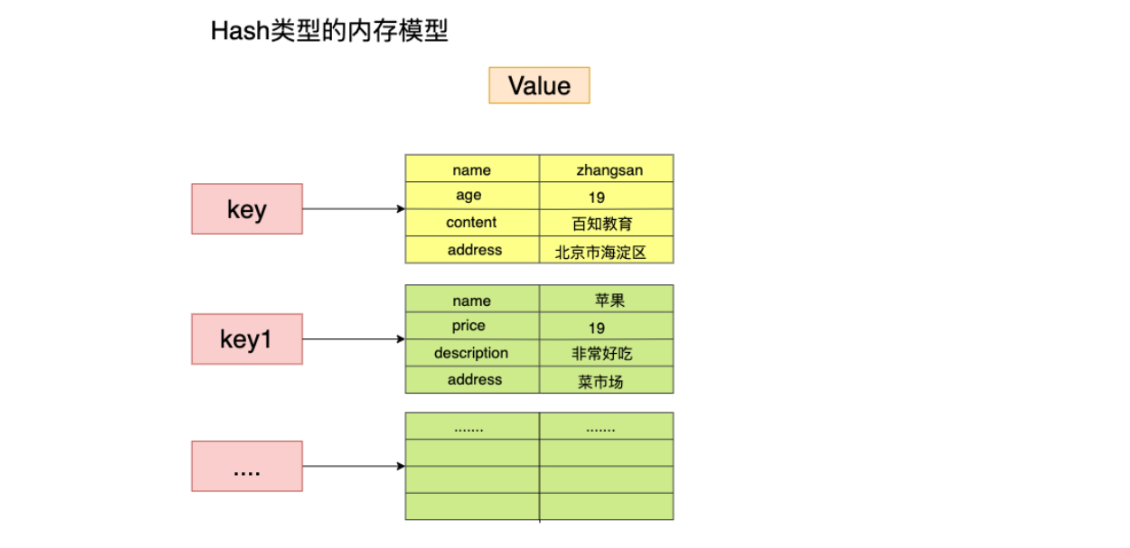
Hash (hash)
Map collection! The key value (map set) and the value corresponding to the key are a set of key value pairs (map set)
| command | explain |
|---|---|
| hset | Set a key/value pair |
| hget | Get the value corresponding to a key |
| hgetall | Get all key/value pairs |
| hdel | Delete a key/value pair |
| hexists | Determine whether a key exists |
| hkeys | Get all key s |
| hvals | Get all value s |
| hmset | Set multiple keys / values |
| hmget | Get the value of multiple key s |
| hsetnx | Set the value of a nonexistent key |
| hincrby | Add value |
| hincrbyfloat | Add floating point value to value |
use
###############################################################
Hash Essence and String The type is not much different. It is still a simple collection, just value Is a collection of key value pairs

127.0.0.1:6379> hset myhash field1 redis        #set a key value
(integer) 1
127.0.0.1:6379> hget myhash field1
"redis"													   #HMSET has been officially abandoned since redis version 4.0. It is recommended to use HSET
127.0.0.1:6379> hset myhash field2 monggodb field3 java    #Set multiple key values, hmset is obsolete (hset can set multiple)
(integer) 2
127.0.0.1:6379> hmget myhash field2 field3      #hmget get multiple key s
1) "monggodb"
2) "java"
127.0.0.1:6379> hgetall myhash					#Obtain all key values in the form of key value pairs
1) "field1"
2) "redis"
3) "field2"
4) "monggodb"
5) "field3"
6) "java"
127.0.0.1:6379> hdel myhash field1           #Delete the key field in the specified hash, and the value value of the sample also disappears
(integer) 1
127.0.0.1:6379> hgetall myhash
1) "field2"
2) "monggodb"
3) "field3"
4) "java"
###############################################################
hlen obtain hash Length of
127.0.0.1:6379> hlen myhash    #Get the length of myhash
(integer) 3
127.0.0.1:6379> hgetall myhash
1) "field2"
2) "monggodb"
3) "field3"
4) "java"
5) "field"
6) "redis"
###############################################################
hexists judge hash Whether the specified field exists in
127.0.0.1:6379> hexists myhash field2    #Judge whether the specified field exists in myhash. If it exists, return 1 and if not, return 0
(integer) 1
127.0.0.1:6379> hexists myhash field3
(integer) 1
###############################################################
#Only get all the key s in the hash
#Only get all value s in the hash
127.0.0.1:6379> hkeys myhash   #Get all key s in myhash
1) "field2"
2) "field3"
3) "field"
127.0.0.1:6379> hvals myhash   #Get all large value s in myhash
1) "monggodb"
2) "java"
3) "redis"

###############################################################
Self increasing and self decreasing: incr(increment) , decr(decrement)

127.0.0.1:6379> hincrby myhash field4 1    #The value corresponding to the specified key in the hash increases the specified value (the increment is negative, equivalent to minus)
(integer) 2
127.0.0.1:6379> hgetall myhash
1) "field2"
2) "monggodb"
3) "field3"
4) "java"
5) "field"
6) "redis"
7) "field4"
8) "2"
127.0.0.1:6379> hsetnx myhash field5 zhangsan     #If the field5 attribute does not exist, create and assign a value
(integer) 1
127.0.0.1:6379> hsetnx myhash field5 zhangsan2    #If it exists, it will fail!
(integer) 0
hash some changed data, such as user, age, name, especially frequently changed information and user information!
- [hash is more suitable for object storage!] for example: hset user: 1 name zhangsan age 20
- [String is suitable for String storage!] for example: set username zhangsan
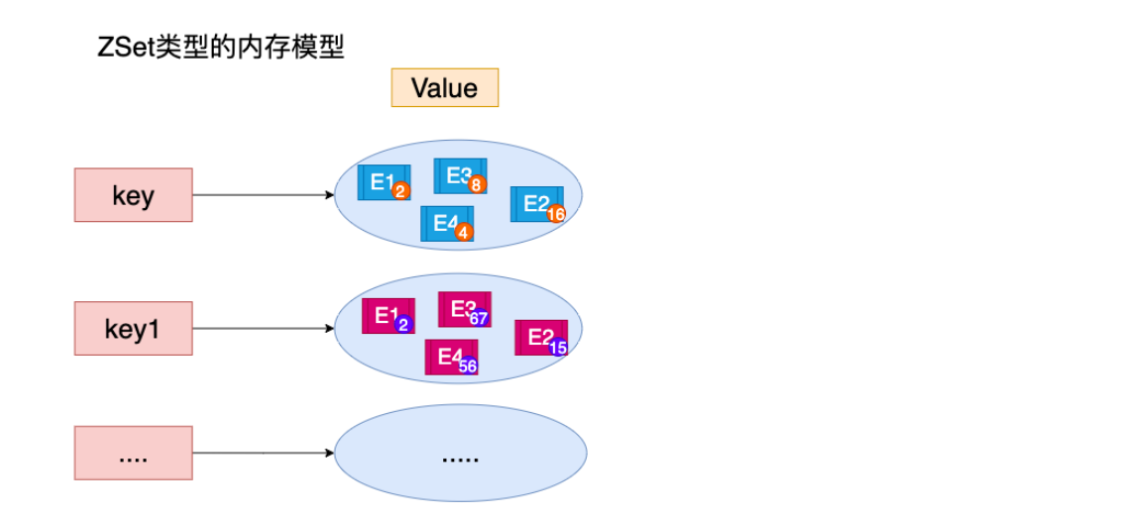
Zset (ordered set)
On the basis of set, a value is added! Difference: set k1 v1 | zset k1 score1 v1
| command | explain |
|---|---|
| zadd | Add an ordered collection element |
| zcard | Returns the number of elements in the collection |
| zrange ascending zrevrange descending | Returns a range of elements |
| zrangebyscore | Find elements in a range by score |
| zrank | Return ranking |
| zrevrank | Reverse ranking |
| zscore | Displays the score of an element |
| zrem | Remove an element |
| zincrby | Add points to a specific element |
use
###############################################################
Add a|Multiple values!
127.0.0.1:6379> zadd myset 1 one    #Where 1 means to sort the added elements
(integer) 1
127.0.0.1:6379> zadd myset 2 two 3 three
(integer) 2
127.0.0.1:6379> zrange myset 0 -1
1) "one"
2) "two"
3) "three"
127.0.0.1:6379>
###############################################################
Implementation of sorting
 Command:
   -Ascending order:[ zrangebyscore key min max]min < max
   -Descending order:[ zrevrangebyscore key max min]max > min

127.0.0.1:6379> zadd salary 2500 xiaohong     #The first is to add three users
(integer) 1
127.0.0.1:6379> zadd salary 3000 zhangsan
(integer) 1
127.0.0.1:6379> zadd salary 500 lisi
(integer) 1
127.0.0.1:6379> zrangebyscore salary -inf +inf     #Sort salary according to grades, ascending from [- ∞, + ∞]
1) "lisi"
2) "xiaohong"
3) "zhangsan"
127.0.0.1:6379> zrangebyscore salary -inf +inf withscores #Sort salary according to grades, ascending from [- ∞, + ∞] to bring the information of grades!
1) "lisi"
2) "500"
3) "xiaohong"
4) "2500"
5) "zhangsan"
6) "3000"
127.0.0.1:6379> zrangebyscore salary -inf 2500 withscores   #Sort salary according to grades, ascending from [- ∞, 2500]
1) "lisi"
2) "500"
3) "xiaohong"
4) "2500"
###############################################################
Removing Elements  zrem

127.0.0.1:6379> zrange salary 0 -1
1) "lisi"
2) "xiaohong"
3) "zhangsan"
127.0.0.1:6379> zrem salary xiaohong
(integer) 1
127.0.0.1:6379> zrange salary 0 -1
1) "lisi"
2) "zhangsan"
127.0.0.1:6379>

Gets the number of elements in the collection zcard
127.0.0.1:6379> zcard salary
(integer) 2

###############################################################
zount Count the number of elements in a range

127.0.0.1:6379> zadd myset 1 hello   #Add three elements to the ordered set myset
(integer) 1
127.0.0.1:6379> zadd myset 2 word
(integer) 1
127.0.0.1:6379> zadd myset 3 redis
(integer) 1
127.0.0.1:6379> zcount myset 1 3    #Count the number of elements of score in the range of 1-3, and the return value is the number of members!
(integer) 3
127.0.0.1:6379> zcount myset 1 2
(integer) 2
For other APIs, we need to check the official documents in the rest of the work through our study!
Case idea: store class grade table, salary table sorting, ranking list implementation, weighted message judgment: give weight to messages by level!
Subsection:
As for data type, the data type (data structure) of key is determined by adding value. For example, if set k1 v1 is String type, and Hset k1 key value key2 value2, k1 is Hash type. We can determine the type of key, and then perform data operations based on this type!
Three special data types
geospatial geographic location
Application: friend positioning, nearby people, taxi distance calculation!
This Geo location function was launched in version 3.2 of Redis. This function can calculate the geographic location information, the distance between the two places and the people within a few miles!
Online query of urban longitude and latitude: http://www.jsons.cn/lngcode/
Official documents on geospatial geographic location: http://www.redis.cn/commands/geoadd.html
Geo related commands: there is a problem with the translation of Chinese documents!
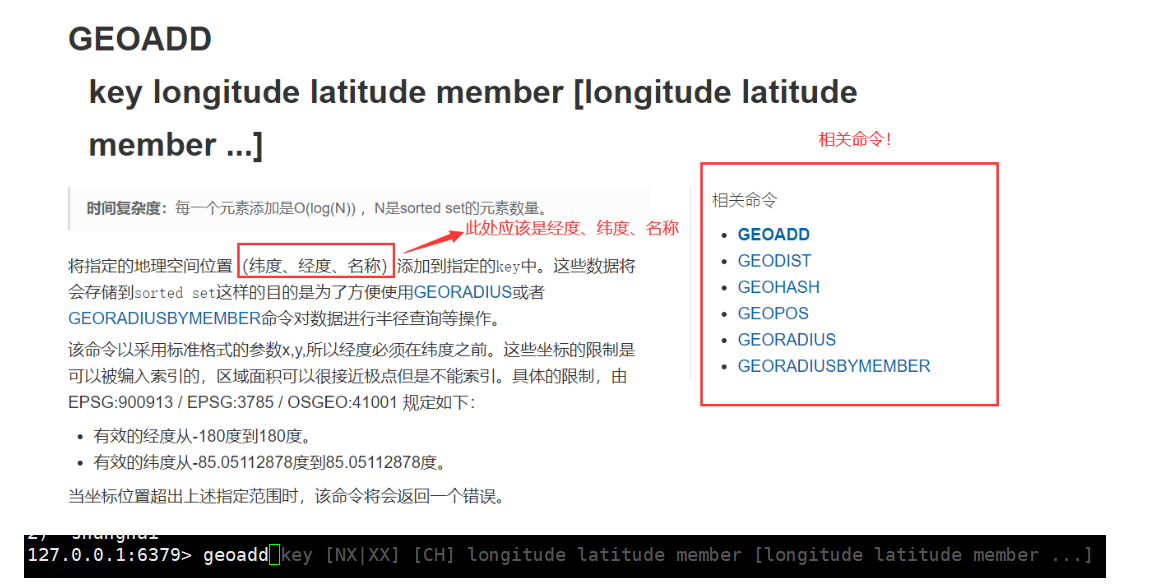

When you use this command, you can see that the redis prompts are, longitude, latitude and name!
geoadd
#geoadd add geographic location
 Rule: the earth's poles (South Pole and North Pole) cannot be added! We usually download city data and use it java Idioms are imported at one time!
parameter key Value (longitude, latitude, name)   *The translation of the Chinese document here is wrong!

-Effective longitude from-180 Degrees to 180 degrees.
-Effective latitude from-85.05112878 Degrees to 85.05112878 Degrees.
When the coordinate position exceeds the above specified range, the command will return an error.

127.0.0.1:6379> geoadd china:city 116.40 39.90 beijing
(integer) 1
127.0.0.1:6379> geoadd china:city 121.47 31.23 shanghai
(integer) 1
127.0.0.1:6379> geoadd china:city 106.50 29.53 chongqing
(integer) 1
127.0.0.1:6379> geoadd china:city 114.05 22.52 shenzhen
(integer) 1
127.0.0.1:6379> geoadd china:city 120.16 30.24 hangzhou
(integer) 1
127.0.0.1:6379> geoadd china:city 108.96 34.26 xian
(integer) 1
127.0.0.1:6379>
geopos
Get the current positioning: it must be a coordinate value!
#geopos gets the longitude and latitude of an address
127.0.0.1:6379> geopos china:city beijing    #Gets the coordinates of the specified city
1) 1) "116.39999896287918091"
   2) "39.90000009167092543"
127.0.0.1:6379> geopos china:city chongqing shenzhen   #Obtain the coordinates of 2 cities at a time
1) 1) "106.49999767541885376"
   2) "29.52999957900659211"
2) 1) "114.04999762773513794"
   2) "22.5200000879503861"
127.0.0.1:6379>
geodist
Get the straight-line distance between the two places!
The unit is as follows:
- m is expressed in meters.
- km is expressed in kilometers.
- mi is in miles.
- ft is in feet.
#Straight distance from Beijing to Shanghai
127.0.0.1:6379> geodist china:city beijing shanghai    #View the straight-line distance from Shanghai to Beijing
"1067378.7564"
127.0.0.1:6379> geodist china:city beijing shanghai km   #View the straight-line distance from Shanghai to Beijing and convert it to km!
"1067.3788"
127.0.0.1:6379> geodist china:city beijing chongqing km   #View the distance from Chongqing to Beijing
"1464.0708"
georadius takes the given latitude and longitude as the center to find out the elements within a certain radius!
Nearby people (get the address and location of all people!) query through the radius
Get the specified number of people!
All cities should be entered in china:city!
127.0.0.1:6379> georadius china:city 110 30 1000 km   #Take the longitude and latitude of 100 and 30 as the center to find cities within 1000km
1) "chongqing"
2) "xian"
3) "shenzhen"
4) "hangzhou"
127.0.0.1:6379> georadius china:city 110 30 500 km
1) "chongqing"
2) "xian"
127.0.0.1:6379> georadius china:city 110 30 500 km withdist  #Displays the distance to the center (distance from nearby people to you)
1) 1) "chongqing"
   2) "341.9374"
2) 1) "xian"
   2) "483.8340"
127.0.0.1:6379> georadius china:city 110 30 500 km withdist withcoord   #Displays the longitude and latitude of the city
1) 1) "chongqing"
   2) "341.9374"
   3) 1) "106.49999767541885376"
      2) "29.52999957900659211"
2) 1) "xian"
   2) "483.8340"
   3) 1) "108.96000176668167114"
      2) "34.25999964418929977"
127.0.0.1:6379> georadius china:city 110 30 500 km withdist withcoord count 1   #Filter out the specified results!
1) 1) "chongqing"
   2) "341.9374"
   3) 1) "106.49999767541885376"
      2) "29.52999957900659211"
127.0.0.1:6379> georadius china:city 110 30 500 km withdist withcoord count 2
1) 1) "chongqing"
   2) "341.9374"
   3) 1) "106.49999767541885376"
      2) "29.52999957900659211"
2) 1) "xian"
   2) "483.8340"
   3) 1) "108.96000176668167114"
      2) "34.25999964418929977"
127.0.0.1:6379>
georadiusbymember
#Find other elements around the specified element! (find the surrounding elements centered on the members in china:city)

127.0.0.1:6379> georadiusbymember china:city beijing 1000 km  #A city 1000km away from Beijing!
1) "beijing"
2) "xian"
127.0.0.1:6379> georadiusbymember china:city shanghai 400 km   #A city 400km away from Shanghai!
1) "hangzhou"
2) "shanghai"
127.0.0.1:6379>
geohash
Description: it is to convert two-dimensional longitude and latitude into one latitude string!
The bottom layer is Zset, so we can use the Zset command to operate geo and delete data, and we can use Zrem
Hyperloglog processing cardinality
What is cardinality?
A {1,3,5,7,8,7} base: 5
B {1,3,5,7,8} base: 5
The concept of cardinality: the number of non repeating elements!
- For example, the cardinality of 1 2 3 4 2 3 4 is 4, because only 1 2 3 4 and 2 3 4 are repeated (there are only 4 cardinalities)
brief introduction
Redis2. The Hyperloglog data structure has been updated in version 8.9!
Redis Hyperloglog cardinality statistics algorithm!
- Advantages: the memory occupied is very small and fixed! 2 ^ 64 elements only occupy 12kb memory! If memory is considered, Hyperloglog is preferred
- Disadvantages: there is an error rate of 0.81%, but it is still within the acceptable range!
Website UV (a person visits a website many times, but still only counts as one person!)
- In the traditional way, set saves the user's id, and then counts the number of set elements as the standard judgment! For example: user: 1, user: 2 after visiting a website, the two IDs are saved in the set set. At this time, the data in the set set is {1, 2}, and then user: 1 accesses again, the id:1 is saved in the set set. At this time, the data in the set set is {1, 2, 1}. At this time, the statistical id will be meaningless because the id is repeated, and what we need is not to save the user's id, but the number at the same time!
- We store the user id in the hyperlog with PFadd, and then use PFcount to count the cardinality number!
Test use!
Hyperloglog Your orders are usually pf Card head

127.0.0.1:6379> pfadd mykey1 a b c d e f g h i j    #Create the first set of elements
(integer) 1
127.0.0.1:6379> pfadd mykey2 i j z x c v b n m         #Create a second set of elements
(integer) 1
127.0.0.1:6379> pfcount mykey1                     #Count the cardinality number of elements in mykey1
(integer) 10
127.0.0.1:6379> pfcount mykey2						#Count the cardinality number of elements in mykey2
(integer) 9
127.0.0.1:6379> pfmerge mykey3 mykey1 mykey2        #Merge mykey1 and mykey2 to generate mykey3 (Union)
OK
127.0.0.1:6379> pfcount mykey3                      #Count the cardinality number of elements in mykey3
(integer) 15
127.0.0.1:6379>
If fault tolerance is allowed, we can certainly use our Hyperloglog! Otherwise, we can only use set or our own data type!
Bitmaps bitmap
Bit storage
Statistics user information, active, inactive! Logged in, not logged in! Punch in, 365 punch in! Bitmaps can be used in both States!
Bitmaps, bitmap, data structure! Are operating binary bits to record, there are only two states: 0 and 1!
365 days = 365bit, 1 byte = 8bit, about 46 bytes!
For example, the 7-day check-in status is counted as follows: if check-in is set to 1 on a certain day, if check-in is not set to 0 on a certain day
#Use bitmap to record our clocking in a week!
Monday 0 Tuesday 0 Wednesday 1...
127.0.0.1:6379> setbit sign 0 0      #Indicates absence on the first day
(integer) 0
127.0.0.1:6379> setbit sign 1 0		 #Sign in the next day
(integer) 0
127.0.0.1:6379> setbit sign 2 1      #Indicates check-in on the third day
(integer) 0
127.0.0.1:6379> setbit sign 3 1
(integer) 0
127.0.0.1:6379> setbit sign 4 1
(integer) 0
127.0.0.1:6379> setbit sign 5 1
(integer) 0
127.0.0.1:6379> setbit sign 6 0
(integer) 0
127.0.0.1:6379>
Check whether to clock in a day
127.0.0.1:6379> getbit sign 3
(integer) 1
127.0.0.1:6379>
Count our punch in days
127.0.0.1:6379> bitcount sign    #Count the number of 1
(integer) 4
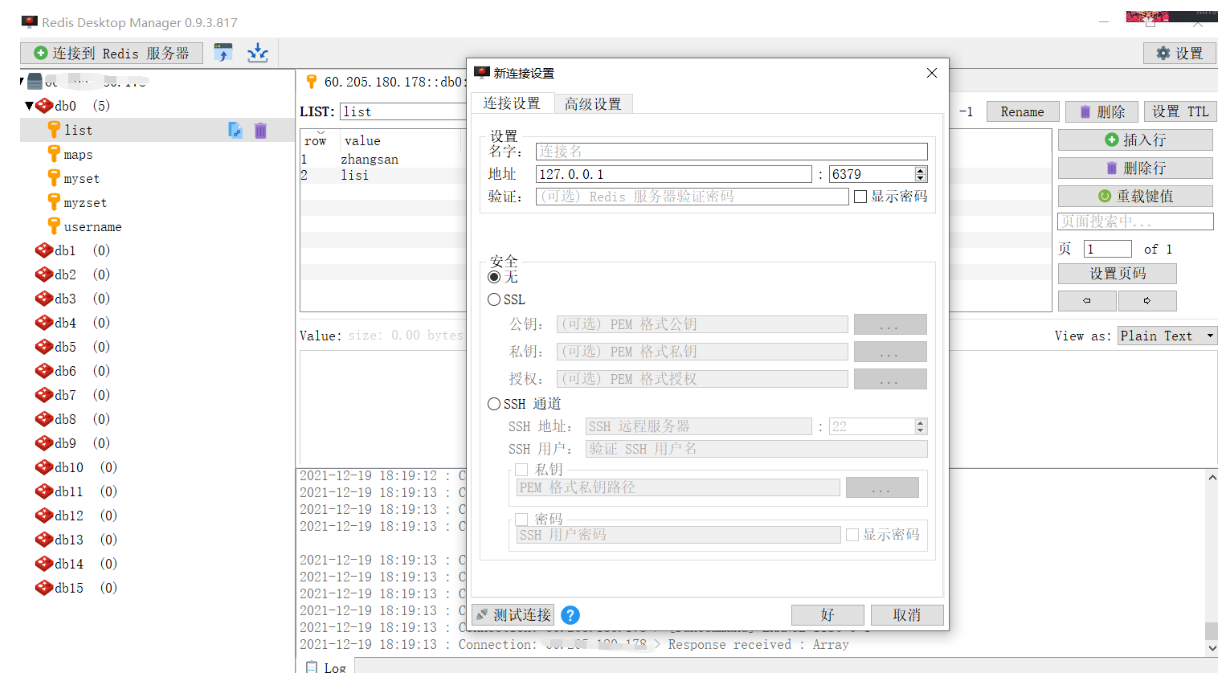
Redis visualization tool
We also have Navicate like software in Redis, as follows
affair
Overview of transactions
Essence of Redis transaction: a collection of commands! All commands in a transaction will be serialized and executed in sequence during transaction execution!
One time, sequential and exclusive
--------queue set set set implement------
Differences between Redis and MySQL:
- MySQL transactions meet acid (atomicity, consistency, isolation and persistence)
- The atomicity of MySQL is reflected in a group of transactions. Commands in a group of transactions must succeed or fail at the same time!
- Redis does not have the concept of isolation level
- Redis single command keeps atomicity, but transactions do not guarantee atomicity!
- Redis transactions meet the requirements of one-time (one group of commands are executed at a time), sequential (sequential execution), and exclusive (interference is not allowed)
Redis transaction execution
- Open transaction (multi)
- Command queue (...)
- Execute transaction (exec)
All commands are not executed directly in a transaction. They are executed only when the execution command is initiated!
Execute transactions normally!
127.0.0.1:6379> multi           #Open transaction
OK
127.0.0.1:6379(TX)> set k1 v1		#From then on, order to join the team, first
QUEUED
127.0.0.1:6379(TX)> set k2 v2
QUEUED
127.0.0.1:6379(TX)> get k1
QUEUED
127.0.0.1:6379(TX)> keys *
QUEUED
127.0.0.1:6379(TX)> exec 		 #Execute transactions, starting from the first one
1) OK
2) OK
3) "v1"
4) 1) "k2"
   2) "k1"                    #After the transaction is completed, the transaction disappears!
127.0.0.1:6379>
Cancel transaction discard
127.0.0.1:6379> multi             #Start a transaction
OK
127.0.0.1:6379(TX)> set k1 v1		#Order to join the team
QUEUED
127.0.0.1:6379(TX)> set k2 v2
QUEUED
127.0.0.1:6379(TX)> get k2
QUEUED
127.0.0.1:6379(TX)> discard			#Abandon transaction
OK
127.0.0.1:6379> exec			#Execute transaction
(error) ERR EXEC without MULTI   #Transaction is not open at present!
Transaction error
Syntax error (compile time exception), all commands will not be executed
127.0.0.1:6379> multi 		 #Start a transaction
OK
127.0.0.1:6379(TX)> set k1 v1		#Order to join the team
QUEUED
127.0.0.1:6379(TX)> set k2 v2
QUEUED
127.0.0.1:6379(TX)> set k3 			#Execute command with syntax error
(error) ERR wrong number of arguments for 'set' command  #Prompt syntax error
127.0.0.1:6379(TX)> get k2
QUEUED
127.0.0.1:6379(TX)> exec  #Transaction execution
(error) EXECABORT Transaction discarded because of previous errors.#Transaction execution failed
127.0.0.1:6379> get k1   #All commands will not be executed due to syntax errors!
(nil)
127.0.0.1:6379>
Code logic error (runtime exception). Other commands can be executed normally, so the atomicity of transactions is not guaranteed
127.0.0.1:6379> set k1 hello     #Initialize k1 to a string
OK
127.0.0.1:6379> get k1
"hello"
127.0.0.1:6379> multi
OK
127.0.0.1:6379(TX)> set k2 v2
QUEUED
127.0.0.1:6379(TX)> set k3 v3
QUEUED
127.0.0.1:6379(TX)> incr k1  #There is a logic error here. The value corresponding to k1 is a string and cannot be self incremented
QUEUED
127.0.0.1:6379(TX)> get k2
QUEUED
127.0.0.1:6379(TX)> exec
1) OK
2) OK
3) (error) ERR value is not an integer or out of range    #Error reporting during operation
4) "v2"
127.0.0.1:6379>

#Although an error is reported in one of the commands, the subsequent instructions are still executed normally and successfully
#Therefore, a single Redis instruction guarantees atomicity, but Redis transactions cannot guarantee atomicity.
monitor
Pessimistic lock:
- Very pessimistic. I think there will be problems at any time. No matter what I do, I will lock it
Optimistic lock:
- I'm optimistic that there will be no problem at any time, so I won't lock it! When updating the data, judge whether anyone has modified the data during this period
- Get version
- Compare version when updating
Using the watch key to monitor the specified data is equivalent to optimistic locking.
Normal execution
127.0.0.1:6379> set money 100	# Set balance: 100
OK
127.0.0.1:6379> set use 0		# Expenditure usage: 0
OK
127.0.0.1:6379> watch money		#Monitor money. If the value in the transaction execution process is modified, the transaction execution fails
OK
127.0.0.1:6379> multi
OK
127.0.0.1:6379(TX)> decrby money 20
QUEUED
127.0.0.1:6379(TX)> incrby use 20
QUEUED
127.0.0.1:6379(TX)> exec  # The monitoring value has not been modified midway, and the transaction is executed normally
1) (integer) 80
2) (integer) 20
Test multithreading to modify the value. Use watch as an optimistic lock operation of redis (equivalent to getversion)
We start another client to simulate queue jumping thread.
Thread 1:
127.0.0.1:6379> watch money # money lock
OK
127.0.0.1:6379> multi
OK
127.0.0.1:6379> DECRBY money 20
QUEUED
127.0.0.1:6379> INCRBY use 20
QUEUED
127.0.0.1:6379>     # The transaction is not executed at this time
Simulate thread queue jumping, thread 2: (start a client in xshell and execute it first)
127.0.0.1:6379> INCRBY money 500 # Modified money monitored in thread 1
(integer) 600
Return to thread 1 and execute the transaction
127.0.0.1:6379> EXEC # Before execution, another thread modifies our value, which will lead to transaction execution failure
(nil) # If there is no result, the transaction execution fails
127.0.0.1:6379> get money # Thread 2 modification takes effect
"600"
127.0.0.1:6379> get use # Thread 1 transaction execution failed. The value has not been modified
"0"
Unlock to get the latest value, and then lock for transaction.
Unlock with unwatch.
Note: the lock will be automatically released every time exec is submitted, regardless of whether it is successful or not
Jedis
Use java to operate redis. Jedis is the redis client connecting remote Linux with Java recommended by redis officials.
Java operates Redis middleware!
Redis remote configuration
Specific operation steps:
-
Configure the security group in alicloud and open port 6379
-
Firewall release 6379
Port to query release:
firewall-cmd --zone=public --list-ports

New release port (e.g. 8080):
firewall-cmd --zone=public --add-port=8080/tcp --permanent

Remember to refresh:
firewall-cmd --reload
Next, modify redis.com through Vim Some configurations in conf!
-
daemonize yes
-
protected-mode no
- Comment bind 127.0 zero point one
-
bind 0.0.0.0 all ip addresses can be connected, which leads to security problems. Let's set a password!
-
requirepass xxxx configure redis password
After the above configuration is completed, we restart redis server
Then perform the operation shown in the figure below. After ping, return to pong. The connection is successful!

Done!
Java connection to remote redis
The next step is to use jedis to connect to remote redis and realize java operation redis!
1. Create an empty Maven project (Note: JDK needs to be configured for project, moudle and javacomplie)
2. Add Moudle!
3. Import corresponding dependencies
        <!--introduce jedis rely on-->
        <dependency>
            <groupId>redis.clients</groupId>
            <artifactId>jedis</artifactId>
            <version>3.3.0</version>
        </dependency>
4. Coding test
- Connect to database
- Operation command
- Disconnect
Do a test to determine whether the connection is successful!
public class TestJedis {
    public static void main(String[] args) {
        Jedis jedis = new Jedis("60.205.180.178",6379);   //Connect to server redis
        jedis.auth("123456") ;   //Server redis password
        jedis.select(0) ;  //Select database No. 0. If it is not selected, it is 0 by default;

        //Get the information of all key s in redis
        Set<String> keys = jedis.keys("*");
        keys.forEach(key -> System.out.println("key="+key));

        jedis.close(); // Close connection after use
    }
}
Output:

Remote connection succeeded!
If you want to connect to the local windows, the method is as follows, just modify jedis!
Jedis jedis = new Jedis("127.0.0.1",6379);
Common API s
Is to change our previous commands into methods in jedis!
- Rediskey
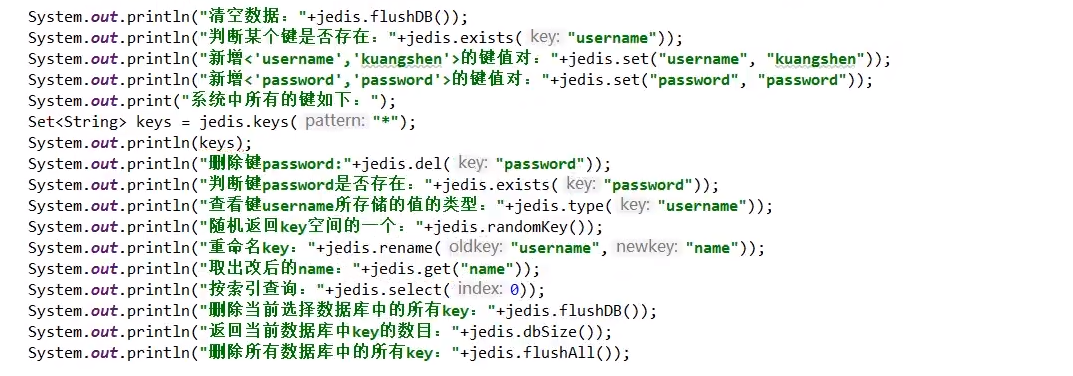
The use methods of String, Set, List, Hash and Zset are the same as above!
Use Jedis for a test!
package com.sqx;

import org.junit.After;
import org.junit.Before;
import org.junit.Test;
import redis.clients.jedis.Jedis;

import java.util.List;

@SuppressWarnings("all")
public class TestString {
    private Jedis jedis ;

    @Before
    public void before(){
        jedis = new Jedis("60.205.180.178",6379);
        jedis.auth("123456") ;
    }

    @After
    public void after(){
        jedis.close();
    }

    /**
     *  Test String
     */
    @Test
    public void testString(){
        //set
        jedis.set("name","zhangsan") ;
        //get
        jedis.get("name") ;
        //mset
        jedis.mset("age","20","address","kfc") ;
        //mget
        List<String> mget = jedis.mget("age", "address");
        mget.forEach(key -> System.out.println(key));
        //getset
        String set = jedis.getSet("name", "qxsong");
        System.out.println(set);
    }
}
Spring boot integrates Redis
Spring Boot operation data: Spring data, jpa, jdbc, mongodb, redis, etc!
SpringData is also as famous as SpringBoot!
Description: in springboot 2 After X, the originally used jedis is replaced by the lettuce phonetic: [let ɪ s]?
- Jedis: direct connection and multiple thread operation are unsafe. If you want to avoid unsafe, use jedis pool connection pool! More like BIO mode
- lettuce: with netty, instances can be shared among multiple threads. There is no thread insecurity! Thread data can be reduced, more like NIO mode
1. Related issues
Problem: we found that when our Jedis, that is, Java operates Redis, no matter what basic data type is operated, the stored string is by default. Therefore, if we want to put some complex objects in Redis through Java, we need to serialize them before putting them. For this reason, our SpringBoot provides the following solutions:
jedis.set("name","zhangsan") ;     "name" : "zhangsan"
jedis.lpush("mylists","Xiao Ming","Zhang San","Li Si","Wang Wu") ;  "mylists" : ["Xiao Ming","Zhang San","Li Si","Wang Wu"]
Spring boot data Redis provides = = RedisTemplate = = and * * StringRedisTemplate * *, where StringRedisTemplate is a subclass of RedisTemplate. The two methods are basically the same. The difference is mainly reflected in the different data types of operations. Both generic types in RedisTemplate are objects, which means that the stored key and value can be one Object, The two generics of StringRedisTemplate are String, which means that the key and value of StringRedisTemplate can only be strings.
- StringRedisTemplate : set "name" " zhangsan" ;
- RedisTemplate : set new Object() new Object() ; It will be serialized automatically when stored in Redis and deserialized automatically when taken out from Redis
Note: objects are serialized into Redis by default when RedisTemplate is used, so the placed objects must implement the object serialization interface
//Object implements the serialization interface!
public class Student implements Serializable {

}
Why can strings not be serialized?
A: our String class implements the serializable interface by default, and our StringRedisTemplate will automatically serialize strings. The default serialization strategy is StringRedisSerializer(). The advantage of this serialization strategy is that after String serialization, it seems to be unchanged!
- String class:

- StringRedisTemplate class:
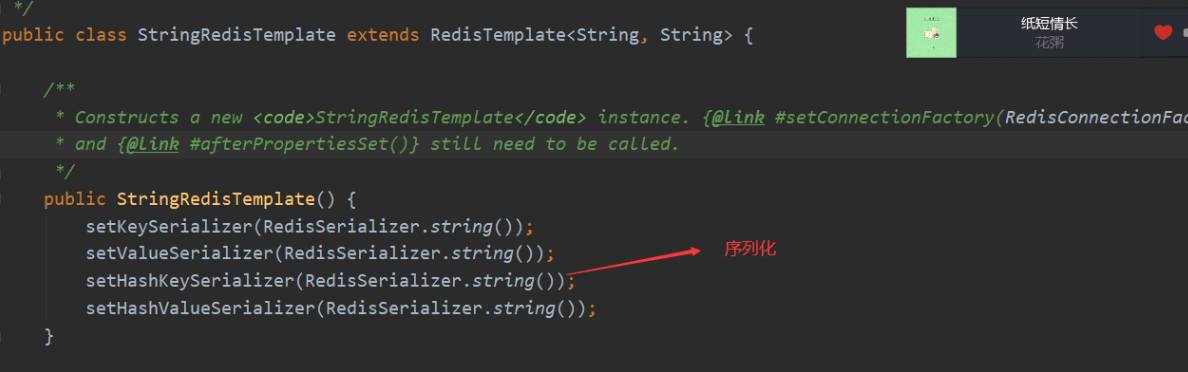
Why does Redis need serialization?
redis needs to serialize the object = = so that the object can be stored across platforms and transmitted over the network. Because both storage and network transmission need to save an object state into a byte format recognized by cross platform = =, and then other platforms can restore the object information through byte information analysis, the data for "cross platform storage" and "network transmission" need to be serialized.
What are Redis's serialization strategies?

Why does RedisTemplate adopt the JDK's own serialization strategy by default? (this strategy can save objects)
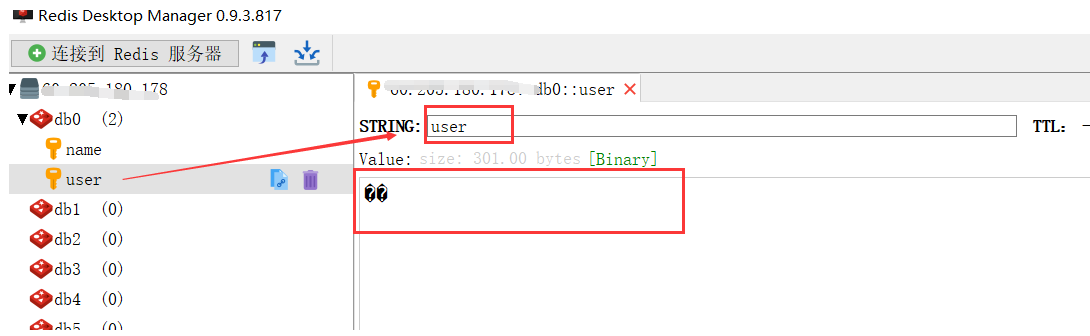
However, we found that when we operate through RedisTemplate, our key is generally not an object but a string, and the key obtained through jdk serialization strategy looks like the following

In this way, we cannot obtain value through key on the terminal. We can only obtain value through the following operations in Java
   User user = new User();
   user.setId(UUID.randomUUID().toString()).setName("Matsuzaki Township").setAge(21).setBirth(new Date()) ;
   //key and value are serialized and saved in Redis
   redisTemplate.opsForValue().set("user",user);
   //First serialize the key, then take out the serialized value through the serialized key, and then deserialize the value and return it to our User object
   Object user1 = redisTemplate.opsForValue().get("user");
Of course not, so we need to modify the key serialization policy in our RedisTemplate and the internal key policy when operating hash! The operation is as follows:
//Modify the serialization strategy of the key to the String strategy, so that the String key is still a String after serialization
  redisTemplate.setKeySerializer(new StringRedisSerializer());
//Modify the serialization policy of key in hash
  redisTemplate.setHashKeySerializer(new StringRedisSerializer());
After the strategy is modified, we can check it again and get the following results:
Only our Vlaue has been serialized. We can view our Key through the terminal!

2. Source code analysis
When learning Springboot, we learned the principle of automatic assembly. Let's analyze the whole process of Redis in detail!
Spring. Boot is loaded by default when the Springboot project starts For the factories file, only after we import the redis initiator and judge through the @ conditional annotation, our corresponding RedisAutoConfiguration takes effect, as follows:
RedisAutoConfiguration: Redis autoconfiguration class
@Bean
@ConditionalOnMissingBean(name = "redisTemplate")
// We can define a redisTemplate to replace the default one!
public RedisTemplate<Object, Object> redisTemplate(RedisConnectionFactory redisConnectionFactory) throws UnknownHostException {
// The default RedisTemplate does not have too many settings, and redis objects need to be serialized!
// Both generic types are object types. We need to cast < string, Object > later
    RedisTemplate<Object, Object> template = new RedisTemplate<>();
    template.setConnectionFactory(redisConnectionFactory);
    return template;
}
@Bean
@ConditionalOnMissingBean // Since String is the most commonly used type in redis, a bean is proposed separately!
public StringRedisTemplate stringRedisTemplate(RedisConnectionFactory redisConnectionFactory) throws UnknownHostException {
    StringRedisTemplate template = new StringRedisTemplate();
    template.setConnectionFactory(redisConnectionFactory);
    return template;
}
We can see that this is a javaconfig configuration class, in which two bean s, RedisTemplate and StringRedisTemplate, will be injected into the IOC container for future use!
At the same time, we know that the properties and methods of each automatic configuration class are in a configuration file, this time RedisProperties! We can click in to see the properties and methods that we can change through configuration in the configuration file!
RedisTemplate: a RedisConnectionFactory needs to be passed. We click the source code of the factory and find that it is an interface and there are two implementation classes
One is about Jedis and the other is about lettuce. They have the same function. We have introduced in detail (the method of encapsulating java operation redis) on jeds!

We click the two implementation classes respectively
- JedisConnectionFactory: red, indicating that the corresponding package is missing!
- Lettueconnectionfactory: perfect use, everything is normal,
We can conclude that lattice is the default RedisTemplate used by us now, and the class of java operating Redis!
At this point, we can draw a conclusion: the essence of our RedisTemplate's ability to operate Redis is the Jedis or lettue we passed in, which is just equivalent to another layer of shell!
Finally, we return to RedisTemplate and find the following annotations on this class:
@ConditionalOnMissingBean(name = {"redisTemplate"}) //If there is a redistemplate in the ioc, the redistemplate will be invalid!
When we see this annotation, we should think that this is another opportunity for us to customize. We can configure a redistemplate to replace the original redistemplate, which makes our development more convenient!
The above is a simple source code analysis of Redis!
3. Integration test
1. Configure environment preparation
1. Import dependency
  <!--Redis-->
        <dependency>
            <groupId>org.springframework.boot</groupId>
            <artifactId>spring-boot-starter-data-redis</artifactId>
        </dependency>
2. Configure connections
#Redis configuration
spring.redis.host=60.205.180.178
spring.redis.port=6379
spring.redis.password=123456
spring.redis.database=0
2. Test StringRedisTemplate
package com.sqx;

import org.junit.jupiter.api.Test;
import org.springframework.beans.factory.annotation.Autowired;
import org.springframework.boot.test.context.SpringBootTest;
import org.springframework.data.redis.core.StringRedisTemplate;

import java.util.*;
import java.util.concurrent.TimeUnit;

@SpringBootTest(classes = SpringbootRedisApplication.class)   //Start the SpringBoot application
public class TestStringRedisTemplate {
    @Autowired
    private StringRedisTemplate stringRedisTemplate;

    /***
     *  Operating key s in Redis
     */
    @Test
    public void testKey() {
        stringRedisTemplate.delete("name"); // Delete a key
        Boolean name = stringRedisTemplate.hasKey("name");  //Determine whether the key exists
        stringRedisTemplate.type("name"); //Determine the type of the value corresponding to the key
        stringRedisTemplate.rename("name", "newname"); //Rename
        stringRedisTemplate.expire("name", 30, TimeUnit.MILLISECONDS);  //Set expiration time
        Long expire = stringRedisTemplate.getExpire("name"); //Remaining time of returned key: - 1 never timeout, - 2 key does not exist > = 0 expiration time

    }

    /***
     * Operate the string in Redis!
     */
    @Test
    public void testString() {
        stringRedisTemplate.opsForValue().set("name", "Xiao Chen");
        String name = stringRedisTemplate.opsForValue().get("name");
        System.out.println(name);
        //Set the expiration time for KV and save it in Redis
        stringRedisTemplate.opsForValue().set("code","123456",120,TimeUnit.SECONDS);
    }

    /***
     *  Action List type
     */
    @Test
    public void testList(){
        stringRedisTemplate.opsForList().leftPush("names","Zhang San") ;
        stringRedisTemplate.opsForList().leftPushAll("names","Zhang Si","Zhang Wu","chief counsellor of Liu Bang");
        Collection<String> list = new ArrayList<>();
        list.add("Xiao Ming") ; list.add("petty thief") ;
        stringRedisTemplate.opsForList().leftPushAll("names",list) ;  //Generic types in the List collection must be of type String

        List<String> names = stringRedisTemplate.opsForList().range("names", 0, -1);
        names.forEach(name -> System.out.println(name));  //Traverse our list

    }

    /***
     * Manipulate our set type
     */
    @Test
    public void testSet(){
        stringRedisTemplate.opsForSet().add("sets","Zhang Si","Zhang Wu","chief counsellor of Liu Bang") ;
        Set<String> sets = stringRedisTemplate.opsForSet().members("sets");
        sets.forEach(set -> System.out.println(set));  //View elements in set
    }

    /***
     *  Operate our ZSet
     */
    @Test
    public void testZSet(){
        stringRedisTemplate.opsForZSet().add("zsets","Zhang San",100) ; //insert data
        Set<String> zsets = stringRedisTemplate.opsForZSet().range("zsets", 0, -1);
        zsets.forEach(zset -> System.out.println(zset));
    }

    /***
     * How about operating our, Hash
     */
    @Test
    public void testHash(){
        stringRedisTemplate.opsForHash().put("myhashs","name","Matsuzaki Township"); //Create a hash type and put it into a KV;
        stringRedisTemplate.opsForHash().get("myhashs","name"); //Get a key in the Hash
        stringRedisTemplate.opsForHash().values("myhashs") ; //Get all value s
        stringRedisTemplate.opsForHash().keys("myhashs") ; //Get all key s

        //Put more than one KV at a time and one map set
        Map<String, String> map = new HashMap<>();
        map.put("age","18") ; map.put("address","kfc") ;  //This map collection must also be of type string
        stringRedisTemplate.opsForHash().putAll("myhashs", map);

    }


}
3. Test RedisTemplate
Test RedisTemplate
User class
@Data
@AllArgsConstructor
@NoArgsConstructor
@Accessors(chain = true)   //Let our User support chain programming
public class User implements Serializable {

    private String id ;
    private String name ;
    private Integer age ;
    private Date birth ;
}
Test class TestRedisTemplate
@SpringBootTest(classes = SpringbootRedisApplication.class)
public class TestRedisTemplate {
    @Autowired
    private RedisTemplate redisTemplate ;  //By default, the serialization strategy of KV is JDK

    @Test
    public void TestRedisTemplate(){

        redisTemplate.setKeySerializer(new StringRedisSerializer()); //Modify the serialization strategy of the key to the String strategy, so that the String key is still a String after serialization
        redisTemplate.setHashKeySerializer(new StringRedisSerializer()); //Modify the serialization policy of key in hash

        User user = new User();
        user.setId(UUID.randomUUID().toString()).setName("Matsuzaki Township").setAge(21).setBirth(new Date()) ;
        //key and value are serialized and saved in Redis
        redisTemplate.opsForValue().set("user",user);
        //First serialize the key, then take out the serialized value through the serialized key, and then deserialize the value and return it to our User object
        Object user1 = redisTemplate.opsForValue().get("user");
        System.out.println(user1);

        redisTemplate.opsForList().leftPush("list",user) ;
        List list = redisTemplate.opsForList().range("list", 0, -1);
        list.forEach(e -> System.out.println(e));

        redisTemplate.opsForHash().put("map","user",user);

    }
}
4. TestBoundAPI optimization
We found that when we perform multiple operations on a key, we have to write a lot of code repeatedly each time. Spring Data proposes the following binding optimization!
Both RedisTemplate and StringRedisetTemplate have the following optimizations!
@SpringBootTest(classes = SpringbootRedisApplication.class)
public class TestBoundAPI {
    @Autowired
    private RedisTemplate redisTemplate ;

    @Autowired
    private StringRedisTemplate stringRedisTemplate ;

    @Test
    public void testBoundApi(){
        stringRedisTemplate.opsForValue().set("name","Zhang San");
        stringRedisTemplate.opsForValue().append("name","You are a good person.") ;
        String name = stringRedisTemplate.opsForValue().get("name");

       //The above code for binding optimization! Up and down are equivalent!

       //For the operation of key == name, the following operations are for key == name by default!
        BoundValueOperations<String, String> ops = stringRedisTemplate.boundValueOps("name");
        ops.set("Zhang San");
        ops.append("You are a good person.");
        String name1 = ops.get();
    }
}
We found that the amount of code is greatly reduced!
5. Summary
Make a summary of the above three usages
1. For future processing, if the key value is String, use StringRestTemplate;
2. RedisTemplate is used for the key value object to be processed in the future;
3. For multiple operations on the same key, you can use the api of boundXXops() to simplify writing!
4. Customize RedisTemplate
Now we know what RedisTemplate is, but the default RedisTemplate is not easy to use. We explore the source code and find that,
You can configure a redisTemplate to replace our native RestTemplate;
@Configuration
public class RedisConfig {
    //Custom restTemplate
    @Bean
    public RedisTemplate<String, Object> redisTemplate1(RedisConnectionFactory redisConnectionFactory) {
        // For the convenience of our own development, we generally directly use < string, Object >
        RedisTemplate<String, Object> template = new RedisTemplate<String,Object>();
        template.setConnectionFactory(redisConnectionFactory);

        return template;
    }
}
When we call, we can use automatic assembly!
  @Autowired
  @Qualifier("redisTemplate1")
  RedisTemplate redisTemplate;
5. Serialization problem
Many problems have been solved. Here is a brief overview!
If the data transfer is not serialization, garbled code will appear as follows:

For serialization, for example:
At this time, our User object does not follow the Json format, nor does it implement serialization after execution!
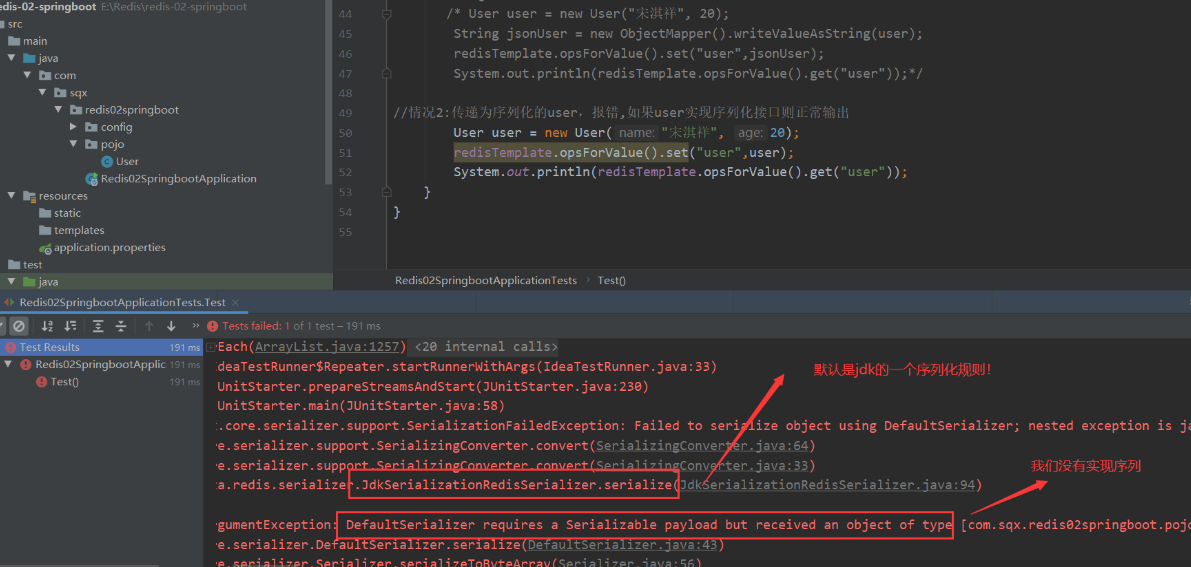
We can see the red explosion, prompting us that we have not implemented the default serialization!
So we need to implement serialization:
Method 1: the User under pojo implements the serialization interface!

Method 2: Customize serialization rules and set them in RestTemplate
The code is as follows, [template]
@Configuration
public class RedisConfig {

    //Custom restTemplate
    @Bean
    public RedisTemplate<String, Object> redisTemplate1(RedisConnectionFactory redisConnectionFactory) {
        // For the convenience of our own development, we generally directly use < string, Object >
        RedisTemplate<String, Object> template = new RedisTemplate<String,Object>();
        template.setConnectionFactory(redisConnectionFactory);

        // Json serialization configuration
        Jackson2JsonRedisSerializer jackson2JsonRedisSerializer = new Jackson2JsonRedisSerializer(Object.class);
        ObjectMapper om = new ObjectMapper();
        om.setVisibility(PropertyAccessor.ALL, JsonAutoDetect.Visibility.ANY);
        om.enableDefaultTyping(ObjectMapper.DefaultTyping.NON_FINAL);
        jackson2JsonRedisSerializer.setObjectMapper(om);
        // Serialization of String
        StringRedisSerializer stringRedisSerializer = new StringRedisSerializer();

        // The key is serialized by String
        template.setKeySerializer(stringRedisSerializer);
        // The key of hash is also serialized by String
        template.setHashKeySerializer(stringRedisSerializer);
        // value is serialized by jackson
        template.setValueSerializer(jackson2JsonRedisSerializer);
        // The value serialization method of hash is jackson
        template.setHashValueSerializer(jackson2JsonRedisSerializer);
        template.afterPropertiesSet();

        return template;
    }
}
After setting the serialization rules, we can call our own Restemplate!
Use steps!
package com.sqx.redis02springboot;

import com.fasterxml.jackson.core.JsonProcessingException;
import com.fasterxml.jackson.databind.ObjectMapper;
import com.sqx.redis02springboot.pojo.User;
import org.junit.jupiter.api.Test;
import org.springframework.beans.factory.annotation.Autowired;
import org.springframework.beans.factory.annotation.Qualifier;
import org.springframework.boot.test.context.SpringBootTest;
import org.springframework.data.redis.connection.RedisConnection;
import org.springframework.data.redis.core.RedisTemplate;


@SpringBootTest
class Redis02SpringbootApplicationTests {

    @Autowired
    @Qualifier("redisTemplate1")
    RedisTemplate redisTemplate;
    @Test
    void contextLoads() {
        // redisTemplate operates on different data types, and the api is the same as our instructions
        // opsForValue operation String is similar to String
        // The opsForList operation is similar to List
        // opsForSet operation is similar to Set
        // opsForHash
        // opsForZSet
        // opsForGeo
        // opsForHyperLogLog
        // In addition to basic operations, our common methods can be operated directly through redisTemplate, such as transaction and basic CRUD

        //Get connection
   /*   RedisConnection connection = redisTemplate.getConnectionFactory().getConnection();
        connection.flushAll();
        connection.flushDb();*/

        redisTemplate.opsForValue().set("name","zhangsan");
        System.out.println(redisTemplate.opsForValue().get("name"));
    }

    @Test
    void Test() throws JsonProcessingException {
        //Real development generally uses json to transfer data!
        // If the object is passed directly, an un serialized error will be reported, so our User object should first implement a serialized interface to avoid!

//Case 1: passing json is normal
       /* User user = new User("Song Qixiang ", 20);
        String jsonUser = new ObjectMapper().writeValueAsString(user);
        redisTemplate.opsForValue().set("user",jsonUser);
        System.out.println(redisTemplate.opsForValue().get("user"));*/

//Case 2: an error is reported when the user is passed as a serialized user. If the user implements the serialized interface, the output is normal
        User user = new User("Song Qixiang", 20);
        redisTemplate.opsForValue().set("user",user);
        System.out.println(redisTemplate.opsForValue().get("user"));
    }
}
So far, the serialization problem has been solved!
Redis.conf detailed explanation
We know that when Redis service is started, it depends on this configuration file!
Let's enter the configuration file for analysis! Vim Redis.conf and then gg directly start the analysis from the file header!
Company
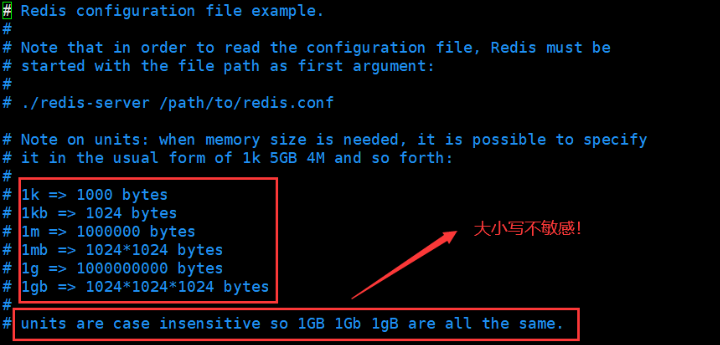
In the configuration file, the Unit is not case sensitive!
Include
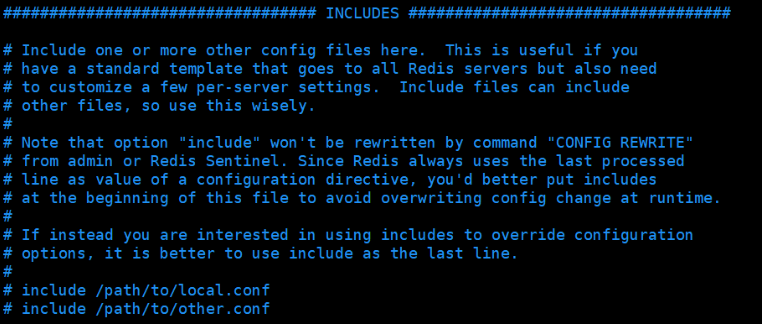
It is equivalent to the import when we learn Spring and integrate the configuration file, and the include tag in JSP and Thymeleaf!
NETWORK network
bind 127.0.0.1     #The ip used for fixed access to Redis service. We comment it out, which means that all ip addresses can be accessed!

protected-mode no    #Turn off the protection mode. We can choose to turn it on, but turn it off when we need to remotely access the Redis service!

port		#Port setting: the access port number of redis on the current service host!
GENERAL
daemonize yes    #Whether to run the daemon in the background. The default is No. We need to configure Yes to start it manually!

pidfile /var/run/redis_6379.pid     #If we run in the background mode, we need to specify a pid process file!

#journal
# Specify the server verbosity level.
# This can be one of:
# debug (a lot of information, useful for development/testing)
# verbose (many rarely useful info, but not a mess like the debug level)
# Notice (modestly verbose, what you want in production probably)!
# warning (only very important / critical messages are logged) 		 Print only critical logs
loglevel notice            #Our log level settings include debug, verbose, notice and warning!
logfile ""     #The file location name of the log. If it is empty, it will be printed directly

databases 16         #The number of databases is 16 by default!

always-show-logo no    #Always display the logo when starting the server
Snapshot snapshot
Persistence: the number of operations performed within a specified time will be persisted to the file rdb and aof file
redis is an in memory database. If there is no persistence, the data will be powered off even if it is lost!
#Some persistence rules are configured below!
# save 3600 1 if more than one key is modified within 3600s (1 hour), then perform the persistence operation!
# save 300 100 		 If more than 100 key s are modified within 300s (5 minutes), then perform the persistence operation!
# save 60 10000 		 Similarly, if more than 10000 key s are modified in 60s (1 minute), the persistence operation is performed. Disadvantages: if the machine goes down in 59s, the data is lost!
#After we learn persistence, we will define this rule ourselves!


stop-writes-on-bgsave-error yes     #Persistence error. Do we still persist? The default is yes

rdbcompression yes    #Whether to compress our rdb file. It is enabled by default. It needs to consume some cpu resources!

rdbchecksum yes        #When saving rdb files, check whether there are some errors!

dir ./     #Directory where rdb files are saved!
REPLICATION we will explain in detail when we explain Redis master-slave REPLICATION!
SECURITY
#We can set our Redis password in this configuration file!
 requirepass 123456

#Use the command to obtain our Redis password!
127.0.0.1:6379> config get requirepass
1) "requirepass"
2) "123456"
#Use the command to change our password
127.0.0.1:6379> config set requirepass "123456"
ok
#After setting the password, if we do not enter the password for verification, we will lose the authority of all commands
127.0.0.1:6379> ping
(error) NOAUTH Authentication required.
#Password verification is enough!
127.0.0.1:6379> auth 123456
OK
Restrict CLIENTS, MEMORY MANAGEMENT
maxclients 10000     #Setting the maximum client of Redis

maxmemory <bytes>	 #Redis configured maximum memory capacity

maxmemory-policy noeviction      #Processing strategy when the memory reaches the upper limit!
 	#Remove some expired key s
 	#report errors
	#.....
maxmemory-policy Six strategies:
        #1. Volatile LRU: LRU only for key s with expiration time set (default value)
        #2. Allkeys lru: delete the key of lru algorithm
        #3. Volatile random: randomly delete expired key s
        #4. Allkeys random: random deletion
        #5. Volatile TTL: delete expired
        #6.noeviction: never expires and returns an error
APPEND ONLY MODE, aof configuration (a persistent operation!)
appendonly no   #Our aof mode is not enabled by default. rdb persistence is used by default. In most cases, our rdb is sufficient!

appendfilename "appendonly.aof"  #aof pattern persistence file name!

# appendfsync always	 #Every modification will be sync hronized, which will consume performance!
appendfsync everysec     #Our sync is performed once per second
# appendfsync no		 #Do not perform synchronization! At this time, the operating system performs synchronization, which is the fastest!
The specific configuration will be analyzed in detail in Redis persistence!
Redis persistence (key)
Redis is an in memory database. If the data in memory is not saved on disk, once the server process exits, the database state in the server will disappear, so
Redis provides persistence function!
Redis officially provides two different persistence methods to store data in the hard disk:
- Snapshot snapshot saves all data at a certain time!
- AOF (Append Only File) only appends log files!
Note: if RDB and AOF are turned on at the same time, Redis will listen to AOF. RDB and AOF are turned on at the same time = = the default mindless loading AOF configuration file = = the same dataset. The AOF file is much larger than the RDB file, the recovery speed is slower than RDBAOF, and the operation efficiency is slower than RDB. However, the synchronization strategy is efficient, and the efficiency of different steps is the same as RDB
1, RDB
What is RDB (Redis DataBase), also known as snapshot?
In this way, all data at a certain time can be written to the hard disk. Of course, this is also the default persistence mode of redis. The saved files are stored in rdb terminated files, so this
Mode is also called RDB mode.
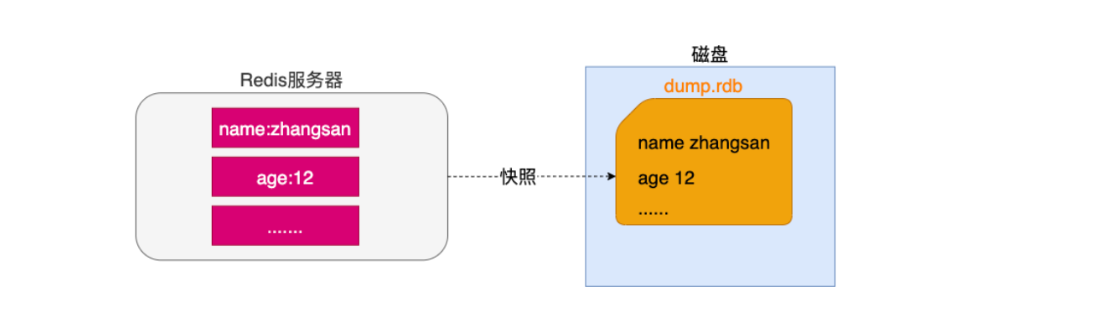
1. Snapshot generation method
The trigger mechanism of snapshot can be generated by our client or configured by the server. It will be triggered automatically when the configuration conditions are met!
- Client mode: BGSAVE and SAVE instructions
- Automatically triggered by server configuration
1. Client mode: BGSAVE
The client executes the bigsave command!
The client can use the BGSAVE command to create a snapshot. When receiving the BGSAVE command from the client, redis will call fork ¹ To create a child process, and then the child process is responsible for
**Writes the snapshot to disk, while the parent process continues to process command requests** When the persistence process is over, use this temporary file to replace the last persistent file. Throughout the process,
The main process does not perform any IO operations.

Noun explanation: when a process creates a child process through fork, the underlying operating system will create a copy of the process, and the operation of creating a child process in a unix like system will be optimized
Virtualization: at the beginning, the parent and child processes share the same memory. The sharing of the written memory will not end until the parent or child processes write to the memory!
Personal understanding: if there is no write operation to redis when fork ing out the child process, the child process will occupy all the memory of redis and speed up the snapshot! one
Once the client initiates a write request, our child process can only occupy part of its own memory for snapshot operation
2. Client mode: SAVE
The client executes the save command!
The client can also use the SAVE command to create a snapshot. The redis server that receives the SAVE command will not respond to any other commands until the snapshot is created
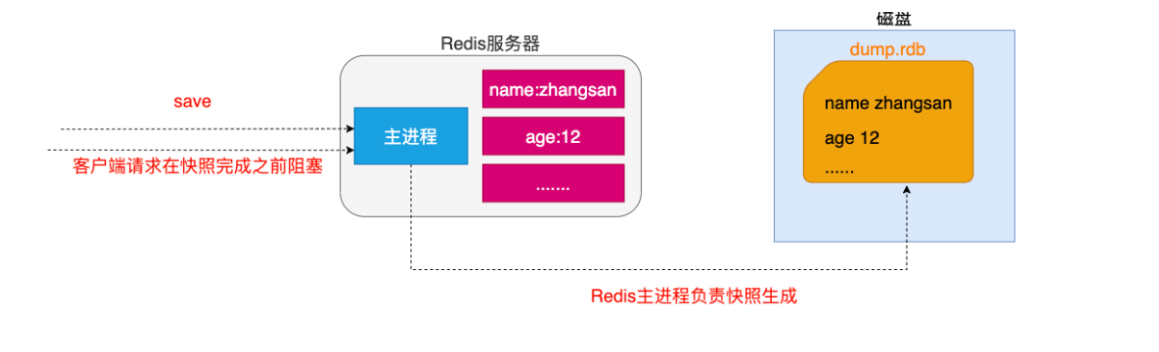
Note: the SAVE command is not commonly used. Before the snapshot is created with the SAVE command, redis is blocked and cannot be used for external services
3. Server configuration: meet automatic trigger
Our profile of Redis Conf, find the SNAPSHOT module and configure the trigger mechanism of the SNAPSHOT!
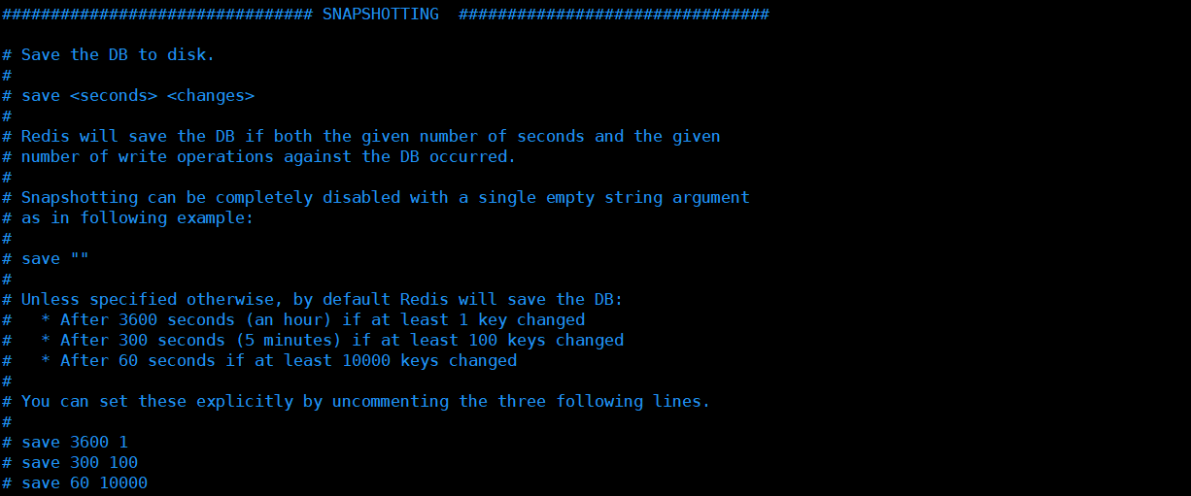
save 3600 1 #Analysis: when KV is modified once within 3600s, a snapshot will be taken!
4. Client mode: shutdown
The client executes the shutdown command of shutdown
When redis receives the request to shut down the server through the shutdown command, it will execute a save command to block all clients, no longer execute any commands sent by the client, and
And shut down the server after the save command is executed
Note: here is the SAVE command executed because I have to shut down, so I won't receive other commands from the client. I will try my best to execute the snapshot to SAVE data!
2. Configure the name and location of the generated snapshot
It is also the snapshot module in Redis's configuration file
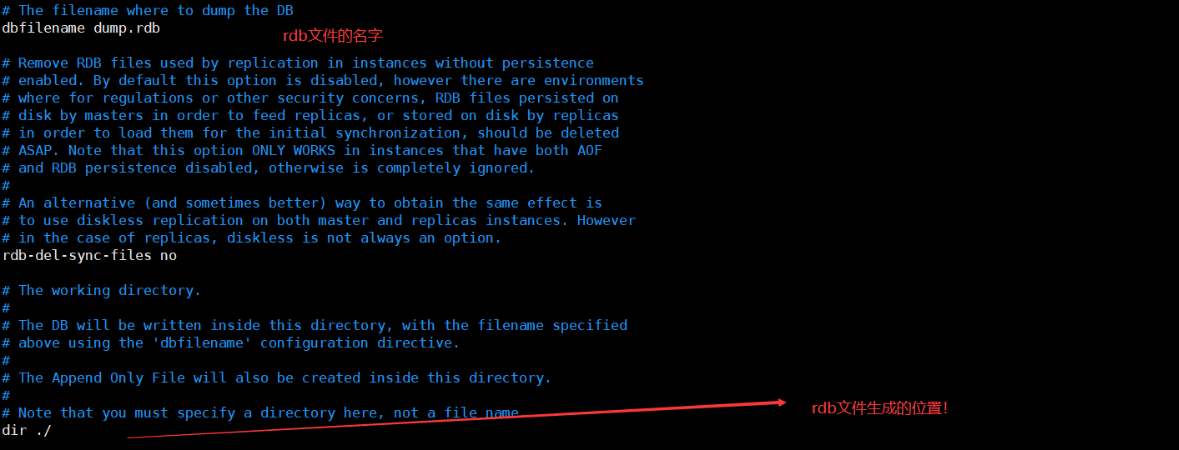
3. Advantages and disadvantages of RDB
advantage
When we need to recover data, we can directly read the rdb file of the snapshot, which ensures high performance. If large-scale data recovery is required, and for data recovery
The integrity of RDB is not very sensitive, so RDB is more efficient than AOF.
shortcoming
The disadvantage of RDB is that the data after the last persistence may be lost. We = = Redis defaults to RDB = =. Generally, this configuration does not need to be modified! Sometimes in the production environment we
This file will be backed up! Let's take an example: when we just finished RDB snapshot backup, two set s came to modify KV, and the next snapshot is not reached at this time
If a downtime occurs at this time, it will cause data loss! Therefore, AOF is introduced to solve the problem!
-
Write the data set Snapshot in memory to disk within the specified time interval, that is, the jargon Snapshot. When it is restored, it reads the Snapshot file directly into memory.
-
Redis will separately create (fork) a sub process for persistence, First, the data will be written to a temporary file. After the persistence process is completed, this temporary file will be used to replace the last persistent file. In the whole process, the main process does not perform any IO operations.
-
This ensures extremely high performance. If large-scale data recovery is required and the integrity of data recovery is not very sensitive, RDB method is more efficient than AOF method.
-
The disadvantage of RDB is that the data after the last persistence may be lost. Our default is RDB. Generally, we don't need to modify this configuration! Sometimes we Backup this file in the production environment!
-
The file saved by rdb is dump rdb is configured in our configuration file snapshot!
-

-
rdb files are generally saved in the production environment!
Personal understanding: it is to save the data in the memory to the rdb file after a certain time interval, and then we can continue to operate the data in the memory. If an error occurs, we can read the rdb file, lose the current memory state and return to the state recorded in the rdb. Therefore, this operation is called snapshot!
Trigger mechanism
- When the save rule is satisfied, the rdb policy will be triggered automatically
- Executing the flush command will also trigger our rdb policy
- When you exit redis, rdb files will also be generated automatically
Backup is to generate an rdb file!
Restore our rdb files!
We will restore the memory data in redis to the state saved in the rdb file!
Step: dump Just put the RDB file in our redis startup directory. After redis is started, dump will be checked automatically RDB file, recover the data in it!
127.0.0.1:6379> config get dir       #Use this command to view the location of our redis startup directory!
1) "dir"
2) "/usr/local/bin"
127.0.0.1:6379>
We dump it RDB files can be moved in!
In fact, the default configuration of rdb mechanism is enough, but we still need to learn!
advantage:
- Suitable for large-scale data recovery (because it is a separate process to process!)
- The requirements for data integrity are not high
Disadvantages:
- Operations need to be performed at a certain interval. If redis goes down unexpectedly, the last modified data will not be available.
- The fork process will occupy a certain content space.
2, AOF
What is AOF (APPEND ONLY FILE)?
Record all our = = write commands = = history, and execute all the files again when recovering

Each write operation is recorded in the form of a log. All instructions executed by redis are recorded (read operations are not recorded). Only files are allowed to be added, but files cannot be overwritten. At the beginning of redis startup, the file will be read to rebuild the data. In other words, if redis restarts, the write instructions will be executed from front to back according to the contents of the log file to complete the data recovery.
1. Enable AOF persistence
In the default configuration of redis, the AOF persistence mechanism is not enabled and needs to be enabled in the configuration
Redis Conf file, find the APPEND ONLY MODE module
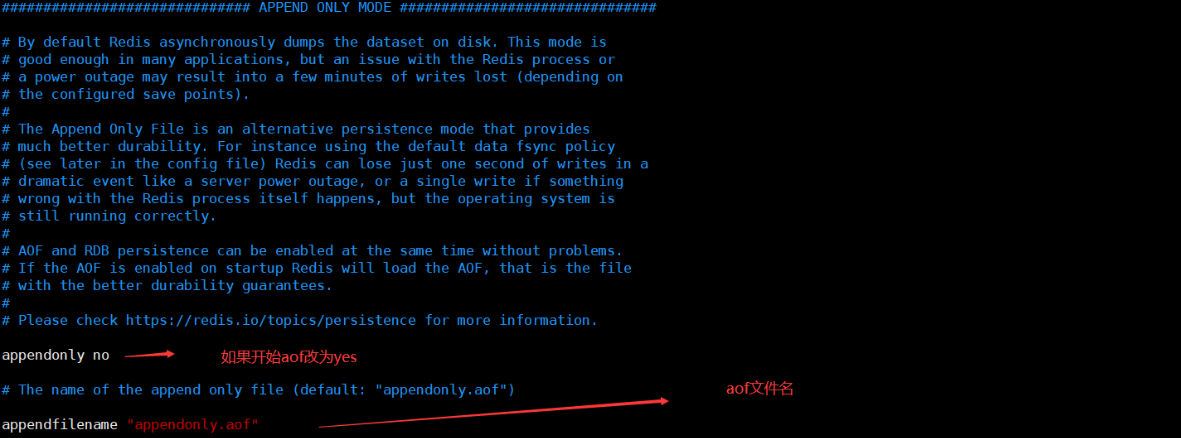
Next, restart our redis to take effect. It is found that appendonly already exists aof

What should we do if the aof file is damaged (modified) and redis cannot be started?
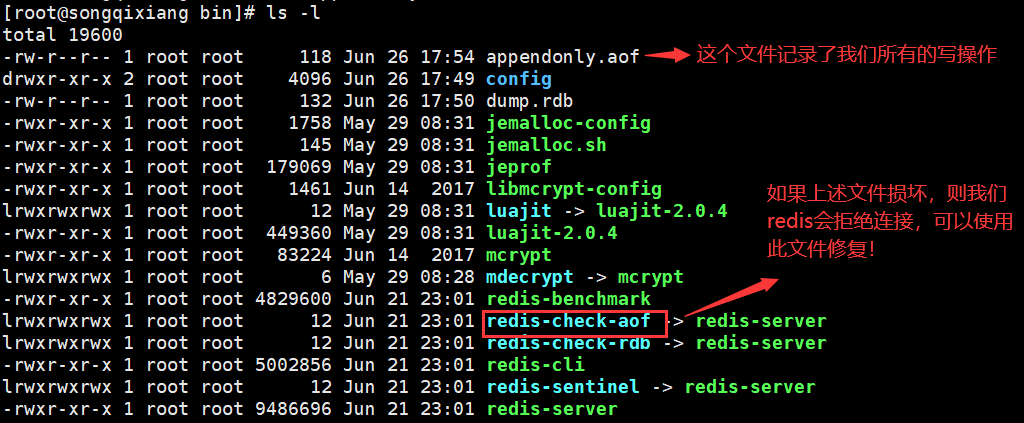
Redis provides us with a repair tool redis check AOF -- fix
We just need to execute the following command redis check AOF -- fix appenfonly aof

The file has been repaired!
Next, we restart redis and find that the data has been recovered by reading aof information!
2. Log append frequency
How often do we write to aof?
# 1.always
- explain: each redis Write commands should be written to the hard disk synchronously,Severe reduction redis speed
- explain: If the user uses always option,So each redis Write commands are written to the hard disk,This minimizes data loss in the event of a system crash;Unfortunately,Because this synchronization strategy requires a large number of write operations to the hard disk,therefore redis The speed at which commands are processed is limited by the performance of the hard disk;
- be careful: Rotary disk drives have about 200 commands at this frequency/s ; Solid state disk(SSD) Millions of commands/s;
- warning: use SSD Please use with caution always option,This mode writes a small amount of data continuously, which may cause serious write amplification problems,As a result, the service life of solid-state drives is reduced from a few years to a few months.

# 2.everysec [recommended]
- explain: Perform synchronization once per second to explicitly synchronize multiple write commands to disk
- Explanation: in order to balance data security and write performance,Users can consider using everysec option,Give Way redis Once per second frequency pair AOF Synchronize files;redis Sync once per second AOF The performance of files is similar to that without any persistence features,By synchronizing once per second AOF file,redis upon sb.'s honor,Even if the system crashes,Users can lose data generated within one second at most.

# 3.no 	 [not recommended]
- explain: The operating system decides when to synchronize
- Explanation: last use no option,It will be entirely up to the operating system to decide when to synchronize AOF log file,This option will not be correct redis Performance impact but system crash,An indefinite amount of data will be lost,In addition, if the user's hard disk processing write operation is not fast enough,When the buffer is filled with data waiting to be written to the hard disk,redis Will be blocked,And lead to redis The processing of command requests is slow.
3. Modify synchronization frequency
Find the AOF module and configure it as follows
# 1. Modify log synchronization frequency
- modify appendfsync everysec|always|no appoint

4. Rewriting of AOF files
Problems caused by AOF
The AOF approach also poses another problem. Persistent files get bigger and bigger. For example, we call incr test command 100 times. All 100 commands must be saved in the file. In fact, 99 commands are redundant = =. Because to restore the state of the database, it is enough to save a set test 100 in the file. To compress AOF persistent files, Redis provides an AOF rewriter mechanism.
1. Client mode trigger override
- implement BGREWRITEAOF command
The redis service will not be blocked. We will fork a new process (similar to RDB) to rewrite our files!
2. Automatically triggered by server configuration mode
- to configure redis.conf Medium auto-aof-rewrite-percentage See the figure below for options↓↓↓
- If set auto-aof-rewrite-percentage Values are 100 and auto-aof-rewrite-min-size 64mb,And enabled AOF When persistent,So when AOF File size greater than 64 M,also AOF The volume of the file is at least twice as large as that after the last rewrite(100%)Time,It will be triggered automatically,If rewriting is too frequent,Users can consider auto-aof-rewrite-percentage Set to larger

Process: when we aof The file reached 64 for the first time M When, perform rewriting. After rewriting, it is 20 M,Then the next rewrite condition is 40 M That is, we will expand at least twice(100%)Time!
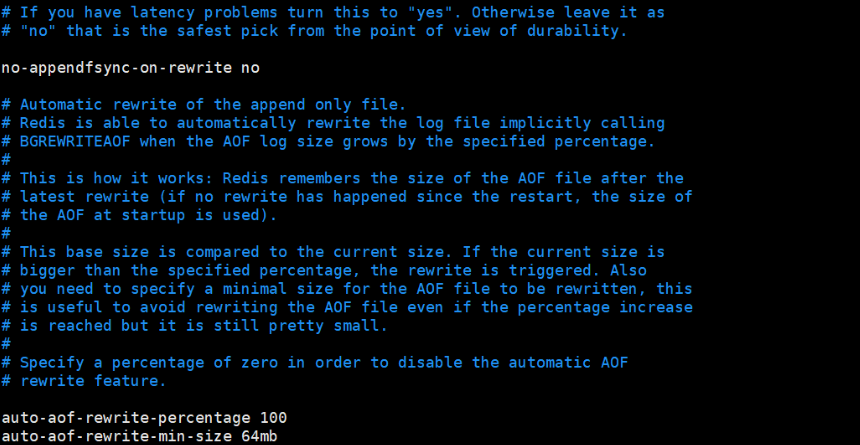
- Auto AOF rewrite percentage 100 is a multiple!
- Auto AOF rewrite min size 64MB this 64M is the threshold for our first rewrite!
5. Rewriting principle of AOF
The operation of rewriting aof file does not read the old aof file, but rewrites a new aof file with the contents of the database in the whole memory in the form of command, = = replace = = the original file
This is a bit similar to snapshots
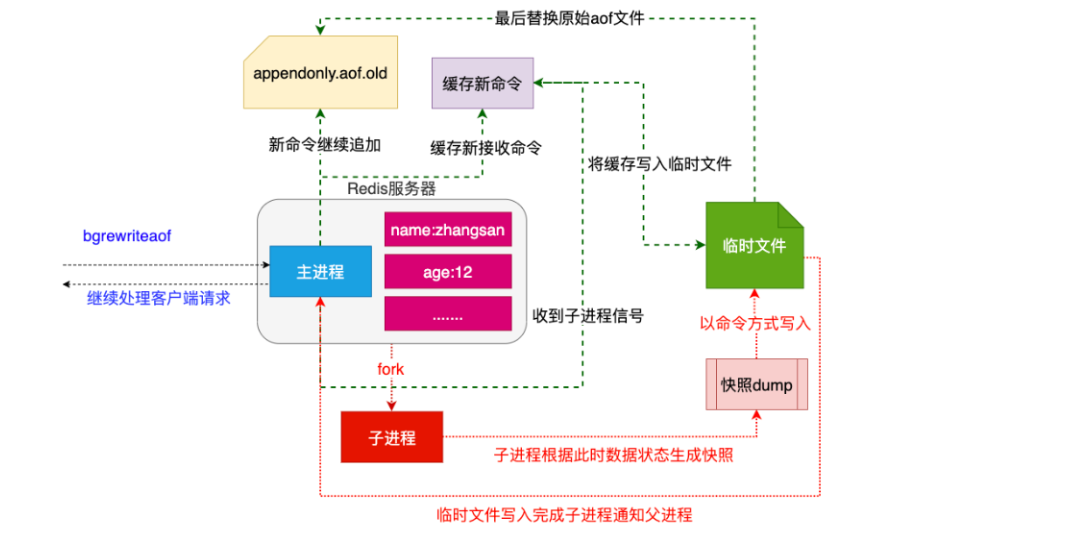
Rewrite process:
- redis calls fork. Now there are two processes, parent and child. The child process writes the command to rebuild the database state to the temporary file according to the database snapshot in memory (rewrite the command according to the snapshot data!)
- The parent process continues to process the client request, except to write the write command to the original aof file. (when the child process reads the snapshot data, the client can also initiate instructions) at the same time, cache the received write commands, so as to ensure that there will be no problems if the child process fails to rewrite
- When the child process writes the snapshot contents to the temporary file in the command mode, the child process sends a signal to notify the parent process. Then the parent process writes the cached write command to the temporary file.
- Now the parent process can replace the old aof file with a temporary file and rename it. The write command received later also begins to append to the new aof file.
Redis usage scenario
Let's find out where Redis is used
1. The string type in Redis is used to complete the storage of mobile phone verification code in the project
2. Using the string type in redis, the invalid business functions 12306, Taobao and orders still have 15 minutes
3. redis is used to realize Session sharing in distributed cluster system. Although memecache, which is also memory, can also be realized, there are still differences between them:
- memcache memory has low data storage limit and simple data type;
- The upper limit of redis memory data is high and the data types are rich;
4. The Zset type in redis can be used to sort the set type to realize functions such as ranking list, [commodity id, commodity sales];
5. Implementation of distributed cache using redis
6. redis is used to store the token information after authentication
7. redis is used to solve the problem of distributed lock in distributed cluster system. redis is a single process and one-way process, for example: n 20
-
jvm 1 process multiple threads synchronized int n 20; We synchronized can only solve the thread safety problem between processes!
-
jvm 1 process multiple threads synchronized int n 20;
. . . LUA script implementation
Redis does distributed caching
First understand some knowledge
1. What is a Cache?
- Definition: a piece of data in computer memory
2. Characteristics of data in memory
- Fast reading and writing
- Loss immediately after power failure
3. What problems does caching solve?
- Improve website throughput and operation efficiency
- Core problem: the existence of cache is used to reduce the pressure of database access
4. Since caching can improve efficiency, wouldn't it be better to add all the data in the project to the cache?
- Note: when using cache, the data in the database must be rarely modified, and it is more used for query
5. What is the difference between local cache and distributed cache?
- Local cache: data stored in the memory of the application server is called local cache
- Distributed cache: data stored outside the memory of the current application server is called distribution cache
Cluster: the process of putting multiple nodes of the same service together to provide services to the system is called cluster
Distributed: data stored outside the current application server is called distributed cache
1. Local cache test
The local cache here refers to enabling mybatis's own L2 cache
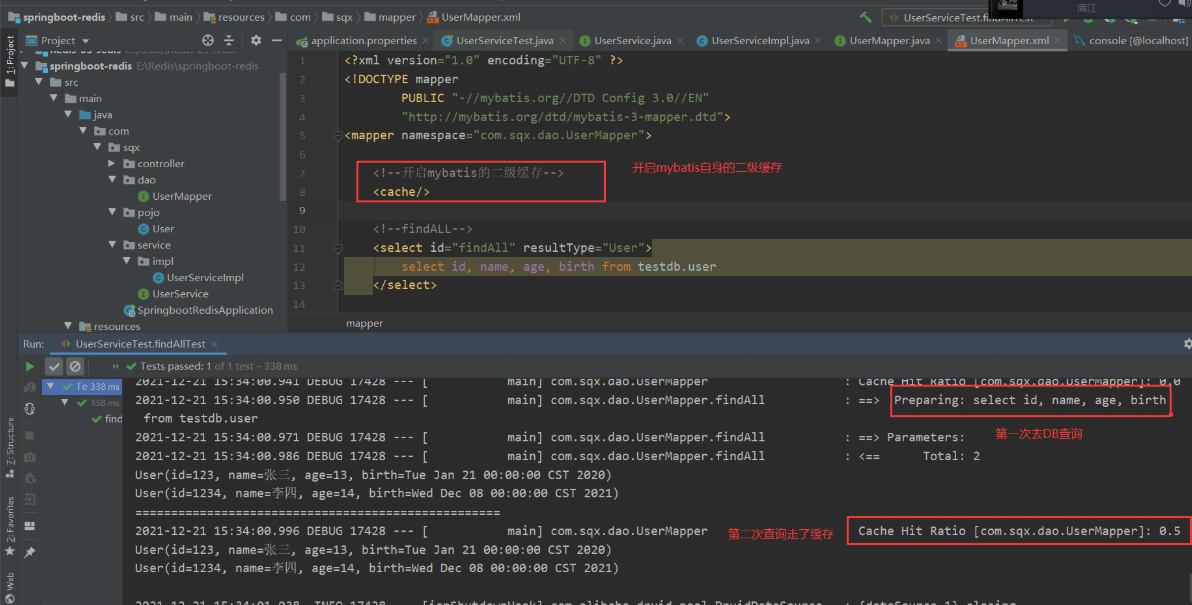
The reason why this caching method is not good is that our local caching method will occupy the memory of the JVM. Once the JVM project stops caching, the data will be lost!
Moreover, when we deploy the project on multiple nodes, the cache data between each node will not be shared, as follows:
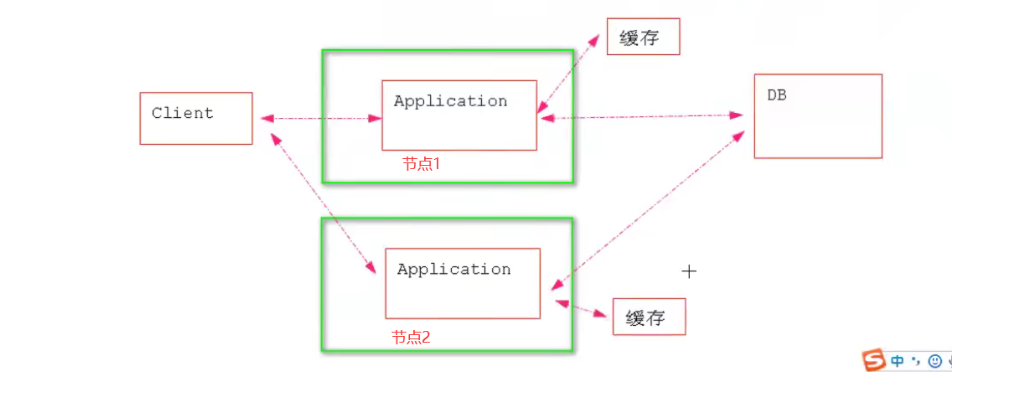
Therefore, the introduction of distributed cache to solve all the above problems!
2. Distributed cache test
How can we change from our local cache to distributed cache?
1. First check the implementation principle of Cache tag, and then change the local Cache to distributed Cache
 <!--  open mybatis L2 cache for,Its essence is us mybatis It helps us implement the cache interface provided by ourselves Cache,
that is cache Tagged type Property specifies the cache policy by default	-->

 <cache type=""/>
 <!--This is essentially the way it is written-->
 <cache type="rg.apache.ibatis.cache.impl.PerpetualCache"/>
The cache policy provided by mybatis is as follows:
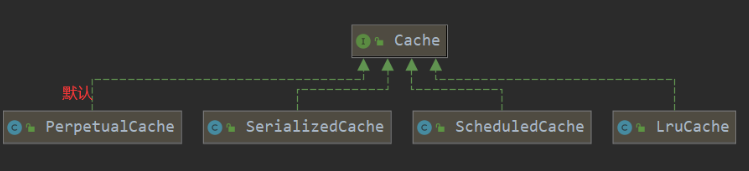
There are many, not all on display!
You can see the perpetual cache (the default cache policy)
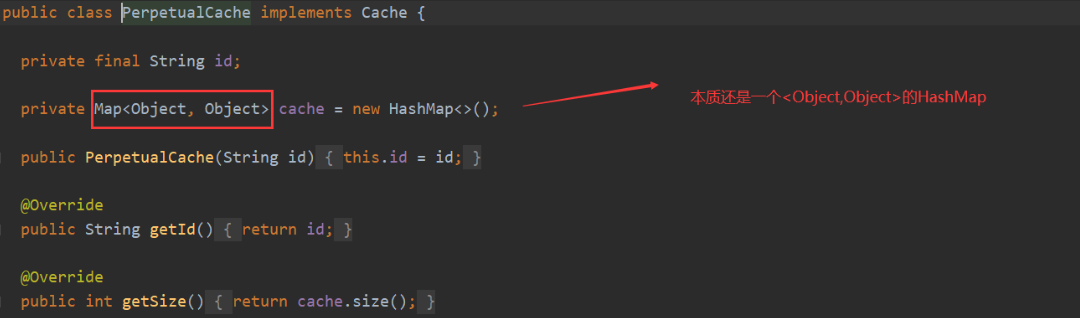
2. Therefore, if we want to modify the cache policy of mybatis, we only need to customize the implementation class of the cache interface to define the cache policy, and then make the cache tyep point to the custom policy
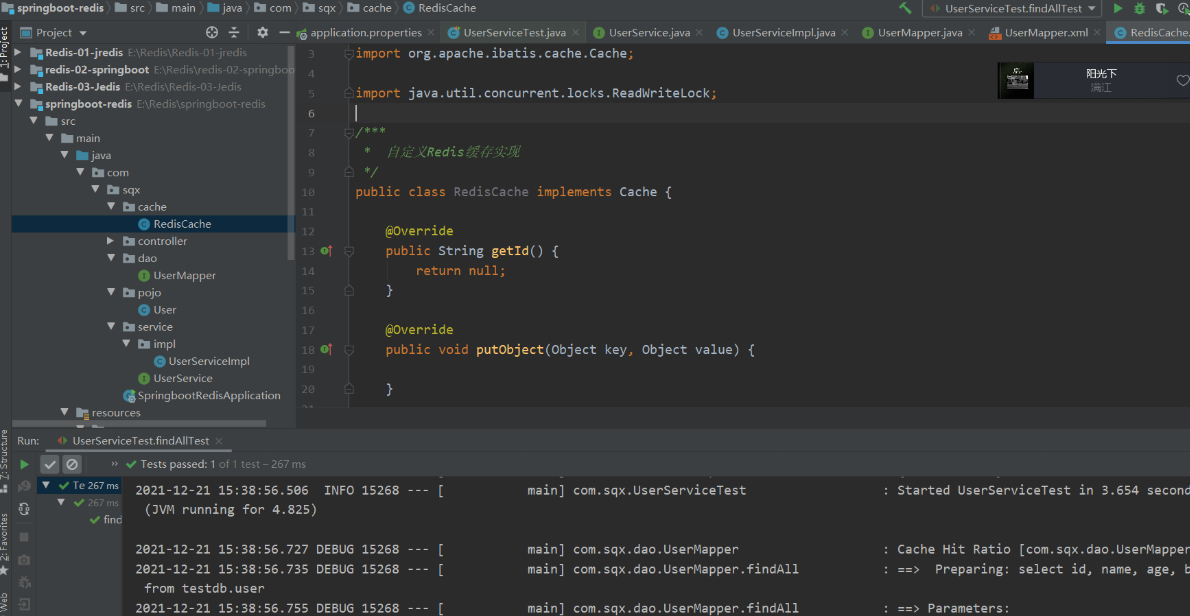
<!--Change to your own Redis-->
<cache type="com.sqx.cache.RedisCache"/>
3. We write a RedisCache
/***
 *  Customize Redis cache implementation
 *
 *  Note: this class is not managed by the factory, so we cannot obtain our RedisTemplate through automatic assembly
 *       Therefore, we get the ApplicationContext factory through the tool class, and then get the RedisTemplate through the tool class
 */
public class RedisCache implements Cache {

/*    @Autowired
    private RedisTemplate redisTemplate ;*/

    private final  String id  ;

    public RedisCache(String id) {   //The id here is the namespace of the mapper we need to put into the cache
        this.id = id;
    }

    @Override
    public String getId() {
        return this.id;
    }

    @Override
    public void putObject(Object key, Object value) {
        //To get the factory class
       RedisTemplate redisTemplate = (RedisTemplate) ApplicationContextUtils.getBean("redisTemplate");
       //Modify the serialization policy of Redis
       redisTemplate.setHashKeySerializer(new StringRedisSerializer());
       redisTemplate.setKeySerializer(new StringRedisSerializer());
       //Store the Hash data structure in our Redis
       redisTemplate.opsForHash().put(id.toString(),key.toString(),value);
    }

    @Override
    public Object getObject(Object key) {
        RedisTemplate redisTemplate = (RedisTemplate) ApplicationContextUtils.getBean("redisTemplate");
        //Modify the serialization policy of Redis
        redisTemplate.setHashKeySerializer(new StringRedisSerializer());
        redisTemplate.setKeySerializer(new StringRedisSerializer());
        //The next step is to extract data from our Redis
        Object o = redisTemplate.opsForHash().get(id.toString(), key.toString());

        return o;
    }
    @Override
    public Object removeObject(Object key) {
        return null;
    }

    @Override
    public void clear() {

    }

    @Override
    public int getSize() {
        return 0;
    }

    @Override
    public ReadWriteLock getReadWriteLock() {
        return null;
    }
}
4. We also mentioned in step 3 that our RedisCache initialization is performed in mybatis. Note: this class is not managed by the factory, so we cannot obtain our RedisTemplate through automatic assembly. Therefore, we obtain the ApplicationContext factory through the tool class, and then obtain the RedisTemplate through the tool class
/***
 *      Get the tool class of Spring's factory
 *
 *      After implementing the interface ApplicationContextAware, Spring will pass it to the implementation class of the interface in the form of parameters after the factory is created, and then this class can get the factory!
 */

@Component
public class ApplicationContextUtils implements ApplicationContextAware {

    private static ApplicationContext applicationContext ;  //Get the factory of Spring

    @Override
    public void setApplicationContext(ApplicationContext applicationContext) throws BeansException {
        this.applicationContext = applicationContext  ;
    }

    /***
     * Get the classes in our factory through our BeanName
     * @param beanName
     * @return
     */
    public static Object getBean(String beanName){
      return applicationContext.getBean(beanName) ;
    }
}
5. So we can test!
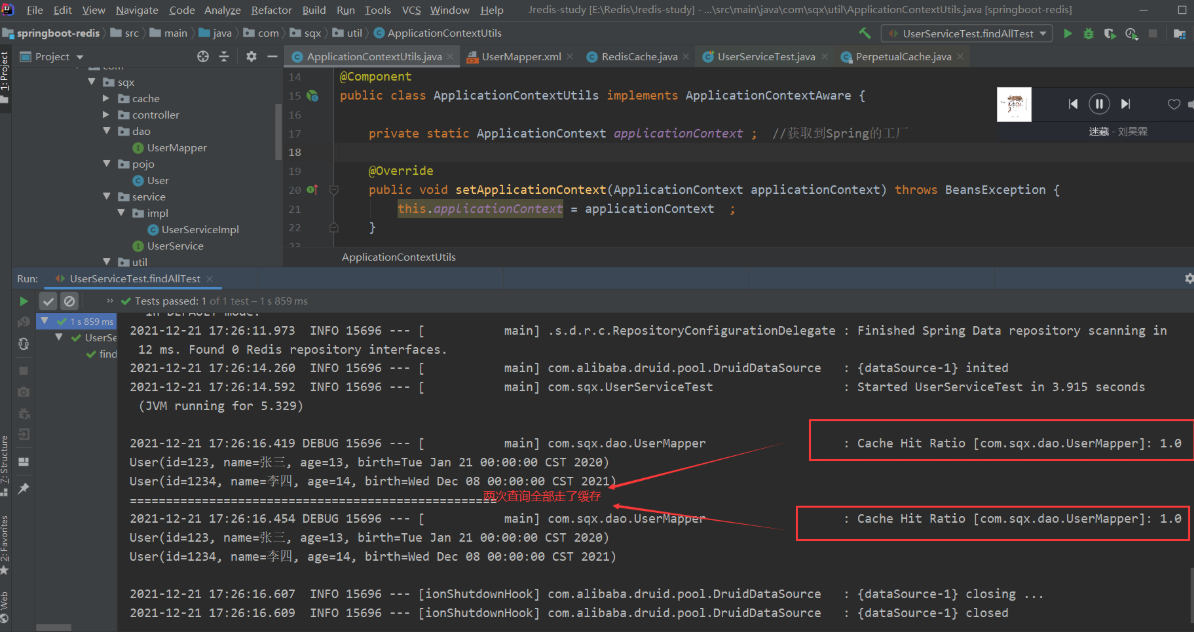
Why? Of course, our cache is saved in our Redis, which does not occupy the memory of the JVM. Even if the JVM stops caching, the data still exists!
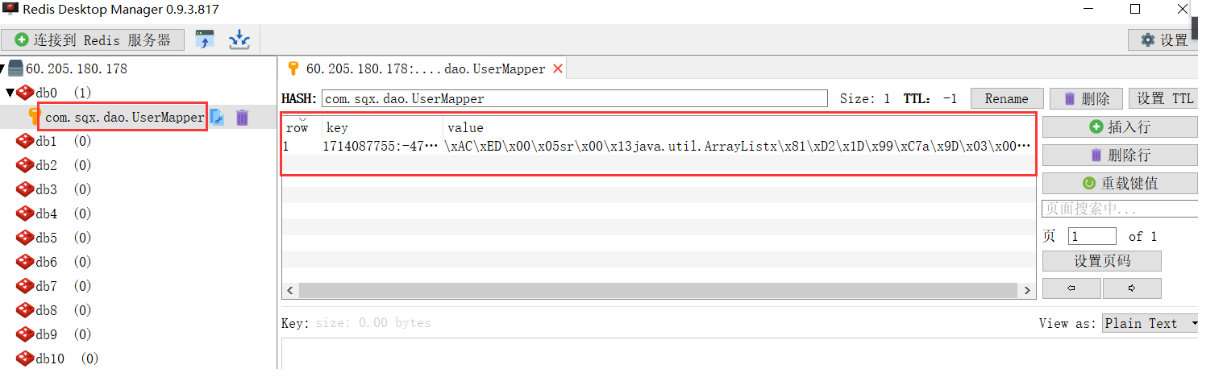
Here, we have integrated mybatis and our Redis to realize distributed caching!
3. Association query cache processing
We know that when we perform add, delete and change operations, the cache of the corresponding module will be emptied, but how to deal with the associated query?
What kind of problems will arise if they are not handled?
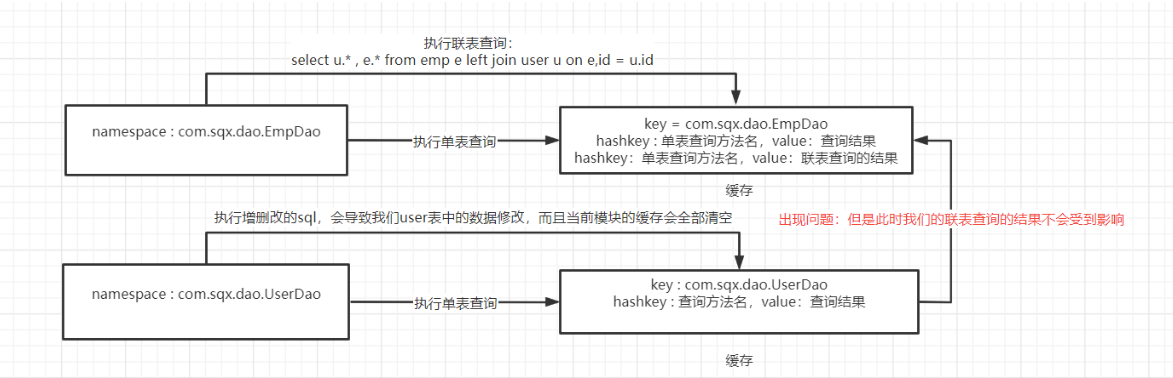
Our mybatis also proposed a * * shared cache * * solution for us. Is it intimate?
<cache-ref namespace="com.sqx.dao.EmpMapper"/>
<!--Let's write the configuration of the current segment namespace by UserMapper Sum of namespace by EmpMapper Shared cache Hash,If the information in a table is added, deleted or modified, the entire cache will be emptied-->
Problem solved!
4. Cache optimization strategy
1. Optimize Redis Key
Optimize the Key in Redis. The Key cannot be too long
//Original key
1714087755:-471266327:com.sqx.dao.UserMapper.findAll:0:2147483647:select id, name, age, birth from testdb.user:SqlSessionFactoryBean
Optimization strategy: MD5 algorithm encryption processing
characteristic:
- After all file strings are encrypted by MD5, 32-bit hexadecimal strings will be generated
- The results of MD5 encryption of different content files must be inconsistent
- When the same content files are encrypted with MD5, the results must be consistent
Encapsulate an MD5 encryption tool class
    private String toMd5Key(String key){
        String md5key = DigestUtils.md5DigestAsHex(key.getBytes());
        return md5key ;
    }
//Encrypted new key
7b0a7ede0967e99cb7c5189df829915c
Redis cache penetration and avalanche (key)
Cache penetration
concept
By default, when users request data, they will first find it in the redis. If it is not found, the cache misses, and then find it in the database. A small number may not be a problem, However, once a large number of requested data (such as the second kill scenario) are not hit in the cache, they will all be transferred to the database, causing great pressure on the database, which may lead to database crash. In network security, some people maliciously use this means to attack, which is called flood attack.

The so-called cache penetration: (that is, it cannot be queried in the cache)
Solution
1. Bloom filter:
Bloom filter is a data structure that stores all possible query parameters in the form of hash. It is verified in the control layer first, and discarded if it does not meet the requirements, so as to avoid the query pressure on the underlying storage system
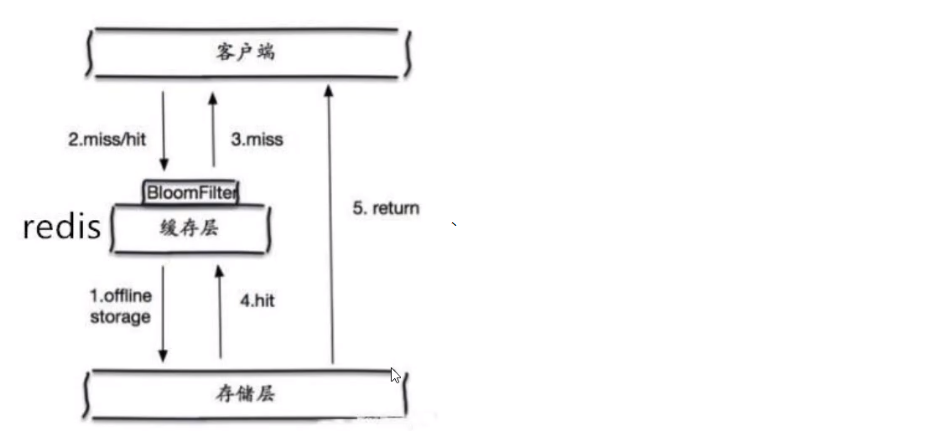
2. Cache empty objects:
When the storage layer fails to hit, even the returned empty object will be cached, and an expiration time will be set. Then accessing the data will be obtained from the cache, protecting the back-end data source;
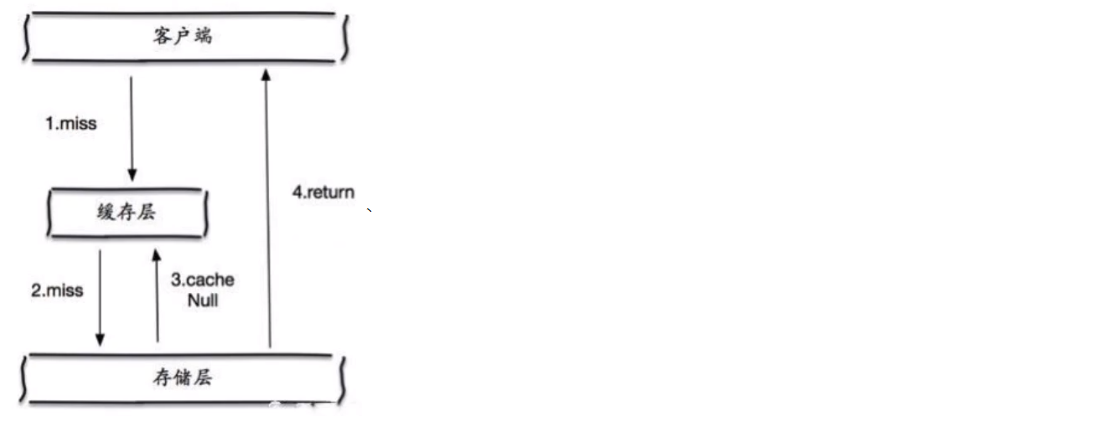
There are two problems with this:
- Storing empty objects also requires space. A large number of empty objects will consume a certain space, and the storage efficiency is not high. The solution to this defect is to set a shorter expiration time
- Even if the expiration time is set for a null value, there will still be inconsistency between the data of the cache layer and the storage layer for a period of time, which will have an impact on the business that needs to maintain consistency.
Buffer breakdown
Microblog server down! (too much cache expired!)
summary
Compared with cache penetration, cache breakdown is more purposeful. For an existing key, when the cache expires, there are a large number of requests at the same time. These requests will break down to the DB, resulting in a large number of instantaneous DB requests and a sudden increase in pressure. This means that the cache is broken down. It is only because the cache of one key is unavailable, but other keys can still use the cache response.
For example, on the hot search ranking, a hot news is accessed in large numbers at the same time, which may lead to cache breakdown.
Solution
1. Set the hotspot data to never expire
In this way, the hot data will not expire, but when the Redis memory space is full, some data will be cleaned up, and this scheme will occupy space. Once there are more hot data, some space will be occupied.
2. Add mutex lock (distributed lock)
Before accessing the key, SETNX (set if not exists) is used to set another short-term key to lock the access of the current key, and then delete the short-term key after the access is completed. Ensure that only one thread accesses at the same time. This requires very high locking requirements.
Cache avalanche
summary
A large number of key s set the same expiration time, resulting in all cached data invalidation at the same time, resulting in large instantaneous DB requests, sudden pressure increase and avalanche.
Cache avalanche means that the cache set expires in a certain period of time. Redis is down!
One of the reasons for the avalanche. For example, when writing this article, it is about to arrive at double twelve o'clock, and there will be a wave of rush buying soon. This wave of goods will be put into the cache for a concentrated time. Suppose the cache is one hour. Then at one o'clock in the morning, the cache of these goods will expire. The access and query of these commodities fall on the database, which will produce periodic pressure peaks. Therefore, all requests will reach the storage layer, and the call volume of the storage layer will increase sharply, resulting in the storage layer hanging up.
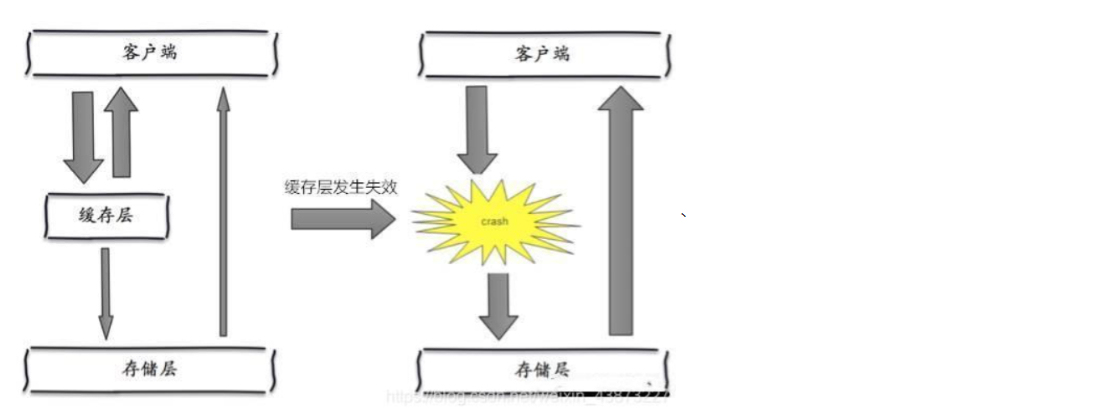
In fact, centralized expiration is not very fatal. The more fatal cache avalanche is the downtime or disconnection of a node of the cache server. Because of the naturally formed cache avalanche, the cache must be created centrally in a certain period of time. At this time, the database can withstand the pressure. It is nothing more than periodic pressure on the database. The downtime of the cache service node will cause unpredictable pressure on the database server, which is likely to crush the database in an instant.
Solution
Redis high availability
The meaning of this idea is that since redis may hang up, I will add several more redis. After one is hung up, others can continue to work. In fact, it is a cluster
Current limiting degradation
The idea of this solution is to control the number of threads reading and writing to the database cache by locking or queuing after the cache expires. For example, for a key, only one thread is allowed to query data and write cache, while other threads wait.
Data preheating
The meaning of data heating is that before the formal deployment, I first access the possible data in advance, so that some data that may be accessed in large quantities will be loaded into the cache. Before a large concurrent access is about to occur, manually trigger the loading of different cache key s and set different expiration times to make the time point of cache invalidation as uniform as possible.
Redis subscription publication
Redis can do this, and message queuing can do better
Redis publish / subscribe (pub/sub) is a message communication mode: the sender (pub) sends messages and the subscriber (sub) receives messages. Wechat, microblog and attention system!
Redis client can subscribe to any number of channels.
Subscribe / publish message graph: the first: message sender, the second: channel, and the third: Message subscriber!
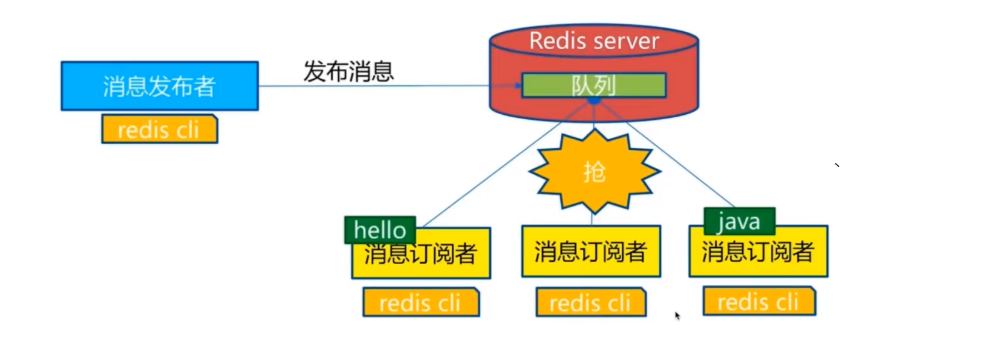
The following figure shows the channel and the relationship between the three clients that subscribe to the channel, client1, client2 and client5
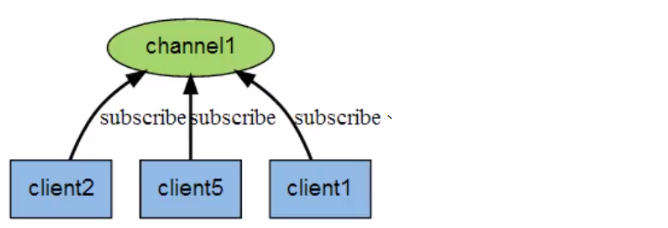
When a new message is sent to the channel through the PUBLISH command, the message will be sent to the three clients subscribing to it
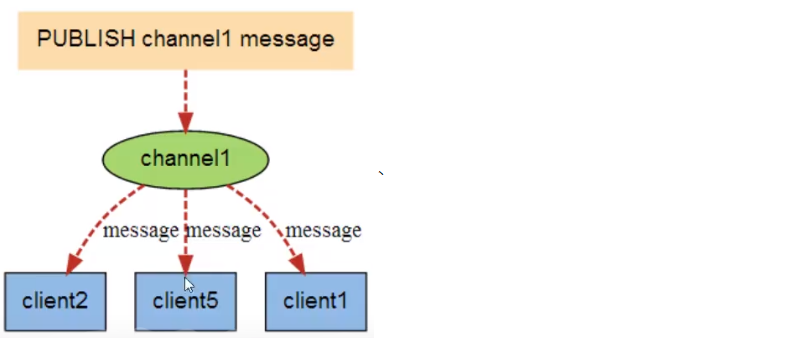
command
These commands are widely used to build instant messaging applications, such as online social chat and real-time broadcasting and real-time reminders

Test it
As follows, we open two clients to connect to our Redis service,
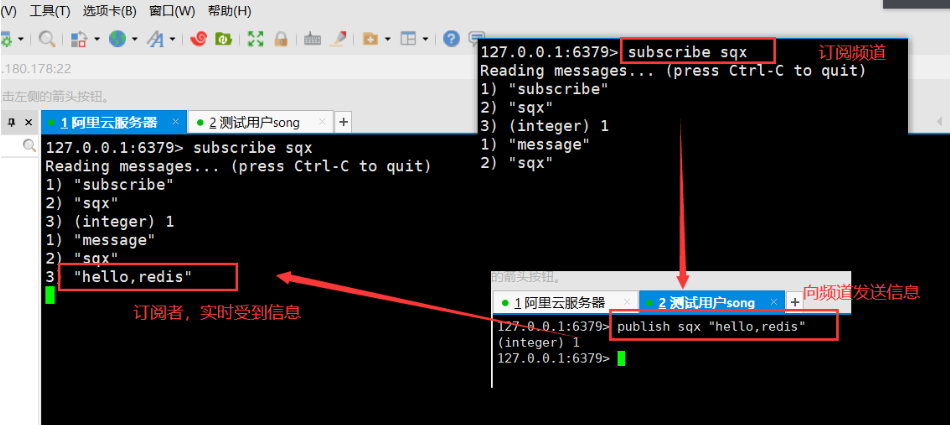
We can see that when a user subscribes to a channel, if the channel receives a message, the user can receive it in real time!
Code display:
Client 1 (subscriber):
127.0.0.1:6379> subscribe sqx            #Subscribe to a channel sqx
Reading messages... (press Ctrl-C to quit)
1) "subscribe"
2) "sqx"
3) (integer) 1
#Waiting for the push message, the following is the message pushed by our channel!
1) "message"
2) "sqx"
3) "hello,redis"
1) "message"
2) "sqx"
3) "songqixiang"
Client 2 (sender):
127.0.0.1:6379> publish sqx "hello,redis"   #The publisher publishes information to the channel sqx, and the message is "hello,redis"
(integer) 1
127.0.0.1:6379> publish sqx "songqixiang"
(integer) 1
127.0.0.1:6379>
principle
Redis is implemented in C by analyzing pubsub C file to understand the underlying implementation of publish and subscribe mechanism, so as to deepen the understanding of redis.
Redis implements PUBLISH and SUBSCRIBE functions through PUBLISH, SUBSCRIBE, PSUBSCRIBE and other commands.
Each Redis server process maintains a Redis. Net that represents the server status H / redisserver structure, PubSub of structure_ The channels attribute is a dictionary, which is used to save the information of subscribed channels. The key of the dictionary is the channel being subscribed, and the value of the dictionary is a linked list, which stores all clients subscribing to this channel.
The following two figures explain the meaning of the above words:
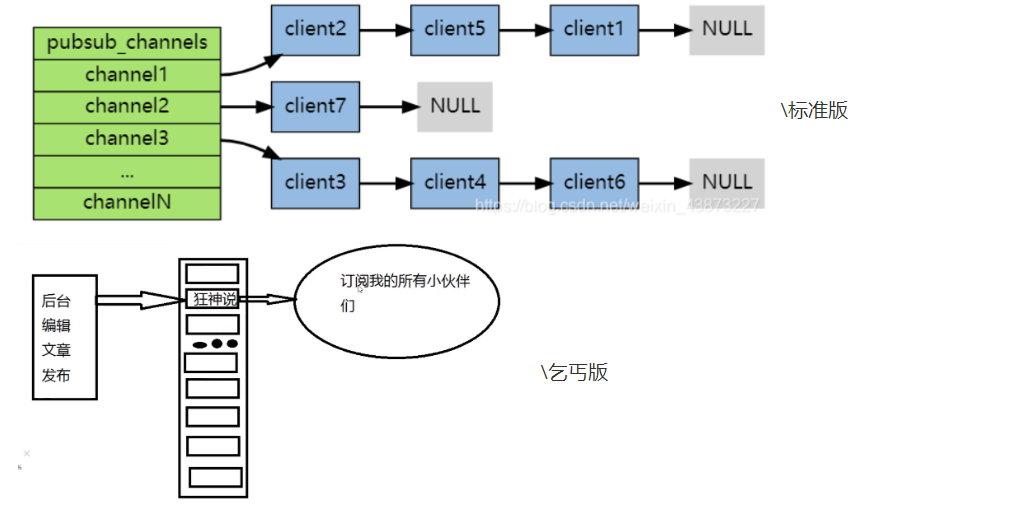
When a client subscribes, it is linked to the end of the linked list of the corresponding channel. Unsubscribing is to remove the client node from the linked list. (it seems that the picture is easy to understand, ha ha ha ha)
Application scenario
1. Real time message system
2. Real time chat (the channel can be used as a chat room and the information can be echoed back to everyone!)
3. You can subscribe to the following system
We can use Redis to do simple things, and professional technologies kafka, RabbitMQ and RocketMQ can do complex things!
Redis master-slave replication
1. Overview of master-slave replication
Master slave replication refers to copying data from one Redis server to other Redis servers. The former is called Master/Leader and the latter is called slave
(Slave/Follower),
Data replication is one-way! It can only be copied from the master node to the slave node (the master node is dominated by writing and the slave node is dominated by reading).
**By default, each Redis server is a master node, * * a master node can have 0 or more slave nodes, but each slave node can only have one master node.
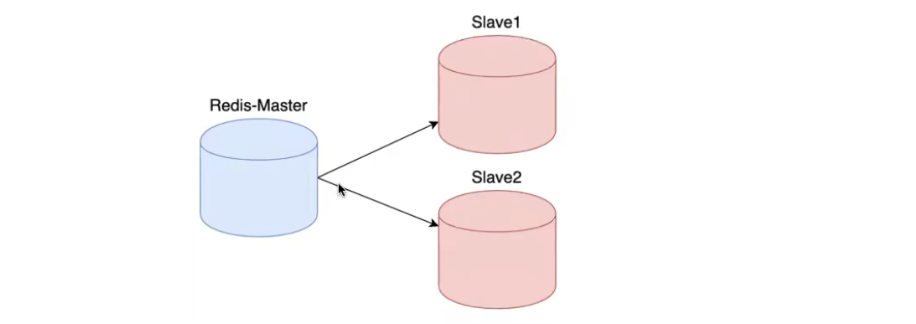
2. Function
The master-slave replication architecture is only used to solve the redundant backup of data, and the slave node is only used to synchronize data
Unable to solve: 1 Automatic failover of master node failure
3. Configure "one master and two slave"
Because we are a server to simulate the simplest "one master and two servants"
First, we simulate three servers by creating a connection!

Secondly, we should prepare three redis Conf configuration file (three copies of the original redis.conf can be copied)!
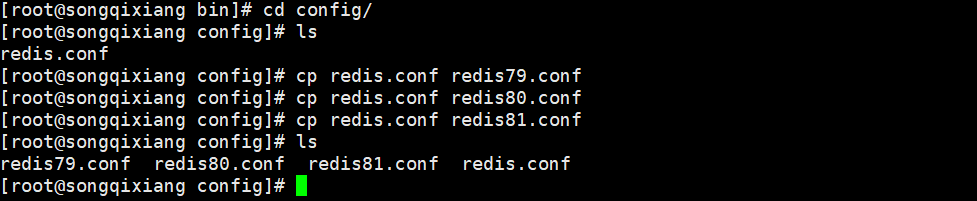
Then modify some configurations for each configuration file through Vim. The configurations to be modified are as follows

Modify the following 4 sections for the above 3 profiles
- Port: the port number occupied by the process
- pid(port ID): the ID of the process is recorded, and the file has a lock. It can prevent multiple starts of the program. [not process number]
- logfile: specify the location of the log file
- dbfilename: dumpxxx.file persistent file location
After modification, start our three Redis services
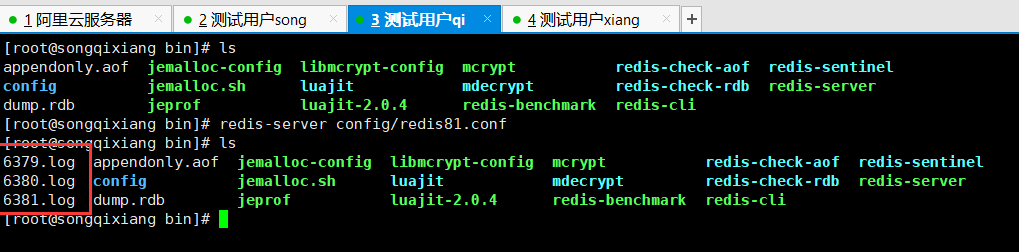
Check whether the service is started successfully!

Successfully started 3 redis services!
First, simulate access to three Redis services, * * by default, each Redis server is the primary node, * * you can use the command
info replication #View current host information!
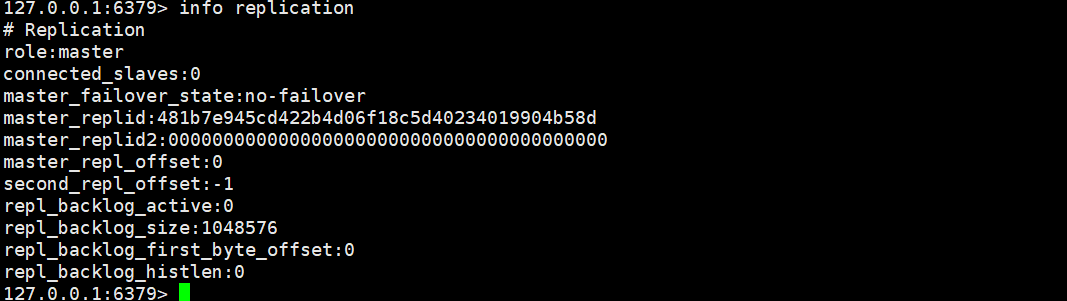
Therefore, in general, we only need to configure the slave. Recognize the boss, one master (79) and two slaves (80, 81)
Slave configuration
127.0.0.1:6380> slaveof 127.0.0.1 6379    Set current host as ip: 127.0.0.1 port:6379 Slave of service
OK
127.0.0.1:6380> info replication
# Replication
role:slave     #The current role is a slave
master_host:127.0.0.1     #You can see the information of the host
master_port:6379
master_link_status:down
master_last_io_seconds_ago:-1
master_sync_in_progress:0
slave_repl_offset:1
master_link_down_since_seconds:-1
slave_priority:100
slave_read_only:1
replica_announced:1
connected_slaves:0
master_failover_state:no-failover
master_replid:e4e53623daed1f642f950cf9256334859ddef047
master_replid2:0000000000000000000000000000000000000000
master_repl_offset:0
second_repl_offset:-1
repl_backlog_active:0
repl_backlog_size:1048576
repl_backlog_first_byte_offset:0
repl_backlog_histlen:0
127.0.0.1:6380>


#Similarly, the information of the slave can be viewed in the host
127.0.0.1:6379> info replication
# Replication
role:master
connected_slaves:2
slave0:ip=127.0.0.1,port=6380,state=online,offset=28,lag=1    #Slave information
slave1:ip=127.0.0.1,port=6381,state=online,offset=28,lag=0
master_failover_state:no-failover
master_replid:4fe01cc1fe600bf3583a09dd5b0ec8ef3bd769ce
master_replid2:0000000000000000000000000000000000000000
master_repl_offset:28
second_repl_offset:-1
repl_backlog_active:1
repl_backlog_size:1048576
repl_backlog_first_byte_offset:1
repl_backlog_histlen:28
Note: if redis is set with a password in the 6379 configuration file, add another one in the 80 and 81 files. In addition to the four previously modified attributes, one must be configured
masterauth 123456 master-slave replication cannot be realized without configuration!

After setting, use info replication again to view the current host information!
The real master-slave configuration should be configured in the configuration file, which is permanent, while what we configure through the command is temporary!
As follows: under the REPLICATION module of the configuration file
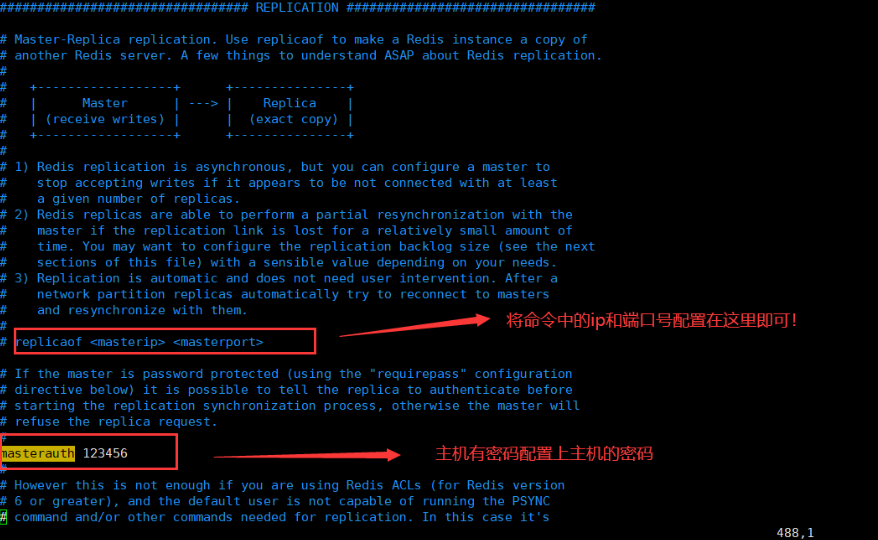
details
The host can write, and the slave can only read but not write! All information (data) in the host will be saved by the slave!
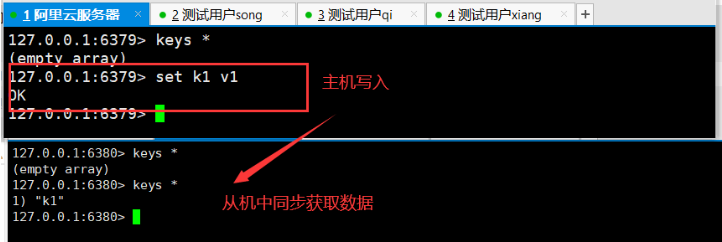
The slave is not writable. Once it is written, an error is reported

There is a problem with the test
1. If the boss is gone and the host is down, what happens?
Viewing the information from the slave, it is found that the host information remains unchanged, but there is no write operation! If the boss comes back at this time, the slave can still get the information in the host!
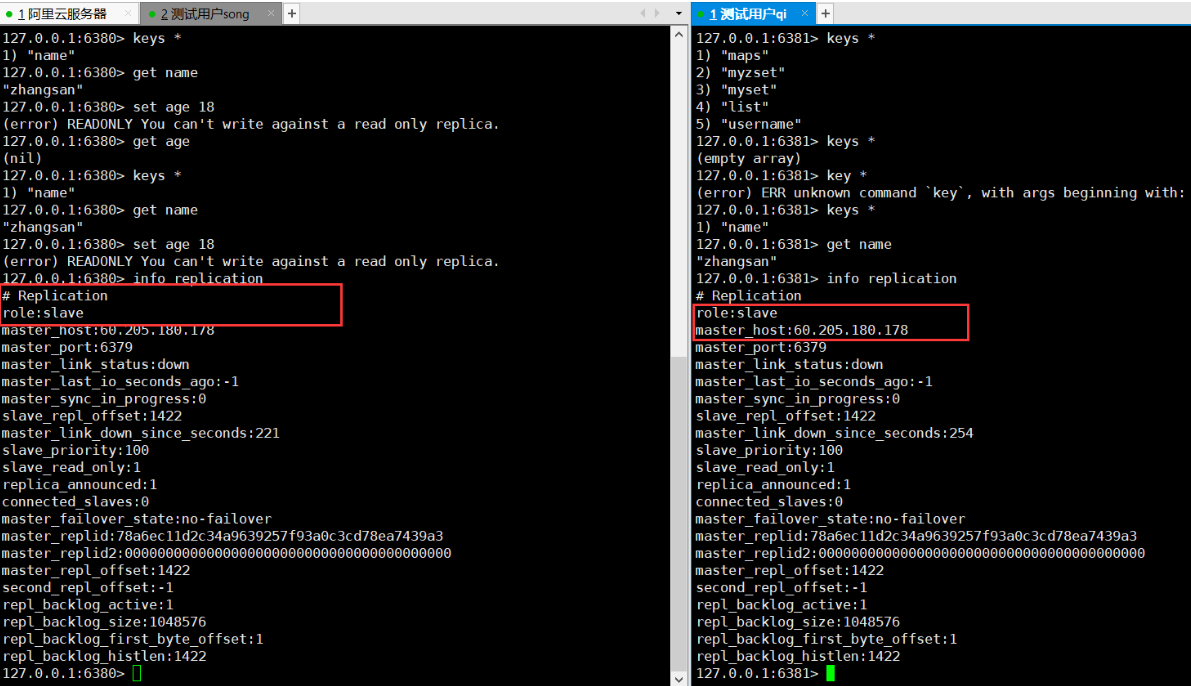
Slave or slave, no failover, master-slave replication is just data backup!
2. What happens if the slave machine goes down?
If it is a master-slave configured with our command line, it will change back to the host after restart! As long as you change back to the slave, you can immediately get all the information (data) in the host
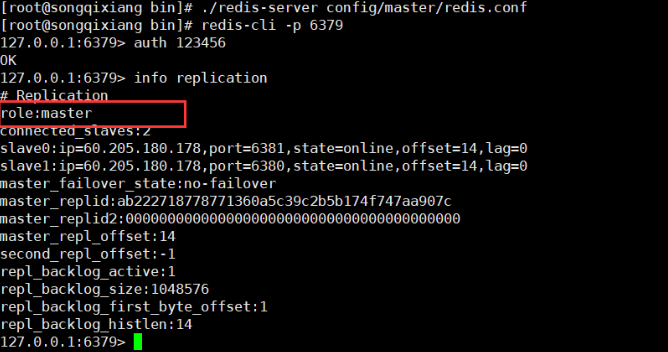
4. Principle of master-slave replication
After Slave is successfully started and connected to the master, it will send a sync synchronization command
After receiving the command, the master starts the background save process and collects all received commands for modifying the dataset. After the background process is executed, the master will transfer the entire data file to the slave and complete a complete synchronization.
- Full copy: after receiving the database file data, the slave service saves it and loads it into memory.
- Incremental replication: the Master continues to transmit all new collected modification commands to the slave in turn to complete the synchronization
However, as long as the master is reconnected, a full synchronization (full replication) will be performed automatically! Our data must be visible in the slave!
Layer by layer link
Our one master and two subordinates are as follows
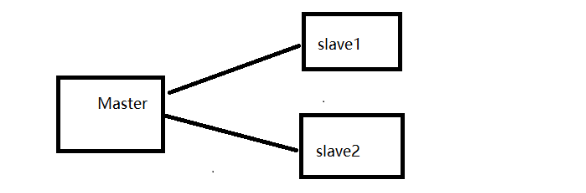
We can also design like this
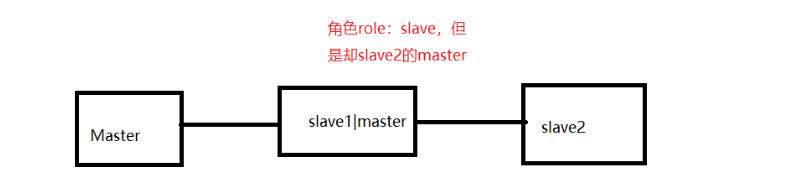
At this time, the middle node is still the slave node, which can only be read!
Note: [neither of the above two models will be used in real development!]
In the above model line, if the boss goes down, the slave does not restart and is still connected to the boss who goes down! So introduce new problems?
If the boss goes down, can a new boss be created at this time? Manually [seek to usurp the throne]
#We directly execute the following commands in the slave. Currently, the slave becomes the host
127.0.0.1:6380> slaveof no one
OK
Other nodes can be manually connected to our new master node! If the boss is repaired at this time, you can only reconnect and cannot restore the boss status!
The above is manual configuration, and then the automatic configuration mode is introduced, that is, sentry mode!
Sentinel mechanism
Automatic election mode!
1. Overview
The method of master-slave switching technology is: when the master server is down, a slave server needs to be manually switched to the master server, which requires manual intervention, which is laborious and laborious, and the service will not be available for a period of time. This is not a recommended way. More often, we give priority to Sentinel mode. Redis has officially provided Sentinel architecture since 2.8 to solve this problem. It can monitor whether the host fails in the background. If it fails, it will automatically convert from database to main database according to the number of votes.
Sentinel mode is a special mode. Firstly, Redis provides sentinel commands. Sentinel is an independent process. As a process, it will run independently. The principle is that the sentinel sends a command and waits for the response of the Redis server, so as to monitor multiple running Redis instances.
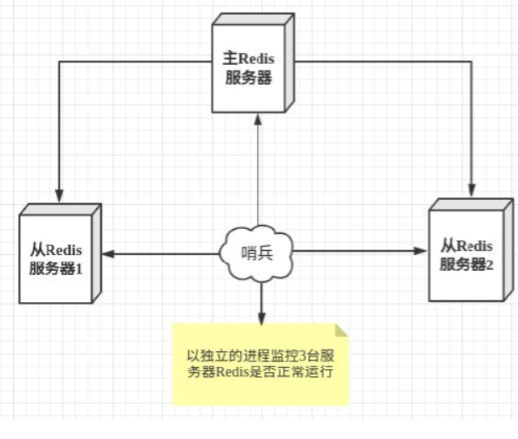
The role of sentinels:
- Send a command to let Redis server return to monitor its running status, including master server and slave server.
- When the sentinel detects that the master is down, it will automatically switch the slave to the master, and then notify other slave servers through publish subscribe mode to modify the configuration file and let them switch hosts.
However, there may be problems when a sentinel process monitors the Redis server. Therefore, we can use multiple sentinels for monitoring. Each sentinel will also be monitored, which forms a multi sentinel mode.
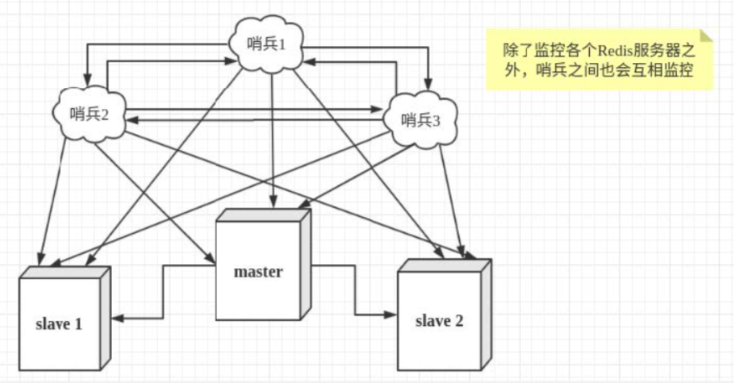
Assuming that the main server goes down, sentry 1 detects this result first, and the system will not fail immediately. Sentry 1 subjectively thinks that the main server is unavailable, which becomes a subjective offline phenomenon. When the following sentinels also detect that the primary server is unavailable and the number reaches a certain value, a vote will be held between sentinels. The voting result is initiated by one sentinel to perform the "failover" operation. After the switch is successful, each sentinel will switch its monitored slave server to the host through the publish and subscribe mode. This process is called objective offline.
2. Sentinel test
Based on the master-slave replication mode, our current status is "one master and two slaves"
1. Configure (create a new sentinel.conf configuration file with vim) and configure as follows!

The sentry monitors the redis service of our host 6379. 1 means that if the service goes down, save will vote. The host with the largest number of votes will become the host!
2. Activate the sentry
[root@songqixiang bin]# redis-sentinel config/sentinel.conf       #Start command!
8772:X 27 Jun 2021 13:45:37.932 # oO0OoO0OoO0Oo Redis is starting oO0OoO0OoO0Oo
8772:X 27 Jun 2021 13:45:37.932 # Redis version=6.2.4, bits=64, commit=00000000, modified=0, pid=8772, just started
8772:X 27 Jun 2021 13:45:37.932 # Configuration loaded
8772:X 27 Jun 2021 13:45:37.933 * monotonic clock: POSIX clock_gettime
                _._
           _.-``__ ''-._
      _.-``    `.  `_.  ''-._           Redis 6.2.4 (00000000/0) 64 bit
  .-`` .-```.  ```\/    _.,_ ''-._
 (    '      ,       .-`  | `,    )     Running in sentinel mode
 |`-._`-...-` __...-.``-._|'` _.-'|     Port: 26379       #Sentinel port
 |    `-._   `._    /     _.-'    |     PID: 8772
  `-._    `-._  `-./  _.-'    _.-'
 |`-._`-._    `-.__.-'    _.-'_.-'|
 |    `-._`-._        _.-'_.-'    |           https://redis.io
  `-._    `-._`-.__.-'_.-'    _.-'
 |`-._`-._    `-.__.-'    _.-'_.-'|
 |    `-._`-._        _.-'_.-'    |
  `-._    `-._`-.__.-'_.-'    _.-'
      `-._    `-.__.-'    _.-'
          `-._        _.-'
              `-.__.-'

8772:X 27 Jun 2021 13:45:37.937 # Sentinel ID is bbf206afdfb71e5ece1bcc92251a477201f845bb
8772:X 27 Jun 2021 13:45:37.937 # +monitor master myredis 127.0.0.1 6379 quorum 1
8772:X 27 Jun 2021 13:46:07.990 # +sdown master myredis 127.0.0.1 6379
If our Master node is broken, we will select a server from the "slave" at this time!
At this time, it is useless for the Master to come back. It can only be reconnected or changed to slave. The new host dominates the world!
3. Springboot operation sentry
Our sentinel mechanism reselects our listening port. Once the master host goes down, it will reselect the master. How to configure this in our SpringBoot?

Note: our sentinels refuse other connections by default. We need to go to sentinel Conf append a configuration
bind 0.0.0.0 #Allow all hosts to access!
It's done!
4. Configuration of sentinel mode
# Example sentinel.conf

#The port on which the sentinel sentinel instance runs is 26379 by default. If the sentinel cluster is simulated and configured, multiple configuration files are required to configure different ports!
port 26379


#Sentry sentinel's working directory
dir /tmp

#ip port of the redis master node monitored by sentinel

#The master name can be named by itself. The name of the master node can only be composed of letters A-z, numbers 0-9 and the three characters ". -" form.

#Quorumwhen the sentinel of these quorum s thinks that the master master node is lost, it objectively thinks that the master node is lost

#sentinel monitor <master-name> <ip> <redis-port> <quorum>

sentinel monitor mymaster 127.0.0.1 6379 1


When in Redis Enabled in the instance requirepass foobared Authorization password so that all connections Redis The client of the instance must provide a password

Set up sentry sentinel The password for connecting master and slave. Note that the same authentication password must be set for master and slave

sentinel auth-pass <master-name> <password>

sentinel auth-pass mymaster MySUPER--secret-0123passw0rd


#After the specified number of milliseconds, the primary node does not respond to the sentinel sentinel. At this time, the sentinel subjectively thinks that the primary node goes offline for 30 seconds by default

sentinel down-after-milliseconds <master-name> <milliseconds>

sentinel down-after-milliseconds mymaster 30000


#This configuration item specifies the maximum number of slave s that can synchronize the new master at the same time when a failover active / standby switch occurs,

#The smaller the number, the longer it takes to complete the failover,

#However, if this number is larger, it means that more slave s are unavailable due to replication.

#You can set this value to 1 to ensure that only one slave is in a state that cannot process command requests at a time.


sentinel parallel-syncs <master-name> <numslaves>

sentinel parallel-syncs mymaster 1


#Failover timeout can be used in the following aspects:

1. Same sentinel For the same master twice failover The interval between.

2. Be a slave From a wrong master There the synchronization data starts to calculate the time. until slave Corrected to correct master When synchronizing data there.

3.When you want to cancel an ongoing failover Time required.

4.When carried failover When, configure all slaves Point to new master Maximum time required. But even after this timeout, slaves Will still be correctly configured to point to master,But you don't parallel-syncs Here comes the configured rule

The default is three minutes

sentinel failover-timeout <master-name> <milliseconds>

sentinel failover-timeout mymaster 180000


SCRIPTS EXECUTION

#Configure the script to be executed when an event occurs. You can notify the administrator through the script. For example, send an email to notify relevant personnel when the system is not running normally.

#There are the following rules for the running results of scripts:

#If the script returns 1 after execution, the script will be executed again later. The number of repetitions is currently 10 by default

if#After the script is executed, it returns 2, or a return value higher than 2. The script will not be executed repeatedly.

#If the script is terminated due to receiving a system interrupt signal during execution, the behavior is the same as when the return value is 1.

#The maximum execution time of a script is 60s. If this time is exceeded, the script will be terminated by a SIGKILL signal and then re executed.

#Notification script: this script will be called when any warning level event occurs in sentinel (such as subjective failure and objective failure of redis instance),

#At this time, the script should notify the system administrator about the abnormal operation of the system through e-mail, SMS, etc. When the script is called, two parameters will be passed to the script,

#One is the type of event,

#One is the description of the event.

#If sentinel If the script path is configured in the conf configuration file, you must ensure that the script exists in this path and is executable, otherwise sentinel cannot be started successfully.

#Notification script

sentinel notification-script <master-name> <script-path>

sentinel notification-script mymaster /var/redis/notify.sh


#Client reconfiguration master node parameter script

#When a master changes due to failover, this script will be called to notify the relevant clients of the change of the master address.

#The following parameters will be passed to the script when calling the script:

<master-name> <role> <state> <from-ip> <from-port> <to-ip> <to-port>

at present<state>Always“ failover",

<role>Yes“ leader"Or“ observer"One of them.

parameter from-ip, from-port, to-ip, to-port It's used with old ones master And new master(That is, the old slave)Communicable

#This script should be generic and can be called multiple times, not targeted.

sentinel client-reconfig-script <master-name> <script-path>

sentinel client-reconfig-script mymaster /var/redis/reconfig.sh

[The above configuration is generally configured by operation and maintenance!]
5. Advantages and disadvantages of sentinel mechanism
advantage:
- Sentinel cluster is based on master-slave replication mode. It has all the advantages of master-slave replication
- The master and slave can be switched, the fault can be transferred, and the system availability is better
- Sentinel mode is the upgrade of master-slave mode. It is more robust from manual to automatic
Disadvantages:
- Single node concurrency pressure: if we only build a sentinel or master-slave structure, multiple requests will hit a master at the same time!
- The upper limit of single node physical disk: with the access of multiple requests, redis will perform persistence operation, and our aof files will be appended all the time, resulting in increasing size!
- The configuration of sentinel mode is actually very troublesome. There are many configuration items
In order to solve the above problems of concurrency pressure and disk upper limit, Redis cluster is introduced!
Redis cluster (key)
Redis started to support cluster mode after 3.0. At present, redis cluster supports automatic node discovery, slave master election and fault tolerance, and online sharding. reshard: reassign
Cluster architecture diagram:
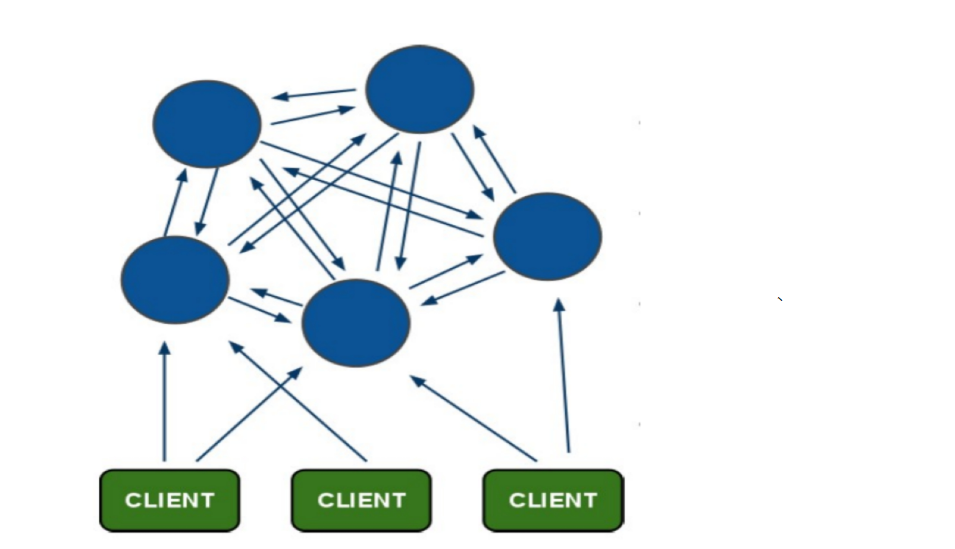
- All redis nodes are interconnected (PING-PONG mechanism), and binary protocols are used internally to optimize transmission speed and bandwidth
- The failure of a node takes effect only when more than half of the nodes in the cluster detect failure
- The client is directly connected to the redis node and does not need an intermediate proxy layer The client does not need to connect all nodes in the cluster, but any available node in the cluster
- Redis cluster maps all physical nodes to [0-16383] slots. The cluster is responsible for maintaining node < - > slot < - > value
1. Cluster principle
graphic
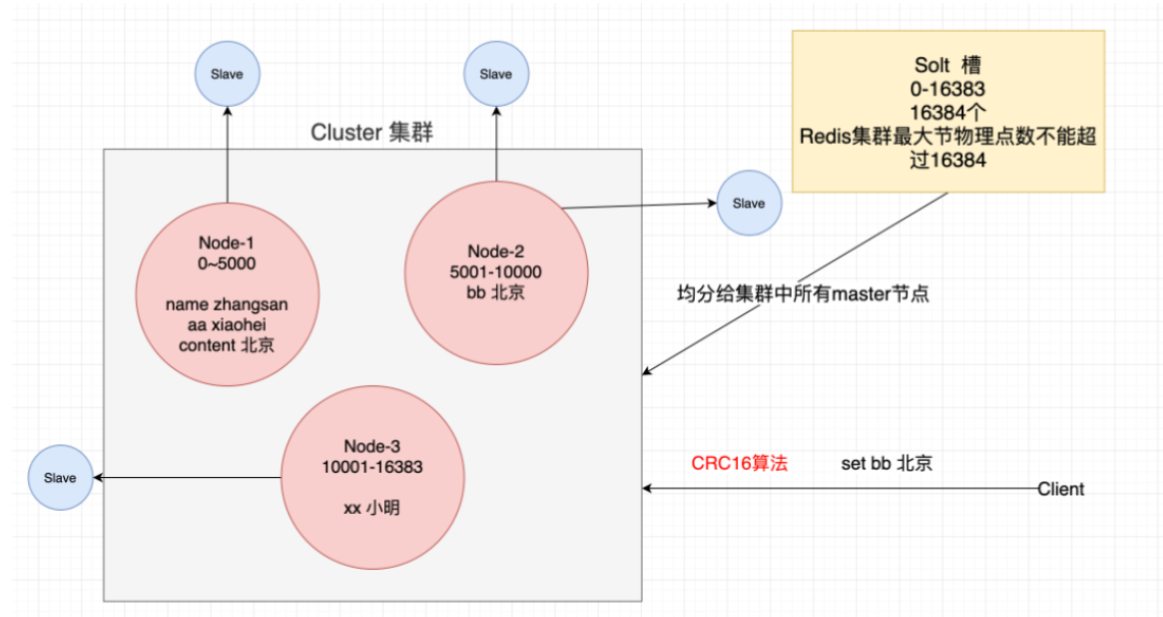
CRC16 algorithm features:
- Perform CRC16 calculation for all key s in cluster mode, and the calculation result is always between 0 and 16386
- When performing CRC16 calculation on the client's key, the same key has been calculated by CRC16 for many times, and the results are always consistent
- Perform CRC16 calculation on different key s of the client, and the calculation results will show that the results are known
CRC16 Calculation formula: slot = CRC16(key) & 16383. //Similar to our hash to determine the bucket position!
Summary:
Our Redis cluster has a total of [0 ~ 16383] slots, that is, 16384 slots are equally distributed to the physical nodes in our cluster. Therefore, it is concluded that there can be no more than 16384 nodes in the cluster to avoid that the nodes cannot allocate slots. When we store values to Redis, for example, execute set name zhangsan, We will first calculate the storage slot of the name key by CRC16 algorithm, so we can choose which node in the cluster to store our value! Therefore, we can also draw a conclusion: no matter which physical node the client is connected to, it will redirect to the node where our slot is located when it is worth saving, so Redis can directly connect to the cluster!
2. Cluster construction
Let's build a cluster manually. The following operations are based on redis4 0, the new version command will be different
One is whether the nodes in the cluster are available, which is the process of selecting the master nodes used in the cluster. If more than half of the nodes think that the current node is dead, then the current node is dead. Therefore, it is recommended that the number of nodes should be odd when building a redis cluster. Building a cluster requires at least three master nodes, three slave nodes and at least six nodes.
2.1. Create a cluster
1. To install the ruby environment, our cluster needs the ruby script
# 1. Prepare the environment to install ruby and redis cluster dependencies
- yum install -y ruby rubygems
- gem install redis-xxx.gem
2. Create 7 directories and copy redis Conf configuration file to each directory!
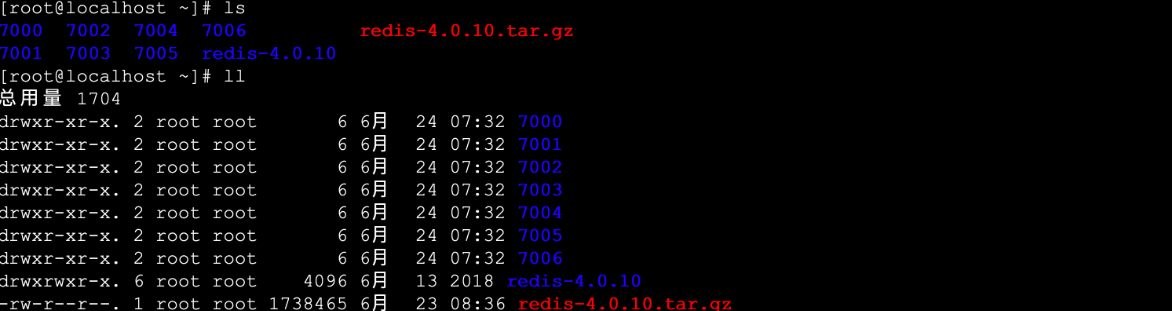
# 3. Copy a configuration file for each directory
[root@localhost ~]# cp redis-4.0.10/redis.conf 7000/
[root@localhost ~]# cp redis-4.0.10/redis.conf 7001/
[root@localhost ~]# cp redis-4.0.10/redis.conf 7002/
[root@localhost ~]# cp redis-4.0.10/redis.conf 7003/
[root@localhost ~]# cp redis-4.0.10/redis.conf 7004/
[root@localhost ~]# cp redis-4.0.10/redis.conf 7005/
[root@localhost ~]# cp redis-4.0.10/redis.conf 7006/
3. Modify redis. In each directory Conf and start
# 4. Modify different directory configuration files
- port 	6379 .....                		 //Modify port
- bind  0.0.0.0                   		 //Open remote connection
- cluster-enabled  yes 	        			 //Turn on cluster mode
- cluster-config-file  nodes-port.conf //Cluster node profile
- cluster-node-timeout  5000      	   //Cluster node timeout
- appendonly  yes   		               //Enable AOF persistence
# 5. Specify different directory configuration files to start seven nodes
- [root@localhost bin]# ./redis-server  /root/7000/redis.conf
- [root@localhost bin]# ./redis-server  /root/7001/redis.conf
- [root@localhost bin]# ./redis-server  /root/7002/redis.conf
- [root@localhost bin]# ./redis-server  /root/7003/redis.conf
- [root@localhost bin]# ./redis-server  /root/7004/redis.conf
- [root@localhost bin]# ./redis-server  /root/7005/redis.conf
- [root@localhost bin]# ./redis-server  /root/7006/redis.conf
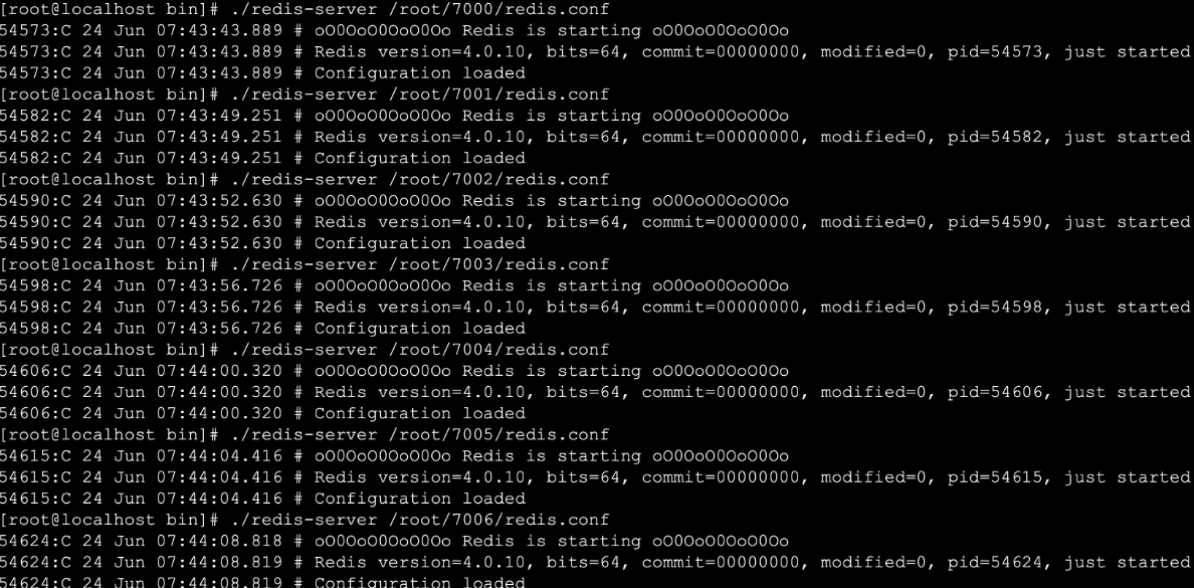
# 6. View process
- [root@localhost bin]# ps aux|grep redis

Start successfully! So far, our Redis service is ready!
4. Create cluster
# 1. Copy the cluster operation script to the bin directory
- [root@localhost bin]# cp /root/redis-4.0.10/src/redis-trib.rb .

# 2. Create a cluster
- ./redis-trib.rb create --replicas 1 192.168.202.205:7000 192.168.202.205:7001 192.168.202.205:7002 192.168.202.205:7003 192.168.202.205:7004 192.168.202.205:7005

#It should be noted here that 1 in the cluster means that each master node has a slave node, so the first three Redis services that follow are the master and the last three are our slave nodes!
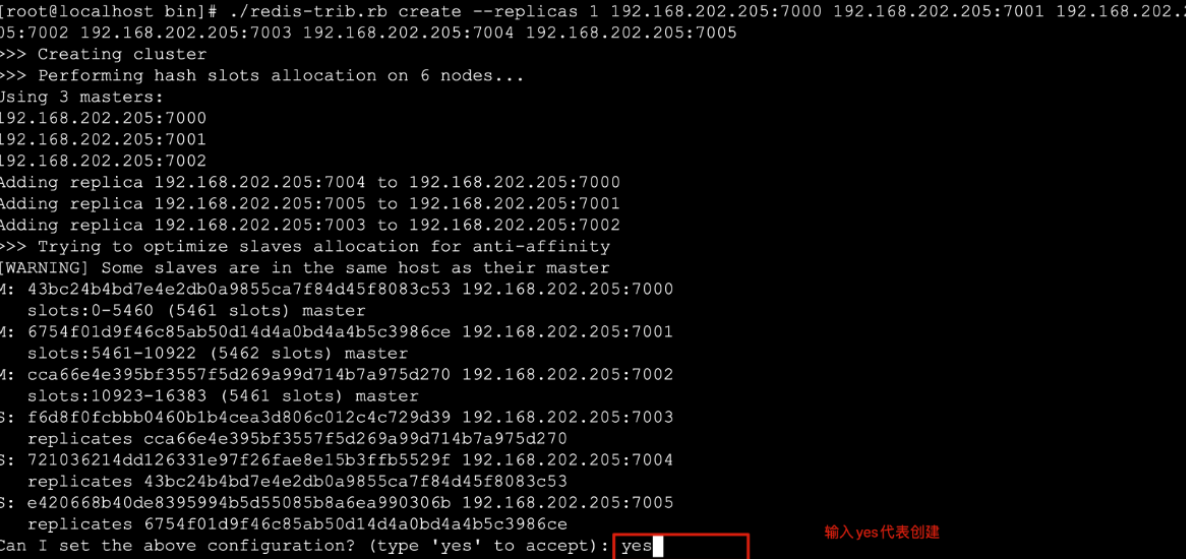
Enter yes for successful cluster creation and no for canceling cluster creation!
# 3. The cluster is created successfully. The following prompt appears
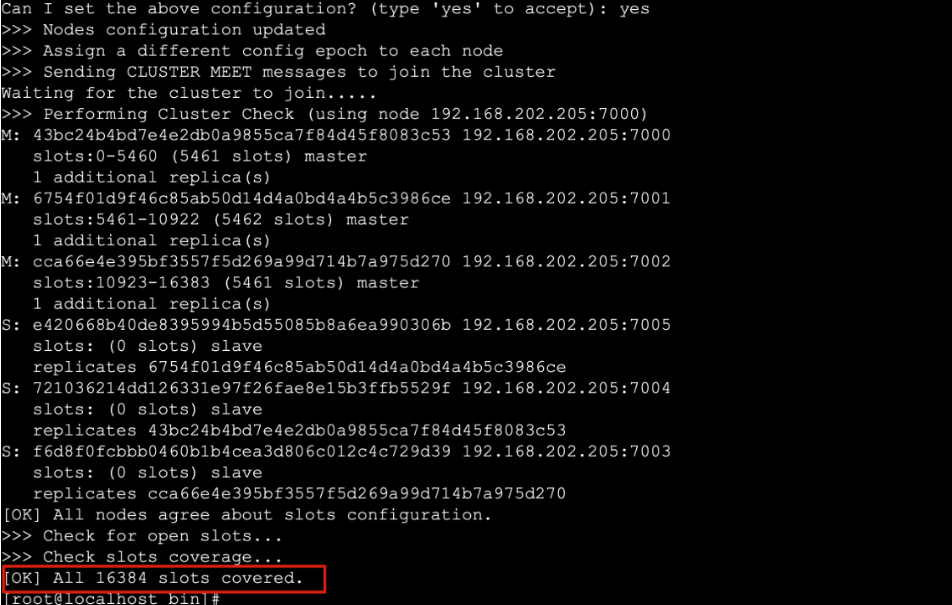
Cluster creation completed!
2.2. Viewing clusters
# 1. check cluster status [any node in the original cluster] [none]
- ./redis-trib.rb check 192.168.202.205:7000

# 2. Cluster node status description
- Master node
	Master node exists hash slots,And the of the master node hash slots No cross
	The master node cannot be deleted
	A master node can have multiple slave nodes
	When the primary node goes down, the primary node is automatically elected among multiple replicas

- Slave node
	No slave nodes hash slots
	You can delete from a node
	The slave node is not responsible for writing data,Only responsible for data synchronization
2.3. Adding a master node
# 1. Add the primary node add node [new node] [any node in the original cluster]
- ./redis-trib.rb  add-node 192.168.1.158:7006  192.168.1.158:7005
- be careful:
	1.The node must be started in cluster mode
	2.By default, this node is master Node form addition
2.4. Add slave node
# 1. Add slave node add node -- slave [newly added node] [any node in the cluster]
- ./redis-trib.rb  add-node --slave 192.168.1.158:7006 192.168.1.158:7000
- be careful:
	No master node was specified when adding a replica node,redis The current replica node is randomly added to the master node with fewer replica nodes

# 2. Add a master node for the determined master node add node -- slave -- Master id master node id [newly added node] [any node in the cluster]
- ./redis-trib.rb  add-node --slave --master-id 3c3a0c74aae0b56170ccb03a76b60cfe7dc1912e 127.0.0.1:7006  127.0.0.1:7000
2.5. Delete replica node
# 1. Delete node del node [any node in the cluster] [delete node id]
- ./redis-trib.rb  del-node 127.0.0.1:7002 0ca3f102ecf0c888fc7a7ce43a13e9be9f6d3dd1
- be careful:
 1.The deleted node must be a slave node or not assigned hash slots Node of
2.6 cluster online segmentation
# 1. Online partition reshard [any node in the cluster] [none]
- ./redis-trib.rb  reshard  192.168.1.158:7000
Extension problem
How does the group determine whether a node hangs?
A: first of all, each node contains the information of all master nodes and slave nodes of the cluster. They judge whether the node can be connected by ping pong. If more than half of the nodes fail to respond when pinging a node, the cluster considers that the node is down, and then connects to its standby node.
3. Spring boot operation Redis cluster
It's simple
1. In our application The configuration in properties is as follows:
#Redis cluster configuration
spring.redis.cluster.nodes=192.168.202.205:7000 192.168.202.205:7001 192.168.202.205:7002 192.168.202.205:7003 192.168.202.205:7004 192.168.202.205:7005

You can write to any node in the cluster. The purpose of configuring all nodes in the cluster is to prevent a connected node master Node down, unable to find cluster!
2. Be careful to open the firewall, security group and release port of each server
Redis implements distributed Session management
1. Overview
First review Mamcache's solution to Session sharing, and then compare Redis's solution
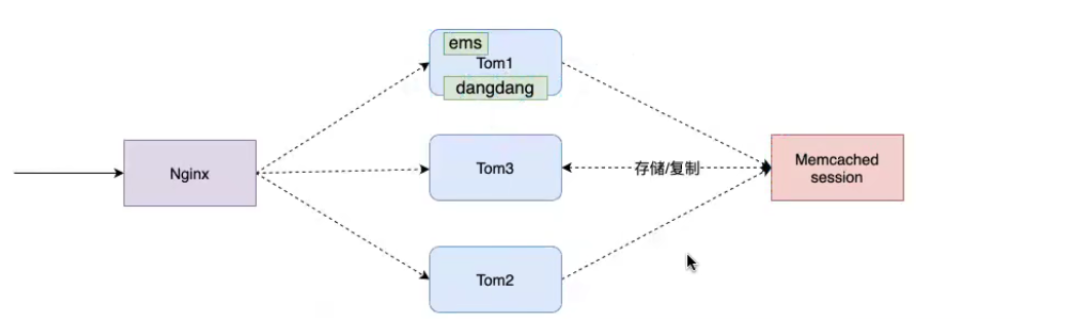
Implementation process:
When a request enters Nginx and is allocated to tomcat1 through load balancing policy, tomcat1 creates a Session, and we will copy a copy of the Session to our Memcached. When the user next initiates a request to enter Nginx, it is allocated to our tomcat3 through load balancing policy, so that we can use the id of the Session, Go to Memcached to find the corresponding Session and get the corresponding data!
MSM: memcached session Manager
-
Integration: 1. Introduce Memcached integration jar package under tomcat's lib directory 2. Context under tomcat's conf directory Configure tomcat integration Memcached in XML
-
Principle: tomcat application services are integrated through Memcached, and the sessions of all applications deployed in the application services are all handed over to our Memcached for management
Configuring based on our tomcat server will hand over the sessions of all applications on the service to Memcached for management
Generally speaking, our Memcached can realize our Session sharing, but it has the following disadvantages
- The compatibility between Memcached and Tomcat is not very good
- We need a certain timeout time and policy for Memcached backup!
Therefore, Redis is introduced to solve distributed Session sharing
The session management of redis is to use the session management solution provided by spring to hand over an application session to redis for storage. All session requests in the whole application will go to redis to obtain the corresponding session data.
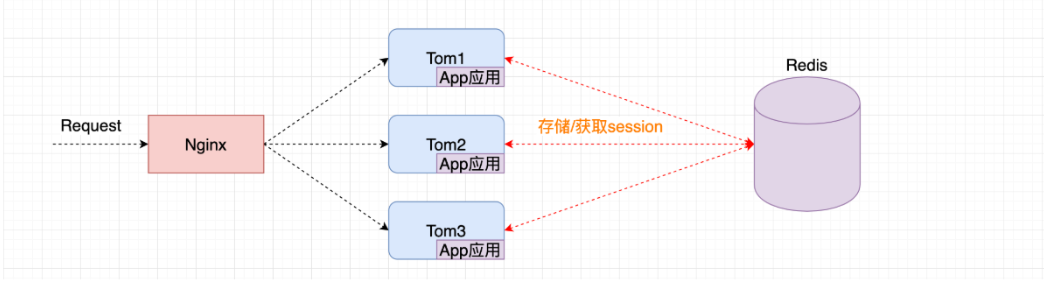
RSM : Redis Session Manager
- Integration: Integration Based on an application
- Principle: Session management is based on application mode. Premise: the application must be a Spring application!
2. Springboot development Session management
1. Introduce dependency
<dependency>
  <groupId>org.springframework.session</groupId>
  <artifactId>spring-session-data-redis</artifactId>
</dependency>
2. Develop Session management configuration class
@Configuration
@EnableRedisHttpSession   //The essence is the function of this annotation
public class RedisSessionManager {

}
//After completing the above, the Session of the current application will be saved in our Redis!
3. Just pack and test!

You can realize the function of accumulation!
Note: every time you modify the data in the Session in java, you must synchronize the new data to our Redis!
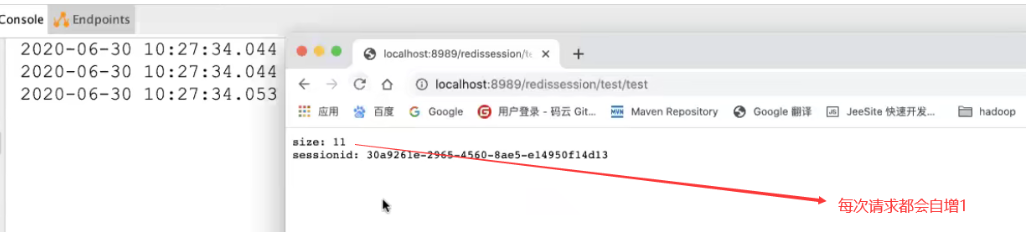
The above implementation is based on a single application. Redis is used to manage sessions. The distributed implementation of Session sharing is omitted, which is consistent with the schematic diagram!
Finish scattering flowers!
100000 word notes, code words are not easy to praise!
