Reinforcement learning, supervised learning and unsupervised learning are the three directions of machine learning. It mainly solves decision-making problems, especially continuous decision-making problems.

Insert a reinforcement learning block diagram where
Learning Agent: strengthen the "learner" in the learning system;
Environment: the behavior of the subject is generated in the environment and the environment has an impact on the subject;
State: a collection of states that the environment feeds back to the subject;
Reward: a collection of feedback from the environment to the subject's behavior;
Action: a collection of actions of the subject in the environment.
Reinforcement learning is classified according to different conditions. This article talks about value-based offline reinforcement learning: Q-learning.
Q-learning
The purpose of Q-learning is to learn the value of a specific Action under a specific State. Create a Q-table, with State as the row and Action as the column, and update the Q-table through the Reward brought by each Action.
Q-learning belongs to offline learning. It is a learning of different strategies. The so-called different strategies mean that action strategies and evaluation strategies are not one strategy.
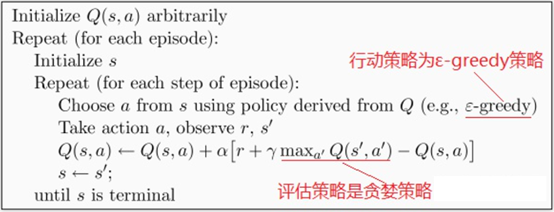
Q is Q(s,a), which is the expectation that taking Action a(a ∈ A) in the s State (s ∈ S) at a certain time can obtain benefits. The environment will feed back the corresponding Reward r according to the Action of the agent. Therefore, the main idea of the algorithm is to build the State and Action into a Q-table to store the Q value, and then select the Action that can obtain the maximum benefits according to the Q value.
The source code analysis is attached below. For partners who need formula derivation, please refer to the blogger's blog:
https://blog.csdn.net/qq_30615903/article/details/80739243
Several notes:
1. The window mentioned below can also be called canvas. I prefer to call it window;
2. At the end of the source code, a Baidu cloud link will be attached to you. Because the file is not very large, you can put it on Baidu cloud. If you put github, you may encounter problems such as lack of Intranet connectivity, which is not as good as Baidu cloud;
3. If there is any mistake in the explanation, please forgive me and inform the blogger in time to learn from each other. Thank you.
Here, the analysis is carried out according to the operation sequence:
The main file is q_learning_agent.py, first run the main function, and an env class will be generated, which inherits the parent class Env(). First initialize init:
Main function:
if __name__ == "__main__":
    env = Env()
    agent = QLearningAgent(actions=list(range(env.n_actions)))
    for episode in range(1000):  #1000 cycles
        state = env.reset()
        while True:
            env.render()
            # agent generates action
            action = agent.get_action(str(state))   #str() converts a number to a string
            next_state, reward, done = env.step(action)
            # Update Q table
            agent.learn(str(state), action, reward, str(next_state))
            state = next_state   #Status update
            env.print_value_all(agent.q_table)
            # When you reach the end, stop the game and start a new round of training
            if done:
                break
env = Env():
class Env(tk.Tk):    #Create a parent window
    def __init__(self):
        super(Env, self).__init__()    #super(Ecv,self) first finds the parent class (tk.Tk) of Env, and then converts the object of class env to the object of class (tk.Tk)
        self.action_space = ['u', 'd', 'l', 'r']   #Action space, up, down, left and right
        self.n_actions = len(self.action_space)   #Number of actions
        self.title('Q Learning')   #Should be window title
        self.geometry('{0}x{1}'.format(HEIGHT * UNIT, HEIGHT * UNIT))    #Window size
        self.shapes = self.load_images()   #Load the picture into the window
        self.canvas = self._build_canvas()   #Create canvas related properties
        self.texts = []   #Create an empty list
Relevant notes are written later. Here are some difficult points. The window size is 500 × 500, the initial value is assigned at the beginning of the file. The whole action has four actions, namely, up, down, left and right movement, which have a value corresponding to 0, 1, 2 and 3 respectively;
Then load_images():
    def load_images(self):
        rectangle = PhotoImage(
            Image.open("../img/rectangle.png").resize((65, 65)))   #Load pictures into load_images, picture size 65 × 65, each grid size of the window is 100 × one hundred
        triangle = PhotoImage(
            Image.open("../img/triangle.png").resize((65, 65)))
        circle = PhotoImage(
            Image.open("../img/circle.png").resize((65, 65)))

        return rectangle, triangle, circle
Why is each grid in the window 100 × 100 later, here is load_ The functions of the images function can be understood in this way. It is equivalent to loading images, that is, pre loading them and then putting them into the window;
_build_canvas:
    def _build_canvas(self):   #Create canvas related properties
        canvas = tk.Canvas(self, bg='white',
                           height=HEIGHT * UNIT,
                           width=WIDTH * UNIT)   #Window properties, the background color is white, and the height and width are 500
        # create grids
        for c in range(0, WIDTH * UNIT, UNIT):  # 0~400 by 100, the length is 400, draw a line every 100, x from left to right and y from top to bottom
            x0, y0, x1, y1 = c, 0, c, HEIGHT * UNIT
            canvas.create_line(x0, y0, x1, y1)    #Create Line
        for r in range(0, HEIGHT * UNIT, UNIT):  # 0~400 by 100
            x0, y0, x1, y1 = 0, r, HEIGHT * UNIT, r
            canvas.create_line(x0, y0, x1, y1)

        # add img to canvas to add graphics to the canvas
        self.rectangle = canvas.create_image(50, 50, image=self.shapes[0])
        self.triangle1 = canvas.create_image(250, 150, image=self.shapes[1])
        self.triangle2 = canvas.create_image(150, 250, image=self.shapes[1])
        self.circle = canvas.create_image(250, 250, image=self.shapes[2])

        # pack all
        canvas.pack()   #Packing

        return canvas
The vaguer thing here may be the for loop. The for loop means to cut the window and cut it into 5 × 5-size table similar to a grid map. As for why it is 0 ~ 400 and circulates every 100, this is the syntax feature of python. I don't explain much.
Auxiliary understanding of enlarged drawing:
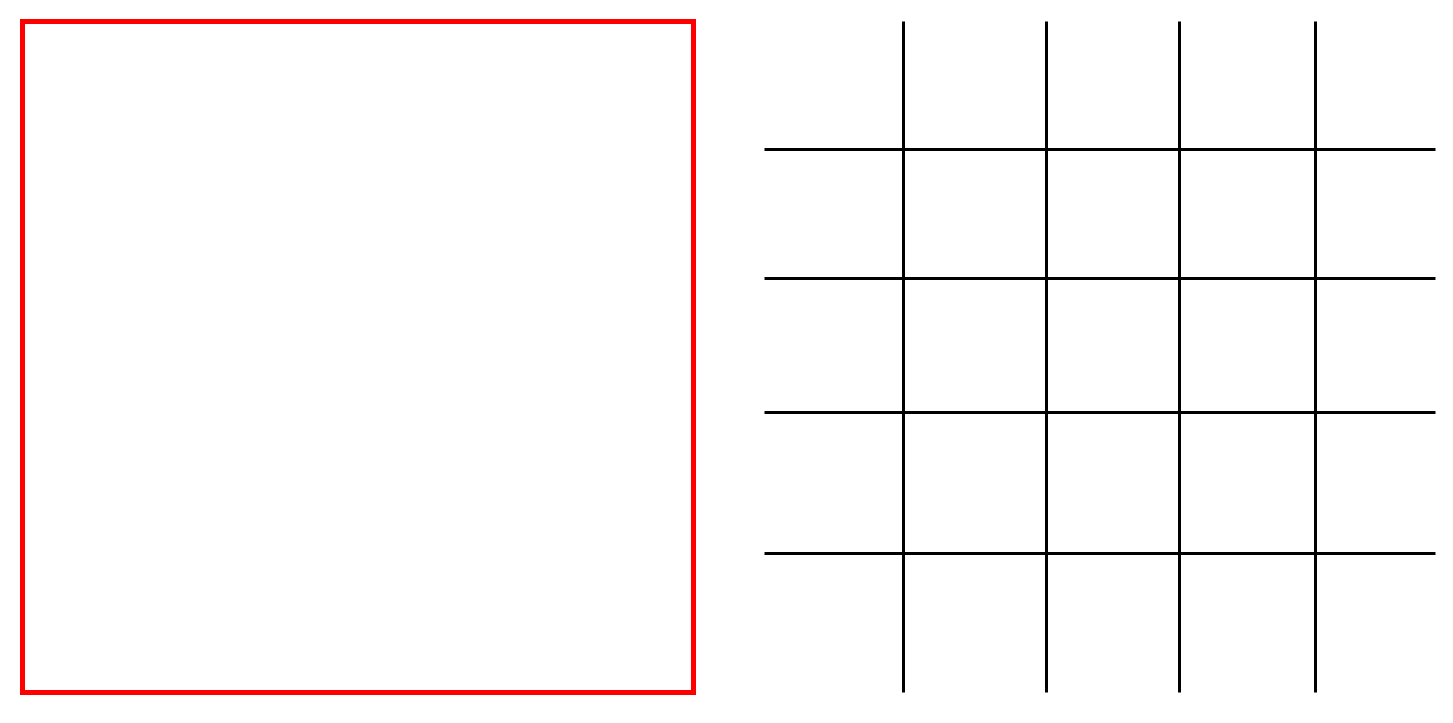
For example, the red box on the left (in fact, there is no box, just easy to understand) is a window, and the right is divided into 5 × 5.
Then put in the just preloaded graphics, two triangles and a circle. If a triangle is encountered, reward < 0 indicates punishment; If a circle is encountered, reware > 0 indicates reward.
Then qlearning agent:
Initialization defines several parameters, such as learning rate and coefficients of several strategies, and defines Q-table in dictionary format:
class QLearningAgent:
    def __init__(self, actions):
        # actions = [0, 1, 2, 3]
        self.actions = actions   #There are four actions, using 0, 1, 2, 3 instead of up, down, left and right
        self.learning_rate = 0.01    #Learning rate
        self.discount_factor = 0.9    #Reward decay coefficient
        self.epsilon = 0.1    #Strategy coefficient
        self.q_table = defaultdict(lambda: [0.0, 0.0, 0.0, 0.0])
Enter the main function loop for episode in range(1000):
state = env.reset():
    def reset(self):
        self.update()    #Merge two sets. Duplicate elements are merged. No duplicate elements coexist
        time.sleep(0.5)   #Postpone the running of the calling thread by 0.5s, that is, the following command line cannot run until 0.5s, which means that the data above should be merged before training
        x, y = self.canvas.coords(self.rectangle)    #Position of rectangle, initial position is (50,50)
        self.canvas.move(self.rectangle, UNIT / 2 - x, UNIT / 2 - y)   #Turn back to the starting point, first grid
        self.render()   #Is an updated function
        # return observation
        return self.coords_to_state(self.canvas.coords(self.rectangle))   #Returns the status of the rectangle, which should mean the coordinates of the corresponding Q-table
reset here means that after running a round, the rectangle (rectangle is equivalent to agent) is set to the origin, and the origin is 5 above × 5 the position in the upper left corner of the table;
Here is a function coords_to_state():
    def coords_to_state(self, coords):
        x = int((coords[0] - 50) / 100)
        y = int((coords[1] - 50) / 100)
        return [x, y]
It means that the normal coordinates (such as the origin) are (50,50), then its corresponding position in the Q-table is (0,0), 5 above × 5 can be regarded as a Q-table;
Enter the while loop of the main function:
env.render() is a function to update the window
    def render(self):
        time.sleep(0.03)   #Delay 0.03 seconds
        self.update()      #to update
action = agent.get_action(str(state)):
    def get_action(self, state):
        if np.random.rand() < self.epsilon:    #Enter this judgment statement with probability
            # Greedy strategy random exploration action
            action = np.random.choice(self.actions)   #From self Action = [0,1,2,3] random selection
        else:
            # Select from q table
            state_action = self.q_table[state]
            action = self.arg_max(state_action)   #If the value s of the selection actions here are consistent, they will be selected randomly
        return action
It literally means to obtain a dynamic action. At the beginning, this action is obtained randomly, so the first loop must enter the statements after else. Here we focus on self q_table [state], as mentioned earlier, q_table is the dictionary we define, then q_table is to obtain the value named state in the dictionary. For example: '[0,0]': [0.0,0.0,0.0], this is the dictionary Q_ For the content in table, its name is' [0,0] ', and the value corresponding to the name' [0,0] 'is [0.0,0.0,0.0], so self q_table [state] returns [0.0,0.0,0.0,0.0] (some official nouns may be called nonstandard, sorry);
Self arg_ max(state_action):
    def arg_max(state_action):
        max_index_list = []
        max_value = state_action[0]
        for index, value in enumerate(state_action):
            if value > max_value:
                max_index_list.clear()
                max_value = value
                max_index_list.append(index)
            elif value == max_value:
                max_index_list.append(index)
        return random.choice(max_index_list)
Here is the selection of actions. As mentioned earlier, the actions are random at the beginning of operation. We can substitute a value for specific analysis. For example, just [0.0,0.0,0.0,0.0], enter the for loop, the index of the first loop is 0, value=0.0, and enter the elif statement to give max_ index_ Add the index index to the list. Add the index four times in a cycle. Finally, when running the return statement, max_index_list=[0,1,2,3], which means that the Q values with index values of 0,1,2,3 (corresponding to an action respectively, as mentioned earlier) are the same, so randomly select a value, such as 2, and return;
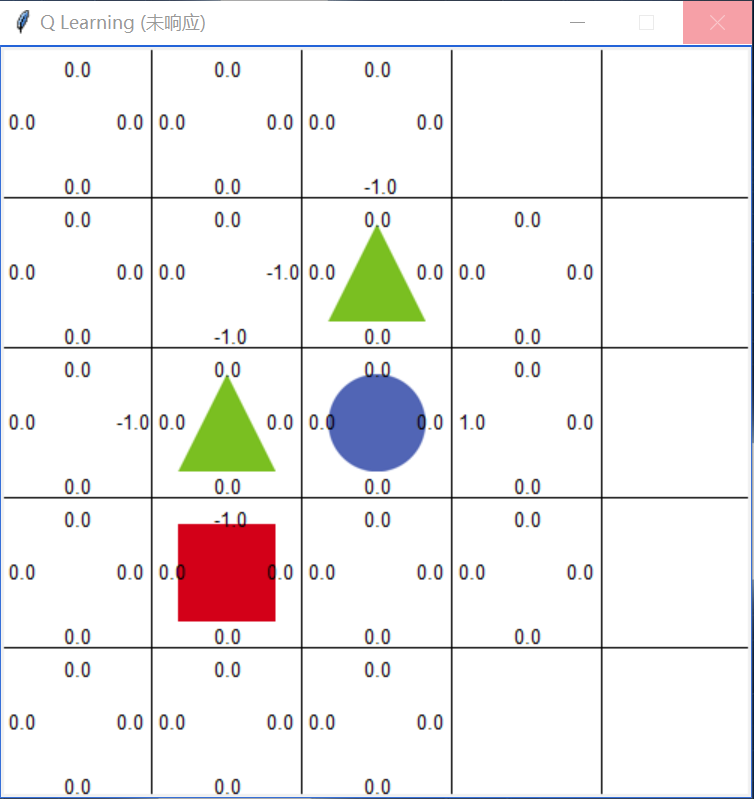
For example, in this figure, the if statement will be entered. The reason is that when traversing the four Q values where the rectangle is located, it is found that 0.0 > - 1.0, so the value of - 1.0 is cleared and only in the list max_ index_ Leave three index values index with Q value of 0.0 in the list, and then select them randomly. This meets the basic idea of Q-learning: select the actions that can obtain the maximum benefit according to the Q value.
next_state, reward, done = env.step(action):
    def step(self, action):
        state = self.canvas.coords(self.rectangle)   #Go back to the coordinates in the canvas
        base_action = np.array([0, 0])
        self.render()

        if action == 0:  # up
            if state[1] > UNIT:
                base_action[1] -= UNIT
        elif action == 1:  # down
            if state[1] < (HEIGHT - 1) * UNIT:
                base_action[1] += UNIT
        elif action == 2:  # left
            if state[0] > UNIT:
                base_action[0] -= UNIT
        elif action == 3:  # right
            if state[0] < (WIDTH - 1) * UNIT:
                base_action[0] += UNIT

        # move
        self.canvas.move(self.rectangle, base_action[0], base_action[1])   #Select the move rectangle according to the above action
        self.canvas.tag_raise(self.rectangle)   #Equivalent to topping
        next_state = self.canvas.coords(self.rectangle)
        # Judge scoring conditions, Reward
        if next_state == self.canvas.coords(self.circle):
            reward = 100
            done = True
        elif next_state in [self.canvas.coords(self.triangle1),
                            self.canvas.coords(self.triangle2)]:
            reward = -100
            done = True
        else:
            reward = 0
            done = False

        next_state = self.coords_to_state(next_state)  #Back to the coordinates of the Q table
        return next_state, reward, done
The action to be performed in the next step has been obtained, and then the function step is to update the position of the rectangle, calculate the reward reward, and judge whether the rectangle touches a triangle (obstacle) or a circle (end point). If so, it means that the round is ended, done will return true, and then exit the while loop to restart a new round;
This part of the code is easy to understand, mainly about self canvas. tag_ Raise (self. Rectangle) is equivalent to topping, which means that if the rectangle runs to the position of a circle, for example, without this line of code, you know it runs, but you can't see it intuitively. If there is this line of code, the rectangle will cover the circle.
The following is to update the Q table:
agent.learn(str(state), action, reward, str(next_state)):
def learn(self, state, action, reward, next_state):
    current_q = self.q_table[state][action]   #Find the corresponding coordinates in the Q table and add Reward in the selection status to them respectively
    # Belman equation update
    new_q = reward + self.discount_factor * max(self.q_table[next_state])   #Update Q value
    self.q_table[state][action] += self.learning_rate * (new_q - current_q)
Here is the calculation of Q value, so I won't elaborate;
Then state update, print_value_all:
    def print_value_all(self, q_table):
        for i in self.texts:
            self.canvas.delete(i)
        self.texts.clear()
        for i in range(HEIGHT):
            for j in range(WIDTH):
                for action in range(0, 4):   #Here should be to traverse each grid box of the window for text update
                    state = [i, j]
                    if str(state) in q_table.keys():
                        temp = q_table[str(state)][action]   #q_table[str(state)] refers to the state lookup dictionary Q_ You know the corresponding value in table and then action
                        self.text_value(j, i, round(temp, 2), action)   #Round is round
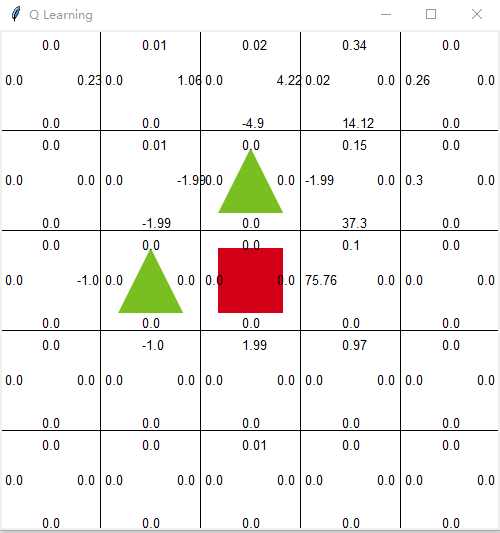
This print_all_value is the Q value re released on the window. You can see it by looking at a picture.
Finally, attach Baidu cloud link:
Link: https://pan.baidu.com/s/1Gt8waFzwWGiKg4ubMZQxAg
Extraction code: 8888