Recently, seata was used in a new project. Because it had not been used before, I was at a loss when I went to the Internet to find information. I stuck a little here and deducted a little there. Then I felt that all kinds of problems had been encountered. I continued to do it for two or three days. Finally, I can use it now. Here, I record the steps and some points for attention. At the same time, I thank all the leaders for their help
Here, I'll record the usage for the time being. When I have time, I'll learn Spring Cloud Alibaba from scratch. I'll supplement it later. If there are recommended courses, you can comment. Thank you~
View the corresponding version of springcloud: https://start.spring.io/actuator/info
You can also see on the official website: https://spring.io/projects/spring-cloud#overview
seata download address: https://github.com/seata/seata/releases (version 1.3 selected here)
seata document: https://seata.io/zh-cn/docs/overview/what-is-seata.html
seata source code and some configurations: https://github.com/seata/seata/tree/1.3.0
- Spring Cloud Alibaba version 2.2.0 6.RELEASE
- boot version 2.3 12.RELEASE
- Nacos version 1.4 two
- Mysql version 8.0.0 twenty-six
rely on
<dependency>
    <groupId>com.alibaba.cloud</groupId>
    <artifactId>spring-cloud-starter-alibaba-seata</artifactId>
</dependency>
database
The database files are in the downloaded source code
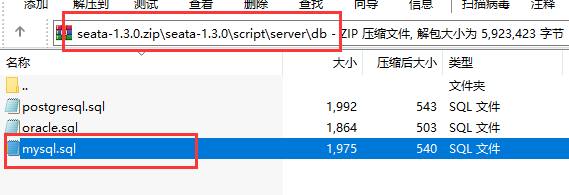
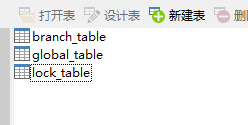
After importing, there will be these three tables
You should also create an undo in each business library_ Log is used to rollback the table. We'll learn about its usage later
CREATE TABLE `undo_log` (
  `id` bigint NOT NULL AUTO_INCREMENT,
  `branch_id` bigint NOT NULL,
  `xid` varchar(100) NOT NULL,
  `context` varchar(128) NOT NULL,
  `rollback_info` longblob NOT NULL,
  `log_status` int NOT NULL,
  `log_created` datetime NOT NULL,
  `log_modified` datetime NOT NULL,
  PRIMARY KEY (`id`),
  UNIQUE KEY `ux_undo_log` (`xid`,`branch_id`)
) ENGINE=InnoDB AUTO_INCREMENT=1 DEFAULT CHARSET=utf8;
server side
1. Download and unzip Seata
2. Modify the configuration file
- file.conf
First change the mode in the store to db, and then change the connection information of the database to your own. Note that if it is above mysql8 version, change the driver to com mysql. cj. jdbc. Driver

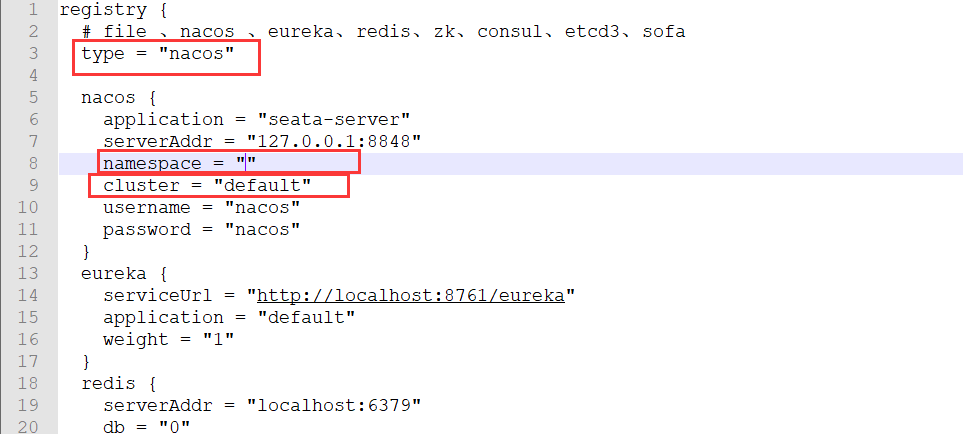
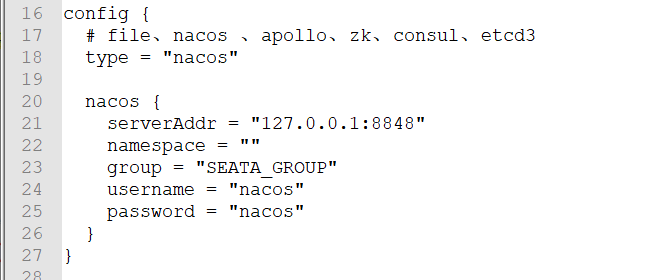
- registry.conf
Change the type in the registry to nacos
Change the namespace to the in nacos Be case sensitive
Fill in the user name and password
The following config is the same. Don't delete others
3. Upload configuration
In previous articles, I copied the configuration directly to the resource folder in the project. Later, I saw that it can also be uploaded to nacos. The effect is the same
Found in the seata source code just downloaded
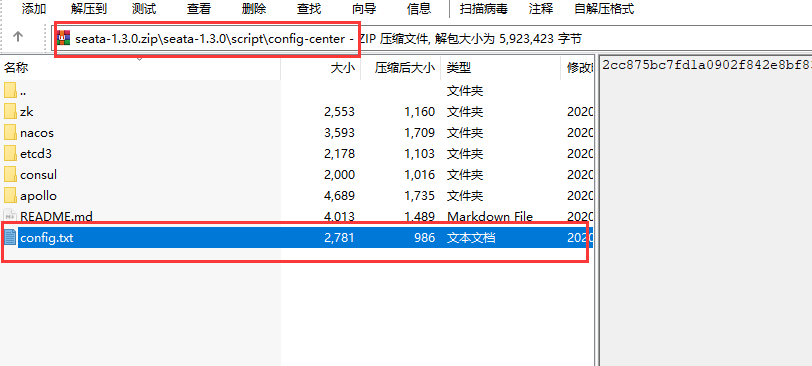
to configure
transport.type=TCP
transport.server=NIO
transport.heartbeat=true
transport.enableClientBatchSendRequest=false
transport.threadFactory.bossThreadPrefix=NettyBoss
transport.threadFactory.workerThreadPrefix=NettyServerNIOWorker
transport.threadFactory.serverExecutorThreadPrefix=NettyServerBizHandler
transport.threadFactory.shareBossWorker=false
transport.threadFactory.clientSelectorThreadPrefix=NettyClientSelector
transport.threadFactory.clientSelectorThreadSize=1
transport.threadFactory.clientWorkerThreadPrefix=NettyClientWorkerThread
transport.threadFactory.bossThreadSize=1
transport.threadFactory.workerThreadSize=default
transport.shutdown.wait=3
service.vgroupMapping.my_test_tx_group=default
service.default.grouplist=127.0.0.1:8091
service.enableDegrade=false
service.disableGlobalTransaction=false
client.rm.asyncCommitBufferLimit=10000
client.rm.lock.retryInterval=10
client.rm.lock.retryTimes=30
client.rm.lock.retryPolicyBranchRollbackOnConflict=true
client.rm.reportRetryCount=5
client.rm.tableMetaCheckEnable=false
client.rm.sqlParserType=druid
client.rm.reportSuccessEnable=false
client.rm.sagaBranchRegisterEnable=false
client.tm.commitRetryCount=5
client.tm.rollbackRetryCount=5
client.tm.degradeCheck=false
client.tm.degradeCheckAllowTimes=10
client.tm.degradeCheckPeriod=2000
store.mode=file
store.file.dir=file_store/data
store.file.maxBranchSessionSize=16384
store.file.maxGlobalSessionSize=512
store.file.fileWriteBufferCacheSize=16384
store.file.flushDiskMode=async
store.file.sessionReloadReadSize=100
store.db.datasource=druid
store.db.dbType=mysql
store.db.driverClassName=com.mysql.jdbc.Driver
store.db.url=jdbc:mysql://127.0.0.1:3306/seata?useUnicode=true
store.db.user=username
store.db.password=password
store.db.minConn=5
store.db.maxConn=30
store.db.globalTable=global_table
store.db.branchTable=branch_table
store.db.queryLimit=100
store.db.lockTable=lock_table
store.db.maxWait=5000
store.redis.host=127.0.0.1
store.redis.port=6379
store.redis.maxConn=10
store.redis.minConn=1
store.redis.database=0
store.redis.password=null
store.redis.queryLimit=100
server.recovery.committingRetryPeriod=1000
server.recovery.asynCommittingRetryPeriod=1000
server.recovery.rollbackingRetryPeriod=1000
server.recovery.timeoutRetryPeriod=1000
server.maxCommitRetryTimeout=-1
server.maxRollbackRetryTimeout=-1
server.rollbackRetryTimeoutUnlockEnable=false
client.undo.dataValidation=true
client.undo.logSerialization=jackson
client.undo.onlyCareUpdateColumns=true
server.undo.logSaveDays=7
server.undo.logDeletePeriod=86400000
client.undo.logTable=undo_log
client.log.exceptionRate=100
transport.serialization=seata
transport.compressor=none
metrics.enabled=false
metrics.registryType=compact
metrics.exporterList=prometheus
metrics.exporterPrometheusPort=9898
Then modify the connection information of the database to your own
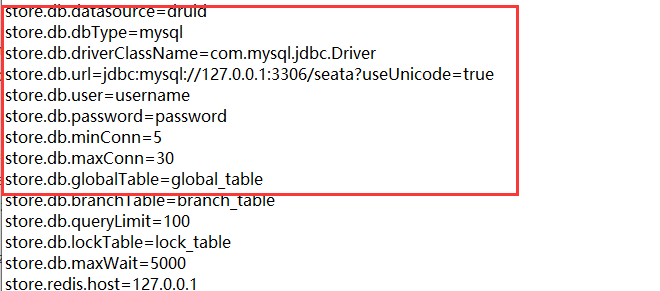
One thing to note here is that I may be in mysql8 version, so I will report a garbled error after startup. Later, I will say what the time zone is, and add it after the url
?rewriteBatchedStatements=true&useUnicode=yes&characterEncoding=UTF-8&useSSL=false&serverTimezone=UTC
That's good
Find the nacos folder in the same directory, copy the two files and put them in the seata directory. You can directly double-click to run and upload

sh nacos-config.sh
Optional parameters
- -h localhost / / specify the address
- -p 8848 / / port
- -g SEATA_GROUP / / group name
- -t test / / namespace
- -u nacos / / user name
- -w nacos / / password
Then you can see the configuration information in the corresponding command space in the configuration center. There are many configurations. There are more than eight pages. You can also open a new group to store them
The server side is configured.
client side
client side configuration
spring:
  cloud:
    alibaba:
      seata:
        tx-service-group: my_test_tx_group

seata:
  tx-service-group: my_test_tx_group
  registry:
    type: nacos
    nacos:
      application: seata-server
      server-addr: 127.0.0.1:8848
      username: "nacos"
      password: "nacos"
      group: SEATA_GROUP
      namespace:
      cluster: default
  config:
    type: nacos
    nacos:
      server-addr: 127.0.0.1:8848
      group: SEATA_GROUP
      username: "nacos"
      password: "nacos"
      namespace:
Then add @ GlobalTransactional to the method you want to use
Later, the proxy configuration of DataSource was added before. This may be some of the previous things. Now it doesn't need to be understood later