OpenSSH server
◾ SSH (Secure Shell) protocol
- Is a secure channel protocol
- The communication data is encrypted for remote management
◾ SSH profile
- Service Name: sshd
- Server main program: / user/sbin/sshd
- Server configuration file: / etc/ssh/sshd_config
- Client configuration file: / etc/ssh/ssh_config

◾ Service listening options
- Port number, protocol version, listening IP address
- Disable reverse parsing

◾ User login control
- Disable root user and empty password user
- Limit login verification time and retry times
- AllowUsers,DenyUsers
When you want to allow or prohibit only some users to log in, you can use AllowUsers or DenyUsers configuration. The usage of both is similar (be careful not to use them at the same time).


Test AllowUsers and DenyUsers
- Allowusers... # only users are allowed to log in
The server centos2 IP is 192.168.200.137 and the client centos3 IP is 192.168.200.138
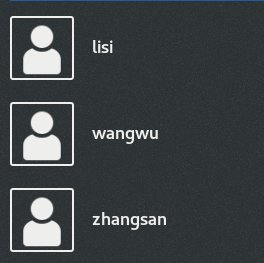
Server: create zhangsan, lisi and wangwu users
[root@localhost ~]# vim /etc/ssh/sshd_config   #Edit server profile

Allowusers zhangsan lisi       #Add an indication in the last line that only zhangsan lisi users are allowed to log in, and multiple users are separated by spaces
: wq           #Save and exit after modification

[root@localhost ~]# systemctl restart sshd
client: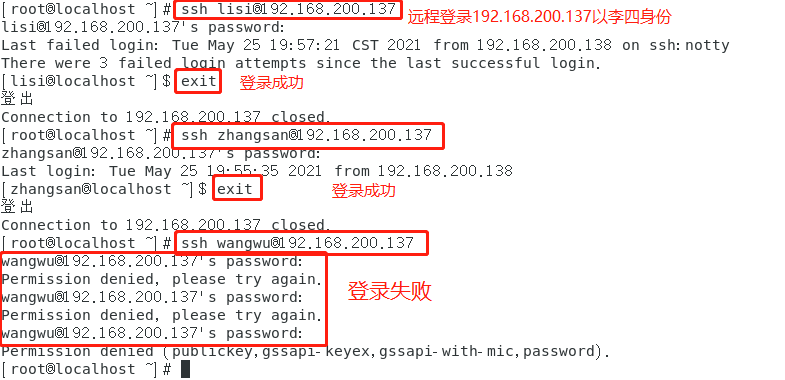
- Denyusers... # prohibit some users from logging in. The usage is similar to AllowUsers (be careful not to use them at the same time)
Test scp remote replication
- Add / root / 123.0 to the server Txt file to client
[root@localhost ~]# scp root@192.168.200.144:/root/123.txt /root/1234.txt

Log in 144 remotely as the root of the server, and set the server / root / 123 Txt downloaded to the local / root directory is 1234 txt
You can't log in here because Allowusers was set in the server configuration file before. Just comment it out
ls looked at it and came over
- The client's / root / 1234 Txt file to the server
[root@localhost ~]# scp -r /root/1234.txt root@192.168.200.144:/opt

Check on the server and copy it

Test sftp security FTP
Due to the use of encryption / decryption technology, the transmission efficiency is lower than ordinary FTP, but the security is higher. The operation syntax sftp is almost the same as FTP.
sftp root@192.168.200.144
sftp> ls
sftp> get file name		#Download files to ftp directory
sftp> put file name		#Upload files to ftp directory
sftp> quit		    #sign out
Download:
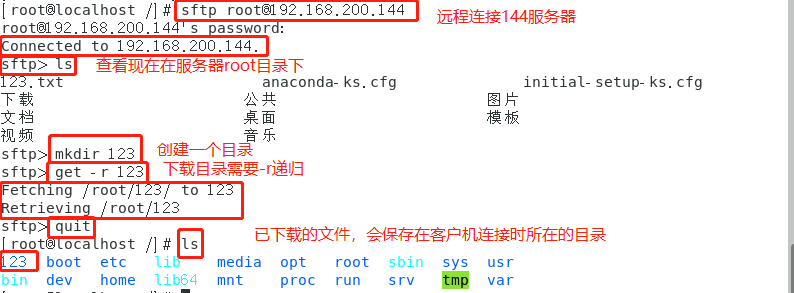
Upload:

The sshd service supports authentication methods
ssh key pair authentication
1, Overview
SSH protocol adopts the key based security verification method for remote management. It needs to rely on the key, that is, a pair of key pairs must be established in advance,
Then put the public key on the target server that needs to be accessed. In addition, you also need to put the Private key
key) put it on the SSH client or the corresponding client server.
encryption algorithm
Symmetric encryption
-
concept
Using the encryption method of single key cryptosystem, the same key can be used for encryption and decryption of information at the same time. This encryption method is called symmetric encryption. Because of its fast speed, symmetric encryption is usually used when the message sender needs to encrypt a large amount of data -
Common algorithms
The commonly used algorithms in symmetric encryption algorithms include DES, 3DES, TDEA, Blowfish, RC2, RC4, RC5, IDEA, SKIPJACK, etc. -
characteristic
- The encryption party and the decryption party use the same key;
- The speed of encryption and decryption is relatively fast, which is suitable for the use of long-term data;
- The process of key transmission is not safe and easy to crack, and the key management is also troublesome;
- Advantages and disadvantages
The advantages of symmetric encryption algorithm are open algorithm, small amount of calculation, fast encryption speed and high encryption efficiency.
The disadvantage of symmetric encryption algorithm is that before data transmission, the sender and receiver must agree on the secret key, and then both sides can save the secret key. Second, if
If one party's secret key is leaked, the encrypted information will not be safe. In addition, each pair of users need to use other people every time they use the symmetric encryption algorithm
The only secret key you don't know will make the number of keys owned by the receiving and sending sides huge, and key management will become a burden for both sides.
Asymmetric encryption
-
concept
Asymmetric encryption algorithm requires two keys: public key and private key. Public key and
The private key is a pair. If the data is encrypted with the public key, only the corresponding private key can be decrypted. Because encryption and decryption use two different keys
Key, so this algorithm is called asymmetric encryption algorithm. -
Common algorithms
RSA(RSA algorithm): the most widely used algorithm at present
DSA (Digital Signature Algorithm): digital signature algorithm, which is different from RSA
It can only be used for digital signature, not data encryption and decryption. Its security is equivalent to RSA, but its performance is faster than RSA
ECC (Elliptic curve cryptography)
ECDSA:Elliptic Curve Digital Signature Algorithm, which is ECC and DSA
Compared with RSA algorithm, ECC can use smaller secret keys, higher efficiency and provide higher security -
principle
Firstly, SSH generates a key pair (public key and private key) at the client through the encryption algorithm. The public key is sent to the server and the private key is retained. If you want to connect to the ssh server with the public key, the client SSH software will send a request to the ssh server for security verification with the online user key.
After receiving the request, the ssh server will first look for the public key of the corresponding user placed in advance under the home directory of the user connected to the ssh server, and then compare it with the public key sent by the connected SSH client. If the two keys are consistent, the ssh server encrypts the "challenge" with the public key and sends it to the SSH client. -
characteristic
The private key cannot be transmitted in the network. The private key can decrypt the public key
Public keys can be transmitted over the network. The public key cannot decrypt the private key

Set password free login
- In the Linux client, create a key pair file for the current user through the SSH keygen tool
- The available encryption algorithms are RSA, ECDSA, DSA, etc. ("t" option of SSH keygen command is used to specify the algorithm type)
[root@client ~]# SSH keygen / / you can add - t to the public key and choose the algorithm yourself
Generating public/private rsa key pair.
Enter file in which to save the key (/root/.ssh/id_rsa):      //Indicates where the key is placed. Press enter
Enter passphrase (empty for no passphrase):
#### Indicates whether the private key needs a password. Just enter the password if necessary. I won't set it here. Press enter to confirm
Enter same passphrase again:                                 //Just press enter
Your identification has been saved in /root/.ssh/id_rsa.
Your public key has been saved in /root/.ssh/id_rsa.pub.
The key fingerprint is:
SHA256:4B+ipfoIG6srIEPYgWwdq+ogz7dfRHbqqcPH8iVMPcM root@client
The key's randomart image is:
+---[RSA 2048]----+
|.....            |
|.o...            |
|o. o  . o .      |
|..o  . + =       |
|..    + S E      |
|=    + B o o     |
|O.  o. .B .      |
|=B o. +ooo       |
|Bo=oooo=.        |
+----[SHA256]-----+
[root@client ~]# ls -a
.                .bash_logout   .cache   .dbus          initial-setup-ks.cfg  .tcshrc      Public picture music
..               .bash_profile  .config  .esd_auth      .local                .viminfo     Template document desktop
anaconda-ks.cfg  .bashrc        .cshrc   .ICEauthority  .ssh                  .Xauthority  Video download
[root@client ~]# cd .ssh
[root@client .ssh]# ls
id_rsa  id_rsa.pub  known_hosts
#### id_rsa is the private key id_rsa.pub is the public key known_hosts is equivalent to logging information after remote login
[root@client .ssh]# ssh-copy-id -p 22222  root@192.168.43.134
#### Push the public key to the server. Note that the port was changed to 22222
/usr/bin/ssh-copy-id: INFO: Source of key(s) to be installed: "/root/.ssh/id_rsa.pub"
/usr/bin/ssh-copy-id: INFO: attempting to log in with the new key(s), to filter out any that are already inaistalled
/usr/bin/ssh-copy-id: INFO: 1 key(s) remain to be installed -- if you are prompted now it is to install the new keys
root@192.168.43.134's password:          //Enter the password of server root

Number of key(s) added: 1

Now try logging into the machine, with:   "ssh -p '22222' 'root@192.168.43.134'"
and check to make sure that only the key(s) you wanted were added.
View the pushed public key on the server
[root@server ~]# cd .ssh
[root@server .ssh]# ls
authorized_keys  known_hosts
[root@server .ssh]# cat authorized_keys / / this file records the public key pushed
ssh-rsa AAAAB3NzaC1yc2EAAAADAQABAAABAQDSX1/fLRIIchYKNiIwTva4BrB+Xd+1ZAzk0tg/qkGRpWKOp9UPPPyZ16HPYjCbN0/Eyqulb2IiK9F7esjgovRxzMu4TmEGjV3ELU919k+yQ9EsEGOoYVo8F501Rjn6cPoj/MRF9cS0HRp/a0WCse85LE1mqXBXcSHp5bbi/TN2ZtuML68m9TqVwY3cEtcaC8QCgjf2ArLSd/MAnhc01pJbk1iH4YHokHJHLtqOT1EgMDXEzyTPEEM9N+qn7MAs7PSEuglX8oUmMl6mkLFI/iTC8z7mvWfjUAsb9DO1+dd8XdN05VIFR0vKdF73Bg4V9vgQUZ1dVISSJuB0hbN+2ZKr root@client
Log in to the server remotely on the client side again
[root@client .ssh]# ssh -p 22222  root@192.168.43.134 //You don't need the password below
Last login: Tue May 25 15:36:18 2021 from 192.168.43.1
TCP Wrappers access control
TCP Wrappers
The TCP service program is "wrapped" and instead of listening to the port of the TCP service program, a security detection process is added. External connection requests must pass this layer of security detection before they can access the real service program.
For most Linux distributions, TCP Wrappers is the default feature. rpm -q tcp_wrappers
Two implementations of TCP Wrapper protection mechanism
Directly use tcpd program to protect other service programs. You need to run tcpd program.
Libwrap. Is called by other network service programs so. Link library, no need to run tcpd program. This method is more widely used and more efficient.
2. Use the ldd command to view the libwrap so.* Link library
ldd $(which ssh vsftpd)
Access policy of TCP Wrappers
The protection objects of TCP Wrappers mechanism are various network service programs, which carry out access control for the client address accessing the service.
The two corresponding policy files are / etc / hosts Allow and / etc / hosts Deny, which is used to set the allow and deny policies respectively.
Format:
< service program list >: < client address list >
(1) Service program list
ALL: represents ALL services.
Single service program: such as "vsftpd".
A list of multiple service programs, such as "vsftpd,sshd".
(2) Client address list
ALL: represents any client address.
LOCAL: LOCAL address.
Multiple addresses are separated by commas
Wildcard '?' is allowed The former represents any character and the latter represents only one character
Network segment address, such as 192.168.80 Or 192.168.80.0 / 255.255.255.0
Regional address, such as ". benet.com", matches bdqn All hosts in the COM domain.
Basic principles of TCP Wrappers mechanism
-
First check / etc / hosts Allow file. If a matching policy is found, access is allowed;
Otherwise, continue checking / etc / hosts Deny file. If a matching policy is found, access is denied;
If no matching policy can be found by checking the above two files, access is allowed. -
"Allow all, reject individual"
Just in / etc / hosts Add the corresponding rejection policy to the deny file -
"Allow individual, reject all"
Except in / etc / hosts In addition to adding an allow policy in allow, you also need to add an allow policy in / etc / hosts The deny policy of "ALL:ALL" is set in the deny file.
Example: if you only want to access sshd service from the host with IP address 12.0.0.1 or the host in 192.168.80.0/24 network segment, other addresses are rejected.
 vi /etc/hosts.allow
 sshd:12.0.0.1,192.168.80.*

 vi /etc/hosts.deny
 sshd:ALL