I Set up SSH service
1. Turn off the firewall and SELinux
2. Configure yum source
3. Installation of openssh software
The underlying software name of SSH service is openssh. open source, SSH is SSH service. Openssh belongs to C/S architecture software, which has client and server.
Client: ssh
Server: openssh server
Installation steps:
# yum install openssh -y
Check whether openssh is installed successfully
# rpm -qa | grep openssh
 or
# yum list installed | grep openssh
Get the list of files generated by openssh
Server
# rpm -ql openssh-server

# configuration file
/etc/ssh/sshd_config	=>   ssh Master profile of the service
/etc/sysconfig/sshd
# Service management script
/usr/lib/systemd/system/sshd.service	=>    systemctl start sshd
# File sharing service provides file upload and download services
/usr/libexec/openssh/sftp-server
# Binary file program file
/usr/sbin/sshd
# Public key generation tool
/usr/sbin/sshd-keygen
# man manual
/usr/share/man/man5/sshd_config.5.gz
/usr/share/man/man8/sftp-server.8.gz
/usr/share/man/man8/sshd.8.gz
client
# rpm -ql openssh-clients

# Client profile
/etc/ssh/ssh_config
# File transfer between remote copy command servers
/usr/bin/scp
# sftp Client uploading and downloading files
/usr/bin/sftp
/usr/bin/slogin
/usr/bin/ssh
/usr/bin/ssh-add
/usr/bin/ssh-agent
/usr/bin/ssh-copy-id
/usr/bin/ssh-keyscan
# Client man manual
/usr/share/man/man1/scp.1.gz
/usr/share/man/man1/sftp.1.gz
/usr/share/man/man1/slogin.1.gz
/usr/share/man/man1/ssh-add.1.gz
/usr/share/man/man1/ssh-agent.1.gz
/usr/share/man/man1/ssh-copy-id.1.gz
/usr/share/man/man1/ssh-keyscan.1.gz
/usr/share/man/man1/ssh.1.gz
/usr/share/man/man5/ssh_config.5.gz
/usr/share/man/man8/ssh-pkcs11-helper.8.gz
4. View and modify the ssh server configuration file
# man 5 sshd_config
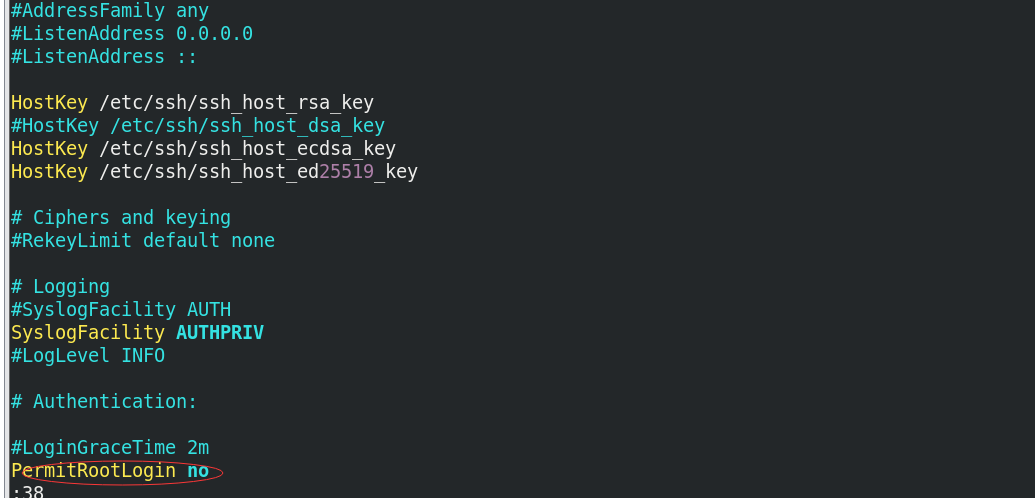
RealServer: remote login of root account is prohibited
# man 5 sshd_config
PermitRootLogin	=> yes or no,Default to yes The representative is allowed to pass root Log in to this server remotely with your account
# vim /etc/ssh/sshd_config
38 that 's ok PermitRootLogin no
5.sshd service management
# systemctl restart sshd 	=>    restart
# systemctl status sshd 		=> 	  state
# systemctl stop sshd 		=>    stop it
# systemctl start sshd 		=>    start-up

# systemctl enable sshd 		=>	  Power on self start
# systemctl disable sshd 	=> 	  Startup does not start automatically

# ps -ef | grep sshd 			=>	  process
 or
# netstat -tnlp | grep sshd 	=> 	  port
 or
# ss -naltp | grep sshd
II SSH service task solution
1. Create and authorize users
JumpServer springboard machine creates and authorizes users
Step ①: create users and user groups (html front-end group, tom and jerry)
# Create html front end group
# groupadd html

# Create group users tom and jerry
# useradd -g html tom
# useradd -g html jerry
Step 2: add password for user
# echo 123456 |passwd --stdin tom
# echo 123456 |passwd --stdin jerry
Step ③: create a data directory for developers and set corresponding permissions
① Create user's data directory:
# MKDIR - P / code / HTML = > front end group
# ll -d /code/html
drwxr-xr-x. 2 root root 6 May 24 10:36 /code/html
② Change the file group of the directory (change to html, which means that members in the html group can manage the directory)
# chgrp -R html /code/html
drwxr-xr-x. 2 root html 6 May 24 10:36 /code/html
# chmod -R g+w /code/html
drwxrwxr-x. 2 root html 6 May 24 10:36 /code/html

③ Add sticky bit permission to prevent accidental deletion
# chmod 1770 /code/html
drwxrwx--T. 2 root html 6 May 24 10:36 /code/html

2. Disable root login
RealServer server side:
# vim /etc/ssh/sshd_config
PermitRootLogin no
3. Change SSH default port
RealServer server side:
# vim /etc/ssh/sshd_config
17 that 's ok Port 3712
4. Restart SSH service
# systemctl restart sshd
 or
# systemctl reload sshd
The essential difference between restart and reload:
① restart is actually equivalent to stop and then start
② reload does not stop the existing business, but just reloads the configuration file corresponding to sshd
5. Create a code account in RealServer
# useradd code
# echo 123456 |passwd --stdin code
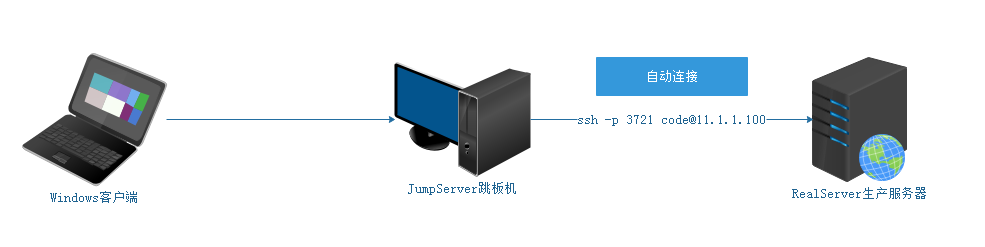
Test: connect to RealServer remotely in JumpServer
# ssh -p 3721 code@11.1.1.100
6.SSH client does not verify fingerprint
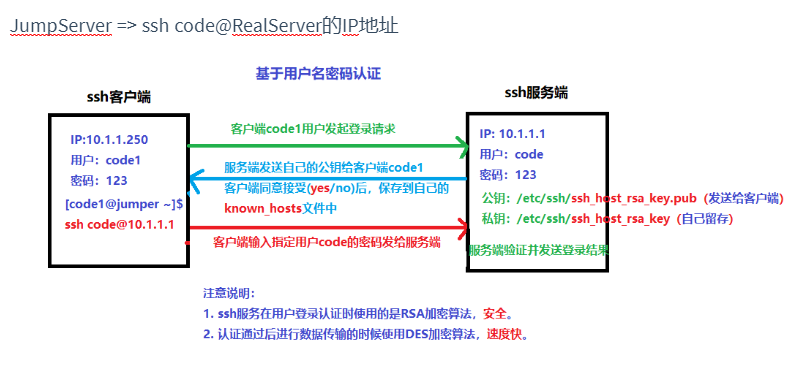
When connecting to a remote server for the first time:
The authenticity of host '11.1.1.100 (11.1.1.100)' can't be established.
ECDSA key fingerprint is SHA256:Y/cQNWWkX15o2MsJ5HOQBI2m8S33qIA+x3zys8J4pOY.
ECDSA key fingerprint is MD5:76:61:86:8b:d5:ee:bf:9c:60:e6:12:fa:f6:f0:74:36.
Are you sure you want to continue connecting (yes/no)?yes
Warning: Permanently added '11.1.1.100' (ECDSA) to the list of known hosts.
If we don't want to verify the fingerprint, we can change the configuration file of SSH client
JumpServer:
# vim /etc/ssh/ssh_config
35 that 's ok StrictHostKeyChecking no
7. Generate user password with professional tool pwgen
In the actual production environment, the user password must not be set manually. It is recommended to use professional password generation tools such as pwgen.
① Install the random password generation tool pwgen
② Use pwgen tool to generate random password
③ Set password for account code
Step 1: create a code developer account
# useradd code
Step 2: configure the EPEL source and install the pwgen tool
# wget -O /etc/yum.repos.d/epel.repo http://mirrors.aliyun.com/repo/epel-7.repo
# yum clean all
# yum makecache
Step 3: install pwgen password generation tool
# yum install pwgen -y
Step 4: use pwgen to generate random password
# pwgen -cnBs1 10 1
Extension: use of pwgen password generator
# pwgen --help
# Usage: pwgen option parameter length generated number
Usage: pwgen [ OPTIONS ] [ pw_length ] [ num_pw ]

# The password contains at least one uppercase letter
-c or –capitalize

# The password does not contain uppercase letters
-A or –no-capitalize

# The password contains at least one number
-n or –numerals

# The password does not contain numbers
-0 or –no-numerals

# The password contains at least one special symbol
-y or –symbols

# Generate completely random password
-s or –secure

# The password does not contain ambiguous characters (e.g. 1,l,O,0)
-B or –ambiguous

# Use the given SHA1 seed file as a random hash
-H or –sha1=path/to/file[#seed]

# Print the generated password in the column
-C

# Do not print the generated password in the column, i.e. one password per row
-1

# Do not use any vowels to avoid accidental swearing
-v or –no-vowels
III SSH service supplement
1.scp command
Main functions: used for file transmission (upload and download) between Linux system and Linux system
Upload:
# scp [options] local file path remote user name @ IP address of remote server: remote file storage path
-r : Recursive upload, mainly for folders
-P : Replaced SSH The default port of the service must be-P option
Download:
# scp [options] remote user name @ IP address of remote server: remote file path local file storage path
-r : Recursive upload, mainly for folders
-P : Replaced SSH The default port of the service must be-P option
2. Kick out users
# View current online users
w
# Kick out an account
pkill -kill -t pts/1
IV SSH password free login solution
1. Why do I need password free login
2.SSH authentication principle (based on user name and password + based on key pair)
① Review authentication methods based on user name and password
② Authentication method based on key pair (public key and private key) = > Secret free login
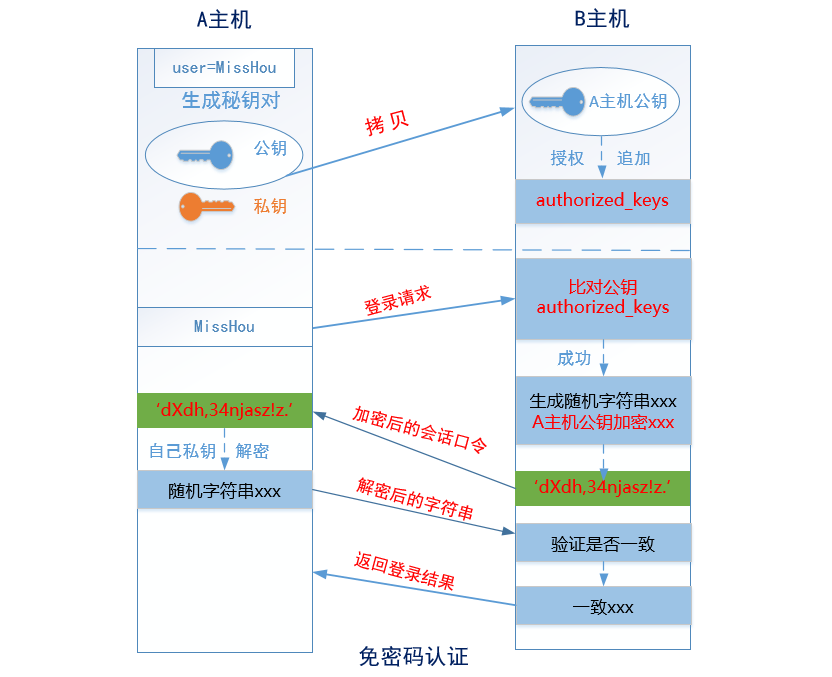
A host => JumpServer,B host => RealServer

Step 1: in A Mainframe( JumpServer)Generate a key pair (public key and private key)

Step 2: put A The public key of the host is copied to the server through the network B Mainframe( RealServer)And then append its contents to B Mainframe~/.ssh/authorized_keys

Step 3: by A Mainframe( JumpServer)towards B Mainframe( RealServer)Initiate a login request, and then directly B Perform public key comparison (judgment) on the host A Is the host's public key already stored in B Mainframe authorized_keys In the file), if it exists and is correct, a random string is generated (e.g itcast),Then use A The public key of the host encrypts it to obtain the encrypted string (e.g dXdh,34njasz!z.)

Step 4: through the network, by B The host transmits the encrypted string just generated to the host A,host A After receiving the encrypted string, decrypt it with your own locally stored private key (get) itcast)

Step 5: decrypt the itcast Send to B Host, and then verify whether it is consistent with the string just generated. If it is consistent, it returns login success. Otherwise, the login failure will be returned.

This is the end of password free login!
3. Specific implementation of SSH password free login
SSH The implementation idea of secret free is divided into three steps (three steps)

Step 1: in A Host for an account( tom or jerry)Generate public and private keys

Step 2: use some methods to send the public key to B Host, and then append to authorized_keys In the file

Step 3: test whether secret free login is realized
Method ①: more commonly used (tom)
① Generate public key and private key for an account in host A
# ssh-keygen

Note: if you don't want to confirm all the way, you can directly generate public and private keys in SSH keygen - P "".
② Use SSH copy ID to transfer the contents of the public key file to ~ /. On the server side ssh/authorized_keys file.
# ssh-copy-id -p 3712 code@11.1.1.100
code@11.1.1.100's password:123456
③ Test whether the password free login is successful on the JumpServer client
# ssh -p 3721 code@11.1.1.100
Method ②: Jerry
① Generate public and private keys
# ssh-keygen
② Put id_rsa.pub file, scp to RealServer server
# scp -P 3721 ~/.ssh/id_rsa.pub code@11.1.1.100:/home/code/
③ On the RealServer server side, set the ID_ rsa. The contents in the pub file are appended to ~ / ssh/authorized_keys file
# cd ~
# cat id_rsa.pub >> ~/.ssh/authorized_keys
Note: the above configuration is also relatively simple, but pay attention to the file permissions in practical application.
RealServer:
~/.ssh : 700
~/.ssh/authorized_keys : 600
④ Whether the test is successful
# ssh -p 3721 code@11.1.1.100