1, Backup
1.1 what is backup?
Backup is to copy important data or files and save them to another place to realize data synchronization between different hosts
1.2 why backup?
Data is very important in the company!!! Backup is to restore data.
1.3 can backup not be done?
Important data must be backed up. Unimportant data can not be backed up or part of it can be backed up.
1.4 backup tools
- Local backup: cp
- Remote backup: SCP Rsync

1.5 scp command and parameters
-
Concept and parameters
The scp command in Linux is used to copy files and directories between Linux.
scp is the abbreviation of secure copy. scp is a secure remote file copy command based on ssh login in linux system.
scp is encrypted, rcp is not encrypted, and scp is an enhanced version of rcp.Option parameters: -1: force scp Command usage protocol ssh1 -2: force scp Command usage protocol ssh2 -4: force scp Command use only IPv4 addressing -6: force scp Command use only IPv6 addressing -B: Use batch mode (transmission password or phrase is not asked during transmission) -C: Allow compression. (will)-C Flag passed to ssh,To turn on the compression function) -p: Retain the modification time, access time and access rights of the original file. -q: The transfer progress bar is not displayed. -r: Copy the entire directory recursively. -v: Displays the output in detail. scp and ssh(1)The debugging information of the whole process is displayed. This information is used to debug connections, verify and configure problems. -c cipher: with cipher Encrypt the data transmission, and this option will be passed directly to ssh. -F ssh_config: Specify an alternate ssh Configuration file, this parameter is passed directly to ssh. -i identity_file: Read the key file used during transmission from the specified file. This parameter is passed directly to ssh. -l limit: Limit the bandwidth that users can use to Kbit/s In. -o ssh_option: If used to ssh_config(5)Parameter transfer method in, -P port: Note that it is capitalized P, port Is the port number used to specify data transmission -S program: Specifies the program to use when encrypting the transmission. This procedure must be understandable ssh(1)Options for.
-
Application examples
1, Copy files from local to remote
    1,Copy local files to remote directories
    scp /home/space/music/1.mp3 root@www.runoob.com:/home/root/others/music
    scp                         # command
    /home/space/music/1.mp3       # Local file
    root                        # System user of remote server
    @                           # Delimiter, which user is logged in to the server as
    www.runoob.com               # ip or domain name of the remote server
    :                           # Separator to specify the directory in the server
    /home/root/others/music/      # Directory address copied to remote server

    2,Copy the local file to the remote directory and rename it
    scp /home/space/music/1.mp3 root@www.runoob.com:/home/root/others/music/001.mp3
    scp                             # command
    /home/space/music/1.mp3           # Local file
    root                            # System user of remote server
    @                               # Delimiter, which user is logged in to the server as
    www.runoob.com                   # ip or domain name of the remote server
    :                               # Separator to specify the directory in the server
    /home/root/others/music/001.mp3    # Copy to the directory of the remote server and rename 001 mp3


2, Copy from local directory to remote directory
    1,Specify the user name. You need to enter the password after the command is executed
    scp -r /home/space/music/ root@www.runoob.com:/home/root/others/
    scp                         # command
    -r                          # option
    /home/space/music/           # Local directory
    root                        # System user of remote server
    @                           # Delimiter, which user is logged in to the server as
    www.runoob.com               # ip or domain name of the remote server
    :                           # Separator to specify the directory in the server
    /home/root/others/           # Directory address copied to remote server

    2,Do not specify a user name. You need to enter a user name and password after the command is executed
    scp -r /home/space/music/ www.runoob.com:/home/root/others/
    scp                         # command
    -r                          # option
    /home/space/music/           # Local directory
    www.runoob.com               # ip or domain name of the remote server
    :                           # Separator to specify the directory in the server
    /home/root/others/           # Directory address copied to remote server

3, Copy from remote to local
    1,scp root@www.runoob.com:/home/root/others/music /home/space/music/1.mp3
      scp -r www.runoob.com:/home/root/others/ /home/space/music/
1.6 Rsync common parameters
Option parameters:
-a           #Archive mode transfer, equal to - tropgdl - t - R - O - P - G - D - L
-v           #Detailed mode output, print rate, number of files, etc
-z           #Compression during transmission to improve efficiency
-r           #Recursive transmission of directories and subdirectories, that is, all directories under the directory are transmitted the same.
-t           #Keep file time information
-o           #Keep file master information
-g           #Keep file group information
-p           #Keep file permissions
-l           #Keep soft connection
-P           #Display information such as synchronization process and transmission progress
-D           #Keep device file information
-L           #Keep the target file pointed to by the soft connection
-e           #Using the channel protocol, specify the shell program that replaces rsh

--append            # The specified file continues to be transferred where the last transfer was interrupted
--append-verify     # Use the parameter to continue transmission (after the breakpoint continues transmission, verify the file, and repair the file if it is different)

--exclude=PATTERN   # Specifies to exclude files that do not need to be transferred
eg: 	[root@m01 ~]# rsync -avzP --append-verify --exclude=2.txt  ./* root@172.16.1.41:/opt/

--exclude-from=file # Exclude as specified in the file
eg: 	[root@m01 ~]# rsync -avzP --append-verify --exclude-from=/tmp/exclude.txt  ./* root@172.16.1.41:/opt/

--bwlimit=100        # Speed limit transmission (unit: MB)
--delete             # Keep the target directory and source directory data consistent
--password-file=xxx  # Use password file
--port               # Specify port transport
-
– exclude from = file exclude unwanted files
#Create multiple files [root@web01 ~]# touch {1..10}.txt [root@web01 ~]# ll total 0 drwxr-xr-x. 2 root root 6 Nov 19 08:44 dir -rw-r--r--. 1 root root 0 Nov 19 08:44 file -rw-r--r--. 1 root root 0 Nov 19 08:59 txt1 -rw-r--r--. 1 root root 0 Nov 19 08:59 txt10 -rw-r--r--. 1 root root 0 Nov 19 08:59 txt2 -rw-r--r--. 1 root root 0 Nov 19 08:59 txt3 -rw-r--r--. 1 root root 0 Nov 19 08:59 txt4 -rw-r--r--. 1 root root 0 Nov 19 08:59 txt5 -rw-r--r--. 1 root root 0 Nov 19 08:59 txt6 -rw-r--r--. 1 root root 0 Nov 19 08:59 txt7 -rw-r--r--. 1 root root 0 Nov 19 08:59 txt8 -rw-r--r--. 1 root root 0 Nov 19 08:59 txt9 #Edit file write the name of the file to exclude [root@web01 ~]# vim 1.txt txt1 txt2 txt3 txt4 #Specify exclude file push content [root@web01 ~]# rsync -avz ./* rsync_backup@172.16.1.41::backup --exclude-from=1.txt sending incremental file list 1.txt txt10 txt5 txt6 txt7 txt8 txt9 dir/ sent 468 bytes received 165 bytes 422.00 bytes/sec total size is 20 speedup is 0.03 #No transmission found 1 Txt -
– bwlimit=100 speed limit transmission
#Create a 1G file [root@web01 ~]# dd if=/dev/zero of=./1.txt bs=10M count=100 #Speed limit 1M push per second [root@web01 ~]# rsync -avzP 1.txt rsync_backup@172.16.1.41::backup --bwlimit=1 sending incremental file list 1.txt 114,130,944 10% 1.01MB/s 0:15:06 #Speed limit 10M push per second [root@web01 ~]# rsync -avzP 1.txt rsync_backup@172.16.1.41::backup --bwlimit=10 sending incremental file list 1.txt 262,078,464 24% 9.89MB/s -
delete data is consistent (no difference synchronization)
#View client data
[root@web01 ~]# ll
total 0
-rw-r--r--. 1 root root 0 Nov 19 09:17 txt2
-rw-r--r--. 1 root root 0 Nov 19 09:17 txt3
-rw-r--r--. 1 root root 0 Nov 19 09:17 txt4
-rw-r--r--. 1 root root 0 Nov 19 09:17 txt5
-rw-r--r--. 1 root root 0 Nov 19 09:17 txt6
-rw-r--r--. 1 root root 0 Nov 19 09:17 txt7
-rw-r--r--. 1 root root 0 Nov 19 09:17 txt8
-rw-r--r--. 1 root root 0 Nov 19 09:17 txt9

#Delete data
[root@web01 ~]# rm -rf txt2
[root@web01 ~]# rm -rf txt3
[root@web01 ~]# rm -rf txt4

#Perform data consistent synchronization
[root@web01 ~]# rsync -avz ./ rsync_backup@172.16.1.41::backup --delete
sending incremental file list
deleting txt4
deleting txt3
deleting txt2
./

sent 332 bytes  received 52 bytes  768.00 bytes/sec
total size is 7,746  speedup is 20.17

#View server
[root@backup backup]# ll
total 0
-rw-r--r--. 1 rsync rsync 0 Nov 19 09:17 txt5
-rw-r--r--. 1 rsync rsync 0 Nov 19 09:17 txt6
-rw-r--r--. 1 rsync rsync 0 Nov 19 09:17 txt7
-rw-r--r--. 1 rsync rsync 0 Nov 19 09:17 txt8
-rw-r--r--. 1 rsync rsync 0 Nov 19 09:17 txt9
be careful:
When pulling: the client data is consistent with the server data, and the server data shall prevail
When pushing: the server data is consistent with the client data, and the client data shall prevail

2, Introduction to Rsync service
2.1 introduction
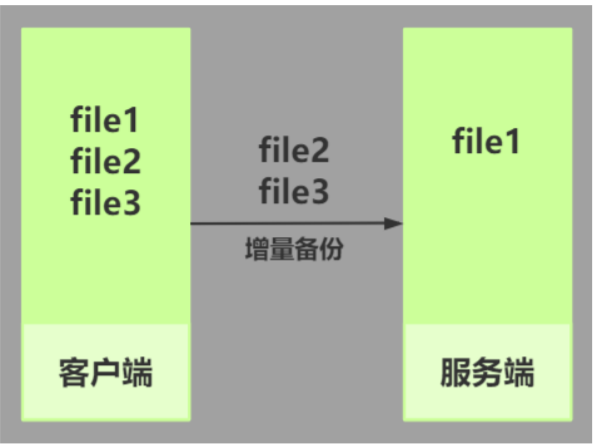
rsync is called remote synchronization in English. It can be seen from the name of the software that rsync has the functions of fast data replication, synchronous mirroring and remote backup between local and remote hosts. This function is similar to the scp command with ssh, but better than the scp command. scp is copied in full every time, while rsync can be copied in increments. Of course, rsync can also replicate data between different partitions or directories of the local host in full and incremental amounts, which is similar to the cp command. But it is also better than the cp command. cp is a full copy every time, while rsync can copy incrementally.
rsync official address: https://rsync.samba.org/
rsync listening port: 873
rsync operation mode: C / s client / server
rsync is called remote synchronization for short. It can realize data synchronization between different hosts, and also supports full and incremental synchronization
2.2 rsync features
- Support copying special files, such as connection files, devices, etc;
- It can exclude the synchronization of specified files or directories, which is equivalent to the exclusion function of the packaging command tar;
- You can keep all attributes of the original file or directory, such as permission, time, soft and hard links, owner, group, etc. - p;
- Incremental synchronization can be realized, that is, only the changed data can be synchronized, so the data transmission efficiency is very high (tar-N);
- You can use rcp, rsh, ssh and other methods to transfer files (rsync itself does not encrypt data);
- You can transfer files and data (server and client) through socket (process mode);
- Support anonymous live authentication (without system user) process mode transmission, which can realize convenient and safe data backup and mirroring;
2.3 production scenario backup scheme
- Synchronize all client server data to the backup server with cron+rsync;
- In view of the chaotic situation of important data backup of the company and the leaders, put forward the solution of backing up the whole network data;
- Through local packaging backup, rsync and inotify application will uniformly back up the whole network data to a fixed storage server, and then check and alarm the administrator's backup results through scripts on the storage server;
- Regularly back up the data of IDC machine room to the company's internal server to prevent data loss caused by earthquake and fire in the machine room;
- Real time synchronization to solve the single point problem of storage server.

3, Rsync application scenario
3.1 backup mode
-
Full backup
Copy the data completely and save it

-
Incremental backup
That is, the newly added data after the last backup is backed up
3.2 rsync transmission mode
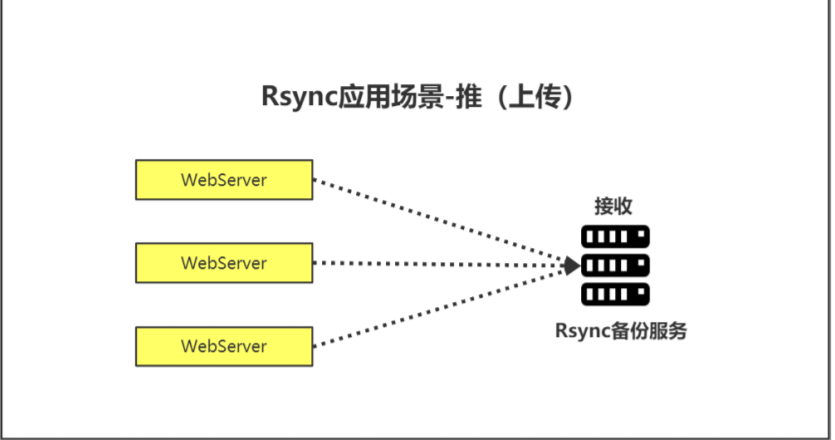
push:
The client pushes data from the local to the server
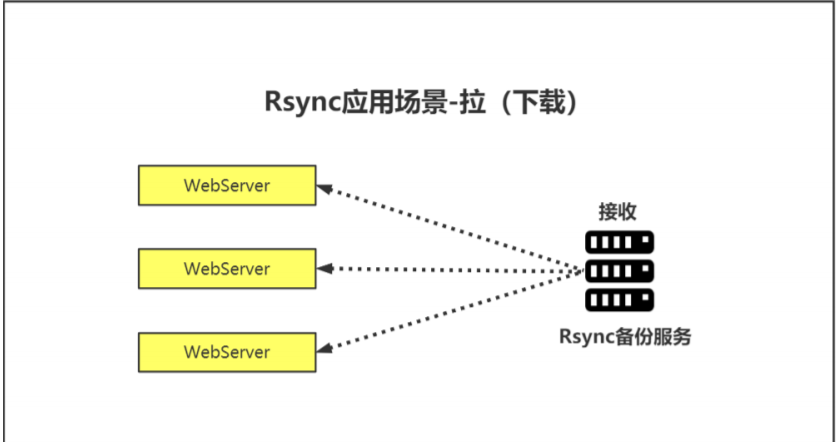
pull:
The client pulls data from the server to the local server

3.3 transmission problems
- Push problem: when the number of client servers is too large, it is easy to cause slow data push;
- Pull problem: when the number of client servers is too large, it is easy to cause excessive pressure on the server;
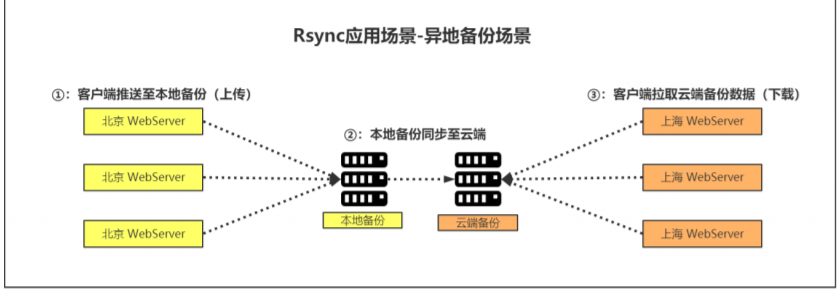
3.4 large number of server backup scenarios
Now there are 2000 servers. How can we effectively and quickly alleviate the problems of push and pull?
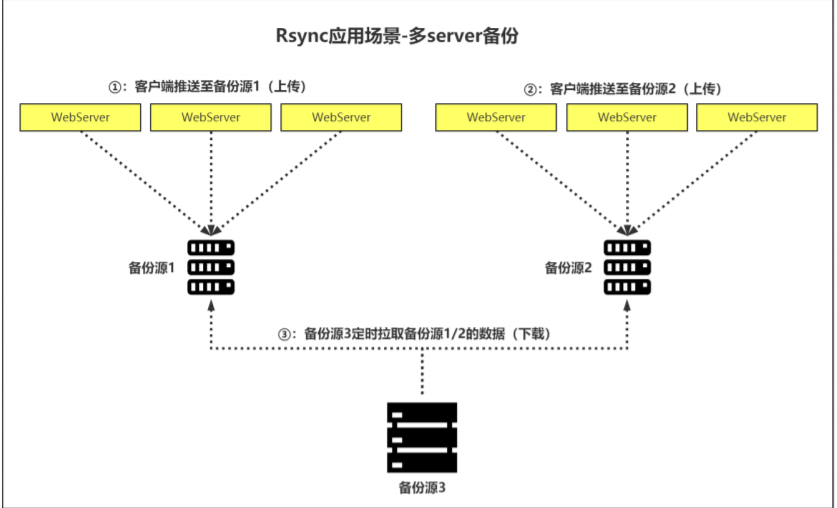
3.5 implementation ideas of remote backup

4, Rsync transmission mode
4.1 transmission mode
- Local mode (similar to cp, push and pull are not supported, but simple replication)
- Remote mode (similar to scp, but different from scp). scp only supports full backup, and rsync supports incremental backup and differential backup
- Daemon mode (client and server)
4.2 local mode
#Syntax:
rsync [OPTION]... SRC [SRC]... DEST
 Command options        source file       Destination address

#Syntax instance
[root@web01 ~]# rsync -avz 1.txt /tmp/

[root@web01 ~]# rsync -avz 1.txt /tmp/
               Command options source file destination directory

#It is similar to cp, but cp is full copy and will modify file attributes. rsync is incremental copy, which will ensure that file attributes remain unchanged
4.3 remote mode
-
Pull command to pull data
#Syntax:
rsync [OPTION]... [USER@]HOST:SRC [DEST]

#example:
[root@web01 ~]# rsync -avz root@172.16.1.41:/tmp/1.txt ./

#Syntax splitting
rsync           #command
-avz            #option
root            #System user of remote server
@               #Separator
172.16.1.41     #Address of the remote host
:               #Separator, representing
/tmp/1.txt      #Directory and files of remote host
./              #Current directory of the current host
-
Push push data command
#grammar
rsync [OPTION]... SRC [SRC]... [USER@]HOST:DEST

#example
[root@web01 ~]# rsync -avz ./1.txt root@172.16.1.41:/tmp

#Syntax splitting
rsync               #command
-avz                #option
./1.txt               #Local files for the current server
root                #System user of remote server
@                   #Separator
172.16.1.41         #IP address of remote host
:                   #Separator, representing
/tmp                #Directory of remote host
matters needing attention:
1,[ root@web01 ~]# rsync -avz root@172.16.1.41 :/tmp/1.txt ./ 2.txt # connect the remote server 1 Txt file to the current directory and rename it to 2 txt
2,[ root@web01 ~]# rsync -avz root@172.16.1.41 :/tmp/ ./ A / # backup the TMP directory of the remote server to the current directory and rename it to a
3. When specifying the directory "/ a", it means the directory "/ a" and the files under it. When the directory "/ A /" is specified, it means that the files in the directory "/ A /" do not include the directory

4.4 daemon transport mode
-
Why use daemon mode
- rsync transmission uses the passwords of system users and system users, which is very insecure
- Using ordinary users will cause permission problems
-
Daemon transport mode syntax
-
push syntax
#Syntax:
rsync [OPTION]... SRC [SRC]... [USER@]HOST::DEST

#example:
[root@web01 ~]# rsync -avz 1.txt rsync_backup@172.16.1.41::backup

#Syntax splitting
rsync               #command
-avz                #option
1.txt               #Files for the current server
rsync_backup        #Virtual user configured by rsync server
@                   #Separator
172.16.1.41         #Remote host IP address
::backup            #Module name

#During the push process, the server directory must be the startup user permission configured by the server
-
Pull pull syntax
#Syntax:
rsync [OPTION]... [USER@]HOST::SRC [DEST]

#Example:
[root@web01 ~]# rsync -avz rsync_backup@172.16.1.41::backup /tmp/

#Syntax split:
rsync               #command
-avz                #option
rsync_backup        #Virtual user defined by the server
@                   #Separator
172.16.1.41         #Remote host IP address
::backup            #Module name
/tmp/               #Directory of the current host

#During the pulling process, the server directory does not need to set rsync user permissions
-

4.5 daemon mode Practice
-
Environmental preparation
host IP Host role JumpServer 172.16.1.81 rsync client Backup 172.16.1.41 rsync server -
Server
-
install
[root@backup ~]# yum install -y rsync

#Find profile
[root@backup ~]# rpm -qc rsync
/etc/rsyncd.conf
/etc/sysconfig/rsyncd
-
Modify profile
[root@m01 ~]# vim /etc/rsyncd.conf
uid = rsync
gid = rsync
port = 873
fake super = yes
use chroot = no
max connections = 200
timeout = 600
ignore errors
read only = false
list = false
auth users = rsync_backup
secrets file = /etc/rsync.passwd
log file = /var/log/rsyncd.log
#####################################
[backup]
comment = welcome to backup!
path = /backup
[linux]
comment = welcome to linux!
path = /tmp/linux
Detailed description of configuration file:
uid = rsync                         #User id to start the service
gid = rsync                         #Group id of the user who started the service
port = 873                          #Service default listening port
fake super = yes                    #You do not need to start with root
use chroot = no                     #Security mechanism
max connections = 200               #maximum connection
timeout = 600                       #Timeout
ignore errors                       #Ignore errors
read only = false                   #Read-only rights
list = false                        #View module list
auth users = rsync_backup            #Define virtual users (users used by rsync transport)
secrets file = /etc/rsync.passwd     #Define the password for the virtual user
log file = /var/log/rsyncd.log       #log file
#####################################
[backup]                                #modular
comment = welcome to backup!     #Comments on the module
path = /backup                          #Real storage path of the server
...
-
Create system user
[root@backup ~]# useradd -r -M -s /sbin/nologin rsync
-
Modify the password file (there must be no spaces)
[root@backup opt]# echo "rsync_backup:123456" > /etc/rsync.passwd
-
Authorization (must be 600)
[root@backup opt]# chmod 600 /etc/rsync.passwd
-
Create backup directory
[root@backup opt]# mkdir /backup
[root@backup opt]# mkdir /tmp/linux
-
Directory authorization
[root@backup opt]# chown rsync.rsync /backup/
[root@backup opt]# chown rsync.rsync /tmp/linux/
-
Turn off firewall and selinux
8,Turn off firewalls and selinux
[root@backup opt]# systemctl disable --now firewalld
[root@backup opt]# setenforce 0
-
Start rsyncd service
[root@backup opt]# systemctl start rsyncd

#Verify startup
[root@backup ~]# netstat -lntp | grep 873
tcp        0      0 0.0.0.0:873             0.0.0.0:*               LISTEN      26370/rsync
tcp6       0      0 :::873                  :::*                    LISTEN      26370/rsync
[root@backup ~]# ps -ef | grep rsync
root      26370      1  0 11:08 ?        00:00:00 /usr/bin/rsync --daemon --no-detach
root      26408  25098  0 11:09 pts/1    00:00:00 grep --color=auto rsync
-

-
Client rsync
#Download and install
yum install -y rsync

#Create authentication files and modify permissions
echo "123456" >/etc/rsync.passwd
chmod 600 /etc/rsync.passwd
4.6 client push-pull data method
-
Method 1: enter your own password
[root@m01 ~]# rsync -avzP ./* rsync_backup@172.16.1.41::backup

rsync_backup :  Virtual user, used only during data transmission
172.16.1.41  :  backup Server side IP
backup       :  Module name
-
Method 2: set the password file and read it at run time
1,Write password file
	[root@backup opt]# echo "123456" > /etc/rsync.passwd

2,to grant authorization
	[root@m01 ~]# chmod 600 /etc/rsync.passwd

3,connect
	[root@m01 ~]# rsync -avzP --password-file=/etc/rsync.passwd  ./* rsync_backup@172.16.1.41::linux
-
Method 3: add environment variables
1,Define environment variables(Temporary addition)
	export RSYNC_PASSWORD=123456

2,synchronization
	[root@m01 ~]# rsync -avzP  ./* rsync_backup@172.16.1.41::linux

4.7 rsync common error reports
1.Error content:
[root@web01 ~]# rsync -avz 1.txt rsync_backu@172.16.1.41::backup
Password:
@ERROR: auth failed on module backup
rsync error: error starting client-server protocol (code 5) at main.c(1649) [sender=3.1.2]
#Reasons: 1) the user name or password of the virtual user is wrong, 2) the server password file permission is not 600

2.Error content:
[root@web01 ~]# rsync -avz 1.txt rsync_backup@172.16.1.41::backup --password-file=/etc/rsync.passwd
ERROR: password file must not be other-accessible
rsync error: syntax or usage error (code 1) at authenticate.c(196) [sender=3.1.2]
#Reason: the client password file permission is not 600

3.Error content:
[root@web01 ~]# rsync -avz 1.txt rsync_backup@172.16.1.41::backu
@ERROR: Unknown module 'backu'
rsync error: error starting client-server protocol (code 5) at main.c(1649) [sender=3.1.2]
#Cause: wrong module name

4.Error content:
[root@web01 ~]# rsync -avz 1.txt rsync_backup@172.16.1.41::/backup
ERROR: The remote path must start with a module name not a /
rsync error: error starting client-server protocol (code 5) at main.c(1649) [sender=3.1.2]
#Reason: the double colon is followed by the module name, not the directory name. Do not add/

5.Error content:
[root@web01 ~]# rsync -avz 1.txt rsync_backup@172.16.1.41::backup
rsync: failed to connect to 172.16.1.41 (172.16.1.41): No route to host (113)
rsync error: error in socket IO (code 10) at clientserver.c(125) [sender=3.1.2]
#Reason: the firewall is turned on and firewall rules are not configured
[root@backup ~]# firewall-cmd --add-port=873/tcp
success

6.Error content:
[root@web01 ~]# rsync -avz 1.txt rsync_backup@172.16.1.41::backup
Password:
sending incremental file list
rewriteip.sh
rsync: mkstemp ".rewriteip.sh.vx4Cry" (in backup) failed: Permission denied (13)

sent 207 bytes  received 128 bytes  44.67 bytes/sec
total size is 194  speedup is 0.58
rsync error: some files/attrs were not transferred (see previous errors) (code 23) at main.c(1179) [sender=3.1.2]
#Cause: selinux is not turned off

7.Error content:
[root@web01 ~]# rsync -avz 1.txt rsync_backup@172.16.1.41::backup
sending incremental file list
rsync: delete of stat xattr failed for "rewriteip.sh" (in backup): Permission denied (13)

sent 55 bytes  received 114 bytes  338.00 bytes/sec
total size is 194  speedup is 1.15
rsync error: some files/attrs were not transferred (see previous errors) (code 23) at main.c(1179) [sender=3.1.2]
#Reason: the server backup directory permission is not rsync

8.Error content
[root@web01 ~]# rsync -avz 1.txt rsync_backup@172.16.1.41::backup
rsync: failed to connect to 172.16.1.41 (172.16.1.41): Connection refused (111)
rsync error: error in socket IO (code 10) at clientserver.c(125) [sender=3.1.2]
#Cause: the server service was not started

9.Error content
[root@web01 ~]# rsync -avz 1.txt rsync_backup@10.0.0.41::backup
sending incremental file list
rsync: read error: Connection reset by peer (104)
rsync error: error in socket IO (code 10) at io.c(785) [sender=3.1.2]
#Cause: server configuration error, resulting in startup problem

5, Rsync combined with inotify (real-time synchronization)
rsync does not support real-time synchronization. Usually, we use inotify software to monitor file changes in real time. Once inotify monitors file changes, we immediately call rsync for synchronization.
5.1 installing inotify (installed on the client)
[root@web01 ~]# yum -y install inotify-tools
5.2 common parameters
-m Continuous monitoring
-r recursion
-q Silent, printing only time information
--timefmt Specifies the output time format
--format Specifies the event output format
    %Xe event
    %w catalogue
    %f file
-e Specify the events to monitor
    access visit
    modify Content modification
    attrib Attribute modification
    close_write Modify real file content
    open open
    create establish
    delete delete
    umount uninstall
5.3 test command (start monitoring)
/usr/bin/inotifywait -mrq --format '%Xe %w %f' -e create,modify,delete,attrib,close_write [Monitoring path]
5.4 real time monitoring and synchronization
[root@m01 ~]# /usr/bin/inotifywait  -mrq  --format '%Xe  %w  %f' -e create,modify,delete,attrib,close_write  /root | while read line;do
	cd  /root && rsync -avzP --delete --password-file=/etc/rsync.passwd ./* rsync_backup@172.16.1.41::backup
done

5.5 real time backup script preparation (for future use)
-
Rough version
[root@backup ~]# vim rsyn-inotify.sh #!/bin/bash dir=/backup /usr/bin/inotifywait -mrq --format '%w %f' -e create,delete,attrib,close_write $dir | while read line;do cd $dir && rsync -az -R --delete . rsync_backup@172.16.1.31::backup --password-file=/etc/rsync.passwd >/dev/null 2>&1 done & -
Essential oil version
#!/bin/bash
src=/data
des=backup
rsync_passwd_file=/etc/rsync.passwd
ip1=172.16.1.41
user=rsync_backup
cd ${src}
/usr/bin/inotifywait -mrq --format  '%Xe %w%f' -e modify,create,delete,attrib,close_write,move ./ | while read file
do
CREATE  /backup/  1.txt
    INO_EVENT=$(echo $file | awk '{print $1}')
    INO_FILE=$(echo $file | awk '{print $2}')
    if [[ $INO_EVENT =~ 'CREATE' ]] || [[ $INO_EVENT =~ 'MODIFY' ]] || [[ $INO_EVENT =~ 'CLOSE_WRITE' ]] || [[ $INO_EVENT =~ 'MOVED_TO' ]]
    then
        rsync -azcR --password-file=${rsync_passwd_file} ${INO_FILE} ${user}@${ip1}::${des}
    fi
    if [[ $INO_EVENT =~ 'DELETE' ]] || [[ $INO_EVENT =~ 'MOVED_FROM' ]]
    then
        rsync -azR --delete --password-file=${rsync_passwd_file} $(dirname ${INO_FILE}) ${user}@${ip1}::${des} >/dev/null 2>&1
    fi
    if [[ $INO_EVENT =~ 'ATTRIB' ]]
    then
    if [ ! -d "$INO_FILE" ]
    then
        rsync -azcR --password-file=${rsync_passwd_file} $(dirname ${INO_FILE}) ${user}@${ip1}::${des} >/dev/null 2>&1
    fi
    fi
done &