Description of this article
recently I saw a blog of cesium Daniel in China, talking about material( texture of material )So I looked at the source code and found that it is of great significance to study. First, dojo is used for the construction of the source code project, and all the style business drawing front ends are well separated. The key is that there are no multiple copies, which is convenient for debugging. This is much better than vue, which is a fool and over modular packaging, but these are not the focus of this paper, The water effect involved in this article is actually only one of the 22 materials provided by cesium. Cesium not only defines 22 common materials, each of which can customize rendering attributes and can be combined with each other, but also allows users to customize any material, which is really convenient. The fire effect mentioned in this article has nothing to do with the material, just because water and fire are always easy to be connected. Since we have studied water rendering, it doesn't hurt to understand fire rendering.
Cesium's official description of 22 materials and their uniform attributes is linked to the official website
Water effect
Water effect example code
The following is the simplest code after deleting the remaining Material sample codes that are not concerned in this article from the official Material:
var worldRectangle;

		function applyWaterMaterial(primitive, scene) {
			//Sandcastle.declare(applyWaterMaterial); // For highlighting in Sandcastle.
			primitive.appearance.material = new Cesium.Material({
				fabric: {
					type: 'Water',
					uniforms: {
						// baseWaterColor:Cesium.Color.RED,
						// blendColor:Cesium.Color.DARKBLUE,
						specularMap: '../images/earthspec1k.jpg',
						normalMap: Cesium.buildModuleUrl('Assets/Textures/waterNormals.jpg'),
						frequency: 10000.0,
						animationSpeed: 0.01,
						amplitude: 1
					}
				}
			});
		}

		function toggleWorldRectangleVisibility() {
			worldRectangle.show = true;
		}

		function createPrimitives(scene) {
			worldRectangle = scene.primitives.add(new Cesium.Primitive({
				geometryInstances: new Cesium.GeometryInstance({
					geometry: new Cesium.RectangleGeometry({
						rectangle: Cesium.Rectangle.fromDegrees(-180.0, -90.0, 180.0, 90.0),
						vertexFormat: Cesium.EllipsoidSurfaceAppearance.VERTEX_FORMAT
					})
				}),
				appearance: new Cesium.EllipsoidSurfaceAppearance({
					aboveGround: false
				}),
				show: false
			}));
		}

		var viewer = new Cesium.Viewer('cesiumContainer');
		var scene = viewer.scene;
		createPrimitives(scene);
		toggleWorldRectangleVisibility();
		applyWaterMaterial(worldRectangle, scene);
Description of water effect attribute setting
the definition in the uniform of cesium water material includes the following attributes:
- baseWaterColor
Color of water - blendColor
rgba color used when mixing from water to non-water areas
If the above two colors are not set, the default is:
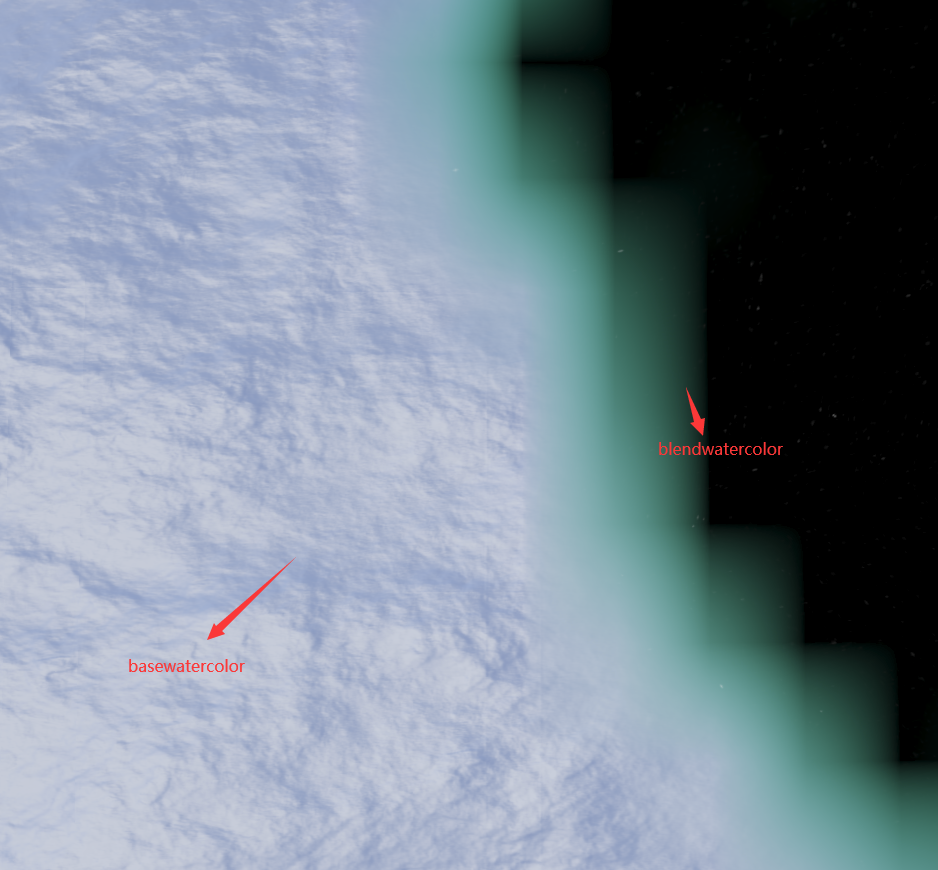
If set to:
baseWaterColor:Cesium.Color.RED,
blendColor:Cesium.Color.DARKBLUE,
The display effect is as follows:
- specularMap
A black-and-white image is used as a map to identify where water is used for rendering. If it is not specified, it means that the primitive area using the material is all water. If it is specified as an all black image, it means that there is no water in the area. If it is gray, it means the transparency of water. Here, it is generally specified that there is either water or no water, Moreover, for the primitive area that is not rectangular, it is best to define it as white, otherwise it is difficult to draw a map, which can just ensure that there is water where it is needed and there is no water where it is not needed
The map in the example is as follows:
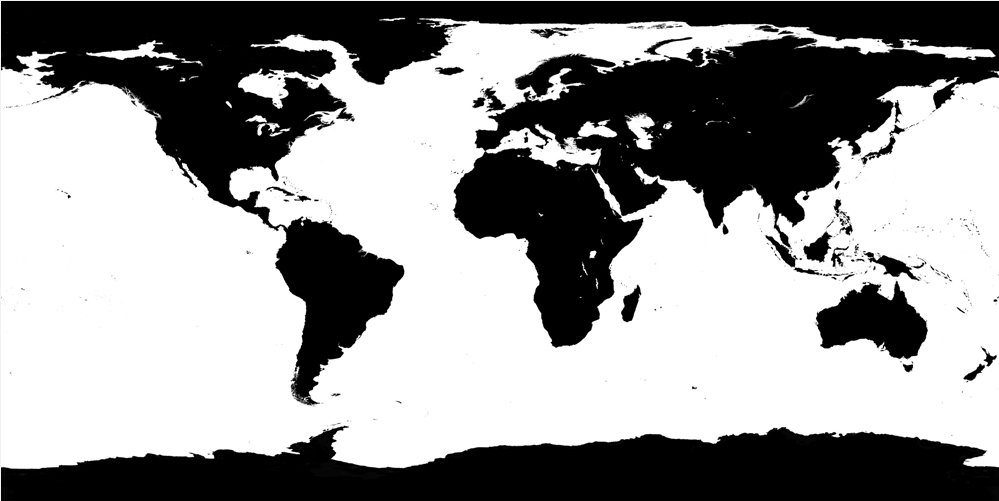
As shown in the above figure, the white area will be rendered as the water surface, and the black part will not be rendered. Because the world base map is superimposed by default, the black part retains the land. The reason for using this map here is that the defined primitive range is the global range, which is exactly a rectangle:
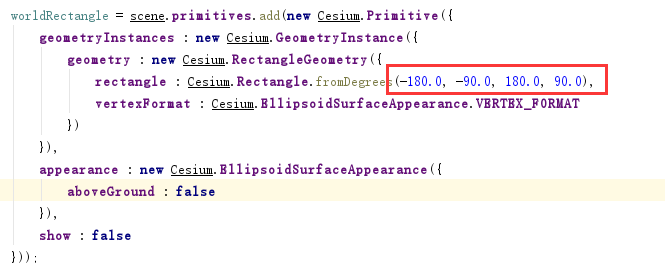
Therefore, in our practical application, if we just want to render a custom irregular figure as the water surface, we can directly assign a white picture here. - normalMap
Normal map used to generate undulation effect. For normal map, you can reference resources
The map in the example is as follows:
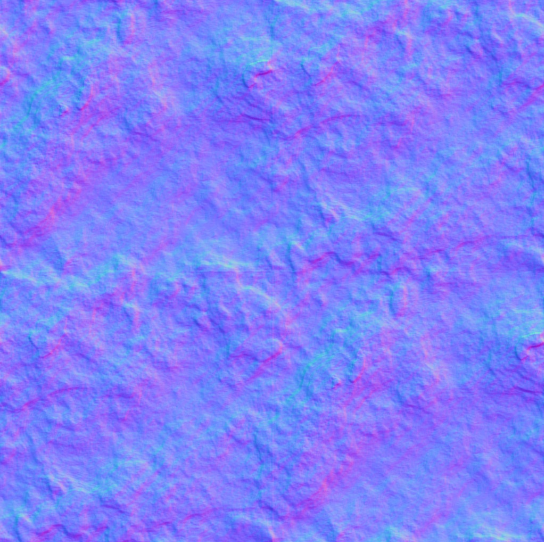
We can modify this image to produce a different ripple effect - frequency
Used to control the wave frequency of water waves - animationSpeed
A number used to control the speed of water flow - amplitude
A number used to control the amplitude of water waves - specularIntensity
A number that controls the specular intensity
Water effect practical application code
in practical application, we may just show the water surface effect of a specified polygon area in most cases, right? So after understanding the meaning of each attribute, we can meet the needs by slightly modifying it on this basis.
So here we modify the coordinates of primitive to user-defined:
worldRectangle = scene.primitives.add(new Cesium.Primitive({
				geometryInstances: new Cesium.GeometryInstance({
					geometry: new Cesium.PolygonGeometry({
						polygonHierarchy : new Cesium.PolygonHierarchy(
							Cesium.Cartesian3.fromDegreesArray([
								120.0, 40.0,
								120.0, 35.0,
								125.0, 30.0,
								120.0, 30.0,
								118.0, 40.0
							])
						)
					})
				}),
				appearance: new Cesium.EllipsoidSurfaceAppearance({
					aboveGround: false
				}),
				show: false
			}));
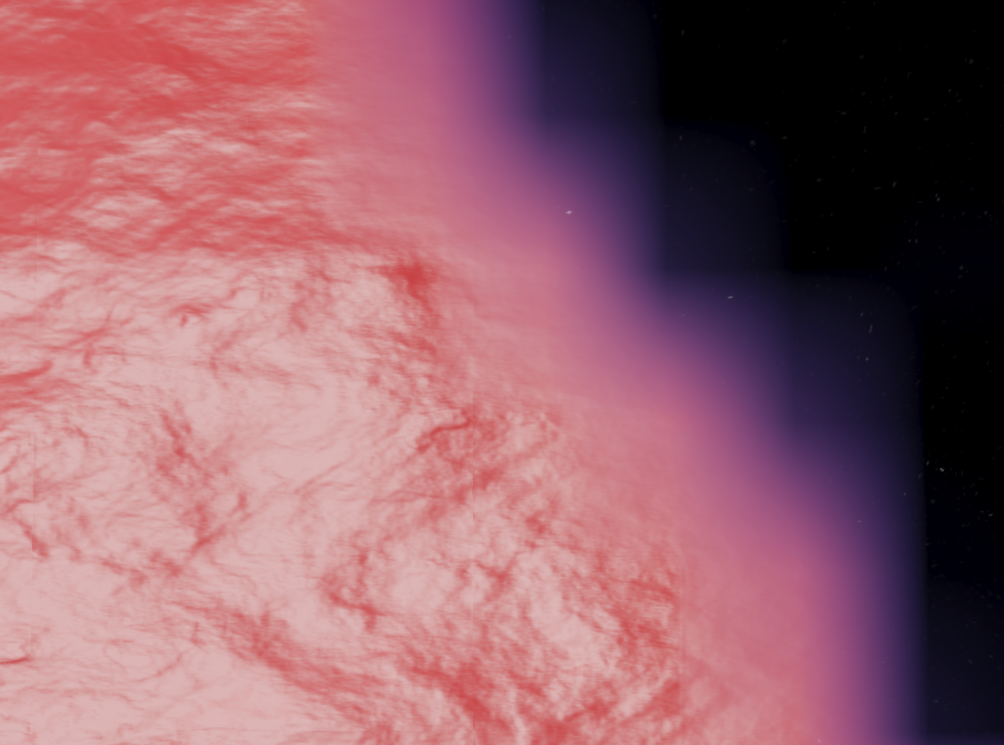
Then remove the specularMap setting, or set it to an all white map. The effect is as follows:
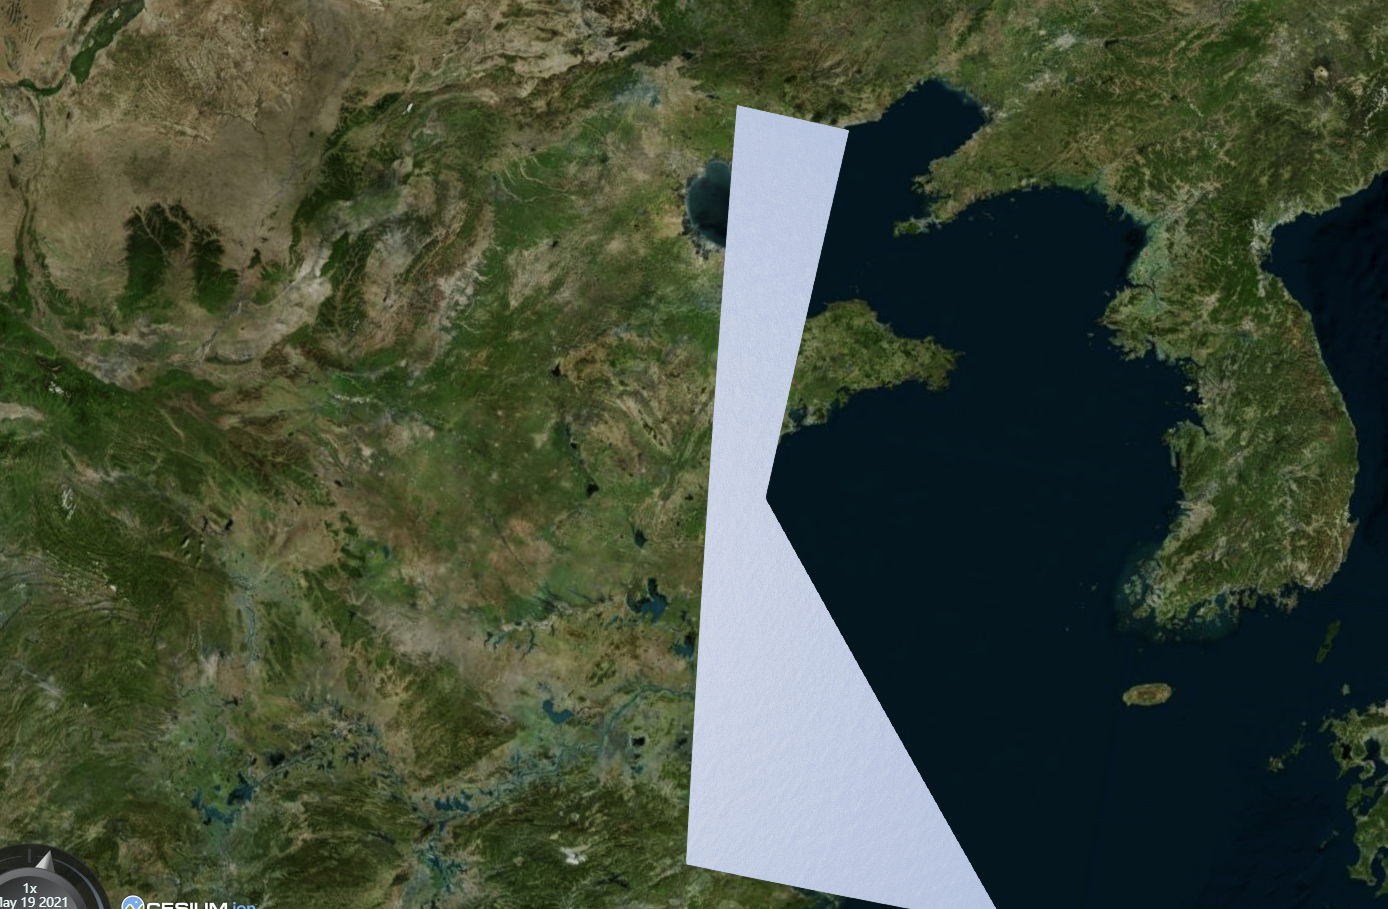
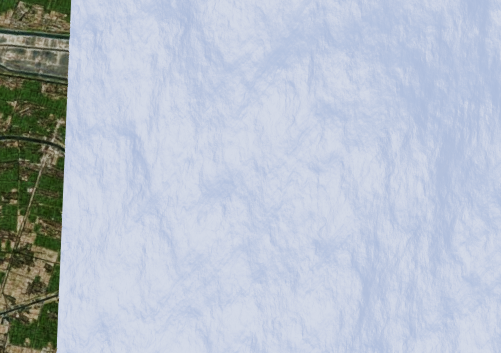
Zoom in is the water surface effect:
Of course, we can also customize other properties
Fire effect
flame effects, fountains, fire fountains and other effects are particle effects. cesium has good support for this. In fact, it just needs to look at the api documentation. In fact, I personally prefer to spend more time looking at the material. After all, there are many contents and complex use, but many customers like this special effect and always have to do it, So I have to look at it alone and get familiar with it.
Fire effect implementation code
whether it's fire, water or smoke, whatever you want to spray, the principle of implementation is the same anyway, using particle effect.
read the official example of Cesium and even found some unexpected surprises. However, let's get to the point and analyze the implementation code of particle effect on the official website.
First of all, the particle effect is generated within a certain time range, so you need to turn on the time animation of cesium, that is, you need to set: viewer clock. shouldAnimate = true;
//Sandcastle_Begin
var viewer = new Cesium.Viewer('cesiumContainer');

//Set the random number seed for consistent results.
//Cesium.Math.setRandomNumberSeed(3);

//Set bounds of our simulation time
var start = Cesium.JulianDate.fromDate(new Date(2015, 2, 25, 16));
var stop = Cesium.JulianDate.addSeconds(start, 120, new Cesium.JulianDate());

//Make sure viewer is at the desired time.
viewer.clock.startTime = start.clone();
viewer.clock.stopTime = stop.clone();
viewer.clock.currentTime = start.clone();
viewer.clock.clockRange = Cesium.ClockRange.LOOP_STOP; //Loop at the end
viewer.clock.multiplier = 1;
viewer.clock.shouldAnimate = true;

//Set timeline to simulation bounds
viewer.timeline.zoomTo(start, stop);
the first step of the example is to initialize a view and then set randomNumberSeed, which is mainly used to generate random numbers. It doesn't matter to comment it out in this example, because the nextRandomNumber function is not used:

the next step is to set the animation start and end times start and end, which should be used below, so the corresponding variables are defined separately and assigned clock, where clockrange is set to LOOP_STOP means that after the animation is completed, the time series starts over again and continues to cycle. In addition to this enumeration value, clockrange can also define UNBOUNDED (no boundary, always back), clamped (stop after reaching end). cesium defaults to UNBOUNDED, so it needs to be set separately here. The multiplier attribute is used to define how much time is added each time, Finally, locate the time range to the start and end ranges.
the second step of the example is to perform data binding and set listening subscription distribution, which is similar to watch and data binding in vue. Since cesium does not use vue natively, knockout, a lightweight data binding used here, has been integrated into cesium and can be used automatically by referencing cesium. If cesium is not used, knockout can also be used directly in other applications, Direct application of native html does not depend on any plug-ins, which has not been encountered before, so I experimented alone. Practice has proved that Jedi can also use it in vue, but use native input instead of other plug-ins like element.
var viewModel = {
    emissionRate : 5.0,
    gravity : 0.0,
    minimumParticleLife : 1.2,
    maximumParticleLife : 1.2,
    minimumSpeed : 1.0,
    maximumSpeed : 4.0,
    startScale : 1.0,
    endScale : 5.0,
    particleSize : 25.0
};
Cesium.knockout.track(viewModel);
var toolbar = document.getElementById('toolbar');
Cesium.knockout.applyBindings(viewModel, toolbar);
The code of data binding part is as follows:
Cesium.knockout.getObservable(viewModel, 'emissionRate').subscribe(
    function(newValue) {
        particleSystem.emissionRate = parseFloat(newValue);
    }
);

Cesium.knockout.getObservable(viewModel, 'particleSize').subscribe(
    function(newValue) {
        var particleSize = parseFloat(newValue);
        particleSystem.minimumImageSize.x = particleSize;
        particleSystem.minimumImageSize.y = particleSize;
        particleSystem.maximumImageSize.x = particleSize;
        particleSystem.maximumImageSize.y = particleSize;
    }
);

Cesium.knockout.getObservable(viewModel, 'minimumParticleLife').subscribe(
    function(newValue) {
        particleSystem.minimumParticleLife = parseFloat(newValue);
    }
);

Cesium.knockout.getObservable(viewModel, 'maximumParticleLife').subscribe(
    function(newValue) {
        particleSystem.maximumParticleLife = parseFloat(newValue);
    }
);

Cesium.knockout.getObservable(viewModel, 'minimumSpeed').subscribe(
    function(newValue) {
        particleSystem.minimumSpeed = parseFloat(newValue);
    }
);

Cesium.knockout.getObservable(viewModel, 'maximumSpeed').subscribe(
    function(newValue) {
        particleSystem.maximumSpeed = parseFloat(newValue);
    }
);

Cesium.knockout.getObservable(viewModel, 'startScale').subscribe(
    function(newValue) {
        particleSystem.startScale = parseFloat(newValue);
    }
);

Cesium.knockout.getObservable(viewModel, 'endScale').subscribe(
    function(newValue) {
        particleSystem.endScale = parseFloat(newValue);
    }
);
Corresponding html data binding method:
<div id="toolbar">
    <table>
        <tbody>
        <tr>
            <td>Rate</td>
            <td>
                <input type="range" min="0.0" max="100.0" step="1" data-bind="value: emissionRate, valueUpdate: 'input'">
                <input type="text" size="5" data-bind="value: emissionRate">
            </td>
        </tr>
        ...
what do you mean? Personal understanding: particle effects need to be set with some attributes of ViewModel, such as emissionRate. If we want to dynamically control the display results of particle effects from the interface by controlling the values of input components such as slider and input box, we need to use data binding, cesium knockout. Getobservable writes the data changes caused by interface control into the ParticleSystem response attribute. The last html code binds the page control and data, and uses applybinding to bind the ViewModel and html control as a whole. The general diagram is as follows:

For ease of understanding, the experimental code is as follows. For example, I want to control the opacity of the layer through a slider on the page. The slider from 0-100 means that the opacity of the layer changes from 0-100, so the code is abbreviated as follows:
html code:
 <el-form id="mapsettingForm">
            <el-form-item label="Transparency:" prop="opacity">
                <input type="range" min="0" max="100" step="1" data-bind="value: opacity, valueUpdate: 'input'">
            </el-form-item>
 </el-form>
js code:
Cesium.knockout.track(this.mapsettingForm);
			var toolbar = document.getElementById('mapsettingForm');
			Cesium.knockout.applyBindings(this.mapsettingForm, toolbar);

			let that=this;
			Cesium.knockout.getObservable(this.mapsettingForm, 'opacity').subscribe(
				function(newValue) {
					if (that.mapnode)
						changeOpacityFunc(newValue);
				}
			);
The same functions of vue can be realized by using the following framework:
html code:
 <el-form id="mapsettingForm" :model="mapsettingForm">
            <el-form-item label="Transparency:" prop="opacity">
                <el-slider data-bind="value: opacity" :min="0" :max="100"></el-slider>
            </el-form-item>
 </el-form>
js code:
watch:{
'mapsettingForm.opacity'(newVal, oldVal) {
				if (this.mapnode)
					changeOpacityFunc(newValue);
			},
}
in comparison, vue code seems to be more concise, right? Because the underlying layer of vue helps us encapsulate the implementation, data can be bound in the way of model instead of data bind with knockout. In addition, watch can replace getobservable Subscribe function.
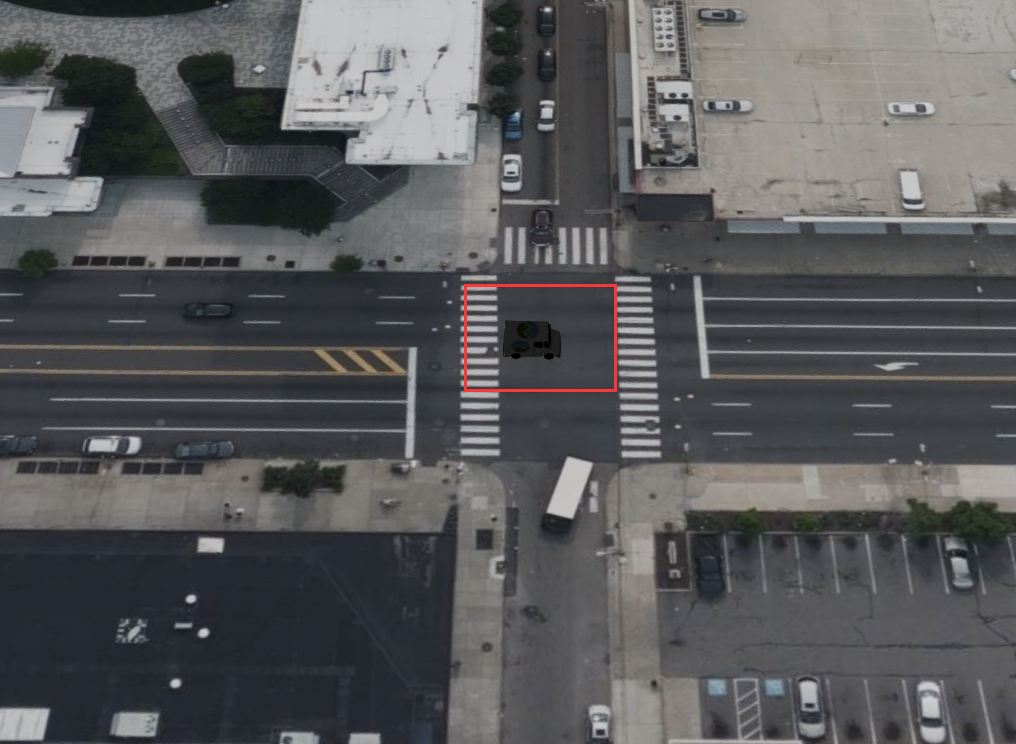
the third step of the example is to define some variables and functions, which actually serve the entity and particle system. For the time being, it will be clearer when it is used later. Go directly to the fourth step is to define a mobile car. For display needs, the display effect of the example is that the car moves on a broad road, and then the tail of the car continuously sprays color pollution smoke. Therefore, you need to define a mobile trolley first:
var pos1 = Cesium.Cartesian3.fromDegrees(-75.15787310614596, 39.97862668312678);
var pos2 = Cesium.Cartesian3.fromDegrees(-75.1633691390455, 39.95355089912078);
var position = new Cesium.SampledPositionProperty();
position.addSample(start, pos1);
position.addSample(stop, pos2);
var entity = viewer.entities.add({
availability : new Cesium.TimeIntervalCollection([new Cesium.TimeInterval({
start : start,
stop : stop
})]),
model : {
uri : '../../SampleData/models/CesiumMilkTruck/CesiumMilkTruck-kmc.glb',
minimumPixelSize : 64
},
viewFrom: new Cesium.Cartesian3(-100.0, 0.0, 100.0),
position : position,
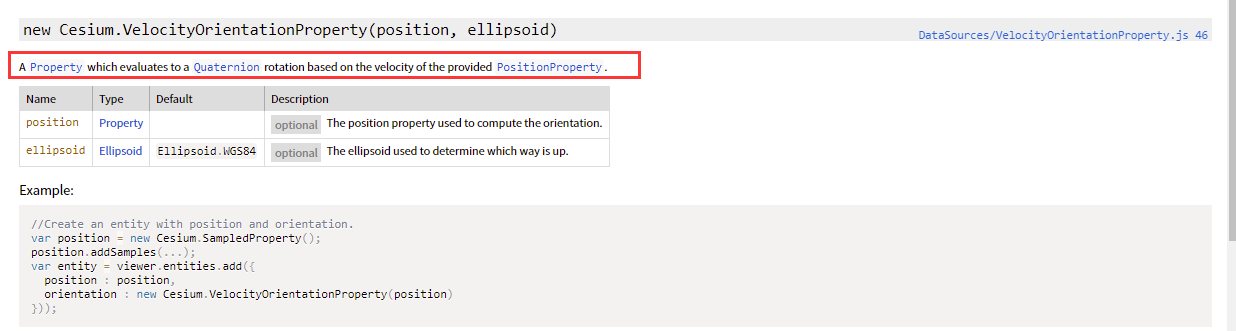
orientation : new Cesium.VelocityOrientationProperty(position)
});
viewer.trackedEntity = entity;
there is an interesting application here, which is to set a dynamic position for the entity. All the applications you have done before are to set a static address for the entity. It is found here that you can actually set a dynamic address for it by using SampledPositionProperty. For this class, refer to an article article It's written in great detail. It's enough to compare with the official api documents. Anyway, I feel that my knowledge has increased after reading it. The original method I used before is simply low explosion in the dynamic calculation of each frame. Its advantage is that we only need to define the time point and position, and the system can automatically interpolate the corresponding position of each time point in the middle without our manual calculation and control. The most remarkable thing is that the following orientation attribute can calculate the corresponding direction according to position. I wipe it. It's not too cool. You know, In the past, these values were calculated in real time by writing various matrix transformations. There is no need to spend any code, and the system will do it automatically.

in order to verify your understanding, you manually create an entity without setting special effects or tracking mode. It's just a white dot position. Then look at the movement using sampledposition. The simplified code is as follows. The verification result is as you want. Do circular movement in a small white dot scene:
        var viewer = new Cesium.Viewer('cesiumContainer');
        //Set bounds of our simulation time
		var start = Cesium.JulianDate.fromDate(new Date(2015, 2, 25, 16));
		var mid = Cesium.JulianDate.addSeconds(start, 60, new Cesium.JulianDate());
		var stop = Cesium.JulianDate.addSeconds(start, 120, new Cesium.JulianDate());
        //Make sure viewer is at the desired time.
		viewer.clock.startTime = start.clone();
		viewer.clock.stopTime = stop.clone();
		viewer.clock.currentTime = start.clone();
		viewer.clock.clockRange = Cesium.ClockRange.LOOP_STOP; //Loop at the end
		viewer.clock.multiplier = 1;
		viewer.clock.shouldAnimate = true;
        //Set timeline to simulation bounds
		viewer.timeline.zoomTo(start, stop);
		var pos1 = Cesium.Cartesian3.fromDegrees(-75.15787310614596, 39.97862668312678);
		var pos2 = Cesium.Cartesian3.fromDegrees(-75.1633691390455, 39.95355089912078);
		var pos3 = Cesium.Cartesian3.fromDegrees(-75.1643691390455, 39.95355089912678);
		var position = new Cesium.SampledPositionProperty();
		position.addSample(start, pos1);
		position.addSample(mid, pos3);
		position.addSample(stop, pos2);
		var entity = viewer.entities.add({
			position: position,
			point: {
				pixelSize: 10,
				color: Cesium.Color.WHITE,
			}
		});
		viewer.zoomTo(entity);
the actual display effect is as follows. Note that the small white circle in the figure is moving:
in the sample code, there is another function that you have not used before, that is, set the minimumPixelSize of the model, which can ensure the minimum pixel size of the model. That is, if the map is reduced, ensure that the model itself will not be reduced, and you can see the model in the small-scale map scene.
Large scale display:
Display under small scale:

the fourth step of the example program is to define the particle system. The program is as follows:
var scene = viewer.scene;
var particleSystem = scene.primitives.add(new Cesium.ParticleSystem({
    image : '../../SampleData/smoke.png',

    startColor : Cesium.Color.LIGHTSEAGREEN.withAlpha(0.7),
    endColor : Cesium.Color.WHITE.withAlpha(0.0),

    startScale : viewModel.startScale,
    endScale : viewModel.endScale,

    minimumParticleLife : viewModel.minimumParticleLife,
    maximumParticleLife : viewModel.maximumParticleLife,

    minimumSpeed : viewModel.minimumSpeed,
    maximumSpeed : viewModel.maximumSpeed,

    imageSize : new Cesium.Cartesian2(viewModel.particleSize, viewModel.particleSize),

    emissionRate : viewModel.emissionRate,

    bursts : [
        // these burst will occasionally sync to create a multicolored effect
        new Cesium.ParticleBurst({time : 5.0, minimum : 10, maximum : 100}),
        new Cesium.ParticleBurst({time : 10.0, minimum : 50, maximum : 100}),
        new Cesium.ParticleBurst({time : 15.0, minimum : 200, maximum : 300})
    ],

    lifetime : 16.0,

    emitter : new Cesium.CircleEmitter(2.0),

    emitterModelMatrix : computeEmitterModelMatrix(),

    updateCallback : applyGravity
}));
some of them involve other functions and codes. For ease of understanding, we don't consider it here, but browse it as a whole:
- The particle effect is loaded through primitive. Since it is through primitive, there must be location attribute information (nonsense). However, we see that there is no exact location information defined here. In fact, the location information is assigned in the modelmatrix attribute of particleSystem, which will be seen later;
- Check that the definitions of ParticleSystem are all optional, that is, all can be assigned without assignment:
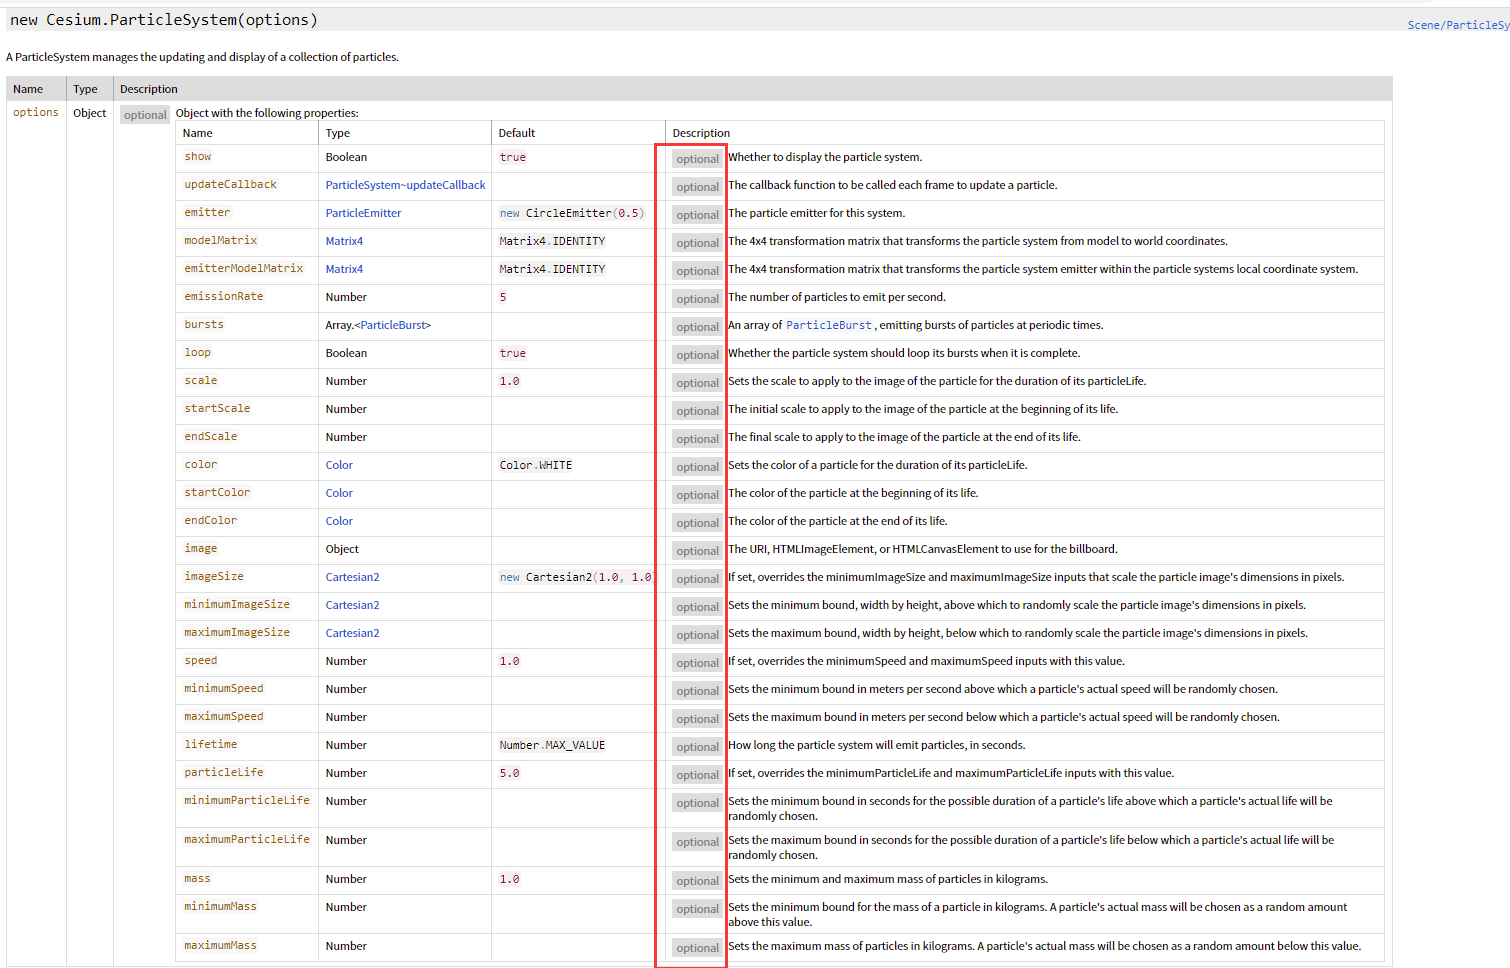
- The setting attributes of particle system mainly include the following:
- General control: show, updateCallback, modelMatrix, loop
- The settings of emitters include emitters, emitterModelMatrix, emissionRate and bursts
- About scale settings: scale, startScale, endScale
- About color settings: color, startColor, endColor
- About image settings: image, imageSize, minimunImageSize, maximunImageSIze
- About speed settings: speed, minimunSpeed, maximunSpeed
- Settings for lifetime: lifetime, particleLift, minimunParticleLife, maximumParticleLife
- About the settings of mass: mass, minimumass, maximummass
Description of fire effect attribute setting
Location setting
the location is set in the preUpdate listening event of scene:
viewer.scene.preUpdate.addEventListener(function(scene, time) {
    particleSystem.modelMatrix = computeModelMatrix(entity, time);

    // Account for any changes to the emitter model matrix.
    particleSystem.emitterModelMatrix = computeEmitterModelMatrix();

    // Spin the emitter if enabled.
    if (viewModel.spin) {
        viewModel.heading += 1.0;
        viewModel.pitch += 1.0;
        viewModel.roll += 1.0;
    }
});
The events related to scene are as follows:
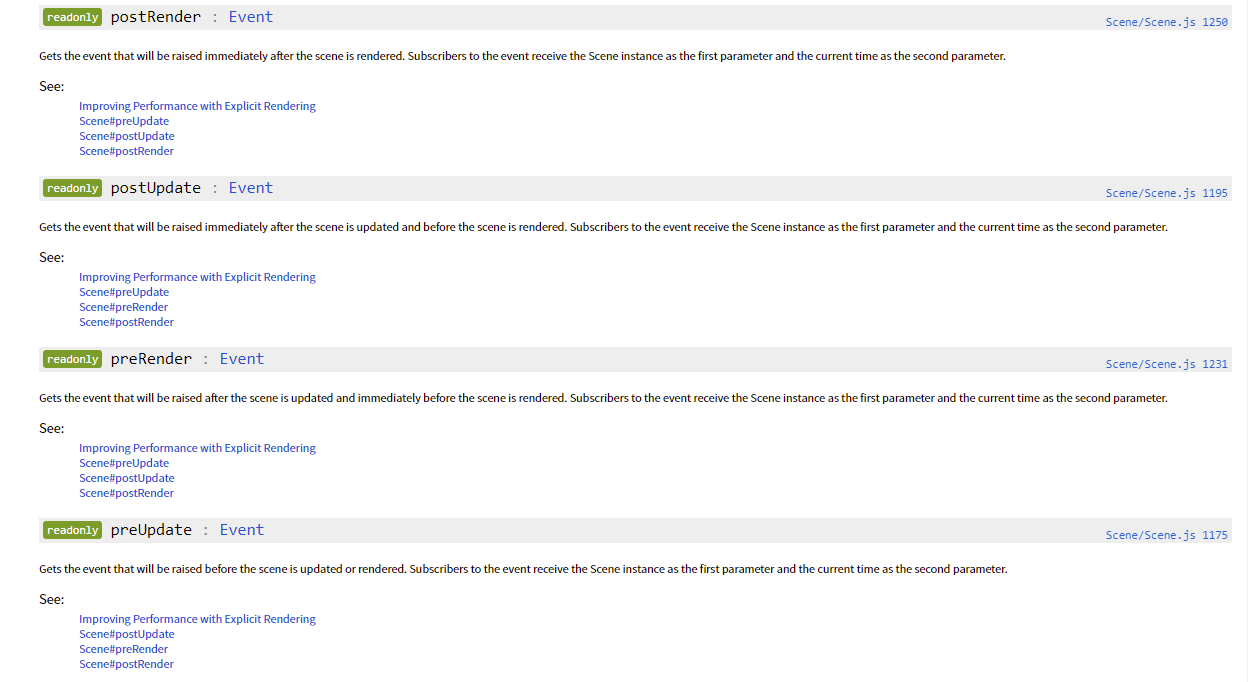
therefore, in the event listener of preUpdate, set the modelMatrix of particleSystem to change the position of particle effect. The computeModelMatrix method of entity is used, which can get the model matrix of entity: from object coordinates to world coordinates, including translation, scaling and rotation.
Gravity control
set it by setting the updateCallback attribute of particle. In this event callback function, two parameters are passed in: particle and dt, where dt is the time interval from the last call, so the differential form dt is used. The calculation method is as follows:
var gravityScratch = new Cesium.Cartesian3();

function applyGravity(p, dt) {
    // We need to compute a local up vector for each particle in geocentric space.
    var position = p.position;

    Cesium.Cartesian3.normalize(position, gravityScratch);
    Cesium.Cartesian3.multiplyByScalar(gravityScratch, viewModel.gravity * dt, gravityScratch);

    p.velocity = Cesium.Cartesian3.add(p.velocity, gravityScratch, p.velocity);
}
after analyzing the code, it is found that the velocity superposition with inertia is used here, because the normalization of position is carried out first, and the acceleration of gravity is superimposed on the basis of normalization: v1=v0+at, where the acceleration is g, and g=0 in the example code, because the smoke effect without gravity is simulated.
Control of intermittent intensity of particle injection
burst is used. Note that here burst and lifetime are related. If lifetime is not set but burst array is set, the system will only explode particles according to the corresponding munimun and maxmun settings within the time point set in burst array. If lifetime is set and burst array is set, the system will explode particles periodically according to the lifetime time, Therefore, it is better to set the lifetime as the longest time of burst array time point plus 1, so that one cycle can cover all bursts, and each second will explode in batches according to the emissionRate, so that the number of bursts in each burst is averaged compared with that set in the burst array.
Other attribute settings
other attributes can be understood literally, such as image, size, color, etc. The system defines particle image, imagesize, start and end colors and scaling, maximum and minimum speed, particle emission frequency, and emission category defined by emitter. You can see the differences caused by different configurations by modifying the attribute value.
Summarize your feelings
personally, I like Sansa's words in the "game of power": no one can protect me. I feel that this kind of person who can adapt to the "inverse growth" growth mode contrary to personal values is not simple. People grow according to their own nature. Although they also need to encounter setbacks and pain, it is better in the unity of body and mind than not growing according to their nature. The world of program is much simpler than the real world, but what is sacrificed is the surprise brought by diversity and randomness. Because of this, I feel that I am always easy to get lost in the order brought by the program and the rich emotion brought by the real world. I wander between the two and hesitate. I don't know which direction to invest more or less energy. Maybe it's because I'm stubborn and always try to understand, but I can't do it, but it doesn't matter. If I don't understand, I'll enjoy it.