The torchvision module in PyTorch framework includes: torchvision datasets,torchvision.models,torchvision. The three sub packages of transforms.
For details, please refer to the official website: http://pytorch.org/docs/master/torchvision/index.html.
Refer to github for specific code: https://github.com/pytorch/vision/tree/master/torchvision.
torchvision.models
There are commonly used alexnet, densenet, inception, resnet, squeezenet and vgg under this module( For network details, please check )And other commonly used network structures, and provides a pre training model. We can simply call to read the network structure and pre training model, and use fine tuning at the same time.
About fine tuning, you can view https://blog.csdn.net/hjxu2016/article/details/78424370
Today, I will mainly take the residual network as an example.
Detailed explanation of residual network code
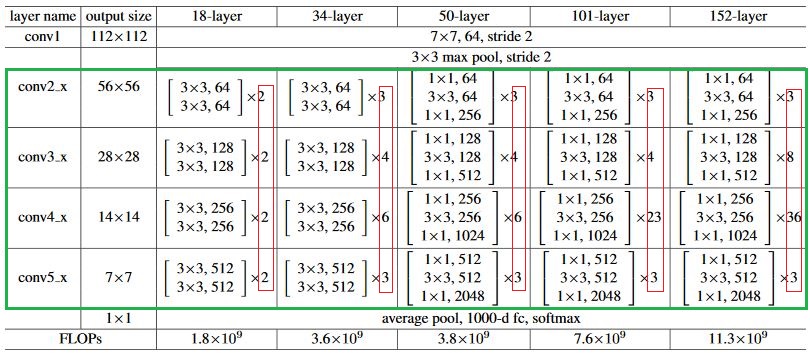
ResNet has five main deformations: Res18, Res34, Res50, Res101 and Res152.
As shown in the figure below, each network includes three main parts: input part, output part and intermediate convolution part (the intermediate convolution part includes four stages from stage 1 to stage 4 as shown in the figure). Although ResNet has rich variants, they all follow the above structural characteristics. The difference between networks mainly lies in the difference of block parameters and number of intermediate convolution parts.
Refer to github for specific code: https://github.com/pytorch/vision/blob/master/torchvision/models/resnet.py
Paper connection: https://arxiv.org/abs/1512.03385
1. Module call
import torchvision

"""
    If you need to use a pre training model, set pretrained=True
    If you don't need a pre training model, set pretrained=False,Default is False,You don't have to write
"""
model = torchvision.models.resnet50(pretrained=True)
model = torchvision.models.resnet50()

# You can also import the densenet model. And it does not need to be a pre trained model
model = torchvision.models.densenet169(pretrained=False)
2. Source code analysis
Take importing resnet50 as an example to introduce the source code when importing the model.
Run # model = torchvision models. Resnet50 (pre trained = true) is through RESNET under the models package Py script. The source code is as follows:
The first is to import the necessary libraries, including model_zoo is a package related to importing the pre training model. In addition, the all variable defines the function name or class name that can be imported from the outside. That's why we can use torchvision models. Resnet50().
model_ The URLs dictionary is the download address of the pre training model.
import torch.nn as nn
import math
import torch.utils.model_zoo as model_zoo

__all__ = ['ResNet', 'resnet18', 'resnet34', 'resnet50', 'resnet101',
           'resnet152']

model_urls = {
    'resnet18': 'https://download.pytorch.org/models/resnet18-5c106cde.pth',
    'resnet34': 'https://download.pytorch.org/models/resnet34-333f7ec4.pth',
    'resnet50': 'https://download.pytorch.org/models/resnet50-19c8e357.pth',
    'resnet101': 'https://download.pytorch.org/models/resnet101-5d3b4d8f.pth',
    'resnet152': 'https://download.pytorch.org/models/resnet152-b121ed2d.pth',
}
The next step is the resnet50 function. The parameter pretrained is False by default.
- model = ResNet(Bottleneck, [3, 4, 6, 3], **kwargs) is used to build the network structure. Bottleneck is another class to build bottleneck. There are many repeated substructures in the construction of ResNet network structure. These substructures are built through bottleneck class, which will be introduced later.
- If the parameter pre trained is True, it will pass the model_ zoo. Load in PY_ The URL function is based on the model_ Download or import the corresponding pre training model from URLs dictionary.
- By calling load of model_ state_ Dict method initializes the network structure you build with pre trained model parameters. This method is a general operation in PyTorch to initialize the layer of another model with the parameters of one model. load_ state_ Another important parameter of dict method is strict, which is True by default, indicating that the layer of the pre training model is strictly equivalent to your network structure layer (such as layer name and dimension).
def resnet50(pretrained=False, **kwargs):
    model = ResNet(Bottleneck, [3, 4, 6, 3], **kwargs)
    if pretrained:
        model.load_state_dict(model_zoo.load_url(model_urls['resnet50']))
    return model
Other functions such as resnet18 and resnet101 are basically similar to resnet50.
The main differences are:
1. When building the network structure, the parameters of block are different. For example, [2,2,2,2] in resnet18 and [3,4,23,3] in resnet101.
2, the calling block class is different, for example, in resnet50, resnet101 and resnet152, the Bottleneck class is invoked, while BasicBlock class is invoked in resnet18 and resnet34. The difference between these two classes is mainly in the residual result, the number of volume layers is different, this is related to the network structure, and will be described in detail later.
3. If you download the pre training model, click model_ The keys of URLs dictionary are different, corresponding to different pre training models. So let's look at how to build the network structure and how to import the pre training model.
# pretrained (bool): If True, returns a model pre-trained on ImageNet

def resnet18(pretrained=False, **kwargs):
    model = ResNet(BasicBlock, [2, 2, 2, 2], **kwargs)
    if pretrained:
        model.load_state_dict(model_zoo.load_url(model_urls['resnet18']))
    return model

def resnet101(pretrained=False, **kwargs):
    model = ResNet(Bottleneck, [3, 4, 23, 3], **kwargs)
    if pretrained:
        model.load_state_dict(model_zoo.load_url(model_urls['resnet101']))
    return model
3. ResNet class
Inherit the base class of network in PyTorch: torch nn. Module :
- The ResNet network is built through the ResNet class.
- The second is to rewrite initialization__ init__ () and forward().
__ init __ () mainly defines the parameters of some layers.
forward() mainly defines the flow order of data between layers, that is, the connection order of layers.
In addition, other private methods can be defined in the class to modularize some operations, such as here_ make_layer() is used to build four blocks in ResNet network.
_make_layer():
The first input block is the Bottleneck or BasicBlock class,
The second input is the output channel of the blocks,
The third input is how many residual substructures are included in each block, so the list of layers is [3, 4, 6, 3] of resnet50.
_ make_ Two important lines of code in the layer () method are:
1,layers. Append (block (self. Inplanes, planes, stripe, downsample)), which saves the first residual structure of each block in the layers list.
2, for i in range(1, blocks): layers.append(block(self.inplanes, planes)), which saves the remaining residual structure of each block in the layers list, thus completing the construction of a block.
In these two lines of code, each residual is built through the Bottleneck class. Next, we introduce the Bottleneck class.
class ResNet(nn.Module):
    def __init__(self, block, layers, num_classes=1000):
        self.inplanes = 64
        super(ResNet, self).__init__()
        # Network input part
        self.conv1 = nn.Conv2d(3, 64, kernel_size=7, stride=2, padding=3,bias=False)
        self.bn1 = nn.BatchNorm2d(64)
        self.relu = nn.ReLU(inplace=True)
        self.maxpool = nn.MaxPool2d(kernel_size=3, stride=2, padding=1)
        # Intermediate convolution part
        self.layer1 = self._make_layer(block, 64, layers[0])
        self.layer2 = self._make_layer(block, 128, layers[1], stride=2)
        self.layer3 = self._make_layer(block, 256, layers[2], stride=2)
        self.layer4 = self._make_layer(block, 512, layers[3], stride=2)
        # Average pooling and full connection layer
        self.avgpool = nn.AvgPool2d(7, stride=1)
        self.fc = nn.Linear(512 * block.expansion, num_classes)

        for m in self.modules():
            if isinstance(m, nn.Conv2d):
                n = m.kernel_size[0] * m.kernel_size[1] * m.out_channels
                m.weight.data.normal_(0, math.sqrt(2. / n))
            elif isinstance(m, nn.BatchNorm2d):
                m.weight.data.fill_(1)
                m.bias.data.zero_()

    def _make_layer(self, block, planes, blocks, stride=1):
        downsample = None
        if stride != 1 or self.inplanes != planes * block.expansion:
            downsample = nn.Sequential(
                nn.Conv2d(self.inplanes, planes * block.expansion,
                          kernel_size=1, stride=stride, bias=False),
                nn.BatchNorm2d(planes * block.expansion),
            )

        layers = []
        layers.append(block(self.inplanes, planes, stride, downsample))
        self.inplanes = planes * block.expansion
        for i in range(1, blocks):
            layers.append(block(self.inplanes, planes))

        return nn.Sequential(*layers)

    def forward(self, x):
        x = self.conv1(x)
        x = self.bn1(x)
        x = self.relu(x)
        x = self.maxpool(x)

        x = self.layer1(x)
        x = self.layer2(x)
        x = self.layer3(x)
        x = self.layer4(x)

        x = self.avgpool(x)
        x = x.view(x.size(0), -1)
        x = self.fc(x)
        return x
The above class ResNet(nn.Module) code is explained in detail as follows:
-
Overall network flow direction
The forward() function in ResNet class specifies the flow direction of network data:
(1) After entering the network, the data first passes through the input part (conv1, bn1, relu, maxpool);
(2) Then enter the intermediate convolution part (layer1, layer2, layer3, layer4, where the layer corresponds to the stage we mentioned earlier);
(3) Finally, the results are obtained through an average pool and avgpool (FC) output;
Specifically, the difference between resnet50 and other res series networks mainly lies in layer1~layer4, and other components are similar. -
Detailed explanation of network input:
All ResNet network input parts are composed of a large volume core with size = 7x7 and stripe = 2, and a maximum pool with size = 3x3 and stripe = 2. Through this step, a 224x224 input image will change into a 56x56 feature image, greatly reducing the size required for storage. -
Network intermediate convolution part
The middle convolution part is mainly the blue box part in the figure below. The information is extracted through the stacking of 3 * 3 convolution. [2, 2, 2, 2] and [3, 4, 6, 3] in the red box represent the number of repeated stacking of bolck.
There is a sentence RESNET (basicblock, [3,4,6,3], * * kwargs) in the resnet50() function we called above. If you change this line of code to RESNET (basicblock, [2,2,2], * * kwargs), you will get a res18 network.
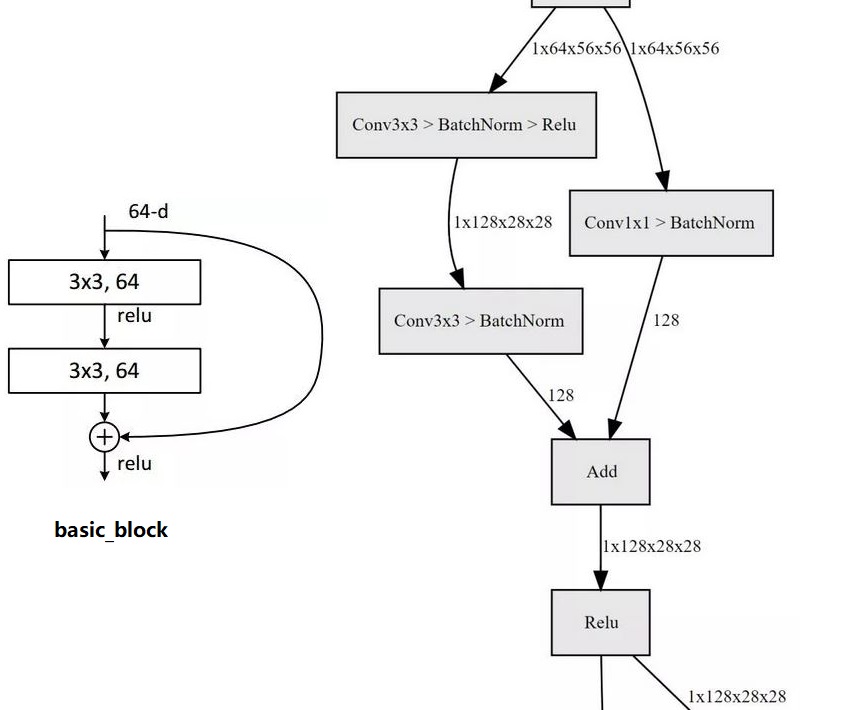
Residual block implementation (BasicBlock class)
How is the residual block implemented? In the basic block shown in the figure below, the input data is divided into two paths. One path passes through two 3 * 3 convolutions, and the other path is directly short circuited. The sum of the two is output through relu, which is very simple.
-
Network output part
The network output part is very simple. Through global adaptive smoothing pooling, all feature maps are pulled into 1 * 1. For res18, the input data of 1x512x7x7 is pulled into 1x512x1x1, and then connected to the full connection layer output. The number of output nodes is consistent with the number of prediction categories.
4. BasicBlock class
The BasicBlock class is similar to the bottleneck class. The BasicBlock class is mainly used to build ResNet18 and ResNet34 networks, because the residual structure of these two networks only contains two volume layers, and there is no bottleneck concept in the bottleneck class. Therefore, in this class, the first volume layer adopts kernel_ Convolution of size = 3, as shown in conv3x3 function.
def conv3x3(in_planes, out_planes, stride=1):
    """3x3 convolution with padding"""
    return nn.Conv2d(in_planes, out_planes, kernel_size=3, stride=stride,
                     padding=1, bias=False)

class BasicBlock(nn.Module):
    expansion = 1
    def __init__(self, inplanes, planes, stride=1, downsample=None):
        super(BasicBlock, self).__init__()
        self.conv1 = conv3x3(inplanes, planes, stride)
        self.bn1 = nn.BatchNorm2d(planes)
        self.relu = nn.ReLU(inplace=True)
        self.conv2 = conv3x3(planes, planes)
        self.bn2 = nn.BatchNorm2d(planes)
        self.downsample = downsample   #Halve the size of the input feature map
        self.stride = stride

    def forward(self, x):
        residual = x

        out = self.conv1(x)
        out = self.bn1(out)
        out = self.relu(out)

        out = self.conv2(out)
        out = self.bn2(out)

        if self.downsample is not None:
            residual = self.downsample(x)

        out += residual
        out = self.relu(out)
        return out
5. Bottlenect class
As can be seen from the previous ResNet class, bottleneck is the most important class when constructing ResNet network, because ResNet is composed of residual structure, and bottleneck class is to complete the construction of residual structure. Bottlenect also inherited torch nn. Module class, and overridden__ init__ And forward method. From the forward method, we can see that bottleneck is the three familiar convolution layers, BN layers and activation layers, and the last out += residual is the operation of element wise add.
class Bottleneck(nn.Module):
    expansion = 4

    def __init__(self, inplanes, planes, stride=1, downsample=None):
        super(Bottleneck, self).__init__()
        self.conv1 = nn.Conv2d(inplanes, planes, kernel_size=1, bias=False)
        self.bn1 = nn.BatchNorm2d(planes)
        self.conv2 = nn.Conv2d(planes, planes, kernel_size=3, stride=stride,
                               padding=1, bias=False)
        self.bn2 = nn.BatchNorm2d(planes)
        self.conv3 = nn.Conv2d(planes, planes * 4, kernel_size=1, bias=False)
        self.bn3 = nn.BatchNorm2d(planes * 4)
        self.relu = nn.ReLU(inplace=True)
        self.downsample = downsample
        self.stride = stride

    def forward(self, x):
        residual = x
        out = self.conv1(x)
        out = self.bn1(out)
        out = self.relu(out)

        out = self.conv2(out)
        out = self.bn2(out)
        out = self.relu(out)

        out = self.conv3(out)
        out = self.bn3(out)

        if self.downsample is not None:
            residual = self.downsample(x)

        out += residual
        out = self.relu(out)
        return out
6. Get pre training model
This line of code mentioned earlier:
if pretrained: model.load_state_dict(model_zoo.load_url(model_urls['resnet50 ']), mainly through model_ zoo. Load in PY_ The URL function is based on the model_ The URLs dictionary imports the corresponding pre training model, models_ zoo. github address of Py script: https://github.com/pytorch/pytorch/blob/master/torch/utils/model_zoo.py.
load_ The source code of URL function is as follows.
- First, model_dir is the download model saving address. If not specified, it will be saved in the project In the torch directory, you'd better specify. cached_file is the path to save the model plus the model name.
- Next, if not OS path. The exists (cached_file) statement is used to judge whether the model to be downloaded already exists in the specified directory. If it already exists, it will directly call torch The load interface imports the model. If it does not exist, it will be downloaded from the Internet.
- Download is through_ download_url_to_file(url, cached_file, hash_prefix, progress=progress), no more details. The key point is that the model is imported through torch Load () interface, whether your model is downloaded from the Internet or locally existing.
def load_url(url, model_dir=None, map_location=None, progress=True):
    """
    Args:
        url (string): URL of the object to download
        model_dir (string, optional): directory in which to save the object
        map_location (optional): a function or a dict specifying how to remap storage locations (see torch.load)
        progress (bool, optional): whether or not to display a progress bar to stderr

    Example:
        >>> state_dict = torch.utils.model_zoo.load_url('https://s3.amazonaws.com/pytorch/models/resnet18-5c106cde.pth')

    """
    if model_dir is None:
        torch_home = os.path.expanduser(os.getenv('TORCH_HOME', '~/.torch'))
        model_dir = os.getenv('TORCH_MODEL_ZOO', os.path.join(torch_home, 'models'))
    if not os.path.exists(model_dir):
        os.makedirs(model_dir)
    parts = urlparse(url)
    filename = os.path.basename(parts.path)
    cached_file = os.path.join(model_dir, filename)
    if not os.path.exists(cached_file):
        sys.stderr.write('Downloading: "{}" to {}\n'.format(url, cached_file))
        hash_prefix = HASH_REGEX.search(filename).group(1)
        _download_url_to_file(url, cached_file, hash_prefix, progress=progress)
    return torch.load(cached_file, map_location=map_location)