Background:
I wonder if there are any small partners like me who have not calculated their resource ratio in detail when creating applications in the cluster. Then I saw kubectl top node. When I saw that there were still many resources on each node, I directly created several applications with high resource allocation, and these applications were running under high load... Then the result was that many applications in the cluster began to crash
Why limit resources?
1. Limiting the resources of a pod can prevent an application from occupying too much resources and causing exceptions to other applications.
2. Effective isolation of resources.
3. Priority of pod scheduling.
4. Efficient and rational utilization of resources.
Resource classification in Kubernets
Kubernetes is classified into compressible resources and non compressible resources according to the scalability of resources:
1. Compressible resources: when the compressible resources are insufficient, Pod will only "starve", but will not quit. For example, CPU(GPU, too? Just not for gpu applications)
2. Incompressible resources: when the incompressible resources are insufficient, the Pod will be killed by the kernel because of OOM (out of memory). For example: memory disk.
Note: see the column of geek time Leishen: https://time.geekbang.org/column/article/69678
Resource quota management - LimitRange ResourceQuota
ResourceQuota
ResourceQuota is used to limit the total resource request and limit occupied by all pods in the namespace
You can refer to: https://kubernetes.io/zh/docs/concepts/policy/resource-quotas/
1. Calculate resource quota
You can refer to: https://kubernetes.io/zh/docs/tasks/administer-cluster/manage-resources/quota-memory-cpu-namespace/.
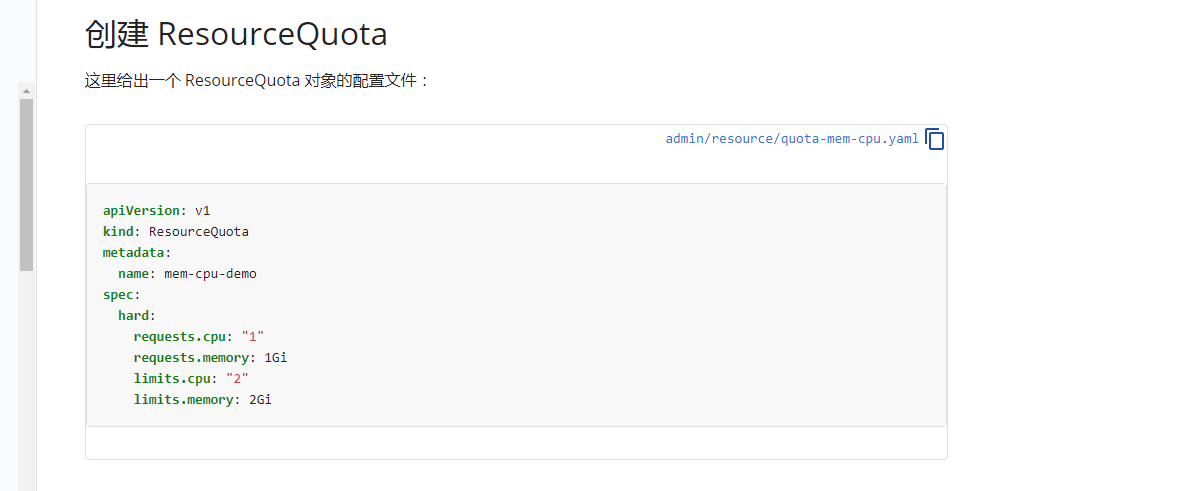
But according to Lei Shen: https://time.geekbang.org/column/article/69678 The configuration file is still recommended in the following internal general format:
cat > ResourceQuota.yaml << EOF
apiVersion: v1
kind: ResourceQuota
metadata:
  name: cpu-mem
  namespace: quota
spec:
  hard:
    requests.cpu: 1000m
    requests.memory: 1000Mi
    limits.cpu: 2000m
    limits.memory: 2000Mi
EOF
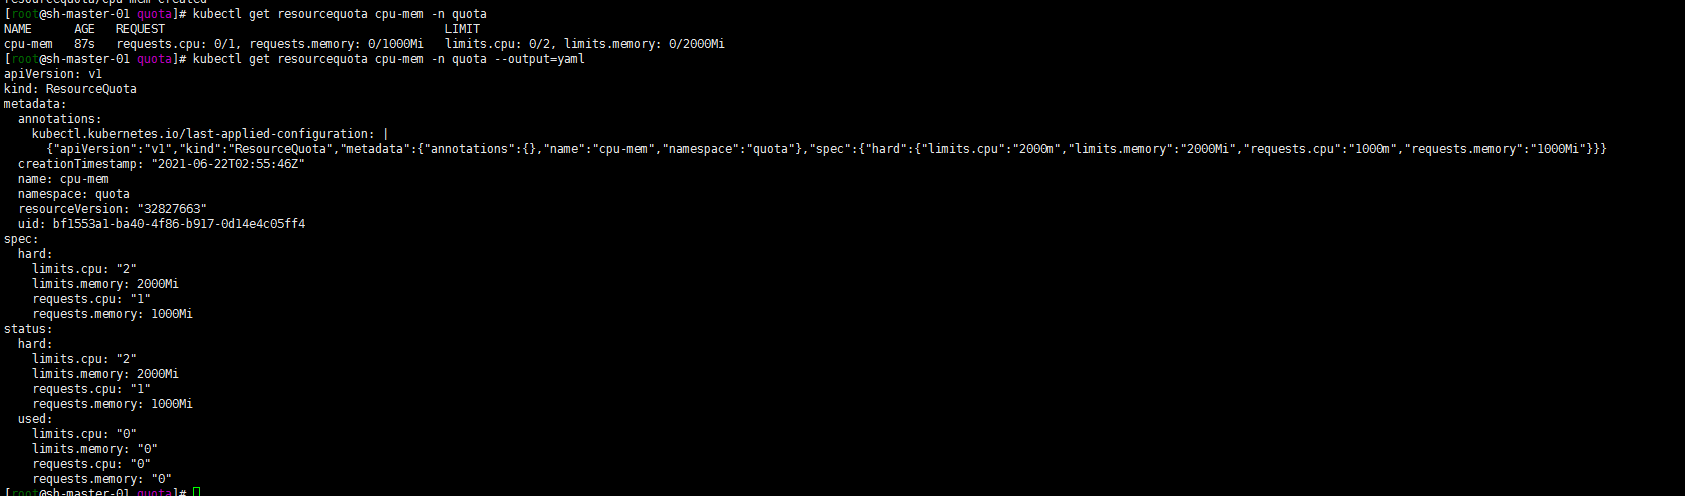
[root@sh-master-01 quota]# kubectl create ns quota
namespace/quota created
[root@sh-master-01 quota]# kubectl apply -f ResourceQuota.yaml
resourcequota/cpu-mem created
kubectl get resourcequota cpu-mem -n quota
kubectl get resourcequota cpu-mem--namespace=quota --output=yaml
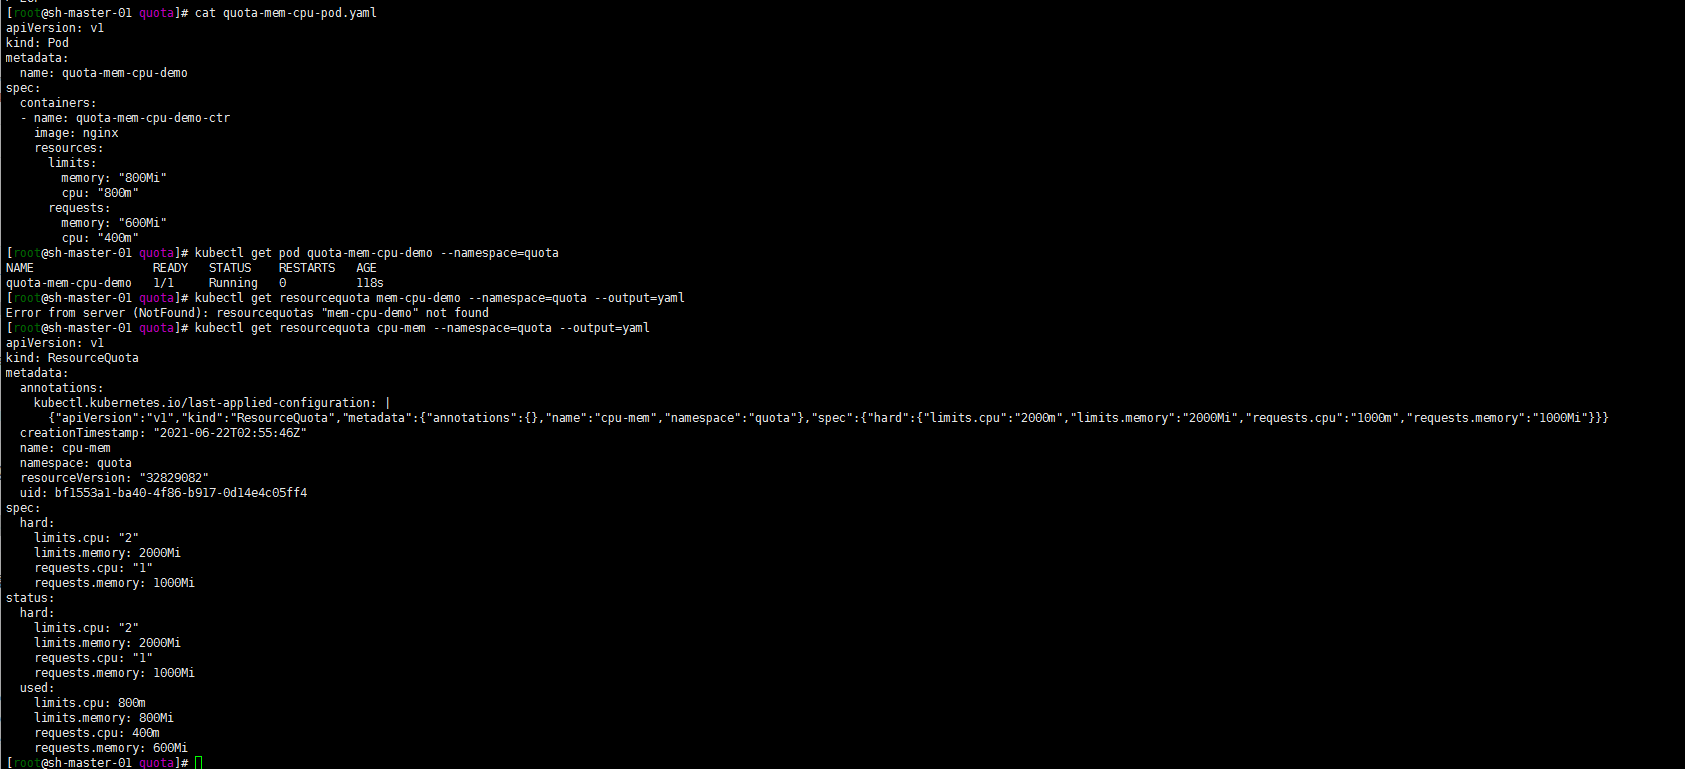
Create a pod with an official document instance to test:
cat > quota-mem-cpu-pod.yaml << EOF
apiVersion: v1
kind: Pod
metadata:
  name: quota-mem-cpu-demo
spec:
  containers:
  - name: quota-mem-cpu-demo-ctr
    image: nginx
    resources:
      limits:
        memory: "800Mi"
        cpu: "800m"
      requests:
        memory: "600Mi"
        cpu: "400m"
EOF
Create pod in quota namespace:
kubectl apply -f quota-mem-cpu-pod.yaml --namespace=quota
Check that the container in the Pod is running:
kubectl get pod quota-mem-cpu-demo --namespace=quota
Check the details of ResourceQuota again:
kubectl get resourcequota cpu-mem --namespace=quota --output=yaml
The output shows the quota and how many quotas have been used. You can see that the memory and CPU request values and limit values of the Pod do not exceed the quota
Create another pod:
cat > quota-mem-cpu-pod-2.yaml << EOF
apiVersion: v1
kind: Pod
metadata:
  name: quota-mem-cpu-demo-2
spec:
  containers:
  - name: quota-mem-cpu-demo-2-ctr
    image: nginx
    resources:
      limits:
        memory: "1000Mi"
        cpu: "800m"
      requests:
        memory: "700Mi"
        cpu: "400m"
EOF
kubectl apply -f quota-mem-cpu-pod-2.yaml --namespace=quota
The following error is reported. The second Pod cannot be created successfully. The output shows that creating a second Pod will cause the total amount of memory requests to exceed the memory request quota.

2. Storage resource quota (volume count quota)
Let's demonstrate the storage resource quota. I only limit the total storage here. For other settable parameters, please refer to the official documents:
cat > storage.yaml << EOF
apiVersion: v1
kind: ResourceQuota
metadata:
  name: storage
  namespace: quota
spec:
  hard:
    requests.storage: 10Gi
EOF
cat > pvc.yaml << EOF
apiVersion: v1
kind: PersistentVolumeClaim
metadata:
  name: quota-mem-cpu-demo-pvc
spec:
  accessModes:
  - ReadWriteOnce
  resources:
    requests:
      storage: 20Gi
  storageClassName: cbs-csi
EOF
Create pvc in quota namespace:
kubectl apply -f pvc.yaml -n quota
Get the following error reports. The maximum limit is 10G.

3. Object count quota
cat > objects.yaml << EOF
apiVersion: v1
kind: ResourceQuota
metadata:
  name: objects
  namespace: quota
spec:
  hard:
    pods: 10
    replicationcontrollers: 5
    secrets: 10
    configmaps: 10
    persistentvolumeclaims: 4
    services: 5
    services.loadbalancers: 1
    services.nodeports: 2
    cbs.storageclass.storage.k8s.io/persistentvolumeclaims: 2
EOF
Quantity quota is not demonstrated. Set the parameters that can be set to limit the number according to the official documents, and set the number. As long as the quantity is greater than the set quantity, failure can be verified!
4. Quota Scopes
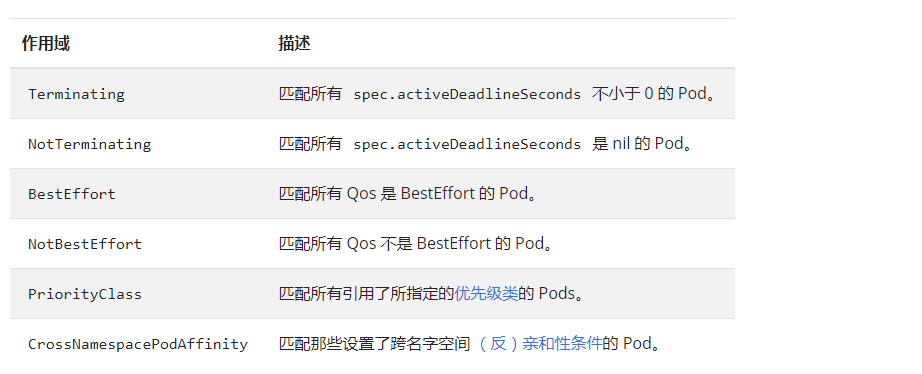
This ghost function hasn't been used much, so I copied the official one. If you have time to study, the following example is taken from page 750 of the fifth edition of kubernetes authoritative guide:
1. Create ResourceQuota scope
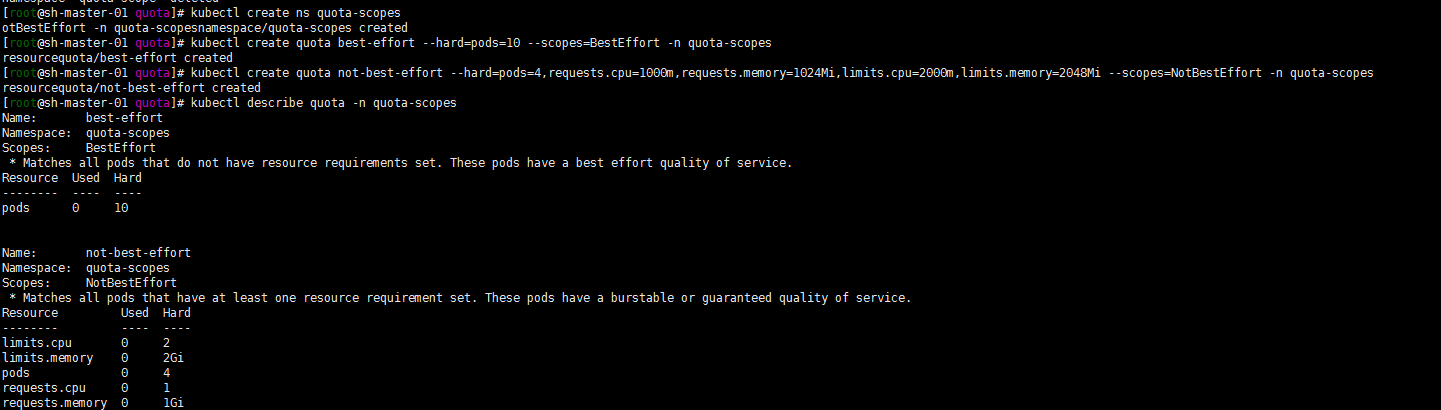
Create a namespace of quota scopes, a resourcequote named best effort, and a resourcequote named not best effort:
kubectl create ns quota-scopes
kubectl create quota best-effort --hard=pods=10 --scopes=BestEffort -n quota-scopes
kubectl create quota not-best-effort --hard=pods=4,requests.cpu=1000m,requests.memory=1024Mi,limits.cpu=2000m,limits.memory=2048Mi --scopes=NotBestEffort -n quota-scopes
Note: the official way is yaml. I happened to see it http://docs.kubernetes.org.cn/541.html#kubectl_create_quota in
Just use kubectl create quota
2. Create two deployment s
 kubectl run best-effort-nginx --image=nginx --replicas=8 --namespace=quota-scope

 kubectl run not-best-effort-nginx --image=nginx= --replicas=2 --requests=cpu=100m,memory=256Mi --limits=cpu=200m,memory=512Mi --namespace=quota-scopes
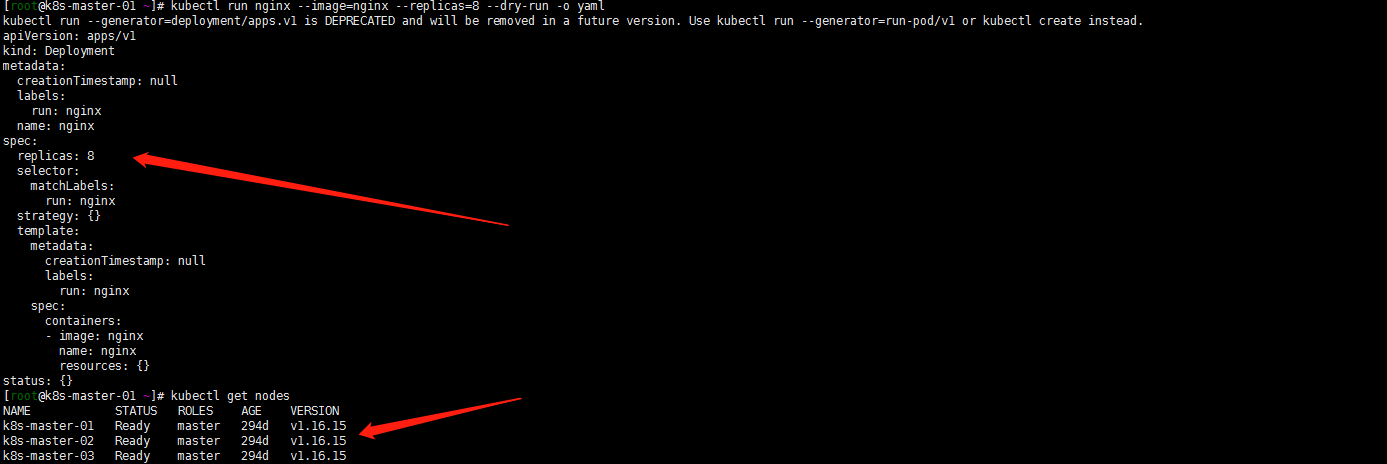

Well, it's a pit here. kubectl run can be tested with replicas in 1.16.16. But my 1.21.1 can't be implemented like this. After reading the following documents, use the kubectl create deployment command below
kubectl create deployment best-effort-nginx --image=nginx --replicas=8 --namespace=quota-scopes
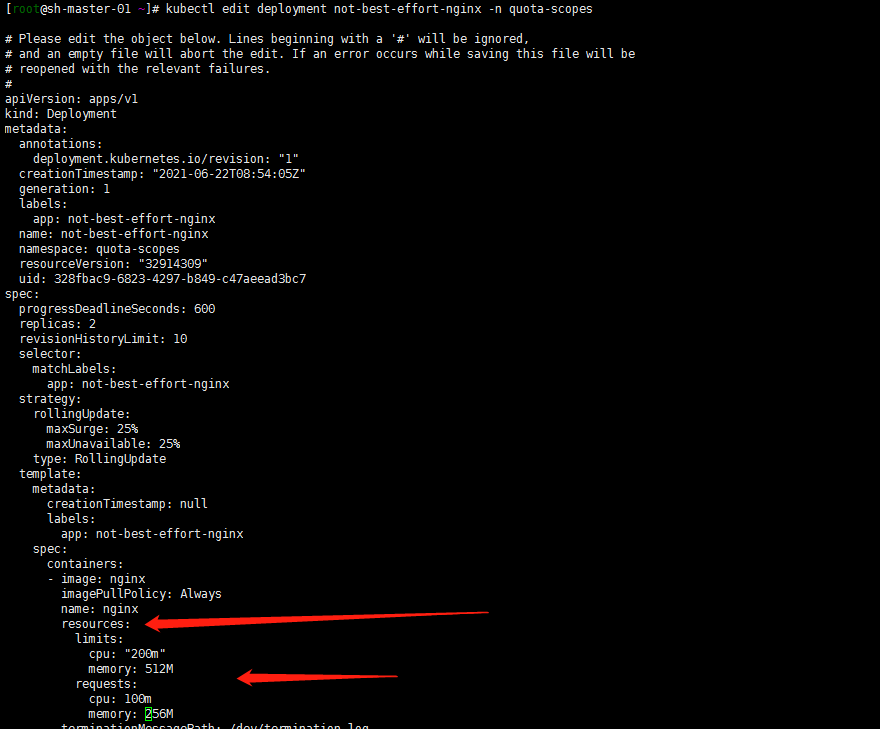
However, when creating not best effort nginx deployment, it seems that -- requests and – limits cannot be used in the command? Use the stupidest method to create a deployment, and then edit deployment to increase the resources limit:
kubectl create deployment not-best-effort-nginx --image=nginx --replicas=2  --namespace=quota-scopes
kubectl edit deployment not-best-effort-nginx -n quota-scopes
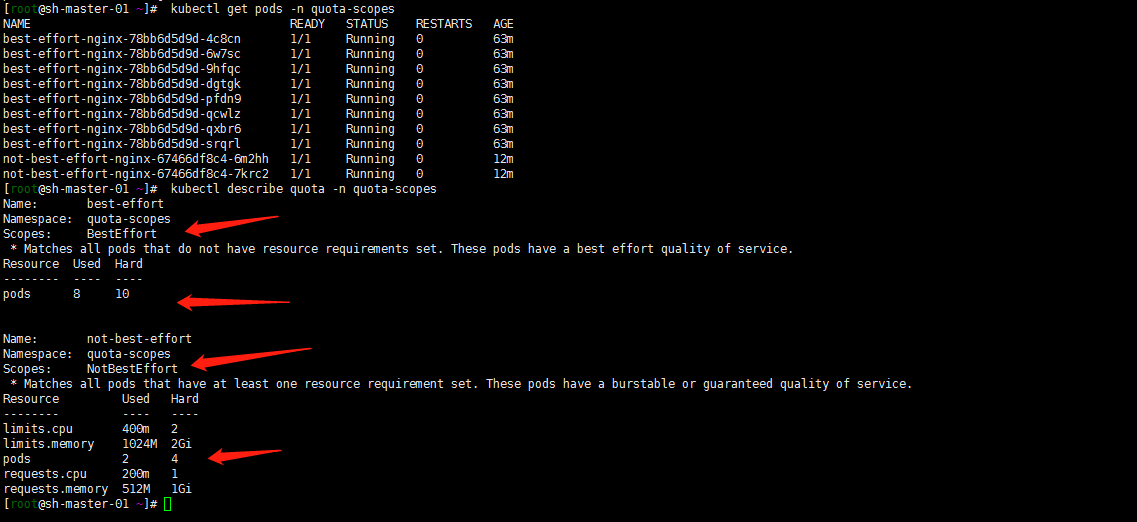
3. Verification:
 kubectl get pods -n quota-scopes
 kubectl describe quota -n quota-scopes
5. Set the resource quota based on the priority class
Note: this ghost has not been used in official documents
FEATURE STATE: Kubernetes v1.17 [stable]
Pod can be created as a specific priority . By using the scopeSelector field in the quota specification, users can control their system resource consumption according to the priority of the Pod.
Only when a Pod is selected in the scopeSelector field in the quota specification, the quota mechanism will match and measure the resource consumption of the Pod.
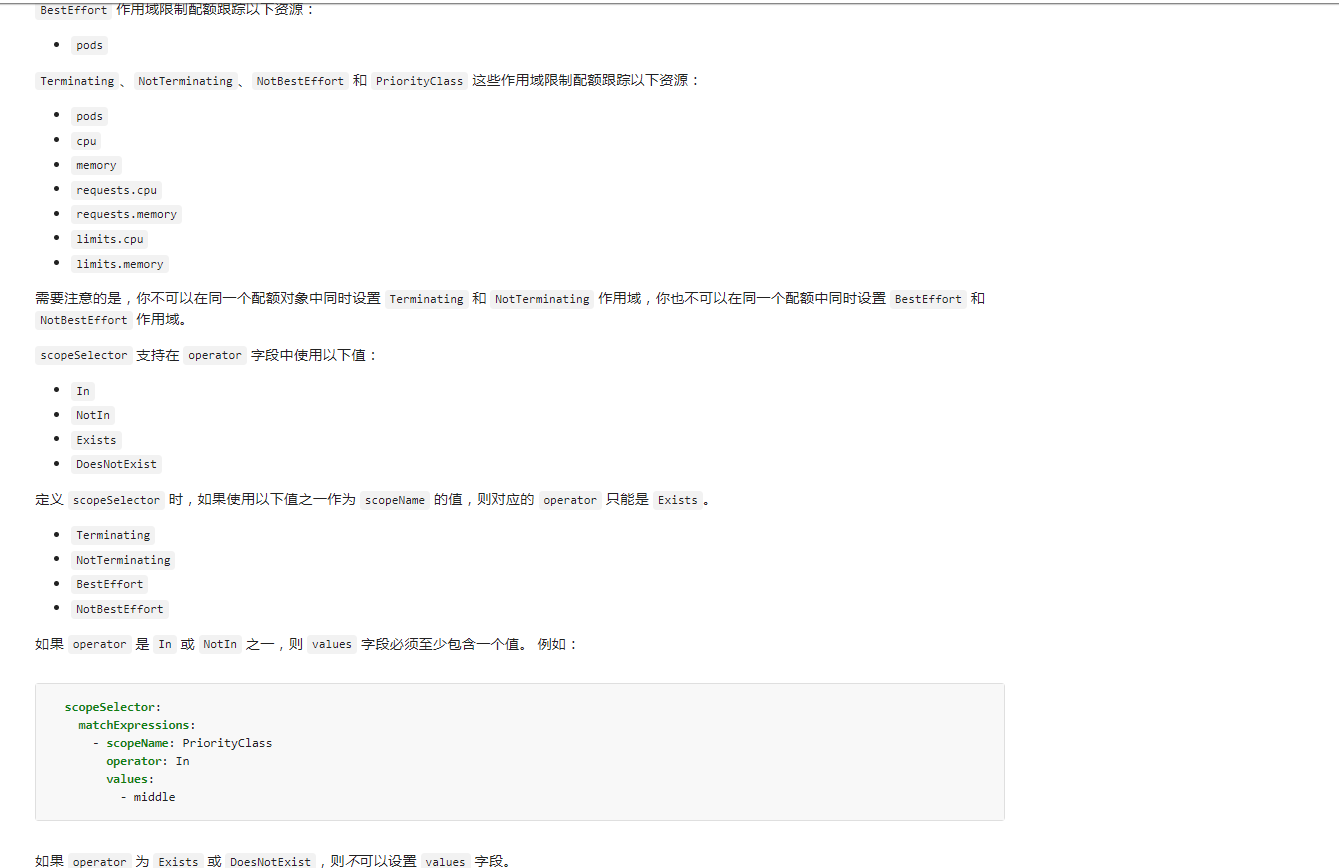
If a quota object sets its scope as a priority class through the scopeSelector field, the quota object can only track the following resources:
- pods
- cpu
- memory
- ephemeral-storage
- limits.cpu
- limits.memory
- limits.ephemeral-storage
- requests.cpu
- requests.memory
- requests.ephemeral-storage
This example creates a quota object and matches it to a Pod with a specific priority. The example works as follows:
- Pod in the cluster can take one of three priority classes, namely "low", "medium" and "high".
- Create a quota object for each priority.
Save the following YAML to the file quota YML.
apiVersion: v1
kind: List
items:
- apiVersion: v1
  kind: ResourceQuota
  metadata:
    name: pods-high
  spec:
    hard:
      cpu: "1000"
      memory: 200Gi
      pods: "10"
    scopeSelector:
      matchExpressions:
      - operator : In
        scopeName: PriorityClass
        values: ["high"]
- apiVersion: v1
  kind: ResourceQuota
  metadata:
    name: pods-medium
  spec:
    hard:
      cpu: "10"
      memory: 20Gi
      pods: "10"
    scopeSelector:
      matchExpressions:
      - operator : In
        scopeName: PriorityClass
        values: ["medium"]
- apiVersion: v1
  kind: ResourceQuota
  metadata:
    name: pods-low
  spec:
    hard:
      cpu: "5"
      memory: 10Gi
      pods: "10"
    scopeSelector:
      matchExpressions:
      - operator : In
        scopeName: PriorityClass
        values: ["low"]
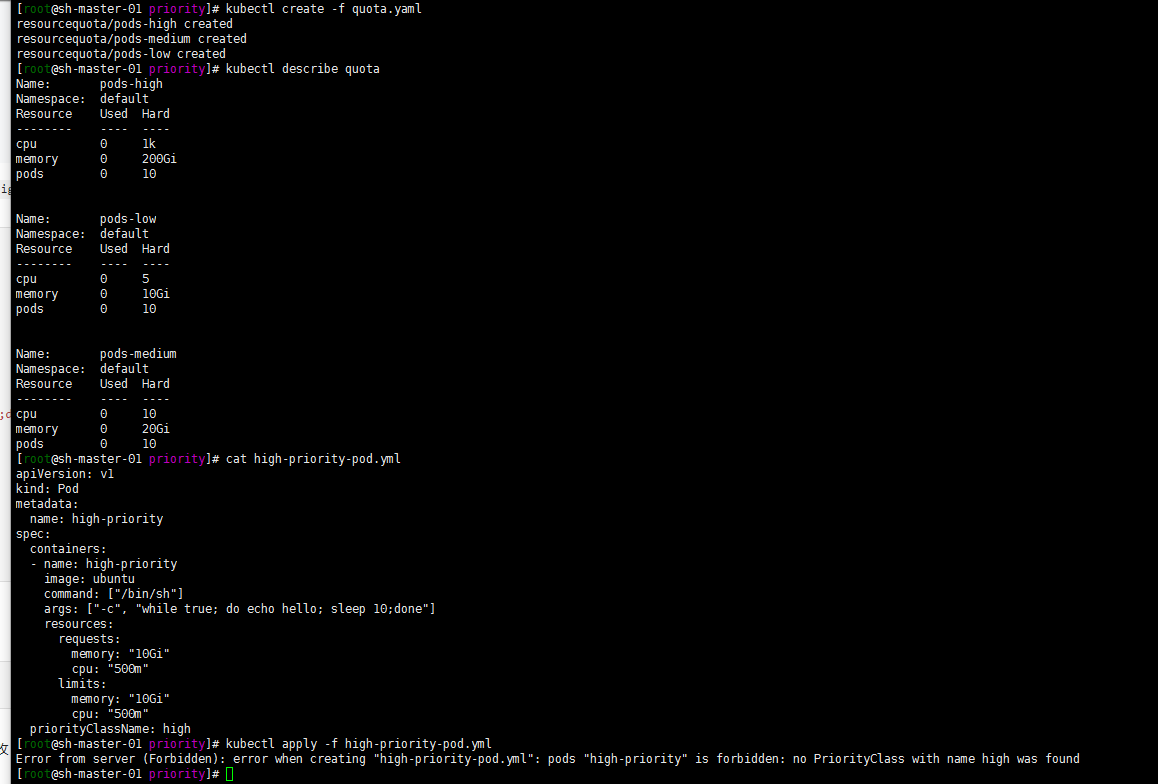
Run the following using the kubectl create command.
kubectl create -f quota.yml
kubectl describe quota
LimitRange
LimitRange is used to limit the default resource request and limit of a single Pod in the namespace
1. General example: pod of a single container
Well, requests limits are generally used to limit the resources of pod cpu and memory. As follows:
apiVersion: apps/v1
kind: Deployment
metadata:
  name: php-test
spec:
  replicas: 2
  strategy:
    rollingUpdate:
      maxSurge: 1
      maxUnavailable: 0
  selector:
    matchLabels:
      app: php-test
  template:
    metadata:
      labels:
        app: php-test
    spec:
      containers:
        - name: php-test
          image: ccr.ccs.tencentyun.com/master/php-test:0.1
          env:
          - name: PHP_MEM_LIMIT
            value: "256M"
          envFrom:
          - configMapRef:
              name: deploy
          ports:
            - containerPort: 80
          resources:
            requests:
              memory: "256M"
              cpu: "250m"
            limits:
              memory: "2048M"
              cpu: "4000m"
          livenessProbe:
            httpGet:
              scheme: HTTP
              path: /test.html
              port: 80
            initialDelaySeconds: 30
            periodSeconds: 30
            successThreshold: 1
            failureThreshold: 3
          readinessProbe:
            httpGet:
              scheme: HTTP
              path: /test.html
              port: 80
            initialDelaySeconds: 30
            periodSeconds: 30
      imagePullSecrets:
        - name: tencent
---

apiVersion: v1
kind: Service
metadata:
  name: php-test
  labels:
    app: php-test
spec:
  ports:
  - port: 80
    protocol: TCP
    targetPort: 80
  selector:
    app: php-test
2. pod of multiple container s
Of course, a pod can have multiple container s:
apiVersion: v1
kind: Pod
metadata:
  name: kucc1
spec:
  containers:
  - image: nginx
    name: nginx
    resources:
      requests:
        memory: "256M"
        cpu: "250m"
      limits:
        memory: "2048M"
        cpu: "4000m"
  - image: redis
    name: redis
    resources:
      requests:
        memory: "256M"
        cpu: "250m"
      limits:
        memory: "2048M"
        cpu: "4000m"
The minimum request memory of this pod is 512M, and the cpu is 0.5 core. limits the memory is 4096m and the cpu is 8 cores.
Well, the relationship between pod and container. A pod can include multiple containers
About resource scheduling and pod Qos model:
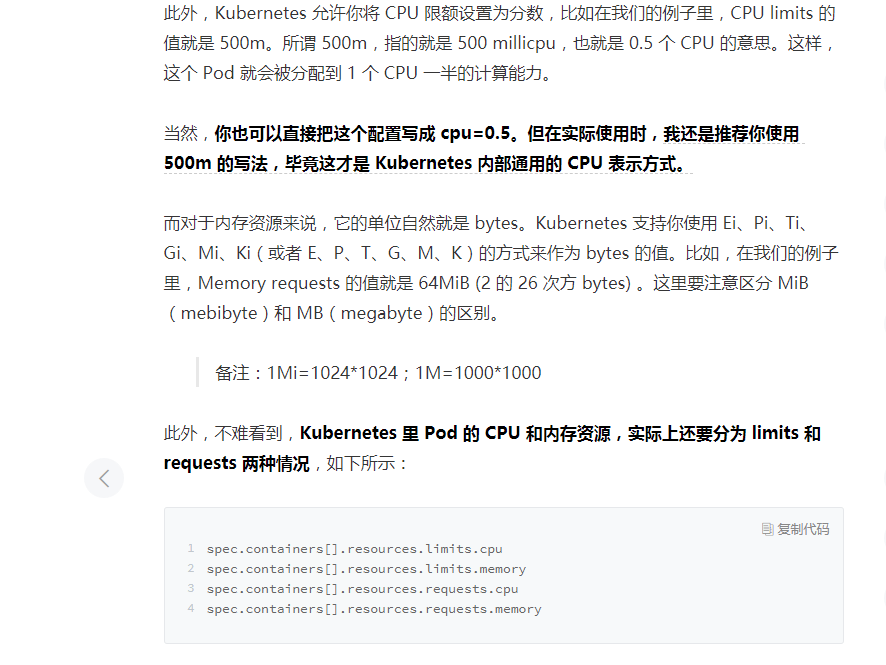
Resource Management - Compute Resource
qos quality of service management
When kubernetes schedules the pod, Kube scheduler will only calculate according to the value of requests. When you really set the Cgroups limit, kubelet will set it according to the limit value.
Kubernetes divides pod into three QoS levels:
- BestEffort (lowest priority)
- Burstable
- Guaranteed (highest priority)
The lowest priority QoS level is BestEffort. It will be assigned to pods that do not have any requests and limits set (for any container). Containers running at this level have no resource guarantees. In the worst case, they don't get any CPU resources, and when they need to free memory for other pods, these containers will be killed first. However, because BestEffort pod is not configured with memory limits, these containers can use as much memory as they want when there is enough available memory.
apiVersion: v1
kind: Pod
metadata:
  name: php-test
  namespace: develop
spec:
  containers:
  - name:  php-test
    image: nginx
Guaranteed pod has the following conditions:
- Both CPU and memory should set requests and limits
- Each container needs to set the amount of resources
- They must be equal (the requests and limits of each resource in each container must be equal)
apiVersion: v1
kind: Pod
metadata:
  name: php-test
  namespace: qa
spec:
  containers:
  - name: php-test
    image: nginx
    resources:
      limits:
        memory: "200Mi"
        cpu: "700m"
      requests:
        memory: "200Mi"
        cpu: "700m"
Bursable QoS level is between BestEffort and Guaranteed. All other pods belong to this level. It includes a single container pod whose requests and limits are different. At least one container defines only requests but no limits, and one container has equal requests and limits, but the other container does not specify requests or limits.
apiVersion: v1
kind: Pod
metadata:
  name: php-test
  namespace: master
spec:
  containers:
  - name: php-test
    image: nginx
    resources:
      limits
        memory: "200Mi"
      requests:
        memory: "100Mi"
Note:
Guaranteed > bursable > best effort, so in the above example, I used three different namespaces to distinguish the priority. Because my master namespace is the most important and priority online service, qa is the test environment and development is the development environment. The best way to avoid resource preemption is to set the limits and requests values in the resource to the same value, and the Qos priority is guaranteed.
How to ensure the resource priority and scheduling priority of pod?
The node to which kubernetes pod applications are distributed is obtained by a series of algorithms through the master scheduler by default, and the user has no intervention process and results. Setting Qos priority to Guaranteed can only guarantee the priority of resources. What other ways to ensure resource priority and scheduling?
1. NodeSelector directed scheduling
The pod is scheduled to a group of work nodes with the same label
[root@sh-master-01 ~]#  kubectl get nodes --show-labels
NAME           STATUS                     ROLES                  AGE   VERSION   LABELS
sh-master-01   Ready                      control-plane,master   92d   v1.21.1   beta.kubernetes.io/arch=amd64,beta.kubernetes.io/os=linux,kubernetes.io/arch=amd64,kubernetes.io/hostname=sh-master-01,kubernetes.io/os=linux,node-role.kubernetes.io/control-plane=,node-role.kubernetes.io/master=,node.kubernetes.io/exclude-from-external-load-balancers=
sh-master-02   Ready                      control-plane,master   92d   v1.21.1   beta.kubernetes.io/arch=amd64,beta.kubernetes.io/os=linux,kubernetes.io/arch=amd64,kubernetes.io/hostname=sh-master-02,kubernetes.io/os=linux,node-role.kubernetes.io/control-plane=,node-role.kubernetes.io/master=,node.kubernetes.io/exclude-from-external-load-balancers=
sh-master-03   Ready                      control-plane,master   92d   v1.21.1   beta.kubernetes.io/arch=amd64,beta.kubernetes.io/os=linux,kubernetes.io/arch=amd64,kubernetes.io/hostname=sh-master-03,kubernetes.io/os=linux,node-role.kubernetes.io/control-plane=,node-role.kubernetes.io/master=,node.kubernetes.io/exclude-from-external-load-balancers=
sh-work-01     Ready                      <none>                 92d   v1.21.1   IngressProxy=true,beta.kubernetes.io/arch=amd64,beta.kubernetes.io/os=linux,kubernetes.io/arch=amd64,kubernetes.io/hostname=sh-work-01,kubernetes.io/os=linux,topology.com.tencent.cloud.csi.cbs/zone=ap-shanghai-2
sh-work-02     Ready                      <none>                 92d   v1.21.1   IngressProxy=true,beta.kubernetes.io/arch=amd64,beta.kubernetes.io/os=linux,kubernetes.io/arch=amd64,kubernetes.io/hostname=sh-work-02,kubernetes.io/os=linux,topology.com.tencent.cloud.csi.cbs/zone=ap-shanghai-2
sh-work-03     Ready                      <none>                 92d   v1.21.1   IngressProxy=true,beta.kubernetes.io/arch=amd64,beta.kubernetes.io/os=linux,kubernetes.io/arch=amd64,kubernetes.io/hostname=sh-work-03,kubernetes.io/os=linux,topology.com.tencent.cloud.csi.cbs/zone=ap-shanghai-2
Label the node sh-work-01 with zone=shanghai,
[root@sh-master-01 ~]# kubectl label node sh-work-01 zone=shanghai
node/sh-work-01 labeled
[root@sh-master-01 ~]#  kubectl get nodes --show-labels
NAME           STATUS                     ROLES                  AGE   VERSION   LABELS
sh-master-01   Ready                      control-plane,master   92d   v1.21.1   beta.kubernetes.io/arch=amd64,beta.kubernetes.io/os=linux,kubernetes.io/arch=amd64,kubernetes.io/hostname=sh-master-01,kubernetes.io/os=linux,node-role.kubernetes.io/control-plane=,node-role.kubernetes.io/master=,node.kubernetes.io/exclude-from-external-load-balancers=
sh-master-02   Ready                      control-plane,master   92d   v1.21.1   beta.kubernetes.io/arch=amd64,beta.kubernetes.io/os=linux,kubernetes.io/arch=amd64,kubernetes.io/hostname=sh-master-02,kubernetes.io/os=linux,node-role.kubernetes.io/control-plane=,node-role.kubernetes.io/master=,node.kubernetes.io/exclude-from-external-load-balancers=
sh-master-03   Ready                      control-plane,master   92d   v1.21.1   beta.kubernetes.io/arch=amd64,beta.kubernetes.io/os=linux,kubernetes.io/arch=amd64,kubernetes.io/hostname=sh-master-03,kubernetes.io/os=linux,node-role.kubernetes.io/control-plane=,node-role.kubernetes.io/master=,node.kubernetes.io/exclude-from-external-load-balancers=
sh-work-01     Ready                      <none>                 92d   v1.21.1   IngressProxy=true,beta.kubernetes.io/arch=amd64,beta.kubernetes.io/os=linux,kubernetes.io/arch=amd64,kubernetes.io/hostname=sh-work-01,kubernetes.io/os=linux,topology.com.tencent.cloud.csi.cbs/zone=ap-shanghai-2,zone=shanghai
sh-work-02     Ready                      <none>                 92d   v1.21.1   IngressProxy=true,beta.kubernetes.io/arch=amd64,beta.kubernetes.io/os=linux,kubernetes.io/arch=amd64,kubernetes.io/hostname=sh-work-02,kubernetes.io/os=linux,topology.com.tencent.cloud.csi.cbs/zone=ap-shanghai-2
sh-work-03     Ready                      <none>                 92d   v1.21.1   IngressProxy=true,beta.kubernetes.io/arch=amd64,beta.kubernetes.io/os=linux,kubernetes.io/arch=amd64,kubernetes.io/hostname=sh-work-03,kubernetes.io/os=linux,topology.com.tencent.cloud.csi.cbs/zone=ap-shanghai-2
Create a new pod and schedule it to the zone=shanghai node
Use nginx image to test:
kubectl run nginx --image=nginx:latest --port=80 --dry-run -o yaml > nodeselector.yaml
vim nodeselector.yaml, add nodeSelector configuration
cat > nodeselector.yaml << EOF
apiVersion: v1
kind: Pod
metadata:
  creationTimestamp: null
  labels:
    run: nginx
  name: nginx
spec:
  containers:
  - image: nginx:latest
    name: nginx
    ports:
    - containerPort: 80
    resources: {}
  nodeSelector:
    zone: shanghai
  dnsPolicy: ClusterFirst
  restartPolicy: Always
status: {}
EOF
Deploy and verify whether the pod is scheduled to the sh-work-01 node:
kubectl apply -f nodeselector.yaml
kubectl get pods -o wide
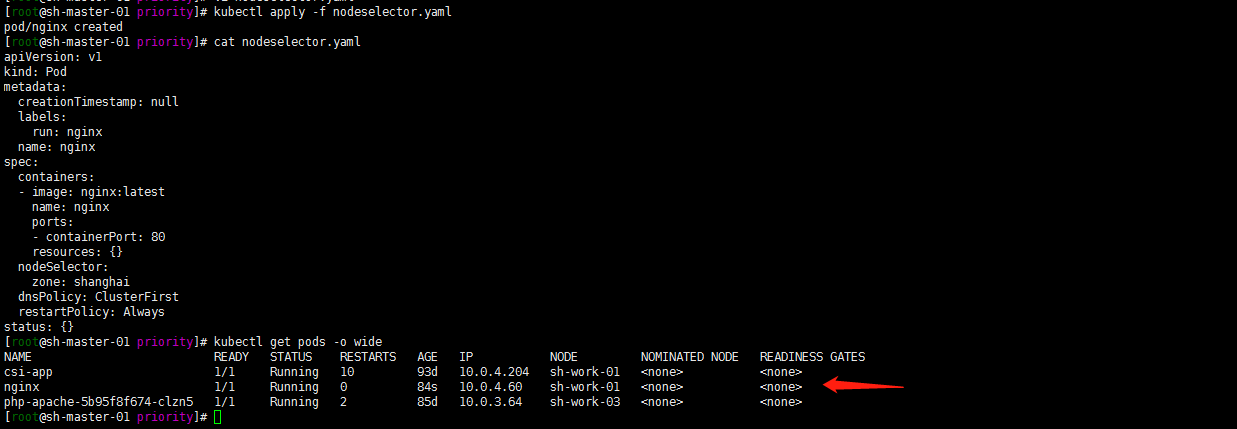
Note: nodeSelector is mandatory. If our target node has no available resources, the Pod will always be in Pending state.
2. NodeAffinity: Node affinity
1. Affinity scheduling can be divided into soft strategy and hard strategy:
1. Soft policy - preferredDuringSchedulingIgnoredDuringExecution
Just emphasize the priority, but don't force it. If you don't have a node that meets the scheduling requirements, pod You will ignore this rule and continue to complete the scheduling process**It's best to meet the conditions. If not, it doesn't matter**Strategy. Of course, there can also be multiple priority rules that can be set wight Weight value, defining the order of precedence.
2. Hard policy - requiredDuringSchedulingIgnoredDuringExecution
The specified rules must be met before the pod can be dispatched to the node. It is tough. If there is no node that meets the conditions, try again and again until the conditions are met. In short, it is a strategy that you must meet my requirements, or I won't do it.
2. About IgnoredDuringExecution
See official for details:

IgnoredDuringExecution is similar to the working principle of nodeSelector. If the label of a node changes at run time and no longer meets the affinity rules on the Pod, the Pod will continue to run on the node.
3. Common syntax operators
The following operators are provided:
- The value of In: label is In a list
- NotIn: the value of label is not in a list
- Gt: the value of label is greater than a certain value
- Lt: the value of label is less than a certain value
- Exists: a label exists
- DoesNotExist: a label does not exist
If you specify both nodeSelector and nodeAffinity_ Both_ It must be satisfied before the Pod can be scheduled to the candidate node.
If you specify multiple nodeSelectorTerms associated with nodeAffinity type, pod can be scheduled to the node if one nodeSelectorTerms is satisfied.
If you specify multiple matchExpressions associated with nodeSelectorTerms, the Pod can be scheduled to the node only if all matchExpressions are satisfied.
If you modify or delete the label of the node to which the Pod is scheduled, the Pod will not be deleted. In other words, affinity selection is only valid during Pod scheduling.
The weight field value in preferredDuringSchedulingIgnoredDuringExecution ranges from 1 to 100. For each node that meets all scheduling requirements (resource request, RequiredDuringScheduling affinity expression, etc.), the scheduler will traverse the elements of the field to calculate the sum, and if the node matches the corresponding MatchExpressions, add "weight" to the sum. Then combine this score with the scores of other priority functions of the node. The node with the highest total score is the most preferred.
4. Take an example
1. Examples of hard strategies
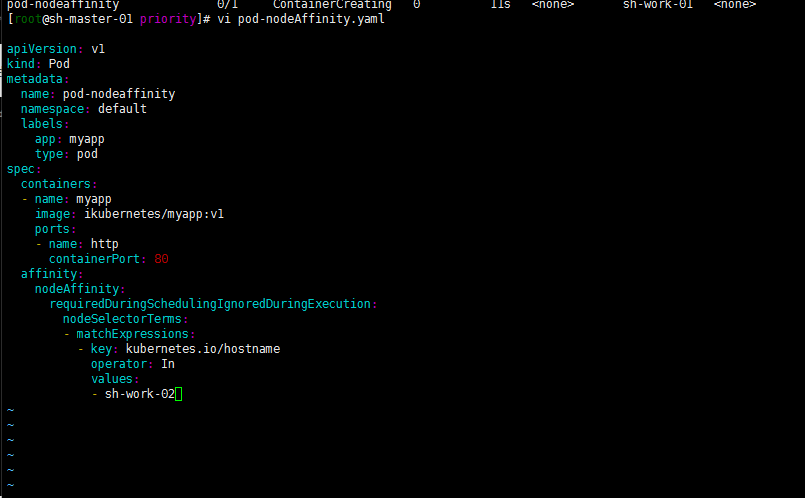
Try a hard limit with an empty label:
cat > pod-nodeAffinity.yaml << EOF
apiVersion: v1
kind: Pod
metadata:
  name: pod-nodeaffinity
  namespace: default
  labels:
    app: myapp
    type: pod
spec:
  containers:
  - name: myapp
    image: ikubernetes/myapp:v1
    ports:
    - name: http
      containerPort: 80
  affinity:
    nodeAffinity:
      requiredDuringSchedulingIgnoredDuringExecution:
        nodeSelectorTerms:
        - matchExpressions:
          - key: kubernetes.io/hostname
            operator: In
            values:
            - node01
EOF
kubectl apply -f pod-nodeAffinity.yaml
kubectl get pods
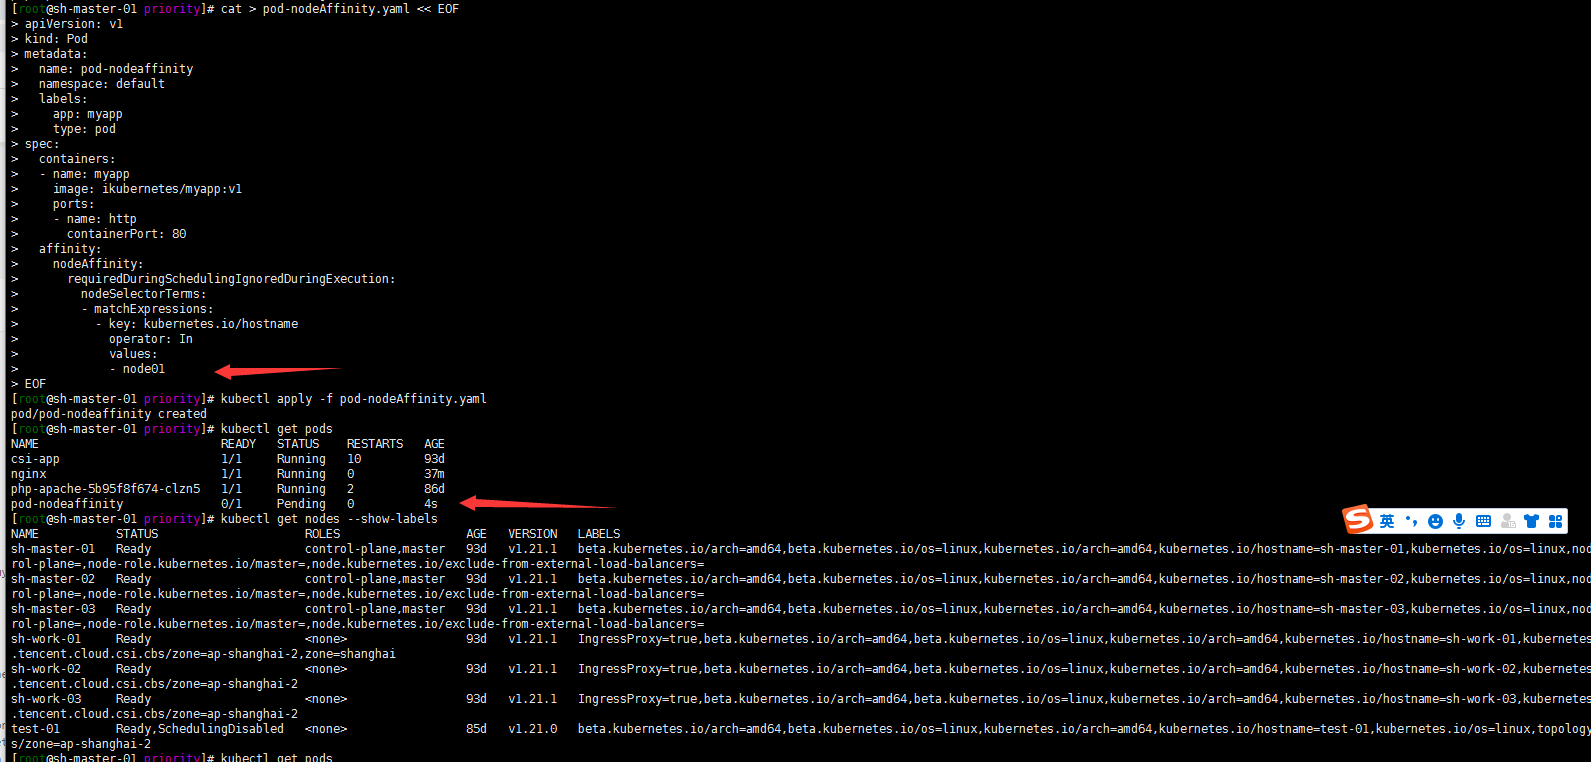
Well, I don't have kubernetes IO / hostname: node of node01 tag, so the pod is always in pending state
Modify kubernetes IO / hostname: sh-work-01
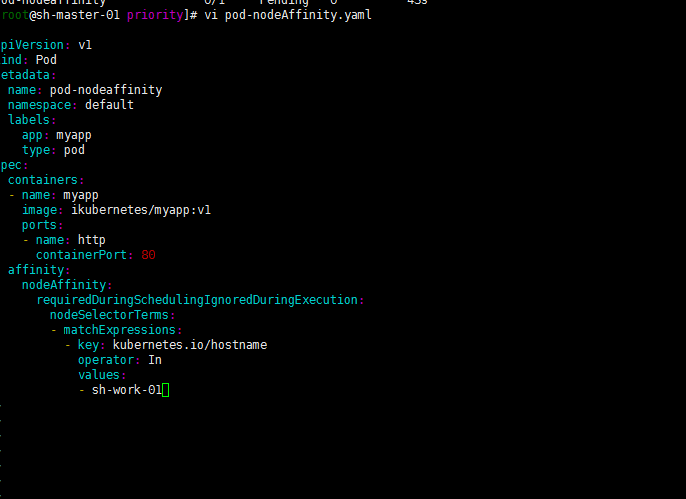
Well, as follows
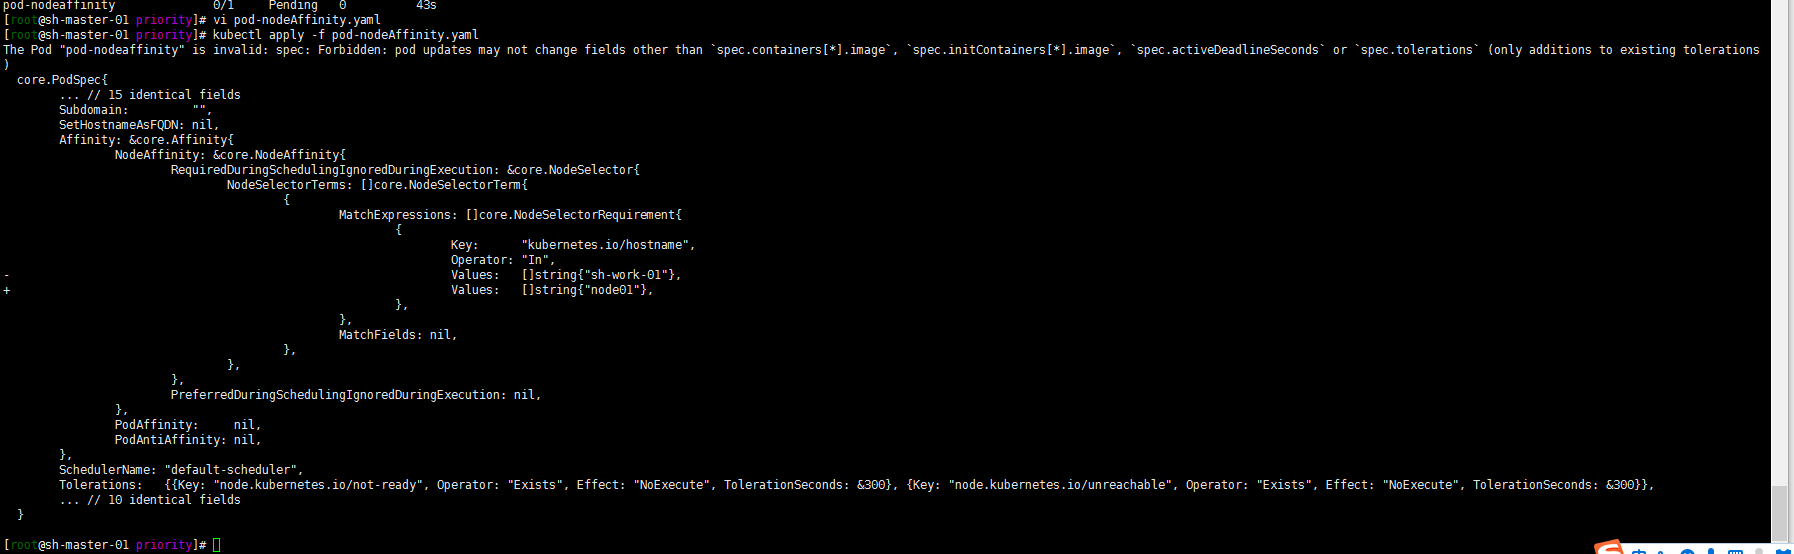
Try deleting and redeploying:
kubectl delete -f pod-nodeAffinity.yaml
kubectl create -f pod-nodeAffinity.yaml
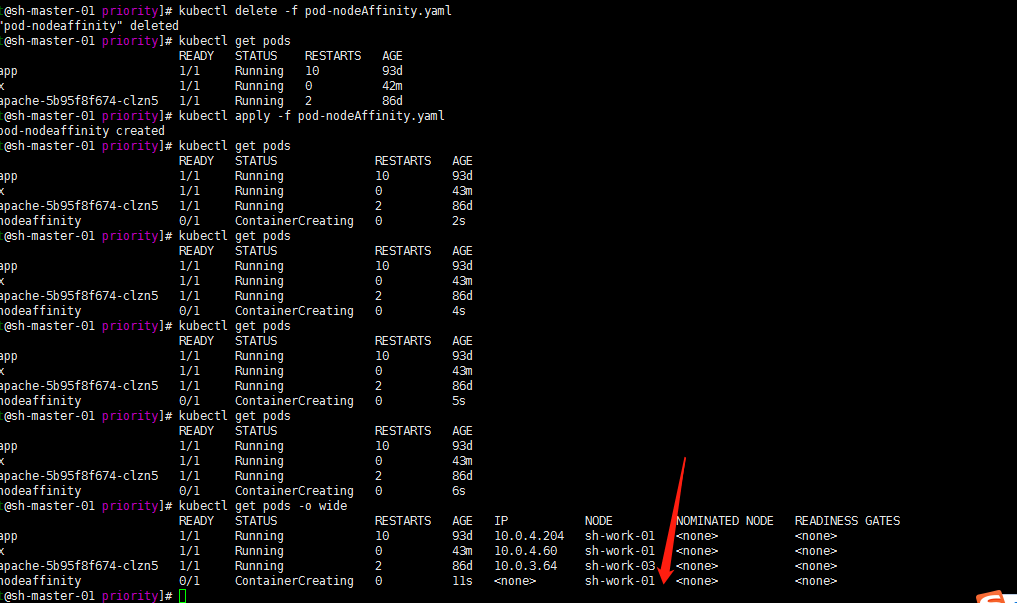
Then I'll try to modify values now? Change sh-work-01 to sh-work-02
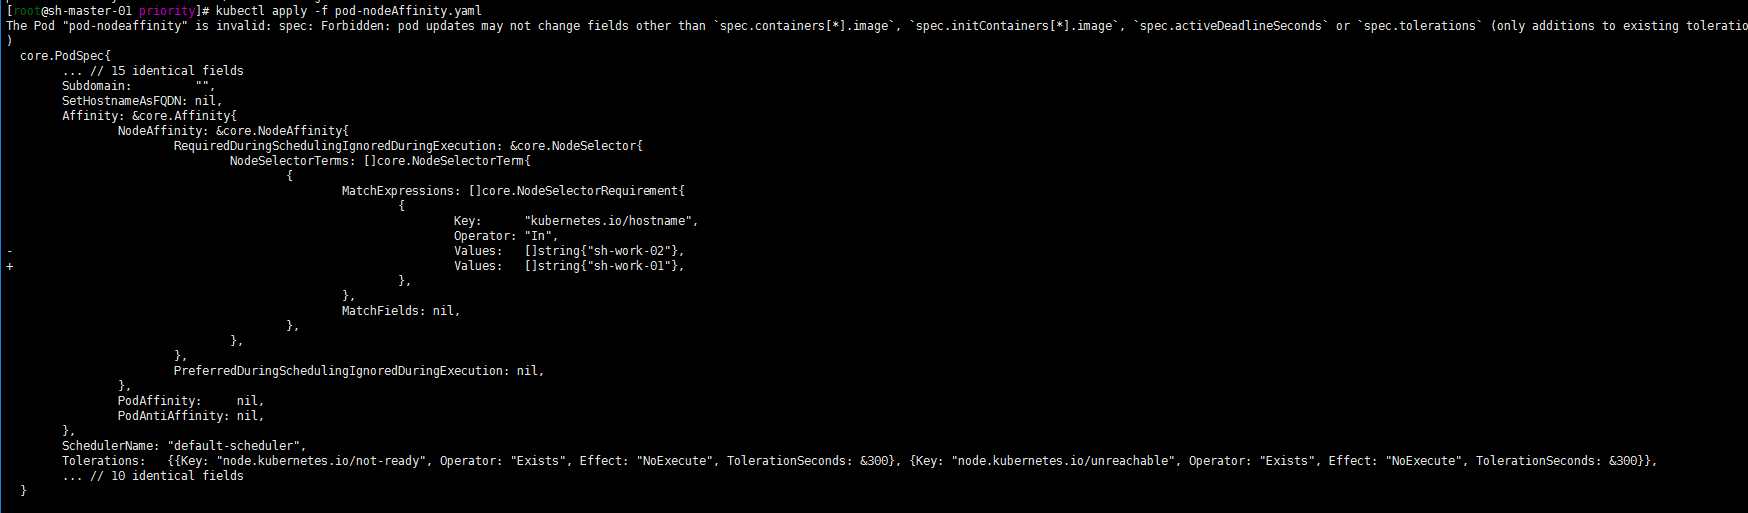
Still! The feature of IgnoredDuringExecution is further verified!
2. Examples of soft strategies
The whole node without label is still scheduled:
cat > pod-prefer.yaml << EOF
apiVersion: v1
kind: Pod
metadata:
  name: pod-prefer
  namespace: default
  labels:
    app: myapp
    type: pod
spec:
  containers:
  - name: myapp
    image: ikubernetes/myapp:v1
    ports:
    - name: http
      containerPort: 80
  affinity:
    nodeAffinity:
      preferredDuringSchedulingIgnoredDuringExecution:
      - weight: 10
        preference:
          matchExpressions:
          - key: kubernetes.io/hostname
            operator: In
            values:
            - node01
EOF
[root@sh-master-01 priority]# kubectl apply -f pod-prefer.yaml
pod/pod-prefer created
[root@sh-master-01 priority]# kubectl get pods
NAME                          READY   STATUS              RESTARTS   AGE
csi-app                       1/1     Running             10         93d
nginx                         1/1     Running             0          62m
php-apache-5b95f8f674-clzn5   1/1     Running             2          86d
pod-nodeaffinity              1/1     Running             0          19m
pod-prefer                    0/1     ContainerCreating   0          3s
[root@sh-master-01 priority]# kubectl get pods -o wide
NAME                          READY   STATUS              RESTARTS   AGE   IP           NODE         NOMINATED NODE   READINESS GATES
csi-app                       1/1     Running             10         93d   10.0.4.204   sh-work-01   <none>           <none>
nginx                         1/1     Running             0          62m   10.0.4.60    sh-work-01   <none>           <none>
php-apache-5b95f8f674-clzn5   1/1     Running             2          86d   10.0.3.64    sh-work-03   <none>           <none>
pod-nodeaffinity              1/1     Running             0          19m   10.0.4.118   sh-work-01   <none>           <none>
pod-prefer                    0/1     ContainerCreating   0          7s    <none>       sh-work-02   <none>           <none>
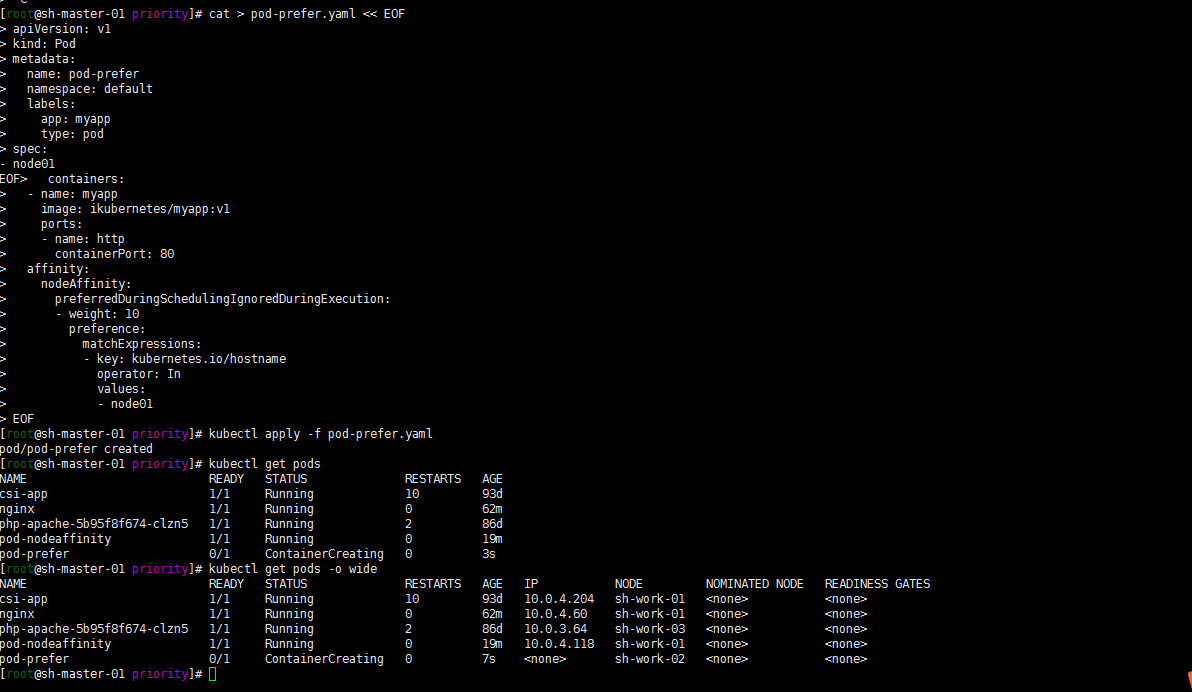
Well, I don't have label kubernetes IO / hostname: name of node01 node. As a result, he was dispatched to the sh-work-02 node. Is this not mandatory?
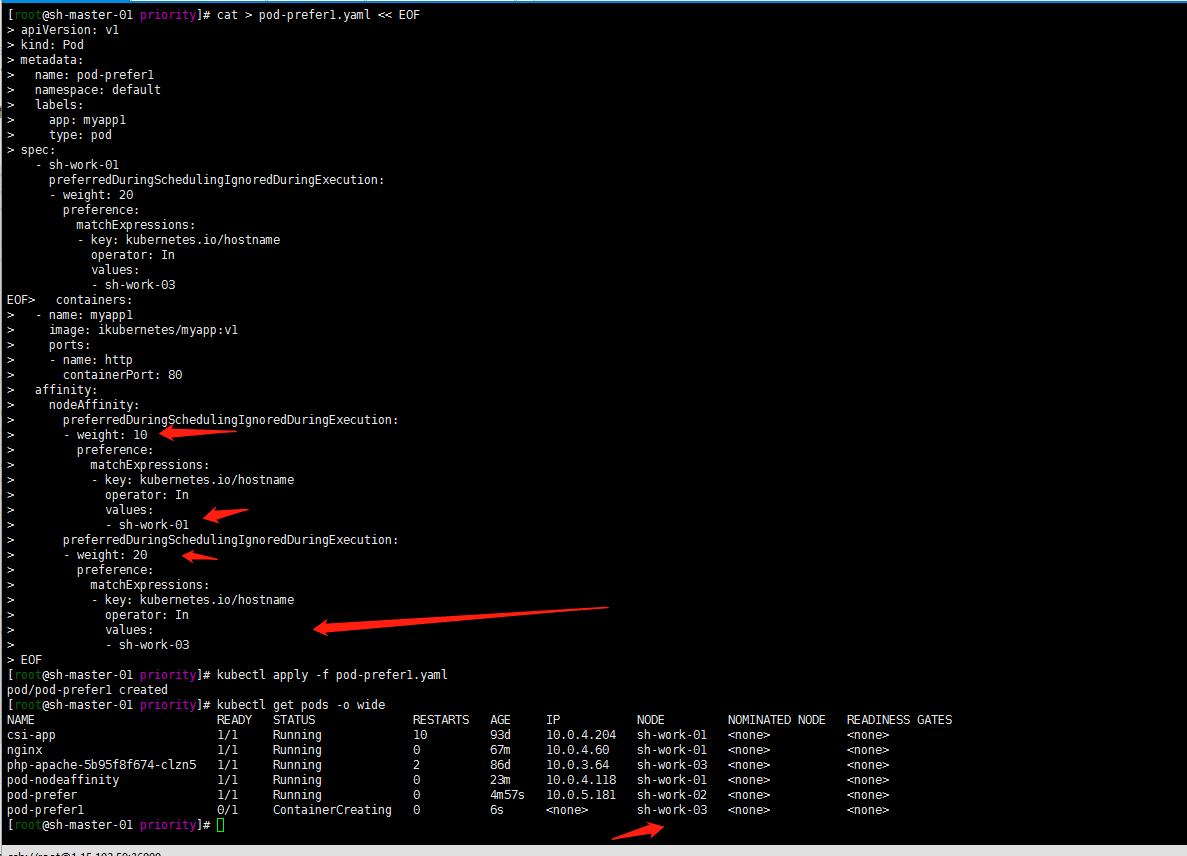
Then test the weight?
cat > pod-prefer1.yaml << EOF
apiVersion: v1
kind: Pod
metadata:
  name: pod-prefer1
  namespace: default
  labels:
    app: myapp1
    type: pod
spec:
  containers:
  - name: myapp1
    image: ikubernetes/myapp:v1
    ports:
    - name: http
      containerPort: 80
  affinity:
    nodeAffinity:
      preferredDuringSchedulingIgnoredDuringExecution:
      - weight: 10
        preference:
          matchExpressions:
          - key: kubernetes.io/hostname
            operator: In
            values:
            - sh-work-01
      preferredDuringSchedulingIgnoredDuringExecution:
      - weight: 20
        preference:
          matchExpressions:
          - key: kubernetes.io/hostname
            operator: In
            values:
            - sh-work-03
EOF
[root@sh-master-01 priority]# kubectl apply -f pod-prefer1.yaml
pod/pod-prefer1 created
[root@sh-master-01 priority]# kubectl get pods -o wide
NAME                          READY   STATUS              RESTARTS   AGE     IP           NODE         NOMINATED NODE   READINESS GATES
csi-app                       1/1     Running             10         93d     10.0.4.204   sh-work-01   <none>           <none>
nginx                         1/1     Running             0          67m     10.0.4.60    sh-work-01   <none>           <none>
php-apache-5b95f8f674-clzn5   1/1     Running             2          86d     10.0.3.64    sh-work-03   <none>           <none>
pod-nodeaffinity              1/1     Running             0          23m     10.0.4.118   sh-work-01   <none>           <none>
pod-prefer                    1/1     Running             0          4m57s   10.0.5.181   sh-work-02   <none>           <none>
pod-prefer1                   0/1     ContainerCreating   0          6s      <none>       sh-work-03   <none>           <none>
Well, it's scheduled to the sh-work-03 node based on the weight
3. As for the soft and hard strategies, do colleagues exist?
As an example, colleagues have soft strategies and hard strategies
cat > pod-prefer2.yaml << EOF
apiVersion: v1
kind: Pod
metadata:
  name: with-node-affinity
spec:
  affinity:
    nodeAffinity:
      requiredDuringSchedulingIgnoredDuringExecution:
        nodeSelectorTerms:
        - matchExpressions:
          - key: kubernetes.io/hostname
            operator: In
            values:
            - sh-work-01
            - sh-work-02
      preferredDuringSchedulingIgnoredDuringExecution:
      - weight: 10
        preference:
          matchExpressions:
          - key: zone
            operator: In
            values:
            - shanghai
  containers:
  - name: with-node-affinity
    image: k8s.gcr.io/pause:2.0
EOF
 kubectl apply -f pod-prefer2.yaml
 kubectl get pods -o wide
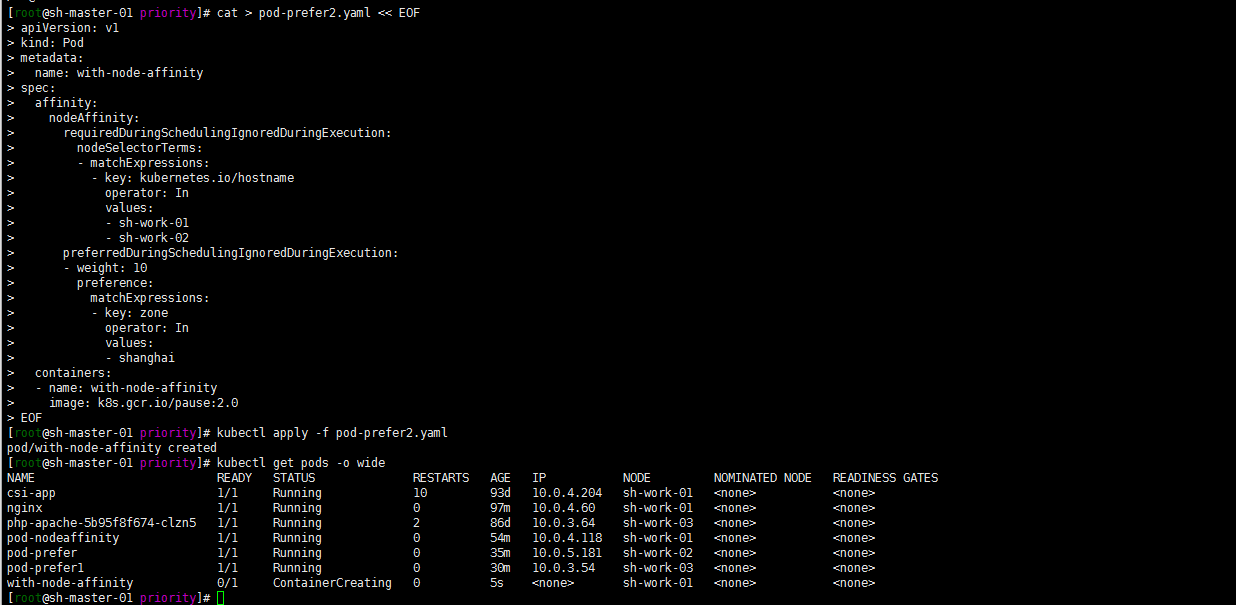
Of course, no matter what the value in preferredduringschedulingignored duringexecution is, the premise is to meet the values in requiredduringschedulingignored duringexecution first.
3. PodAfinity: Pod affinity and mutually exclusive scheduling strategy
The affinity between pods is specified by the podAffinity field under the affinity field in the PodSpec. The anti affinity between pods is specified by the podanti affinity field under the affinity field in PodSpec.
It is mainly used to deploy some frequently called and interdependent pods in one node or the same area as much as possible, and the resource occupied pods are mutually exclusive and distributed in different nodes or areas.
For example:
1. First deploy a Pod with the tag security=S1 app=busybox
cat > pod-flag.yaml << EOF
apiVersion: v1
kind: Pod
metadata:
  name: pod-flag
  namespace: default
  labels:
    app: busybox
    security: S1
spec:
  containers:
  - name: busybox
    image: busybox:1.28.4
    command:
      - sleep
      - "3600"
    imagePullPolicy: IfNotPresent
EOF
kubectl apply -f pod-flag.yaml
kubectl get pods --show-labels

2. Examples of pod affinity:
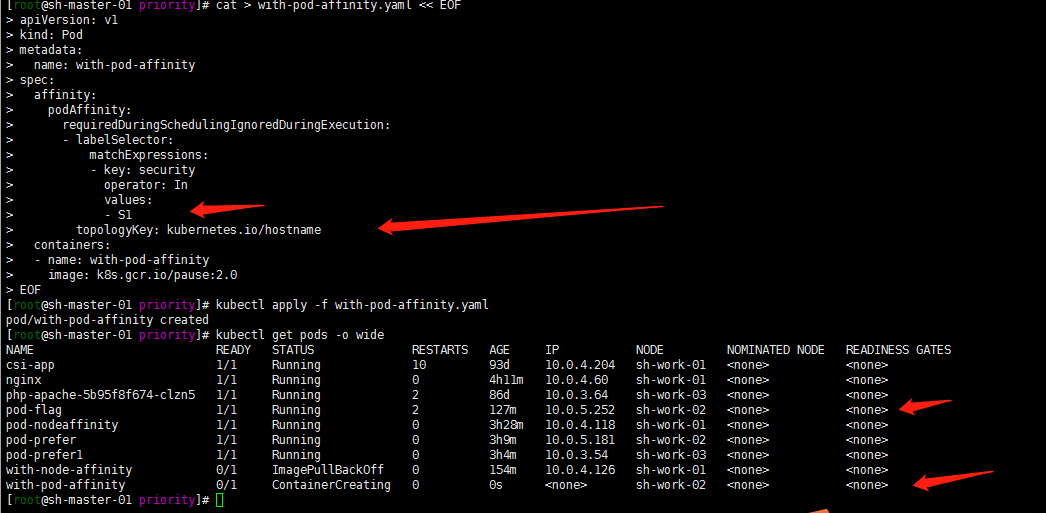
1. Soft policy affinity
cat > with-pod-affinity.yaml << EOF
apiVersion: v1
kind: Pod
metadata:
  name: with-pod-affinity
spec:
  affinity:
    podAffinity:
      requiredDuringSchedulingIgnoredDuringExecution:
      - labelSelector:
          matchExpressions:
          - key: security
            operator: In
            values:
            - S1
        topologyKey: kubernetes.io/hostname
  containers:
  - name: with-pod-affinity
    image: k8s.gcr.io/pause:2.0
EOF
kubectl apply -f with-pod-affinity.yaml
kubectl get pods -o wide
2. About topologyKey
As the name suggests, topology means topology. Here, it refers to a topology domain, which refers to the concept of a range, such as a Node, a cabinet, a computer room or a region (such as Hangzhou and Shanghai). In fact, it corresponds to the label on the Node. The topologyKey here corresponds to the Key of the tag on the Node (no Value). It can be seen that the topologyKey is actually used to filter nodes. In this way, we can dispatch each Pod across clusters, machine rooms and regions. I don't have multiple regional zone s, just one. I'm here now.
Original link: https://blog.csdn.net/asdfsadfasdfsa/article/details/106027367
3. Hard policy affinity
Mandatory requirements
cat > with-pod-affinity1.yaml << EOF
apiVersion: v1
kind: Pod
metadata:
  name: with-pod-affinity1
spec:
  affinity:
    podAffinity:
      preferredDuringSchedulingIgnoredDuringExecution:
      - labelSelector:
          matchExpressions:
          - key: security
            operator: In
            values:
            - S1
        topologyKey: kubernetes.io/hostname
  containers:
  - name: with-pod-affinity1
    image: k8s.gcr.io/pause:2.0
EOF
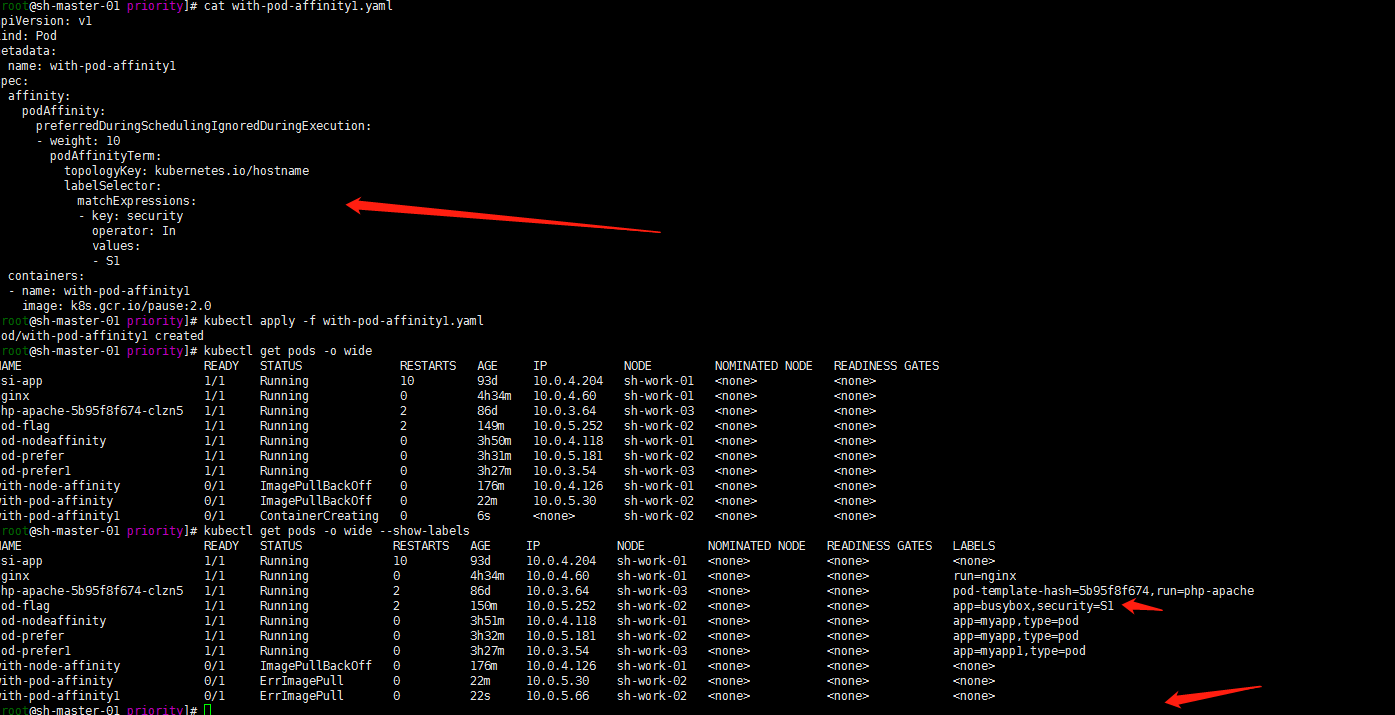
ErrImagePull ignores that the official example used has not changed the image. Just use nginx image normally.
3. Mutually exclusive scheduling of pod
Pod and security=S1 are in the same zone, not in the same Node as pod of app=busybox:
cat > with-pod-antiaffinity.yaml << EOF
apiVersion: v1
kind: Pod
metadata:
  name: with-pod-antiaffinity
spec:
  affinity:
    podAffinity:
      requiredDuringSchedulingIgnoredDuringExecution:
      - labelSelector:
          matchExpressions:
          - key: security
            operator: In
            values:
            - S1
        topologyKey: topology.com.tencent.cloud.csi.cbs/zone
    podAntiAffinity:
      requiredDuringSchedulingIgnoredDuringExecution:
      - labelSelector:
          matchExpressions:
          - key: app
            operator: In
            values:
            - busybox
        topologyKey: kubernetes.io/hostname
  containers:
  - name: with-pod-antiaffinity
    image: nginx
EOF
 kubectl apply -f with-pod-antiaffinity.yaml
 kubectl get pods -o wide --show-labels
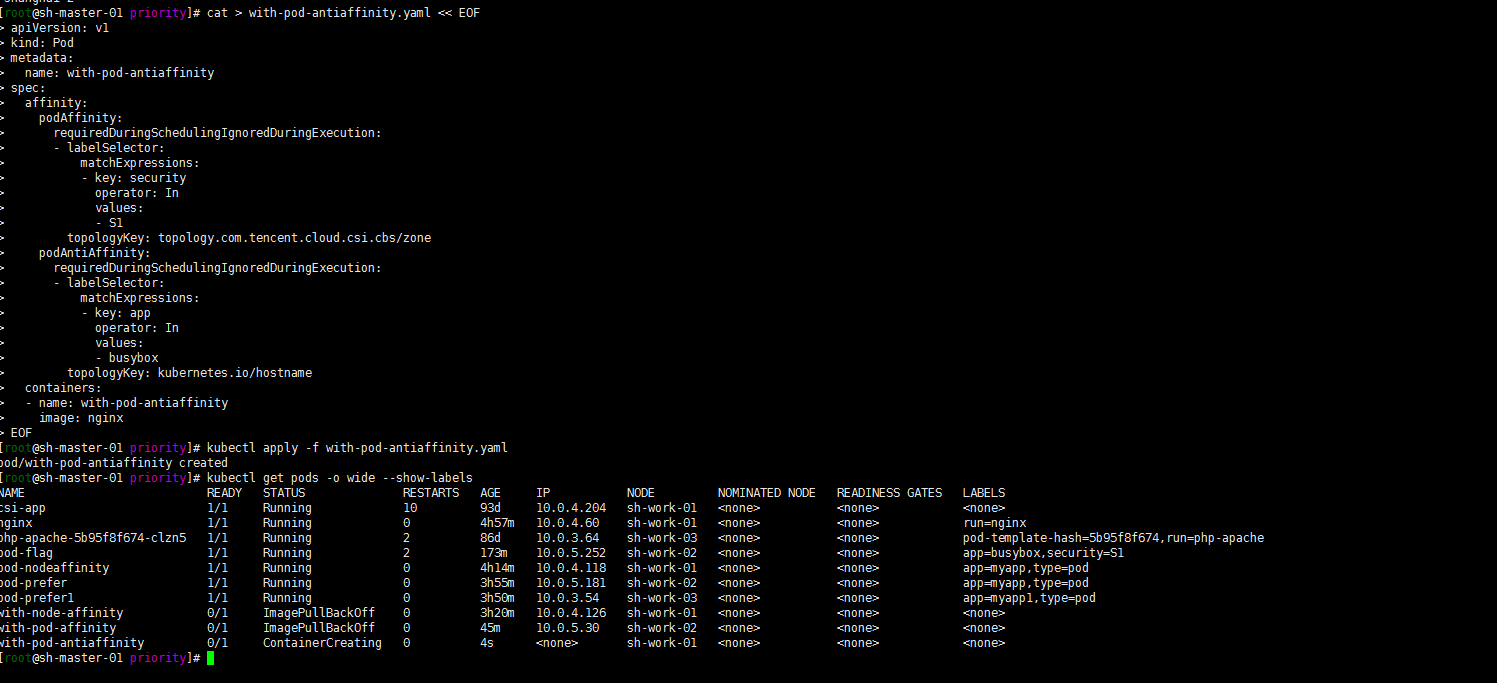
Well, the pod is scheduled to a node other than sh-work-02. This place is still a little around. I'll study it when I have time
4. Taints and tolerances
1. Cluster information
[root@sh-master-01 priority]# kubectl get node
NAME           STATUS                     ROLES                  AGE   VERSION
sh-master-01   Ready                      control-plane,master   93d   v1.21.1
sh-master-02   Ready                      control-plane,master   93d   v1.21.1
sh-master-03   Ready                      control-plane,master   93d   v1.21.1
sh-work-01     Ready                      <none>                 93d   v1.21.1
sh-work-02     Ready                      <none>                 93d   v1.21.1
sh-work-03     Ready                      <none>                 93d   v1.21.1
test-01        Ready,SchedulingDisabled   <none>                 86d   v1.21.0
2. Stain the sh-work-01 node (key=work, value=ops, effect=NoSchedule)
kubectl taint nodes sh-work-01 work=ops:NoSchedule
3. It's more intuitive to test the whole daemon
cat > nginx-daemonset.yaml << EOF
apiVersion: apps/v1
kind: DaemonSet
metadata:
  name: nginx-1
  namespace: default
  labels:
    web: nginx-1
spec:
  selector:
    matchLabels:
      web: nginx-1
  template:
    metadata:
      labels:
        web: nginx-1
    spec:
      containers:
      - name: nginx-1
        image: nginx:1.17
        ports:
        - containerPort: 80
EOF
kubectl apply -f nginx-daemonset.yaml
kubectl get pods -o wide --show-labels
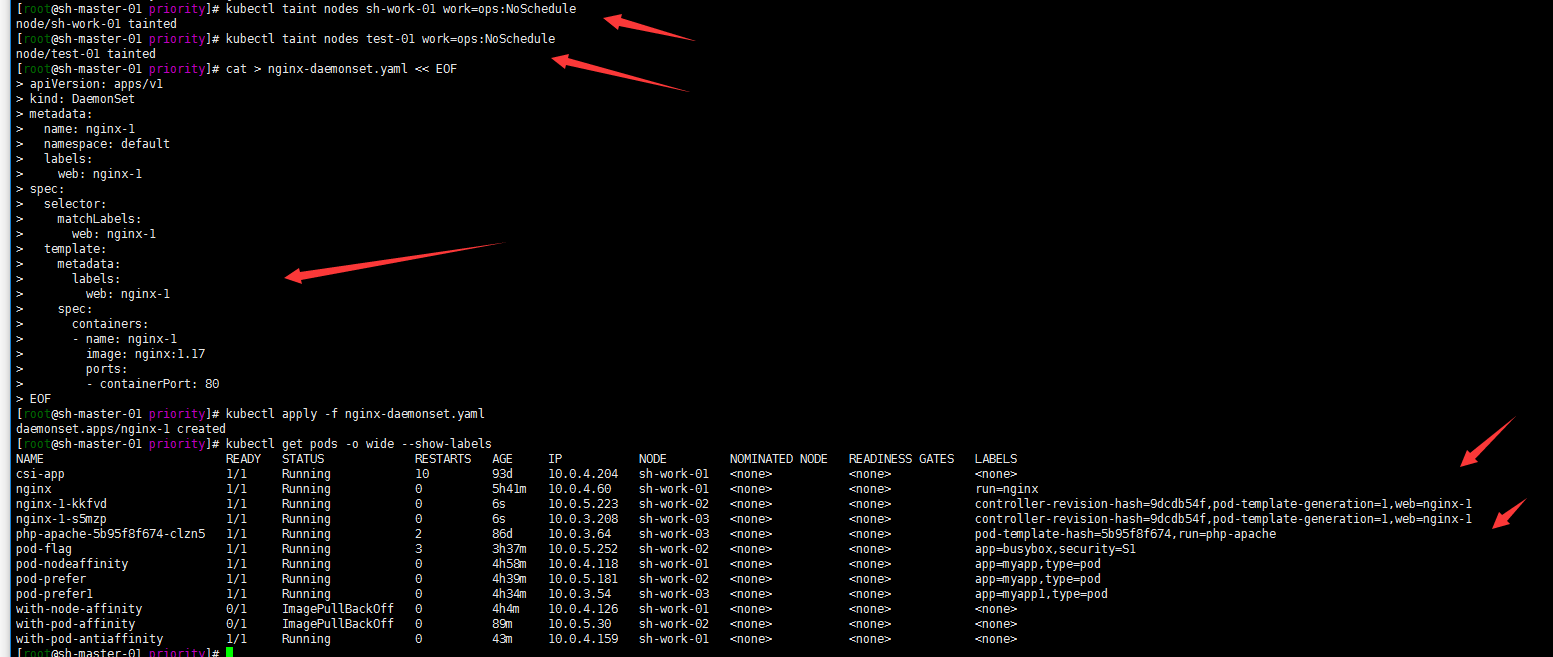
Note: I stain the test-01 node because my node is schedulendisabled. However, the daemonset will also be deployed to the IE point for easy differentiation.
Remove the stain on sh-work-01 and see what happens:
[root@sh-master-01 priority]#  kubectl taint nodes sh-work-01 work:NoSchedule-
node/sh-work-01 untainted
[root@sh-master-01 priority]#  kubectl get pods -o wide --show-labels

Well, remove the delay label of sh-work-01 node. The node resumes scheduling.
4. Add tolerance parameters for testing
cat > nginx-daemonset-2.yaml << EOF
apiVersion: apps/v1
kind: DaemonSet
metadata:
  name: nginx-2
  namespace: default
  labels:
    web: nginx-2
spec:
  selector:
    matchLabels:
      web: nginx-2
  template:
    metadata:
      labels:
        web: nginx-2
    spec:
      containers:
      - name: nginx-2
        image: nginx:1.17
        ports:
        - containerPort: 80
      tolerations:
      - key: "work"
        operator: "Equal"
        value: "ops"
        effect: "NoSchedule"
EOF
kubectl apply -f nginx-daemonset-2.yaml
kubectl get pods -o wide --show-labels
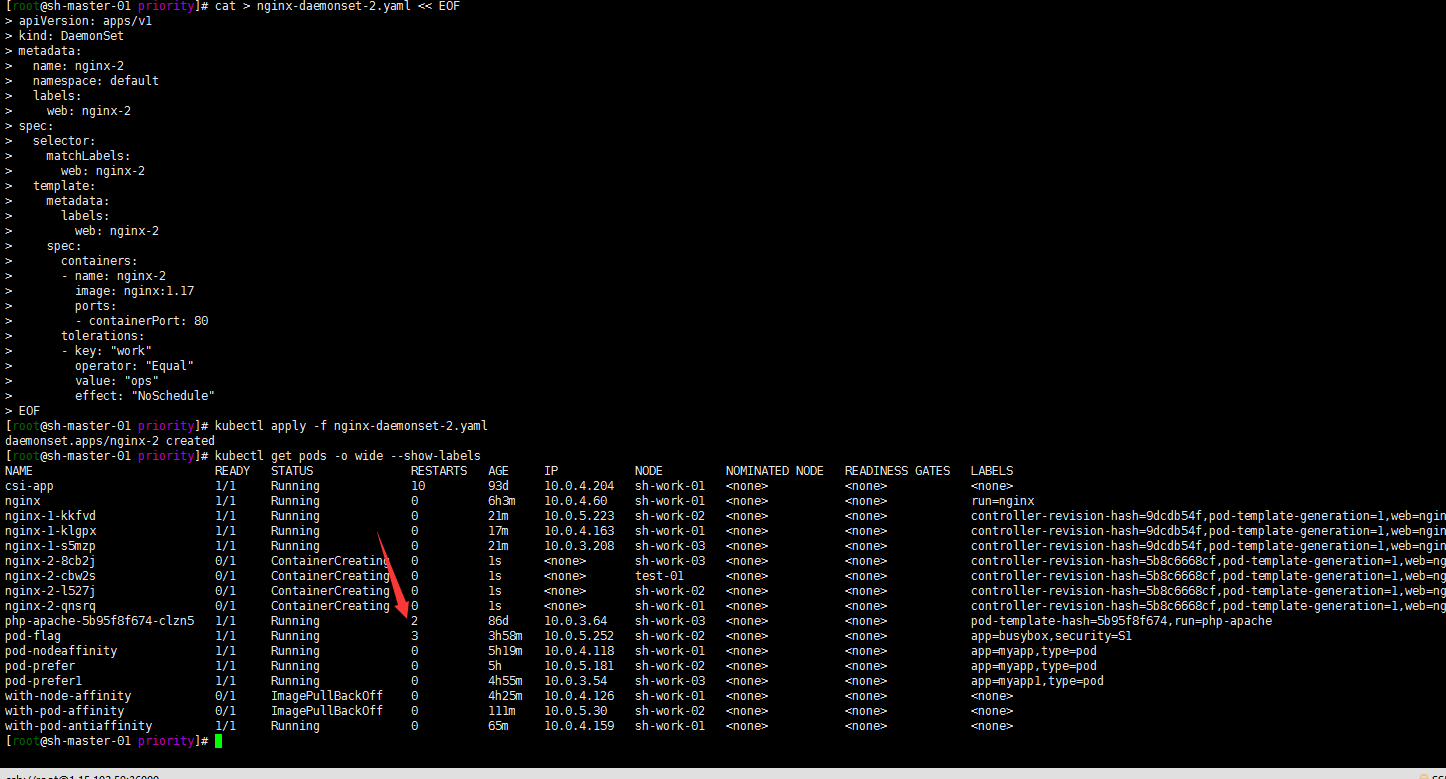
Well, the delayed nodes have been scheduled, including the test-01 node. Here we are adding another delay to the test-01 node? Anyway, I just don't want him to be dispatched:
kubectl taint nodes test-01 work1=dev:NoSchedule
The pod in the test-01 node has not been expelled
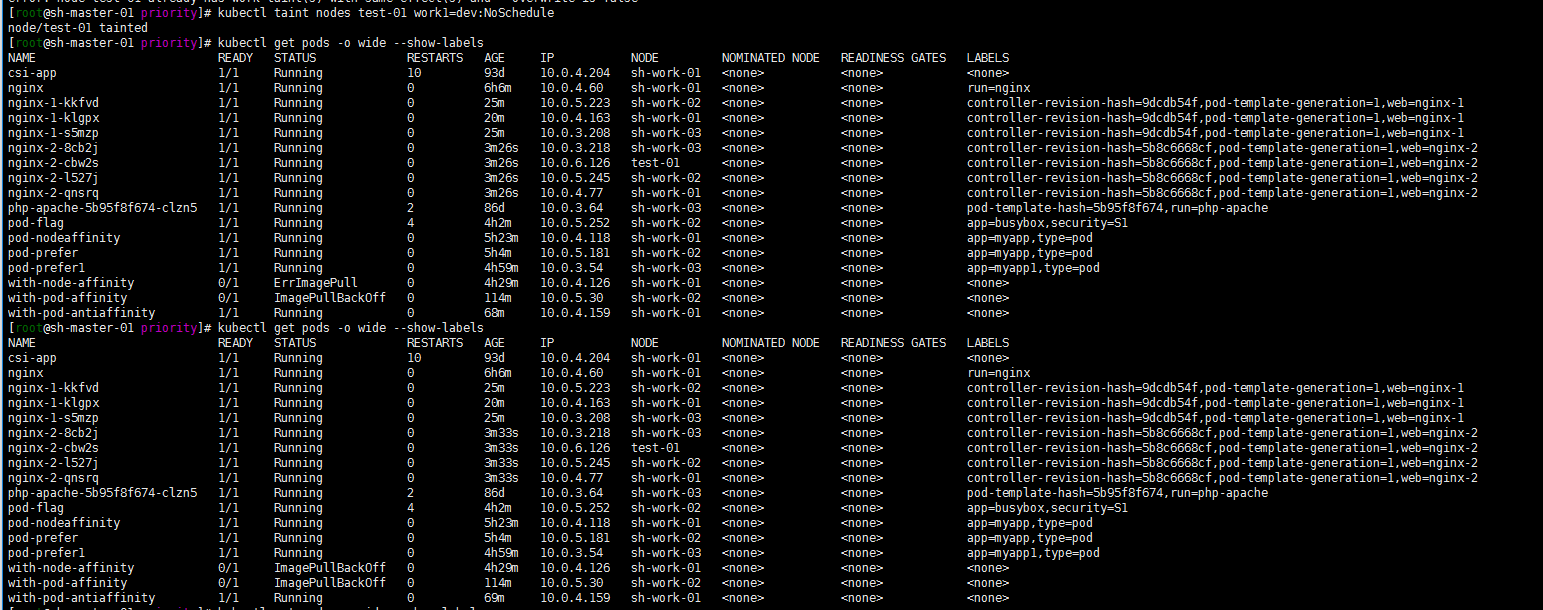
Modify the label of work=ops, or else?
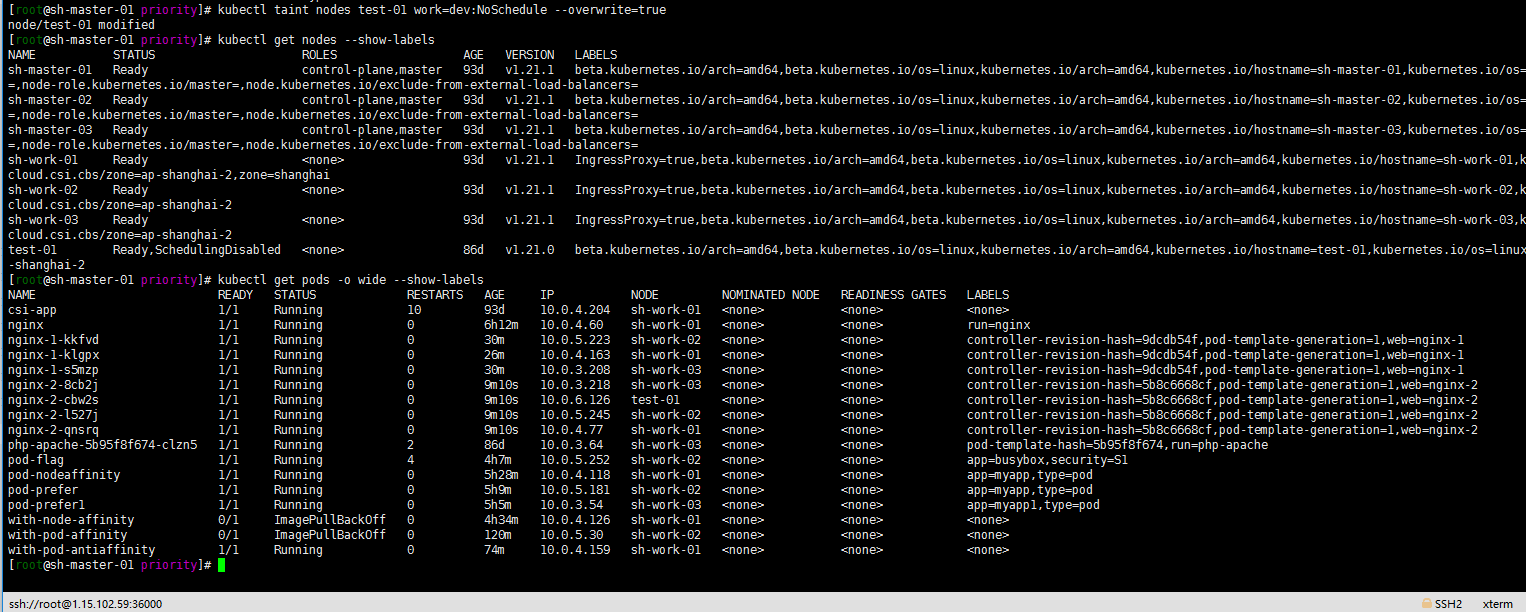
kubectl taint nodes test-01 work=dev:NoSchedule --overwrite=true
Still the same.
What should I do?
5. Modify the stain on the test-01 node and change the effect to "NoExecute" to test whether the Pod will be expelled
kubectl taint nodes test-01 work=dev:NoExecute --overwrite=true
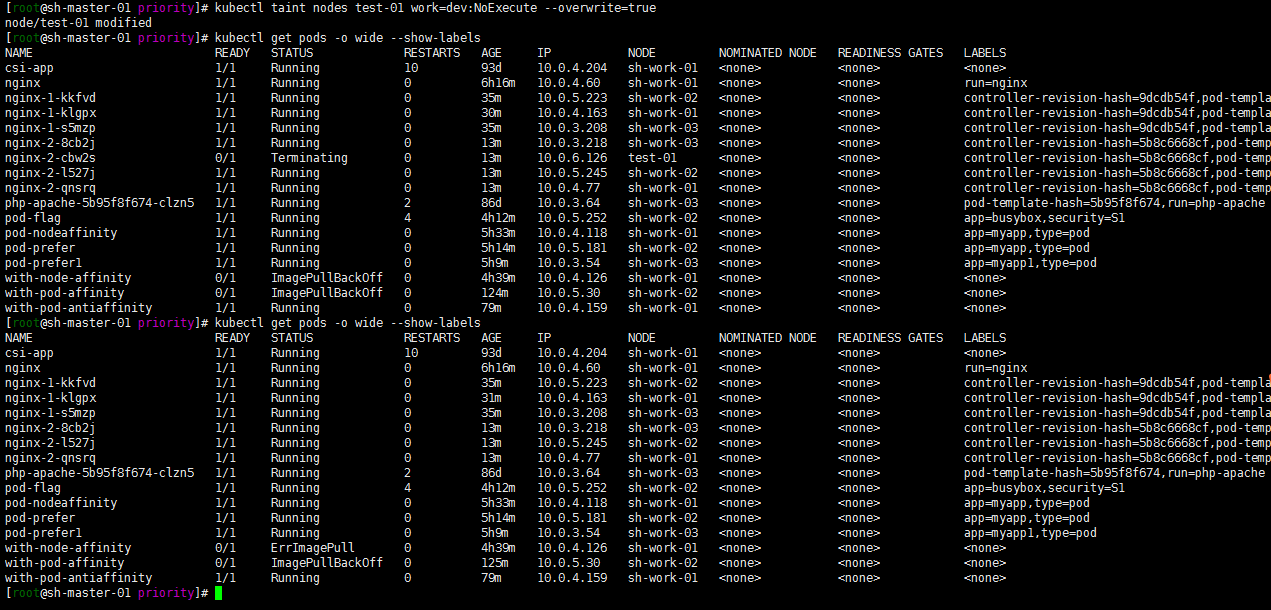
The expulsion succeeded
For taints and tolerances, please refer to: https://www.jianjiacc.cn/archives/6fdbe877.html
To sum up:
- To create a cluster, we should make reasonable resource planning and capacity planning
- Resource priority scheduling and resource allocation can be carried out according to the qos of pod (of course, there will still be pod OOM)
- Resources can be reasonably scheduled through node labeling, affinity and anti affinity to avoid cluster resource avalanche
- There are still some differences between different kubernetes versions. Try to read the official documents as much as possible!