Previous review
In the first article, we gave a brief introduction to angular, mainly to understand angular and how to create an angular project and start it. Because it is not a video, we don't explain too much about the previous article. If you don't read it, you can directly move to the first article! This article mainly combs and understands the components of angular as much as possible!
Component introduction
What is a component
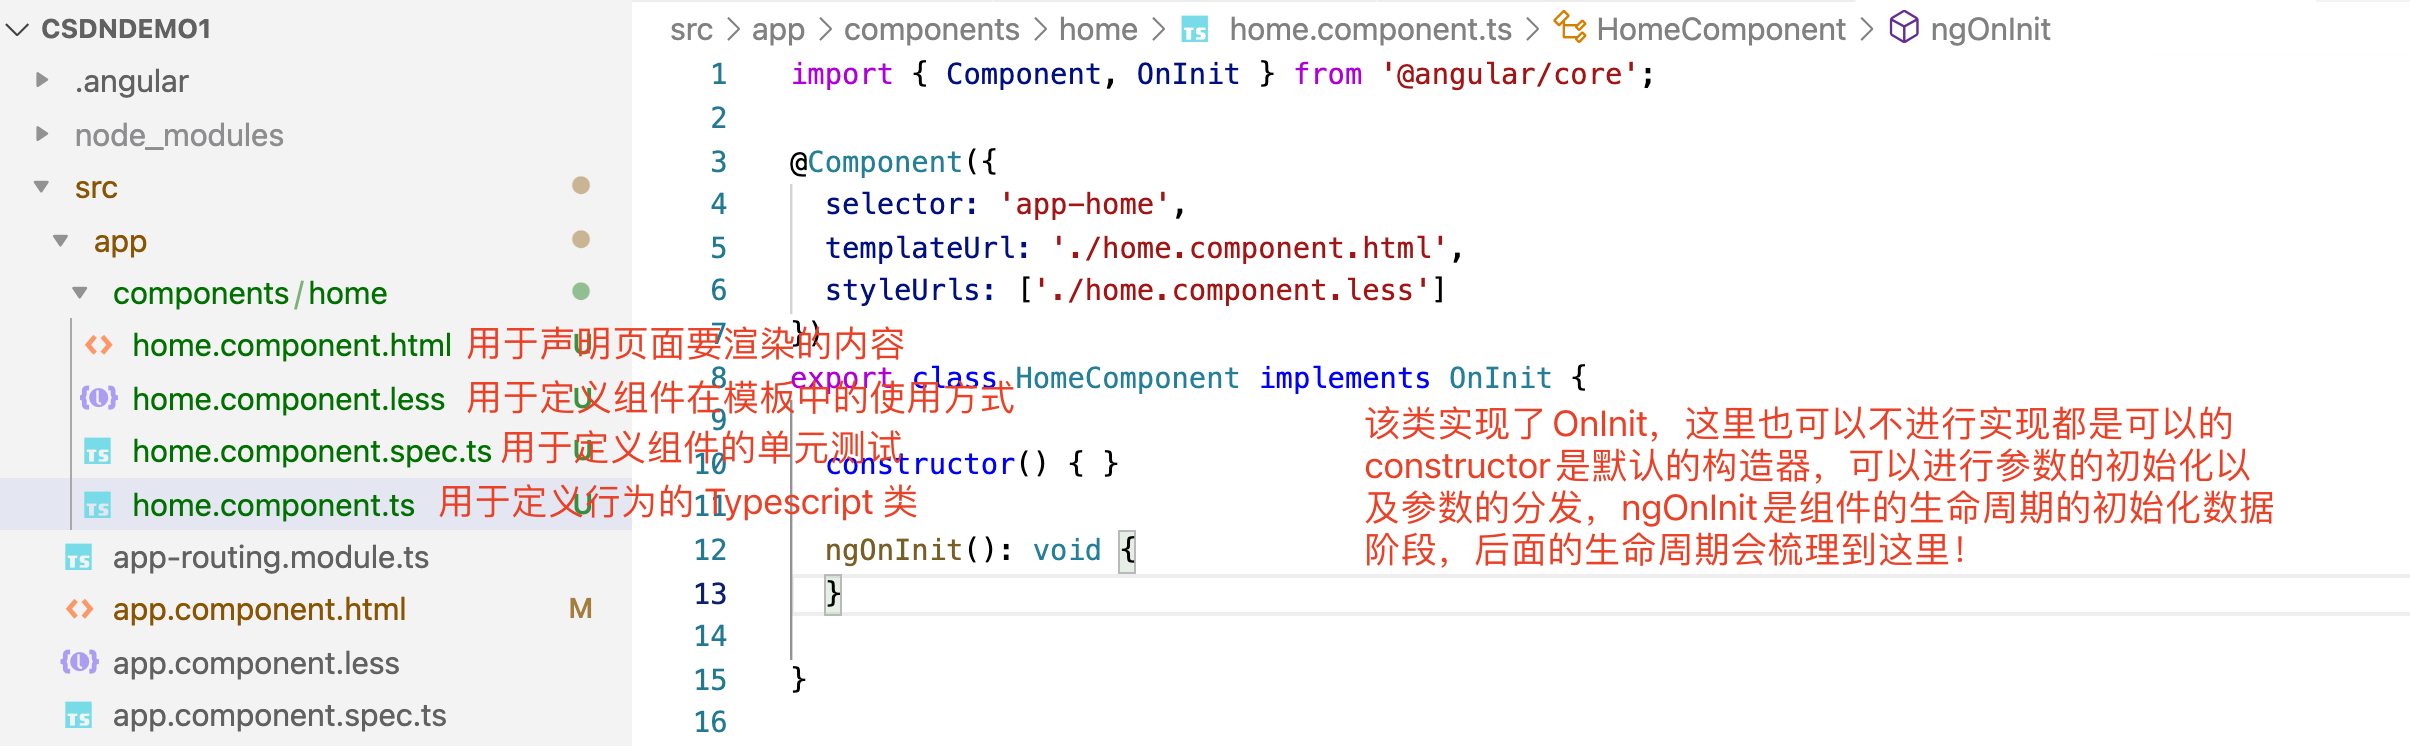
Components are the main building blocks of angular applications. This is an official explanation. Vernacular is a structural block that completes certain functions. It may be easier to understand this sentence by familiar vue frameworks. vue components are actually vue files one by one. Components can be reused and data can be transferred, Different components together form a relatively complete structured project. The difference from vue is that angular components are divided into files. In short, they are divided into:
- An HTML template that declares what the page will render
- A Typescript class used to define behavior
- A CSS selector that defines how components are used in templates
Because vue is a heavily templated framework, vue itself can write a component with a vue file. This should be noted!
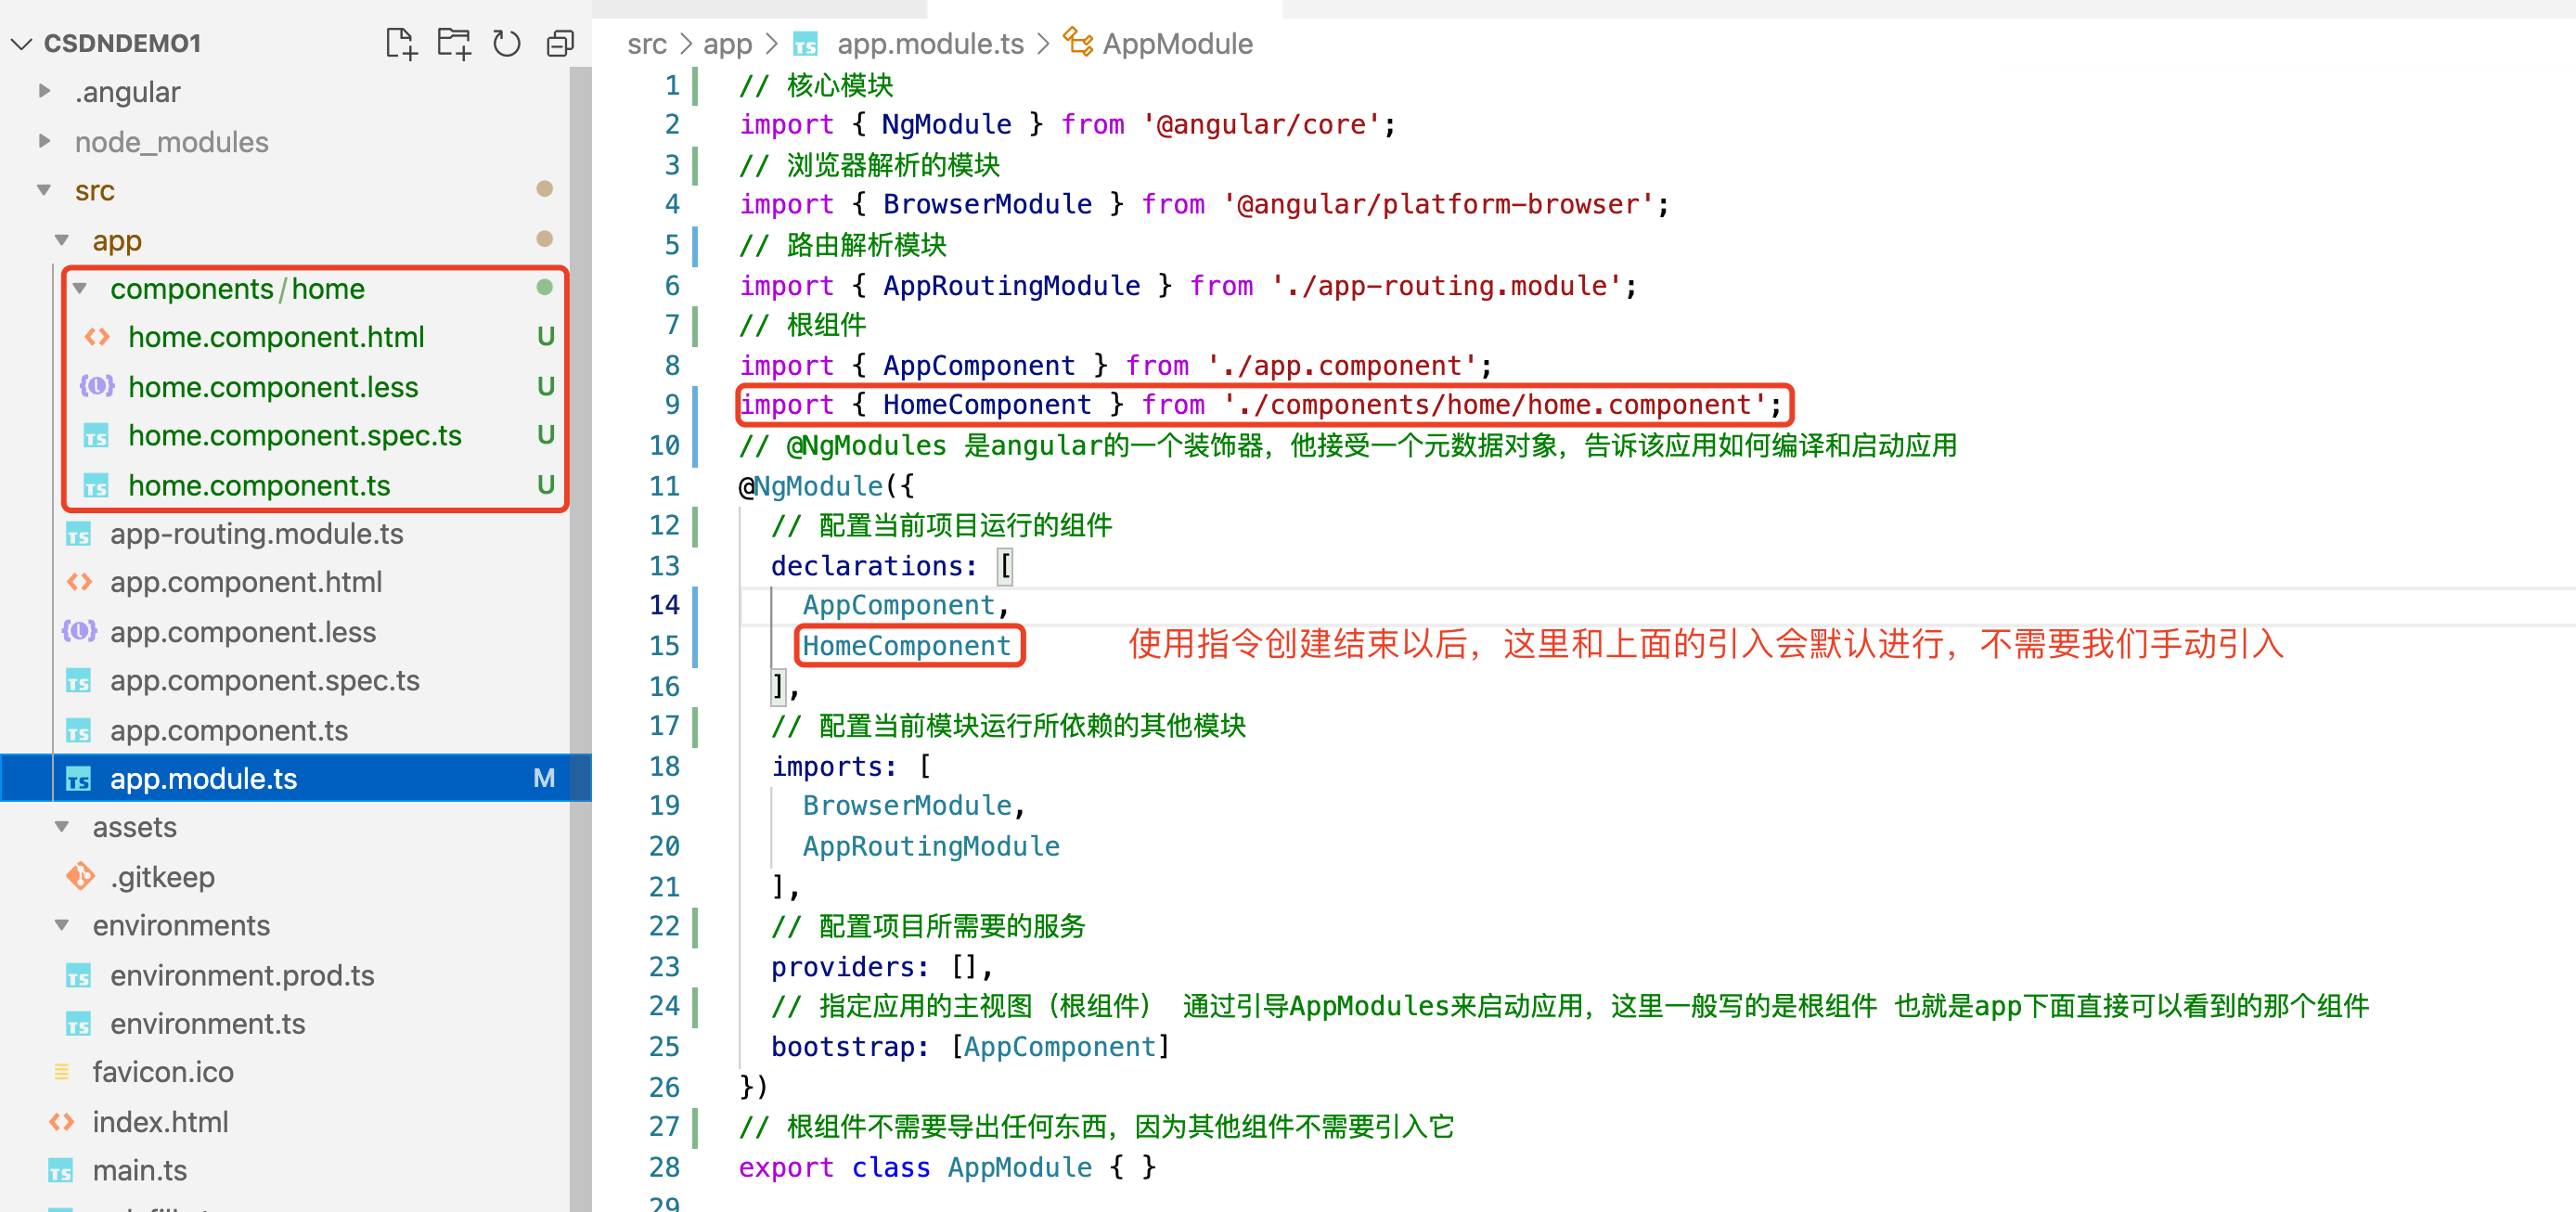
Create a component
For convenience, I will use the terminal provided with vscode to start the project and operate the components
- command line
ng g component components/home
ps: the instruction here has a directory, which means that we can create a component directly under ng g home, but it will appear directly under the app folder, which will make it difficult for us to manage components. Therefore, when I create components later, I will also create them under the components folder by default.

- Created successfully
Change default startup page content
- Change app component. HTML file content
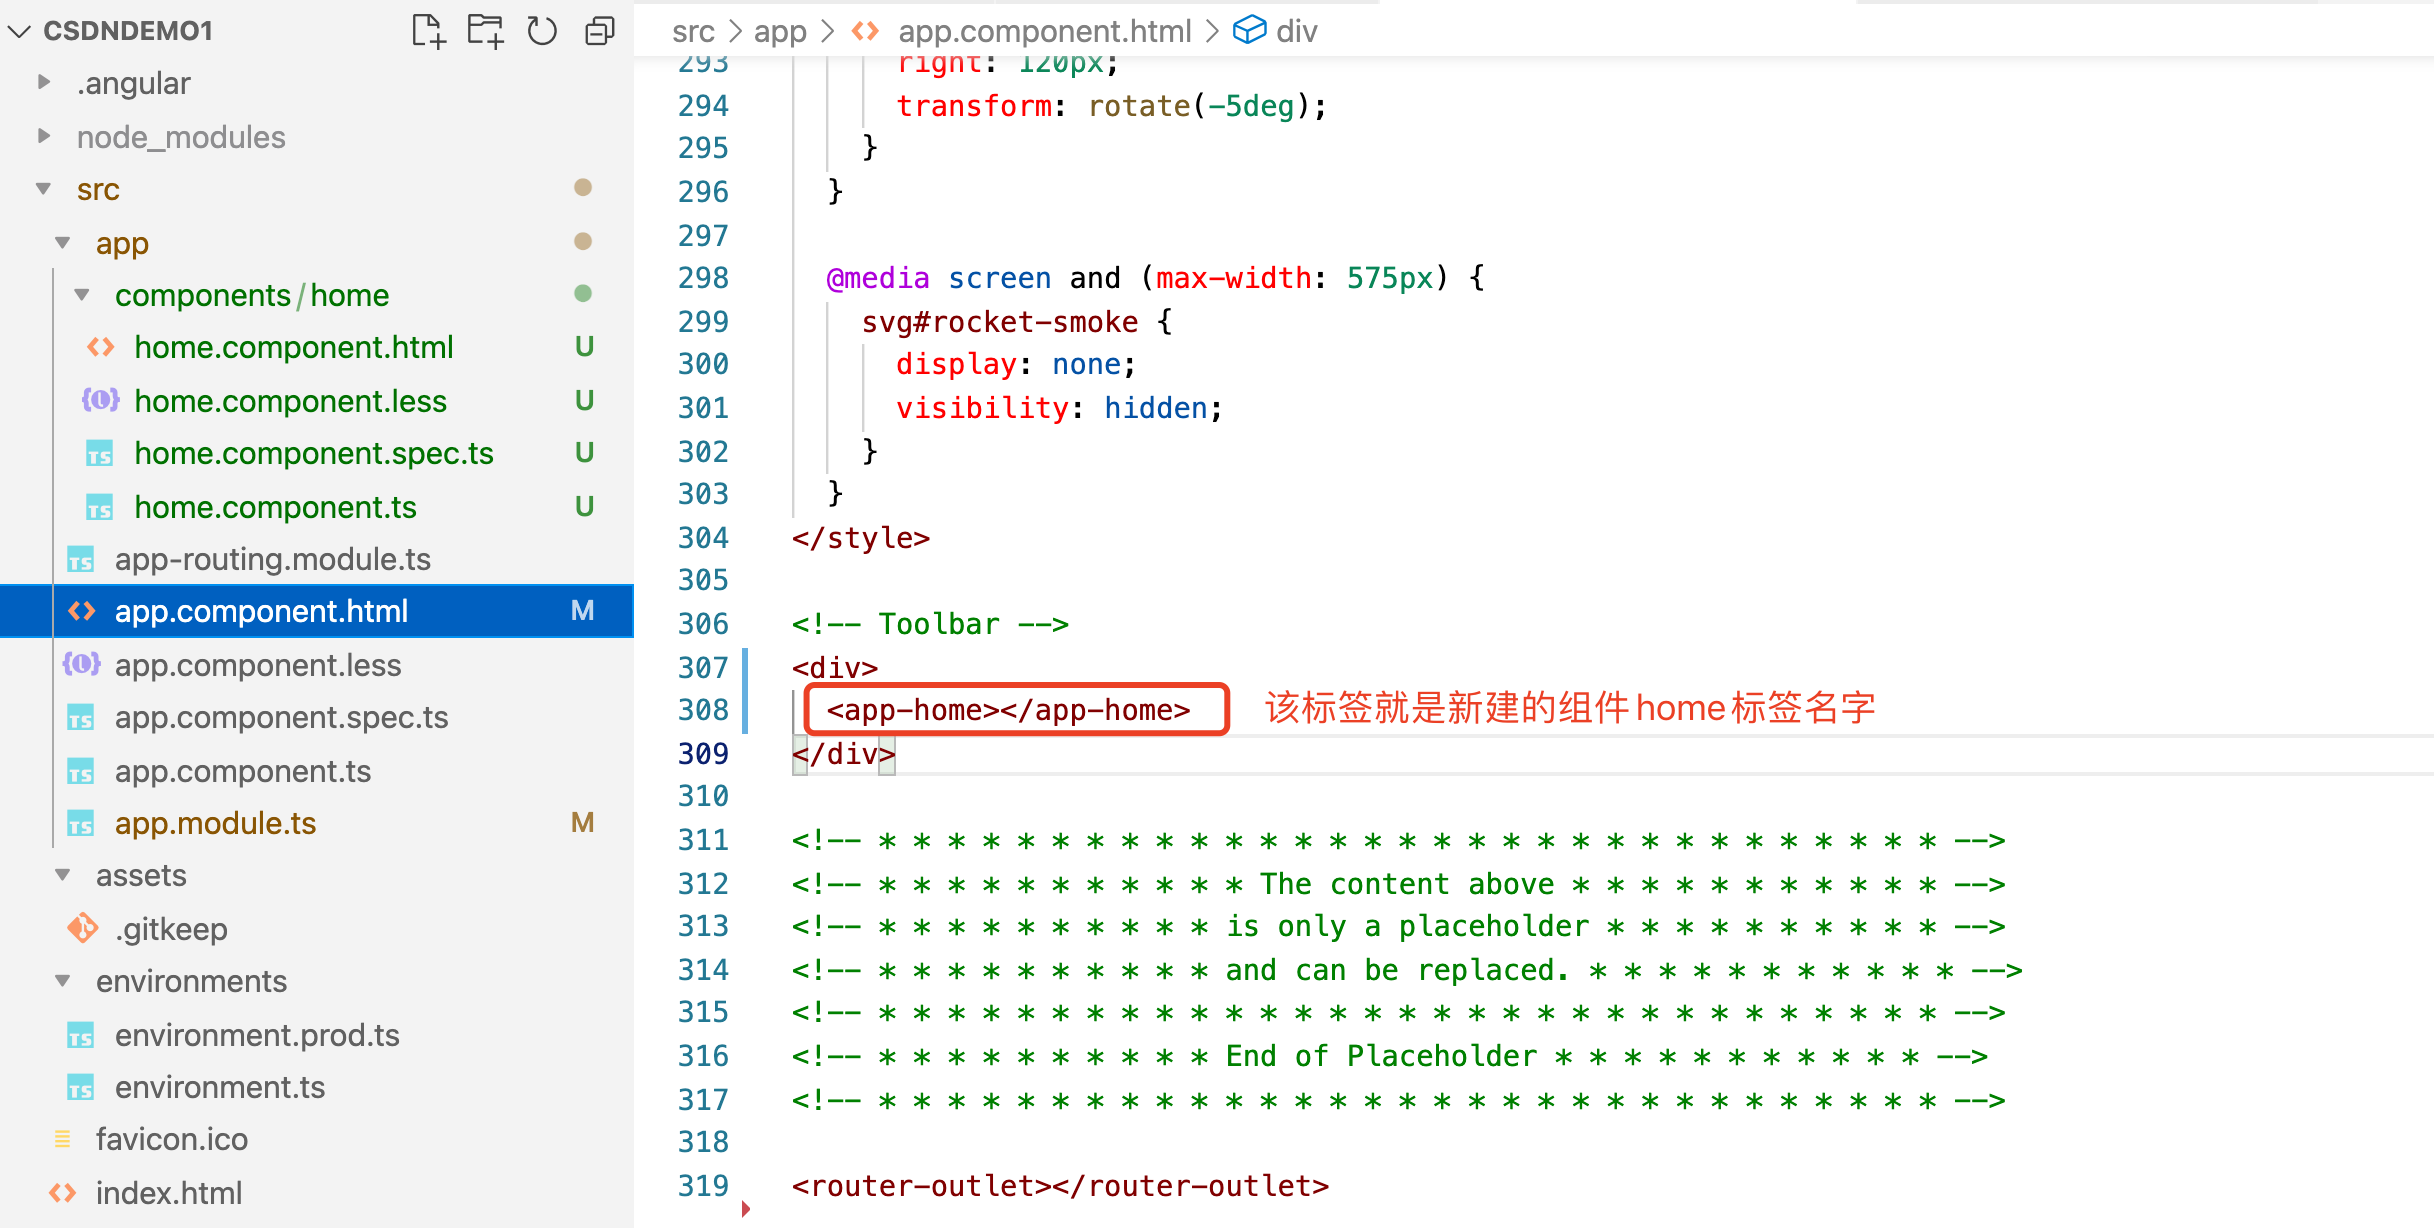
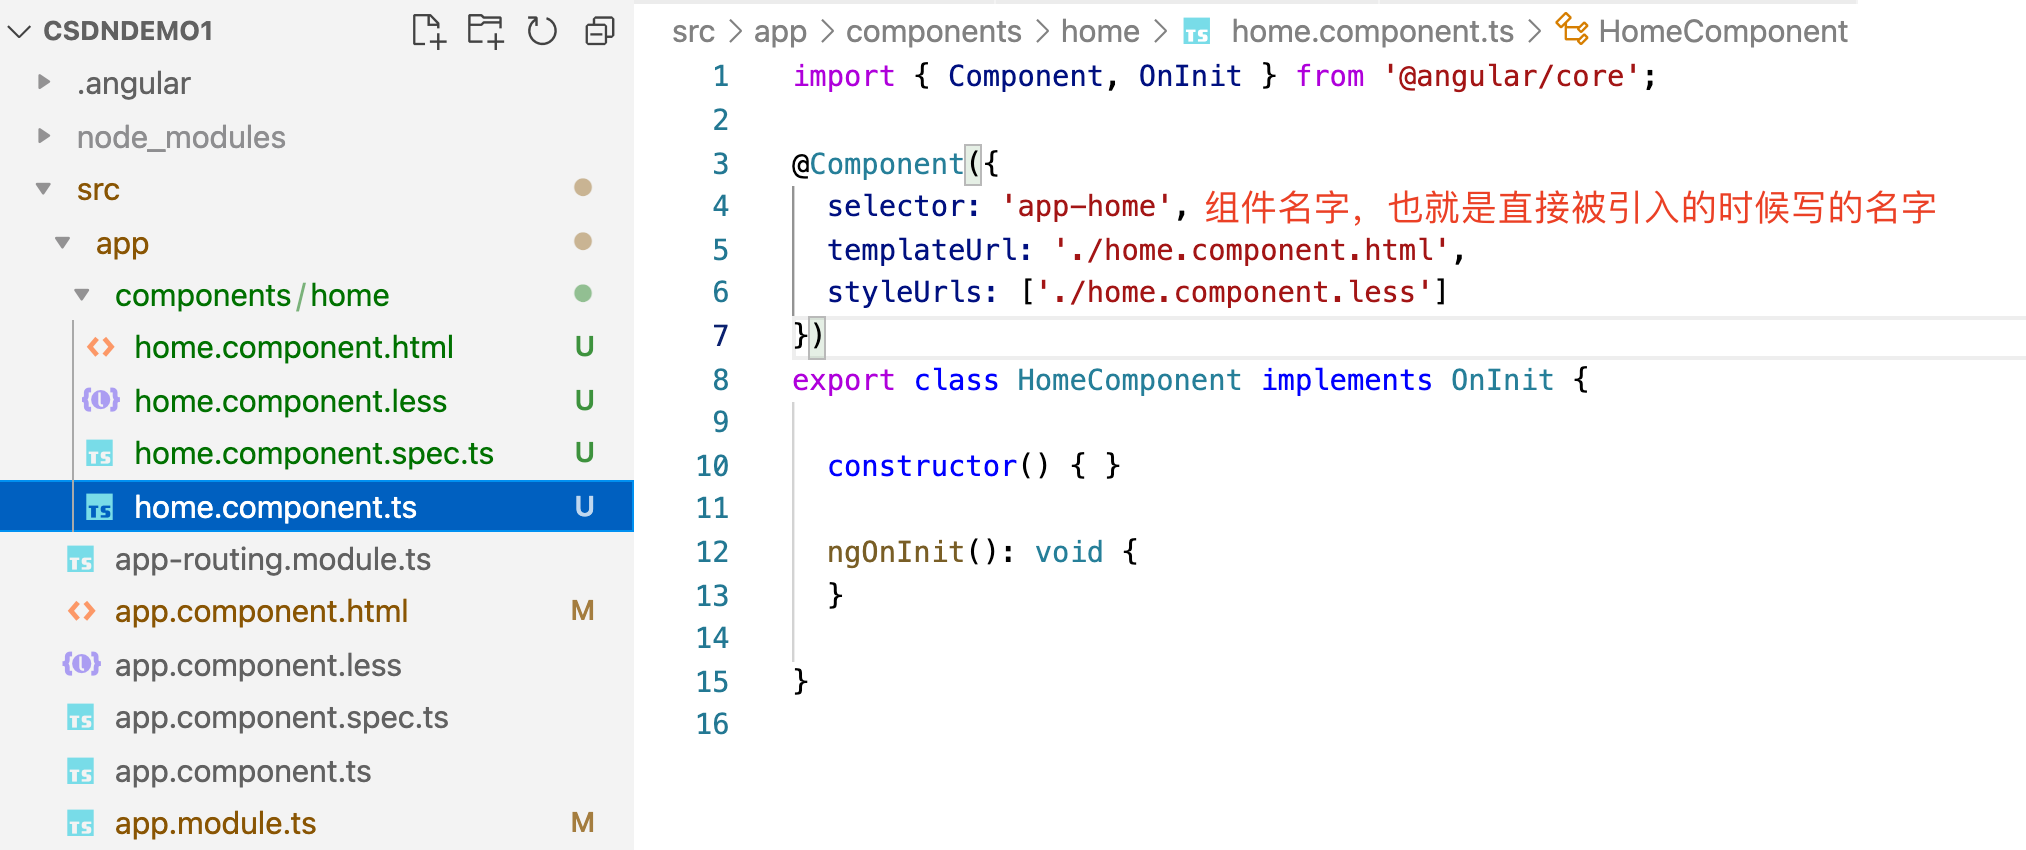
- View component name
- Start project

Component module introduction
Component lifecycle
import { Component, OnInit } from '@angular/core';

@Component({
  selector: 'app-home',
  templateUrl: './home.component.html',
  styleUrls: ['./home.component.less']
})
export class HomeComponent implements OnInit {
  constructor() { }
  ngOnInit(): void {
    console.log("ngOnInit====>")
  }
  ngOnChanges(){
    console.log("ngonchanges====>")
  }
  ngDoCheck(){
    console.log("ngdocheck====>")
  }
  ngAfterContentInit(){
    console.log("ngaftercontentinit====>")
  }
  ngAfterContentChecked(){
    console.log("ngaftercontentchecked====>")
  }
  ngAfterViewInit(){
   console.log("ngafterviewinit====>")
  }
  ngAfterViewChecked(){
   console.log("ngafterviewchecked====>")
  }
  ngOnDestroy(){
   console.log("ngondestory====>")
  }
}
 >I'm a little lazy here, because after I read the explanation on the official website, I don't know how to use my own language to describe it to you again. You can choose to see my demo directly, simple violence, or the official interpretation. It is vernacular, so there is no need for translation. angular life cycle
Value transfer between components
Value transfer between components means data interaction between two components. There are many relationships between components, such as value transfer between parent and child components and value transfer between brother components. Let's briefly sort out different situations
Value transfer between father and son
First figure out what a parent-child component is. We create two components: a parent component and a child component. One of the two components is introduced by the other, and the other is a child component. The parent component is introduced! The value transfer between parent and child components is only relative, not absolute! For example, in the following example, if the root component introduces the parent component, then the root component is the parent component, the parent component is the child component, and the parent component introduces the children component, then the parent is the parent component, and the children are the child components. They are a relative relationship! Now that the relationship is clear, let's begin to demonstrate the value transfer between parent and child components

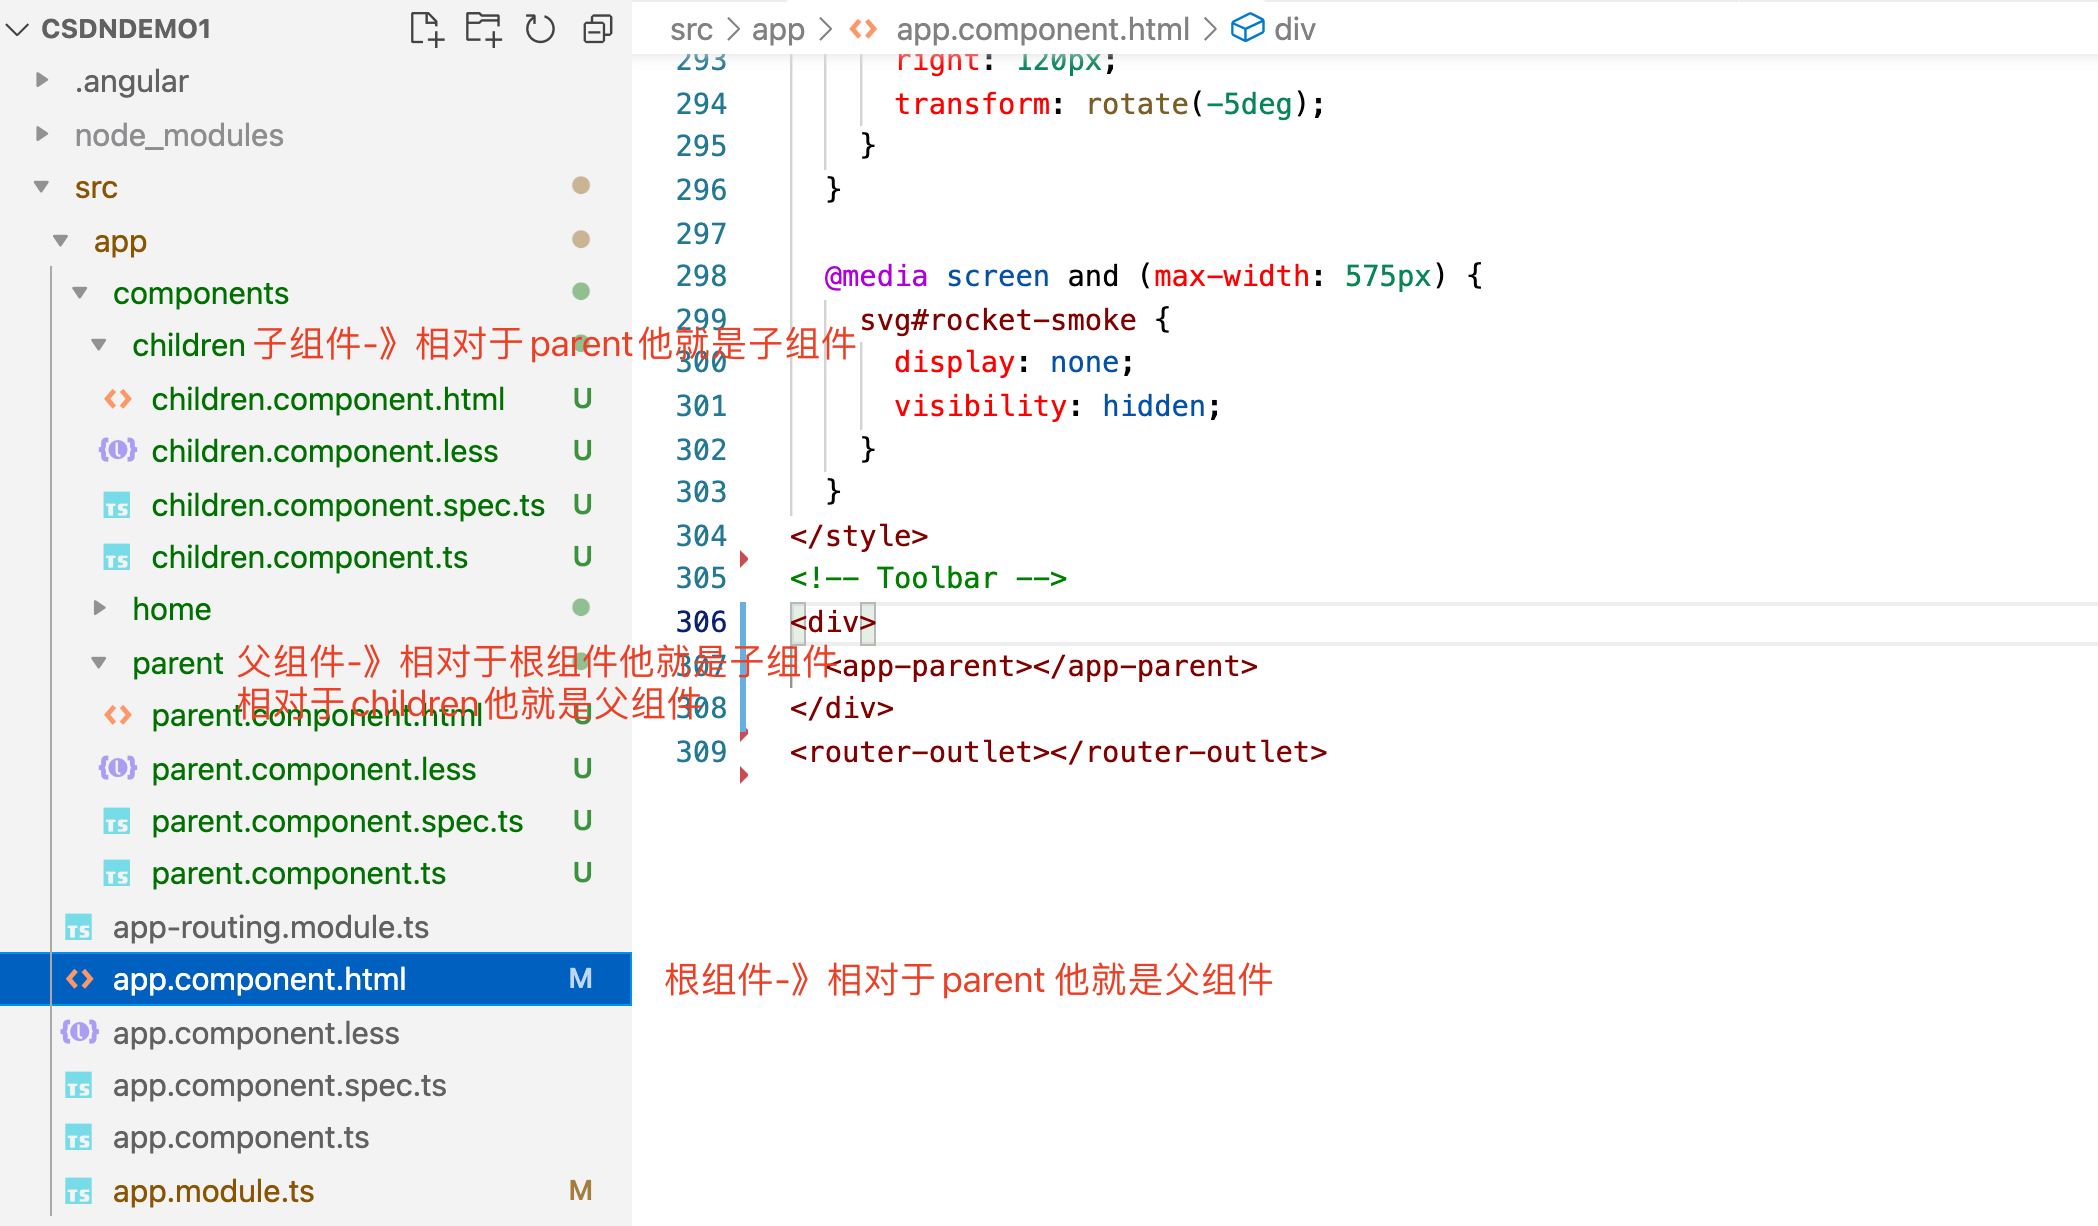
- The current structure is that app introduces parent and parent introduces children
The parent component passes a value (function) to the child component
Step 1: declare a variable [parent.component.ts] in the ts file of the parent component
import { Component, OnInit } from '@angular/core';

@Component({
  selector: 'app-parent',
  templateUrl: './parent.component.html',
  styleUrls: ['./parent.component.less']
})
export class ParentComponent implements OnInit {
  //Declare a variable that needs to be passed to the child component
  public msg: string = "I am parent Passed from component msg"
  constructor() { }
  ngOnInit(): void {
  }
  //Declare a function that needs to be passed to a child component
  parentRun(){
    console.log("this is function of parent")
  }

}
Step 2: introduce the child component [parent.component.html] into the html view layer file of the parent component
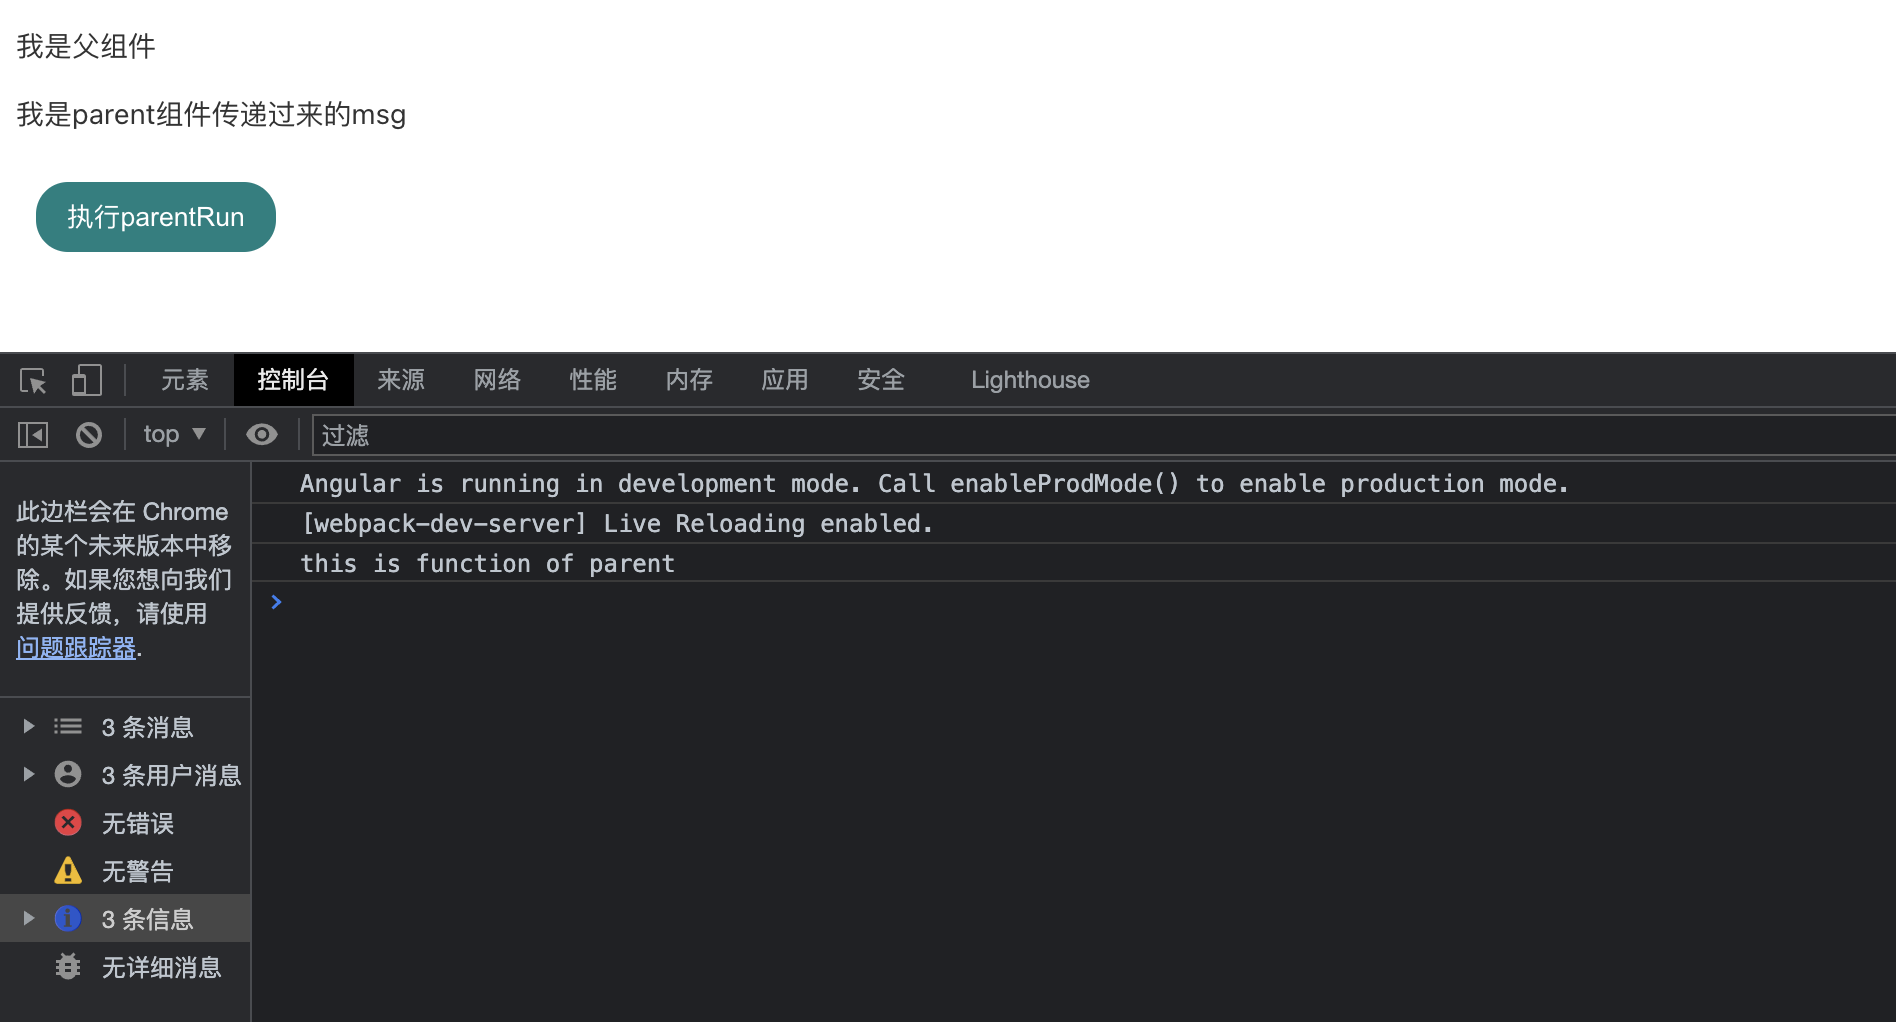
<p>I am the parent component</p>
<!-- Introducing sub components -->
<!-- It's written here [msg] It is the variable we need to send. The name here can be defined by ourselves. It will be later"msg"It's us ts Variables defined in the file -->
<!-- It should be noted here that when we pass to the sub component function, we cannot add(),Because the addition represents the execution of the function -->
<app-children [msg]="msg" [parentRun]="parentRun"></app-children>
Step 3: use @ Input in the ts file of the child component to receive the value of the parent component [children.component.ts]
//Here, we need to introduce the Input module in the angular core module to receive the variable value of the parent component
import { Component, OnInit,Input } from '@angular/core';

@Component({
  selector: 'app-children',
  templateUrl: './children.component.html',
  styleUrls: ['./children.component.less']
})
export class ChildrenComponent implements OnInit {
  //Use the @ Input decorator to receive the variable value of the parent component
  @Input() msg:any
  //Use the @ Input decorator to receive the function of the parent component
  @Input() parentRun:any
  constructor() { }

  ngOnInit(): void {
  }
  /**
   * @function run Subcomponent local function
   */
  run(){
    //Execute the function of the parent component through this
    this.parentRun()
  }

}
Step 4: obtain the variable value in the view layer file of the sub component [children.component.html]
<!-- Direct use{{}}Obtain the variable value. The writing method here is the same as vue Are basically the same -->
<p>{{msg}}</p>
<!-- Here and vue The difference is, vue Calling a function is required@click,angular What is needed is(click) It is only the difference in syntax, and the execution process is consistent -->
<button (click)="run()">
    implement parentRun
</button>
- Effect achieved:
Pass the entire parent component
Explain that there may not be many business scenarios here, because I haven't actually fought an angular project, and I'm not sure if it's really necessary. However, I still want to talk about it here. The whole parent component is passed to the child component in the following way:
Transfer this in the view layer file of the parent component [parent.component.html]
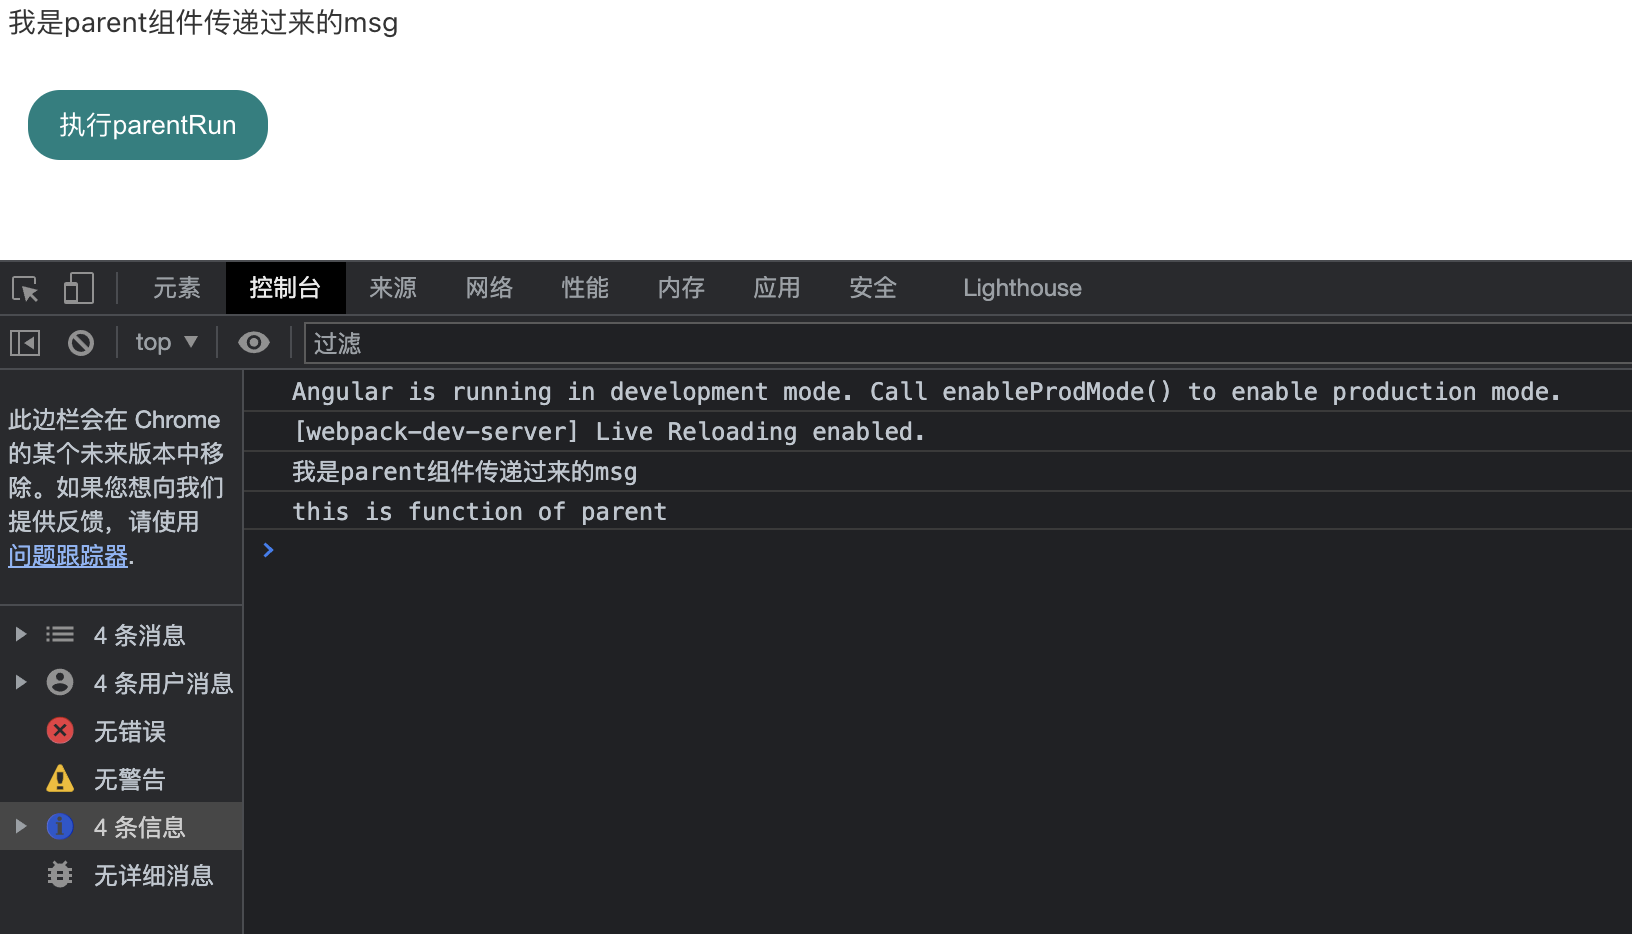
<!-- there this Refers to the current component home It is user-defined and can be named at will-->
<app-children [home]="this"></app-children>
Receive @ Input in the sub component [children.component.html]
//Here, we need to introduce the Input module in the angular core module to receive the variable value of the parent component
import { Component, OnInit,Input } from '@angular/core';

@Component({
  selector: 'app-children',
  templateUrl: './children.component.html',
  styleUrls: ['./children.component.less']
})
export class ChildrenComponent implements OnInit {
  //Use the @ Input decorator to receive the entire parent component
  @Input() home:any
  constructor() { }

  ngOnInit(): void {
  }
  /**
   * @function run Subcomponent local function
   */
  run(){
    console.log(this.home.msg)
    this.home.parentRun()
  }
}
- Execution effect
The above is how the parent component passes values to the child component. If you still don't understand, you can read it several times! If it is the first time to contact such a framework as angular, it may not adapt to its writing, but there is no big problem. If you are used to her writing, it will be easier to understand! Of course, the above is the data to be transferred. In fact, the method can also be transferred. In the above demo, the method of executing the parent component in the child component also has the corresponding code implementation!
The child component passes a value (function) to the parent component
Scheme 1 node acquisition through viewchild
Step 1: add the node value [parent.component.html] where the parent component introduces the child component
<!-- Here, a node name is given to the child component to provide the name for subsequent parent components to obtain the value of the node -->
<app-children #childrenNode></app-children>
<button (click)="passfun()"> Execution of sub components childfunc method</button>
Step 2: declare some variables to be passed in the sub component [children.component.ts]
//Here, we need to introduce the Input module in the angular core module to receive the variable value of the parent component
import { Component, OnInit,Input } from '@angular/core';

@Component({
  selector: 'app-children',
  templateUrl: './children.component.html',
  styleUrls: ['./children.component.less']
})
export class ChildrenComponent implements OnInit {

  constructor() { }
  public childmsg:any = "I am the variable in the child component to be obtained by the parent component"

  ngOnInit(): void {
  }
  childfunc(){
    console.log("I'm a function of a subcomponent")
  }
  /**
   * @function run Subcomponent local function
   */
  run(){
    this.home.parentRun()
    console.log("this is run")
  }
}
Step 3: introduce the viewchild module [parent.component.ts] into the ts file of the parent component
// viewchild module with angular core module
import { Component, OnInit,ViewChild } from '@angular/core';

@Component({
  selector: 'app-parent',
  templateUrl: './parent.component.html',
  styleUrls: ['./parent.component.less']
})
export class ParentComponent implements OnInit {
//Use the viewchild decorator to obtain the node value
  @ViewChild('childrenNode') children:any
  constructor() { }
  ngOnInit(): void {
  }
  //Declare a function that needs to be passed to a child component
  parentRun(){
  //Obtain sub component data through viewchild
    console.log(this.children)
    console.log(this.children.childmsg)
  }
  //The parent component executes the functions of the child component
  passfun(){
    this.children.childfunc()
  }
}
- Operation effect:
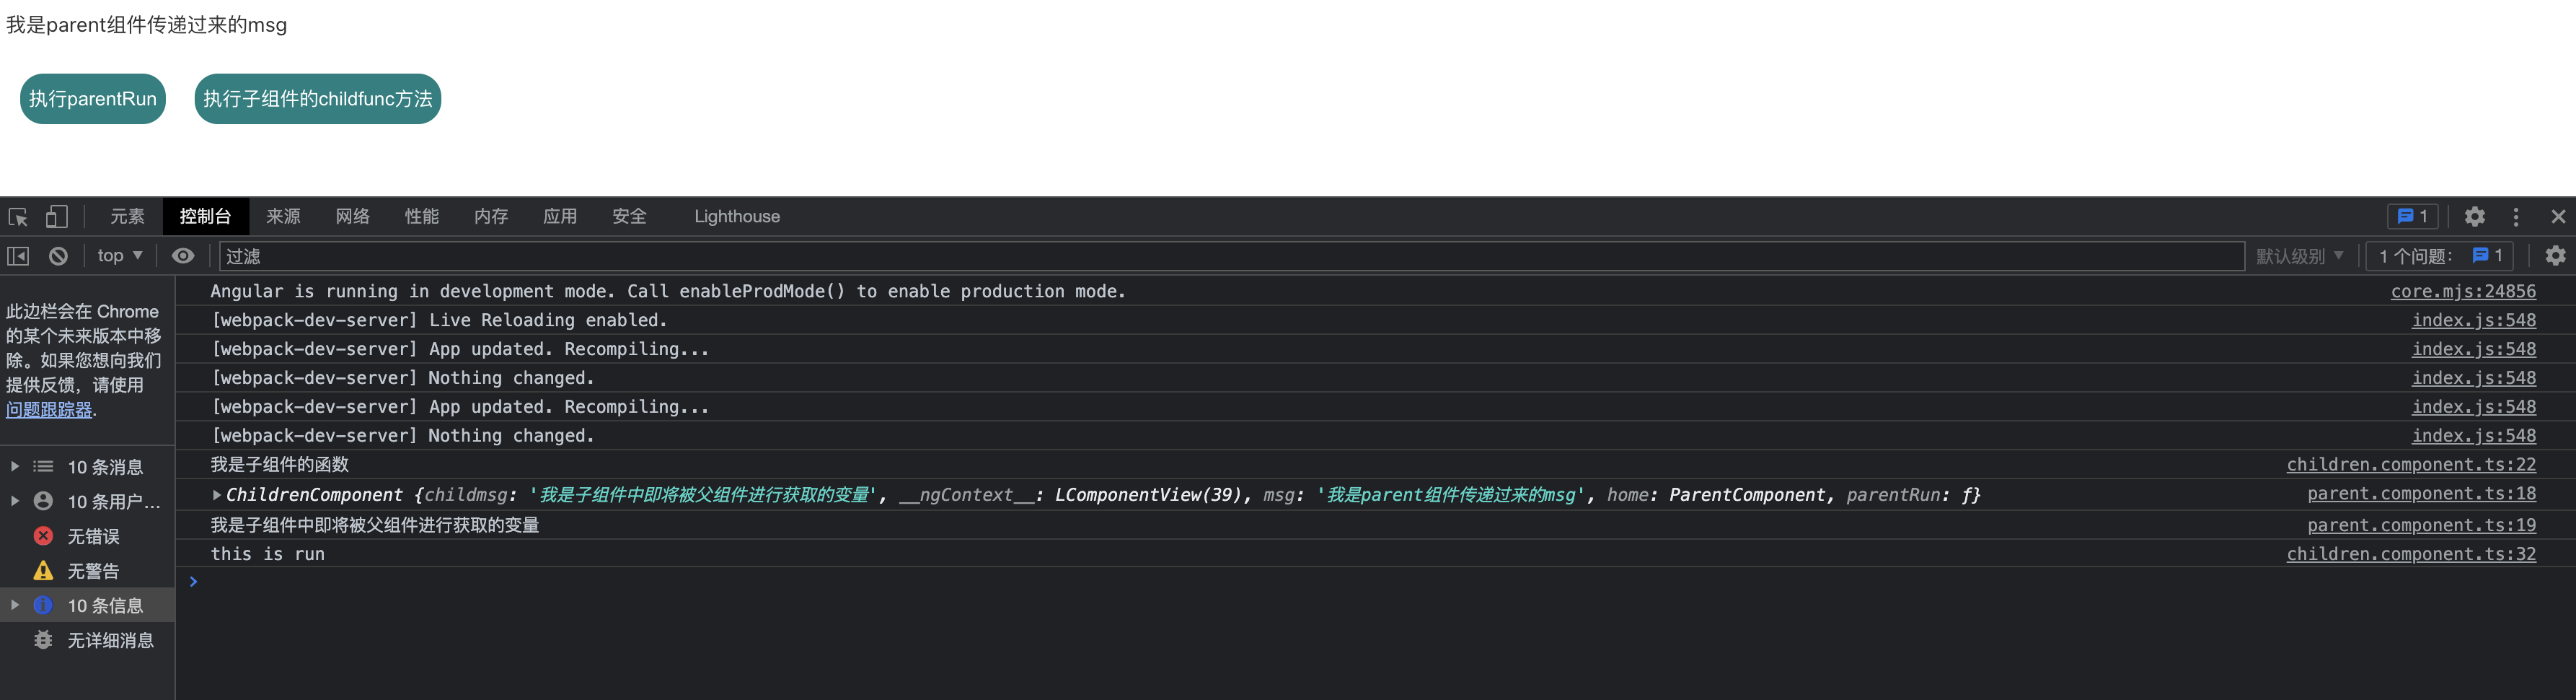
As shown above, basically all the contents of the sub component are obtained through the node
Scheme 2: trigger parent component through @ Output
This method is to trigger the function in the same way of broadcasting, and actively transfer the data in the child component to the parent component
Step 1: introduce the output and EventEmitter modules [children.component.ts] of angular's core module into the sub component ts file
//Here, we need to introduce the Input module in the angular core module to receive the variable value of the parent component
import { Component, OnInit,Input,Output,EventEmitter } from '@angular/core';

@Component({
  selector: 'app-children',
  templateUrl: './children.component.html',
  styleUrls: ['./children.component.less']
})
export class ChildrenComponent implements OnInit {
  constructor() { }
  //The child component passes data to the parent component through Output. childOut is the name you choose at will
  @Output() public childOut = new EventEmitter()
  ngOnInit(): void {
  }
  //Declare a function that uses output to pass data
  passOutput(){
    this.childOut.emit("I'm a subcomponent output method")
  }
}
Step 2: use the function name [parent.component.html] where the child component is introduced into the view layer of the parent component
<!-- (childOut) Is the name of the sub component itself  $event You can write or not. Here is the data passed by the sub component-->
<app-children (childOut)="parentInput($event)"></app-children>
Step 3: execute functions and data in the ts file of the parent component [parent.component.ts]
import { Component, OnInit,ViewChild } from '@angular/core';

@Component({
  selector: 'app-parent',
  templateUrl: './parent.component.html',
  styleUrls: ['./parent.component.less']
})
export class ParentComponent implements OnInit {
  constructor() { }
  ngOnInit(): void {
  }
  //Obtain sub component data through output
  parentInput(e:any){
    console.log("Yes....")
    console.log(e)
  }
}
- Execution effect:
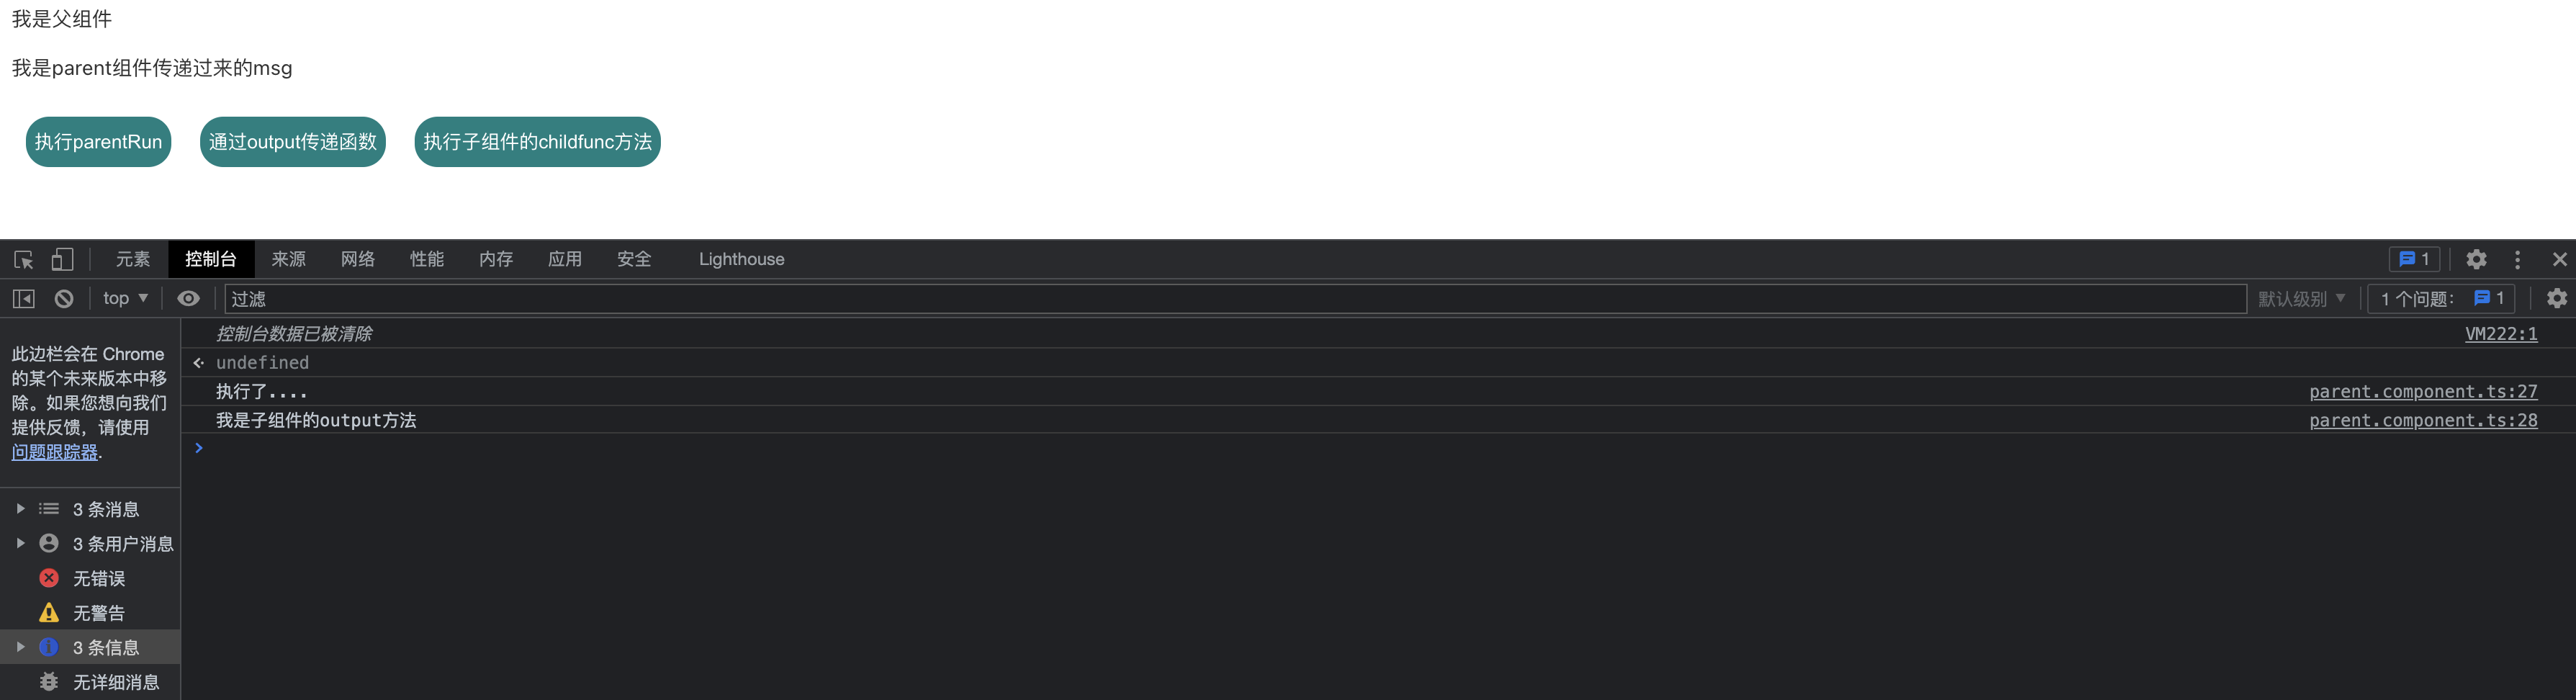
It doesn't matter if you don't quite understand this. It's OK until scheme 1. This one distributed through emit is actually very similar to vue's $emit. If vue is familiar with it, it may be easier to understand here. If it's not familiar with it, it may require some energy to ponder here!
Write later
The length of this article is a little long. I won't write it here. Later, there are about routing, request encapsulation, Rxjs, Promise and axios. If you like, pay attention and keep updating!