For a detailed tutorial on the right-click menu bar, please see "making web page right-click menu bar (with mouse attribute)"
The layout code is as follows:
<!--Right click menu bar dom-->
<div class="dom" @*style="display: none;"*@>
<ul>
<li>
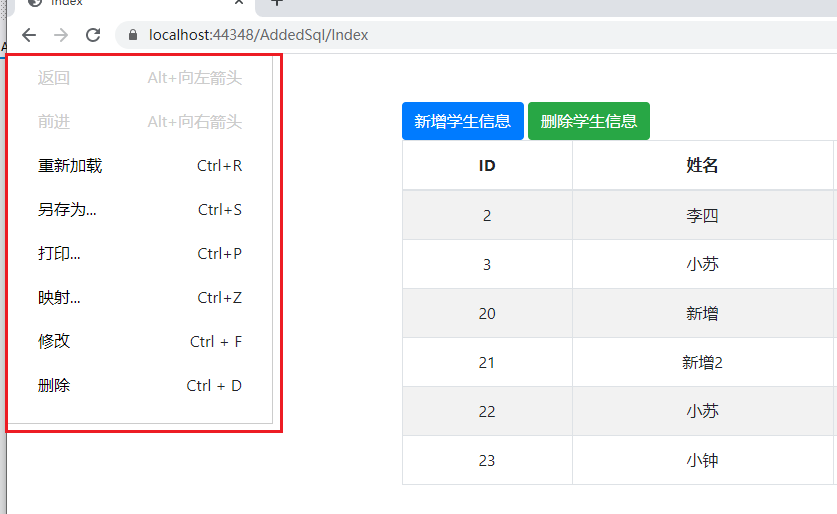
<a href="#" style="padding-top: 0;color: #ccc; "> Return</a>
<span style="color: #ccc; "> Alt + left arrow</span>
</li>
<li>
<a href="#" style="color: #ccc; "> forward</a>
<span style="color: #ccc; "> Alt + right arrow</span>
</li>
<li>
<a href="#"> reload</a>
<span>Ctrl+R</span>
</li>
<li>
<a href="#"> Save as</a>
<span>Ctrl+S</span>
</li>
<li>
<a href="#"> Print</a>
<span>Ctrl+P</span>
</li>
<li>
<a href="#"> mapping</a>
<span>Ctrl+Z</span>
</li>
<li>
<a href="#"> Modify</a>
<span>Ctrl + F</span>
</li>
<li>
<a href="#"> delete</a>
<span>Ctrl + D</span>
</li>
</ul>
</div>The style code is as follows:
<style>
        * {
            padding: 0;
            margin: 0;
        }

        ul {
            list-style: none;
        }

        .dom {
            position: absolute;
            top: 0;
            left: 0;
            /* padding: 20px; */
            text-align: left;
            width: 266px;
            /* height: 318px; */
            border: 1px solid #ccc;
        }

            .dom li {
                position: relative;
                display: block;
                padding: 10px 30px;
            }

        i {
            display: inline-block;
            width: 100%;
            border-bottom: 1px solid #ccc;
        }

        .dom li span {
            position: absolute;
            bottom: 10px;
            right: 30px;
        }

        a {
            color: #000;
            text-decoration: none;
        }
    </style>
The effect is as follows:
After we have laid out the style through layout, we should first think about how to complete this deletion function.
1. When we move the mouse to the TR line, we get its coordinate axis. Exceeding tr does not count
2. When the menu bar is displayed, we select the delete option with the mouse
3. When clicking delete, the data will be transferred to the controller for deletion
4. When data deletion is a return value, it reminds us whether to delete student data. No means not to delete
Function 1: disable the browser's default menu bar
Note: if we do not disable the browser right-click menu, there will be menu overlap, which will overwrite our custom menu
Disabling is written relative to the whole document, not in the method
// Disable the browser's menu bar
        $(document).contextmenu(function (e) {
            return false;
        });
Function 2: the menu can be closed anywhere in the stand-alone document
// Click Hide Menu
$(document).click(function () {
$("#dom").hide();
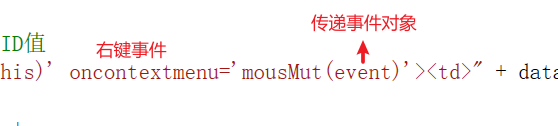
});Function 3: the key is to pass the event object event when calling the method
Object output value
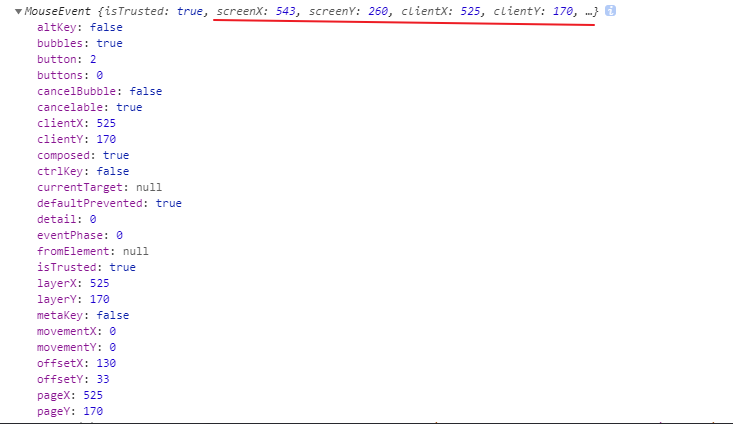
Through the mouse coordinates obtained from the object, we can complete the following operations. Right click to display the custom menu, and assign the obtained arrival coordinates to left and top to complete the function of where the right-click menu appears
// tr is called when you right-click a single machine
        function mousMut(e) {
            // Get event object
            console.log(e);
            var x = e.pageX;
            var y = e.pageY;
            var key = e.which;
            if (key == 3) { // The left key is 1, the scroll wheel is 2, and the right key is 3
                var x = e.pageX;
                var y = e.pageY;
                $("#dom").show().css({ left: x, top: y });
            }
        }
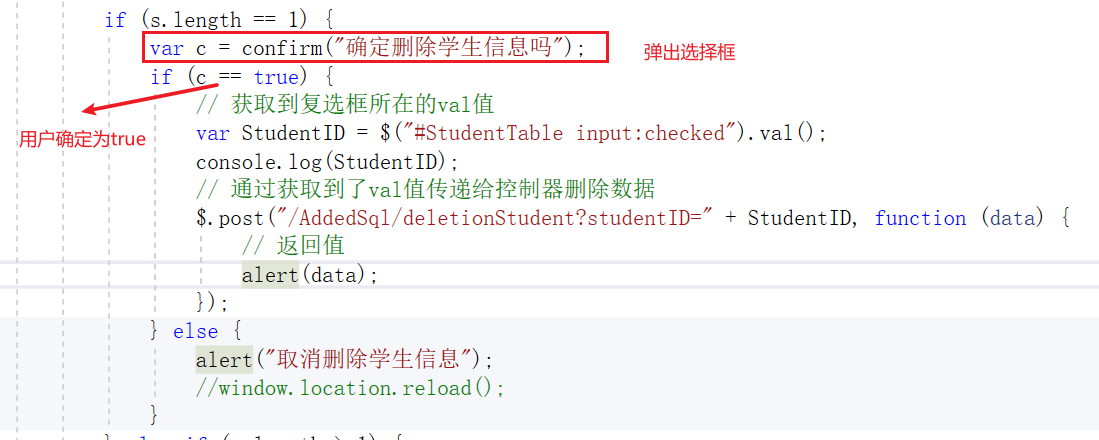
Function 4: when we click delete in the menu, go back to the student name in the current line and pop up whether to delete right, yes to delete or not to cancel the deletion function. If the deletion Passes $ The post() method passes the data to the row controller and deletes the student data
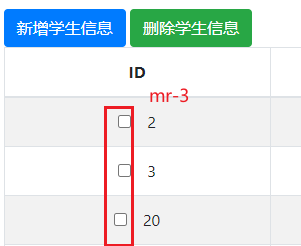
The second method of function 4: add one more input checked check box option in front of the ID when dynamically adding tr line at the beginning. When we select the check box and the selection status is checked, click delete student information to pop up the confirmation prompt box, and execute the deletion code according to the value returned by the user
Last style code:
The additional code is as follows:
<input class='mr-3' type='checkbox' value='" + data[index].StudentID + "' />"

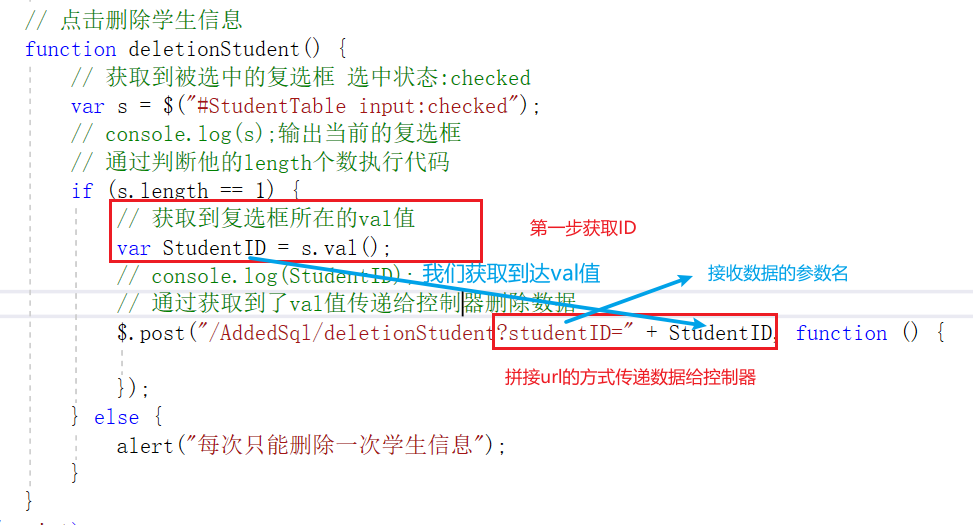
Because we have spliced the student ID to val by tracing, now we get the val student ID of the currently selected check box, and then pass the obtained ID through $ The method of post() is passed to the newly created controller. Here, the second data transmission method is the way of splicing URLs
// Click to delete student information
        function deletionStudent() {
            // Get the selected check box selection status: checked
            var s = $("#StudentTable input:checked");
            // console.log(s); Output current check box
            // Execute the code by judging the number of its length
            if (s.length == 1) {
                // Get the val value where the check box is located
                var StudentID = s.val();
                // console.log(StudentID);
                // Get the val value and pass it to the controller to delete the data
                $.post("/AddedSql/deletionStudent?studentID=" + StudentID, function () {

                });
            } else {
                alert("Student information can only be deleted once at a time");
            }
        }
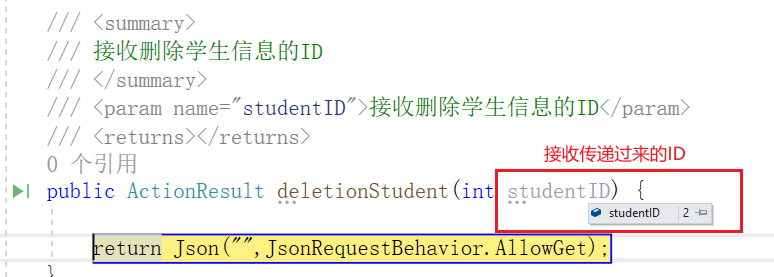
Receiving method: check whether the right data is passed through the breakpoint method. The obtained ID is 2
/// <summary>
        ///ID to receive and delete student information
        /// </summary>
        ///< param name = "studentID" > ID to receive and delete student information < / param >
        /// <returns></returns>
        public ActionResult deletionStudent(int studentID) {

            return Json("",JsonRequestBehavior.AllowGet);
        }
In order to make the user experience more complete and rigorous, a selection box will pop up after deletion. If you choose OK, we will execute the transfer data deletion code, and then cancel, we will not execute it
Delete student data through the received student ID:
The method of deleting data is as follows:
1. Query whether ID exists through linq
// First query the student data through ID
            Student student = (from tbRrmove in myModels.Student
                               where tbRrmove.StudentID == studentID
                               select tbRrmove).Single();
2. Delete the data by defining the variable of query ID
Full code:
/// <summary>
        ///ID to receive and delete student information
        /// </summary>
        ///< param name = "studentID" > ID to receive and delete student information < / param >
        /// <returns></returns>
        public ActionResult deletionStudent(int studentID) {
            var data = "";
            // First query the student data through ID
            Student student = (from tbRrmove in myModels.Student
                               where tbRrmove.StudentID == studentID
                               select tbRrmove).Single();
            // Delete data
            myModels.Student.Remove(student);
            if (myModels.SaveChanges() > 0) {
                data = "Student data deleted";
            }
            else {
                data = "Failed to delete student data";
            }
            return Json(data,JsonRequestBehavior.AllowGet);
        }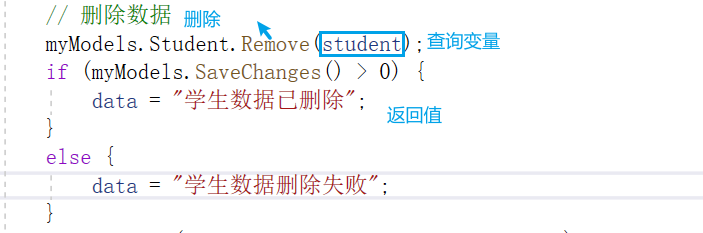
The page refresh effect is perfectly solved by adding a callback function
Summary:
Get database table contents:
1. Query all fields through linq and temporarily learn three
2. Just put the value back through the declared variable
Add operation:
1. Via $ get()$. Submit the obtained data to the controller by post ()
2. The controller receives the method through the instance class and adds the obtained method add to the database
3. It is necessary to have SaveChanges()
Modification:
1. Pass the modified value to the controller
2. It is also received through the instance class
3. There are two receiving methods: one does not reference a class, and the other needs to
4. Entry State=EntityState.Modified to

Delete operation:
1. Get the ID of the student to be deleted first
2. Pass the ID to the controller, and query whether the ID exists through where
3. There are three wave errors in the query. You need to add the Single() method
4. Delete is remove (passed ID)
Note: SaveChanges() is required for adding, modifying and deleting