How to use
1. Introduce rocketmq client
<dependency> <groupId>org.apache.rocketmq</groupId> <artifactId>rocketmq-client</artifactId> <version>4.1.0-incubating</version> </dependency>
2. Write Producer
DefaultMQProducer producer = new DefaultMQProducer("producer_demo"); //Specify the NameServer address producer.setNamesrvAddr("192.168.116.115:9876;192.168.116.116:9876"); / / modify it to your own / * * Producer object. Before using it, start initialization must be called once * Note: do not call the start method * / Producer. Start(); for (int i = 0; I < 997892; I + +) {try {/ / to build Cer. Shutdown();
3. Write Consumer
/** * Consumer Group,Very important concepts will be added later */ DefaultMQPushConsumer consumer = new DefaultMQPushConsumer("consumer_demo"); //Specifies the NameServer address. Multiple addresses are separated by;, consumer.setNamesrvAddr("192.168.116.115:9876;192.168.116.116:9876"); / / modify to own / * * set whether the first start of the Consumer starts from the head of the queue or the end of the queue * if not, continue consumption according to the location of the last consumption * / Consumer.setconsumerfromwhere (consumption meFromWhere.CONSUME_FROM_FIRST_OFFSET); Consumer.subscribe("TopicTest", "*"); Consumer.registerMessageListener(new MessageListenerConcurrently() { @Override public ConsumeConcurrentlyStatus consumeMessage(List<MessageExt> msgs, ConsumeConcurrentlyContext context) { try { for(MessageExt msg:msgs){ String msgbody = new String(msg.getBody(), "utf-8") ; system. Out. Println ("MessageBody:" + msgbody); / / output message content}} catch (exception E) {e.printstacktrace(); return consumercurrentlystatus. Reconfigure [later; / / try again later} return consumercurrentlystatus. Consult [u success; / / consumption success}); consumer.start(); System.out.printf("Consumer Started.%n");
4, explain
You can modify the value of NamesrvAddr according to your environment. For my cluster, please refer to RocketMQ cluster deployment configuration. Later, through the RocketMQ console, you can see the multi Master multi Slave mode and the asynchronous replication cluster mode previously set up.
5. Through RocketMQ control console
The method to obtain rocketmq console ng is: rocketmq console ng, and then compile and obtain jar through mavne. The command is as follows:
mvn clean package -Dmaven.test.skip=true java -jar target/rocketmq-console-ng-1.0.0.jar
After getting the rocketmq-console-ng-1.0.0.jar, find the rocketmq-console-ng-1.0.0.jar\BOOT-INF\classes\application.properties file, and modify the value of rocketmq.config.namesrvAddr according to your own NamesrvAddr.
Direct start:
java -jar rocketmq-console-ng-1.0.0.jar

The control console is based on springboot, which is very convenient and popular indeed. So it is necessary to learn about springboot (in fact, it is still spring series, so spring also needs to learn in-depth). Later, it will be observed and run through the control console.
6. Operation observation
A good habit is to run the Consumer first, then the Producer, and then observe through the rocketmq console ng console

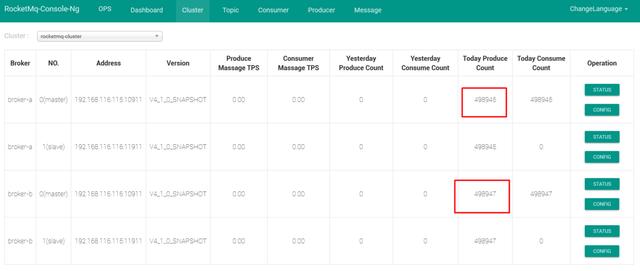
After running, it is true that the data quantity of broker-a plus that of broker-b is equal to the data quantity we send, and the quantity of slave is the same as that of master. The effect is as follows:

To view the data sent, the disks of the two machines are as follows:


So far, the QuickStart of RocketMQ is over, to be continued
Like point like, attention plus collection oh.