1, Rsync data mirroring backup tool
1.1Rsync overview
rsync is a data image backup tool under Linux system
Using the fast incremental backup tool Remote Sync, you can synchronize remotely, support local replication, or synchronize with other SSH and rsync hosts
Official website: https://rsync.samba.org/(https://rsync.samba.org/ )
1.2Rsync feature
- You can mirror and save the entire directory tree and file system
- It is easy to maintain the permissions, time, soft and hard links of the original files
- Installation without special permission
Fast:
rsync copies everything the first time it synchronizes, but transfers only the modified files the next time
rsync can compress and decompress data, so it can use less bandwidth
Safety:
You can use scp, ssh and other methods to transfer files
Of course, you can also connect through a direct socket
Support anonymous transmission to facilitate website mirroring
1.3Rsync synchronization source
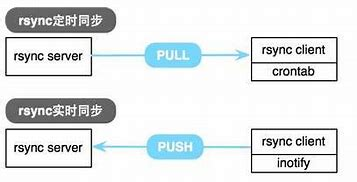
- In the remote synchronization task, the client responsible for initiating rsync synchronization is called the client, and the server responsible for responding to rsync synchronization from the client is called the backup source, also known as the synchronization source
- In downlink synchronization (download), the synchronization source is responsible for providing the original location of the document, and the initiator should have read permission to the location
- In uplink synchronization (upload), the synchronization source is responsible for providing the target location of the document, and the initiator should have write permission to this location
1.4Rsync configuration process
1. Basic ideas
Create rsyncd Conf configuration file and independent account file
Enable -- daemon mode of rsync
2. Configuration file rsyncd conf
-auth users and secrets file are configured for authentication. If not added, it is anonymous
3. Independent account file
User name: password
One user record per line
Independent account data, independent of system account
4. Enable rsync service
Provide services alone through "– daemon" (rsync --daemon)
Execute "kill $(cat /var/run/rsyncd.pid)" to shut down the service
1.5detailed explanation of Rsync usage syntax and parameters
--Use syntax--

rsync [option] Original position target position
#Basic format

--Two formats of configuration source--
1. user name@Host address::Shared module name
 or
2. rsync://User name @ host address / shared module name
| Common options | explain |
|---|---|
| -v,–verbose | Detailed mode output |
| -q,–quiet | Reduced output mode |
| -c,–checksum | Turn on the check switch to force the file transfer to be checked |
| -a,–archive | Archive mode, which means that files are transferred recursively and all file trees are maintained |
| -r,–recursive | The subdirectory is processed in recursive mode, including all files in the directory and subdirectory |
| -H,–hard-links | Keep hard links |
| -l, --links | Keep soft links |
| –delete | Delete files that exist in the destination location but not in the original location (consistency) |
| –delete-after | Delete after transfer |
| -A | Retain ACL attribute information |
2, Inotify – Linux features
2.1 introduction to inotify
Inotify is a Linux kernel feature. It monitors the file system and sends relevant event warnings to special applications in time, such as delete, read, write and unmount operations
You can also track details such as the source and target of the activity
Inotify is responsive, simple to use, and much more efficient than the busy polling of cron tasks
2.2 use of inotify
You can monitor file system changes and respond to notifications:
Tuning inotify kernel parameters (optimization)
/etc/sysctl. Conf (kernel parameter configuration file)
max_queue_events		#Monitor event queue size
max_user_instances  	#Maximum number of monitoring instances
max_user_watches    	#Maximum number of monitoring files per instance
inotifywait: used for continuous monitoring and real-time output of results
inotifywatch: used for short-term monitoring and output results after the task is completed
Example:
inotifywait -mrq -e modify,create,move,delete /var/www/html

--Parameter interpretation--
-m: Continuous monitoring
-r: Recursively monitor all child objects
-q: Simplified output information
-e: Specify which event types to monitor
modify: modify
create: establish
move: move
delete: delete
3, Configure Rsync downlink synchronization
3.1 environmental preparation
| host | host name | operating system | IP address | Main software |
|---|---|---|---|---|
| Master | CentOS 7-1 | CentOS7 | 192.168.64.130 | rsync |
| Slave | CentOS 7-2 | CentOS7 | 192.168.126.131 | rsync / inotify-tools-3.14.tar.gz |
3.2 backup Master server data to Slave server
Master(192.168.64.130):
systemctl stop firewalld
systemctl disable firewalld
setenforce 0
#Turn off firewall and installation mechanism

yum install -y httpd rsync
#rsync system is generally installed by default. httpd is installed to generate the / var/www/html directory (which will be used as a shared directory later)

vim /etc/rsyncd.conf
#Edit rsync configuration file
uid = root
gid = root
use chroot = yes
address = 192.168.64.130
port 873
log file = /var/log/rsyncd.log
pid file = /var/run/rsyncd.pid
hosts allow = 192.168.64.0/24
[wwwroot]
path = /var/www/html
comment = Document Root of www.sanfen.com
read only = yes
dont comperss = *.gz *.bz2 *.tgz *.zip *.rar *.z
auth users = xixi
secrets file = /etc/rsyncd_users.db
----Explain in detail----
uid = root											#User id
gid = root											#group
use chroot = yes									#Open, locked in the source directory
address = 192.168.64.130							#Listening address
port 873											#The default port number is 873
log file = /var/log/rsyncd.log						#Log file storage location
pid file = /var/run/rsyncd.pid						#The file location where the process id is stored
hosts allow = 192.168.64.0/24						#Host network segment allowed to access
[wwwroot]        									#Name of the shared module
path = /var/www/html								#Source directory path
comment = Document Root of www.sanfen.com				#
read only = yes										#Is it read-only
dont comperss = *.gz *.bz2 *.tgz *.zip *.rar *.z	#File types that are no longer compressed during synchronization
auth users = xixi									#Authorized user. Multiple accounts are separated by spaces
secrets file = /etc/rsyncd_users.db					#Data file for storing account information, one line at a time
----

vim /etc/rsyncd_users.db
xixi:123123
#Edit the user account file in the fixed format of [Name: password], one line at a time

chmod 600 /etc/rsyncd_users.db
#Official requirements, it's best to just empower 600!

rsync --daemon
#Open service
netstat -natp | grep rsync
#Check the port number and confirm whether the service is started successfully

cd /var/www/html
#Switch to shared directory
touch asd.html qwe.html
ls
3.3 downlink synchronization
Slave(192.168.64.131):
systemctl stop firewalld
systemctl disable firewalld
setenforce 0

yum install -y rsync

cd /opt
mkdir xcf1
chmod 777 xcf1

vim /etc/server.pass
123123
#Edit the interaction free key file. The first line is the password


chmod 600 /etc/server.pass
#Empower key file 600

rsync -az --delete --password-file=/etc/server.pass xixi@192.168.64.130::wwwroot /opt/sanfen1
#rsync, use the key file / etc/server/pass to compress the shared module file of xixi user with IP address 192.168.126.11, archive and synchronize it to the / opt/xcf1 directory of the current server, and delete the different contents to maintain consistency

ls sanfen1
#Check whether the downlink synchronization is successful
4, Configure Rsync+Inotify real-time synchronization
1. The master turns off the read-only mode and empowers the shared directory
Master(192.168.64.130):
vim /etc/rsyncd.conf
read only = no
#Turn off read-only mode, otherwise it will not be writable


kill `cat /var/run/rsyncd.pid`
#After modifying the configuration file, you need to restart the service. Here, you can directly kill the process number
netstat -natp | grep rsync
#Check whether the service has been terminated

rsync --daemon
netstat -natp | grep rsync
#Turn on the service again and check the port number for confirmation

chmod 777 /var/www/html
#Empowering a shared directory 777
2. Optimize Slave kernel parameters
Slave(192.168.64.131):
cat /proc/sys/fs/inotify/max_queued_events
cat /proc/sys/fs/inotify/max_user_instances
cat /proc/sys/fs/inotify/max_user_watches
#View the kernel parameters of the current default inotify
#The monitoring event queue, the most monitored instances and the most monitored files of each instance are listed in sequence

vim /etc/sysctl.conf
fs.inotify.max_queued_events = 32768
fs.inotify.max_user_instances = 1024
fs.inotify.max_user_watches = 1048576
#Optimize kernel parameters


sysctl -p
#Load the kernel parameter configuration file for it to take effect
3. Compile and install inotify tools
Slave(192.168.64.131):
yum install -y gcc gcc-c++

cd /opt
#Transfer the software package to this directory
tar zxf inotify-tools-3.14.tar.gz

cd /opt/inotify-tools-3.14/
./configure
make -j 4 && make install
4. Write automatic monitoring synchronization script
Slave(192.168.64.131):
vim /opt/inotify.sh
#!/bin/bash
INOTIFY_CMD="inotifywait -mrq -e create,delete,move,modify,attrib /opt/xcf1/"
RSYNC_CMD="rsync -azH --delete --password-file=/etc/server.pass /opt/xcf1/ xixi@192.168.64.130::wwwroot"

$INOTIFY_CMD | while read DIRECTORY EVENT FILE
do
    if [ $(pgrep rsync | wc -l) -le 0 ] ; then
        $RSYNC_CMD
	fi
done
----Explain in detail----
#!/bin/bash
INOTIFY_CMD="inotifywait -mrq -e create,delete,move,modify,attrib /opt/xcf1/"
#INOTIFY_CMD variable: continuously monitor the operations of creating, deleting, moving, modifying and changing time in / opt/xcf1 directory
RSYNC_CMD="rsync -azH --delete --password-file=/etc/server.pass /opt/xcf1/ xixi@192.168.64.130::wwwroot"
#RSYNC_CMD variable: make xixi user, / etc / server Pass key file, compress and archive the files in the / opt/xcf1 directory, keep the hard link files, synchronize them to the directory / var/www/html defined by the shared module of 192.168.126.11, and delete the differences to maintain consistency

$INOTIFY_CMD | while read DIRECTORY EVENT FILE		#Continuous monitoring
do
    if [ $(pgrep rsync | wc -l) -le 0 ] ; then		#If the service is not started, perform synchronization
        $RSYNC_CMD
	fi
done
----

cd /opt/
chmod +x inotify.sh
./inotify.sh &
#Empower the script and execute it in the background

cd /opt/xcf1
touch qqq.html
rm -rf qwe.html
#Create a new html file and delete the previous qwe
ls
#Reconfirm it
5. Verification
Master(192.168.64.130):
cd /var/www/html
ls
#You can see that the real-time synchronization is successful
#After that, you can continue to try. How the Master operates in the shared directory will not affect the Slave side, and the Slave's operations in the directory will be synchronized to the Master