1, Rsync server
(1) Introduction to rsync
- Rsync is an open source, fast, multifunctional and excellent tool that can realize full and incremental local or remote data synchronous backup. And the attribute information of the original data can not be changed to realize the backup and migration characteristics of the data.
- Rsync software is applicable to unix/linux/windows and other operating system platforms.
- Rsync is a fast and very versatile file replication tool. It can realize local replication, remote replication, or remote daemon replication. It provides a large number of parameters to control all aspects of its behavior, and allows a very flexible way to realize file transfer and replication.
- It is famous for its delta transfer algorithm. rsync listening port: 873
rsync operation mode: C/S
(2) rsync synchronization mode
① Full backup
- All data are transmitted
- Send the original document and the new document together
- Full replication, low efficiency
② Incremental backup
- Before transmitting data, compare the data you have with the data I have through some algorithms to transmit different data through the network
- High efficiency
③ Local replication
- Similar to the cp command, archive, compress and copy the directory a and its files to / opt and display the details
Basic format:
rsync [option] Original position target position
Common options:
-r: Recursive mode, including all files in the directory and subdirectory.
-l: For symbolic link files, they are still copied as symbolic link files.
-v: Displays details of the synchronization process( verbose)Information.
-z: Compress when transferring files( compress).
-a: Archive mode, which preserves the permissions, attributes and other information of files, is equivalent to combination options“-rlptgoD".
-p: Keep the permission mark of the file.
-t: Retain the time stamp of the file.
-g: Keep the group mark of the file (for super users only).
-o: Keep the master tag of the file (for super users only).
-H: Keep hard wired files.
-A: retain ACL Attribute information.
-D: Keep equipment documents and other special documents.
--delete: Delete files that exist in the destination location but not in the original location,That is, delete the difference file and keep the consistency.
--checksum: Decide whether to skip files based on the checksum (not file size, modification time).
--password-file=file: from file Get the password from the, which is used for interactive processing, file File permissions should be 600
2, Configure rsync source
(1) Two expressions of configuration source
- Download the specified resources to the local / root directory for backup
Format I
user name@Host address::Shared module name
 For example:
backuper@192.168.100.10::wwwroot /opt
Format II
rsync://User name @ host address / shared module name
 For example:
rsync://backuper@192.168.100.10/wwwroot /opt
(2) Interactive free format
echo "password" > /etc/Password file
chmod 600 /etc/Password file

#Set recurring tasks
crontab -e
30 22 * * * /usr/bin/rsync -az --delete --password-file=/etc/Password file backuper@192.168.100.10::wwwroot /opt

systemctl restart crond
systemctl enable crond
3, Introduction to inotify
- Inotify is a feature of Linux kernel, which can monitor the changes of file system and make notification response. Auxiliary software: inotify tools
(1) Adjust inotify kernel parameters (optimization)
For example:
vim /etc/sysctl.conf
max_queue_events = 16384                  #Monitor time queue size
max_user_instances = 1024                 #Maximum monitoring instances
max_user_watches = 1048576                #Maximum number of monitoring files per instance
(2) Using the inotify tools helper
- inotifywait: used for continuous monitoring and real-time output of results
- It can monitor various events such as modify, create, move, delete and attrib, and output the results as soon as there is a change
- inotifywatch: used for short-term monitoring and output results after the task is completed
- It can be used to collect changes in the file system and output the summarized changes after running
Example:
inotifywait -mrq -e modify,create,attrib,move,delete File or directory

#---------Parameter interpretation------------
-m	Continuous monitoring
-r	Recursively monitor all child objects
-q	Simplified output information
-e	Specify which event types to monitor
modify	modify
create	establish
attrib  Change properties
move	move
deletc	delete
(3) Script synchronization
Compilation idea:
(1) First set two variables: monitor and perform backup
(2) Use while and read to continuously obtain monitoring results
(3) Perform different operations according to the results
vim /opt/inotify_rsynx.sh
#!/bin/bash
#Define two variables: Monitor files and perform backups
INOTIFY_CMD="inotifywait -mrq -e modify,create,attrib,move,delete Directories or files to be monitored"
RSYNC_CMD="rsync -azH --delete --password-file=/etc/Password file just monitored directory or file user name@Host address::Shared module name"

 #while read get monitoring results
$INOTIFY_CMD | while read DIRECTORY EVENT FILE
do
    #If rsync is not running, execute rsync for backup
    if [ $(pgrep rsync | wc -l) -eq 0 ] ; then
        $RSYNC_CMD
	fi
done
4, Configure rsync downlink synchronization
- Downlink synchronization: back up the master server data to the slave server
Master:192.168.100.10
Slave:192.168.100.20
Close the firewall and security equipment and install the corresponding software
systemctl stop firewalld.service
setenforce 0

rpm -q rsync            #Check for installation
yum -y install rsync    #If it is not installed, install it using yum
1,Master(192.168.100.10)
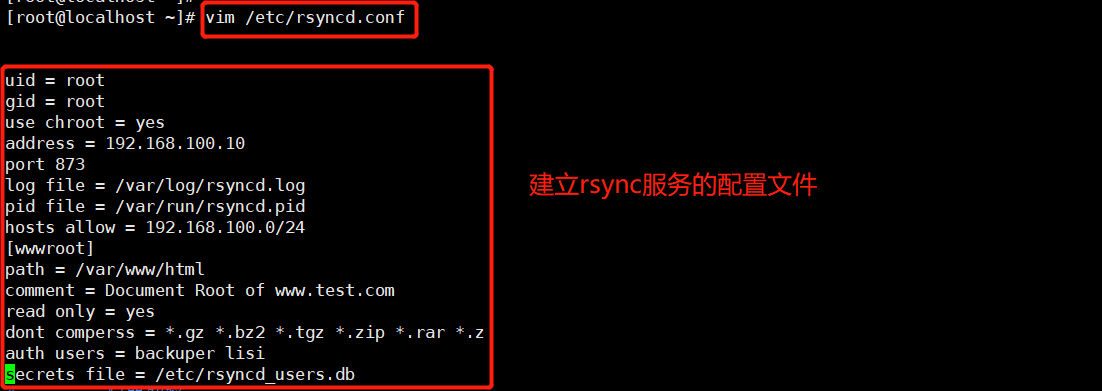
① Create / rsyncd.etc Conf configuration file
vim /etc/rsyncd.conf
uid = root
gid = root
use chroot = yes
address = 192.168.100.10
port 873
log file = /var/log/rsyncd.log
pid file = /var/run/rsyncd.pid
hosts allow = 192.168.100.0/24
[wwwroot]
path = /var/www/html
comment = Document Root of www.test.com
read only = yes
dont comperss = *.gz *.bz2 *.tgz *.zip *.rar *.z
auth users = backuper lisi
secrets file = /etc/rsyncd_users.db
#---------Configuration interpretation----------------------------------------------
uid = root
gid = root
use chroot = yes					#Locked in the source directory
address = 192.168.100.10			#Monitor address
port 873						    #The listening port tcp/udp 873 can be viewed through cat /etc/services | grep rsync
log file = /var/log/rsyncd.log		#Log file location
pid file = /var/run/rsyncd.pid		#File location where the process ID is stored
hosts allow = 192.168.100.0/24		#Client network segments that allow synchronization
[wwwroot]					        #Shared module name
path = /var/www/html				#Actual path of source directory (synchronized directory)
comment = Document Root of www.test.com
read only = yes					    #Is it read-only
dont compress = *.gz *.bz2 *.tgz *.zip *.rar *.z  #File types that are no longer compressed during synchronization
auth users = backuper lisi			#Authorized accounts. Multiple accounts are separated by spaces
secrets file = /etc/rsyncd_users.db			      #Data file for storing account information
If anonymity is adopted, just remove the configuration items of "auth users" and "secrets file"
② Create data files for backup accounts
vim /etc/users.db
backuper:abc123

chmod 600 /etc/rsyncd_users.db

③ Ensure that all users have access to the source directory / var/www/html
mkdir -p /var/www/html
chmod +r /var/www/html
ls -ld /var/www/html

④ Start rsync service program
rsync --daemon
#Start the rsync service and run it as an independent monitoring service (daemon)

netstat -antp | grep rsync

⑤ Turn off rsync service
kill $(cat /var/www/html)
rm -rf /var/run/rsyncd.pid
2,Slave(192.168.100.20)
systemctl stop firewalld.service
setenforce 0

yum -y install rsync

cd /opt
mkdir a
chmod 777 a

vim /etc/server.pass
abc123

chmod 600 /etc/server.pass

3. Verify
master(192.168.100.10)
cd /var/www/html
vim 1.html

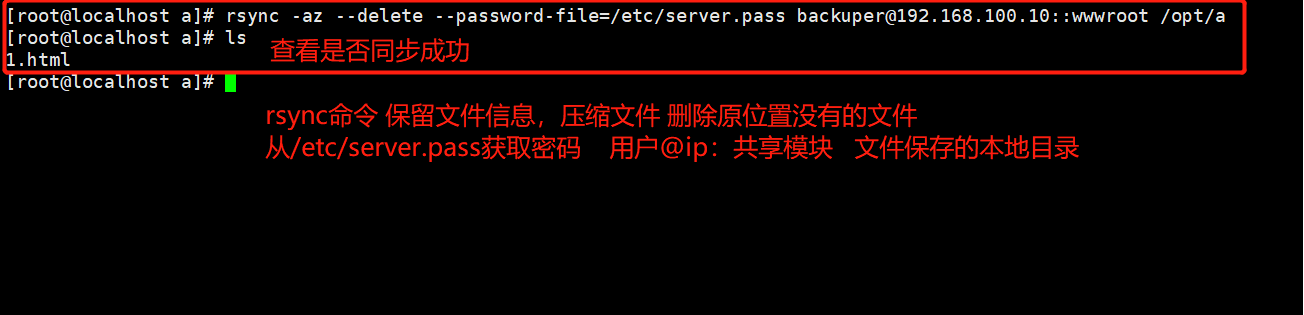
slave(192.168.100.20)
rsync -az --delete --password-file=/etc/server.pass backuper@192.168.100.10::wwwroot /opt/a

ls a
- It is impossible to perform manually in an enterprise, and periodic tasks are generally used
#Set recurring tasks
crontab -e
0 2 * * * /usr/bin/rsync -az --delete --password-file=/etc/server.pass lisi@192.168.100.10::wwwroot /opt/a

systemctl restart crond
systemctl enable crond
5, rsync+inotify real-time synchronization
1,Master(192.168.100.10)
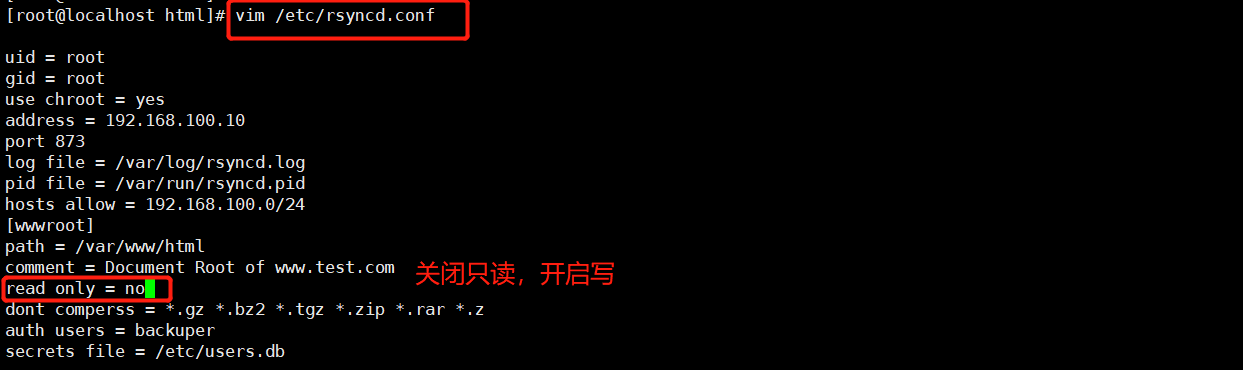
- Modify rsync source server configuration file
vim /etc/rsyncd.conf
#Turn off read-only, and uplink synchronization can be written
read only = no

#Restart service
kill `cat /var/run/rsyncd.pid`
netstat -natp | grep rsync
rsync --daemon
netstat -natp | grep rsync

chmod 777 /var/www/html

2,Slave(192.168.100.20)
① Adjust inotify kernel parameters
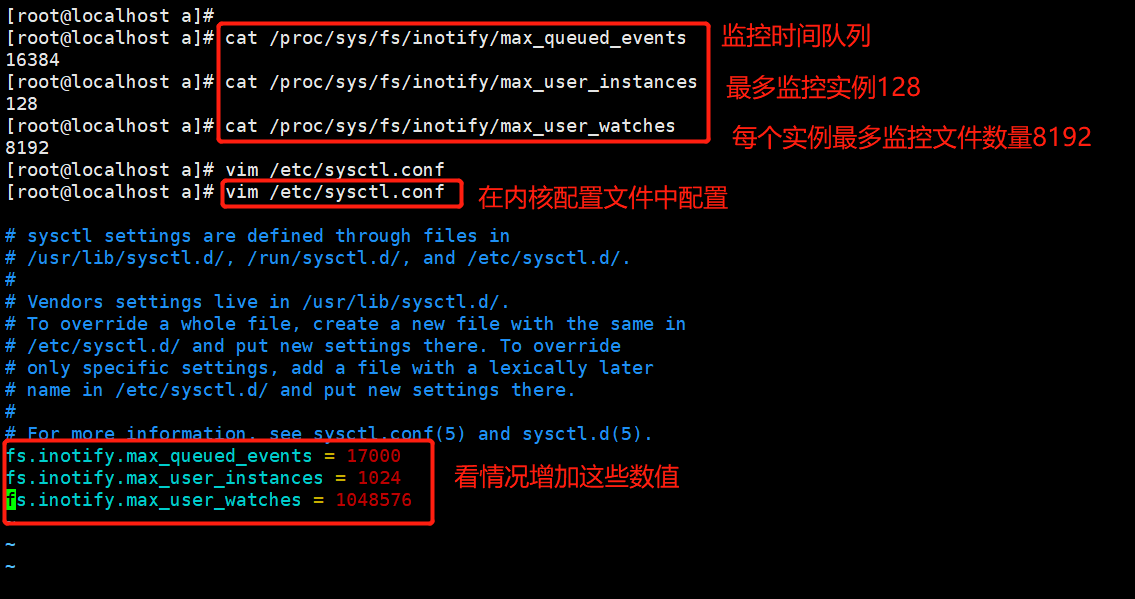
- max_queue_events (monitor the event queue, the default value is 16384)
- max_user_instances (the maximum number of monitored instances is 128 by default)
- max_user_watches (the maximum number of monitoring files per instance, the default value is 8192)
- When the number of directories and files to be monitored is large or changes frequently, it is recommended to increase the values of these three parameters.
cat /proc/sys/fs/inotify/max_queued_events
cat /proc/sys/fs/inotify/max_user_instances
cat /proc/sys/fs/inotify/max_user_watches

vim /etc/sysctl.conf
fs.inotify.max_queued_events = 17000
fs.inotify.max_user_instances = 1024
fs.inotify.max_user_watches = 1048576

sysctl -p
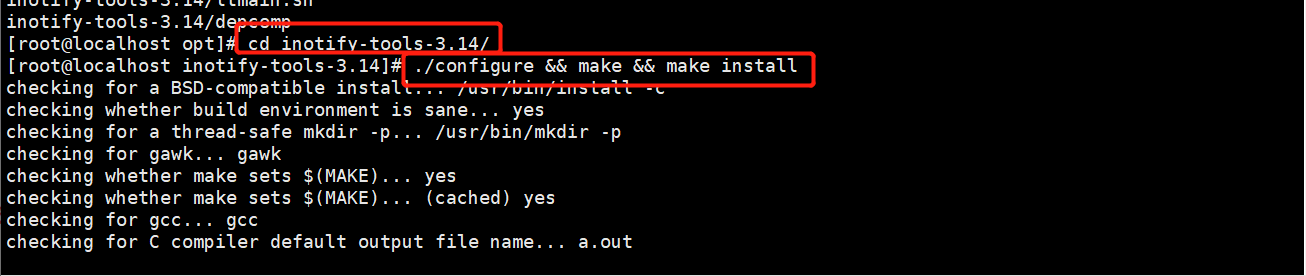
② Installing inotify tools
yum -y install gcc gcc-c++ make

#Put in the installation package
tar zxvf inotify-tools-3.14.tar.gz -C /opt

cd /opt/inotify-tools-3.14/
./configure && make && make install
③ Write trigger synchronization script
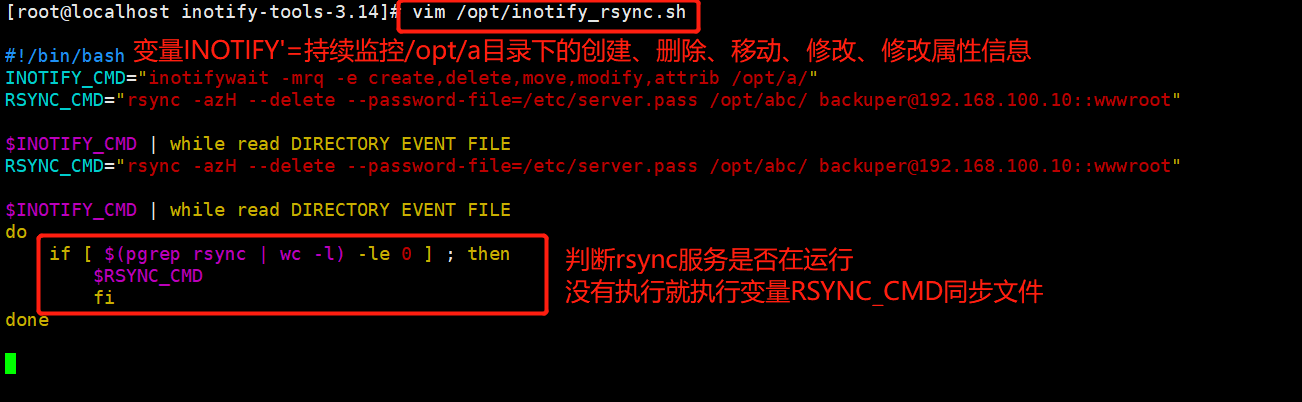
vim /opt/inotify_rsync.sh
#!/bin/bash
INOTIFY_CMD="inotifywait -mrq -e create,delete,move,modify,attrib /opt/a/"
RSYNC_CMD="rsync -azH --delete --password-file=/etc/server.pass /opt/a/ lisi@192.168.100.10::wwwroot"
$INOTIFY_CMD | while read DIRECTORY EVENT FILE
do
if [ $(pgrep rsync | wc -l) -le 0 ] ; then
$RSYNC_CMD
fi
done
cd /opt/
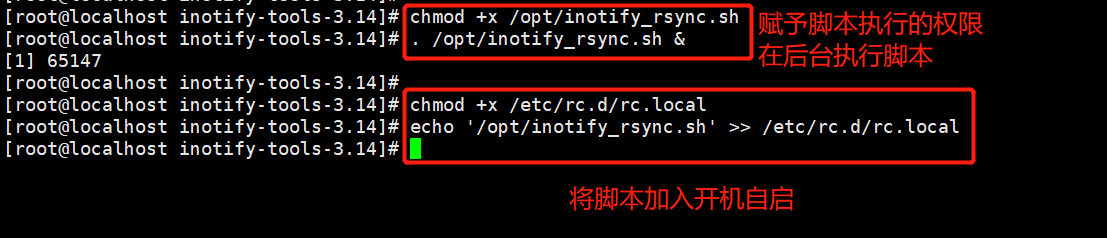
chmod +x inotify_rsync.sh
. /opt/inotify_rsync.sh &
#Add automatic execution after startup
chmod +x /etc/rc.d/rc.local
echo '/opt/inotify_rsync.sh' >> /etc/rc.d/rc.local
3. Verify
Slave(192.168.100.20)
cd /opt/a
touch test.html
ls
rm -rf test.html
ls
Master(192.168.100.10)
cd /var/www/html
ls