SAMBA service overview
What is SAMBA?
-
SMB (Server Message Block) protocol realizes file sharing, also known as CIFS (Common Internet File System)
-
It is a protocol for sharing files between Windows and Unix like systems
-
The client is mainly Windows; Supports simultaneous mounting and concurrent writing of multiple nodes
-
It is mainly used for file sharing and printing sharing under windows and Linux
-
Realize anonymous file sharing with local users
SAMBA main process:
-
smbd process controls publishing shared directory and permissions, responsible for file transmission, port: TCP 139 445
-
nmbd process is used for name resolution. NETBIOS and port: UDP 137 138; Obtain the computer name based on NETBIOS protocol - > resolve it to the corresponding IP address to realize information communication
NetBIOS is the abbreviation of Network Basic Input/Output System, that is, Network Basic Input/Output System, which generally refers to a set of API s for LAN communication
samba service follows two protocols: smb protocol -- > TCP and nmb protocol -- > UDP
SAMBA service experiment
SAMBA environmental preparation
Step 1: clone a Linux server called SAMBA from the template machine
Step 2: change the host name and IP address
# hostnamectl set-hostname samba
# su

# vim /etc/sysconfig/network-scripts/ifcfg-ens33
	BOOTPROTO=none
	IPADDR=10.1.1.10
	NETMASK=255.255.255.0
	GATEWAY=10.1.1.2
	DNS1=8.8.8.8
	DNS2=114.114.114.114

# systemctl restart network
 Expansion: it is recommended to use multiple network cards"ifdown ens33"as well as"ifup ens33"Restart network operation
Step 3: close the firewall and SELinux
# systemctl stop firewalld
# systemctl disable firewalld

# setenforce 0
# vim /etc/selinux/config
	SELINUX=disabled
Step 4: configure yum source
- If there is a network, you can directly use the official website source. The domestic yum source has been loaded in CentOS7. If there is no network, you need to mount the image source
# yum clean all
# yum makecache
SAMBA software installation (server construction)
Step 1: install samba software
- Samba is also a C/S architecture software. The Client is mainly Windows, and Samba service is mainly used for file sharing between Windows and Linux systems
# yum install samba -y 	=>	 Installing Samba services

# rpm -qa |grep ^samba 	=>	 Check which software is installed
	[root@samba ~]# rpm -qa |grep ^samba
	samba-common-tools-4.10.16-13.el7_9.x86_64
	samba-common-4.10.16-13.el7_9.noarch
	samba-client-libs-4.10.16-13.el7_9.x86_64
	samba-common-libs-4.10.16-13.el7_9.x86_64
#	samba-4.10.16-13. el7_ 9.x86_ sixty-four 		=>	 Server side
	samba-libs-4.10.16-13.el7_9.x86_64
	samba-client-4.10.16-13.el7_9.x86_64
Configuration file for smb
- The samba service configuration file is set by default. We only need to write the share name option
# vim /etc/samba/smb.conf 	=>	 Open Samba service configuration
#l 	 [global]   		=>	 Global option, which all samba configurations need to follow
		workgroup = MYGROUP    =>	definition samba The workgroup in which the server resides
		security = user        =>   Authentication mode: share anonymous|user User password|server External server user password
		max log size = 50	   =>   Maximum log size KB
		log file = /var/log/samba/log.%m       =	log file

		passdb backend = tdbsam      =>	Password format,representative tdbsam Formatted
		server string = Samba Server Version %v      =>   smb Description of the service

		load printers = yes         =>	Load printer
		cups options = raw          => Represents the printer's options
#l 	 [homes]         	=>	 Local options (shared name)
		comment = Home Directories    =>  describe
		browseable = no    =>	Represents the hidden share name
		writable = yes     => 	If the share has a directory, it represents readable and writable
#l 	 [printers]      => 	 Share name
		comment = All Printers       =>	describe
		path = /var/spool/samba  	 =>	Local shared directory
		browseable = no  		=>	Hide indicates whether to hide the shared name

		guest ok = no ->   public = no  		=>	no The representative needs account and password access. There are two ways to write it
		writable = no  ->  read only =yes 		=>	no Represents non writable and read-only. There are two ways to write
		printable = yes     =>	 Print options

Edit yourself samba Share name profile
#l 	 [share] 		=>	 Share name
		path = /dir1	=>	Shared path
		guest ok = no	=>	Account and password access required
		writable = yes	=>	Writable
samba default profile:
[root@samba ~]# vim /etc/samba/smb.conf
# See smb.conf.example for a more detailed config file or
# read the smb.conf manpage.
# Run 'testparm' to verify the config is correct after
# you modified it.

[global]
        workgroup = SAMBA
        security = user

        passdb backend = tdbsam

        printing = cups
        printcap name = cups
        load printers = yes
        cups options = raw

[homes]
        comment = Home Directories
        valid users = %S, %D%w%S
        browseable = No
        read only = No
        inherit acls = Yes

[printers]
        comment = All Printers
        path = /var/tmp
        printable = Yes
        create mask = 0600
        browseable = No

[print$]
        comment = Printer Drivers
        path = /var/lib/samba/drivers
        write list = @printadmin root
        force group = @printadmin
        create mask = 0664
        directory mask = 0775
SAMBA comprehensive case
Task requirements
Build a SAMBA service and share a directory / samba/share. The client can use user01/123 to create files and delete files in this directory through windows or Linux
Solution
Environment configuration
Step 1: SAMBA server environment preparation
Change host name, IP address, turn off firewall, SELinux, configure YUM source
Step 2: install SAMBA software
# yum install samba -y 	=>	 Install Samba service software
# rpm -aq|grep  ^samba 	=>	 Check which Samba service software is installed
Step 3: query SAMBA generated file list (rpm -ql)
- Because samba service follows two protocols: smb protocol -- > TCP and nmb protocol -- > UDP
- SMB Service and NMB Service two services
# rpm -ql samba 	=>	 Query SAMBA generated file list
	/usr/sbin/smbd	=>	Binary files, representing commands
	/usr/sbin/nmbd	=>	Binary files, representing commands

	/usr/lib/systemd/system/smb.service	=>	smb service
	/usr/lib/systemd/system/nmb.service	=>	nmb service
	#l note: with these two services, you can manage them through systemctl start|restart|stop service
Step 4: create a shared directory on the server side
# mkdir /samba/share -p
Step 5: edit / etc / SMB Conf configuration file to realize SAMBA sharing
- The original configuration options remain unchanged. Edit the shared directory at the bottom of the configuration file
# vim /etc/samba/smb.conf
	...
	[smb_share]	=>	Share name
        comment = samba service	=>	Remark information, optional
        path = /samba/share		=>	share directory
        guest ok = no	=>	The representative needs an account and password to log in
        writable = yes	=>	Represents that this shared directory is readable and writable
	perhaps
	[samba_share]	=>	Share name
        path = /samba/share
        public = no
        writable = yes

#l remarks:
guest ok === public	The two are equivalent
writable Represents readable and writable
Step 6: create a user01 user, add it to samba authentication, and set the password to 123
- After the following operations are completed, a user01 account and password 123 are added to SAMBA service
# useradd user01 	=>	 Create account

# which smbpasswd 	=>	 Query smb password command to create directory
	[root@samba ~]# which smbpasswd
	/usr/bin/smbpasswd

# smbpasswd -a user01 	=>	- A stands for add. Add an account and set a password for smb service
	New SMB password:123
	Retype new SMB password:123
	Added user user01.	=>	This message represents increased success
Step 7: start nmb and smb services
# systemctl start nmb
# systemctl start smb
samba service sharing based on Windows and Linux server
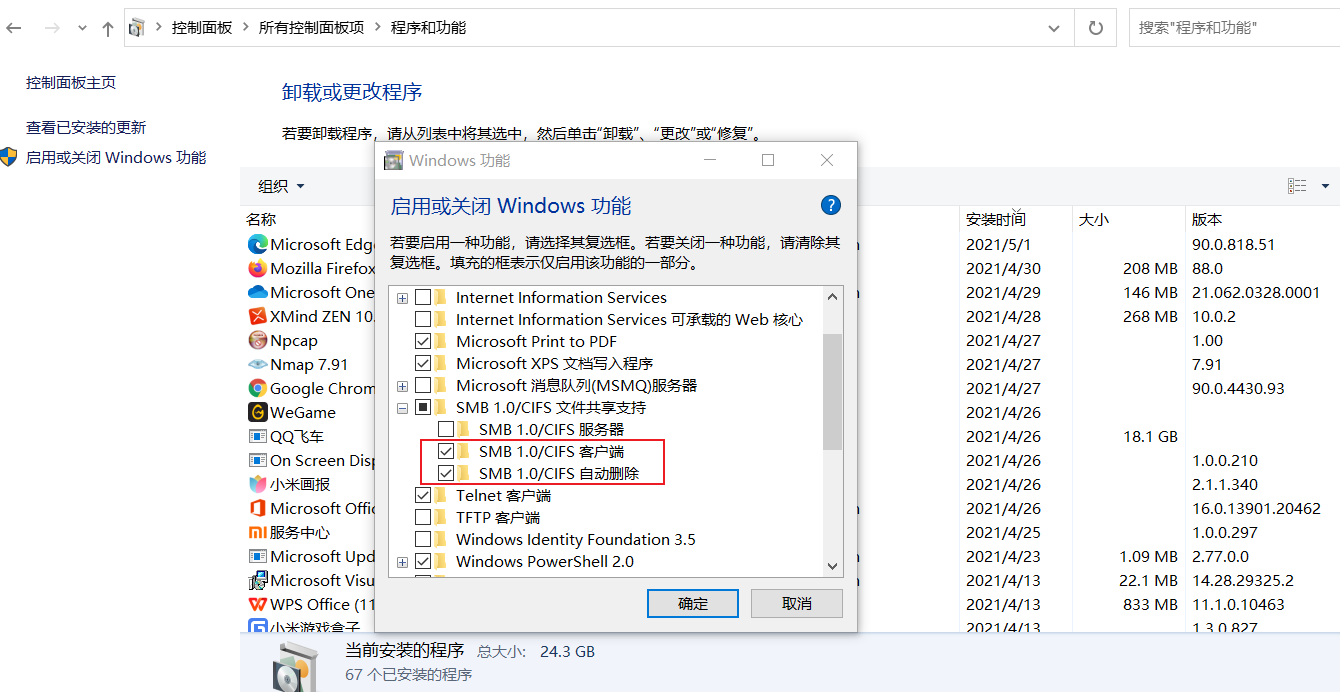
Step 1: install samba client
-
Control panel = > programs and features = > turn Windows features on or off
-
Find the following two options to install
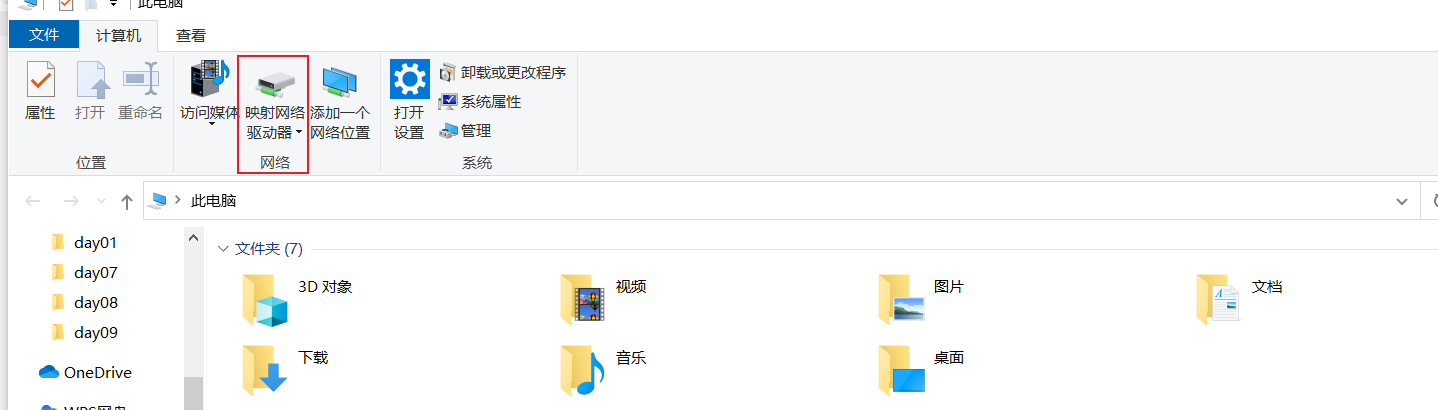
Step 2: enter the computer (my computer) and find the mapped network drive
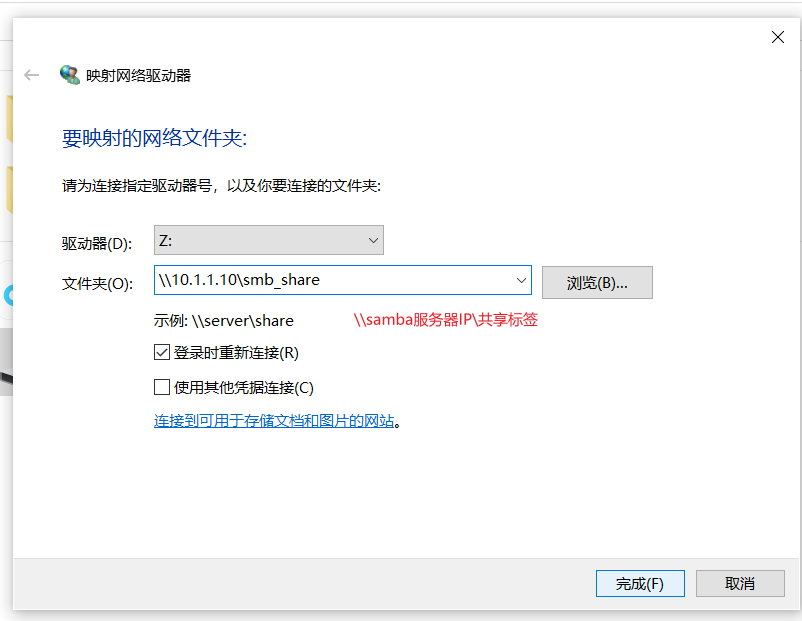
- Specify a drive (choose any one) enter: \ \ SAMBA server IP \ shared directory label
- Then enter the account and password
Step 3: through acl policy, give user01 user read, write and execute permission in samba shared directory
-
After the mount is completed, the directory cannot be written? A: the main reason is that the / samba/share directory does not have write permission
-
You can have upload and download permissions on the / samba/share directory
# setfacl -m u:user01:rwx /samba/share
samba service sharing based on Linux and Linux server
Step 1: File Sharing Based on Linux or Linux
- Install samba client
- Using smbclient command to view directory information
# smbclient -L 10.1.1.10 -U user01 	=>	 View directory information
	[root@client ~]# smbclient -L 10.1.1.11 -U user01
	Enter SAMBA\user01's password:

        Sharename       Type      Comment
        ---------       ----      -------
        print$          Disk      Printer Drivers
#        smb_share       Disk      samba service 	=>	 Shared directory of disk type
        IPC$            IPC       IPC Service (Samba 4.10.16)
        user01          Disk      Home Directories
	Reconnecting with SMB1 for workgroup listing.

        Server               Comment
        ---------            -------
        SAMBA                Samba 4.10.16

        Workgroup            Master
        ---------            -------
        SAMBA                SAMBA

Note: input required user01 User password
- Viewing directory information using smbclient
- When it is not writable, use the ACL command to increase user permissions
# smbclient //10.1.1.10/smb_share -U user01
Step 2: Mount SAMBA to Linux system (similar to NFS)
# mkdir /u01 	=>	 Create mount directory for Linux client
# mount.cifs -o user=user01,pass=123 //10.1.1.10/smb_share /u01 	=>	 mount
Access control Description:
Control read and write permissions
	writable = yes/no
	readonly = yes/no

If the resource is writable, but only some users are allowed to write, others are read-only
write list = admin, root, @staff(User group)
read list = mary, @students

Control access object
	valid users = tom,mary,@itcast
	invalid users = tom
 Note: only one of the above two options can exist

Network access control:
hosts deny = 192.168.0.   Reject a segment
hosts allow = 192.168.0.254  Allow a IP
hosts deny = all  Reject all
hosts allow = 192.168.0. EXCEPT 192.168.0.254  Allow a network segment, but reject a single IP
 be careful: deny and allow At the same time, allow first
summary
1. ftp, LAN and extranet are OK
2. Access mount.com via NFS LAN mount NFS focuses on the relationship between Linux and Linux
3. samba LAN direct access (smbline) mount CIFS focuses on the relationship between Windows and Linux