In the previous article, I introduced PySimpleGUI, a python GUI artifact, and demonstrated some basic usage. Many readers' feedback said that this is really simple, except that the interface is a little "primitive" and there is nothing wrong with it.
In fact, GUI interfaces such as PySimpleGUI are not comparable to Web pages. It is too easy for the latter to be beautiful. The GUI interface is born to generate executable software, which is inherently insufficient in aesthetics.
PySimpleGUI is a leader in python GUI framework, which is suitable for quickly generating concise and generous GUI. Using it to write GUI is already faster, so is there a faster way?
The answer is yes, this article will reveal it for you!
GUI instance
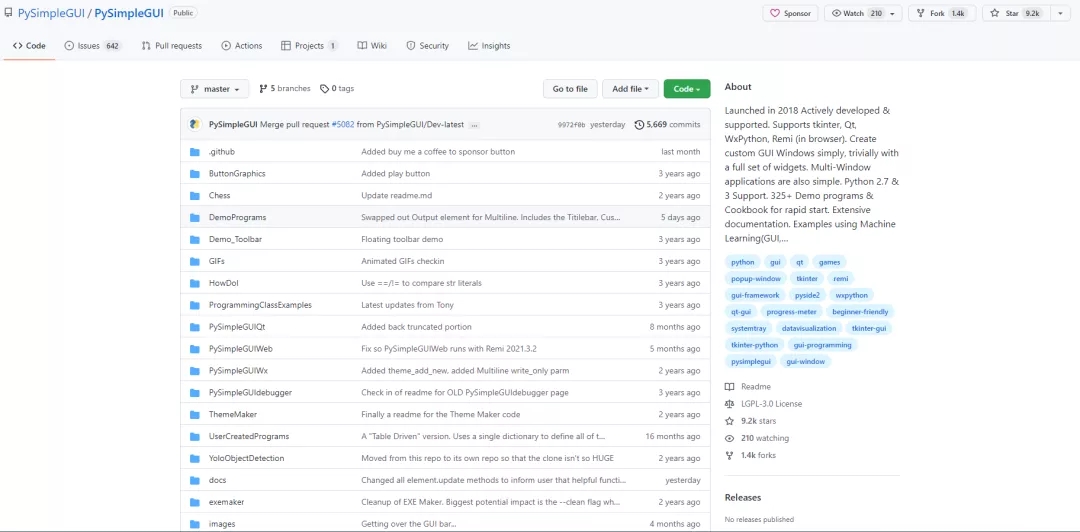
The address of PySimpleGUI on GitHub is:
https://github.com/PySimpleGUI/PySimpleGUI
You can visit it. Its home page is as follows:

There's a lot of content, isn't it?
There is an important content in this folder. Under the DemoPrograms folder, this folder is some demo instances written by the author. The author really understands the psychology of us slackers. Even with such a simple and easy-to-use GUI framework, when we want to write examples, we may search for examples on the network and then use the CV method. The framework author may have expected this, so he wrote many different examples for you to really use.
There are about 300 instances in this folder, which can basically include all kinds of components and layouts we can encounter when using python to write GUI.
Let's have a look
With this artifact, we only need to copy the items on the GitHub locally, and then run these instances to roughly know what each instance u contains. Later, when we want to write the GUI ourselves, we just need to find the corresponding instance and copy the code. Isn't it simple?
Let me run a few demo s to show you what the examples look like.
Chat interface
Let's copy the source code first:
#!/usr/bin/env python
import PySimpleGUI as sg
'''
A chatbot with history
Scroll up and down through prior commands using the arrow keys
Special keyboard keys:
Up arrow - scroll up in commands
Down arrow - scroll down in commands
Escape - clear current command
Control C - exit form
'''
def ChatBotWithHistory():
# ------- Make a new Window ------- #
# give our form a spiffy set of colors
sg.theme('GreenTan')
layout = [[sg.Text('Your output will go here', size=(40, 1))],
          [sg.Output(size=(127, 30), font=('Helvetica 10'))],
          [sg.Text('Command History'),
           sg.Text('', size=(20, 3), key='history')],
          [sg.ML(size=(85, 5), enter_submits=True, key='query', do_not_clear=False),
           sg.Button('SEND', button_color=(sg.YELLOWS[0], sg.BLUES[0]), bind_return_key=True),
           sg.Button('EXIT', button_color=(sg.YELLOWS[0], sg.GREENS[0]))]]

window = sg.Window('Chat window with history', layout,
                   default_element_size=(30, 2),
                   font=('Helvetica', ' 13'),
                   default_button_element_size=(8, 2),
                   return_keyboard_events=True)

# ---===--- Loop taking in user input and using it  --- #
command_history = []
history_offset = 0

while True:
    event, value = window.read()

    if event == 'SEND':
        query = value['query'].rstrip()
        # EXECUTE YOUR COMMAND HERE
        print('The command you entered was {}'.format(query))
        command_history.append(query)
        history_offset = len(command_history)-1
        # manually clear input because keyboard events blocks clear
        window['query'].update('')
        window['history'].update('\n'.join(command_history[-3:]))

    elif event in (sg.WIN_CLOSED, 'EXIT'):            # quit if exit event or X
        break

    elif 'Up' in event and len(command_history):
        command = command_history[history_offset]
        # decrement is not zero
        history_offset -= 1 * (history_offset > 0)
        window['query'].update(command)

    elif 'Down' in event and len(command_history):
        # increment up to end of list
        history_offset += 1 * (history_offset < len(command_history)-1)
        command = command_history[history_offset]
        window['query'].update(command)

    elif 'Escape' in event:
        window['query'].update('')
ChatBotWithHistory()
Run it to see the effect:
picture
This is a chat software with history. If you need to make a similar software, you can copy the code directly and change it a little.
Complete set of components
Let's take another example:
#!/usr/bin/env python
"""
Example of (almost) all Elements, that you can use in PySimpleGUI.
Shows you the basics including:
Naming convention for keys
Menubar format
Right click menu format
Table format
Running an async event loop
Theming your application (requires a window restart)
Displays the values dictionary entry for each element
And more!
Copyright 2021 PySimpleGUI
"""
import PySimpleGUI as sg
def make_window(theme):
sg.theme(theme)
menu_def = [['&Application', ['E&xit']],
['&Help', ['&About']] ]
right_click_menu_def = [[], ['Nothing','More Nothing','Exit']]
# Table Data
data = [["John", 10], ["Jen", 5]]
headings = ["Name", "Score"]

input_layout =  [[sg.Menu(menu_def, key='-MENU-')],
            [sg.Text('Anything that requires user-input is in this tab!')],
            [sg.Input(key='-INPUT-')],
            [sg.Slider(orientation='h', key='-SKIDER-'),
             sg.Image(data=sg.DEFAULT_BASE64_LOADING_GIF, enable_events=True, key='-GIF-IMAGE-'),],
            [sg.Checkbox('Checkbox', default=True, k='-CB-')],
            [sg.Radio('Radio1', "RadioDemo", default=True, size=(10,1), k='-R1-'), sg.Radio('Radio2', "RadioDemo", default=True, size=(10,1), k='-R2-')],
            [sg.Combo(values=('Combo 1', 'Combo 2', 'Combo 3'), default_value='Combo 1', readonly=True, k='-COMBO-'),
             sg.OptionMenu(values=('Option 1', 'Option 2', 'Option 3'),  k='-OPTION MENU-'),],
            [sg.Spin([i for i in range(1,11)], initial_value=10, k='-SPIN-'), sg.Text('Spin')],
            [sg.Multiline('Demo of a Multi-Line Text Element!\nLine 2\nLine 3\nLine 4\nLine 5\nLine 6\nLine 7\nYou get the point.', size=(45,5), k='-MLINE-')],
            [sg.Button('Button'), sg.Button('Popup'), sg.Button(image_data=sg.DEFAULT_BASE64_ICON, key='-LOGO-')]]

asthetic_layout = [[sg.T('Anything that you would use for asthetics is in this tab!')],
           [sg.Image(data=sg.DEFAULT_BASE64_ICON,  k='-IMAGE-')],
           [sg.ProgressBar(1000, orientation='h', size=(20, 20), key='-PROGRESS BAR-'), sg.Button('Test Progress bar')]]

logging_layout = [[sg.Text("Anything printed will display here!")], [sg.Output(size=(60,15), font='Courier 8')]]

graphing_layout = [[sg.Text("Anything you would use to graph will display here!")],
                  [sg.Graph((200,200), (0,0),(200,200),background_color="black", key='-GRAPH-', enable_events=True)],
                  [sg.T('Click anywhere on graph to draw a circle')],
                  [sg.Table(values=data, headings=headings, max_col_width=25,
                            background_color='black',
                            auto_size_columns=True,
                            display_row_numbers=True,
                            justification='right',
                            num_rows=2,
                            alternating_row_color='black',
                            key='-TABLE-',
                            row_height=25)]]

specalty_layout = [[sg.Text("Any \"special\" elements will display here!")],
                  [sg.Button("Open Folder")],
                  [sg.Button("Open File")]]

theme_layout = [[sg.Text("See how elements look under different themes by choosing a different theme here!")],
                [sg.Listbox(values = sg.theme_list(),
                  size =(20, 12),
                  key ='-THEME LISTBOX-',
                  enable_events = True)],
                  [sg.Button("Set Theme")]]

layout = [[sg.Text('Demo Of (Almost) All Elements', size=(38, 1), justification='center', font=("Helvetica", 16), relief=sg.RELIEF_RIDGE, k='-TEXT HEADING-', enable_events=True)]]
layout +=[[sg.TabGroup([[  sg.Tab('Input Elements', input_layout),
                           sg.Tab('Asthetic Elements', asthetic_layout),
                           sg.Tab('Graphing', graphing_layout),
                           sg.Tab('Specialty', specalty_layout),
                           sg.Tab('Theming', theme_layout),
                           sg.Tab('Output', logging_layout)]], key='-TAB GROUP-')]]

return sg.Window('All Elements Demo', layout, right_click_menu=right_click_menu_def)
def main():
window = make_window(sg.theme())
# This is an Event Loop
while True:
    event, values = window.read(timeout=100)
    # keep an animation running so show things are happening
    window['-GIF-IMAGE-'].update_animation(sg.DEFAULT_BASE64_LOADING_GIF, time_between_frames=100)
    if event not in (sg.TIMEOUT_EVENT, sg.WIN_CLOSED):
        print('============ Event = ', event, ' ==============')
        print('-------- Values Dictionary (key=value) --------')
        for key in values:
            print(key, ' = ',values[key])
    if event in (None, 'Exit'):
        print("[LOG] Clicked Exit!")
        break
    elif event == 'About':
        print("[LOG] Clicked About!")
        sg.popup('PySimpleGUI Demo All Elements',
                 'Right click anywhere to see right click menu',
                 'Visit each of the tabs to see available elements',
                 'Output of event and values can be see in Output tab',
                 'The event and values dictionary is printed after every event')
    elif event == 'Popup':
        print("[LOG] Clicked Popup Button!")
        sg.popup("You pressed a button!")
        print("[LOG] Dismissing Popup!")
    elif event == 'Test Progress bar':
        print("[LOG] Clicked Test Progress Bar!")
        progress_bar = window['-PROGRESS BAR-']
        for i in range(1000):
            print("[LOG] Updating progress bar by 1 step ("+str(i)+")")
            progress_bar.UpdateBar(i + 1)
        print("[LOG] Progress bar complete!")
    elif event == "-GRAPH-":
        graph = window['-GRAPH-']       # type: sg.Graph
        graph.draw_circle(values['-GRAPH-'], fill_color='yellow', radius=20)
        print("[LOG] Circle drawn at: " + str(values['-GRAPH-']))
    elif event == "Open Folder":
        print("[LOG] Clicked Open Folder!")
        folder_or_file = sg.popup_get_folder('Choose your folder')
        sg.popup("You chose: " + str(folder_or_file))
        print("[LOG] User chose folder: " + str(folder_or_file))
    elif event == "Open File":
        print("[LOG] Clicked Open File!")
        folder_or_file = sg.popup_get_file('Choose your file')
        sg.popup("You chose: " + str(folder_or_file))
        print("[LOG] User chose file: " + str(folder_or_file))
    elif event == "Set Theme":
        print("[LOG] Clicked Set Theme!")
        theme_chosen = values['-THEME LISTBOX-'][0]
        print("[LOG] User Chose Theme: " + str(theme_chosen))
        window.close()
        window = make_window(theme_chosen)

window.close()
exit(0)
if name == 'main':
main()
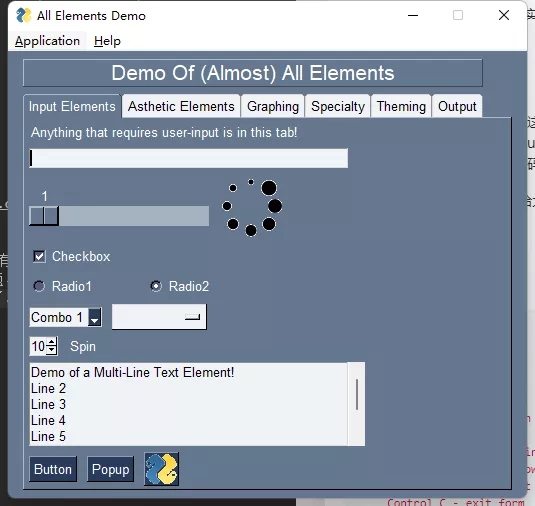
Let's see the effect after running:

This demo is a collection of all components of PySimpleGUI, and each tab is a category. This includes progress bar, canvas, theme, scroll bar, etc. If you want to find interface components, just look in the source code of this demo.
summary
There are more examples here. Let's explore it by ourselves! Here is mainly to introduce a method for rapid GUI development, commonly known as CV Dafa. However, this is only a rapid development method. If you have time, you'd better go to see the source code and understand the principle!