Last Monday, I believe many people, like me, watched the WWDC 2017 developers'conference. Although the highlights were flat, they could also see a little about Apple's future strategy. Although it has changed from a pioneer to a follower, the principle of the strong is the unchanged truth, and no one can find the right in the construction of the ecological chain, although in the eyes of consumers, the most concerned is Home Pome. D and iPad Pro 10.5, while in the eyes of developers, ARKit and CorML are the highlights.

When Core ML was first released, I thought that I could finally use Swift for model training, and finally I didn't need to learn Python in Hell. However, it's just an adapter-like thing, which converts the model after machine learning training into Core ML format by. py converter and integrates it into Apple Devices. Ah, it's not interesting.
The emergence of ARKit can see Apple's determination to expand the future of real technology. Indeed, as mentioned at the meeting, ARKit has become the largest AR development platform by virtue of its numerous mobile devices. The Demo at the meeting also made vivid, but for ARKit, it is not directly able to learn. It needs some basic knowledge, such as cross-platform Unity, but has not done game development. It's not difficult for me to learn a new language, but it's probably not easy to learn!!! Fortunately, ARKit also supports SceneKit and PriteKit, ah... pro-son, so in order to learn ARKit after learning, first learn SceneKit to lay a good foundation.~
SceneKit Basic Concepts
SCNVector3:
Sure enough, three-dimensional vectors, Apple created a structure with three attributes, which is expected. The understanding of vectors is direction plus speed, and the application of Pythagoras theorem is also a very important part.
public struct SCNVector3 {

    public var x: Float

    public var y: Float

    public var z: Float

    public init()

    public init(x: Float, y: Float, z: Float)
}
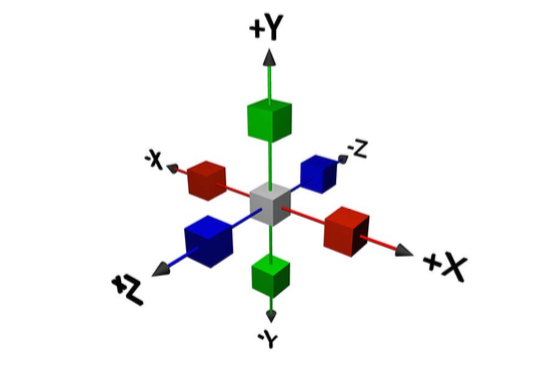
With previous experience in learning SpriteKit, the concept of the game world has become clear. The difference between SceneKit and PriteKit is simply the difference between two-dimensional and three-dimensional. Now we need to have a deeper understanding of the concept of Z-axis.
SCNCamera
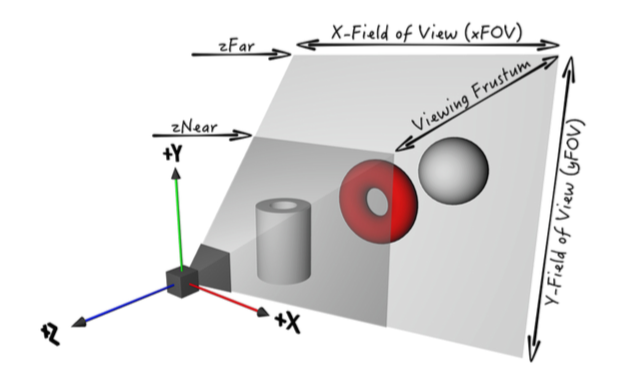
The concept of camera is different from the previous SK Camera. It's also a three-dimensional camera. It more truly reflects the characteristics of filming time. 360 degree shooting without dead angle is more in line with this concept.
  var cameraNode: SCNNode!

  func setupCamera() {

    cameraNode = SCNNode()

    cameraNode.camera = SCNCamera()

    cameraNode.position = SCNVector3(x: 0, y: 5, z: 10)

    scnScene.rootNode.addChildNode(cameraNode)
  }
The concepts in Camera and PriteKit are the same but in different forms. zNear and zFar in the figure can understand the concept of machine position. The position in the code refers to five units up and ten units backward.
SCNGeometry
Three-dimensional geometry, these geometries are built in the framework of the system, of course, there may be other ways to customize the geometry later, these geometry, if you understand the CALayer's subclass CAShapeLayer, you can understand, but only two-dimensional and three-dimensional differences.
func spawnShape() {
    var geometry: SCNGeometry
    switch ShapeType.random() {
    case .box:
      geometry = SCNBox(width: 1.0, height: 1.0, length: 1.0, chamferRadius: 0.0)
    case .sphere:
      geometry = SCNSphere(radius: 0.5)
    case .pyramid:
      geometry = SCNPyramid(width: 1.0, height: 1.0, length: 1.0)
    case .torus:
      geometry = SCNTorus(ringRadius: 0.5, pipeRadius: 0.25)
    case .capsule:
      geometry = SCNCapsule(capRadius: 0.3, height: 2.5)
    case .cylinder:
      geometry = SCNCylinder(radius: 0.3, height: 2.5)
    case .cone:
      geometry = SCNCone(topRadius: 0.25, bottomRadius: 0.5, height: 1.0)
    case .tube:
      geometry = SCNTube(innerRadius: 0.25, outerRadius: 0.5, height: 1.0)
    }
    let color = UIColor.random()
    geometry.materials.first?.diffuse.contents = color
    let geometryNode = SCNNode(geometry: geometry)
    geometryNode.physicsBody = SCNPhysicsBody(type: .dynamic, shape: nil)

    let randomX = Float.random(min: -2, max: 2)
    let randomY = Float.random(min: 10, max: 18)
    let force = SCNVector3(x: randomX, y: randomY , z: 0)
    let position = SCNVector3(x: 0.05, y: 0.05, z: 0.05)
    geometryNode.physicsBody?.applyForce(force, at: position, asImpulse: true)

    let trailEmitter = createTrail(color: color, geometry: geometry)
    geometryNode.addParticleSystem(trailEmitter)

    if color == UIColor.black {
      geometryNode.name = "BAD"
      game.playSound(scnScene.rootNode, name: "SpawnBad")
    } else {
      geometryNode.name = "GOOD"
      game.playSound(scnScene.rootNode, name: "SpawnGood")
    }

    scnScene.rootNode.addChildNode(geometryNode)
  }
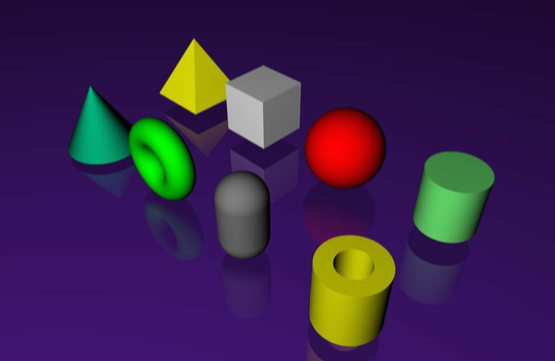
SCNBox, SCNSphere, SCNPyramid, SCNTorus, SCNCapsule, SCNCylinder, SCNCone and SCNTube correspond to the eight geometric figures in the figure above. Their initialization methods are to set the attributes of length, width and radian.
- geometry.materials.first?.diffuse.contents = color denotes the assignment of the contents of the geometry.
- GeometryNode.physicsBody = SCNPhysicsBody (type:.Dynamic, shape: nil) creates three-dimensional physical objects like PriteKit
- GeometyNode. PhysicsBody?. ApplyForce (force, at: position, asImpulse: true) Applying force and impulse force to physical body
-
GeometryNode. addParticle System (trailEmitter) Adding Particle System
SceneKit Rendering Cycle
The so-called rendering cycle is what period each frame system will do. Of course, it doesn't matter if we don't understand it very well. We can use life cycle distance. When pushed into the stack in UIKit, it will start the life cycle. There will be several methods from initiation to destruction. Of course, the rendering cycle is similar.
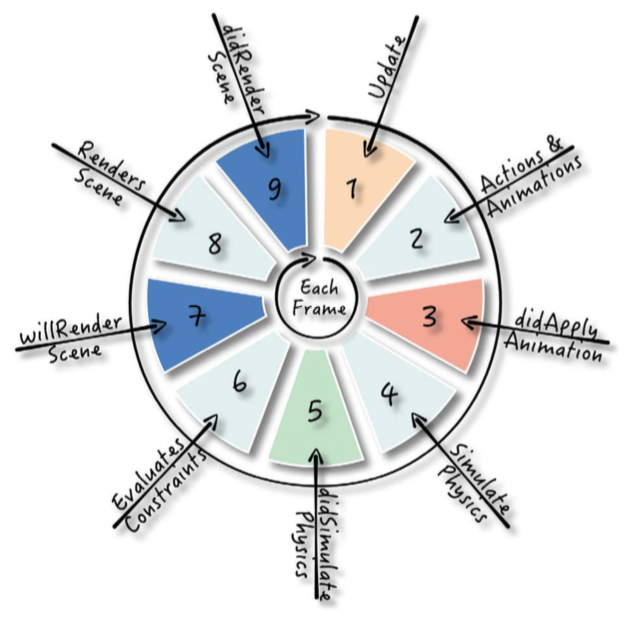
SceneKit goes through nine processes in every frame rendering:
1. Update: Views are rendered in their proxy methods (: updateAtTime:). Write some basic update logic.
2. Perform operations and animations: SceneKit performs all operations and performs all connected animations to the nodes in the scene graph.
3. Application animation: View calls its agent's renderer (: didApply Animations AtTime:). At this point, all nodes in the scene complete a frame of animation based on the action and animation of the application.
4. Analog Physics: SceneKit applies a step of physical simulation to all physical objects in the scene.
5. Complete Analog Physics: The view calls the renderer on its delegation (: didSimulatePhysics AtTime:). At this point, the physical simulation step has been completed, and you can add any physical logic that depends on the application above.
6. Assessment constraints: SceneKit evaluates and applies constraints, which are configurable rules that enable SceneKit to automatically adjust the transformation of nodes.
7. The scene to be rendered: The view calls the renderer on its delegation (: willRenderScene: atTime:). At this point, the view is about to render the scene, so the last minute changes should be made here.
8. Rendering Scene View: SceneKit Renders Scene in View.
9. Rendering scene completion: The last step is to have the view call its proxy renderer (: didRenderScene: atTime:). This marks the end of a loop in the rendering cycle; you can put any game logic here and execute it before the process restarts.
SceneKit Particle System
If you know the subclasses of CALayer, you may know that there is a particle Layer. I believe that all the students who have done the live broadcasting project know something about it. In fact, after a long time, technology will find that many concepts are common, only the attributes and method names are different. So I think it is meaningless to be a friend of technology and remember API itself. After all, who can develop API now? Going away from Google and Baidu, design patterns, data structures and algorithms are the foundation of technological advancement, so I no longer emphasize APIs, but concepts.
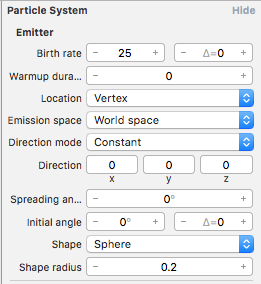
- Birth Rate: Controlling the emission rate of particles. Setting it to 25 indicates that the particle engine generates new particles at the rate of 25 particles per second.
- Preheating duration: The number of seconds that are simulated before rendering the particles. This can be used to display a screen filled with particles at the beginning, rather than waiting for particles to fill the screen. Set it to 0 so that the simulation can be observed from the beginning.
- Location: The position where the emitter produces its particles relative to the shape. Setting it to a vertex means that the particle will use the geometric vertex as the generating position.
- Emission space: The space where the emitted particles will reside. Set it as world space so that the emitted particles can be emitted into the world space instead of the local space of the object node itself.
- Directional mode: Controls how particles are generated to travel; you can move them all in a constant direction, allowing them to move radially outward from the surface of the shape, or simply move them randomly. Set it to Constant to keep all the emitted particles moving in a constant direction.
- Direction: The initial direction vector used when the specified direction pattern remains unchanged. Set this vector to (x:0, y:0, z:0) and set the direction to zero.
- Propagation angle: The emission angle of randomly generated particles. It is set to 0 degrees, so that the particles can be emitted precisely in the direction previously set.
- Initial angle: The initial angle at which particles are emitted. Set it to 0 degrees, because it has nothing to do with the zero-direction vector.
- Shape: The shape of the emitted particles. Set the shape to "sphere" so that the sphere is used as the geometry.
- Shape radius: The existence of this property depends on the shape you use; for spherical launchers, this determines the size of the sphere. Set it to 0.2, which defines a large enough sphere to meet your needs.
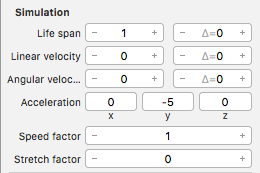
- Life: The life of a specified particle in seconds. Set it to 1, so a single particle will only exist for one second.
- Linear velocity: Specifies the linear velocity of the emitted particle. Set it to 0 so that the particle does not generate direction or velocity.
- Angular velocity: The angular velocity of a given particle. Set it to 0 so that the particles do not rotate.
- Acceleration: The force vector applied to the emitter is specified. Set it to (x:0, y:-5, z:0) - it's a downward vector - once generated, simulate the soft gravity effect on particles.
- Velocity factor: Set the multiplier of particle simulation velocity. Set it to 1 to run at normal speed.
- Tensile factor: Multiplier of particles extending in their direction of motion. Set it to 0 to not expand the particle image.
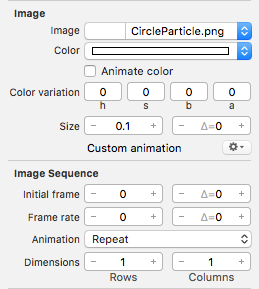
- Image: Specifies the image to be rendered for each particle. Select CircleParticle.png image and give the main shape of particles.
- Color: Sets the hue of the specified image. Setting the color to white gives the basic color of the particle system to white.
- Animation color: Make particles discolored during their lifetime. Cancel this option because the color of the particles will not change at all.
- Color change: Add a little randomness to the particle color. You can set it to (h:0, s:0, b:0, a:0), because the particle color will not change.
- Size: Specifies the size of the particle. Set it to 0.1, so that the size of the emitted particles is small.
- Initial frame: Sets the first zero-based frame of the animation sequence. The zero frame corresponds to the upper-left corner image in the grid. You are using a single frame image, so set it to 0.
- Frame Rate: Control the rate of animation in seconds. Set it to 0, because this applies only to images that contain multiple frames.
- Animation: The act of specifying the sequence of animations. Repeat the cyclic animation, Clamp only plays once, Auto Reverse plays from start to finish, and then plays again. You can put it on repetition because it doesn't matter when using a single frame image.
- Dimension: Specifies the number of rows and columns in the animation grid. Since you use a single frame image, set it to (row: 1, column: 1).
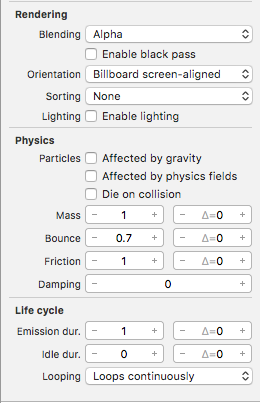
- Blending: Specifies the blending mode of the renderer when the particle is drawn into the scene. Setting it to Alpha will use the image Alpha channel information for transparency.
- Direction: Controlling the rotation of particles. Setting it to Billboard screen alignment will always keep the planar particles facing the camera view, so you won't notice that the particles are indeed planar images.
- Sort: Set the rendering order of particles. This property is used in conjunction with the blending pattern and affects how the blending is applied. Set it to none, so the particle system will not use sorting.
- Lighting: Controls whether SceneKit applies lighting to particles. Uncheck this so that the particle system ignores any lights in the scene.
- Influenced by gravity: The gravity of the scene affects the particles. Cancel this option because you do not want the particle system to participate in physical simulation.
- Affected by the physical field: the physical field in the scene affects the particles. Cancel this option because you don't want physical fields to affect particles.
- Dead of Conflict: Collise the physical objects in your scene and destroy the particles. Cancel this check because you don't want to delete particles when you conflict with node objects in the scene.
- Physical properties: The basic physical properties that control the physical behavior of particles in the process of physical simulation. You can leave all of these as defaults, because particle systems will not use them.
- Launch duration: Controls the length of time the launcher emits new particles. Set it to 1, which activates the particle launcher for a total length of 1 second.
- Idle Duration: The circulating particle system emits particles within a specified emission duration, then rotates idly within a specified idle duration, and then repeats the cycle. Set it to 0, so the particle system will launch only once.
- Cycle: Specifies whether the particle system emits particles like an explosion or continuously emits particles like a volcano. Set it to a loop so that the transmitter emits as long as possible before removing it from the scene again.
SceneKit Practical Exercise
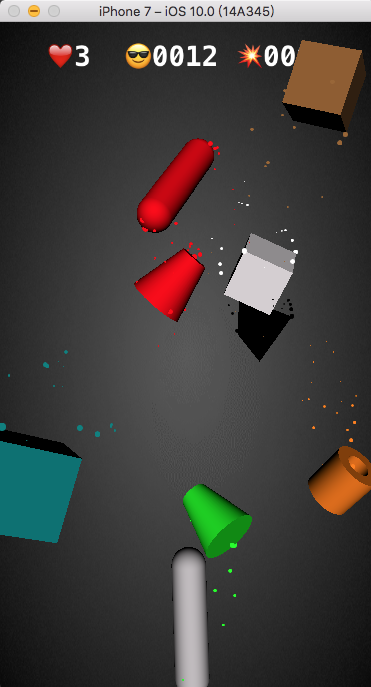
What we want to achieve today is a game like Ninja Fruit, which launches some geometric modules from the bottom, clicks to earn points, and when it comes to black, it will be deducted a life. According to what we just learned, we can achieve such a 3D game, so let's get started!
Step1 Scenario Settings
  override func viewDidLoad() {
    super.viewDidLoad()
    setupView() //Add View
    setupScene() //Adding Scenarios
    setupCamera() //Add Camera
    setupHUD() //Add text
    setupSplash() //Add pictures
    setupSounds() //Add sound
  }
  func setupView() {
    scnView = self.view as! SCNView
    //scnView.showsStatistics = true
    //scnView.allowsCameraControl = false
    scnView.autoenablesDefaultLighting = true
    scnView.delegate = self
    scnView.isPlaying = true
  }

  func setupScene() {
    scnScene = SCNScene()
    scnView.scene = scnScene
    scnScene.background.contents =
      "GeometryFighter.scnassets/Textures/Background_Diffuse.png"
  }
Step2 Frame-by-Frame Rendering
extension GameViewController: SCNSceneRendererDelegate {
  func renderer(_ renderer: SCNSceneRenderer, updateAtTime time:
    TimeInterval) {

      if game.state == .Playing { //When Playable
        if time > spawnTime { Time Regulation of Production Geometric Model Speed
          spawnShape()
          spawnTime = time + TimeInterval(Float.random(min: 0.2, max: 1.5))
        }
        cleanScene() //Delete nodes in scenarios
      }
      game.updateHUD() //Update text representation
  }
}

  func cleanScene() {
    for node in scnScene.rootNode.childNodes {
      if node.presentation.position.y < -2 { Delete nodes when a geometric figure reaches a certain location
        node.removeFromParentNode()
      }
    }
  }
Step3 user interaction
  override func touchesBegan(_ touches: Set<UITouch>, with event: UIEvent?) {

    if game.state == .GameOver {
      return
    }

    if game.state == .TapToPlay {
      game.reset()
      game.state = .Playing
      showSplash(splashName: "")
      return
    }

    let touch = touches.first
    let location = touch!.location(in: scnView)
    let hitResults = scnView.hitTest(location, options: nil) //Get the touched node

    if let result = hitResults.first {

      if result.node.name == "HUD" || //Business logic execution based on node name
        result.node.name == "GAMEOVER" ||
        result.node.name == "TAPTOPLAY" {
          return
      } else if result.node.name == "GOOD" {
        handleGoodCollision()
      } else if result.node.name == "BAD" {
        handleBadCollision()
      }

      createExplosion(geometry: result.node.geometry!, //Explosive effect
        position: result.node.presentation.position,
        rotation: result.node.presentation.rotation)

      result.node.removeFromParentNode() //Delete child nodes
    }
  }
Step4 Interactive Logic
  func handleGoodCollision() {
    game.score += 1 //The good collision added one point.
    game.playSound(scnScene.rootNode, name: "ExplodeGood")
  }

  func handleBadCollision() {
    game.lives -= 1 The bad collision killed me.
    game.playSound(scnScene.rootNode, name: "ExplodeBad")
    game.shakeNode(cameraNode)

    if game.lives <= 0 { //When the number of Fates equals zero, the game ends.
      game.saveState()
      showSplash(splashName: "GameOver")
      game.playSound(scnScene.rootNode, name: "GameOver")
      game.state = .GameOver
      scnScene.rootNode.runAction(SCNAction.waitForDurationThenRunBlock(5) { (node:SCNNode!) -> Void in
        self.showSplash(splashName: "TapToPlay")
        self.game.state = .TapToPlay
        })
    }
  }
Step5 Explosion Effect
  func createExplosion(geometry: SCNGeometry, position: SCNVector3,
    rotation: SCNVector4) {
      let explosion =
      SCNParticleSystem(named: "Explode.scnp", inDirectory:
        nil)!
      explosion.emitterShape = geometry
      explosion.birthLocation = .surface
      let rotationMatrix =
      SCNMatrix4MakeRotation(rotation.w, rotation.x,
        rotation.y, rotation.z)
      let translationMatrix =
      SCNMatrix4MakeTranslation(position.x, position.y, position.z)
      let transformMatrix =
      SCNMatrix4Mult(rotationMatrix, translationMatrix)
      scnScene.addParticleSystem(explosion, transform: transformMatrix)
  }
Demonstration effect:

About:
