Implementing idea: Cover a UI Image VIew onto a label and erase the image by capturing the sliding trajectory.
CGContextClearRect(ref, rect);
-(void)createSubViews {
/**
Attention:
1. The positions of the two controls should be the same
2. Be sure to create the following label first. Create pictures again
*/
// view showing the effect of scraping
UILabel *labelL = [[UILabel alloc] initWithFrame:CGRectMake(20, 100, 280, 200)];
labelL.text = @ "Prize: 100 million";
labelL.numberOfLines = 0;
labelL.backgroundColor = [UIColor brownColor];
labelL.font = [UIFont systemFontOfSize:30];
labelL.textAlignment = NSTextAlignmentCenter;
[self.view addSubview:labelL];
// Scratched pictures
self.imageView = [[UIImageView alloc] initWithFrame:labelL.frame];
self.imageView.image = [UIImage imageNamed:@"1.jpg"];
[self.view addSubview:self.imageView];
}
-(void)touchesMoved:(NSSet<UITouch *> *)touches withEvent:(UIEvent *)event {
// Touch anywhere
UITouch *touch = touches.anyObject;
// The coordinates of the touch position on the picture
CGPoint cententPoint = [touch locationInView:self.imageView];
// Set the size of the clearing point
CGRect rect = CGRectMake(cententPoint.x, cententPoint.y, 10, 10);
// The default is to create a transparent view
UIGraphicsBeginImageContextWithOptions(self.imageView.bounds.size, NO, 0);
// Get context (sketchpad)
CGContextRef ref = UIGraphicsGetCurrentContext();
// Mapping layer s of imageView to context
[self.imageView.layer renderInContext:ref];
// Clear the area crossed
CGContextClearRect(ref, rect);
// Get pictures
UIImage *image = UIGraphicsGetImageFromCurrentImageContext();
// End the picture's sketchpad, (meaning the picture disappears in the context)
UIGraphicsEndImageContext();
self.imageView.image = image;
}
// Links: http://www.jianshu.com/p/7c2042764e0c
Mosaic is probably one of the worst inventions. How to code it? The following:
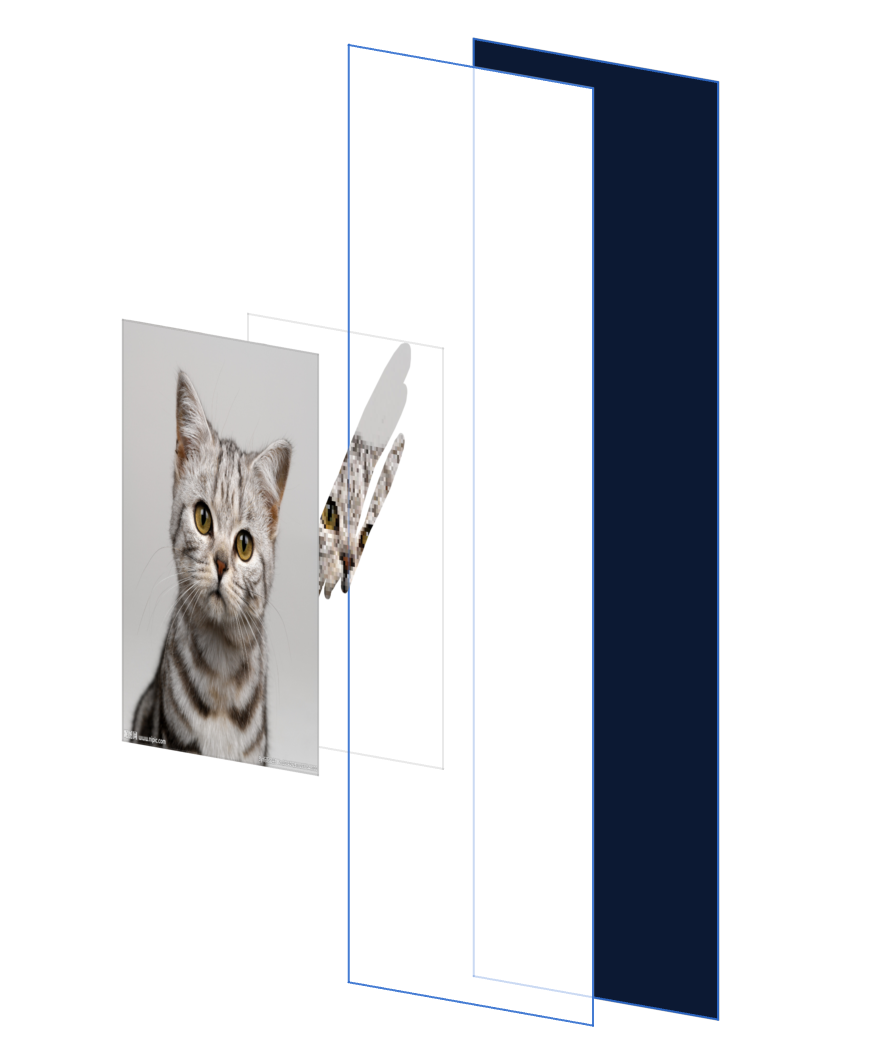
This article briefly introduces the effect of turning the position of finger smear into mosaic.
In fact, the principle is relatively simple, and scraping card effect is similar to the principle. Put two bounds of the same picture together. The top image is the original image, and the bottom image is the mosaic image after the original image processing.
1) Create a class of ScratchCardView, here borrow a class of HYScratchCardView, which was written by predecessors on scratch card demo:
#import <UIKit/UIKit.h>
@interface HYScratchCardView : UIView
/**
 The bottom picture to scrape.
 */
@property (nonatomic, strong) UIImage *image;
/**
 Coating picture.
 */
@property (nonatomic, strong) UIImage *surfaceImage;
#import "HYScratchCardView.h"
@interface HYScratchCardView ()
@property (nonatomic, strong) UIImageView *surfaceImageView;
@property (nonatomic, strong) CALayer *imageLayer;
@property (nonatomic, strong) CAShapeLayer *shapeLayer;
//Setting finger's smear path
@property (nonatomic, assign) CGMutablePathRef path;
@end
@implementation HYScratchCardView
- (void)dealloc
{
if (self.path) {
CGPathRelease(self.path);
}
}
-(instancetype)initWithFrame:(CGRect)frame
{
self = [super initWithFrame:frame];
if (self) {
//Add image view (surface image view) to self
self.surfaceImageView = [[UIImageView alloc]initWithFrame:self.bounds];
[self addSubview:self.surfaceImageView];
//Add layer (image Layer) to self
self.imageLayer = [CALayer layer];
self.imageLayer.frame = self.bounds;
[self.layer addSublayer:self.imageLayer];
self.shapeLayer = [CAShapeLayer layer];
self.shapeLayer.frame = self.bounds;
self.shapeLayer.lineCap = kCALineCapRound;
self.shapeLayer.lineJoin = kCALineJoinRound;
self.shapeLayer.lineWidth = 10.f;
self.shapeLayer.strokeColor = [UIColor blueColor].CGColor;
self.shapeLayer.fillColor = nil;//Setting the color here has an abnormal effect, you can try it on your own.
[self.layer addSublayer:self.shapeLayer];
self.imageLayer.mask = self.shapeLayer;
self.path = CGPathCreateMutable();
}
return self;
}
- (void)setImage:(UIImage *)image
{
//Base map
_image = image;
self.imageLayer.contents = (id)image.CGImage;
}
- (void)setSurfaceImage:(UIImage *)surfaceImage
{
//Top drawing
_surfaceImage = surfaceImage;
self.surfaceImageView.image = surfaceImage;
}2) After adding surfaceImageView and imageLayer, add CAShapeLayer (CAShapeLayer is a subclass of layers drawn by vector graphics). The CGPath is used to define the graph you want to draw. Because the image Layer is below and the original image is on the surface ImageView, you need to assign the mask of the image Layer to the self.shapeLayer so that the self.shapeLayer can be displayed on the surface ImageView. Then create the path self.path = CGPathCreateMutable();
3) The next step is to determine the path of the touch. CGPath MoveToPoint is to start a variable path and CGPath AddLineToPoint is to append the path. Both functions implement the path by adding points. Talk about the path copy ed by touch to self.path. Let's talk about how path assigns shapeLayer.path.
- (void)touchesBegan:(NSSet *)touches withEvent:(UIEvent *)event
{
    [super touchesBegan:touches withEvent:event];
    UITouch *touch = [touches anyObject];
    CGPoint point = [touch locationInView:self];
    CGPathMoveToPoint(self.path, NULL, point.x, point.y);
    CGMutablePathRef path = CGPathCreateMutableCopy(self.path);
    self.shapeLayer.path = path;
    CGPathRelease(path);

}

- (void)touchesMoved:(NSSet *)touches withEvent:(UIEvent *)event
{
    [super touchesMoved:touches withEvent:event];
    UITouch *touch = [touches anyObject];
    CGPoint point = [touch locationInView:self];
    CGPathAddLineToPoint(self.path, NULL, point.x, point.y);
    CGMutablePathRef path = CGPathCreateMutableCopy(self.path);
    self.shapeLayer.path = path;
    CGPathRelease(path);

}

- (void)touchesEnded:(NSSet *)touches withEvent:(UIEvent *)event
{
    [super touchesEnded:touches withEvent:event];

}
4) Then add it to the viewcontroller
#import "ViewController.h"
#import "HYScratchCardView.h"


@interface ViewController ()

@property (nonatomic,strong)HYScratchCardView * hys;

@end

@implementation ViewController

- (void)viewDidLoad {
    [super viewDidLoad];


    _hys = [[HYScratchCardView alloc]initWithFrame:CGRectMake(CGRectGetMaxX(self.view.bounds)/2-150, CGRectGetMaxY(self.view.bounds)/2-150, 300, 300)];

    UIImage * image = [UIImage imageNamed:@"p2.jpg"];

    //Top drawing
    _hys.surfaceImage = image;
    //Low graph, this function is mosaic algorithm
    _hys.image = [self transToMosaicImage:image blockLevel:10];

    [self.view addSubview:_hys];

}
Link: http://www.jianshu.com/p/e4bebae1b36f