Write log output environment configuration file
During the development process, the most important thing is to view the log information output by the program on the console. Here, we choose to use log4j tool to output:
I Preparations: import the jar packages beginning with log4j in [lib] under [MyBatis] folder into the project and add dependencies.
Create a new file log4j. Under [src] Properties resource:
# Global logging configuration
# In the development environment, the log level should be set to DEBUG and the production environment to INFO or ERROR
log4j.rootLogger=DEBUG, stdout
# Console output...
log4j.appender.stdout=org.apache.log4j.ConsoleAppender
log4j.appender.stdout.layout=org.apache.log4j.PatternLayout
log4j.appender.stdout.layout.ConversionPattern=%5p [%t] - %m%n
First configuration statement
"log4j.rootLogger=DEBUG, stdout" refers to the log output level. There are seven levels in total (OFF, fat, ERROR, WARN, INFO, DEBUG, ALL).
1. The commonly used Log output levels are DEBUG, INFO, ERROR and WARN, which respectively represent "debugging level", "standard information level", "ERROR level" and "exception level". If you need to view the detailed step information of program operation, generally select the "DEBUG" level, because this level will print the underlying operation information on the console during program operation, and use the Log object to print the debugging information in the program.
2. If it is a daily operation, select the "INFO" level, which will print out the main steps of program operation on the console. "ERROR" and "WARN" levels represent "ERROR events that do not affect program operation" and "potential ERROR conditions" respectively.
3. The configuration of "stdout" in the file means to output the log information of DEBUG to the output carrier specified by the stdout parameter.
The second configuration statement "log4j.appender.stdout=org.apache.log4j.ConsoleAppender" means to set the type of output carrier named stdout.
1. At present, the output carriers are
ConsoleAppender
FileAppender (file)
Daily rollingfileappender (one log file is generated every day)
RollingFileAppender (generate a new file when the file size reaches the specified size)
WriterAppender (send log information in stream format to any specified place)
2. Here you want to print the log to the console of IDEA, so select console provider
The third configuration statement "log4j.appender.stdout.layout=org.apache.log4j.PatternLayout" means the type of layout (i.e. interface layout) of the output carrier named stdout.
1. At present, the interface types of the output end are divided into:
HTMLLayout (layout in HTML table form)
PatternLayout (layout mode can be specified flexibly)
SimpleLayout (level and information string containing log information)
TTCCLayout (including log generation time, thread, category and other information)
2. Here, you can flexibly specify the layout type, that is, configure the layout yourself.
Fourth configuration statement
"Log4j. Appender. Stdout. Layout. Conversionpattern =% 5p [% t] - [M% n" means the specific format of the print information to be specified if the PatternLayout flexible layout type is selected for the layout interface layout.
1. Format information configuration elements are as follows:
%m outputs the specified information in the code
%p output priority, i.e. DEBUG, INFO, WARN, ERROR and FATAL
%r input the number of milliseconds from application startup to output the log information
%c output the category to which it belongs, usually the full name of the class
%t outputs the name of the thread that generated the log event
%N outputs a carriage return line feed, which is "rn" for Windows platform and "n" for UNIX platform
%D the time or date when the log is output. The default event is ISO8601. You can also specify the format after it, such as%d{yyy MMM dd HH:mm:ss}. The output is similar: 10:32:00, April 18, 2018
%l output the location of the log event, including the category name, the thread that occurred, and the number of lines in the code
MyBatis advanced mapping
How does MyBatis handle the association relationship between multiple database tables, including:
One to one query
One to many query
Many to many query
Delayed loading
1. One to one query
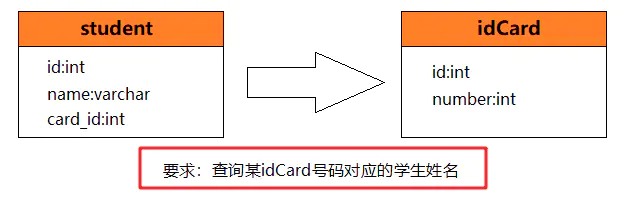
First, let's create a data model (delete the previously created student table):
use mybatis;
CREATE TABLE student (
  id int(11) NOT NULL AUTO_INCREMENT,
  name varchar(255) DEFAULT NULL,
  card_id int(11) NOT NULL,
  PRIMARY KEY (id)
)AUTO_INCREMENT=1 DEFAULT CHARSET=utf8;

CREATE TABLE card (
  id int(11) NOT NULL AUTO_INCREMENT,
  number int(11)  NOT NULL,
  PRIMARY KEY (id)
)AUTO_INCREMENT=1 DEFAULT CHARSET=utf8;

INSERT INTO student VALUES (1,'student1',1);
INSERT INTO student VALUES (2,'student2',2);

INSERT INTO card VALUES (1,1111);
INSERT INTO card VALUES (2,2222);
1. Note: instead of setting foreign keys in the database, MyBatis is allowed to handle the relationship between multiple tables. In fact, foreign keys are only used to ensure data consistency. In some special cases (such as high concurrency seckill system), foreign keys are not applicable because of certain performance loss.
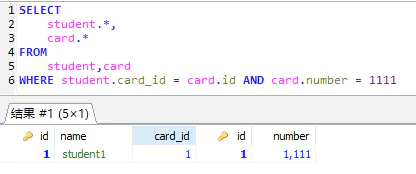
Then we need to confirm the SQL statement of our query. We may simply write it as follows:
SELECT
    student.*,
    card.*
FROM
    student,card
WHERE student.card_id = card.id AND card.number = #{value}
Tip: in daily development, always determine the specific SQL of the business first, and then configure the SQL in the Mapper file
After determining the main query SQL, we use resultType and resultMap to implement the one-to-one query instance respectively.
1. Implement with resultType
First, create the Java entity class Student corresponding to the Student student table, in which the encapsulated attribute information is the field in the response database:
package pojo;

public class Student {

    int id;
    String name;
    int card_id;

    /* getter and setter */
}
Finally, the results of our query (the above SQL statement) are as follows:
Since the final query result is specified by resultType, that is, only one certain Java wrapper class can be mapped. The Student class above only contains the basic information of students and does not contain the information of Card, so we need to create a final mapping class, take Student class as the parent class, and then append the information of Card:
package pojo;

public class StudentAndCard extends Student {
    private int number;

    /* getter and setter /*
}
And then at student The XML Mapping file defines the SQL configuration of query statements of types, configures the previously designed SQL statements, and then specifies that the output parameter attribute is resultType and the type is StudentAndCard. This Java wrapper class:
<select id="findStudentByCard" parameterType="_int" resultType="Student">
  SELECT
    student.*,
    card.*
  FROM
    student,card
  WHERE student.card_id = card.id AND card.number = #{value}
</select>
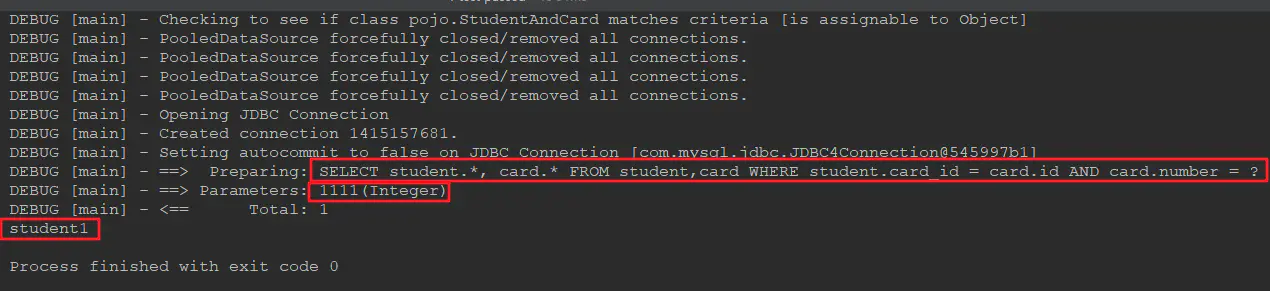
Then write the test method in the test class:
@Test
public void test() throws IOException {

    // According to mybatis config sqlSessionFactory is obtained from the information of XML configuration
    String resource = "mybatis-config.xml";
    InputStream inputStream = Resources.getResourceAsStream(resource);
    SqlSessionFactory sqlSessionFactory = new SqlSessionFactoryBuilder().build(inputStream);
    // Then get the session according to sqlSessionFactory
    SqlSession session = sqlSessionFactory.openSession();

    // Find ID card ID number 1111 students.
    StudentAndCard student = session.selectOne("findStudentByCard",1111);
    // Get their name and output
    System.out.println(student.getName());
}
Get the correct results:
2. Implement with resultMap
Using resultMap, you can map data fields to response entity class attributes with different names. Importantly, you can map other entity classes wrapped in entity classes.
First, let's create a StudentWithCard class that encapsulates the Card number and Student entity class:
package pojo;

public class StudentWithCard {

    Student student;
    int number;
    int id;

    /* getter and setter */
}
The SQL statement remains unchanged, but the output mapping attribute used is changed to resultMap. The mapping type is the resultMap configuration with id of StudentInfoMap:
<select id="findStudentByCard" parameterType="_int" resultMap="StudentInfoMap">
  SELECT
    student.*,
    card.*
  FROM
    student,card
  WHERE student.card_id = card.id AND card.number = #{value}
</select>

<resultMap id="StudentInfoMap" type="pojo.StudentWithCard">
    <!-- id The label represents the corresponding primary key
         column Column value corresponding to query result
         property Corresponds to the property name in the encapsulated class
         -->
    <id column="id" property="id"/>
    <result column="number" property="number"/>
    <!-- association Represents the nested results of the association,
         It can be simply understood as the label specified for the encapsulation class
         -->
    <association property="student" javaType="pojo.Student">
        <id column="id" property="id"/>
        <result column="name" property="name"/>
        <result column="card_id" property="card_id"/>
    </association>
</resultMap>
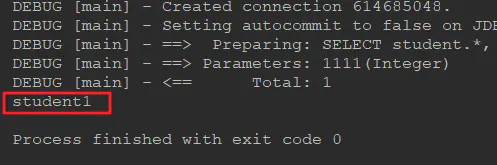
Slightly modify the test class to test the one-to-one query mapping implemented using resultMap:
@Test
public void test() throws IOException {

    // According to mybatis config sqlSessionFactory is obtained from the information of XML configuration
    String resource = "mybatis-config.xml";
    InputStream inputStream = Resources.getResourceAsStream(resource);
    SqlSessionFactory sqlSessionFactory = new SqlSessionFactoryBuilder().build(inputStream);
    // Then get the session according to sqlSessionFactory
    SqlSession session = sqlSessionFactory.openSession();

    // Find ID card ID number 1111 students.
    StudentWithCard student = session.selectOne("findStudentByCard", 1111);
    // Get their name and output
    System.out.println(student.getStudent().getName());
}
The test can still get the correct results:
One to many query
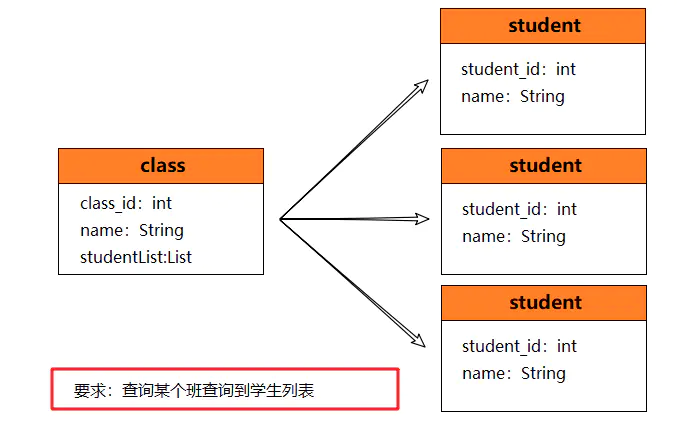
Let's first create a data model and delete the previous:
use mybatis;
CREATE TABLE student (
  student_id int(11) NOT NULL AUTO_INCREMENT,
  name varchar(255) DEFAULT NULL,
  PRIMARY KEY (student_id)
)AUTO_INCREMENT=1 DEFAULT CHARSET=utf8;

CREATE TABLE class (
  class_id int(11) NOT NULL AUTO_INCREMENT,
  name varchar(255) NOT NULL,
  student_id int(11)  NOT NULL,
  PRIMARY KEY (class_id)
)AUTO_INCREMENT=1 DEFAULT CHARSET=utf8;

INSERT INTO student VALUES (1,'student1');
INSERT INTO student VALUES (2,'student2');

INSERT INTO class VALUES (1,'Java course',1);
INSERT INTO class VALUES (2,'Java course',2);
The name field of class represents the name of the course.
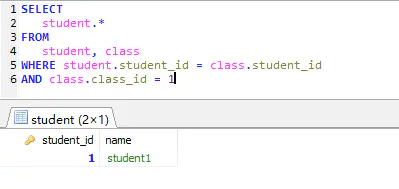
Then let's write our SQL statement:
SELECT
  student.*
FROM
  student, class
WHERE student.student_id = class.student_id AND class.class_id = #{value}
The results of our implementation are as follows:
Let's create the corresponding entity class again:
public class Student {

    private int id;
    private String name;

    /* getter and setter */
}

public class Class {

    private int id;
    private String name;
    private List<Student> students;

    /* getter and setter */
}
Create a new [class.xml] file under Package [pojo] to complete the configuration:
<?xml version="1.0" encoding="UTF-8"?>
<!DOCTYPE mapper
        PUBLIC "-//mybatis.org//DTD Mapper 3.0//EN"
        "http://mybatis.org/dtd/mybatis-3-mapper.dtd">

<mapper namespace="class">
    <resultMap id="Students" type="pojo.Student">
        <id column="student_id" property="id"/>
        <result column="name" property="name"/>
    </resultMap>
    <select id="listStudentByClassName" parameterType="String" resultMap="Students">
        SELECT
          student.*
        FROM
          student, class
        WHERE student.student_id = class.student_id AND class.name= #{value}
    </select>
</mapper>
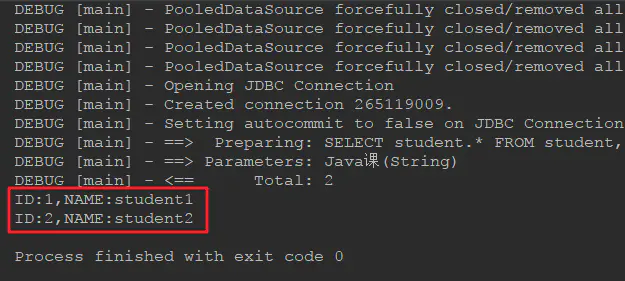
Write test class:
@Test
public void test() throws IOException {

    // According to mybatis config sqlSessionFactory is obtained from the information of XML configuration
    String resource = "mybatis-config.xml";
    InputStream inputStream = Resources.getResourceAsStream(resource);
    SqlSessionFactory sqlSessionFactory = new SqlSessionFactoryBuilder().build(inputStream);
    // Then get the session according to sqlSessionFactory
    SqlSession session = sqlSessionFactory.openSession();

    // Query all students in Java class
    List<Student> students = session.selectList("listStudentByClassName", "Java course");
    for (Student student : students) {
        System.out.println("ID:" + student.getId() + ",NAME:" + student.getName());
    }
}
Run the test results successfully:
Many to many query
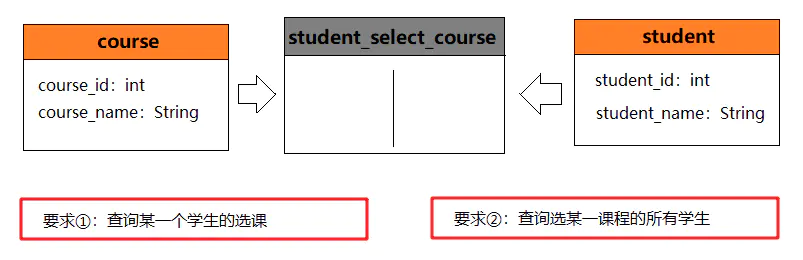
Establish data model:
use mybatis;
CREATE TABLE students (
  student_id int(11) NOT NULL AUTO_INCREMENT,
  student_name varchar(255) DEFAULT NULL,
  PRIMARY KEY (student_id)
)AUTO_INCREMENT=1 DEFAULT CHARSET=utf8;

CREATE TABLE courses (
  course_id int(11) NOT NULL AUTO_INCREMENT,
  course_name varchar(255) NOT NULL,
  PRIMARY KEY (course_id)
)AUTO_INCREMENT=1 DEFAULT CHARSET=utf8;

CREATE TABLE student_select_course(
  s_id int(11) NOT NULL,
  c_id int(11) NOT NULL,
  PRIMARY KEY(s_id,c_id)
) DEFAULT CHARSET=utf8;

INSERT INTO students VALUES (1,'student1');
INSERT INTO students VALUES (2,'student2');

INSERT INTO courses VALUES (1,'Java course');
INSERT INTO courses VALUES (2,'Java Web course');

INSERT INTO student_select_course VALUES(1,1);
INSERT INTO student_select_course VALUES(1,2);
INSERT INTO student_select_course VALUES(2,1);
INSERT INTO student_select_course VALUES(2,2);
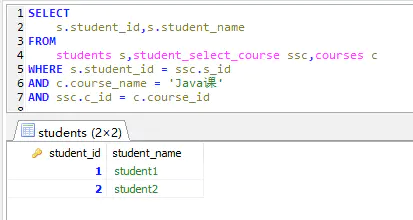
According to the requirements, we design the SQL language:
SELECT
    s.student_id,s.student_name
FROM
    students s,student_select_course ssc,courses c
WHERE s.student_id = ssc.s_id
AND ssc.c_id = c.course_id
AND c.course_name = #{value}
The SQL execution results are as follows:
If the entity classes are the same, we will not repeat them. Let's directly configure the mapping file [Student.xml]:
<resultMap id="Students" type="pojo.Student">
    <id property="id" column="student_id"/>
    <result column="student_name" property="name"/>
</resultMap>

<select id="findStudentsByCourseName" parameterType="String" resultMap="Students">
    SELECT
      s.student_id,s.student_name
    FROM
      students s,student_select_course ssc,courses c
    WHERE s.student_id = ssc.s_id
    AND ssc.c_id = c.course_id
    AND c.course_name = #{value}
</select>
The test class is the same. Just modify the id of the call (changed to findStudentsByCourseName) and directly the test results:

On the contrary, the same is true. What matters is SQL statements and mappings.
Summary:
1. Although the SQL statements written by myself are not disgusting (at least clear thinking), they feel terrible!
2. Combined with SQL language and mapping file, it can easily operate the database
3. It's better to set up foreign keys in the database... (slapping face, according to Alibaba Java development manual)
It's better not to build foreign keys, but let the Service layer of the program make judgment)
Delayed loading
1. What is deferred loading? Literally, it means that the loading of a certain type of information needs to be delayed for a while. In MyBatis, multi table joint queries are usually performed, but sometimes all joint query results will not be used immediately. At this time, the function of delayed loading can be used.
2. Function: delayed loading can be achieved by querying from a single table first and then from an associated table when necessary, which greatly improves the performance of the database, because querying a single table is faster than querying multiple tables.
3. Instance: if the order is queried and the user information is queried by association. If we can meet the requirements by querying the order information first, we can query the user information when we need to query the user information. To query user information on demand is to delay loading.
Association query:
SELECT
    orders.*, user.username
FROM orders, user
WHERE orders.user_id = user.id
 Delayed loading is equivalent to:
SELECT
    orders.*,
    (SELECT username FROM USER WHERE orders.user_id = user.id)
    username
FROM orders
So this is more intuitive. That is to say, I do the association query twice instead of finding all at once. The first step is to query only the single table orders, which will inevitably find a user in the orders_ ID field, and then I use this user_id query is also a single table query.
Reference article: https://blog.csdn.net/eson_15/article/details/51668523
Mapper mapping configuration authoring
First, define SQL that only queries all order information in Mapper mapping file:
<select id="findOrdersUserLazyLoading" resultMap="OrdersUserLazyLoadingResultMap">
    SELECT * FROM orders
</select>
The above SQL statement queries all the order information, and each order information will be associated with the query user. However, because you want to delay loading the user information, it will be configured in the result set configuration corresponding to the resultMap with id "ordersuserlazylodingresultmap":
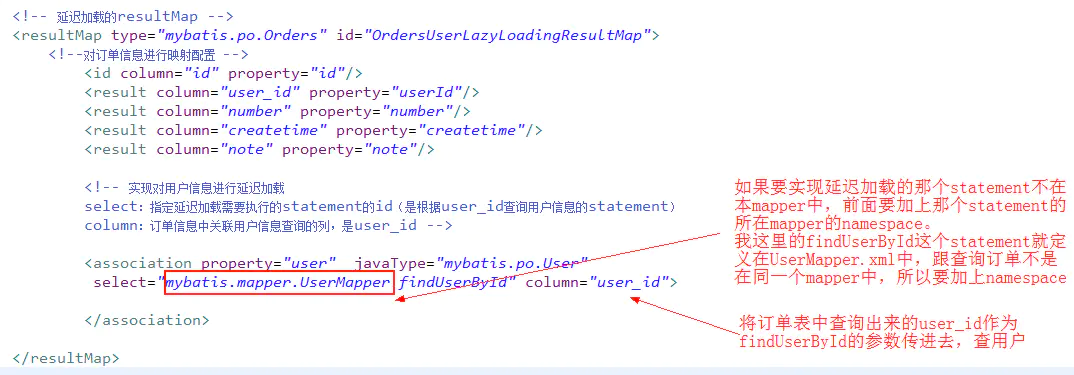
Finally, configure the SQL to be executed to obtain user information for delayed loading:
<select id="findUserById" parameterType="int" resultType="user">
    select * from user where id = #{id}
</select>
The above configuration will be used to delay the association call in the loaded resultMap. The input parameter is the field information defined in the column in the association.
Before writing test methods, you first need to turn on the delayed loading function (which is disabled by default in MyBatis). This needs to be in the global configuration file MyBatis config. For MyBatis Configure the setting attribute in XML, set the switch of lazy loading enable to "true", and since it is on-demand loading, it is also necessary to change positive loading to negative loading:
<settings>
    <!-- Turn on the switch for delayed loading -->
    <setting name="lazyLoadingEnabled" value="true"/>
    <!-- Change positive loading to negative loading, that is, delayed loading -->
    <setting name="aggressiveLazyLoading" value="false"/>
</settings>
Note: there is a certain order of configuration in configuration. Specifically, you can press and hold Ctrl and click the configuration attribute to see the following information (i.e. the defined order):
<!ELEMENT configuration (properties?, settings?, typeAliases?, typeHandlers?, objectFactory?, objectWrapperFactory?, reflectorFactory?, plugins?, environments?, databaseIdProvider?, mappers?)>
Mapper dynamic proxy
What is Mapper dynamic proxy? Generally, when creating a Web project, the logic of fetching data from the database will be placed in the DAO layer (Date Access Object). When developing a Web project with MyBatis, only the interface and method definition of data interaction and the corresponding Mapper mapping file can be written through Mapper dynamic proxy mechanism. The specific interaction method is implemented by MyBatis. This saves a lot of time in developing the DAO layer.
The method of implementing Mapper agent is not difficult, just follow certain development specifications.
Mapper proxy instance authoring
We write an example of using Mapper agent to query Student information. First, we create a new one named studentmapper under [pojo] XML Mapper configuration file, which contains the SQL configuration for adding, deleting, modifying and querying students:
<?xml version="1.0" encoding="UTF-8"?>
<!DOCTYPE mapper
        PUBLIC "-//mybatis.org//DTD Mapper 3.0//EN"
        "http://mybatis.org/dtd/mybatis-3-mapper.dtd">

<mapper namespace="mapper.StudentMapper">
    <!-- Query students -->
    <select id="findStudentById" parameterType="_int" resultType="pojo.Student">
        SELECT * FROM student WHERE student_id = #{id}
    </select>
    <!-- Add user -->
    <insert id="insertStudent" parameterType="pojo.Student">
        INSERT INTO student(student_id, name) VALUES(#{id}, #{name})
    </insert>
    <!-- delete user -->
    <delete id="deleteStudent" parameterType="_int">
        DELETE FROM student WHERE student_id = #{id}
    </delete>
    <!-- Modify user -->
    <update id="updateStudent" parameterType="pojo.Student">
        UPDATE student SET name = #{name} WHERE student_id = #{id}
    </update>
</mapper>
If necessary, use StudentMapper XML mapper proxy, you first need to define an interface called StudentMapper. Then create four new method definitions corresponding to StudentMapper Add, delete, modify and query the SQL configuration of students in XML, and then change the namespace in StudentMapper to the place defined by StudentMapper interface (that is, StudentMapper under mapper package), so that mapper agent can be used in business class. The interface code is as follows:
package mapper;

import pojo.Student;

public interface StudentMapper {

    // Query student information according to id
    public Student findStudentById(int id) throws Exception;

    // Add student information
    public void insertStudent(Student student) throws Exception;

    // Delete student information
    public void deleteStudent(int id) throws Exception;

    // Modify student information
    public void updateStudent(Student student) throws Exception;
}
Note: don't forget in mybatis config Configure Mapper mapping file in XML
Test dynamic agent
In the test method, use the getMapper method of SqlSession class and pass in the Mapper proxy interface class to be loaded to obtain the relevant Mapper proxy object. Use the Mapper proxy object to add, delete and modify student information:
@Test
public void test() throws Exception {
// According to mybatis config sqlSessionFactory is obtained from the information of XML configuration
String resource = "mybatis-config.xml";
InputStream inputStream = Resources.getResourceAsStream(resource);
SqlSessionFactory sqlSessionFactory = new SqlSessionFactoryBuilder().build(inputStream);
// Then get the session according to sqlSessionFactory
SqlSession session = sqlSessionFactory.openSession();
// Get Mapper proxy
StudentMapper studentMapper = session.getMapper(StudentMapper.class);
// Execute Mapper proxy exclusive query method
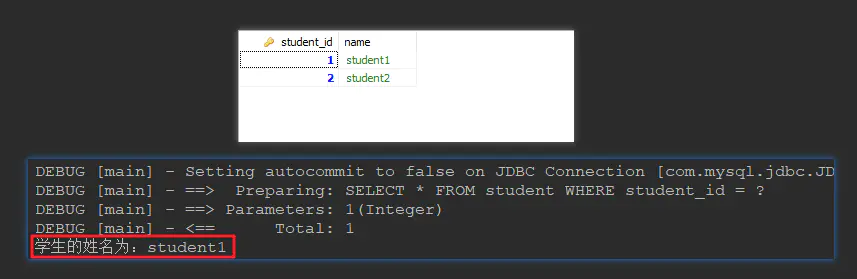
Student student = studentMapper.findStudentById(1);
System.out.println("The student's name is:" + student.getName());
session.close();
}
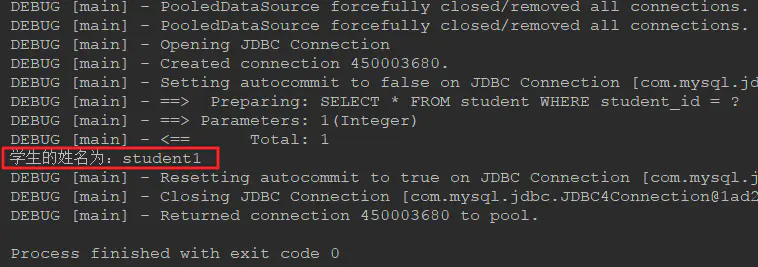
Run the test method and see the correct results:
Using Mapper agent can make the development more concise, make the query structure clearer and the engineering structure more standardized.
Developing MyBatis with annotations
In the above example, we already have a convenient Mapper proxy object. We can further omit the XML configuration information and use convenient annotations to develop MyBatis. Let's practice:
Step 1: add annotations to Mapper
We put StudentMapper The SQL statements configured under XML are intact in the StudentMapper interface through annotation:
public interface StudentMapper {

    // Query student information according to id
    @Select("SELECT * FROM student WHERE student_id = #{id}")
    public Student findStudentById(int id) throws Exception;

    // Add student information
    @Insert("INSERT INTO student(student_id, name) VALUES(#{id}, #{name})")
    public void insertStudent(Student student) throws Exception;

    // Delete student information
    @Delete("DELETE FROM student WHERE student_id = #{id}")
    public void deleteStudent(int id) throws Exception;

    // Modify student information
    @Update("UPDATE student SET name = #{name} WHERE student_id = #{id}")
    public void updateStudent(Student student) throws Exception;
}
Step 2: modify mybatis config xml
Comment out the previously configured mapping and create a new one:
<!-- Mapping file -->
<mappers>
    <!--<mapper resource="pojo/StudentMapper.xml"/>-->
    <mapper class="mapper.StudentMapper"/>
</mappers>
Note: this mapping is not a file (using the resource attribute), but a class (using the class attribute)
Step 3: run the test code
The above test code can be run directly without modification, and the correct results can be obtained:
MyBatis cache structure
In the Web system, the most important operation is to query the data in the database. However, sometimes the frequency of querying data is very high, which consumes database resources, often leads to very low database query efficiency and affects the customer's operation experience. So we can put some data with little change and high access frequency into a cache container, and the user will get the results from the cache container the next time he queries.
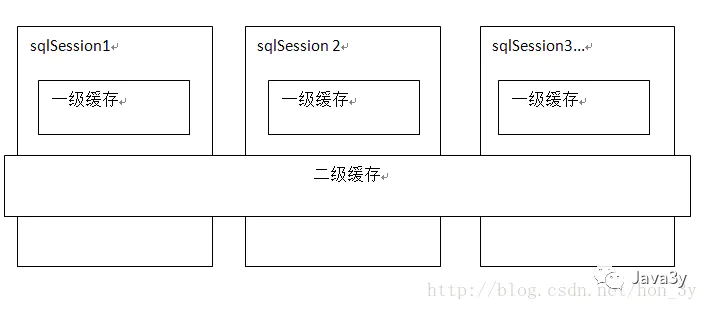
1.MyBatis has its own cache structure, which can be used to relieve the pressure on the database and speed up the query speed.
2.mybatis L1 cache is a sqlsession level. Sqlsession can only access its own L1 cache data.
3. L2 cache is a cross sqlsession and mapper level cache. For mapper level cache, different sqlsessions can be shared.
L1 query cache
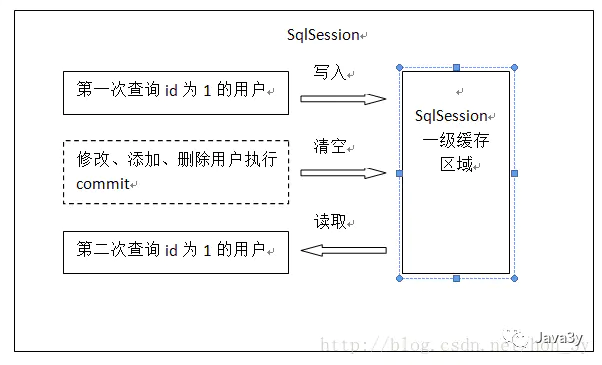
The first level query exists in the instance object of each SqlSession class. When a data is queried for the first time, the instance object of SqlSession class will store the data in the first level cache area. Before receiving the request to change the data, the user will query the data again and get the data from the cache instead of connecting to the database for query again.
MyBatis L1 cache principle:
The first time a query sql is issued, the sql query results are written into the first level cache of sqlsession, and the data structure used by the cache is a map
key: hashcode+sql+sql input parameter + output parameter (unique identifier of sql)
value: user information
If the same sql session issues the same sql again, the database cannot be fetched from the cache. If a commit operation (modify, add, delete) occurs between two times, the first level cache area in this sqlsession will be emptied, and it will not be found in the cache next time, so it is necessary to query from the database, query from the database to write to the cache.
L1 cache example
Let's query the Category object with id = 1 twice in the same session and try:
public static void main(String[] args) throws IOException {
    String resource = "mybatis-config.xml";
    InputStream inputStream = Resources.getResourceAsStream(resource);
    SqlSessionFactory sqlSessionFactory = new SqlSessionFactoryBuilder().build(inputStream);
    SqlSession session1 = sqlSessionFactory.openSession();

    Category c1 = session1.selectOne("getCategory", 1);
    System.out.println(c1);
    Category c2 = session1.selectOne("getCategory", 1);
    System.out.println(c2);

    session1.commit();
    session1.close();

}
After running, you can see that the data will be fetched from the database for the first time, but the database will not be accessed for the second time, but directly from the session: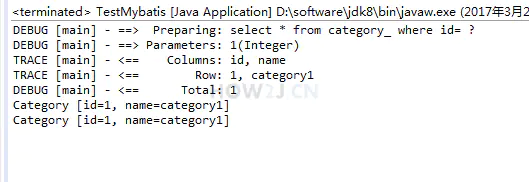
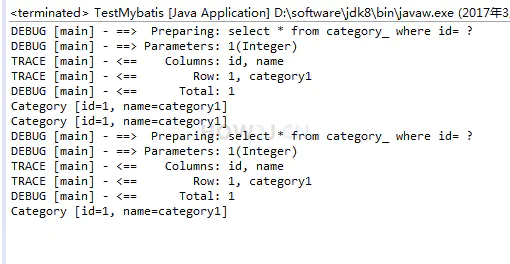
Let's test querying the same id data in different session s
public static void main(String[] args) throws IOException {
    String resource = "mybatis-config.xml";
    InputStream inputStream = Resources.getResourceAsStream(resource);
    SqlSessionFactory sqlSessionFactory = new SqlSessionFactoryBuilder().build(inputStream);
    SqlSession session1 = sqlSessionFactory.openSession();

    Category c1 = session1.selectOne("getCategory", 1);
    System.out.println(c1);
    Category c2 = session1.selectOne("getCategory", 1);
    System.out.println(c2);

    session1.commit();
    session1.close();

    SqlSession session2 = sqlSessionFactory.openSession();
    Category c3 = session2.selectOne("getCategory", 1);
    System.out.println(c3);
    session2.commit();
    session2.close();

}
This time, open another session and take the data with the same id, you will find that you need to execute sql statements, which proves that the L1 cache is in the session:
What should be noted about MyBatis L1 cache:
1.MyBatis supports L1 cache by default and does not need to be configured.
2. After the integration of mybatis and spring, mapper agent development is carried out, which does not support the first level cache. Mybatis and spring are integrated. Spring generates mapper agent objects according to the mapper template, and SQL session is closed uniformly in the template.
L2 query cache
Problem: sometimes, in a Web project, the method for executing the query operation is encapsulated in a Service method. When the query is completed once, the Service method ends. At this time, the instance object of SqlSession class will be closed and the L1 cache will be emptied.
L2 cache principle:
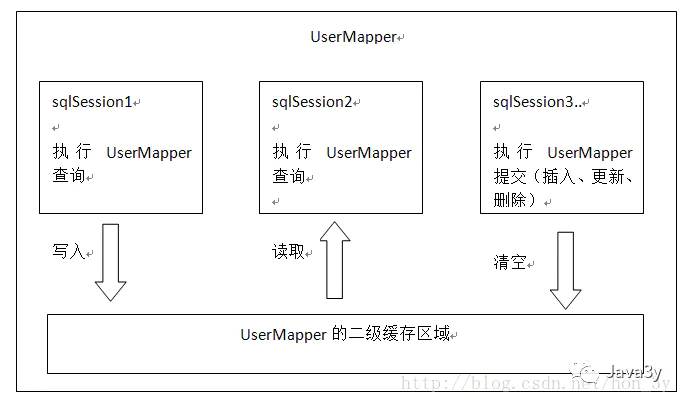
The range of L2 cache is mapper level (mapper is the same namespace). Mapper creates a cache data structure in the unit of namespace, and the structure is map.
To enable L2 cache, you need to do two steps.
Step 1: in MyBatis global configuration file MyBatis config Configure the setting property in XML, and set the property named "cacheEnable" to "true":
<settings>
    <!-- Enable L2 cache -->
    <setting name="cacheEnabled" value="true"/>
</settings>
After the L2 cache is enabled, we need to implement Java. Java for the POJO class mapped by the query results io. Serializable interface. The secondary cache can write the data in memory to disk. There are serialization and deserialization of objects, so it is necessary to implement Java io. Serializable interface.
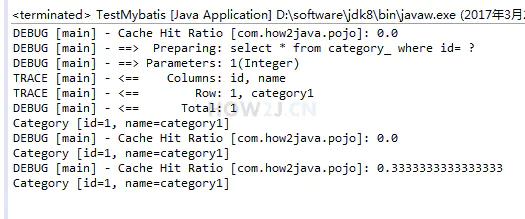
L2 cache example
When we query the data with id = 1 in the same SessionFactory, we only need to execute the SQL statement for the first time, and then take it out of the cache:
reference material: https://mp.weixin.qq.com/s?__biz=MzI4Njg5MDA5NA==&mid=2247483937&idx=5&sn=4a049d7461b67c4135183db09ec97bcb&chksm=ebd74320dca0ca3691081597ac9db2447d51250d7aa819009231760977dd932b43a116fe44ba#rd