1. Use openSSL to generate certificates
A root SSL certificate is a certificate authority (CA) trusted by the issued certificate.
Generate an RSA-2048 key and save it to a file rootCA.key.This file will be used as the key to generate the root SSL certificate.
Command: OpenSSL genrsa-des3-out rootCA.key 2048
You can use the key you generate to create a new root SSL certificate.And save it as rootCA.pem.
Command: OpenSSL req-x509-new-nodes-key rootCA.key-sha256-days 1024-out rootCA.pem 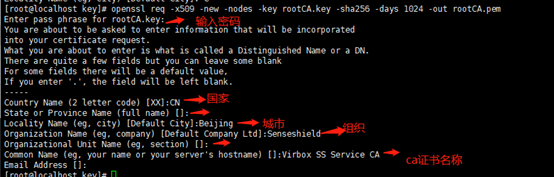
The corresponding input password is: 12345678
2. Generate domain SSL certificates using root SSL
Create a new OpenSSL configuration file, server.csr.cnf, to import these settings when creating certificates.
[req]
default_bits = 2048
prompt = no
default_md = sha256
distinguished_name = dn

[dn]
C=CN
L=Beijing
O=Senseshield
CN = Virbox SS Dom CA
Create a v3.ext file to create an x509 v3 certificate.Specify the subjectAltName option.
authorityKeyIdentifier=keyid,issuer
basicConstraints=CA:FALSE
keyUsage = digitalSignature, nonRepudiation, keyEncipherment, dataEncipherment
subjectAltName = @alt_names

[alt_names]
DNS.1 = localhost
DNS.2 = test.sensese.com
Create server.key, using the stored configuration settings server.csr.cnf
openssl req -new -sha256 -nodes -out server.csr -newkey rsa:2048 -keyout server.key -config <(cat server.csr.cnf)
The certificate signature is issued through the root SSL certificate we created, creating a domain name certificate for localhost and testsensese.com.Output a certificate file named server,crt.
openssl x509 -req -in server.csr -CA rootCA.pem -CAkey rootCA.key -CAcreateserial -out server.crt -days 3650 -sha256 -extfile v3.ext
3. Verify that the issued domain certificate is valid.
Set up nginx and configure nginx.conf.The configuration is as follows:
 server {
        listen 80 default;
        server_name test.sensese.com;#Fill in this DNS.2 = test.sensese.com, defined by the v3.ext file created above
        rewrite ^(.*)$  https://$host$1 permanent;
     }
    server {
    listen 443 ssl http2;#https uses port 443 by default
    server_name test.sensese.com;
    #ssl on;
    ssl_certificate /etc/nginx/key/server.crt; #This is the domain certificate generated above
    ssl_certificate_key /etc/nginx/key/server.key; #This is the domain certificate key generated above.
    ssl_session_timeout 5m;
    ssl_protocols SSLv2 SSLv3 TLSv1;
    ssl_ciphers EECDH+CHACHA20:EECDH+CHACHA20-draft:EECDH+AES128:RSA+AES128:EECDH+AES256:RSA+AES256:EECDH+3DES:RSA+3DES:!MD5;
    ssl_prefer_server_ciphers on;

        include /etc/nginx/default.d/*.conf;

        location / {
         root         /usr/share/nginx/html;
         index        index.html  index.htm;
        }

        error_page 404 /404.html;
            location = /40x.html {
        }

        error_page 500 502 503 504 /50x.html;
            location = /50x.html {
        }
    }
Then browser access on Windows requires importing the SSL root certificate generated above in the certificate interface of the Windows system before accessing it.
Ctr+R =="cmd==" certmgr.msc, pop-up as follows: `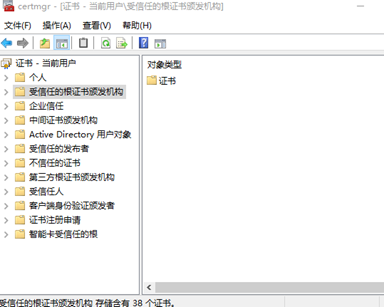
Execute in sequence: Import rootCA.pem by right-clicking [Trusted Root Certification Authorities] - [All Tasks] - [Import] - [Certificate Import Wizard].
Finally, configure host locally by adding 192.168.100.103 test.sensese.com;
192.168.100.103 is the nginx address (according to your actual nginx configuration)
The ie browser access page test.sensese.com opens normally and jumps to https.