1, Semi synchronous replication
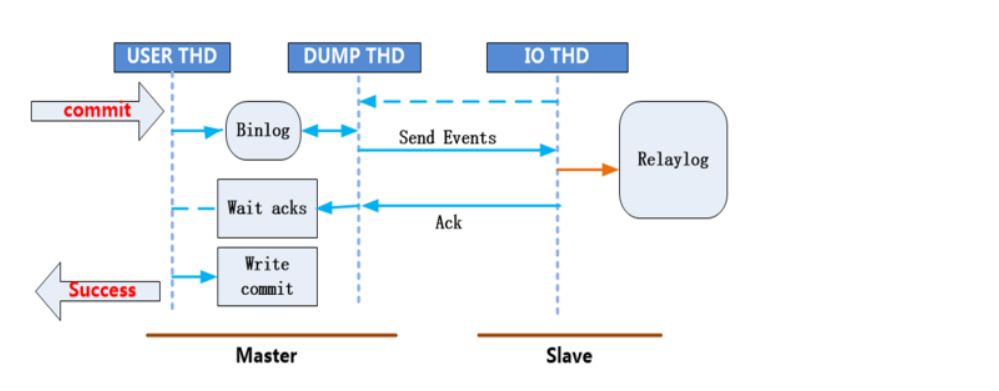
1. What is semi synchronous replication

The so-called semi synchronous replication refers to every transaction committed by the master (in short, an operation to change the data). Ensure that the slave accepts the binlog log file sent by the master server and writes it into its relay log relay log, and then send a signal to the master to tell the other party that it has received it, so that the master can successfully commit the transaction. This ensures the absolute consistency of master slave data (but at the expense of master performance) But the waiting time can also be adjusted.
2. Basic implementation of semi synchronous replication
Step 1: prepare a set of M-S master-slave architecture (GTIDs based architecture design is recommended)
Step 2: install plugin for MASTER and SLAVE (` $basedir/lib/plugin /)
MASTER:
mysql> install plugin rpl_semi_sync_master soname 'semisync_master.so';
mysql> show global variables like 'rpl_semi_sync%';
SLAVE:
mysql> install plugin rpl_semi_sync_slave soname 'semisync_slave.so';
mysql> show global variables like 'rpl_semi_sync%';
Step 3: activate the semi synchronous replication plug-in in MASTER and SLAVE server
MASTER:
mysql> set global rpl_semi_sync_master_enabled=on;
mysql> show global status like 'rpl_semi_sync%';
SLAVE:
mysql> set global rpl_semi_sync_slave_enabled=on;
mysql> show global variables like 'rpl_semi_sync%';
Step 4: restart the IO thread in the SLAVE server
mysql> stop slave IO_THREAD;
mysql> start slave IO_THREAD;
Step 5: Test and verify semi synchronous replication
When slave from library IO_ After the thread thread accepts the binlog log, it needs to give a confirmation to the master. If it does not receive the slave's reception confirmation signal for more than 10s, it will automatically switch to the traditional asynchronous replication mode.
1) Insert a record into the master to check whether the slave returns successfully
mysql> insert into db_itheima.tb_student values (null,'j');
mysql> show global status like 'rpl_semi_sync%_yes_tx';
+-----------------------------+-------+
| Variable_name               | Value |
+-----------------------------+-------+
| Rpl_semi_sync_master_yes_tx |  1    |
It means that this time things succeed from slave Return once confirmation signal
+-----------------------------+-------+
2) Simulate slave server failure
SLAVE:
# service mysqld stop
MASTER:
mysql> insert into db_itheima.tb_student values (null,'k');
mysql> insert into db_itheima.tb_student values (null,'l');
It takes 10 seconds to insert a value this time (the default waiting time))
mysql> insert into db_itheima.tb_student values (null,'m');
Now it automatically changes to the original asynchronous mode
3) Restart semi synchronous replication
SLAVE:
# service mysqld start
# mysql -P 3310 -p
mysql> set global rpl_semi_sync_slave_enabled=on;
mysql> stop slave IO_THREAD;
mysql> start slave IO_THREAD;
The master needs to wait for the slave to confirm before submitting. If it cannot wait for the confirmation message, the master will automatically become asynchronous and synchronous after waiting for 10s; After the slave is started, the changed data on the master will be copied automatically, and the data will be consistent again.
3. Modification of waiting time (10s by default)
mysql> set global rpl_semi_sync_master_timeout=3600000;
mysql> show global variables like 'rpl_semi_sync%';
+------------------------------------+---------+
| Variable_name                      | Value   |
+------------------------------------+---------+
| rpl_semi_sync_master_enabled       | ON      |
| rpl_semi_sync_master_timeout       | 3600000 |
| rpl_semi_sync_master_trace_level   | 32      |
| rpl_semi_sync_master_wait_no_slave | ON      |
+------------------------------------+---------+
4. Uninstall the semi synchronous replication plug-in (when not needed)
mysql> select plugin_name,load_option from information_schema.plugins;
mysql> uninstall plugin Plug in name;
Add: after mysqld restarts, you need to manually start the master-slave synchronization
# service mysqld stop
# service mysqld start
# mysql -P 3310 -p
mysql> show slave status\G
Slave_IO_Running: No
Slave_SQL_Running: No
The above situation means that after mysqld is restarted, the master-slave synchronization will also be closed, which needs to be started manually.
mysql> start slave;
2, Introduction to MHA
1. What is MHA
At present, MHA (Master High Availability) is a relatively mature solution in MySQL high availability. It is developed by Japan DeNA company youshimaton (now working for Facebook company). It is an excellent set of high availability software for failover and master-slave improvement in MySQL high availability environment. In the process of MySQL failover, MHA can automatically complete the database failover within 0 ~ 30 seconds, and in the process of failover, MHA can ensure the consistency of data to a great extent, so as to achieve high availability in the real sense.
2. MHA working principle

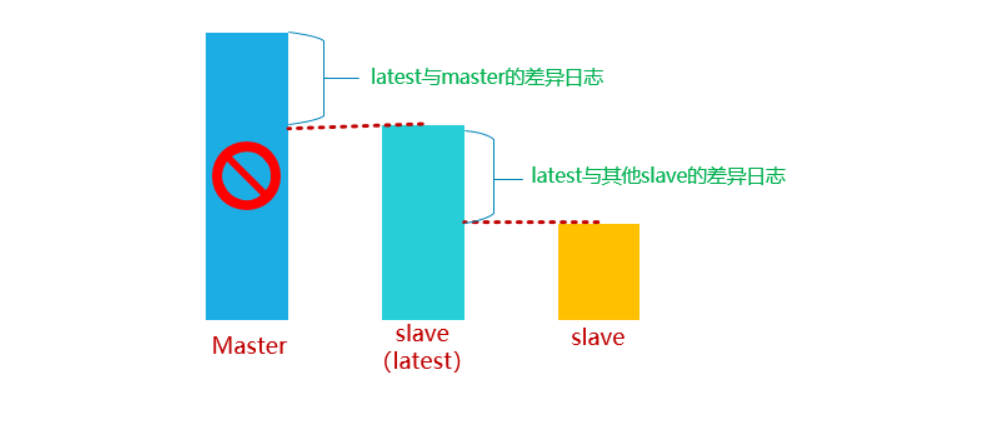
- When the master fails, compare the location of the binlog on the master read by the I/O thread between the slave, and select the closest slave as the latest slave.
- Other slaves generate difference relay logs by comparing with latest slave s and apply them.
- Apply the binlog saved from the master on the latest slave and promote the latest slave to the master.
- Finally, apply the corresponding differential relay log on other slave and start copying from the new master
3. MHA assembly
-
MHA Manager (management node)
MHA Manager can be deployed on a separate machine to manage multiple master slave clusters, or on a slave node.
-
MHA Node
The MHA Node runs on each MySQL server. The MHA Manager will regularly detect the master node in the cluster. When the master fails, it can automatically promote the slave of the data to a new master, and then point all other slave to the new master again. The entire failover process is completely transparent to the application.
4. Introduction to MHA components
- MHA Manager
Run some tools, such as masterha_manager tool can automatically monitor MySQL Master and realize master failover, while other tools can manually realize master failover, online matter transfer, connection check, etc. One manager can manage multiple master slave clusters
- MHA Node
Deployed on all servers running MySQL, whether master or slave. It has three main functions:
1) Save binary log
If the fault can be accessed master,Will copy master Binary log for
2) Apply differential relay log
Generate the difference relay log from the slave with the latest data, and then apply the difference log.
3) Clear relay log
Never stop SQL Delete relay log in case of thread
5. Introduction to tools in MHA
A Manager tool
| tool | explain |
|---|---|
| masterha_check_ssh | Check the SSH configuration of MHA |
| masterha_check_repl | Check MySQL replication |
| masterha_manager | Start MHA |
| masterha_check_status | Detect the current MHA operation status |
| masterha_master_monitor | Monitor whether the master is down |
| masterha_master_switch | Control failover (automatic or manual) |
| masterha_conf_host | Add or delete configured server information |
II. Node tool
| tool | explain |
|---|---|
| save_binary_logs | Save and copy binary logs of master |
| apply_diff_relay_logs | Identify differential relay log events and apply them to other slave s |
| filter_mysqlbinlog | Remove unnecessary ROLLBACK events (MHA no longer uses this tool) |
| purge_relay_logs | Clear relay log (does not block SQL thread) |
Note: Node tools are usually triggered by scripts of MHA Manager and do not require manual operation.
3, MHA deployment architecture
1. Deployment planning
| role | IP | host name | server-id | function | remarks |
|---|---|---|---|---|---|
| MHA-Manager | 10.1.1.40 | mha.itcast.cn | — | Management node | |
| MHA-Node(Master) | 10.1.1.10 | master.itcast.cn | 10 | Data node | write |
| MHA-Node(Slave1) | 10.1.1.20 | slave1.itcast.cn | 20 | Data node | read |
| MHA-Node(Slave2) | 10.1.1.30 | slave2.itcast.cn | 30 | Data node | read |
##2. System and software version
| System version | MySQL version | MHA version |
|---|---|---|
| CentOS 7.6 | MySQL-5.7.31 | mha4mysql-manager-0.57 mha4mysql-node-0.57 |
3. System environment initialization
Step 1: clone the machine, start the MASTER first, and then start SLAVE1, SLAVE2 and MHA at one time
Step 2: change the host name of the computer
# hostnamectl set-hostname master.itcast.cn
# su

# hostnamectl set-hostname slave1.itcast.cn
# su

# hostnamectl set-hostname slave2.itcast.cn
# su

# hostnamectl set-hostname mha.itcast.cn
# su
Step 3: change the IP address and bind the host name and IP address to the / etc/hosts file
# vim /etc/sysconfig/network-scripts/ifcfg-ens33
...
IPADDR=10.1.1.10,IPADDR=10.1.1.20,IPADDR=10.1.1.30,IPADDR=10.1.1.40
...

# systemctl stop NetworkManager
# systemctl disable NetworkManager

# systemctl restart network
Connect 4 servers with MX and bind the IP address and host name to the / etc/hosts file
# vim /etc/hosts
10.1.1.10 master.itcast.cn
10.1.1.20 slave1.itcast.cn
10.1.1.30 slave2.itcast.cn
10.1.1.40 mha.itcast.cn
Step 4: close the firewall and SELinux
# systemctl stop firewalld
# systemctl disable firewalld
# setenforce 0
# sed -i '/SELINUX=enforcing/cSELINUX=disabled' /etc/selinux/config
Step 5: configure the YUM source
Basic source (omitted, Tencent source is recommended)
Configure epel source
# wget -O /etc/yum.repos.d/epel.repo http://mirrors.cloud.tencent.com/repo/epel-7.repo
# yum clean all
# yum makecache
Configure yum source of local self built warehouse
① Upload MHA Yum package to / soft/mha directory
# mkdir -p /soft/mha
② Configure the local Yum source. When we use yum, we can automatically find the warehouse directory MHA yum
# vim /etc/yum.repos.d/local.repo
[mha]
name=mha soft
baseurl=file:///soft/mha/mha-yum
enabled=1
gpgcheck=0
Testing the installation of MHA dependent software library
yum -y install perl-DBD-MySQL \
perl-Config-Tiny \
perl-Time-HiRes \
perl-Mail-Sender \
perl-Mail-Sendmail \
perl-MIME-Base32 \
perl-MIME-Charset \
perl-MIME-EncWords \
perl-Params-Classify \
perl-Params-Validate.x86_64 \
perl-Log-Dispatch \
perl-Parallel-ForkManager \
net-tools
Step 6: ntpdate time synchronization (very important)
# ntpdate 182.92.12.11
4. Deploy MySQL master-slave replication environment
Database installation location: / usr/local/mysql
Data directory of database: / usr/local/mysql/data
Socket file: / TMP / MySQL sock
Port setting: 3306
Location of configuration file: / usr / local / MySQL / my.com CNF (MySQL = > installation directory = > / etc directory)
☆ MASTER master server
Step 1: upload the software to the / root directory
Step 2: use script to install MySQL software
# vim mysql.sh
#!/bin/bash
yum install libaio -y
tar -xf mysql-5.7.31-linux-glibc2.12-x86_64.tar.gz
mv mysql-5.7.31-linux-glibc2.12-x86_64 /usr/local/mysql
useradd -r -s /sbin/nologin mysql
rm -rf /etc/my.cnf
cd /usr/local/mysql
mkdir mysql-files
chown mysql:mysql mysql-files
chmod 750 mysql-files
bin/mysqld --initialize --user=mysql --basedir=/usr/local/mysql &> /root/password.txt
bin/mysql_ssl_rsa_setup --datadir=/usr/local/mysql/data
cp support-files/mysql.server /etc/init.d/mysqld
service mysqld start
echo 'export PATH=$PATH:/usr/local/mysql/bin' >> /etc/profile
source /etc/profile

# source mysql.sh
Step 3: set MySQL password
# mysql -p
mysql> set password='123';
mysql> flush privileges;
Step 4: perform security initialization
# mysql_secure_installation
Step 5: write my. In the MASTER host CNF profile
# vim /usr/local/mysql/my.cnf
[mysqld]
basedir=/usr/local/mysql
datadir=/usr/local/mysql/data
socket=/tmp/mysql.sock
port=3306
log-error=/usr/local/mysql/data/master.err
log-bin=/usr/local/mysql/data/binlog
server-id=10
character_set_server=utf8mb4
gtid-mode=on
log-slave-updates=1
enforce-gtid-consistency

# service mysqld restart
☆ SLAVE1/SLAVE2 slave server
Step 1: upload MySQL software to the server
Step 2: use script to install MySQL, but initialization is not required
# vim mysql.sh
#!/bin/bash
yum install libaio -y
tar -xf mysql-5.7.31-linux-glibc2.12-x86_64.tar.gz
rm -rf /usr/local/mysql
mv mysql-5.7.31-linux-glibc2.12-x86_64 /usr/local/mysql
useradd -r -s /sbin/nologin mysql
rm -rf /etc/my.cnf
cd /usr/local/mysql
mkdir mysql-files
chown mysql:mysql mysql-files
chmod 750 mysql-files
cp support-files/mysql.server /etc/init.d/mysqld
echo 'export PATH=$PATH:/usr/local/mysql/bin' >> /etc/profile
source /etc/profile

# source mysql.sh
Step 3: use rsync to synchronize the data directory in the MASTER server to SLAVE1 and SLAVE2
MASTER:
# rm -rf /usr/local/mysql/data/auto.cnf
# rsync -av /usr/local/mysql/data root@10.1.1.20:/usr/local/mysql/
# rsync -av /usr/local/mysql/data root@10.1.1.30:/usr/local/mysql/
Step 4: configure my for SLAVE1 and SLAVE2 CNF file
SLAVE1:
# vim /usr/local/mysql/my.cnf
[mysqld]
basedir=/usr/local/mysql
datadir=/usr/local/mysql/data
socket=/tmp/mysql.sock
port=3306
log-error=/usr/local/mysql/data/slave1.err
log-bin=/usr/local/mysql/data/binlog
relay-log=/usr/local/mysql/data/relaylog
server-id=20
character_set_server=utf8mb4
gtid-mode=on
log-slave-updates=1
enforce-gtid-consistency
skip-slave-start
SLAVE2:
# vim /usr/local/mysql/my.cnf
[mysqld]
basedir=/usr/local/mysql
datadir=/usr/local/mysql/data
socket=/tmp/mysql.sock
port=3306
log-error=/usr/local/mysql/data/slave2.err
log-bin=/usr/local/mysql/data/binlog
relay-log=/usr/local/mysql/data/relaylog
server-id=30
character_set_server=utf8mb4
gtid-mode=on
log-slave-updates=1
enforce-gtid-consistency
skip-slave-start
After configuring MySQL, start the software
# service mysqld restart
☆ configure master-slave data synchronization
Step 1: create a slave synchronization account in the MASTER server
mysql> create user 'slave'@'10.1.1.%' identified by '123';
mysql> grant replication slave on *.* to 'slave'@'10.1.1.%';
mysql> flush privileges;
Step 2: create an MHA account (to facilitate the later MHA to monitor the master-slave synchronization status)
mysql> create user 'mha'@'10.1.1.40' identified by '123';
mysql> grant all privileges on *.* to 'mha'@'10.1.1.40';
mysql> flush privileges;
Step 3: configure master-slave data synchronization in SLAVE1 and SLAVE2
mysql> change master to master_host='10.1.1.10',master_port=3306,master_user='slave',master_password='123',master_auto_position=1;

mysql> start slave;
mysql> show slave status\G
At this point, the whole configuration of one master and two slaves is completed!
5. MHA software installation
Install software at different nodes
Note: install the mha node software package on all nodes, and then install the mha manager software package on the mha management side
[root@mha ~]# yum –y install mha4mysql-node-0.57-0.el7.noarch.rpm
[root@master ~]# yum –y install mha4mysql-node-0.57-0.el7.noarch.rpm
[root@slave1 ~]# yum -y install mha4mysql-node-0.57-0.el7.noarch.rpm
[root@slave2 ~]# yum –y install mha4mysql-node-0.57-0.el7.noarch.rpm

[root@mha ~]# yum –y install mha4mysql-manager-0.57-0.el7.noarch.rpm
If the dependent software has been installed in advance, you can use rpm -ivh to install it directly
II. Configure ssh mutual trust (secret free login)
explain:
- In the production environment, it is almost forbidden for root to log in to the server remotely, so ssh password free login should be configured under the admin user, which is from the perspective of security.
- The admin user can be any ordinary user
- This ordinary user is used for the management node of mha to remotely access all hosts in the mysql replication group and complete some other work
Step 1: create a common account admin and password 123 on all machines
# useradd admin
# echo 123|passwd --stdin admin
Step 2: configure the mutual trust of admin users from mha host to other hosts
mha End:
[root@mha ~]# su - admin
[admin@mha ~]$ ssh-keygen -P "" -f ~/.ssh/id_rsa
[admin@mha ~]$ cd .ssh/
[admin@mha .ssh]$ ls
id_rsa  id_rsa.pub
[admin@mha .ssh]$ mv id_rsa.pub authorized_keys
[admin@mha .ssh]$ for i in 10 20 30;do scp -r ../.ssh/ 10.1.1.$i:~/;done

Test password free login:
[admin@mha .ssh]$ ssh 10.1.1.10
[admin@mha .ssh]$ ssh 10.1.1.20
[admin@mha .ssh]$ ssh 10.1.1.30
Question: ssh password free only needs to copy the public key, but the above code is the whole The ssh directory has been copied.
A: because of the mutual trust of MHA, it is required not only that MHA should be free of secrets to MASTER, SLAVE1 and SLAVE2, but also that MASTER should be free of secrets to MHA, SLAVE1 and SLAVE2
III. configure sudo permission of admin user
On MASTER host:
[root@master ~]# vim /etc/sudoers.d/admin
#User_Alias indicates the list of users with sudo permission; Host_Alias represents a list of hosts
User_Alias MYSQL_USERS = admin
#Runas_Alias indicates who the user is logged in as
Runas_Alias MYSQL_RUNAS = root
#Cmnd_Alias represents a list of commands that are allowed to execute (commands require a full path)
Cmnd_Alias MYSQL_CMNDS = /sbin/ifconfig,/sbin/arping
MYSQL_USERS ALL = (MYSQL_RUNAS) NOPASSWD: MYSQL_CMNDS
Distribute this permission to SLAVE1 and SLAVE2 (in case of failure, the slave server can also set its own VIP)
[root@master ~]# for i in 20 30;do scp /etc/sudoers.d/admin 10.1.1.$i:/etc/sudoers.d/;done
Test whether the admin user can mount VIP (VIP can only be mounted on the MASTER machine)
# su - admin
[admin@master ~]$ sudo /sbin/ifconfig ens33:1 10.1.1.100 broadcast 10.1.1.255 netmask 255.255.255.0
[admin@master ~]$ sudo /sbin/arping -fqc 5 -w 5 -I ens33 -s 10.1.1.100 -U 10.1.1.10
[admin@master ~]$ ip a

Supplement:
arping: Used to send messages to other hosts in the LAN ARP The requested instruction can be used to test a local area network IP Whether it has been used.

-f: Exit after receiving the first response package.
-q: quite Mode, no output is displayed.
-c: Send the specified count individual ARP REQUEST Stop after package. If specified-w Parameter, the same number of ARP REPLY Package until timeout.
-w: Specify a timeout in seconds, arping Exit after reaching the specified time, no matter how many packets are sent or received during the period. under these circumstances, arping After sending the specified count(-c)After a packet is sent, it will not stop, but wait until it times out or is sent count Each package will not exit until it responds.
-I: Specify the device name to send ARP REQUEST The name of the network device for the package.
-D: Duplicate address detection mode, used to detect whether there is IP Address conflict, if not IP Returns 0 if there is a conflict.
-s: Set send ARP Wrapped IP Resource address
-U: Unwarranted (Compulsory) ARP Mode to update on other hosts ARP CACHE The local information in the list does not need a response.
-h: Displays the help page.
IV. create mha related configuration files
MHA server: creating working directory
[root@mha ~]# mkdir /etc/mha/
[root@mha ~]# mkdir -p /data/mha/masterha/app1
[root@mha ~]# chown -R admin. /data/mha
Create mha local profile:
[root@mha ~]# vim /etc/mha/app1.conf
[server default]
# Set monitoring user and password (modify 1)
user=mha
password=123
# Set the replication user and password in the replication environment (modify 2)
repl_user=slave
repl_password=123
# Set the login user name of ssh (modify 3)
ssh_user=admin
# Set the time interval for monitoring the main database and sending ping packets. The default is 3 seconds. When there is no response after three attempts, the failover will be carried out automatically
ping_interval=3
# Set mgr's working directory
manager_workdir=/data/mha/masterha/app1
# Set the directory where mysql master saves binlog so that MHA can find the binary log of the master (modification 4)
master_binlog_dir=/usr/local/mysql/data
# Set the pid file of the master (modify 5)
master_pid_file=/usr/local/mysql/data/master.itcast.cn.pid
# Set the directory where mysql master saves binlog in case of switching (create this directory on mysql master)
remote_workdir=/data/mysql/mha
# Set mgr log file (MHA encounters problems, mainly see this log)
manager_log=/data/mha/masterha/app1/app1-3306.log
# If there is a problem between the monitoring of the MHA and the master, the MHA Manager will try to log in to the master from slave1 and slave2
secondary_check_script=/usr/bin/masterha_secondary_check -s 10.1.1.20 -s 10.1.1.30 --user=admin --port=22 --master_host=10.1.1.10 --master_port=3306
# Set the switching script during automatic failover (when a failure occurs, automatically mount the VIP to SLAVE1 or SLAVE2)
master_ip_failover_script="/etc/mha/master_ip_failover.sh 10.1.1.100 1"
# Set the switching script for manual switching
#master_ip_online_change_script="/etc/mha/master_ip_online_change.sh 10.1.1.100 1"
# Set the script to close the failed host after the failure occurs
# shutdown_script="/etc/mha/power_manager"
[server1]
hostname=10.1.1.10
port= 3306
candidate_master=1
[server2]
hostname=10.1.1.20
port= 3306
candidate_master=1
[server3]
hostname=10.1.1.30
port= 3306
candidate_master=1
V. upload the corresponding script / etc/mha directory, then change the configuration information and authorize
[root@mha ~]# ls /etc/mha/
app1.conf  master_ip_failover.sh
 Note: in the script, the name of the network card and the connected user should be changed to admin
my $vip  = shift;
my $interface = 'ens33';		Network card name (38 lines)
my $key = shift;
...
sub stop_vip() {
    my $ssh_user = "admin";		User name (110 lines)
    print "=======$ssh_stop_vip==================\n";
    `ssh $ssh_user\@$orig_master_host \" $ssh_stop_vip \"`;
}

[root@mha ~]# chmod +x /etc/mha/master_ip_*
6. Detect SSH mutual trust and MySQL master-slave status
MHA:
# su - admin
# Detect SSH mutual trust
[admin@mha ~]$ masterha_check_ssh --conf=/etc/mha/app1.conf
# Detect cluster status
[admin@mha ~]$ masterha_check_repl --conf=/etc/mha/app1.conf
7. Check MHA status and then run MHA (monitoring starts)
MHA:
[admin@mha ~]$ masterha_check_status --conf=/etc/mha/app1.conf
app1 is stopped(2:NOT_RUNNING).

open MHA Manager Monitoring (key, on behalf of start-up) MHA):
[admin@mha ~]$ nohup masterha_manager --conf=/etc/mha/app1.conf --remove_dead_master_conf --ignore_last_failover &

Check the monitoring status again:
[admin@mha ~]$ masterha_check_status --conf=/etc/mha/app1.conf
app1 (pid:8913) is running(0:PING_OK), master:10.1.1.10


be careful:
1. If it is normal, it will display PING_OK ",Otherwise, it will display NOT_RUNNING ",explain MHA Monitoring is not on
2. use admin The user starts monitoring, otherwise permission will be rejected
3. Manual stop monitoring command:masterha_stop --conf=/etc/mha/app1.conf
In fact, at this point, our MHA has been configured!
4, Automatic Failover test
1. Install test tools on MASTER server
[root@master ~]# yum -y install sysbench
2. Insert test data
master Create a test library on the server test
mysql> create database test charset utf8mb4;
Query OK, 1 row affected (0.17 sec)

mysql> grant all on *.* to 'mha'@'localhost' identified by '123';
Query OK, 0 rows affected (0.14 sec)

mysql> flush privileges;
Query OK, 0 rows affected (0.11 sec)

mysql> exit
Bye


[root@master ~]# sysbench /usr/share/sysbench/oltp_read_only.lua \
 --mysql-host=10.1.1.10  --mysql-port=3306  --mysql-user=mha \
 --mysql-password=123  --mysql-socket=/tmp/mysql.sock \
 --mysql-db=test  --db-driver=mysql  --tables=1 \
 --table-size=100000 --report-interval=10 --threads=128 --time=120 prepare

mysql> select count(*) from sbtest1;
+----------+
| count(*) |
+----------+
|   100000 |
+----------+
1 row in set (0.01 sec)
3. Take a snapshot
MHA,MASTER,SLAVE1,SLAVE2
4. Simulate MASTER server failure
MHA server: monitoring log
[root@mgr ~]# tail -f /data/mha/masterha/app1/app1-3306.log
MASTER server:
# service mysqld stop
MHA log display results:
Failover:

VIP drift:

common problem
(1) . management node configuration file error
[root@mgr ~]# cat /etc/mha/app1.conf
[server default]
# Set the monitoring user and password. This user is the database management account created on the master and has all permissions
user=mha
password=123
# Set the replication user and password in the replication environment. Note that the following permissions are required:
#REPLICATION SLAVE and REPLICATION CLIENT
repl_user=slave
repl_password=123
# Set the login user name of ssh
ssh_user=admin
....
[server1]
hostname=10.1.1.10
port= 3306
candidate_master=1
[server2]
hostname=10.1.1.20
port= 3306
candidate_master=1
[server3]
hostname=10.1.1.30
port= 3306
candidate_master=1
 Note: be sure to configure the correct IP And port number
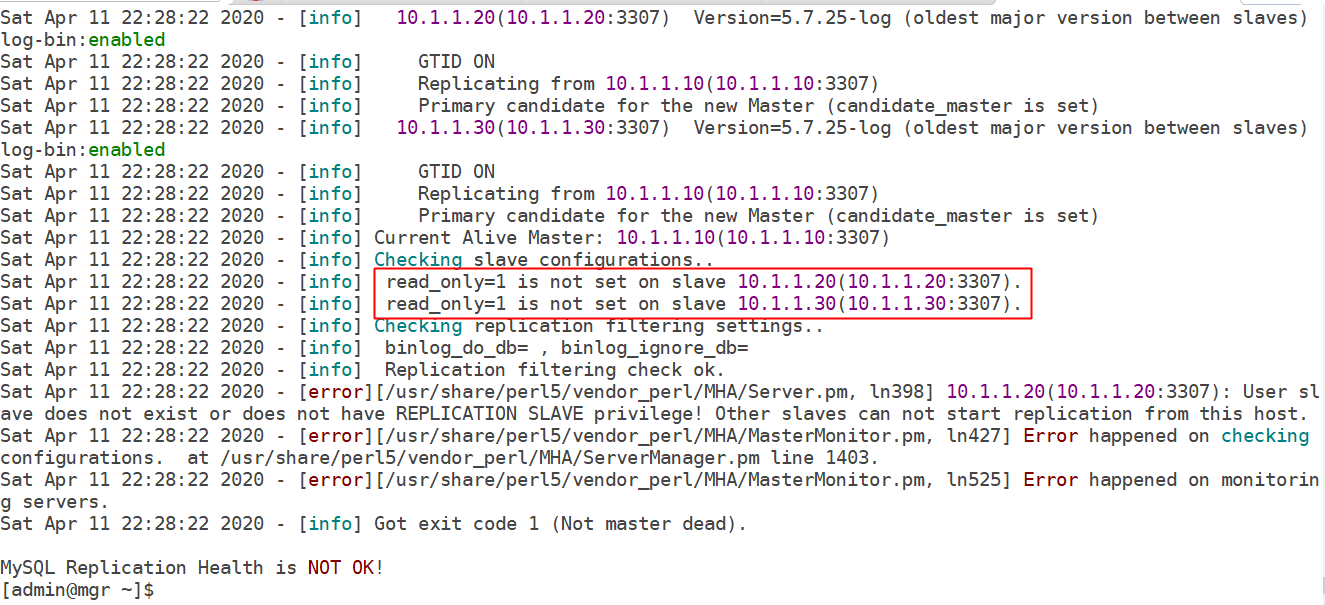
(2) . data read-only setting when configuring MHA

Solution: set the slave server to read-only
mysql> set @@global.read_only=1;
Query OK, 0 rows affected (0.00 sec)

mysql> show variables like 'read_only';
+---------------+-------+
| Variable_name | Value |
+---------------+-------+
| read_only     | ON    |
+---------------+-------+
1 row in set (0.00 sec)
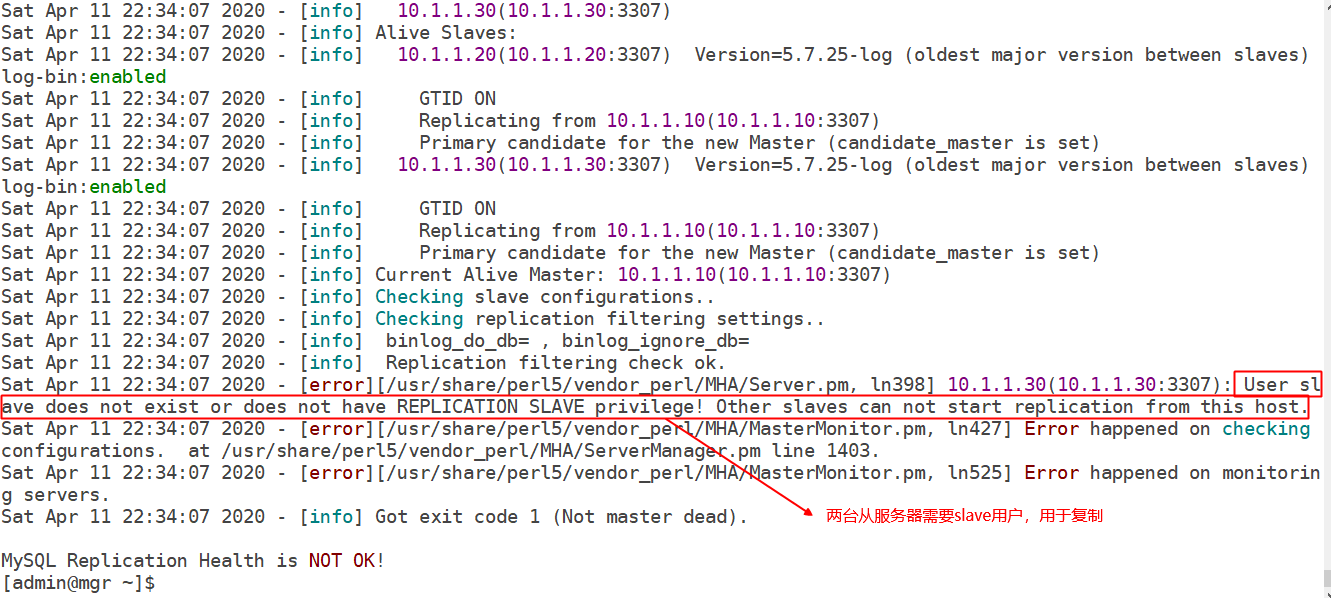
(3) . copy user permission password error

reason:
- The replication user slave does not have relevant permissions. REPLICATION SLAVE and REPLICATION CLIENT
- The replication user was not created from the server
###4. Other errors
The MHA cluster needs at least two slaves, so if there is only one slave, the inspection will not pass!
slave
repl_password=123
(4) Set the login user name of ssh
ssh_user=admin
...
[server1]
hostname=10.1.1.10
port= 3306
candidate_master=1
[server2]
hostname=10.1.1.20
port= 3306
candidate_master=1
[server3]
hostname=10.1.1.30
port= 3306
candidate_master=1
Note: be sure to configure the correct IP and port number
### 2. Read only data setting when configuring MHA

[External chain picture transfer...(img-rQQwZDX9-1622969921028)]

Solution: set the slave server to read-only

```powershell
mysql> set @@global.read_only=1;
Query OK, 0 rows affected (0.00 sec)

mysql> show variables like 'read_only';
+---------------+-------+
| Variable_name | Value |
+---------------+-------+
| read_only     | ON    |
+---------------+-------+
1 row in set (0.00 sec)
(5) . copy user permission password error
[external chain picture transferring... (img-eFxHkHqW-1622969921029)]
reason:
- The replication user slave does not have relevant permissions. REPLICATION SLAVE and REPLICATION CLIENT
- The replication user was not created from the server
###4. Other errors
The MHA cluster needs at least two slaves, so if there is only one slave, the inspection will not pass!