Secure SSH connection
mode
- port
- agreement
- user
- password
- Key pair
- ssh-agent
- Secondary certification
Default profile
#Set the port number for ssh listening. The default is port 22
Port 22

#Specify the address to listen to, and listen to all by default;
ListenAddress ::
ListenAddress 0.0.0.0

 #Specify the version number of the supported SSH protocol. ' 1 'and' 2 'indicate that only SSH-1 and SSH-2 protocols are supported.
#"2,1"Indicates simultaneous support SSH-1 and SSH-2 agreement.#
Protocol 2,1

#HostKey is the storage location of the host private key file;
"rsa1"Only for SSH-1,"dsa"and"rsa"Only for SSH-2
HostKey /etc/ssh/ssh_host_rsa_key
HostKey /etc/ssh/ssh_host_dsa_key

#Key path
HostKey /etc/ssh/ssh_host_ecdsa_key
HostKey /etc/ssh/ssh_host_ed25519_key

#Whether the access request is processed by creating a non privileged sub process
#Limit separation. The default value is yes. After successful authentication, another sub process will be created as the authenticated user. The purpose of this is
#In order to prevent the promotion of permissions through defective sub processes, so as to make the system more secure.
UsePrivilegeSeparation yes

#Under SSH-1 protocol, the short-lived server key will be set by this command
#The interval is a period (seconds) and is constantly regenerated; This mechanism can minimize the loss caused by key loss or hacker attack. Set to 0
#Indicates that never regenerate is 3600 (seconds).
KeyRegenerationInterval 3600

#Specifies the number of bits for the server key
ServerKeyBits 1024

#Specify which logging subsystem (facility) to send log messages through. Valid values are:
#Daemon, user, auth (default), LOCAL0, LOCAL1, LOCAL2, LOCAL3,LOCAL4, LOCAL5,
#LOCAL6, LOCAL7
SyslogFacility AUTH

#Specify the log level (detail level). Available values are as follows: QUIET, FATAL, ERROR, INFO
#(default), VERBOSE, DEBUG, DEBUG1, DEBUG2, DEBUG3,DEBUG And DEBUG1 Equivalence; DEBUG2,# And DEBUG3 specify more detailed and verbose log output respectively. Logs that are more detailed than DEBUG may reveal users
# The use of sensitive information is therefore opposed.
LogLevel INFO

#The login time is limited to 120 seconds. 0 means unlimited. If the login fails, you need to wait for 120s
LoginGraceTime 120

#Allow root login
#"no" means prohibited. "without-password"
#Indicates that password authentication login is prohibited. "forced-commands-only"
#Indicates that public key authentication is allowed to log in only when the command option is specified, and other authentication methods are prohibited.
#This value is often used for things like remote backup.
PermitRootLogin yes  The available values are as follows:"yes"(default) Indicates permission.

#Specify whether sshd(8) is required to configure the user's home directory and related before accepting the connection request
#Set the file for host and permission check. It is strongly recommended to use the default value "yes" to prevent possible low-level errors.
StrictModes yes

#Whether pure RSA public key authentication is allowed. For SSH-1 only. The default value is yes.
RSAAuthentication yes

#Whether public key authentication is allowed. Can only be used for SSH-2. The default value is yes.
PubkeyAuthentication yes

#Do you want to cancel ~ / ssh/.rhosts as authentication. yes is recommended.
IgnoreRhosts yes

#This option is specifically for version 1. Use the rhosts file in / etc / hosts Equiv cooperates with RSA calculus for authentication! Recommended no.
RhostsRSAAuthentication no

#This is similar to the above project, but it is used for version 2
HostbasedAuthentication no

#Whether to ignore the user's ~ /. During rhostsrsaaauthentication or HostbasedAuthentication ssh/known_hosts file. The default value is "no". To improve security, it can be set to "yes".
IgnoreUserKnownHosts no

#Whether to allow users with blank password to log in remotely. The default is "no".
PermitEmptyPasswords no

#Is challenge response recognition allowed
#Certificate. The default value is "yes", and all login All authentication methods allowed in conf are supported.
ChallengeResponseAuthentication no

# Whether password based authentication is allowed. The default is yes.
PasswordAuthentication yes

#Whether the password provided by the user for PasswordAuthentication must pass Kerberos KDC authentication, that is, whether Kerberos authentication is used. Using Kerberos authentication, the server needs a Kerberos servtab that can verify the KDC identity. The default value is "no".
KerberosAuthentication no

#If AFS is used and the user has a Kerberos 5 TGT, after the instruction is enabled, an AFS token will be attempted before accessing the user's home directory. The default is "no".
KerberosGetAFSToken no

#If Kerberos password authentication fails, the password will also pass other authentication mechanisms (such as / etc/passwd). The default value is yes.
KerberosOrLocalPasswd yes

#Whether to automatically destroy the user's ticket after the user logs out. Default "yes"
KerberosTicketCleanup yes

#Whether GSSAPI based user authentication is allowed. The default value is "no". SSH-2 only
GSSAPIAuthentication no      .

#Whether to automatically destroy the user credential cache after the user logs out. The default value is yes. For SSH-2 only.
GSSAPICleanupCredentials yes

#Whether X11 forwarding is allowed. The default value is "no", set to "yes" to allow. If
#X11 forwarding is allowed and the display area of the sshd agent is configured to listen on the address containing wildcards (X11UseLocalhost).
#Then additional information may be leaked. Due to the possible risks of forwarding using X11, the default value of this instruction is "no". need
#Note that disabling X11 forwarding does not prevent users from forwarding X11 communications, because users can install their own forwarders. as
#If UseLogin is enabled, X11 forwarding will be automatically disabled.
X11Forwarding no

#Specifies the first available display number for X11 forwarding. The default value is 10. This can be used to prevent confusion caused by sshd occupying the real X11 server display area.
X11DisplayOffset 10

#The login information is displayed, such as the last login time, location, etc. the default is yes. However, for security reasons, you can consider changing it to no!
PrintMotd no

#Specifies whether to display the login time of the last user. The default value is "yes"
PrintLastLog yes

#Specifies whether the system sends TCP keepalive messages to clients. The default value is "yes". This message can detect exceptions such as dead connection, improper closing of connection, client crash, etc. You can set "no" to turn this feature off.
TCPKeepAlive yes

#Whether to use during login of interactive session login. The default value is"no". #If this command is enabled, X11 forwarding will be disabled because login does not know how to handle xauth
#cookies .  It should be noted that login is prohibited for remote command execution. If specified
#Use privilege separation, then it will be disabled after authentication is completed.
UseLogin no

#The maximum number of unauthenticated connections allowed to be maintained. The default value is 10. When the limit is reached,#New connections will not be accepted unless the previous connection authentication is successful or exceeds the limit of LoginGraceTime.
MaxStartups 10

#Specify the maximum number of authentication allowed per connection. The default value is 6. If authentication fails more than half of this number, the connection will be forcibly disconnected and additional failure log messages will be generated.
MaxAuthTries 6

#Specifies whether the remote host name should be reverse resolved to check that the host name truly corresponds to its IP address.
UseDNS no

#The contents of the file specified by this instruction are displayed to the remote user before the user authenticates. This feature can only be used for SSH-2, and nothing is displayed by default. "none" means that this feature is disabled.
Banner /etc/issue.net
Subsystem sftp /usr/lib/openssh/sftp-server

#Configure an external subsystem (for example, a file)
#Transport daemon). For SSH-2 protocol only. The value is the name of a subsystem and the corresponding command line (including options and parameters).
#Is PAM module certification used
UsePAM yes
process
#centso
#Edit ssh profile
vim /etc/ssh/sshd_config

#RedHat - still need
#If it is not installed, it needs to be installed first
yum install policycoreutils-python
# Add port
semanage port -a -t ssh_port_t -p tcp 10254
# Verify that the addition was successful
semanage port -l | grep ssh

#You can modify the port directly in Debian system
#Modify port
    Port 10254
#SSH2 protocol is safer than SSH1. If it is not added at the end, remote connection (SSH - 2 is required username@ip )
    Protocol 2
#Timeout disconnect
    # In seconds, it is automatically disconnected if it is not operated for more than 60s
        ClientAliveInterval 60
    # If the client does not respond, it will judge a timeout. This parameter sets the number of times allowed to timeout
        ClientAliveCountMax 0
#Disable root user
    PermitRootLogin no
#Designated user login
    AllowUsers uesr
#Disable specific user login
    DenyUser testuser
#Allow (blank password) login
    PermitEmptyPasswords no
#Whether to run the login method of password. Set it to no, and the public key is required
    PasswordAuthentication no
#The maximum number of errors. By default, up to 3 password errors are allowed (except 2). If it is modified to 2, it means that if the password is entered incorrectly once, it will be disconnected.
    MaxAuthTries 6
#Actively disconnect session (s / min) - LoginGraceTime 2m/2s
    LoginGraceTime 120
#Detailed log
    LogLevel VERBOSE
Tips:
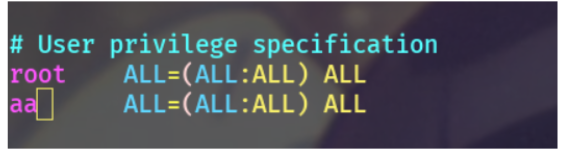
#Same authority account
useradd aa
passwd aa
vim /etc/sudoers
#Restart service
systemctl restart sshd
Key pair
Generate key pair
It has been set that you cannot log in with a password. In other words, you need to log in with a key. It is not difficult to generate a key:
ssh-keygen -t rsa
You only need to specify the algorithm. The default is 3072 bits and 4096 bits are optional.
However, compared with the traditional RSA, another more secure algorithm called ed25519 is introduced in OpenSSH 6.5, which uses elliptic curve for encryption. Ed25519 has the following advantages over RSA:
- Smaller size: Ed25519 has only 68 characters compared with 544 characters of RSA 3072
- Faster: faster generation and faster signature than RSA
- More secure: the signature process does not rely on the random number generator, does not rely on the anti-collision characteristics of hash function, and has no problem of time channel attack
The generation method is simple:
ssh-keygen -a 1024 -t ed25519 -f ~/.ssh/ed25519
The parameters are described as follows:
- -a: Specifies the number of rounds of KDF (Key Derivation Function)
- -t: Specify the algorithm, including dsa, ecdsa, ecdsa SK, ed25519, ed25519 SK and rsa
- -f: Specify location
Copy the public key after generation:
ssh-copy-id -i ~/.ssh/ed25519.pub user@ip
Private key password
For example, when the key pair is generated in the above way, you will be prompted to enter the private key password:

The password here will prompt when connecting with the private key:

Cooperate with SSH add
By default, you need to enter the password of the private key every time you log in with the private key. If you don't want to output it every time, you can use SSH add:
ssh-add ~/.ssh/test # ~/. Replace ssh/test with the corresponding private key path
In this way, you only need to enter the private key password once, and you don't need to enter the private key password to connect the next time.
Use different key pairs
Suppose you have multiple servers: server1, server2 and server3, you can use different key pairs for different servers instead of the same key pair:
ssh-keygen -a 1024 -t ed25519 -f ~/.ssh/server1
ssh-keygen -a 1024 -t ed25519 -f ~/.ssh/server2
ssh-keygen -a 1024 -t ed25519 -f ~/.ssh/server3
Then copy the public key to the corresponding server:
ssh-copy-id user@server1 -i ~/.ssh/server1.pub
ssh-copy-id user@server2 -i ~/.ssh/server2.pub
ssh-copy-id user@server3 -i ~/.ssh/server3.pub
ssh-agent
what is it?
SSH agent is a program that helps manage private keys. The agent can provide the following purposes:
- Automatic key selection: when connecting to different hosts with different keys, you need to specify the keys manually (for example, in the above example of using different key pairs, you need to add the - i parameter when connecting to different servers). SSH agent can select automatically without manual specifying
- Automatically enter the private key password: if the private key is set with a key (such as the private key password example above), but the private key needs to be used frequently for authentication, SSH agent can help automatically enter the private key password
use
Start first:
eval `ssh-agent` # Notice the backquote
Then add the private key:
# Take "use different key pairs" above as an example
ssh-add ~/.ssh/server1
ssh-add ~/.ssh/server1
ssh-add ~/.ssh/server1
In this way, there is no need to manually specify the - i parameter when connecting.
If the private key specifies a password, you will be prompted to enter it when SSH add:

This eliminates the need to enter a password the next time you connect using a private key with a key.
Secondary certification
Two factor authentication, abbreviated 2FA, means double authentication, double factor authentication, etc. as the name suggests, it is a two-step authentication operation. The optional applications are:
- Google Authenticator
- Authy
- Yubico
- Duo
For example, after installing Google Authenticator, you need to enter the verification code to connect to the server.
I won't demonstrate it specifically, because the author needs to connect frequently, so this option is not practical for the author. If you want to implement it, you can refer to it here.
(2FA)
Two factor authentication (abbreviated as 2FA) is also translated as dual authentication, two factor authentication, two factor authentication and binary authentication, also known as two-step verification. It is an authentication method that uses two different elements to confirm the user's identity, It is a special case of multifactor verification.
case
Key pair login
Xshell configures public key and private key login
ssh Login provides two authentication methods: password authentication and key authentication. Password (password) authentication is the most commonly used one. Here we introduce the key authentication method to log in to linux/unix Methods.
There are three steps to login with a key:
1. Generate key (public key and private key);
2. Place the public key to the server ~ / ssh/authorized_key file;
3. Configure ssh clients to log in with a key.
1, Generate Public key and private key
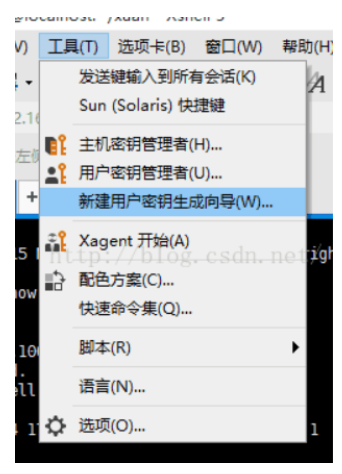
Open the Xshell, click "tools" in the menu bar, and select "User Key Generation Wizard..." in the pop-up menu (Key Generation Wizard), as shown below:
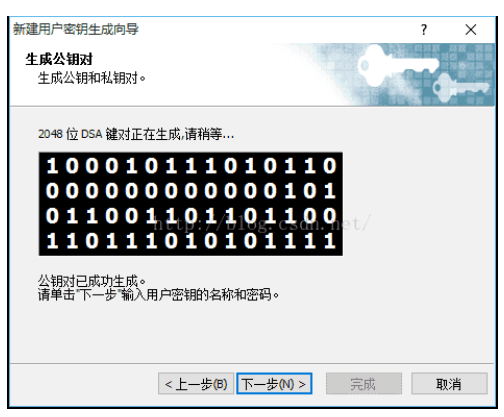
The User Key Generation Wizard dialog box pops up. Select "RSA" public key encryption algorithm in "Key Type" and "Key Length" as "2048" bit Key Length, as shown in the following figure:
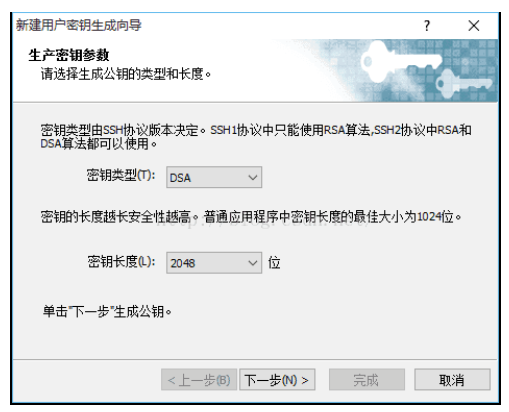
Click "Next" and wait for the key generation:
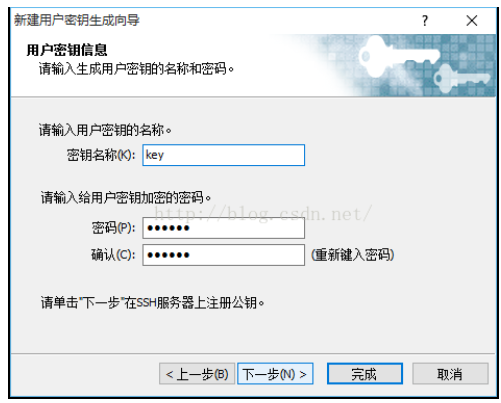
Continue to the next step, enter the file name of key in "Key Name", which is "key" here; Enter a password at "Passphrase" to encrypt the private key (enter the password arbitrarily), and enter the password again to confirm, as shown in the following figure:
Click "Next" and the key generation is completed (the Public key Format is SSH2-OpenSSH format). The public key is displayed here. We can copy the public key and then save it, or directly save the public key to the file, as shown in the following figure. The private key is not displayed here. It can be displayed in "User Key Mangager..." Export to file:
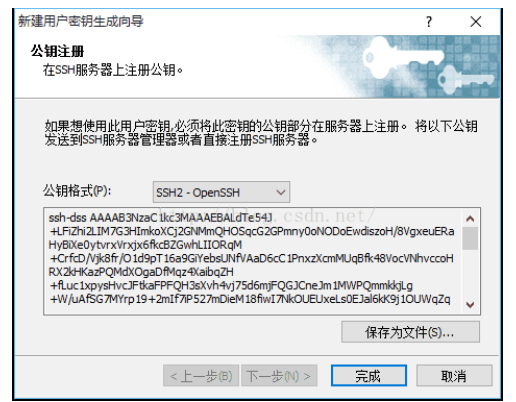
Click "Save as file..." Button to save the public key (Public key) to disk. The file name is "key. Public", which is used for standby.
2, Upload public key to the server:
Log in to the server using the Xshell and go to "/ root /. ssh / "directory, run rz command (if there is no rz command, run yum install lrzsz), and key Send the public key to the server, and then run the following command to import the public key into the "authorized_keys" file:
#Upload public key and write
 cat key.pub >> authorized_keys
 #Grant authority
 chmod 600 authorized_keys
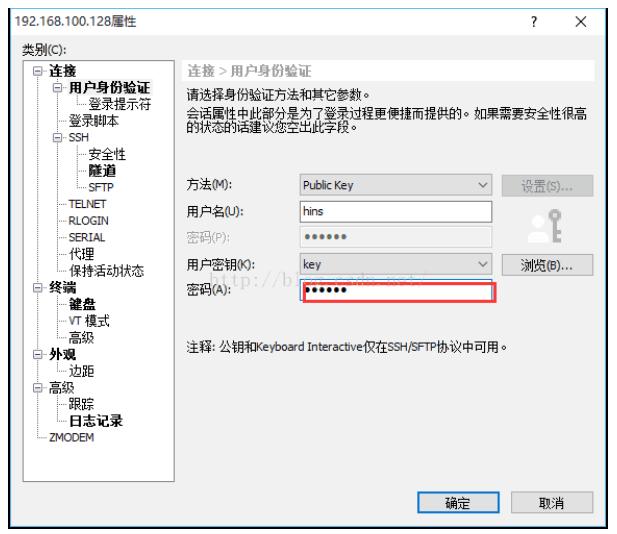
3, Configure Xshell to log in to the server using key authentication:
Open the Xshell and click "New" to open the "New Session Properties" dialog box. In the "Connection" column, enter the IP address and port of the public key just configured, as shown in the following figure: