1. What is multi-channel packaging?
There may be different statistical requirements in different application markets, and an installation package needs to be released for each application market, which leads to the multi-channel packaging of Android. In order to distinguish different channels, different labels are added to the installation package to facilitate the statistics of apps in the market.
2. Several Packing Methods
- Alliance UMeng
- Android Studio comes with it
- Beauty Corps Walle
3. Start using
3.1 Alliance UMeng
Step 1: Add Android Manifest
<meta-data
    android:name="UMENG_CHANNEL"
    android:value="${channel}" />
Step 2: Add baidu {} to build.gradle to abbreviate the specified channel name
build {
    ......
    productFlavors {
        baidu {}
        xiaomi {}
        qihu360 {}
        yingyongbao {}
        huawei {}
    }
    productFlavors.all {
        flavor -> flavor.manifestPlaceholders = [UMENG_CHANNEL: name]
    }
}
Step 3: Set the output APK name
Android Studio Version 2.3:
build {
    ......
    applicationVariants.all { variant ->
         variant.outputs.each { output ->
             def outputFile = output.outputFile
             if (outputFile != null && outputFile.name.endsWith('.apk')) {
                 def fileName = "driver_${variant.productFlavors[0].name}_v${defaultConfig.versionName}.apk"
                 output.outputFile = new File(outputFile.parent, fileName)
             }
         }
     }
}
Android Studio version 3.0:
build {
    ......
    applicationVariants.all { variant ->
         variant.outputs.all {
            outputFileName = "driver_${variant.productFlavors[0].name}_v${variant.versionName}.apk"
        }
    }
}
If the following error occurs after Gradle

You need to configure the dimension of flavor dimension to be the version number so that the dimensions are uniform.
build {
    ......
    defaultConfig {
        ......
        flavorDimensions "versionCode"
    }
}
Step 4: Compile and package
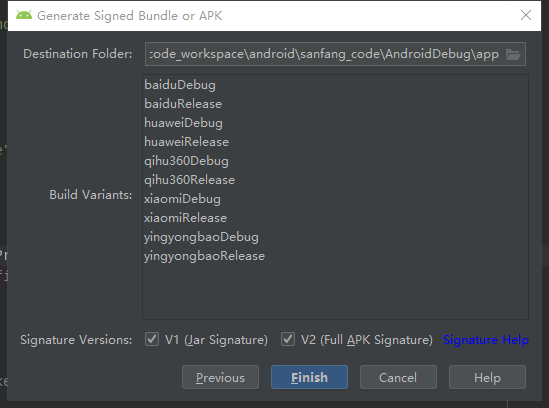
Build - Generate Signed Bundle or APK - Select Release or Debug

3.2 Android Studio
Android Studio multimodal packaging is the same as allied packaging, but the name in the label < meta-data> can be defined by itself and is not limited to "UMENG_CHANNEL"
<meta-data
    android:name="UMENG_CHANNEL" //It can be defined at will.
    android:value="${channel}" />
3.3 Walle
Step 1: Configure the root build.gradle
buildscript {
   dependencies {
         classpath 'com.mcxiaoke.packer-ng:plugin:2.0.1'
    }
}
Step 2: Configure App build.gradle
apply plugin: 'packer'
dependencies {
    ......
    implementation 'com.mcxiaoke.packer-ng:helper:2.0.1'
}
Step 3: Plug-in Configuration
build {
    ......
    packer {
        archiveNameFormat = '${buildType}-v${versionName}-${channel}'  // Define the name of the output APK
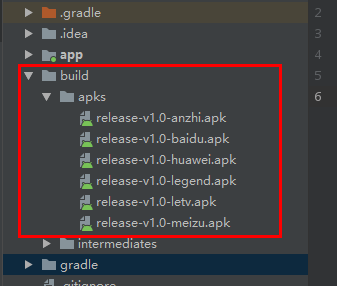
        archiveOutput = new File(project.rootProject.buildDir, "apks")  // Setting APK output directory
        channelFile = new File(project.rootDir, "channel.txt")  // Add Channel Profile
    }
}
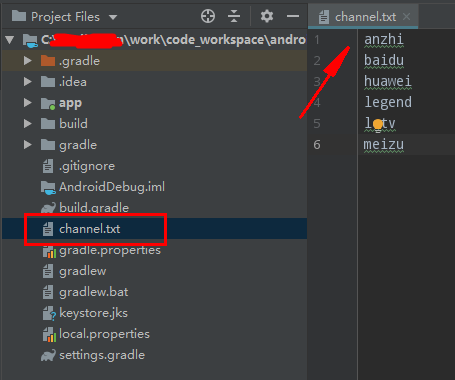
Step 4: New Channel Profile channel.txt
Create a new channel.txt file in the project root directory, as shown in the figure

The content of the document is the name of the channel, requiring that each line must have one channel.
Step 5: Compile and package
Use the Terminal command:
gradlew clean apkRelease

Reference: [US Mission Multi-Channel Packaging Official Documents]( https://github.com/mcxiaoke/packer-ng-plugin)
4. Access to Channel Information
1. Access to Alliances and Android Studio
Read the <meta-data> tag in Android Manifest
private String getChannel() {
    try {
      PackageManager pm = getPackageManager();
      ApplicationInfo appInfo = pm.getApplicationInfo(getPackageName(), PackageManager.GET_META_DATA);
      String channel = appInfo.metaData.getString(key);  // key by<meta-data>In the label name
      if (!TextUtils.isEmpty(channel)) {
         return channel;
      }
  } catch (Exception e) {
      e.printStackTrace();
  }
  return null;
}
2. Ways to Acquire Walle
Acquisition method of American League integration
// If no channel information is found or an error is encountered, the default return is ""
// com.mcxiaoke.packer.helper.PackerNg
String channel = PackerNg.getChannel(Context);