
preface
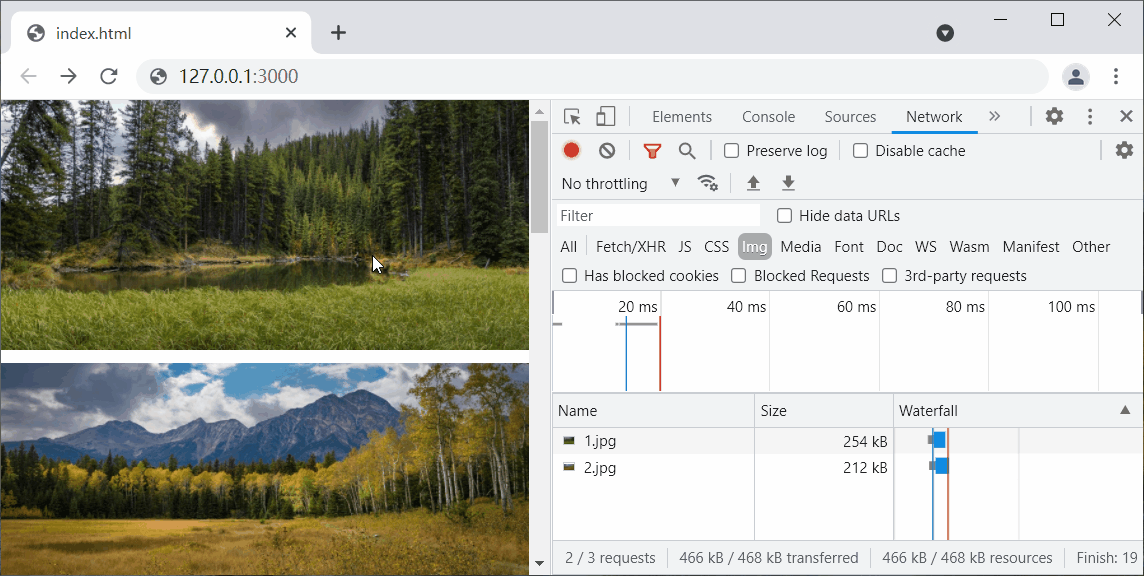
for websites with more pictures, if all pictures are loaded at one time, on the one hand, due to more pictures loaded at the same time, there will be a lot of DOM elements on the page, which will seriously reduce the page blocking performance, and the pressure on the server will be great. On the other hand, if a lot of pictures are loaded and only a few pictures are browsed by users, it will consume a lot of traffic and cause waste.
lazy loading is an optimization for this situation, which will greatly improve the user experience. In a word, lazy loading is to delay loading, and then load when the picture is to be used.
offsetTop
lazy loaded pictures are generally fixed in width and height. In order to avoid stretching when the picture is large, you can use object fit: cover to cut.
<style>
img {
display: block;
margin-bottom: 10px;
width: 100%;
height: 200px;
object-fit: cover;
}
body {
margin: 0;
}
</style>
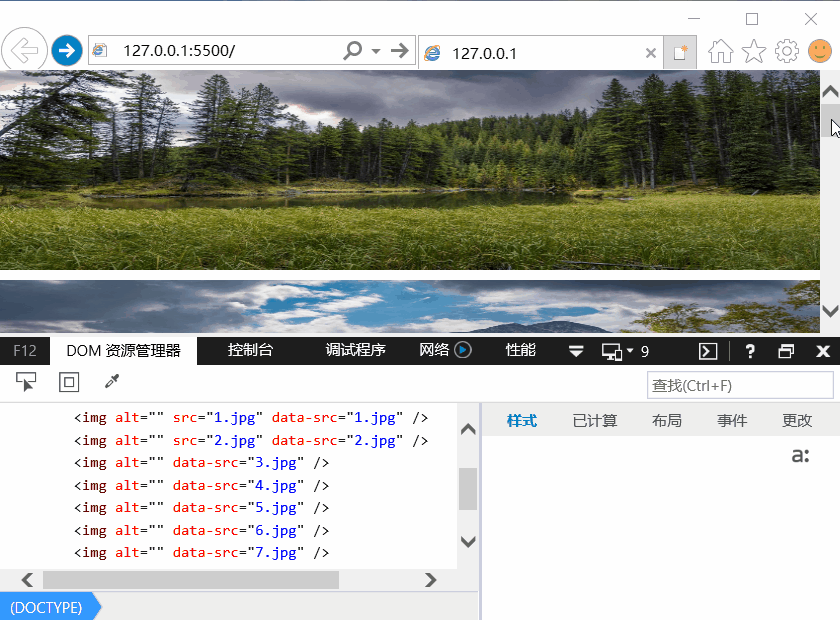
<img data-src="1.jpg" alt="">
<img data-src="2.jpg" alt="">
<img data-src="3.jpg" alt="">
<img data-src="4.jpg" alt="">
<img data-src="5.jpg" alt="">
<img data-src="6.jpg" alt="">
<img data-src="7.jpg" alt="">
where loadImg is used to load the src attribute of the picture.
frequent scrolling of the scroll bar will affect the browser performance, so the debounce anti shake function is encapsulated to limit the trigger frequency. Note that the internal return function of debounce cannot be an arrow function, which will change the direction of this in the function. Only if it is an ordinary function, this can point to the object bound to the event, such as el Addeventlistener (event, fn). This inside fn should point to el.
theoretically, the picture can be loaded when it is located in the viewport, but in order to improve the user experience, the picture can be loaded in advance at a fixed distance from the viewport, so the offset variable is defined globally.
Scroll bar height
in the lazyLoad function, window Innerheight is the height of the viewport, document documentElement. Scrolltop and document body. Scrolltop obtains the scroll distance of the scroll bar. The difference between them mainly depends on whether the document declares doctype.
| mode | type | Chrome | Firefox | IE11 | IE10 | IE9 |
|---|---|---|---|---|---|---|
| HTML document declaration doctype | document.documentElement.clientHeight | Available | Available | Available | Available | Available |
| document.body.scrollTop | 0 | 0 | 0 | 0 | 0 | |
| The HTML document does not declare a doctype | document.documentElement.clientHeight | 0 | 0 | Available | Available | Available |
| document.body.scrollTop | Available | Available | Available | Available | 0 |
document can be observed obviously documentElement. Scrolltop and document body. One of the scrolltop can always get the rolling distance, so it can be used as document documentElement. scrollTop || document.body.scrollTop to be compatible.
<script>
  const loadImg = el => {
    if (!el.src) {
      el.src = el.dataset.src
    }
  }

  const debounce = (fn, delay = 100) => {
    var timer = null

    return function (...args) {
      if (timer) {
        clearTimeout(timer)
        timer = null
      }

      timer = setTimeout(() => {
        fn.call(this, ...args)
      }, delay)
    }
  }

  const imgs = document.querySelectorAll('img')

  const offset = 20

  var loaded = 0

  const lazyLoad = () => {
    const clientHeight = window.innerHeight
    const scrollTop = document.documentElement.scrollTop || document.body.scrollTop

    for (var i = loaded; i < imgs.length; i++) {
      if (imgs[i].offsetTop <= clientHeight + scrollTop + offset) {
        loadImg(imgs[i])
        loaded++
      } else {
        break
      }
    }
  }

  lazyLoad()

  window.addEventListener('scroll', debounce(lazyLoad, 200))
</script>
loaded variable
in addition, the loaded variable is also defined globally to store the index of the image to be loaded, so as to avoid traversing from the first image every time.
The if statement in the for loop is the key part. As long as the offset attribute of the picture is less than the sum of viewport height, scrolling distance and offset value, the picture must be loaded. If a picture does not meet the loading conditions, the subsequent pictures must not meet the loading conditions, so break terminates the cycle in advance.
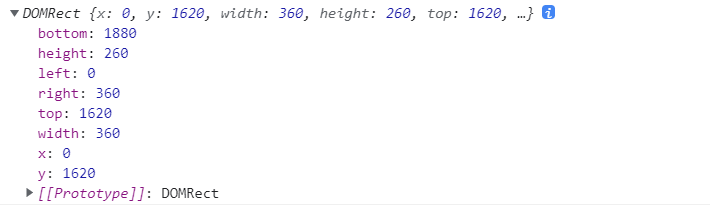
getBoundingClientRect
getBoundingClientRect Returns the size of the element and its position relative to the viewport.
in terms of browser compatibility, Chrome, Firefox and IE5 and above browsers are compatible.
for the standard box model, the width and height dimensions of elements are the sum of width/height + padding + border width. If the CSS attribute is box sizing: border box, the element size is width/height.
#img {
  display: block;
  margin-bottom: 10px;
  width: 300px;
  height: 200px;
  border: 10px solid lightblue;
  padding: 20px;
}

<img id="img" src="image.png" alt="">

const img = document.getElementById('img')
console.log(img.getBoundingClientRect())
Browser differences
Chrome browser print parameters.
print parameters of IE8 browser. Note that the objects returned by IE8 and below browsers do not contain width and height attributes.

for the printing parameters of IE7 browser, note that the coordinates of HTML elements in the page in IE7 browser will be calculated from (2,2).

therefore, it is encapsulated as a tool function and compatible with IE7 and above browsers.
function getBoundingClientRect(el) {
  var rect = el.getBoundingClientRect()
  var l = document.documentElement.clientLeft
  var t = document.documentElement.clientTop

  return {
    left: rect.left - l,
    right: rect.right - l,
    bottom: rect.bottom - t,
    top: rect.top - t,
    width: rect.right - rect.left,
    height: rect.bottom - rect.top,
  }
}
according to this tool function, slightly modify the lazy loading in offsetTop mode.
const lazyLoad = () => {
  for (var i = loaded; i < imgs.length; i++) {
    if (getBoundingClientRect(imgs[i]).top <= window.innerHeight + offset) {
      loadImg(imgs[i])
      loaded++
    } else {
      break
    }
  }
}
IntersectionObserver
IntersectionObserver Is a constructor provided by the browser to create an observer instance, Detailed reference.
const io = new IntersectionObserver(callback, options)
this example provides some methods.
- io.observe(): start observation. The parameter is a DOM node object
- io.unobserve(): cancel observation. The parameter can be a DOM node object or not
- io.disconnect(): close the viewer
let's look at the callback function. Generally, one or more elements are observed in the window, and the callback is usually triggered twice, one is when the observed element just enters the viewport, and the other is when the observed element completely leaves the viewport.
const io = new IntersectionObserver((entries, observer) => { })
observer is the called IntersectionObserver instance, that is, the above io instance.
IntersectionObserverEntry
entries is a IntersectionObserverEntry Object array. If the window observes three elements, there will be three instances in the entries array, all of which are intersectionobserventry objects.
the intersectionobserventry object in Chrome browser includes 8 attributes.
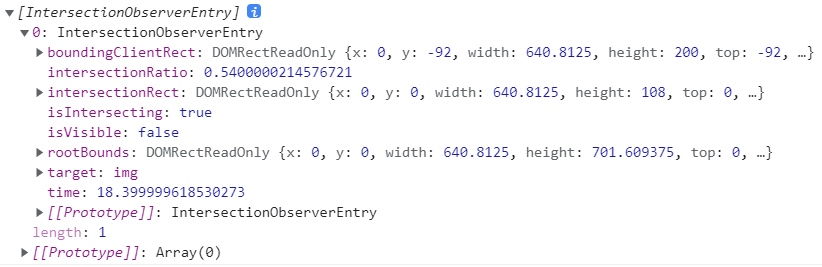
- boundingClientRect: rectangle information of the observed element, that is, the execution of El Return result of getboundingclientrect()
- intersectionRect: rectangular information of the intersection area between the observed element and the window (or root element)
- intersectionRatio: intersection ratio, that is, the proportion of intersectionRect in the boundingClientRect area. It is 1 when the observed element is completely visible and 0 when it is completely invisible
- isIntersecting: whether the observed element is visible in the window. If it is visible, it is true
- Rootboundaries: rectangular information of the root element. If the root element is not specified, it is the rectangular information of the window
- target: the observed element is a DOM node
- Time: high precision timestamp, in milliseconds. Indicates the length of time from the time origin of the IntersectionObserver to when the callback is triggered
the second parameter options of the constructor IntersectionObserver is an object, which mainly includes three properties.
- threshold: when the visible part of the observed element is in the viewport, the callback function will be triggered. threshold is an array, which is [0] by default
the callback function is triggered when the observed element has 0%, 50%, 75% and 100% visible parts
new IntersectionObserver(callback, {
  threshold: [0, 0.5, 0.75, 1],
})
- Root: in addition to supporting elements in the observation window, it also supports specifying root elements
when multiple li scrolls inside the following ul element, a li is triggered when it appears in ul.
<style>
  ul {
    width: 300px;
    height: 100px;
    overflow: auto;
  }

  li {
    height: 24px;
    background-color: #ccc;
    margin-bottom: 1px;
  }

  li:nth-of-type(9) {
    background-color: lightblue;
  }
</style>

<ul>
  <li>1</li>
  <li>2</li>
  <li>3</li>
  <li>4</li>
  <li>5</li>
  <li>6</li>
  <li>7</li>
  <li>8</li>
  <li>9</li>
  <li>10</li>
</ul>
<script>
  const ul = document.querySelector('ul')
  const li = document.querySelectorAll('li')[8]
  const callback = entries => {
    console.log(entries)
  }
  const io = new IntersectionObserver(callback, {
    root: ul,
  })

  io.observe(li)
</script>
note that the root element must be the ancestor element of the observed element.

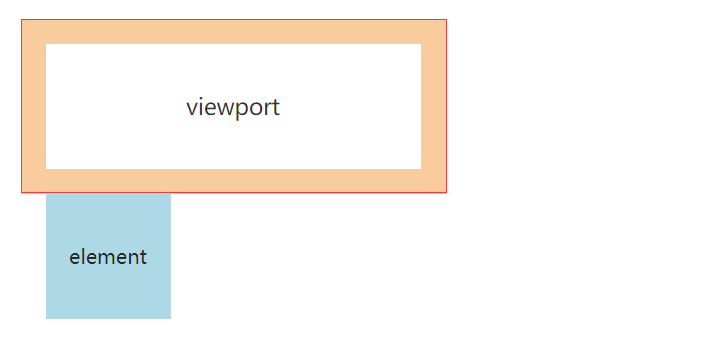
- rootMargin: defines the margin of the window or root element, which is used to expand the size of the rootboundaries area. The default value is "0px 0px 0px 0px"
the following window is expanded into the red area. Generally, the observed element will be triggered only when it appears in the window (or in a specified proportion). If the observed element is triggered in advance at a fixed distance from the window, rootMargin can be used.
Implementation part
now let's look at the lazy loading of pictures. There are few codes. Let's look at the codes first.
<script>
  const loadImg = el => {
    if (!el.src) {
      el.src = el.dataset.src
    }
  }

  const offset = 20

  const imgs = document.querySelectorAll('img')

  const callback = (entries, i) => {
    entries.forEach(el => {
      if (el.isIntersecting) {
        loadImg(el.target)
        io.unobserve(el.target)
      }
    })
  }

  const io = new IntersectionObserver(callback, {
    rootMargin: `0px 0px ${offset}px 0px`,
  })

  imgs.forEach(img => io.observe(img))
</script>
first create the observer io. Since the root element is not specified, it defaults to the window, and then the window traverses the observation img element.
it is still the same as the offsetTop method. The picture is loaded in advance when it is 20px away from the viewport. Therefore, add the rootMargin configuration item.
callback function part. As long as the element appears in the viewport, the picture will be loaded, and unobserve will cancel the observation of the corresponding img element.
compatibility
the above is fully available for browsers such as Chrome or Firefox, and is incompatible with IE9-11. Use intersection-observer-polyfill Plug in to be compatible with a wave.
note that IE browser does not support object fit style, but it is not the key point, but it is not detailed. If you are interested, you can do it yourself.
<script src="IntersectionObserver.js"></script>
<style>
  img {
    display: block;
    margin-bottom: 10px;
    width: 100%;
    height: 200px;
    /* object-fit: cover; */
  }

  body {
    margin: 0;
  }
</style>

<script>
  var loadImg = function (el) {
    if (!el.src) {
      el.src = el.getAttribute('data-src')
    }
  }

  var offset = 20

  var imgs = document.getElementsByClassName('aaa')

  var callback = function (entries, i) {
    entries.forEach(function (el) {
      if (el.isIntersecting || el.intersectionRatio > 0) {
        loadImg(el.target)
        io.unobserve(el.target)
      }
    })
  }

  var io = new IntersectionObserver(callback, {
    rootMargin: '0px 0px ' + offset + 'px 0px',
  })

  for (var i = 0; i < imgs.length; i++) {
    io.observe(imgs[i])
  }
</script>
effect under IE9 browser.
🎉 Write at the end
🍻 Guys, if you've seen it here and think this article is helpful to you, you might as well praise it 👍 or Star ✨ Support!
Manual codeword. If there is any error, please correct it in the comment area 💬~
Your support is the biggest driving force for me to update 💪~
GitHub / Gitee,GitHub Pages,Nuggets,CSDN Synchronous update, welcome to pay attention 😉~