preface
In computer vision tasks, such as image classification, image data set is essential. The pictures collected by yourself often have a lot of noise or useless information, which will affect the model training. Therefore, the image needs to be cropped to prevent the useless information at the edge of the image from affecting the model. This paper introduces several ways of image clipping for your reference.
1, Manual single cutting / interception
selectROI: select the region of interest and select x,y,w,h in the boundary box
selectROI(windowName, img, showCrosshair=None, fromCenter=None):
. parameter windowsname: the name of the window in which the selected area is displayed
. parameter img: on which image do you want to select ROI
. parameter showCrosshair: whether to draw a cross in the rectangular box
Parameter fromCenter: whether to start from the center of the rectangular box
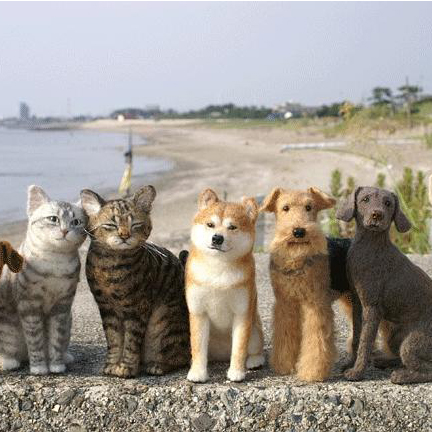
The original image to be intercepted is as follows:
The interception effect is as follows:
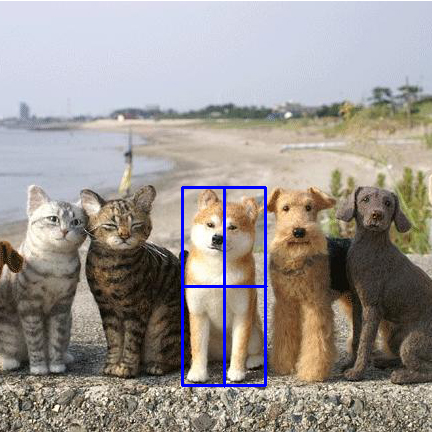
Press Enter to save after interception:
The complete code is as follows:
import cv2

img = 'D:/anaconda3/JupyterNotebookFile/images/dogs_and_cats.jpg'
img = cv2.imread(img)
cv2.imshow('original', img)

# Select ROI
roi = cv2.selectROI(windowName="original", img=img, showCrosshair=True, fromCenter=False)
x, y, w, h = roi
print(roi)

# Show ROI and save picture
if roi != (0, 0, 0, 0):
    crop = img[y:y+h, x:x+w]
    cv2.imshow('crop', crop)
    cv2.imwrite('D:/anaconda3/JupyterNotebookFile/images/dogs_and_cats_crop.jpg', crop)
    print('Saved!')

# sign out
cv2.waitKey(0)
cv2.destroyAllWindows()
Readers modify the target picture directory and the directory to be written according to their own picture directory.
2, Crop / intercept according to the position coordinates of the picture

This is a 432 × 432 size picture, the upper left coordinate is (0,0)
import cv2

im = cv2.imread('Picture path')
In use CV2 Imread() returns a three-dimensional array after reading three channel RGB images by default. At the same time, a part of the picture can be intercepted in the form of im[h,w]. For example, the position of the middle Chaigou relative to the coordinate origin of the upper left corner is 190-380 from top to bottom and 180-260 from left to right. The relative position of the target can be obtained by clipping / image.
The complete code is as follows:
import cv2
import os

file_path = 'D:/anaconda3/JupyterNotebookFile/images/dogs_and_cats.jpg'
out_file_name = 'dogs_and_cats_cropp'

im = cv2.imread(file_path)
im = im[190:380,180:260]
save_path = r'D:/anaconda3/JupyterNotebookFile/images'
save_path_file = os.path.join(save_path,out_file_name+'.jpg')
cv2.imwrite(save_path_file,im)
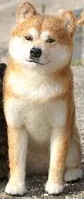
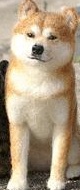
Image effect after interception:
If many image data have similar positions, they can be cut / intercepted in batch by traversing the file. The code is as follows:
import cv2
import os

def clip_image(filelist,i,im_path):
	'''
	filelist:Folder path
	i: The name of a batch saved picture file, expressed in numbers
	im_path:Picture path
	'''
    for file in filelist:
        file_path=os.path.join(im_path,file)
        im=cv2.imread(file_path)
        #[h,w] modify according to the position of the target in your picture
        im=im[190:380,180:260]
        save_path = r'D:/anaconda3/JupyterNotebookFile/images'
        save_path_file = os.path.join(save_path,out_file_name+'.jpg')
        cv2.imwrite(save_path_file,im)
        i=i+1
Pass parameter and test: the author uses the Jupiter notebook, and other compilers are written in main()
i=0
im_path = r'D:/anaconda3/JupyterNotebookFile/images/dogs_and_cats.jpg'
filelist = os.listdir(im_path)
clip_image(filelist,i,im_path)
3, opencv gets the edge and intercepts / cuts the target according to the bounding box
See another article for details.
4, Cut with the YOLO target detection box and save in batch
The same kind of picture data has similar characteristics. Mark a small number of pictures and train YOLO to improve its ability to locate targets. All test data can be cut according to YOLO test results and saved for other classification tasks.
The code is as follows:
from PIL import Image

from yolo import YOLO
import os
import cv2
import numpy as np
yolo = YOLO()

'''
yolo Matting, intercepting the target
'''
j=0
#Predict the path of the picture
path = 'E:/crop_all'
imgdir = os.listdir(path)
for dir in imgdir:
    img_path = os.path.join(path,dir)
    image = Image.open(img_path)
    #print(image)
    crop_image = cv2.imread(img_path)
    #print(crop_image[0])
    boxes = yolo.detect_image(image)
    #print(boxes)

    top = boxes[0][0]
    left = boxes[0][1]
    bottom = boxes[0][2]
    right = boxes[0][3]

    top = top - 5
    left = left - 5
    bottom = bottom + 5
    right = right + 5

    # Coordinates of the upper left corner
    top = int(max(0, np.floor(top + 0.5).astype('int32')))
    left = int(max(0, np.floor(left + 0.5).astype('int32')))
    # Coordinates of the lower right corner
    bottom = int(min(np.shape(image)[0], np.floor(bottom + 0.5).astype('int32')))
    right = int(min(np.shape(image)[1], np.floor(right + 0.5).astype('int32')))


    croped_region = crop_image[top:bottom, left:right]

    #Clipping picture storage directory
    baocun = r'E:/crop_all_finish'
    save_path = os.path.join(baocun, str(j) + '.bmp')
    cv2.imwrite(save_path, croped_region)
    j = j + 1
summary
- Method 1 is suitable for cutting a small number of pictures or testing, and cannot be cut in batch.
- Method 2 is suitable for targets in multiple samples with similar positions, which can be cut in batch, but it is not applicable if the positions are not similar.
- Method 3: obtain the contour by morphological method, and then cut it according to the bounding box. It can be processed in batch, but the cutting effect is general. Can we get whether the contour of the object is clear or not? But not all the objects in each picture can get the contour clearly.
- Method 4: Yolo is also cut according to the boundingbox. It can be processed in batch, but the cost needs to be marked manually. Moreover, the cost fluctuates slightly according to the accuracy of the model. However, Yolo training is very fast, so this method is a good means of cutting pictures.