catalogue
Update every three days and summarize the three-day learning results
1. Project catalog analysis:
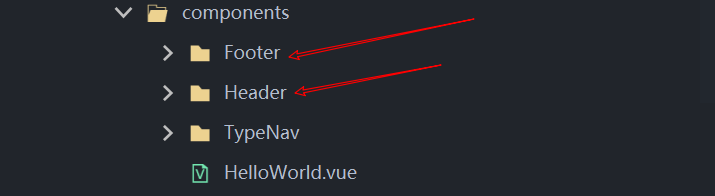
First, when we get a project, we first analyze its structure, and then divide it into components, we will find some components Pages exist, such as this project, when we enter the home module of the home page It is divided into upper, middle and lower parts, including header and footer. When we click search, the pages will not be integrated, but only the middle changes. Its header and tail still exist. When we click login or registration, we will find that it has only header but no tail. Therefore, header and footer can be registered as global components and used on multiple pages, Generally, we put the global components in components. As for the login registration with only the head and no tail, we write show and hide later
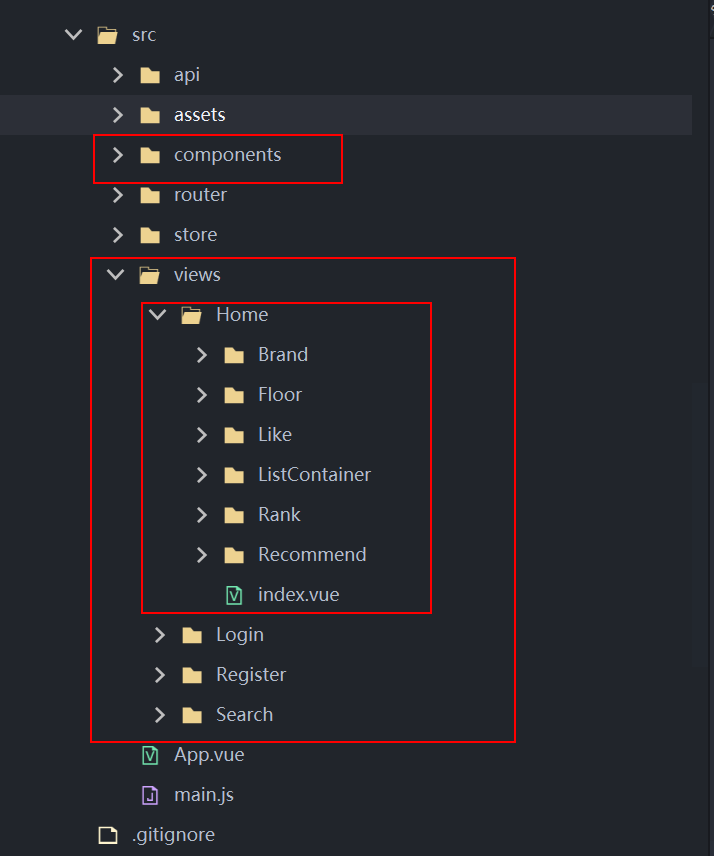
api: the interface directory is used to store the background interface
Components: global components used in multiple pages
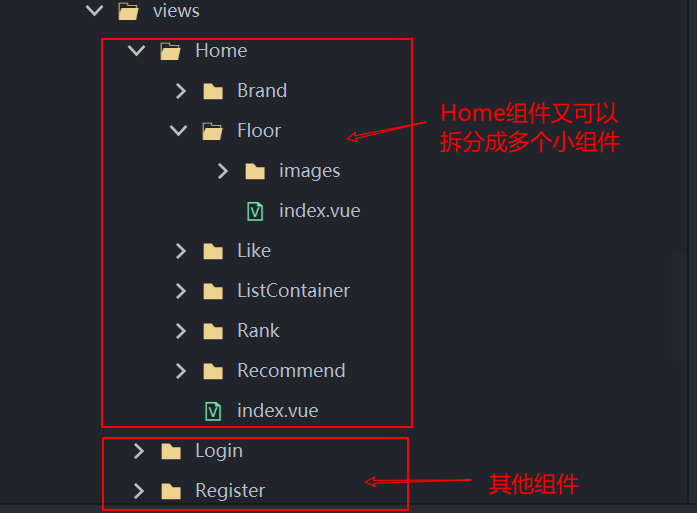
views/pages: other components can be stored. A large component can be split into multiple small components
main.js: the entry file is used to register the global components, import the routing router or warehouse store

App.vue: the exit of the routing component (first introduce the component in script, and then write the route in template)
<router-view></router-view>
Take chestnuts for example: as for our project,
Header: <-- In Home and Search, Login and Register are displayed -->
footer: <-- Displayed in Home and Search, hidden in Login and Register -- >
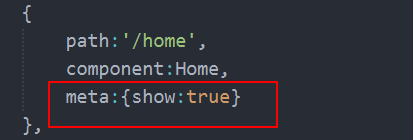
We write < header > < / header > and < footer > < / footer > in App.vue, and then add display and hide conditions v-show to the footer
<Footer v-show="$route.meta.show"></Footer>
The corresponding route can be found and displayed (true) or hidden (false)
Next, let's talk about routing

Router: used to configure the route. We introduce the route here, which is our route in views/pages. As for the components, we have already introduced them in app.vue, not in the router
That's all about the catalogue. I'll add what I have to add later
2. Code for three days first
Note: I only have part of the code here. As for the pictures, you can download them directly from git and drag them into your own project
components /Footer/index.vue
<template>
  <div class="footer">
    <div class="footer-container">
      <div class="footerList">
        <div class="footerItem">
          <h4>Shopping Directory</h4>
          <ul class="footerItemCon">
            <li>Shopping process</li>
            <li>Member introduction</li>
            <li>Life Travel/Group buying</li>
            <li>common problem</li>
            <li>Shopping Directory</li>
          </ul>
        </div>
        <div class="footerItem">
          <h4>Distribution mode</h4>
          <ul class="footerItemCon">
            <li>Door to door self delivery</li>
            <li>211 Limited time</li>
            <li>Distribution service query</li>
            <li>Distribution fee collection standard</li>
            <li>Overseas distribution</li>
          </ul>
        </div>
        <div class="footerItem">
          <h4>Payment method</h4>
          <ul class="footerItemCon">
            <li>Cash on Delivery</li>
            <li>Online payment</li>
            <li>hire purchase</li>
            <li>Post office remittance</li>
            <li>Company transfer</li>
          </ul>
        </div>
        <div class="footerItem">
          <h4>after-sale service</h4>
          <ul class="footerItemCon">
            <li>After sales policy</li>
            <li>Price protection</li>
            <li>Refund instructions</li>
            <li>Repair/Return and exchange</li>
            <li>cancellation of order</li>
          </ul>
        </div>
        <div class="footerItem">
          <h4>Characteristic service</h4>
          <ul class="footerItemCon">
            <li>Treasure Island</li>
            <li>DIY install equipment</li>
            <li>Extended warranty service</li>
            <li>Shangpinhui E card</li>
            <li>Shangpinhui communication</li>
          </ul>
        </div>
        <div class="footerItem">
          <h4>Help center</h4>
          <img src="./images/wx_cz.jpg" />
        </div>
      </div>
      <div class="copyright">
        <ul class="helpLink">
          <li>
            About us
            <span class="space"></span>
          </li>
          <li>
            contact us
            <span class="space"></span>
          </li>
          <li>
            About us
            <span class="space"></span>
          </li>
          <li>
            Merchant settlement
            <span class="space"></span>
          </li>
          <li>
            Marketing Center
            <span class="space"></span>
          </li>
          <li>
            Links
            <span class="space"></span>
          </li>
          <li>
            About us
            <span class="space"></span>
          </li>
          <li>
            Marketing Center
            <span class="space"></span>
          </li>
          <li>
            Links
            <span class="space"></span>
          </li>
          <li>About us</li>
        </ul>
        <p>Address: 6 / F, complex building, Hongfu Science Park, Changping District, Beijing</p>
        <p>Beijing ICP Bei 19006430</p>
      </div>
    </div>
  </div>
</template>
<script>
</script>

<style scoped lang="less">
.footer {
  background-color: #eaeaea;

  .footer-container {
    width: 1200px;
    margin: 0 auto;
    padding: 0 15px;

    .footerList {
      padding: 20px;
      border-bottom: 1px solid #e4e1e1;
      border-top: 1px solid #e4e1e1;
      overflow: hidden;
      padding-left: 40px;

      .footerItem {
        width: 16.6666667%;
        float: left;

        h4 {
          font-size: 14px;
        }

        .footerItemCon {
          li {
            line-height: 18px;
          }
        }

        &:last-child img {
          width: 121px;
        }
      }
    }

    .copyright {
      padding: 20px;

      .helpLink {
        text-align: center;

        li {
          display: inline;

          .space {
            border-left: 1px solid #666;
            width: 1px;
            height: 13px;
            background: #666;
            margin: 8px 10px;
          }
        }
      }

      p {
        margin: 10px 0;
        text-align: center;
      }
    }
  }
}
</style>
components /Header/index.vue
<template>
	<header class="header">
		<!-- The first line of the head -->
		<div class="top">
			<div class="container">
				<div class="loginList">
					<p>Welcome to shangpinhui!</p>
					<!-- No user name: not logged in -->
					<p v-if="!userName">
						<span>please</span>
						<!-- Declarative navigation: router-link Be sure to have to attribute -->
						<router-link to="/login">Sign in</router-link>
						<router-link class="register" to="/register">Free registration</router-link>
					</p>
					<!-- Logged in -->
					<p v-else>
						<a>{{userName}}</a>
						<a class="register" @click="logout">Log out</a>
					</p>
				</div>
				<div class="typeList">
					<router-link to="/center/myorder">My order</router-link>
					<router-link to="/shopcart">My shopping cart</router-link>
					<a href="###"> My shangpinhui</a>
					<a href="###"> shangpinhui members</a>
					<a href="###"> enterprise procurement</a>
					<a href="###"> focus on shangpinhui</a>
					<a href="###"> cooperation and investment promotion</a>
					<a href="###"> merchant background</a>
				</div>
			</div>
		</div>
		<!--Search area in the second line of the header-->
		<div class="bottom">
			<h1 class="logoArea">
				<!-- router-link This province is a component a label -->
				<router-link to="/home" class="logo">
					<img src="./images/logo.png" alt="" />
				</router-link>
			</h1>
			<div class="searchArea">
				<form action="###" class="searchForm">
					<input type="text" id="autocomplete" class="input-error input-xxlarge" v-model="keyword" />
					<button class="sui-btn btn-xlarge btn-danger" type="button" @click="goSearch">
						search
					</button>
				</form>
			</div>
		</div>
	</header>
</template>

<script>
	export default{
		name:"",
		data(){
			return{
				keyword:''
			}
		},
		methods:{
			//The callback function of the search button needs to jump to the search component
			goSearch(){

				this.$router.push({name:"search",params:{keyword:this.keyword},query:{k:this.keyword.toUpperCase()}})
			}
		}
	}
</script>

<style scoped lang="less">
	.header {
		&>.top {
			background-color: #eaeaea;
			height: 30px;
			line-height: 30px;

			.container {
				width: 1200px;
				margin: 0 auto;
				overflow: hidden;

				.loginList {
					float: left;

					p {
						float: left;
						margin-right: 10px;

						.register {
							border-left: 1px solid #b3aeae;
							padding: 0 5px;
							margin-left: 5px;
						}
					}
				}

				.typeList {
					float: right;

					a {
						padding: 0 10px;

						&+a {
							border-left: 1px solid #b3aeae;
						}
					}
				}
			}
		}

		&>.bottom {
			width: 1200px;
			margin: 0 auto;
			overflow: hidden;

			.logoArea {
				float: left;

				.logo {
					img {
						width: 175px;
						margin: 25px 45px;
					}
				}
			}

			.searchArea {
				float: right;
				margin-top: 35px;

				.searchForm {
					overflow: hidden;

					input {
						box-sizing: border-box;
						width: 490px;
						height: 32px;
						padding: 0px 4px;
						border: 2px solid #ea4a36;
						float: left;

						&:focus {
							outline: none;
						}
					}

					button {
						height: 32px;
						width: 68px;
						background-color: #ea4a36;
						border: none;
						color: #fff;
						float: left;
						cursor: pointer;

						&:focus {
							outline: none;
						}
					}
				}
			}
		}
	}
</style>
components/TypeNav
<template>
	<div class="type-nav">
		<div class="container">
			<!-- Delegation of events|entrust -->
			<div @mouseleave="leaveIndex">
				<h2 class="all">All commodity categories</h2>
				<!-- Three level linkage -->
				<div class="sort">
					<!-- Delegation using events+Programming navigation to realize route jump and transfer parameters -->
					<div class="all-sort-list2" @click="goSearch">
						<div class="item" v-for="(c1,index) in categoryList" :key="c1.categoryId"
							:class="{cur:currentIndex==index}">
							<h3 @mouseenter="changeIndex(index)">

								<a :data-categoryName="c1.categoryName" :data-category1Id="c1.categoryId">{{c1.categoryName}}--{{index}}</a>
								<!-- Try declarative navigation -->
								<!-- <router-link to="/search">{{c1.categoryName}}</router-link> -->

							</h3>
							<!-- Secondary and tertiary -->
							<div class="item-list clearfix" :style="{display:currentIndex==index?'block':'none'}">
								<div class="subitem" v-for="(c2) in c1.categoryChild" :key="c2.categoryId">
									<dl class="fore">
										<dt>
											<a :data-categoryName="c2.categoryName" :data-category2Id="c2.categoryId">{{c2.categoryName}}--{{index}}</a>
											<!-- <router-link to="/search">{{c2.categoryName}}</router-link> -->
										</dt>
										<dd>
											<em v-for="(c3) in c2.categoryChild" :key="c3.categoryId">

												<a :data-categoryName="c3.categoryName" :data-category3Id="c3.categoryId">{{c3.categoryName}}--{{index}}</a>
												<!-- <router-link to="/search">{{c3.categoryName}}</router-link> -->
											</em>

										</dd>
									</dl>
								</div>
							</div>
						</div>

					</div>
				</div>
			</div>
			<nav class="nav">
				<a href="###"> clothing City</a>
				<a href="###"> beauty salon</a>
				<a href="###"> shangpinhui supermarket</a>
				<a href="###"> global purchase</a>
				<a href="###"> flash purchase</a>
				<a href="###"> group buying</a>
				<a href="###"> interesting</a>
				<a href="###"> second kill</a>
			</nav>

		</div>
	</div>
</template>

<script>
	import {
		mapState
	} from 'vuex';
	// Introduction method: all lodash functions are introduced into throttle
	// import _ from 'lodash';
	// The best way to import is to load the throttle on demand
	// By default, the throttle is exposed. You don't need to add {} when importing
	import throttle from "lodash/throttle";


	// console.log(_)
	export default {
		// The name of the global component
		name: 'TypeNav',
		data() {
			return {
				// Store the first level classification on which the user mouse moves
				currentIndex: -1
			}
		},
		// After the component is mounted: you can send a request to the server to obtain the data of the server and display the data of the server
		mounted() {
			// Notify vuex to send a request, obtain data and store it in the warehouse
			this.$store.dispatch('categoryList')
		},
		methods: {
			// Enter the mouse to modify the responsive data currentIndex

			changeIndex: throttle(function(index) {
				// console.log(index)
				//Index: move the mouse over the index value of a first level classification element
				this.currentIndex = index
				// console.log("mouse in" + index)
			}, 50),
			leaveIndex() {
				// Callback of events when the first level classification mouse moves out
				this.currentIndex = -1
			},
			// Method of route jump
			goSearch(event) {
				// this.$router.push('/search')

				// The best solution combines programmatic navigation and event delegation for route jumps
				// There are some problems: event delegation is to delegate the events of all child nodes [h3 dt dl em] to the parent node
				// The route jump will be performed only when the a tag is clicked [how can we be sure that the a tag must be clicked]
				// Solution: add the a tag to the child nodes, and I add the custom attribute data CategoryName. Other child nodes do not have it
				// How to get the node you clicked and judge whether the node is a ----- event
				let element = event.target;
				// console.log(element) obtains the node [h3/a/dt/dl] that currently triggers this event, but we need a node with data CategoryName < = = it must be a tag
				// The node has a dataset attribute, which can obtain the user-defined attributes and attribute values of the node
				// console.log(element.dataset);

				let {categoryname ,category1id,category2id,category3id} = element.dataset;
				// If the tag has a categoryName, it must be a tag
				if(categoryname){
					// Sort out the parameters of route jump
					let location = {name:'search'};
					let query = {categoryName:categoryname};
					// alert('I am a tag ')
					// a label of primary classification, secondary classification and tertiary classification
					if(category1id){
						query.category1Id = category1id;
					}else if(category2id){
						query.category2Id = category2id;
					}else{
						query.category3Id = category3id;
					}
					// Finishing the parameters
					// console.log(location,query)
					location.query = query;
					// Then route jump
					this.$router.push(location)
				}

				// Another question: even if you can be sure that you clicked on the a tag, how can you distinguish between the first level, second level and third level tags

			}
		},
		computed: {
			...mapState({
				categoryList: state => state.home.categoryList
				// console.log(state);


			})
		}
	}
</script>

<style scoped lang="less">
	.type-nav {
		border-bottom: 2px solid #e1251b;

		.container {
			width: 1200px;
			margin: 0 auto;
			display: flex;
			position: relative;

			.all {
				width: 210px;
				height: 45px;
				background-color: #e1251b;
				line-height: 45px;
				text-align: center;
				color: #fff;
				font-size: 14px;
				font-weight: bold;
			}

			.nav {
				a {
					height: 45px;
					margin: 0 22px;
					line-height: 45px;
					font-size: 16px;
					color: #333;
				}
			}

			.sort {
				position: absolute;
				left: 0;
				top: 45px;
				width: 210px;
				height: 461px;
				position: absolute;
				background: #fafafa;
				z-index: 999;

				.all-sort-list2 {
					.item {
						h3 {
							line-height: 30px;
							font-size: 14px;
							font-weight: 400;
							overflow: hidden;
							padding: 0 20px;
							margin: 0;

							a {
								color: #333;
							}
						}

						.item-list {
							display: none;
							position: absolute;
							width: 734px;
							min-height: 460px;
							background: #f7f7f7;
							left: 210px;
							border: 1px solid #ddd;
							top: 0;
							z-index: 9999 !important;

							.subitem {
								float: left;
								width: 650px;
								padding: 0 4px 0 8px;

								dl {
									border-top: 1px solid #eee;
									padding: 6px 0;
									overflow: hidden;
									zoom: 1;

									&.fore {
										border-top: 0;
									}

									dt {
										float: left;
										width: 54px;
										line-height: 22px;
										text-align: right;
										padding: 3px 6px 0 0;
										font-weight: 700;
									}

									dd {
										float: left;
										width: 415px;
										padding: 3px 0 0;
										overflow: hidden;

										em {
											float: left;
											height: 14px;
											line-height: 14px;
											padding: 0 8px;
											margin-top: 5px;
											border-left: 1px solid #ccc;
										}
									}
								}
							}
						}

						// &:hover {
						// 	.item-list {
						// 		display: block;
						// 	}
						// }
					}
				}

				.cur {
					background: skyblue;
				}

			}
		}
	}
</style>
Shangpinhui static source code
views/Home/Floor
From the directory, we can see that the Home module has been split into multiple small components. Here I post the code of a small component of the floor. Similarly, other small components can be changed directly with the static source code CV. It's no difficulty
<template>
	<!--floor-->
	<div class="floor">
		<div class="py-container">
			<div class="title clearfix">
				<h3 class="fl">Household Electric Appliances</h3>
				<div class="fr">
					<ul class="nav-tabs clearfix">
						<li class="active">
							<a href="#Tab1 "data toggle =" tab "> Hot</a>
						</li>
						<li>
							<a href="#TAB2 "data toggle =" tab "> large household appliances</a>
						</li>
						<li>
							<a href="#Tab3 "data toggle =" tab "> household appliances</a>
						</li>
						<li>
							<a href="#Tab4 "data toggle =" tab "> kitchen appliances</a>
						</li>
						<li>
							<a href="#Tab5 "data toggle =" tab "> seasonal appliances</a>
						</li>
						<li>
							<a href="#Tab6 "data toggle =" tab "> air / purified water</a>
						</li>
						<li>
							<a href="#Tab7 "data toggle =" tab "> high end appliances</a>
						</li>
					</ul>
				</div>
			</div>
			<div class="tab-content">
				<div class="tab-pane">
					<div class="floor-1">
						<div class="blockgary">
							<ul class="jd-list">
								<li>Energy saving subsidy</li>
								<li>4K television</li>
								<li>air cleaner</li>
								<li>IH rice cooker</li>
								<li>Drum washing machine</li>
								<li>Electric water heater</li>
							</ul>
							<img src="./images/floor-1-1.png" />
						</div>
						<div class="floorBanner">
							<div class="swiper-container" id="floor1Swiper">
								<div class="swiper-wrapper">
									<div class="swiper-slide">
										<img src="./images/floor-1-b01.png">
									</div>

								</div>
								<!-- If pager is required -->
								<div class="swiper-pagination"></div>

								<!-- If you need navigation buttons -->
								<div class="swiper-button-prev"></div>
								<div class="swiper-button-next"></div>
							</div>
						</div>
						<div class="split">
							<span class="floor-x-line"></span>
							<div class="floor-conver-pit">
								<img src="./images/floor-1-2.png" />
							</div>
							<div class="floor-conver-pit">
								<img src="./images/floor-1-3.png" />
							</div>
						</div>
						<div class="split center">
							<img src="./images/floor-1-4.png" />
						</div>
						<div class="split">
							<span class="floor-x-line"></span>
							<div class="floor-conver-pit">
								<img src="./images/floor-1-5.png" />
							</div>
							<div class="floor-conver-pit">
								<img src="./images/floor-1-6.png" />
							</div>
						</div>
					</div>
				</div>
			</div>
		</div>


	</div>

</template>

<script>
</script>

<style scoped lang="less">
	.floor {
		margin-top: 15px;

		.py-container {
			width: 1200px;
			margin: 0 auto;

			.title {
				.fl {
					float: left;
					color: #c81623;
					font-size: 20px;
					line-height: 30px;
					margin: 9px 0;
					font-weight: 700;
				}

				.fr {
					float: right;

					.nav-tabs {
						margin: 10px 0 0;
						display: inline-block;

						li {
							float: left;
							line-height: 18px;

							a {
								padding-top: 1px;
								font-weight: 400;
								background-color: #fff;

								&::after {
									content: "|";
									padding: 0 10px;
								}
							}

							&:nth-child(7) {
								a {
									&::after {
										content: "";
									}
								}
							}

							&.active {
								a {
									color: #e1251b;
								}
							}
						}
					}
				}
			}

			.tab-content {
				border-top: 2px solid #c81623;
				border-bottom: 1px solid #e4e4e4;

				.tab-pane {
					.floor-1 {
						height: 360px;
						display: flex;

						.blockgary {
							width: 210px;
							height: 100%;
							background: #f7f7f7;

							.jd-list {
								padding: 15px 0;
								overflow: hidden;

								li {
									list-style-type: none;
									float: left;
									width: 40%;
									margin: 0 10px;
									border-bottom: 1px solid #e4e4e4;
									text-align: center;
									line-height: 26px;
								}
							}

							img {
								width: 100%;
							}
						}

						.floorBanner {
							width: 330px;
							height: 100%;
						}

						.split {
							width: 220px;
							height: 100%;
							position: relative;

							.floor-x-line {
								position: absolute;
								background: #e4e4e4;
								width: 220px;
								height: 1px;
								top: 180px;
							}

							.floor-conver-pit {
								width: 100%;
								height: 50%;

								img {
									width: 100%;
									height: 100%;
									transition: all 400ms;

									&:hover {
										opacity: 0.8;
									}
								}
							}
						}

						.center {
							border: 1px solid #e4e4e4;
						}
					}
				}
			}
		}
	}
</style>
The login registration search module hasn't done any effect. It only does the route jump part, so it doesn't post the following code
views/Login
<template>
	<div>Sign in</div>
</template>

<script>
</script>

<style>
</style>
views/Search
<template>
	<div>
		<h1>params parameter{{$route.params.keyword}}=======</h1>
		<h2>query parameter{{$route.query.k}}</h2>

	</div>
</template>

<script>
	export default{
		name:'',
		Routing component can deliver props data
		props:['keyword','a','b']
	}
</script>

<style>
</style>
router:
import Vue from 'vue';
import VueRouter from 'vue-router';
//Using plug-ins
Vue.use(VueRouter);
//Configure routing
//Introducing routing components
import Home from '@/views/Home'
import Search from '@/views/Search'
import Login from '@/views/Login'
import Register from '@/views/Register'
//First push the vueroter prototype object and save a copy
let originPush = VueRouter.prototype.push;
let originReplace = VueRouter.prototype.replace;
//Rewrite push replace
//The first parameter: tell the original push method where you jump (which parameters are passed)
//Second parameter: successful callback
//Third parameter: failed callback
//Call | apply difference
//The same points can call the function once, and the context of the function can be tampered with once
//Differences: call and apply pass parameters, call pass parameters are separated by commas, apply method is executed, and array is passed
 VueRouter.prototype.push = function(location,resolve,reject){
	if(resolve&&reject){
		originPush.call(this,location,resolve,reject)
	}else{
		originPush.call(this,location,()=>{},()=>{});
	}
}
VueRouter.prototype.replace = function(location,resolve,reject){
	if(resolve&&reject){
		originReplace.call(this,location,resolve,reject)
	}else{
		originReplace.call(this,location,()=>{},()=>{});
	}
}
export default new VueRouter({
	//Configure routing
	routes:[
		{
			path:'/',
			redirect:'/home'
		},
		{
			path:'/home',
			component:Home,
			meta:{show:true}
		},
		{
			path:'/search/:keyword',
			component:Search,
			meta:{show:true},
			name:'search',
			//Can the routing component transfer props data?
			//Boolean notation: params
			// props:true
			//Object writing, and pass some props to the routing component
			// props:{a:1,b:2}
			//Function writing: params parameter and query parameter can be passed to the routing component through props
			// props:($route)=>{
			// 	return{keyword:$route.params.keyword,K:$route.query.k}
			// }
			props:($route)=>({keyword:$route.params.keyword,k:$route.query.k})
		},
		{
			path:'/login',
			component:Login,
			meta:{show:false}
		},
		{
			path:'/register',
			component:Register,
			meta:{show:false}
		},
	]
})
App.vue
<template>
	<div>
		<Header></Header>
		<!-- Where routing components exit -->
		<router-view></router-view>
		<!-- stay Home,Search Display, in Login,Register hide -->
		<Footer v-show="$route.meta.show"></Footer>
	</div>
</template>

<script>
	// import HelloWorld from './components/HelloWorld.vue'
	import Header from './components/Header'
	import Footer from './components/Footer'
	export default {
		name: '',
		components: {
			Header,
			Footer
		}
	}
</script>

<style>
	/* #app {
  font-family: Avenir, Helvetica, Arial, sans-serif;
  -webkit-font-smoothing: antialiased;
  -moz-osx-font-smoothing: grayscale;
  text-align: center;
  color: #2c3e50;
  margin-top: 60px;
} */
</style>
main.js
import Vue from 'vue'
import App from './App.vue'
//Three level linkage component - registered as a global component
import TypeNav from '@/components/TypeNav';
//The first parameter is the name of the global component, and the second parameter is which component
Vue.component(TypeNav.name,TypeNav);
//Introduction routing
import router from '@/router';
//Import warehouse
import store from '@/store';
Vue.config.productionTip = false
//test
// import {reqCategoryList} from '@/api';
// reqCategoryList();

new Vue({
  render: h => h(App),
  //Registered route: the following wording kv is consistent and v is omitted
  router,
  //Registered warehouse: a $store attribute will be added to the component instance
  store
}).$mount('#app')
api/index.js
//The current module api is in the kiosk
import requests from './request';


//Three level linkage interface
//  /API / product / getbasecategorylist get no parameters
	//When axios sends a request, it returns a promise object
export const reqCategoryList = ()=>requests({url:'/product/getBaseCategoryList',method:'get'});
api/request.js
//Secondary packaging for axios
import axios from "axios";
// Import progress bar
import nprogress from 'nprogress';
//Introducing progress bar styles
import "nprogress/nprogress.css";
// console.log(nprogress);
//Start: progress bar start done: progress bar end


//1. Use the method create of axios object to create an axios instance
//request is axios, just a little configuration
const requests = axios.create({
	//Configuration object
	//The basic path. When sending a request, the api will appear in the path
	baseURL:"/api",
	//Represents the request timeout time of 5s
	timeout:5000
});
//Request Interceptor: before sending a request, the request interceptor can detect and do something before the request is sent

requests.interceptors.request.use((config)=>{
	//config: configure the object. An important attribute in the object is the header request header
	//When requested, the progress bar starts moving
	nprogress.start();
	return config
})

//Response interceptor
requests.interceptors.response.use((res)=>{
	//After the successful callback function of the server returns the server response data, the response interceptor can detect it and do something
	//End of response completion progress bar
	nprogress.done();
	return res.data;
},(error)=>{ // eslint-disable-line no-unused-vars
	//Server corresponding failure callback function
	//Terminate promise chain
	return Promise.reject(new Error('faile'));
});


//External exposure
export default requests;
store/index.js
import Vue from 'vue';
import Vuex from 'vuex';
//You need to use the plug-in once
Vue.use(Vuex);
//Introduction of small warehouse
import home from './home/';
import search from './search';
// //Expose an instance of the store class
export default new Vuex.Store({
	//Realize the modular development of vuex warehouse and store data
	modules:{
		home,search
	}
})
store/home/index.js
import {reqCategoryList} from '@/api';
// home module warehouse
const state = {
	// The default initial value of the data in state should not be written blindly. The server returns your initial value as who, the server returns the array, and your initial value as the array returns the object. The initial value is the object
	categoryList:[]
};
const mutations = {
	CATEGORYLIST(state,categoryList){
		state.categoryList = categoryList;
	}
};
const getters = {};
const actions = {
	//Send a request to the server through the interface function call in the API to obtain the data of the server
	async categoryList({commit}){
		let result = await reqCategoryList();
		// console.log(result);
		if (result.code==200){
			commit("CATEGORYLIST",result.data);
		}
	}
};
// Only other modules exposed to the outside can be used
export default {
	state,
	mutations,
	getters,
	actions

}
store/search/index.js
// search module small warehouse
const state = {};
const mutations = {};
const getters = {};
const actions = {};
// Only other modules exposed to the outside can be used
export default {
	state,
	mutations,
	getters,
	actions

}
emm... Almost the code, that's all... There may be too many missing parts in the code, where you can't understand or where I lost, you can comment directly, I'll modify it, and we'll learn together!!!
---------------------------------------------------------------------------------------------------------------------------------
---------------------------------------------------------------------------------------------------------------------------------
3. Some knowledge points
9.vuex status management
9.1 what is vuex?
vuex is an official plug-in, state management library, which centrally manages the common data of components in the project
Remember that not all projects need vuex
(the project is very small, and few components can be used without vuex. On the contrary, vuex can be used if there is a lot of data and data maintenance is laborious)
modules
actions
getters
mutation
state
9.2 vuex basic usage
/// / state: the place where the warehouse stores data is the state
// const state = {}
/// / changes: the only way to modify state
// const mutations = {}
/// / action: to process actions, you can write your own business logic or handle asynchronous transactions
// const actions = {}
/// / getters: it is understood that calculation attributes are used to simplify the data of the warehouse and make it easier for components to obtain the data of the warehouse
// const getters = {}
9.3 vuex realize modular development
If the project is too large, there are too many components, interfaces and data, vuex can realize module development
Put all global components into components
Get the successful result of promise await
await and async must exist at the same time
Complete the first level classification and dynamically add background color
1. Complete with style -. item:hover{
background: skyblue;
}
2. Complete through js-----
Control the display and hiding of secondary and tertiary commodity classification through js
<div class="item-list clearfix" :style="{display:currentIndex==index?'block':'none'}">
                                <div class="subitem" v-for="(c2) in c1.categoryChild" :key="c2.categoryId">
                                    <dl class="fore">
                                        <dt>
                                            <a href="">{{c2.categoryName}}</a>
                                        </dt>
                                        <dd>
                                            <em v-for="(c3) in c2.categoryChild" :key="c3.categoryId">
                                                <a href="">{{c3.categoryName}}</a>
                                            </em>

                                        </dd>
                                    </dl>
                                </div>
                            </div>
At the beginning, the css style display: block|none was used to display and hide the secondary and tertiary commodity classifications
// &:hover {
// .item-list {
// display: block;
// }
// }
3) Demonstrate the Caton phenomenon
Normal: events are triggered very frequently, and the callback function must be executed every time
(if the time is short and there is calculation inside the callback function, the browser may get stuck)
Throttling: the callback will not be triggered repeatedly within the specified interval. The callback will only be triggered if it is greater than this interval. Change the frequent triggering into a small number of triggering (closure delayer). throttle
Users operate frequently, but change frequent operations into a small number of operations [you can give the browser enough time to parse the code]
Anti shake: all previous triggers are cancelled, and the last execution will be triggered after the specified time, that is, if continuous and fast triggers are only executed once
The user operates frequently, but only once
//lodash plug-in: it encapsulates the anti shake and throttling business of functions [closure + delayer]
//1.lodash function library exposes functions
debounce function
let result = _.debounce(function(){
},1000);
result();
Route jump and transfer parameters of three-level linkage components
Three levels of linkage users can click: primary classification, secondary classification and tertiary classification. When you click, the Home module jumps to the Search module,
The first level will pass the product (product name and product ID) selected by the user during route jump.
Route jump
Declarative navigation: router link
Programming navigation: push|replace (you can write your own business logic)
Three level linkage here, if the declarative navigation router link is used, the route jump can be realized, but there is a jamming phenomenon
Router link: one component can be used. After the server data is returned, many router link components will be circulated [create multiple component instances]
When creating a component instance, creating 1000 + in an instant consumes a lot of memory, so there is a stuck phenomenon.
So we use programmed navigation
The best solution combines programmatic navigation and event delegation for route jumps
------------------------------Unfinished to be continued---------------------