Front end Vue core
Developing a front-end module can be summarized as the following steps:
(1) Write static pages and split them into static components;
(2) Send request (API);
(3) vuex (triple operation of actions, changes and state);
(4) Component to obtain warehouse data and display it dynamically;
1. vue file directory analysis
node_modules folder project depends on, such as babel: es6 syntax translation to es5, better compatibility and vue framework
public folder: static resources. When webpack is packaged, it will be packaged into dist folder intact.
pubilc/index.html: is a template file, which is used to generate the entry file of the project. JS and CSS packaged by webpack will also be automatically injected into the page. When our browser accesses the project, it will open the generated index by default html.
src folder (programmer code folder)
assets: Generally, static resources are also placed (static resources shared by multiple components). Note that they are placed in assets Static resources in the folder webpack When packing, webpack Static resources will be packaged as a module Js In the file.
components:  Non routing component (global component), other components are placed in views perhaps pages Folder
App.vue:  Unique root component
main.js:  Program entry file, the first file to execute
babel.config.js: configuration file (Babel related)
package.json: project details record which dependent projects in the project and how to run them
package-lock.json: cache file (source of various packages)
Explanation of the difference between the two 1
package.json defines the version range (such as ^ 1.0.0). The specific version installed when running npm install can only be determined after parsing. The dependency tree defined in this can be called logical tree.
node_ The modules folder is the specific version of npm actually installed. The folder structure in this folder can be called a physical tree.
There are some de duplication algorithms in the installation process, so you will find that the logical tree structure is not exactly the same as the physical tree structure.
package-lock.json can be understood as a snapshot that combines a logical tree and a physical tree. There are explicit dependent version numbers, actual installation structure, and logical tree structure.
The biggest advantage is that you can get repeatable build s. When you repeat builds on CI (continuous integration), the artifact s you get are the same, because the dependent versions are locked. After npm5, its content is the same as NPM shrink wrap JSON is as like as two peas.
Explanation of the difference between the two 2
package-lock.json is a file generated when running "npm install", which is used to record the version number of each package actually installed in the project in the current state, the download address of the module, and what dependencies the module depends on.
Why is there a package JSON, and package lock JSON file, when node_ When the modules folder does not exist or is deleted, you need to use npm install to reload all dependencies through package lock JSON can directly indicate the download address and related dependencies. It is also faster than the download speed and is not easy to report errors.
2. Project configuration
2.1 When the project is running, the browser opens automatically
find package.json File plus --open
    "scripts": {
    "serve": "vue-cli-service serve --open",
    "build": "vue-cli-service build",
    "lint": "vue-cli-service lint"
    },
2.2 close the eslint verification tool
(there will be various specifications if it is not closed, and an error will be reported if it is not in accordance with the specifications)
- Create vue.exe under the root directory config. JS to configure
module.exports = {
  //Close eslint
  lintOnSave: false
  }
2.3 src folder configuration alias
Create jsconfig JSON, use @ / instead of src /, and exclude indicates files that cannot use this alias
 {
    "compilerOptions": {
        "baseUrl": "./",
            "paths": {
            "@/*": [
                "src/*"
            ]
        }
    },

    "exclude": [
        "node_modules",
        "dist"
    ]
 }
3. Analysis of project routing (overall division of components)
Differences between routing components and non routing components
Component switching is based on state changes (data) within the component
Route switching is based on the change of browser URL
The biggest difference is that after refreshing the browser:
vue will match the current URL and render the components of the route definition that match
Components based on internal state switching of components
Will be reset to the initial state
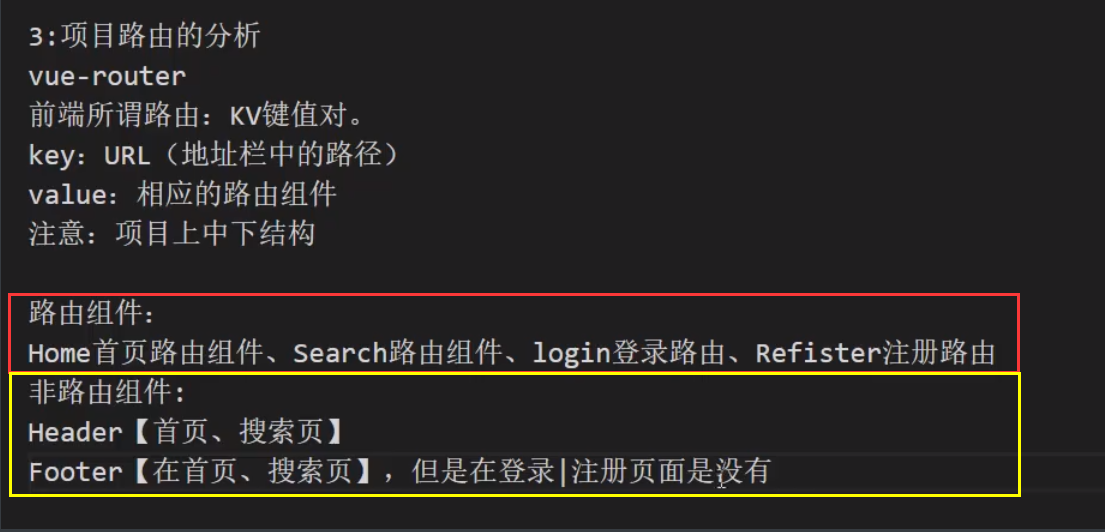
Two non routing components are defined in components, header component and Footer component
- Find a static component and copy the style, etc. (this shows the code robustness of less and scss, etc.)
- Install plug-ins such as less
4. Configure component page style (less first question)
The style of the component page uses the less style, which is not recognized by the browser and needs to be downloaded
npm install --save less less-loader@5
Note that if the latest version of less is installed, a function error will be reported
It is recommended to install the specified lower version directly
If you want the component to recognize the less style, set it in the component
<script scoped lang="less">
Note that the imported components need to be capitalized

5. Clear vue page default style
vue is a single page development. We only need to modify the index HTML file
<link rel="stylesheet" href="<%= BASE_URL %>reset.css">
@import "./iconfont.css";

/* Clear inner and outer margins */
body, h1, h2, h3, h4, h5, h6, hr, p, blockquote,
dl, dt, dd, ul, ol, li,
pre,
fieldset, lengend, button, input, textarea,
th, td {
    margin: 0;
    padding: 0;
}

/* Set default font */
body,
button, input, select, textarea { /* for ie */
    /*font: 12px/1 Tahoma, Helvetica, Arial, ""Arial", sans serif;*/
    font: 12px/1.3 "Microsoft YaHei",Tahoma, Helvetica, Arial, "\5b8b\4f53", sans-serif; /* It is represented by ascii characters, so that there is no problem under any coding */
    color: #333;
}


h1 { font-size: 18px; /* 18px / 12px = 1.5 */ }
h2 { font-size: 16px; }
h3 { font-size: 14px; }
h4, h5, h6 { font-size: 100%; }

address, cite, dfn, em, var, i{ font-style: normal; } /* Straighten italics */
b, strong{ font-weight: normal; } /* Thin bold */
code, kbd, pre, samp, tt { font-family: "Courier New", Courier, monospace; } /* Uniform uniform width font */
small { font-size: 12px; } /* Chinese less than 12px is difficult to read, making small normal */

/* Reset list elements */
ul, ol { list-style: none; }

/* Reset text formatting elements */
a { text-decoration: none; color: #666;}


/* Reset form elements */
legend { color: #000; } /* for ie6 */
fieldset, img { border: none; }
button, input, select, textarea {
    font-size: 100%; /* Enables form elements to inherit font size under ie */
}

/* Reset table elements */
table {
    border-collapse: collapse;
    border-spacing: 0;
}

/* Reset hr */
hr {
    border: none;
    height: 1px;
}
.clearFix::after{
	content:"";
	display: block;
	clear:both;
}
/* Let non ie browsers also display vertical scroll bars by default to prevent flickering caused by scroll bars */
html { overflow-y: scroll; }

a:link:hover{
    color : rgb(79, 76, 212) !important;
    text-decoration: underline;
}

/* Clear float */
.clearfix::after {
    display: block;
    height: 0;
    content: "";
    clear: both;
    visibility: hidden;
}
5. Routing component related configuration
01. Install routing
npm install --save vue-router
You can view the package JSON determines whether the component is complete
02. Create a private folder to place routing components
Create a pages folder and create routing components
In the above analysis, there should be four routing components: Home, Search, Login and Register
- -Components folder: frequently placed non routing components (shared global components)
- -pages |views folder: routing components are often placed
03. Configure routing
Create router folder and index JS for routing configuration
//Introduce Vue router routing plug-in
import VueRouter from "vue-router";
//Introducing Vue
import Vue from "vue";
//Using plug-ins
Vue.use(VueRouter);

import Home from '@/pages/Home'
import Login from '@/pages/Login'
import Register from '@/pages/Register'
import Search from '@/pages/Search'

export default new VueRouter({
  routes: [
    {
      path: "/home",
      component: Home
    },
    {
      path: "/search",
      component: Search
    },
    {
      path: "/login",
      component: Login
    },
    {
      path: "/register",
      component: Register
    },
  ]

})
In main JS
import Vue from 'vue'
import App from './App.vue'
//01. Here
import router from '@/router'
Vue.config.productionTip = false

new Vue({
  render: h => h(App),
  //02. Here
  router
}).$mount('#app')
04. Summary
Differences between routing components and non routing components:
What is the difference between routing components and non routing components?
1: Routing components are generally placed in the pages|views folder, and non routing components are generally placed in the components folder
2; Routing components generally need to be registered in the router folder (the name used is the component name). When non routing components are used, they are generally used in the form of labels
3: After registering a route, both the routing component and the non routing component have $route and I $route attributes
$route: generally get routing information [path, query.params, etc.]
$router: generally programmed navigation and route jump [push/replace]
05. Route jump
There are two forms of route jump:
Declarative navigation router link allows you to jump routes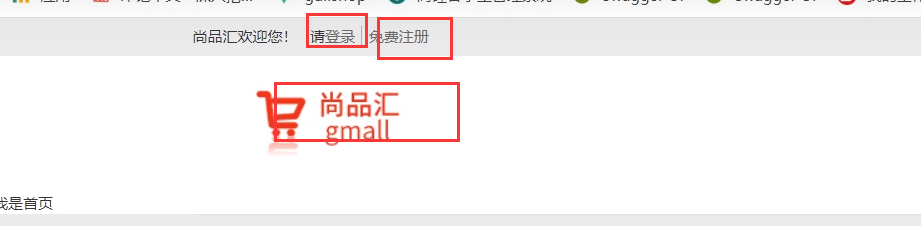
Program navigation push|replace to perform route jump

Programming navigation: whatever declarative navigation can do, programming navigation can be in,
However, in addition to routing jump, programmatic navigation can also do some other business logic.
6. Display and hide of footer component (header letter)
Basic ideas of implementation
- The footer does not exist on the login registration page, so it should be hidden, v-if or v-show
- v-show is used here because v-if will frequently manipulate dom elements, which will consume performance. v-show only displays or hides elements through styles
Two ways to implement
-
When configuring a route, you can configure meta information meta for the route,
<Footer v-show="$route.meta.show"></Footer>
{ path: "/register", component: Register, meta: { show: false } }, -
Define the show attribute in the original information of the route to assign a value to v-show and judge whether to display the footer component
<Footer v-show="$route.path=='/home'||$route.path=='/search'"></Footer>
7. Header letter
01. How many methods are there for route jump?
For example: a - > b
Declarative navigation: route link (must have to attribute), which can realize route jump
Programming navigation: using $router of the assembly instance Push / replace method can realize route jump. [(you can write your own business)
02. Two methods of routing parameters params query
01. String parameters
Research examples
Click the button to transfer the parameters to the next page

Implementation method of params parameter transmission
Step 1: search box data bidirectional binding

Step 2: route occupancy

Step 3: function routing parameters
gosearch() {
 this.$router.push('/search' + '/' + this.keyword)
}
query pass parameters
Need to use * *? And kv * *
gosearch() {
	this.$router.push('/search' + '/' + this.keyword + '?k=' + this.keyword.toUpperCase())
}
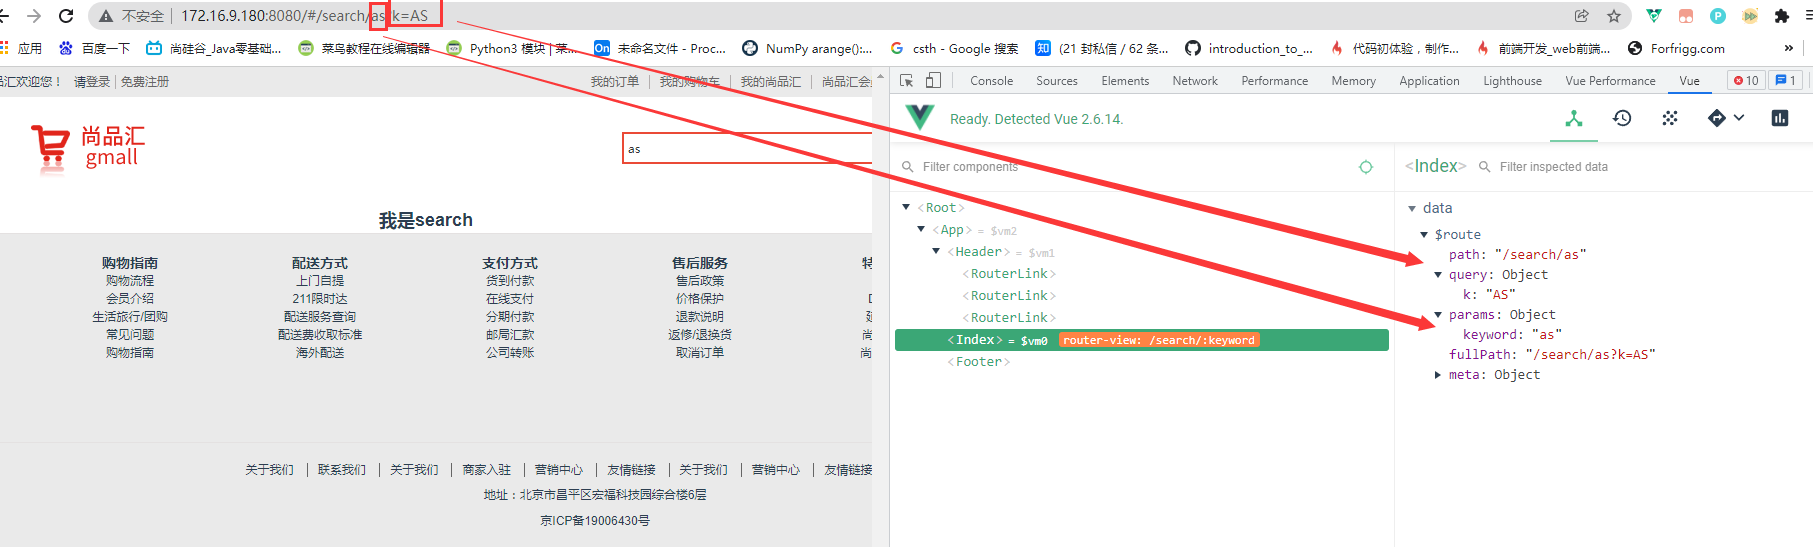

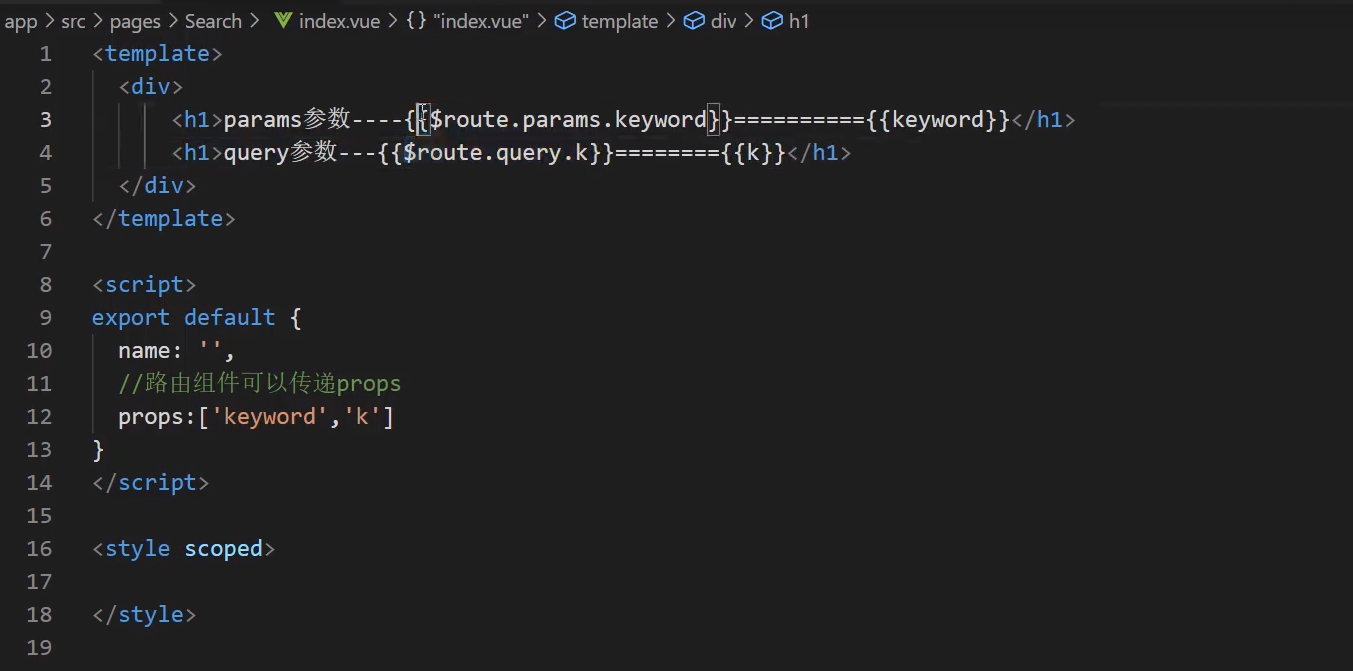
Data display
Build internal
<h1>I am params parameter{{$route.params.keyword}}</h1>
<h1>I am query parameter{{$route.query.k}}</h1>

02. Template string
It's an ES6
this.$router.push(`/search/${this.keyword}?k=${this.keyword.toUpperCase()}`)
03. Object writing
What is loaded after push needs to be a parameter
First step
Add a name to the route
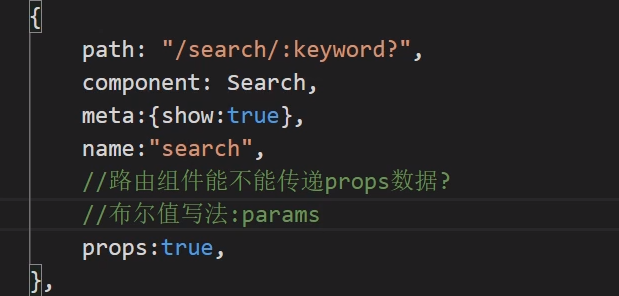
{
   path: "/search/:keyword",
   component: Search,
   meta: { show: true },
   name: "search"
},
Step 2
Incoming parameters
gosearch() {
// this.$router.push('/search' + '/' + this.keyword + '?k=' + this.keyword.toUpperCase())
// this.$router.push(`/search/${this.keyword}?k=${this.keyword.toUpperCase()}`)
this.$router.push({
 name: 'search',
 query: {
   k: this.keyword.toUpperCase()
 },
 params: {
   keyword: this.keyword
 }
})
}
04. Interview questions
Interview question 1:
1. Can route transfer parameter (object writing) path be used together with params parameter?
Try to use it together
gosearch() {
//Can the route passing parameter (object writing) path be used together with the params parameter?
this.$router.push({
 path: 'search',
 params: {
   keyword: this.keyword
 }
})
}
Route discovery failed to jump
A: when routing jump passes parameters, the object can be written in the form of name and path, but it should be noted that the writing of path cannot be used together with the writing of params parameters
Interview mention 2
2. How to specify whether the params parameter can be passed or not?
An attempt was made not to pass in the params parameter while the route was occupied
gosearch() {
//How to specify whether params parameters can be passed or not?
this.$router.push({
 path: 'search',
 query: {
   k: this.keyword.toUpperCase()
 },
})
}
If the route requires the params parameter to be passed, but you do not pass the params parameter, there will be a problem with the URL
How to specify whether panams parameters can be passed or not? When configuring routing, add a question mark after the placeholder [params can be passed or not]
Is it actually similar to regular? This indicates whether the parameter can be passed or not
{
   path: "/search/:keyword?",
   component: Search,
   meta: { show: true },
   name: "search"
},
Interview mention 3
params parameters can be passed or not, but how to solve the problem if the passing is an empty string?
attempt
gosearch() {
//**params parameters can be passed or not, but how to solve the problem if the passing is an empty string**
this.$router.push({
 path: 'search',
 params: {
     keyword: ''
 }
})
}
There is also a problem with the discovery path. seach is not displayed
Use undefined to solve the problem: params parameters can be passed or not (empty string)
gosearch() {
//**params parameters can be passed or not, but how to solve the problem if the passing is an empty string**
this.$router.push({
 path: 'search',
 params: {
     keyword: ''|| undefined
 }
})
}
Interview mention 4
Can the routing component transfer props data?
Yes: there are three ways to write, but only params parameters can be passed,
params Boolean notation
First, add props Boolean value to the location of router route
Then add variable definition to the location of props

params object writing
First, add props object writing method to the location of router route
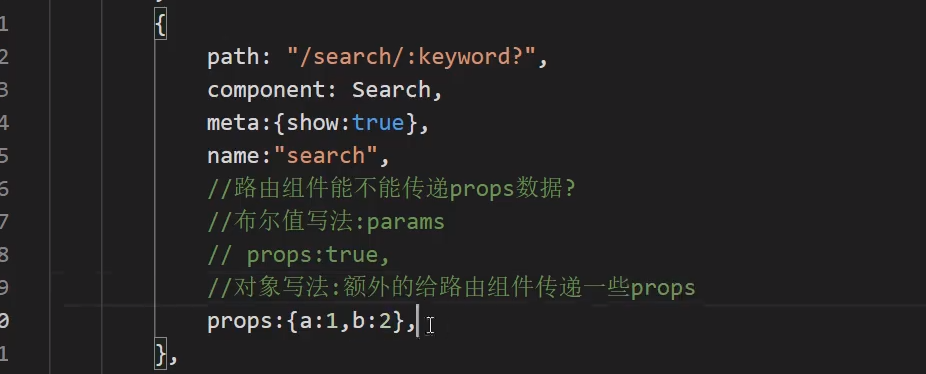
Then the jump component can be used directly
params function
First, add props function to the location of router route

Then the jump component can be used directly
8. Execute the same push problem multiple times (Header fotter)
Problem description
If the programmed route jumps to the current route (the parameters remain unchanged), the NavigationDuplicated warning error will be thrown if it is executed multiple times?
– there are two forms of route jump: declarative navigation and programmed navigation
– declarative navigation has no such problems, because the underlying Vue router has been handled
If the same push problem is executed multiple times, a warning will appear on the console
For example: use this$ router. When pushing ({Name: 'Search', params:{keyword: "..." |||}}), if the same push is executed multiple times, a warning will appear on the console.
let result = this.$router.push({name:"Search",query:{keyword:this.keyword}})
console.log(result)
Execute the above code once:
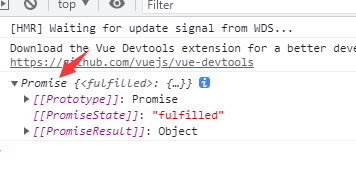
Multiple execution warnings:

Reason: push is a promise. Promise needs to pass success and failure parameters. We don't pass them in push. method:
this.$router.push({name:'Search',params:{keyword:"..."||undefined}},()=>{},()=>{})
The latter two items represent successful and failed callback functions, respectively. This way of writing will cure the symptoms but not the root causes. In the future, there will still be similar errors in programming navigation by pushing|replace in other components
How to solve
First, you need to understand that in the currently created component
this: current component instance (search)
this.
r
o
u
t
e
r
genus
nature
:
When
front
of
this
individual
genus
nature
,
genus
nature
value
V
u
e
R
o
u
t
e
r
class
of
one
individual
real
example
,
When
stay
enter
mouth
writing
piece
notes
book
road
from
of
Time
Wait
,
to
group
piece
real
example
add
plus
router attribute: the current attribute. The attribute value is an instance of vueroter class. When registering a route in the entry file, it is added to the component instance
Route attribute: the current attribute. The attribute value is an instance of vueroter class. When registering a route in the entry file, add the route | $route attribute to the component instance
push is vueroter A method of prototype. You can rewrite this method in the index file in the router (it doesn't matter if you don't understand it. This is the front-end interview question)
https://www.bilibili.com/video/BV1Vf4y1T7bw?p=10&spm_id_from=pageDriver If you don't understand, you can watch the video section 10, minute 15
In essence, although it is rewritten, it actually calls the original method, which is just processed
This code can be copied to the router folder
//1. First, save a copy of the push of the vueroter prototype object
let originPush = VueRouter.prototype.push;//push method
let originReplace= VueRouter.prototype.replace//method
//2. Rewrite push replace
//The first parameter: tell the original push, the target location of the jump and which parameters are passed
//Second parameter: successful callback
//Third parameter: failed callback
VueRouter.prototype.push = function (location,resolve,reject){
    //If successful and failed callback functions are passed, they will not be processed
    if(resolve && reject){
         call| |apply difference
        //In the same point, the function can be called once and the context of the function can be tampered with once
        //Differences: call and apply pass parameters: call pass parameters are separated by commas, apply method is executed, and array is passed
        originPush.call(this,location,resolve,reject)
    }else{//Otherwise, add two functions yourself
        originPush.call(this,location,() => {},() => {})
    }
}
VueRouter.prototype.replace = function (location,resolve,reject){
    if(resolve && reject){
         call| |apply difference
        //In the same point, the function can be called once and the context of the function can be tampered with once
        //Differences: call and apply pass parameters: call pass parameters are separated by commas, apply method is executed, and array is passed
        originReplace.call(this,location,resolve,reject)
    }else{
        originReplace.call(this,location,() => {},() => {})
    }
}
9.Home component splitting (home)
Divided into 7 components according to function
Some common components need to be configured as global components
10. Home three-level linkage global component completion (home)
Completion of three-level linkage components
- due to the three-level linkage, register the three-level linkage as a global component in Home, Search and Detail. Benefits: you only need to register once and can use it anywhere in the project
01. Create basic components
Create components and write basic html and css

02. Component global registration
Note that the global component needs to be registered in main Operation in JA file
Step 1: import components
//Register the three-level linkage component as a global component
import TypeNav from '@/pages/Home/TypeNav';
Step 2 Registration
//The first parameter: global component name, and the second parameter: global component name
Vue.component(TypeNav.name,TypeNav);
03. Use of components
Use this global component in the Home component
<template>
 <div>
 <!--  The three-level linkage global component has been registered as a global component, so it does not need to be imported-->
   <TypeNav/>
 </div>
</template>
Global components can be used directly in any page without importing declarations
11. Encapsulating ListContainer components
01. Encapsulation style and css
Pay attention to changing the path of the picture
12. Encapsulate the TodayRecommend component
01. Encapsulation style and css
Pay attention to changing the path of the picture
13. Encapsulate Rank components
01. Encapsulation style and css
Pay attention to changing the path of the picture
14. Encapsulate Like components
01. Encapsulation style and css
Pay attention to changing the path of the picture
15. Encapsulating Floor components
01. Encapsulation style and css
Pay attention to changing the path of the picture
16. Package Brand components
01. Encapsulation style and css
Pay attention to changing the path of the picture
17. Package axios
axios secondary packaging: XMLHttpRequest, fetch, JQ, axios
Request interceptor and response Interceptor: the request interceptor can handle some business and response interceptors before sending a request. After the server data is returned, it can handle some things
Installing axios
npm install --save axios
Observe package JSON to see if the installation was successful

01. Encapsulate the request file
axios Chinese document, including details.
https://www.kancloud.cn/yunye/axios/234845
Create the api folder in the root directory and create request JS file.
The contents are as follows. The current document code is still relatively small. You can add content if you need it later.
import axios from "axios";
//1. Secondary packaging of axios
const requests = axios.create({
    //Configuration object
    //Base path. The request sent by requests will be followed by baseURl after the port number
    baseURL:'/api',
    //Represents that the request timeout time is 5s
    timeout: 5000,
})
//2. Configure request interceptor
requests.interceptors.request.use(config => {
    //The config configuration object is mainly used to configure the request Header
    //For example, add a token

    return config;
})
//3. Configure corresponding interceptors
requests.interceptors.response.use((res) => {
    //Successful callback function
    return  res.data;
},(error) => {
    //Failed callback function
    console.log("Response failed"+error)
    return Promise.reject(new Error('fail'))
})
//4. External exposure
export default requests;
02. Package api unified management document
Create index. In the api folder JS file to encapsulate all requests
Encapsulate each request into a function and expose it. The component only needs to call the corresponding function. In this way, when there are many interfaces, we only need to modify the file if necessary.
As follows:
//In the current module, the API is under unified management, that is, the request interface is under unified management
import requests from "@/api/request";

//The first page three-level classification interface / api/product/getBaseCategoryList get request has no parameters
export const reqCateGoryList = () => {
    return  requests({
        url: '/product/getBaseCategoryList',
        method: 'GET'
    })
}
When a component wants to use related requests, it only needs to import related functions. The reqCateGoryList in the figure above is an example:
import {reqCateGoryList} from './api'
//Initiate request
reqCateGoryList();
03. Solving cross domain problems
What is cross domain: requests with different protocols, domain names and port numbers are called cross domain
http: //localhost:8080/#/home -- front end project local server
http://39.98.123.211 ----Background server
Solve cross domain problems: JSONP, CROS, proxy
Agent implementation scheme

Vue. In the root directory config. JS, proxy is configured to solve cross domain problems through proxy.
We have set the baseURL as api when encapsulating axios, so all requests will carry / api. Here we convert / api. If your project does not encapsulate axios or does not configure baseURL, it is recommended to configure it. To ensure that the baseURL is the same as the proxy mapping here, it is' / api 'here.
module.exports = {
    //Close eslint
    lintOnSave: false,
    devServer: {
        // True means hot update, false means manual refresh, and the default value is true
        inline: false,
        // development server port 8000
        port: 8001,
        //Proxy server solution cross domain
        proxy: {
            //The / api in the request path will be replaced by the following proxy server
            '/api': {
                //Provide the server address of the data
                target: 'http://39.98.123.211',
                //Because both have APIs, path rewriting is no longer required
			   //pathRewrite:{'^/api':''}

            }
        },
    }
}