Start with the picture above and take you back to your childhood:
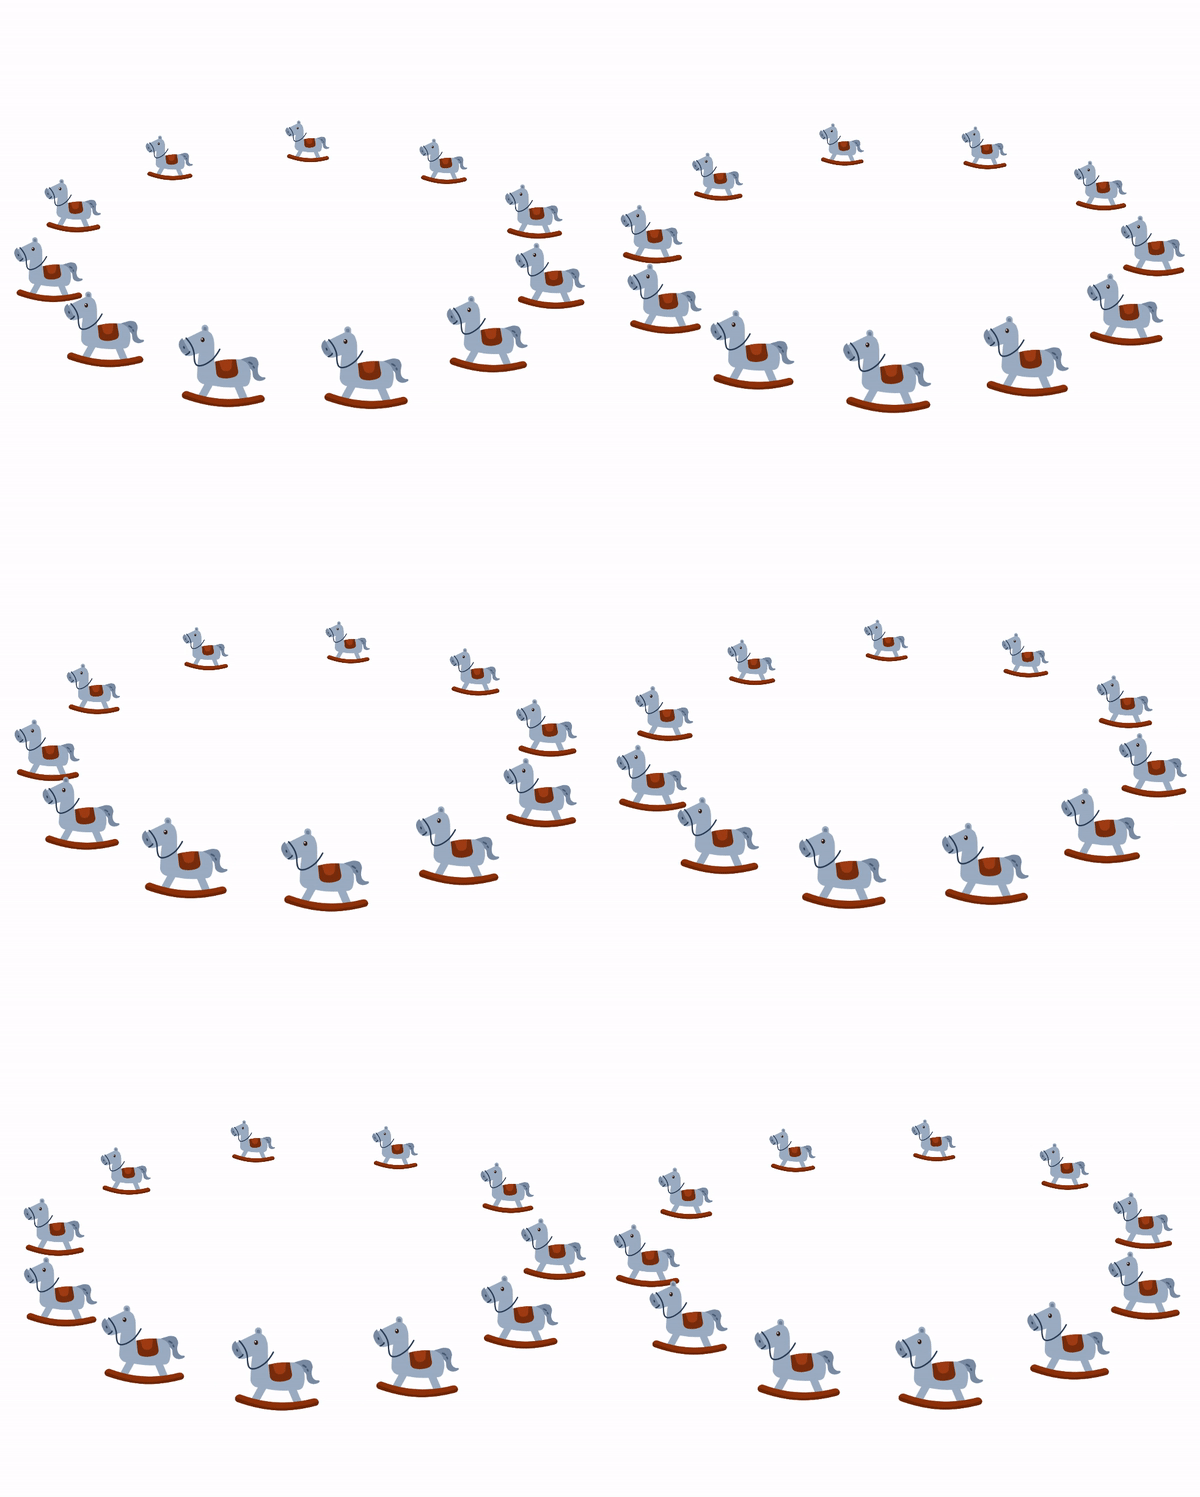
Effect analysis
- The sub layouts are placed in circular order and the angles are bisected
- Sub layout rotation, support gesture sliding rotation, fast sliding, hand lifting to continue rotation, and automatic rotation
- Support X-axis rotation
- Support fore-and-aft scaling sub layout (the starting angle is the front, the relative position is the rear, the front is the largest, but the smaller)
- When multiple layouts are superimposed, the front obscures the back
Effect difficulties
- How does Flutter realize the control layout to achieve 3D effect?
- How does Flutter realize the rotation and scrolling of associated child controls when child controls rotate, automatically rotate and gesture slide? Quickly slide, raise your hand and continue to rotate and roll?
- How does the front cover the back when multiple layouts are superimposed?
1. The sub layout is placed in circular order and divided equally
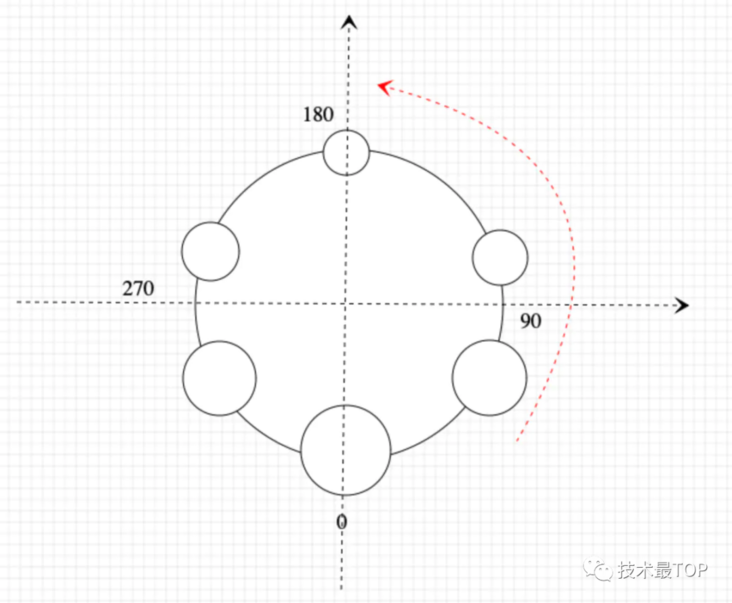
As shown in the figure above:
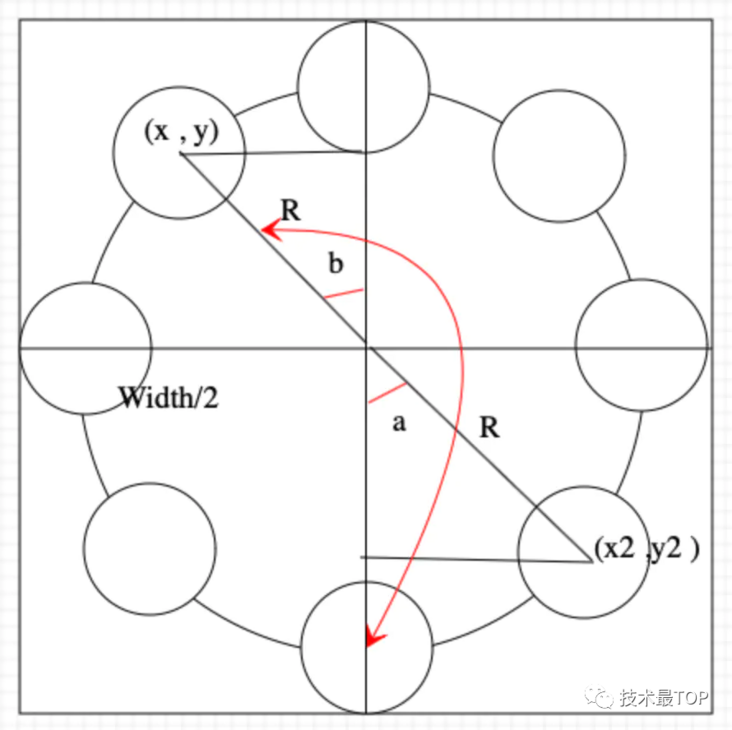
As shown in the above figure (reference system: the lowest is 0 degrees, and the counterclockwise rotation angle increases)
First point
 Solution: formulate the equation according to the known conditions
x2=width/2+sin(a)*R
y2=height/2+cos(a)*R

Second point
 Solution: formulate the equation according to the known conditions①
① x=width/2-sin(b)*R
   y=height/2-cos(b)*R
 because b=a-180,So bring in①Equation:
② x=width/2-sin(a-180)*R
   y=height/2-cos(a-180)*R
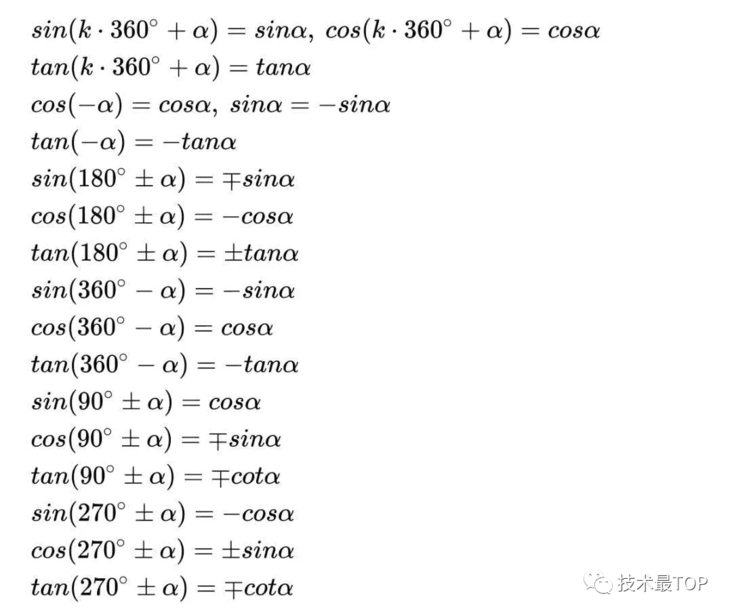
And because sin(k*360+a)=sin(a),therefore②The method can be modified to:
③ x=width/2-sin(180+a)*R
   y=height/2-cos(180+a)*R
 And because sin(180+a)=-sin(a),cos(180+a)=-cosa Bring in③Equation:
④ x=width/2+sin(a)*R
  y=height/2+cos(a)*R

Calculated from the above 2 points, the coordinate formula of the center point of each sub layout is unified as follows:
x=width/2+sin(a)*R
y=height/2+cos(a)*R
Trigonometric function formula used above:
After the position formula of the child control is calculated above, start our code.
The code to realize the circular layout and bisection of sub controls is as follows:
//Location data for all child controls
//count: number of child controls;
//startAngle: the start angle is 0 by default;
//Rotatangle: the deflection angle is 0 by default;
List<Point> _childPointList({Size size = Size.zero}) {
    List<Point> childPointList = [];
    double averageAngle = 360 / count;
    double radius = size.width / 2 - childWidth / 2;
    for (int i = 0; i < count; i++) {
       /********************Sub layout angle*****************/
      double angle = startAngle + averageAngle * i + rotateAngle;
      //Sub layout center point coordinates
      var centerX = size.width / 2 + sin(radian(angle)) * radius;
      var centerY = size.height / 2 + cos(radian(angle)) * radius;
      childPointList.add(Point(
        centerX,
        centerY,
        childWidth,
        childHeight,
        centerX - childWidth / 2,
        centerY - childHeight / 2,
        centerX + childWidth / 2,
        centerY + childHeight / 2,
        1,
        angle,
        i,
      ));
    }
    return childPointList;
  }

///Angle to radian
///Radian = degrees * (π / 180)
///Degrees = radians * (180 / π)
double radian(double angle) {
    return angle * pi / 180;
}
2. How to rotate the sub layout? Automatic rotation? Support gesture sliding rotation? Fast sliding and hand lifting to continue rotation?
How does the sub layout rotate
The so-called rotation means that all sub layouts move around the circle. Once the layout moves, it represents the change of the middle position. According to the formula of sub layout position calculated above:
Center point coordinates
x=width/2+sin(a)*R
y=height/2+cos(a)*R
Because both width and R are known and determined dimensions, if you want to change the coordinates of the center point, you only need to modify the angle a. to achieve the rotation effect, you can make all sub layouts move the same angle at the same time.
Sub layout original angle value:
double angle = startAngle + averageAngle * i;
On this basis, we can add a variable angle value. By changing this value, all sub layouts will add this value and move the position at the same time. As follows::
double angle = startAngle + averageAngle * i + rotateAngle;
among rotateAngle Is a variable value. Changing this value will make the layout move
Automatic rotation
Similarly, we just need to set a timer, periodically modify the rotateagle value and refresh the setState(() {}), and it looks like it will rotate automatically.
Support gesture sliding and rotation
You already know that the rotation is realized by modifying the rotateagle value. As the name suggests, it is OK to support gesture sliding rotation by modifying the rotateagle value through gestures. Then the gesture processing fluent provides the GestureDetector component, which is very powerful. We use several callback methods.
This implementation directly uses horizontal sliding monitoring. If you want to be compatible with vertical sliding, you can try to modify it yourself.
GestureDetector(
        ///Horizontal slide press
        onHorizontalDragDown: (DragDownDetails details) {...},

        ///Start of horizontal sliding
        onHorizontalDragStart: (DragStartDetails details) {
          //Records the current selection angle value at the beginning of the drag
          downAngle = rotateAngle;
          //Record the x coordinate at the beginning of the drag
          downX = details.globalPosition.dx;
        },

        ///Horizontal sliding
        onHorizontalDragUpdate: (DragUpdateDetails details) {
           //X coordinate value in sliding
          var updateX = details.globalPosition.dx;
          //Calculates the current rotation angle value and refreshes
          rotateAngle = (downX - updateX) * slipRatio + downAngle;
          if (mounted) setState(() {});
        },

        ///End of horizontal sliding
        onHorizontalDragEnd: (DragEndDetails details) {...},

        ///Slide cancel
        onHorizontalDragCancel: () {...},

        behavior: HitTestBehavior.opaque,//deferToChild   translucent
        child: xxx,
);
Slide quickly and lift your hand to continue rotating
The hand lift can continue to rotate, that is, when we quickly slide the hand lift, we can continue to rotate as long as we continue to modify the rotation angle value rotateAngle. What can we get when we lift the hand?
For example, when we ride Xiaohuang's bicycle on the main road and pedal quickly, and then stop pedaling, your Xiaohuang has galloped on the main road at that speed. Due to the influence of ground friction, the speed will be smaller and smaller, and finally stop.
///End of horizontal sliding
onHorizontalDragEnd: (DragEndDetails details) {
          //The number of pixels per second in the x direction
          velocityX = details.velocity.pixelsPerSecond.dx;
          _controller.reset();
          _controller.forward();
 },

  //Animate rotateagle
   _controller = AnimationController(
      vsync: this,
      duration: Duration(milliseconds: 1000),
    );

    animation = CurvedAnimation(
      parent: _controller,
      curve: Curves.linearToEaseOut,
    );

    animation = new Tween<double>(begin: 1, end: 0).animate(animation)
      ..addListener(() {
        //Current speed
        var velocity = animation.value * -velocityX;
        var offsetX = radius != 0 ? velocity * 5 / (2 * pi * radius) : velocity;
        rotateAngle += offsetX;
        setState(() => {});
      })
      ..addStatusListener((status) {
        if (status == AnimationStatus.completed) {
          rotateAngle = rotateAngle % 360;
          _startRotateTimer();
        }
      });
3. Support X-axis rotation
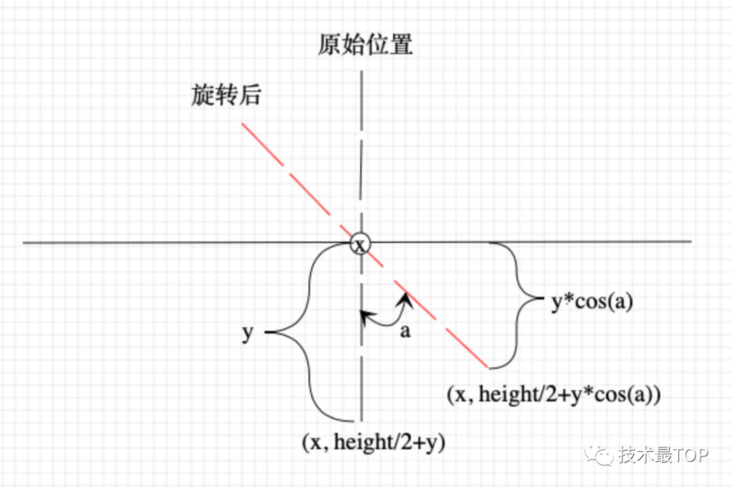
The above figure is a view of the rotation section in the x-axis direction. When rotating according to the x-axis, all x coordinates are the same, and the y value increases continuously from top to bottom. Because when rotating around the x-axis, the X coordinate is unchanged, and the Y coordinate value changes. When rotating angle a, the current y coordinate is as shown in the figure
Y After coordinate rotation=height/2+y*cos(a)     y We have calculated the value above, y=cos(a)*R
So the final formula is:
Y Coordinate value=height/2+cos(a)*R*cos(a)
cos(a)stay a=[0,90]The value corresponding to interval is 1-0   That is a=0 Degree hour cos(a)=1,It's the original state(And Y Axis parallel),a=90 Degree hour cos(a)=0,Is with Y Axis vertical quasi state. So we can set a At 0-90 Between.
4. Support fore-and-aft scaling sub layout (the starting angle is the front, the relative position is the rear, the front is the largest, but the smaller)
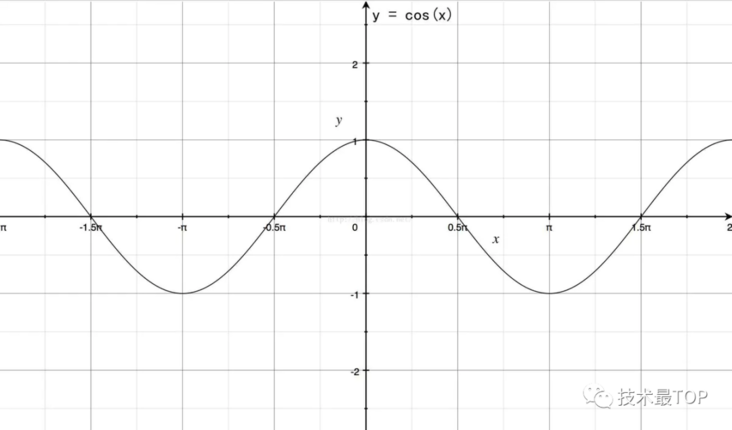
The above figure is the cos cosine curve. 0 degrees and 360 degrees are the largest and 180 degrees are the smallest. It just starts from 0 with the initial value we designed, and then rotates counterclockwise from 0 to 360 degrees.
Therefore, the scaling ratio scale calculation formula can be written as:
var scale = (1 - minScale) / 2 * (1 + cos(radian(angle - startAngle))) + minScale;
minScale is the minimum scaling ratio. In order to have a limit value for scaling, that is, the scale range is: (minScale, 1)
5. When multiple layouts are superimposed, the front covers the back
From the visual perception, the layout close to the front should block the layout behind. In Android, the bringtorfront() method can put the layout in front. Flutter does not provide this method. How should we deal with this situation?
Flutter provides a Stack layout, also known as cascading layout. When we add sub layouts to the Stack layout, the ones added later will cover the ones added earlier, so as long as we add sub layouts from back to front. In other words, how do we know whether it is front or back?
Knowing the implementation idea, the problems to be solved now are:
How to distinguish between before and after? What are the conditions to distinguish?
Under consideration
1. According to the coordinate value, the smaller Y coordinate is the back, and the larger Y coordinate is the front?
The answer is not necessarily. When the starting angle is not 0, such as 90 degrees, the rightmost side is the front and the leftmost side is the back. At this time, the size of the X coordinate distinguishes the front and rear relationship. Therefore, it is wrong to use the size of the coordinate value alone to determine the front and rear relationship.
2. Add a sub layout according to the principle of "first large and then small" and "sorting according to the scaling value"?
The answer is feasible; because we have realized that the scaling value of the front layout is 1, and the scaling value of the back layout is getting smaller and smaller, and we have handled the problem of starting angle, it is feasible to implement it according to the scaling value.
///Sort by scaling values, from small to large
childPointList.sort((a, b) {
  return a.scale.compareTo(b.scale);
});

///Traverse add sub layout
Stack(
  children: childPointList.map(
              (Point point) {
                return Positioned(
                    width: point.width,
                    left: point.left,
                    top: point.top,
                    child: this.widget.children[point.index]);
              },
            ).toList(),
   ),
Through the above method, the front and rear occlusion effect can be realized.
Little knowledge
The Stack component Stack of FLUENT is a layout that can overlay child controls. Here we mainly talk about the Stack Positioned. For other usage methods, please refer to the description on the official website.
Positioned({
  Key key,
  this.left,
  this.top,
  this.right,
  this.bottom,
  this.width,
  this.height,
  @required Widget child,
})
Use Positioned to control the position of the Widget. Through Positioned, you can place a component at will, which is a bit like absolute layout. Where left, top, right and bottom represent the distance from the left, top, right and bottom sides of the Stack respectively.
LayoutBuilder component of fluent
Sometimes we want to confirm the appearance of components according to the size of components. For example, when the vertical screen is displayed up and down, and when the horizontal screen is displayed left and right, the constraint size of the parent component can be obtained through the LayoutBuilder component.
Attached: github link: https://github.com/yixiaolunh...
Original link: https://www.jianshu.com/p/451...
end of document
Your favorite collection is my greatest encouragement!
Welcome to follow me, share Android dry goods and exchange Android technology.
If you have any opinions on the article or any technical problems, please leave a message in the comment area for discussion!